


uikit2 uikit3
Exordium (Exordium)
Core Location is Apple’s native framework for obtaining a device’s location, altitude, and orientation. Core Location is also how a device interacts with iBeacon devices. All of this is very cool technology and can be utilized in amazing ways. For example, I have used Core Location to create a pothole reporting app, RoadHazard. I really view the mobile device as a way to integrate technology with day to day human life.
核心位置是Apple的本机框架,用于获取设备的位置,高度和方向。 核心位置也是设备与iBeacon设备交互的方式。 所有这些都是非常酷的技术,并且可以以惊人的方式加以利用。 例如,我已经使用Core Location创建了一个坑洞报告应用程序RoadHazard。 我确实认为移动设备是将技术与日常人类生活相集成的一种方式。
Core Location collects data via onboard components such as Wi-Fi, GPS, Bluetooth, magnetometer, barometer, and cellular hardware. In this post, I’ll show you how to initially set up Core Location in your iOS app by using a simple Storyboard-based user interface, the CLLocationManager and location simulation.
核心位置通过机载组件(例如Wi-Fi,GPS,蓝牙,磁力计,气压计和蜂窝硬件)收集数据。 在本文中,我将向您展示如何通过使用简单的基于Storyboard的用户界面, CLLocationManager和位置模拟,在iOS应用程序中初始设置Core Location。
You can find the code to this project on GitHub: https://github.com/andrew-lundy/core-location-tutorial/tree/set-up
您可以在GitHub上找到此项目的代码: https : //github.com/andrew-lundy/core-location-tutorial/tree/set-up
Environment: Xcode 12, Swift 5, Deployment Target: iOS 13.
环境:Xcode 12,Swift 5,部署目标:iOS 13。
该项目 (The Project)
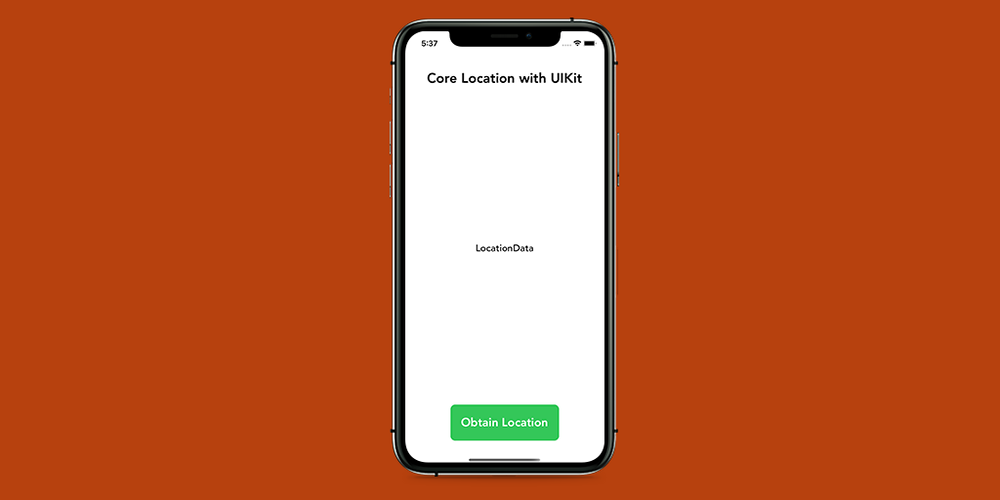
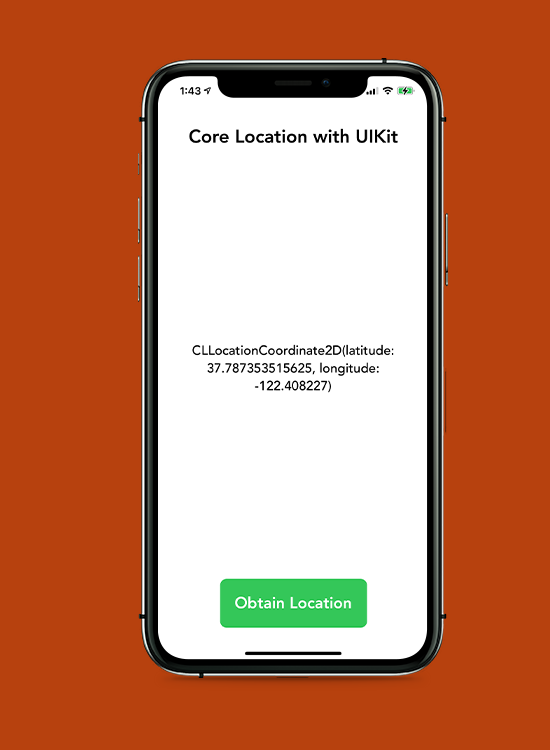
I’ve created a user interface that will show some location data using a UILabel. The location services will be enabled and obtained when the green button is pressed.
我创建了一个用户界面,它将使用UILabel显示一些位置数据。 当按下绿色按钮时,将启用并获得位置服务。

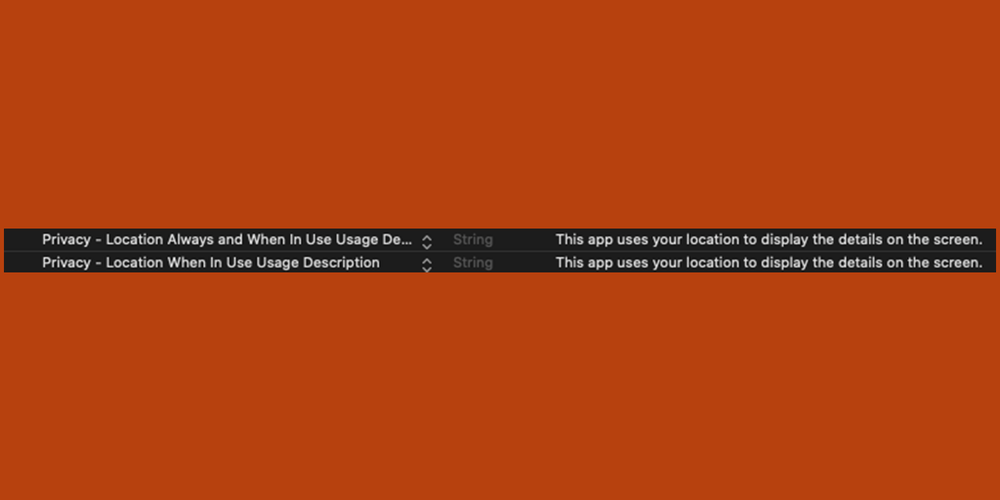
Before you can write any Core Location code, you need to provide a reason as to why your app needs the user’s location in the Info.plist file. As of iOS 13, two properties are required when requesting location access to an app — NSLocationAlwaysAndWhenInUseUsageDescription and NSLocationWhenInUseUsageDescription. The names of the keys in the Info.plist file are Privacy — Location Always and When In Use Usage Description and Privacy — Location When In Use Usage Description.
在编写任何核心位置代码之前,您需要提供一个原因,说明您的应用为何需要Info.plist文件中的用户位置。 从iOS 13开始,请求对应用程序进行位置访问时需要两个属性-NSLocationAlwaysAndWhenInInUsageDescription和NSLocationWhenInInUsageDescription 。 Info.plist文件中的键的名称为“ 隐私-始终位置和使用时使用情况描述”和“ 隐私-位置”使用时使用情况描述。
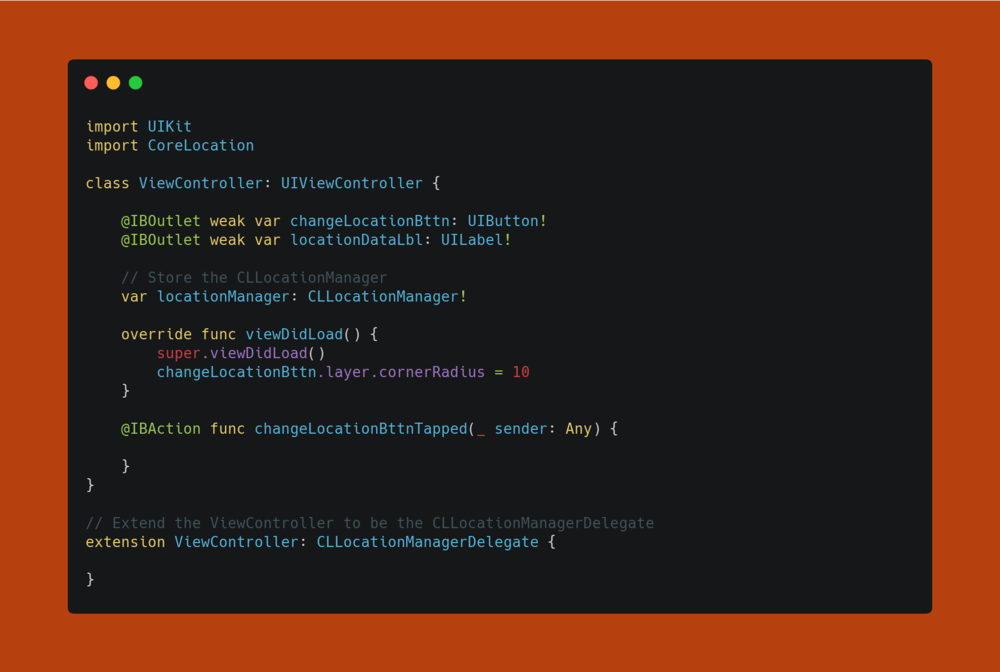
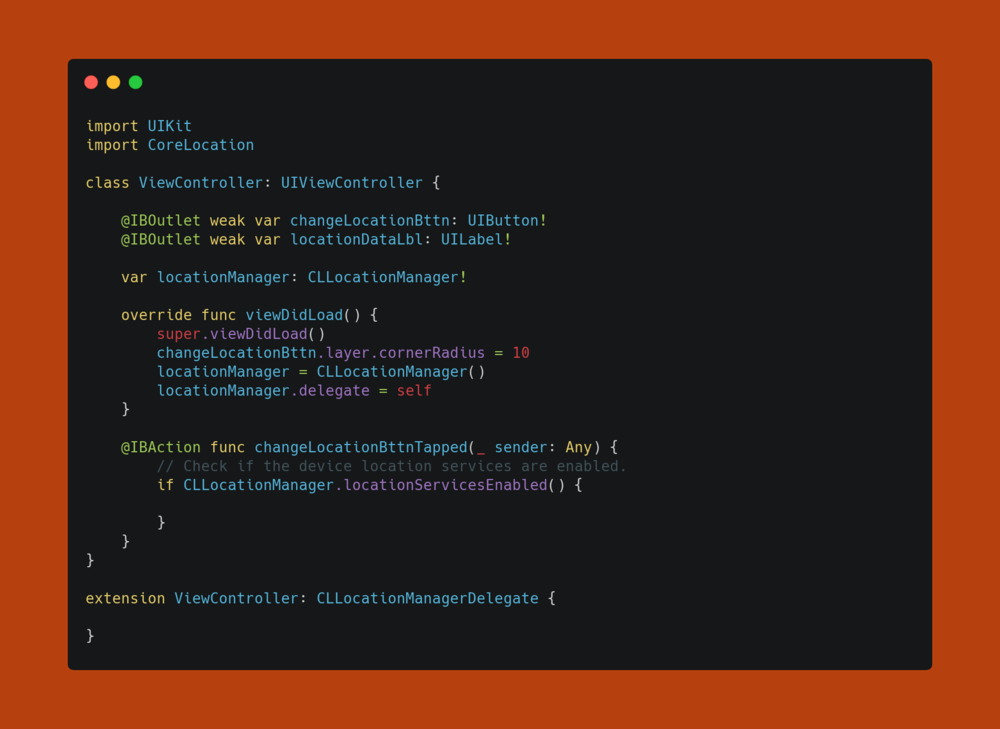
Now that you’ve provided a reason to access the device location, let’s start using Core Location. In the ViewController class, you will need to import the CoreLocation framework, add a variable that holds a CLLocationManager, and extend the ViewController to be the CLLocationManagerDelegate. The CLLocationManager is the object you’ll use to request location access, start and stop location events, set the desired accuracy, and more.
现在,您已经提供了访问设备位置的理由,让我们开始使用Core Location。 在ViewController类中,您将需要导入CoreLocation框架,添加一个包含CLLocationManager的变量,并将ViewController扩展为CLLocationManagerDelegate 。 CLLocationManager是用于请求位置访问,开始和停止位置事件,设置所需精度等的对象。
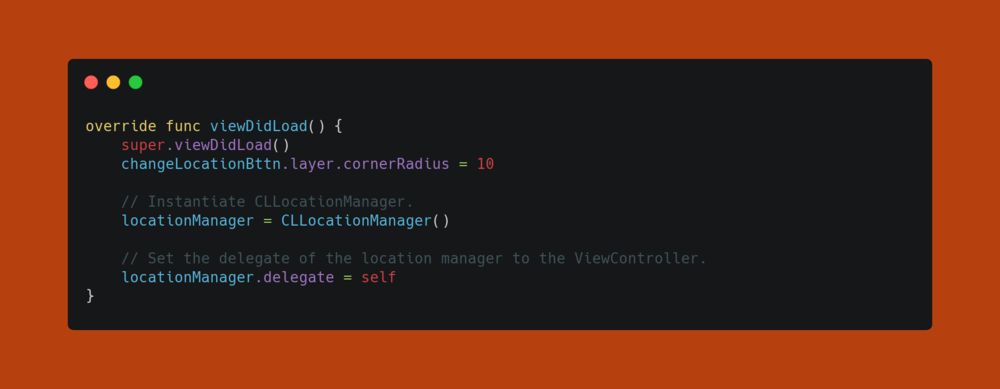
Next, go ahead and instantiate the CLLocationManager and set the delegate to the ViewController. The viewDidLoad method should look like this:
接下来,继续实例化CLLocationManager并将委托设置为ViewController 。 viewDidLoad方法应如下所示:
Before actually using any Core Location functionality, making sure the device location services are enabled is the first thing you should do. Please note that this isn’t mandatory, but it’s good to check if your users have enabled location services so you can handle the situation accordingly. I’ve added this check to the changeLocationBttnTapped method since that’s where we’ll be launching the location services.
在实际使用任何核心定位功能之前,请确保首先启用了设备定位服务。 请注意,这不是强制性的,但是最好检查您的用户是否启用了位置服务,以便您可以相应地处理此情况。 我已将此检查添加到changeLocationBttnTapped方法中,因为这是我们将启动位置服务的地方。
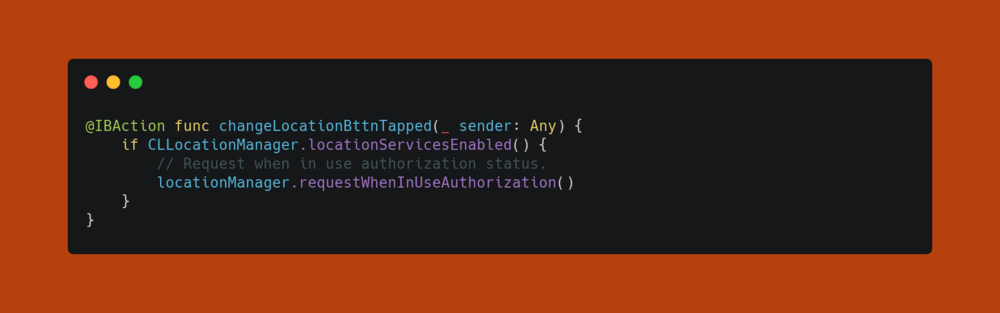
After checking to make sure the location services are enabled, the next thing to do is to request authorization. In this case, we will be requesting ‘when in use’ authorization. This is exactly what it sounds like — this requests the user’s permission to use location services while the app is in use. The changeLocationBttnTapped method should now look like this:
在检查以确保启用了位置服务后,下一步是请求授权。 在这种情况下,我们将请求“使用时”授权。 这就是听起来像的样子-这要求用户在使用应用程序时允许其使用位置服务。 现在, changeLocationBttnTapped方法应如下所示:
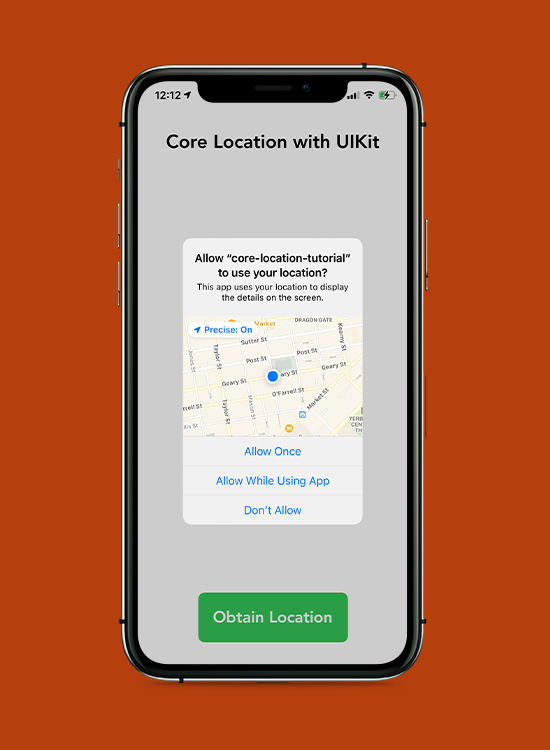
If you run the app, an alert will pop up and ask you if you want to give the app access to the device’s location.
如果您运行该应用程序,则会弹出警报,询问您是否要授予该应用程序访问设备位置的权限。
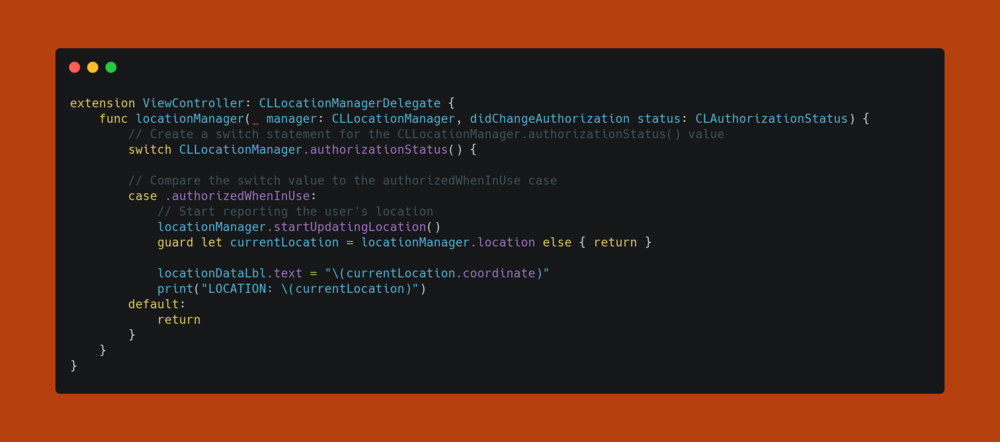
After you choose the authorization status, you need to call the startUpdatingLocation method on the locationManager in order to begin reporting the user’s location. I do this within the didChangeAuthorization method of the CLLocationManagerDelegate because an app can’t report location data if it’s not authorized to use the device’s location services. The didChangeAuthorization method is called when the app creates the location manager and any time the authorization status of the CLLocationManager changes. Update the CLLocationManagerDelegate as seen below:
您选择的授权状态后,你需要呼吁的LocationManager的startUpdatingLocation方法,以便开始报告该用户的位置。 我在CLLocationManagerDelegate的didChangeAuthorization方法中执行此操作,因为如果未授权使用应用程序的位置服务,则该应用程序将无法报告位置数据。 当应用程序创建位置管理器以及CLLocationManager的授权状态更改时,将调用didChangeAuthorization方法。 更新CLLocationManagerDelegate ,如下所示:
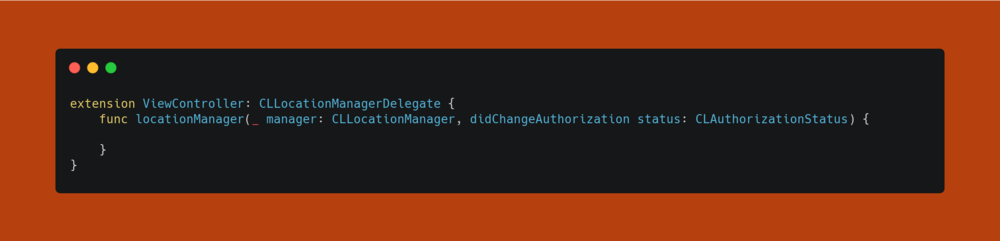
The next thing to do is to check the authorizationStatus of the CLLocationManager using a switch statement. In this example, we will only be comparing the switch value to the .authorizedWhenInUse case and simply ‘returning’ during the default case.
下一步是使用switch语句检查CLLocationManager的authorizationStatus 。 在此示例中,我们仅将开关值与.authorizedWhenInUse情况进行比较,并在默认情况下简单地“返回”。
I’ve updated the UI to display the coordinate value of the device’s location. The coordinate type is a CLLocationCoordinate2D, and it holds the latitude and longitude of the location. In a future post, I will go through Geocoding with CLGeocoder class. Geocoding is the process of transforming the latitude and longitude into a human-readable address.
我已经更新了UI,以显示设备位置的坐标值。 坐标类型是CLLocationCoordinate2D,它保存位置的纬度和经度。 在以后的文章中,我将通过CLGeocoder类进行地理编码。 地理编码是将纬度和经度转换为人类可读地址的过程。
As for now, that’s how you set up Core Location. It’s a pretty simple process, and the framework provides powerful features that can be used in a variety of different applications.
到目前为止,这就是设置核心位置的方式。 这是一个非常简单的过程,该框架提供了可以在各种不同应用程序中使用的强大功能。
Thank you for reading — I’ll see you in the next post!
感谢您的阅读-我将在下一篇文章中见!
翻译自: https://levelup.gitconnected.com/core-location-setting-up-core-location-with-uikit-fc7980565b4f
uikit2 uikit3


 238
238

 被折叠的 条评论
为什么被折叠?
被折叠的 条评论
为什么被折叠?
 到【灌水乐园】发言


