


uikit2 uikit3
With SwiftUI receiving a lot of support from Apple and Swift community, more companies are starting to use it in production. However, older projects will have a lot of UIKit code and will want to refactor that to SwiftUI. Or they might want to adopt SwiftUI for newer parts of UI and reuse existing businesses logic. Some might even want to support iOS versions before iOS 13 and write SwiftUI counterpart views to their UIKit views so they can drop UIKit when switching to iOS 13 minimum App version.
随着SwiftUI受到Apple和Swift社区的大力支持,越来越多的公司开始在生产中使用它。 但是,较早的项目将有很多UIKit代码,并且希望将其重构为SwiftUI。 或者,他们可能想为UI的较新部分采用SwiftUI,并重用现有的业务逻辑。 有些人甚至可能想要支持iOS 13之前的iOS版本,并将SwiftUI对应视图写入其UIKit视图,以便他们在切换到iOS 13最低App版本时可以删除UIKit。
Adopting SwiftUI is all great, but how do we refactor old UIKit code to SwiftUI without breaking any business logic?In this article, I will attempt to answer that question.
采用SwiftUI很棒,但是如何在不破坏任何业务逻辑的情况下将旧的UIKit代码重构为SwiftUI? 在本文中,我将尝试回答该问题。
样例项目 (Sample Project)
I created a sample project in the form of a simple Counter App with two architectural implementations, using MVC(simple) and Clean Swift(scalable) design patterns. I would recommend downloading the project from here to follow along.
我使用MVC(简单)和Clean Swift(可缩放)设计模式,以具有两个体系结构实现的简单Counter App形式创建了一个示例项目。 我建议从此处下载该项目以继续进行。
Firstly if you are doing any business logic, network request, mapping or any other computation inside your UIViewController class, you will have to decouple that into a separate class so that your UIViewController stays plain. The view controller should only display what the presentation layer tells it to display. And notify the business logic layer what actions the user has taken. You can achieve that decoupling with both MVC and Clean Swift example implementations.
首先,如果您在UIViewController类中执行任何业务逻辑,网络请求,映射或任何其他计算,则必须将其解耦到单独的类中,以便UIViewController保持原样。 视图控制器应仅显示表示层告诉其显示的内容。 并通知业务逻辑层用户已采取的操作。 您可以使用MVC和Clean Swift示例实现来实现这种解耦。
UIKit实现 (UIKit implementation)
In this article, I will walk you through Clean Swift implementation, so lets, first of all, see how Clean Swift works with a UIViewController module.
在本文中,我将引导您完成Clean Swift的实现,因此,首先让我们了解Clean Swift如何与UIViewController模块一起工作。

You can see the data flow in a circular fashion View-Interactor-Presenter; sometimes, you will see this called a VIP cycle(which is how I will refer to it below). Clean Swift avoids concrete referencing of VIP classes, and it creates references to classes via interfaces(protocols), so concrete implementations can be swapped for testing or in our case reuse purposes. Referencing via interfaces conforms to Liskov Substitution Principle from SOLID, so it is a good practice when writing clean code.
您可以以循环方式查看数据流View-Interactor-Presenter; 有时,您会看到一个称为VIP周期(这就是我在下文中称呼它的方式)。 Clean Swift避免了对VIP类的具体引用,而是通过接口(协议)创建了对类的引用,因此可以将具体的实现交换用于测试或在我们的情况下重用。 通过接口进行引用符合SOLID中的Liskov替换原理 ,因此在编写简洁代码时是一种很好的做法。
In practice that would look something like: user taps a button in the UIKit class, which notifies the interactor that button has been tapped, interactor performs any computation needed(stores the data, makes a network request, maps the data etc..) and passes the data to presenter which formats that data for display and gives it to the view controller which displays the outcome.
实际上,它看起来像是:用户在UIKit类中点击一个按钮,通知交互器该按钮已被轻击,交互器执行所需的任何计算(存储数据,发出网络请求,映射数据等),以及将数据传递给演示者,演示者对该数据进行格式化以进行显示,并将其提供给显示结果的视图控制器。
So let’s see an example of this in our counter App;
因此,让我们在柜台应用程序中查看一个示例;
When you tap “+” button, the view notifies interactor that the user tapped increment via increaseTapped() method. Interactor then increases the value of the local count variable and gives that new count value to the presenter. The presenter then formats the string saying “Current count is: \(count)” and passes that string to the view controller to display. If you look at the project structure downloaded from the link above, you will see all of the VIP components sit in separate files.
当您点击“ +”按钮时,视图会通知交互器用户已通过增量Tapped increaseTapped()方法点击了增量。 然后,Interactor增加本地计数变量的值,并将新的count数值提供给演示者。 演示者然后格式化字符串“当前计数为:\(count)”,并将该字符串传递给视图控制器以进行显示。 如果您查看从上面的链接下载的项目结构,则会看到所有VIP组件都位于单独的文件中。
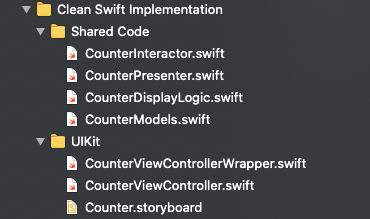
Inside Counter -> Clean Swift Implementation folder you have two folders, one of which is a folder called Shared Code which holds all of our shared logic and UIKit folder with our CounterViewController implementation.
在Counter-> Clean Swift Implementation文件夹中,您有两个文件夹,其中一个是名为Shared Code的文件夹,其中包含我们所有的共享逻辑和带有CounterViewController实现的UIKit文件夹。
Note also that there is the CounterViewControllerWrapper file inside the UIKit folder which acts as a wrapper of our ViewController class, as I have written root HomeView in SwiftUI. To navigate from SwiftUI view to UIKit view, I needed to wrap that inside a UIViewControllerRepresentable struct.
还要注意,UIKit文件夹中有CounterViewControllerWrapper文件,它充当ViewController类的包装器,因为我已经在SwiftUI中编写了根HomeView 。 要从SwiftUI视图导航到UIKit视图,我需要将其包装在UIViewControllerRepresentable结构中。
SwiftUI实现 (SwiftUI implementation)
A great thing about using this pattern is that now we can reuse our business logicCounterInteractor and presentation logicCounterPresenter in SwiftUI implementation of this counter. For this, we will need an additional Adapter layer which will conform to the same CounterDisplayLogic protocol as previously the CounterViewController class (see how we are “substituting” concrete class implementation). Let’s see a little graphic of that new implementation here.
使用此模式的一大CounterInteractor是,现在我们可以在该计数器的SwiftUI实现中重用我们的业务逻辑CounterInteractor和表示逻辑CounterPresenter 。 为此,我们将需要一个附加的适配器层,该层将与以前的CounterViewController类遵循相同的CounterDisplayLogic协议(请参阅我们如何“替代”具体的类实现)。 让我们在这里看到这个新实现的一些图形。

Our new CounterViewAdapter class will also conform to ObservableObject (getting into the good stuff here), so our SwiftUI view will be able to observe the changes in it.
我们新的CounterViewAdapter类也将符合ObservableObject (在这里加入好东西),因此我们的SwiftUI视图将能够观察其中的变化。
Now the only thing we have to do is create a @Published var currentCountDisplayString inside our CounterViewAdapter class and update it whenever showCurrentCount() method fires. Our SwiftUI view will then subscribe to currentCountDisplayString and automatically update to the latest value. Let’s see our new implementation:
现在,我们唯一要做的就是在CounterViewAdapter类内创建一个@Published var currentCountDisplayString ,并在showCurrentCount()方法触发时进行更新。 然后,我们的SwiftUI视图将订阅currentCountDisplayString并自动更新为最新值。 让我们看看我们的新实现:
You can now notice that the CounterView struct now needs an @ObservedObject property to reference our new CounterViewAdapter.Now we can use adapter.currentCountDisplayString within SwiftUI’s Text (line 40) and two buttons with actions calling descreaseTapped()(line 45) and increaseTapped()(line 55) methods via adapter.interactor. The rest is just your good old (or very young 👶) SwiftUI code.
现在您可以注意到CounterView结构现在需要一个@ObservedObject属性来引用我们的新CounterViewAdapter 。现在我们可以在SwiftUI的Text(第40行)中使用adapter.currentCountDisplayString和两个带有调用descreaseTapped() (第45行)和gainTapped increaseTapped() (第55行)方法通过adapter.interactor 。 剩下的只是您的旧的(或很年轻的)SwiftUI代码。
If you expand the folder in your project under Counter -> Clean Swift Implementation -> SwiftUI, you will find these new files in there. Notice that business logic(CounterInteractor) and presentation logic(CounterPresenter) are in the same Counter -> Clean Swift Implementation -> Shared folder completely reused from our early UIKit implementation.
如果在“ 计数器”->“清理Swift实施”->“ Swift UI”下展开项目中的文件夹,您将在其中找到这些新文件。 注意,业务逻辑( CounterInteractor )和表示逻辑( CounterPresenter )在同一CounterInteractor > Clean Swift实现-> Shared文件夹中, 完全从我们早期的UIKit实现中重用 。

If you run the App, you will see that you can navigate from landing screen to two similar screens. The first screen is UIKit implementation of the counter App, and the second is SwiftUI implementation of the Counter App with shared business and presentation logic.
如果运行该应用程序,将会看到可以从登录屏幕导航到两个类似的屏幕。 第一个屏幕是计数器App的UIKit实现,第二个屏幕是具有共享业务和表示逻辑的Counter App的SwiftUI实现。
Now when any business or presentation logic is changed, it will reflect in both view implementations. And if later down the line you decide you don’t need a UIKit implementation anymore you can remove it, and the App should still behave as before with SwiftUI implementation.
现在,当任何业务或表示逻辑发生更改时,它将反映在两个视图实现中。 而且,如果稍后再行,则决定不再需要UIKit实现,则可以将其删除,并且该应用在使用SwiftUI实现时仍应像以前一样运行。
And that’s it, we reused most of our code inside the Counter module and written both UIKit and SwiftUI views on top of it!
就是这样,我们在Counter模块内重用了大部分代码,并在其上面编写了UIKit和SwiftUI视图!
One more note: if you downloaded the project you might have noticed that there are two targets and two implementations of Adapter pattern, the first one is above described Clean Swift and the second a simple MVC implementation. You can see both design pattern implementations to show how easy it is to reuse business logic code also with a basic architectural pattern as MVC if done correctly. If you run each of the targets, the App will look the same; however, under-the-hood implementation is either MVC or Clean Swift design pattern.
另一个注意事项 :如果下载了该项目,则可能已经注意到有两个目标和Adapter模式的两个实现,上面第一个描述了Clean Swift,第二个是简单的MVC实现。 您可以看到这两种设计模式的实现,以显示如果正确完成,还可以使用基本架构模式(例如MVC)重用业务逻辑代码,这是多么容易。 如果您运行每个目标,该应用程序将看起来相同; 但是,幕后实施是MVC或Clean Swift设计模式。
I hope you enjoyed this article and learned something new on the way.
我希望您喜欢这篇文章,并在此途中学到了一些新东西。
If you have any thoughts on this article, I would love to hear them!
如果您对本文有任何想法,我想听听他们的意见!
Cheers,
干杯,
Tim
提姆
翻译自: https://medium.com/swlh/refactor-uikit-views-to-swiftui-using-adapter-pattern-bcef190834a1
uikit2 uikit3


 2354
2354

 被折叠的 条评论
为什么被折叠?
被折叠的 条评论
为什么被折叠?
 到【灌水乐园】发言


