


vue.js nodejs
When you are working on any project the way you set up your development environment is as important as packing and shipping for production. We can save a lot of time if your development environment is seamless and right. You need to automate your development environment as much as possible so that you can focus on what’s important which is your functionality.
当您处理任何项目时,建立开发环境的方式与打包和运输生产一样重要。 如果您的开发环境完美无缺,我们可以节省大量时间。 您需要尽可能地使开发环境自动化,以便您可以专注于重要的功能。
In this post, we will see how we can set up the development environment for Vue with NodeJS backend and how we can automate any repeated tasks.
在本文中,我们将看到如何使用NodeJS后端为Vue设置开发环境,以及如何使重复的任务自动化。
Introduction
介绍
Prerequisites
先决条件
Example Project
示例项目
Running Vue on port 8080
在端口8080上运行Vue
Running NodeJS Server on port 3080
在端口3080上运行NodeJS Server
Interaction between Vue and NodeJS
Vue与NodeJS之间的交互
Automate Your Tasks
自动化您的任务
Run it with Docker-compose
使用Docker-compose运行它
Key Takeaways
重要要点
Summary
摘要
Conclusion
结论
介绍 (Introduction)
When it comes to developing your Vue app with nodejs backend you should use two separate ports. As shown in the following figure, Vue and nodejs server runs on separate ports.
在使用nodejs后端开发Vue应用程序时,应使用两个单独的端口。 如下图所示,Vue和nodejs服务器在单独的端口上运行。

You need to use separate node_modules for both and you should not combine both. Vue lives under the my-app folder and nodejs related code lives under the api folder.
您需要为两者使用单独的node_modules ,并且不应将两者结合使用。 Vue位于my-app文件夹下,而与nodejs相关的代码位于api文件夹下。

先决条件 (Prerequisites)
There are some prerequisites for this article. You need to have nodejs installed on your laptop and know-how http works. If you want to practice and run this on your laptop you need to have these on your machine.
本文有一些先决条件。 您需要在笔记本电脑上安装Node.js,并了解HTTP的工作原理。 如果要在笔记本电脑上练习并运行此程序,则需要在计算机上安装它们。
示例项目 (Example Project)
This is a simple project which demonstrates developing and running Vue application with NodeJS. We have a simple app in which we can add users, count, and display them at the side, and retrieve them whenever you want.
这是一个简单的项目,演示了如何使用NodeJS开发和运行Vue应用程序。 我们有一个简单的应用程序,可以在其中添加用户,计数并在侧面显示它们,并在需要时检索它们。
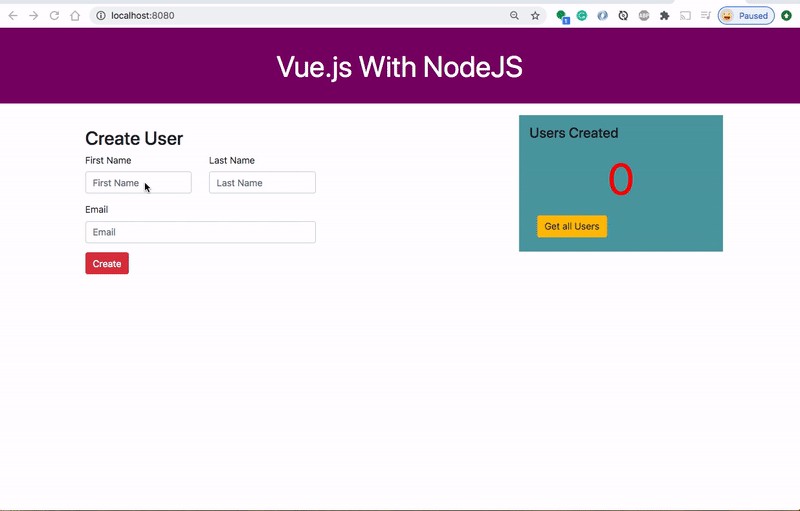
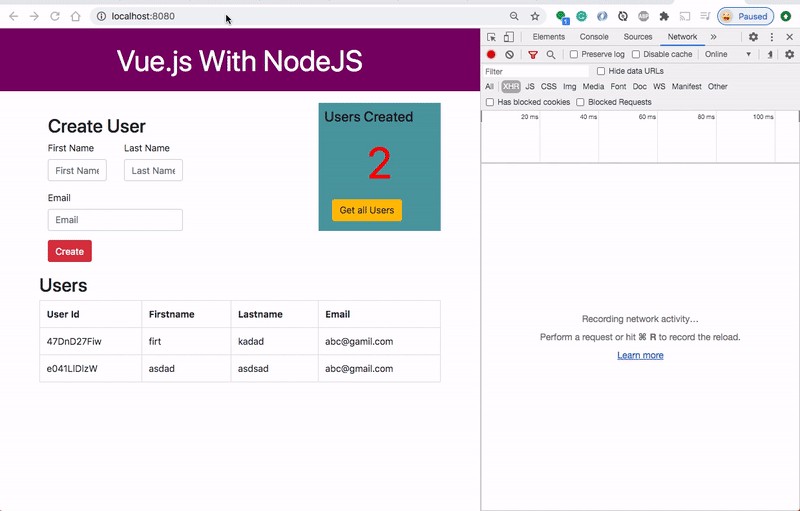
As you add users we are making an API call to the nodejs server to store them and get the same data from the server when we retrieve them. You can see network calls in the following video.
添加用户时,我们正在对nodejs服务器进行API调用以存储它们,并在我们检索用户时从服务器获取相同的数据。 您可以在以下视频中看到网络通话。
Here is a Github link to this project. You can clone it and run it on your machine.
这是该项目的Github链接。 您可以克隆它并在计算机上运行它。
// clone the project
git clone https://github.com/bbachi/vue-nodejs-develop-env.git
在端口8080上运行Vue (Running Vue on port 8080)
Once you clone the project you need to install Vue dependencies and run the Vue code on port 8080 by default.
克隆项目后,默认情况下需要安装Vue依赖项并在端口8080上运行Vue代码。
// change the directory
cd my-app// install dependencies
npm install// start the project
npm run serve
Vue uses webpack dev-server/Vue-cli-service to run the whole app on the port 8080 and it looks for any changes you make in the Vue code. As soon as you change the code you can see that change on the browser. You don’t have to do any extra configuration for this.
Vue使用webpack dev-server / Vue-cli-service在端口8080上运行整个应用程序,它会查找您在Vue代码中所做的任何更改。 更改代码后,您就可以在浏览器上看到该更改。 您不必为此做任何额外的配置。
在端口3080上运行NodeJS Server (Running NodeJS Server on port 3080)
Let’s run the NodeJS server on the port 3080. You can choose whatever the port you want. Here is the NodeJS code.
让我们在端口3080上运行NodeJS服务器。您可以选择所需的任何端口。 这是NodeJS代码。
const express = require('express');
const path = require('path');
const randomId = require('random-id');
const app = express(),
      bodyParser = require("body-parser");
      port = 3080;


// place holder for the data
const users = [];


app.use(bodyParser.json());
app.use(express.static(process.cwd()+ '/my-app/build'));


app.get('/api/users', (req, res) => {
  console.log('api/users called!!!!!!!')
  res.json(users);
});


app.post('/api/user', (req, res) => {
  const user = req.body.user;
  user.id = randomId(10);
  console.log('Adding use:::::::::::', user);
  users.push(user);
  res.json("user addedd");
});


app.get('/', (req,res) => {
  res.sendFile(process.cwd()+ '/my-app/build/index.html');
});


app.listen(port, () => {
    console.log(`Server listening on the port::${port}`);
});
We need to install a nodemon for an automatic restart of the nodejs server if you make any changes.
如果您进行任何更改,我们需要安装一个nodemon来自动重启nodejs服务器。
{
  "name": "api",
  "version": "1.0.0",
  "description": "example project react with nodejs",
  "main": "server.js",
  "scripts": {
    "start": "node server.bundle.js",
    "build": "webpack",
    "dev": "nodemon ./server.js localhost 3080"
  },
  "repository": {
    "type": "git",
    "url": "git+https://github.com/bbachi/vuejs-nginx-docker.git"
  },
  "author": "Bhargav Bachina",
  "license": "ISC",
  "bugs": {
    "url": "https://github.com/bbachi/vuejs-nginx-docker/issues"
  },
  "homepage": "https://github.com/bbachi/vuejs-nginx-docker#readme",
  "dependencies": {
    "express": "^4.17.1",
    "http-proxy-middleware": "^1.0.4",
    "random-id": "^1.0.4"
  },
  "devDependencies": {
    "del": "^5.1.0",
    "fancy-log": "^1.3.3",
    "gulp": "^4.0.2",
    "gulp-zip": "^5.0.1",
    "nodemon": "^2.0.4",
    "webpack": "^4.43.0",
    "webpack-cli": "^3.3.11",
    "webpack-stream": "^5.2.1"
  }
}
If you look at the scripts section in the above file. We can configure nodemon with a simple command. The nodemon looks for any changes in the server.js and reload the changes on the server port 3080. If you want to do some further configuration by going through the details here.
如果您查看上面文件中的脚本部分。 我们可以用一个简单的命令配置nodemon。 nodemon在server.js中查找任何更改,然后将更改重新加载到服务器端口3080上 。 如果您想通过此处的详细信息进行一些进一步的配置。

Vue与NodeJS之间的交互 (Interaction between Vue and NodeJS)
In the development phase, the Vue app is running on port 8080 with the help of a vue-cli-service and nodejs API running on port 3080.
在开发阶段,借助于在端口3080上运行的vue-cli-service和nodejs API,Vue应用程序在端口8080上运行。
There should be some interaction between these two. We can proxy all the API calls to nodejs API. Vue-cli-service provides some inbuilt functionality and to tell the development server to proxy any unknown requests to your API server in development, you need to add a vue.proxy.js file at the root of the location where package.json resides. We need to add the following file.
两者之间应该有一些互动。 我们可以将所有API调用代理到nodejs API。 Vue-cli-service提供了一些内置功能,并告诉开发服务器将任何未知请求代理到开发中的API服务器,您需要在package.json所在位置的根目录处添加一个vue.proxy.js文件。 我们需要添加以下文件。
module.exports = {
  devServer: {
    proxy: {
      '^/api': {
        target: 'http://localhost:3080',
        changeOrigin: true
      },
    }
  }
}
With this in place, all the calls start with /api will be redirected to http://localhost:3080 where the nodejs API running.
有了这个,所有以/ api开头的调用将被重定向到http:// localhost:3080 运行nodejs API的位置。
Once this is configured, you can run the Vue app on port 8080 and nodejs API on 3080 still make them work together.
配置完成后,您可以在端口8080上运行Vue应用程序,而在3080上的nodejs API仍然可以使它们协同工作。
Here is the user service file in which you make the API calls.
这是您在其中进行API调用的用户服务文件。
export async function getAllUsers() {


    const response = await fetch('/api/users');
    return await response.json();
}


export async function createUser(data) {
    const response = await fetch(`/api/user`, {
        method: 'POST',
        headers: {'Content-Type': 'application/json'},
        body: JSON.stringify({user: data})
      })
    return await response.json();
}
自动化您的任务 (Automate Your Tasks)
You need to automate all the repetitive tasks with some builder or some task runner. We are using gulp here as a task runner. For example, building the project for production is one of the developers’ tasks. We use below gulpfile for the automation. You can create folders, moving files, running commands, a lot more. Once you have the gulpfile.js in place all you need to issue this command gulp.
您需要使用某些构建器或某些任务运行器来自动化所有重复性任务。 我们在这里使用gulp作为任务运行器 。 例如,构建用于生产的项目是开发人员的任务之一。 我们使用下面的gulpfile进行自动化。 您可以创建文件夹,移动文件,运行命令等等。 将gulpfile.js放置好后,您需要发出此命令gulp 。
const { src, dest, series, parallel } = require('gulp');
const del = require('del');
const fs   = require('fs');
const zip = require('gulp-zip');
const log = require('fancy-log');
const webpack_stream = require('webpack-stream');
const webpack_config = require('./webpack.config.js');
var exec = require('child_process').exec;


const paths = {
  prod_build: '../prod-build',
  server_file_name: 'server.bundle.js',
  vue_src: '../my-app/dist/**/*',
  vue_dist: '../prod-build/my-app/build',
  zipped_file_name: 'vue-nodejs.zip'
};


function clean()  {
  log('removing the old files in the directory')
  return del('../prod-build/**', {force:true});
}


function createProdBuildFolder() {


  const dir = paths.prod_build;
  log(`Creating the folder if not exist  ${dir}`)
  if(!fs.existsSync(dir)) {
    fs.mkdirSync(dir);
    log('📁  folder created:', dir);
  }


  return Promise.resolve('the value is ignored');
}


function buildVueCodeTask(cb) {
  log('building Vue code into the directory')
  return exec('cd ../my-app && npm run build', function (err, stdout, stderr) {
    log(stdout);
    log(stderr);
    cb(err);
  })
}


function copyVueCodeTask() {
  log('copying Vue code into the directory')
  return src(`${paths.vue_src}`)
        .pipe(dest(`${paths.vue_dist}`));
}


function copyNodeJSCodeTask() {
  log('building and copying server code into the directory')
  return webpack_stream(webpack_config)
        .pipe(dest(`${paths.prod_build}`))
}


function zippingTask() {
  log('zipping the code ')
  return src(`${paths.prod_build}/**`)
      .pipe(zip(`${paths.zipped_file_name}`))
      .pipe(dest(`${paths.prod_build}`))
}


exports.default = series(
  clean,
  createProdBuildFolder,
  buildVueCodeTask,
  parallel(copyVueCodeTask, copyNodeJSCodeTask),
  zippingTask
);
使用Docker-compose运行它 (Run it with Docker-compose)
Nowadays everything runs on Docker and moving to the cloud. It’s important to run those on Docker as well. We can develop with docker-compose in which Vue and nodejs running as different services and interact with each other.
如今,一切都在Docker上运行并迁移到云中。 在Docker上运行它们也很重要。 我们可以使用docker-compose开发,其中Vue和nodejs作为不同的服务运行并相互交互。
First of all, we need to define two Docker files for both api and Vue UI so that docker-compose.yml will take these files and run these as services.
首先,我们需要为api和Vue UI定义两个Docker文件,以便docker-compose.yml将这些文件作为服务运行。
Vue UI Dockerfile (Vue UI Dockerfile)
FROM node:10


WORKDIR /usr/src/app/my-app


COPY package*.json ./


RUN npm install


EXPOSE 8080


CMD ["npm", "run", "serve"]
NodeJS API Dockerfile (NodeJS API Dockerfile)
FROM node:10


WORKDIR /usr/src/app/api


COPY package*.json ./


RUN npm install


EXPOSE 3080


CMD ["npm", "run", "dev"]
Docker撰写文件 (Docker Compose File)
Here is the docker-compose.yml file at the root of the project that takes the Dockefile from both and creates services so that you can run the whole setup with one command.
这是项目根目录下的docker-compose.yml文件,该文件从这两个文件中获取Dockefile并创建服务,以便您可以使用一个命令运行整个设置。
// build with no cache
docker-compose build --no-cache// start the services
docker-compose up// list the services
docker-compose ps// list the containers
docker ps// stop services
docker-compose stop
version: '3'
services:
nodejs-server:
build:
context: ./api
dockerfile: Dockerfile-dev
ports:
- "3080:3080"
container_name: node-api
volumes:
- ./api:/usr/src/app/api
- /usr/src/app/api/node_modules
vue-ui:
build:
context: ./my-app
dockerfile: Dockerfile-dev
ports:
- "8080:8080"
container_name: vue-ui
volumes:
- ./my-app:/usr/src/app/my-app
- /usr/src/app/my-app/node_modules
While developing with docker-compose, we need to use the service name while proxying API calls. For example, we need to use this http://node-api:3080 instead of http://localhost:3080
在使用docker-compose开发时,我们需要在代理API调用时使用服务名称。 例如,我们需要使用此http:// node-api:3080而不是http:// localhost:3080
重要要点 (Key Takeaways)
- When the nodejs backend involved with your Vue project you should be running those in separate ports to speed up your development. 当您的Vue项目涉及nodejs后端时,您应该在单独的端口中运行它们,以加快开发速度。
- Automate any repetitive tasks such as building projects for production. 使任何重复性任务自动化,例如建立生产项目。
- Always use separate node_modules for node and Vue. Never try to combine both. 始终对node和Vue使用单独的node_modules。 切勿尝试将两者结合。
摘要 (Summary)
- Setting up a development environment is as important as building and packing for production. 建立开发环境与为生产进行包装和包装一样重要。
- In the development environment, Vue and node server runs on separate ports. 在开发环境中,Vue和节点服务器在单独的端口上运行。
Vue runs on the port 8080 and the node server running on the port 3080. You can choose the ports.
Vue在端口8080上运行,节点服务器在端口3080上运行。 您可以选择端口。
- Vue uses a webpack dev server to look for any changes in the files. Vue使用webpack开发服务器查找文件中的任何更改。
- We use nodemon for automatic restarting of nodejs code. 我们使用nodemon自动重启nodejs代码。
- Vue-cli-service provides a feature for proxying all the API calls to the nodejs server. Vue-cli-service提供了一项功能,用于将所有API调用代理到nodejs服务器。
While developing with docker-compose, we need to use the service name while proxying API calls. For example, we need to use this http://node-api:3080 instead of http://localhost:3080
在使用docker-compose开发时,我们需要在代理API调用时使用服务名称。 例如,我们需要使用此http:// node-api:3080而不是http:// localhost:3080
结论 (Conclusion)
Your development environment should be effective and seamless to speed up your development. Automate any repetitive tasks.
您的开发环境应有效且无缝,以加快开发速度。 自动执行所有重复性任务。
vue.js nodejs


 1108
1108

 被折叠的 条评论
为什么被折叠?
被折叠的 条评论
为什么被折叠?
 到【灌水乐园】发言


