


aws上部署hadoop
Adapted by Daniel Hogan from a post by Adam Van Etten and Nick Weir
由Daniel Hogan改编自Adam Van Etten和Nick Weir的帖子
Preface: SpaceNet LLC is a nonprofit organization dedicated to accelerating open source, artificial intelligence applied research for geospatial applications, specifically foundational mapping (i.e., building footprint & road network detection). SpaceNet is run in collaboration by co-founder and managing partner CosmiQ Works, co-founder and co-chair Maxar Technologies, and our partners including Amazon Web Services (AWS), Capella Space, Topcoder, IEEE GRSS, the National Geospatial-Intelligence Agency and Planet.
前言: SpaceNet LLC是一个非营利组织,致力于加速针对地理空间应用的开放源代码,人工智能应用研究,尤其是基础地图绘制(即建筑物占地面积和道路网络检测)。 SpaceNet由联合创始人兼管理合伙人CosmiQ Works ,联合创始人兼Maxar Technologies联合主席共同运行,我们的合作伙伴包括Amazon Web Services(AWS) , Capella Space , Topcoder , IEEE GRSS ,美国国家地理空间情报局和星球。
The SpaceNet 7 Challenge centers on a unique time-series dataset, with monthly collects over an approximately-two-year period for more than 100 locations spanning the globe. Challenge participants are asked to identify building footprints in the imagery and, furthermore, to track buildings from month to month revealing the temporal structure of the data. The challenge is currently underway. With a Challenge end date of October 28, now is a great time to sign up!
SpaceNet 7 Challenge以一个独特的时间序列数据集为中心,在大约两年的时间内每月收集一次,分布在全球100多个位置。 挑战参加者被要求在图像中识别建筑物的足迹,并逐月跟踪建筑物,以揭示数据的时间结构。 挑战目前正在进行中。 随着10月28日的挑战赛结束日期,现在是一个伟大的时间来报名!
Deep learning techniques, which have increasingly become the norm for complex tasks like this, require powerful hardware usually in the form of graphical processing units (GPUs). To help democratize access to the tools needed for the SpaceNet 7 Challenge, this blog post shows step-by-step how to run our baseline (i.e., example) solution online with Amazon Web Services (AWS). No special hardware on the user’s part is required, and the total cost to train the model is around $60. To further democratize the process, the SpaceNet team is providing AWS compute credits to SpaceNet 7 competitors. Specifically, the first 100 competitors to reproduce (or exceed) the score of the open source baseline model will receive a $250 credit, thus allowing a large number of competitors to freely experiment and improve upon their submissions.
深度学习技术已日益成为诸如此类的复杂任务的规范,它们通常需要图形处理单元(GPU)形式的强大硬件。 为了帮助使对SpaceNet 7 Challenge所需工具的访问民主化,此博客文章逐步介绍了如何使用Amazon Web Services (AWS)在线运行我们的基准(即示例)解决方案。 用户不需要特殊的硬件,训练该模型的总成本约为60美元。 为了进一步使流程民主化,SpaceNet团队正在向SpaceNet 7竞争对手提供AWS计算积分。 具体来说,前100位重现(或超过)开源基准模型得分的竞争者将获得250美元的信用额,从而使大量竞争者可以自由地进行实验并改进其提交的内容。
I. Introduction
一,引言
To lower the barrier to entry for SpaceNet 7 participation, the CosmiQ Works team created an Amazon Machine Image (AMI) pre-loaded with the Solaris software suite, SpaceNet 7 baseline algorithm, and the SpaceNet 7 dataset. This post walks through how to use that AMI to train and test the baseline model in the cloud. No hardware beyond an ordinary laptop is required. Challenge participants have the option of using the baseline as a starting point as they set off to develop their own innovative solutions to the SpaceNet 7 Challenge.
为了降低SpaceNet 7参与的门槛,CosmiQ Works团队创建了一个预装了Solaris软件套件,SpaceNet 7基准算法和SpaceNet 7数据集的Amazon Machine Image(AMI)。 这篇文章介绍了如何使用该AMI在云中训练和测试基线模型。 除了普通笔记本电脑外,不需要其他硬件。 挑战参与者可以选择以基线为起点,因为他们着手为SpaceNet 7挑战开发自己的创新解决方案。
II. Loading the AMI
二。 加载AMI
In order to load and prepare the AMI for model training and testing, simply execute the following steps:
为了加载和准备用于模型训练和测试的AMI,只需执行以下步骤:
In a web browser navigate to:
在网络浏览器中,导航至:
https://console.aws.amazon.com/ec2If you don’t have an AWS account, create one as a “Root user” and login.
如果您没有AWS账户,请创建一个“ Root用户”并登录。
2. In the top-right of the page, ensure you are in the “N. Virginia” region:
2.确保在页面的右上方,您位于“ N. 弗吉尼亚州”地区:
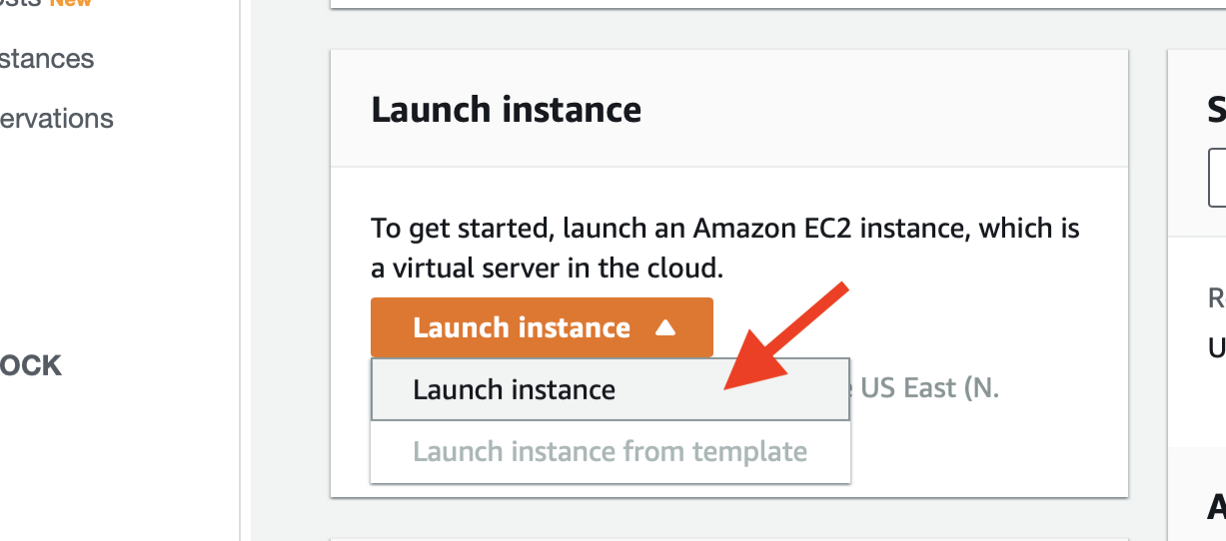
3. Select “Launch Instance” (orange button)
3.选择“启动实例”(橙色按钮)
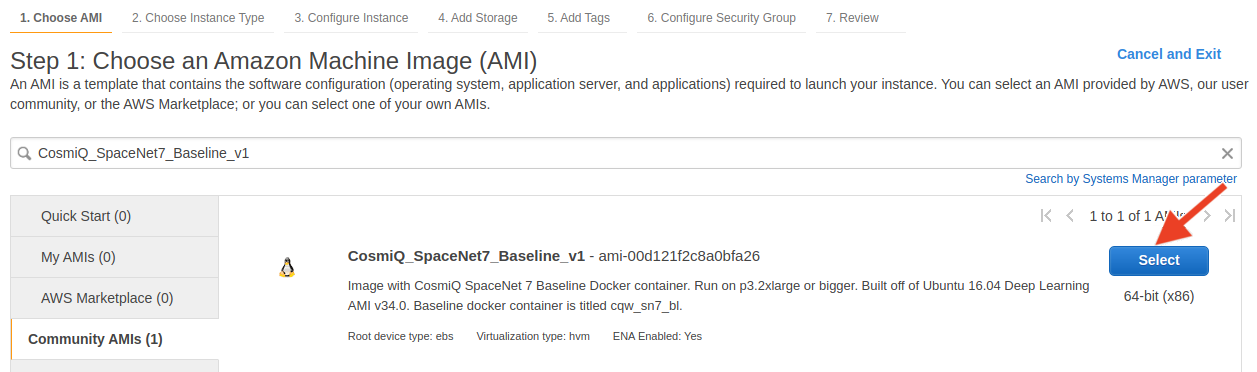
4. Search for the pre-built AMI
4.搜索预建的AMI
Type “CosmiQ_SpaceNet7_Baseline_v1” in the search bar, click the “Community AMIs” tab, and hit “Select.”
在搜索栏中键入“ CosmiQ_SpaceNet7_Baseline_v1”,单击“社区AMI”选项卡,然后单击“选择”。
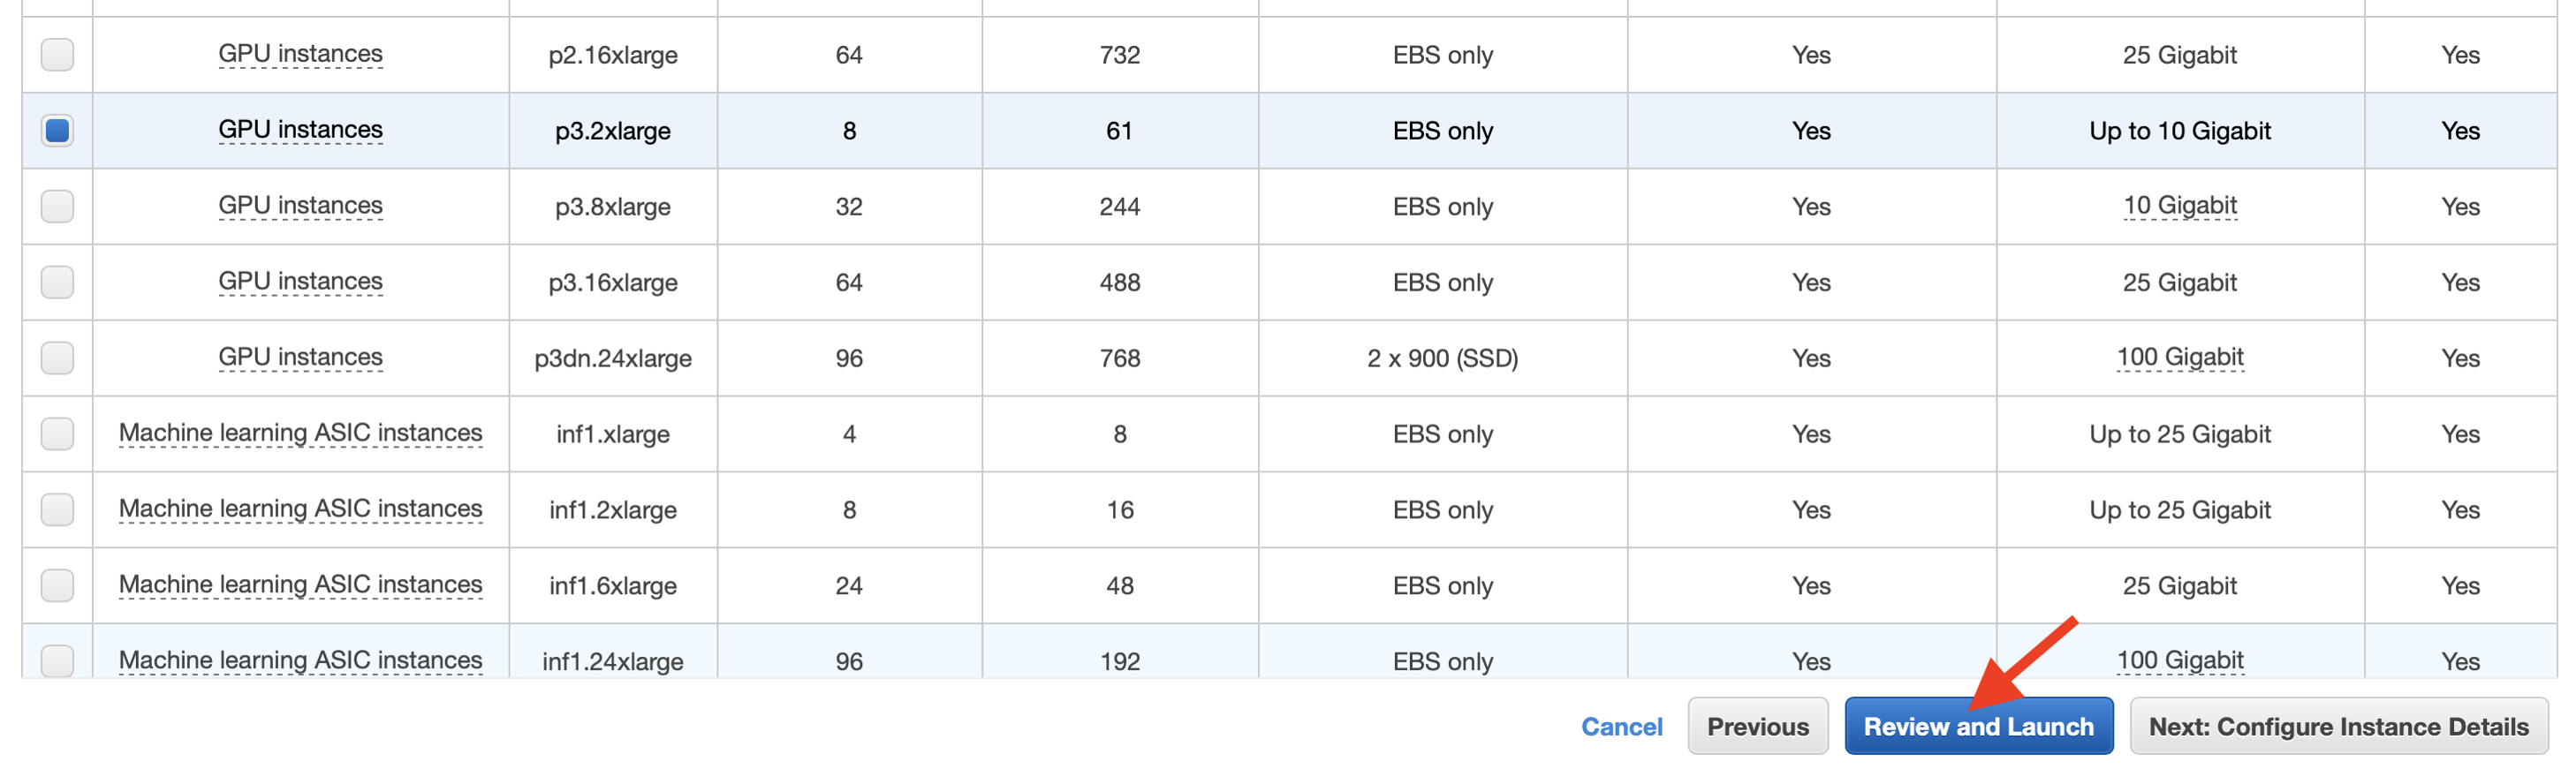
5. Select the appropriate instance
5.选择适当的实例
We recommend the p3.2xlarge instance, which includes one NVIDIA P100 GPU and costs $3.06 per hour. Hit “Review and Launch.”
我们建议使用p3.2xlarge实例,其中包括一个NVIDIA P100 GPU,每小时收费3.06美元。 点击“查看并启动”。
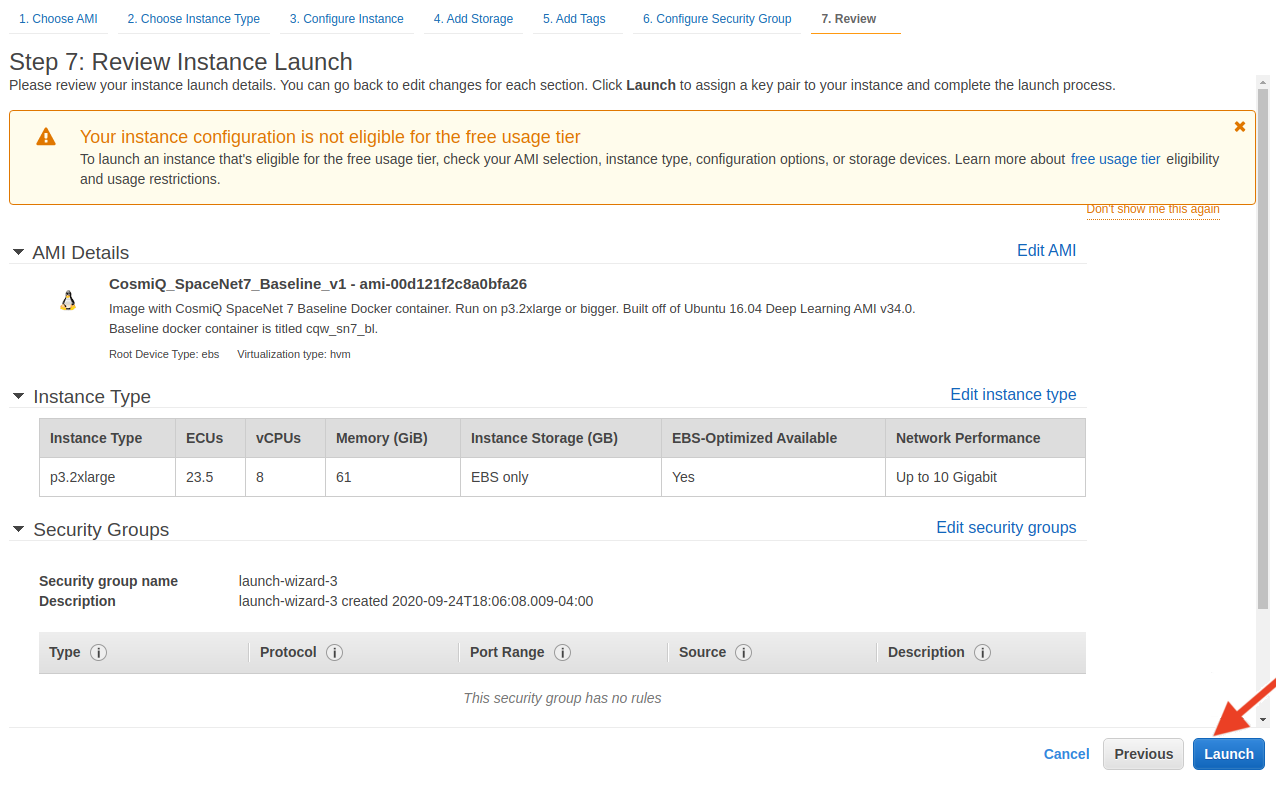
6. Initiate launch
6.启动
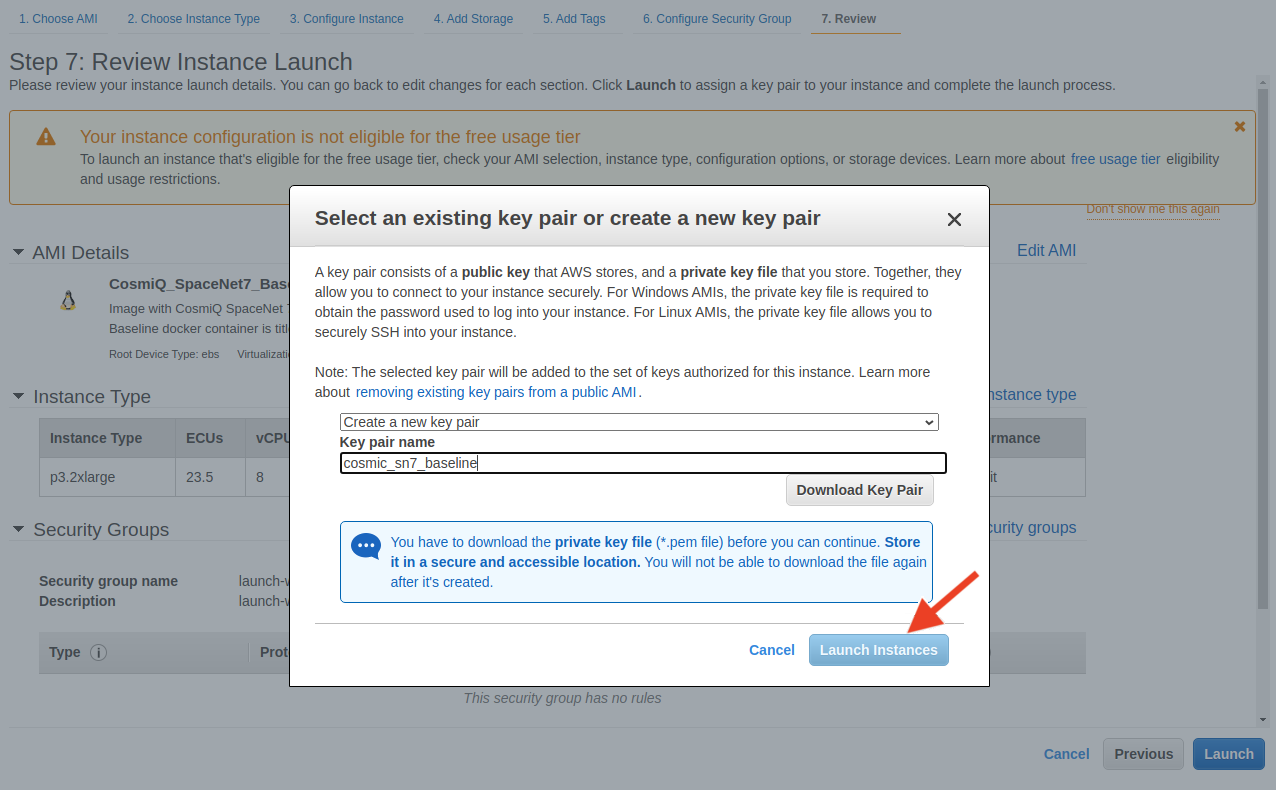
7. Create a new Key Pair
7.创建一个新的密钥对
Create a new key pair (e.g. cosmiq_sn7_baseline), and save to your local machine. Hit “Launch Instances.”
创建一个新的密钥对(例如cosmiq_sn7_baseline),并将其保存到本地计算机。 点击“启动实例”。
Note: It is possible that AWS may throw an error stating that you have requested more vCPU capacity than allowed (this is an intentional feature put in place to keep users from unwittingly accumulating large bills). In this case, open a ticket for a service limit increase at: https://console.aws.amazon.com/support/home#/case/create.
注意:AWS可能会抛出错误,表明您请求的vCPU容量超出了允许的数量(这是一项有意提供的功能,可防止用户无意间累积大笔账单)。 在这种情况下,请通过以下网址打开票证以增加服务限额: https : //console.aws.amazon.com/support/home#/case/create 。

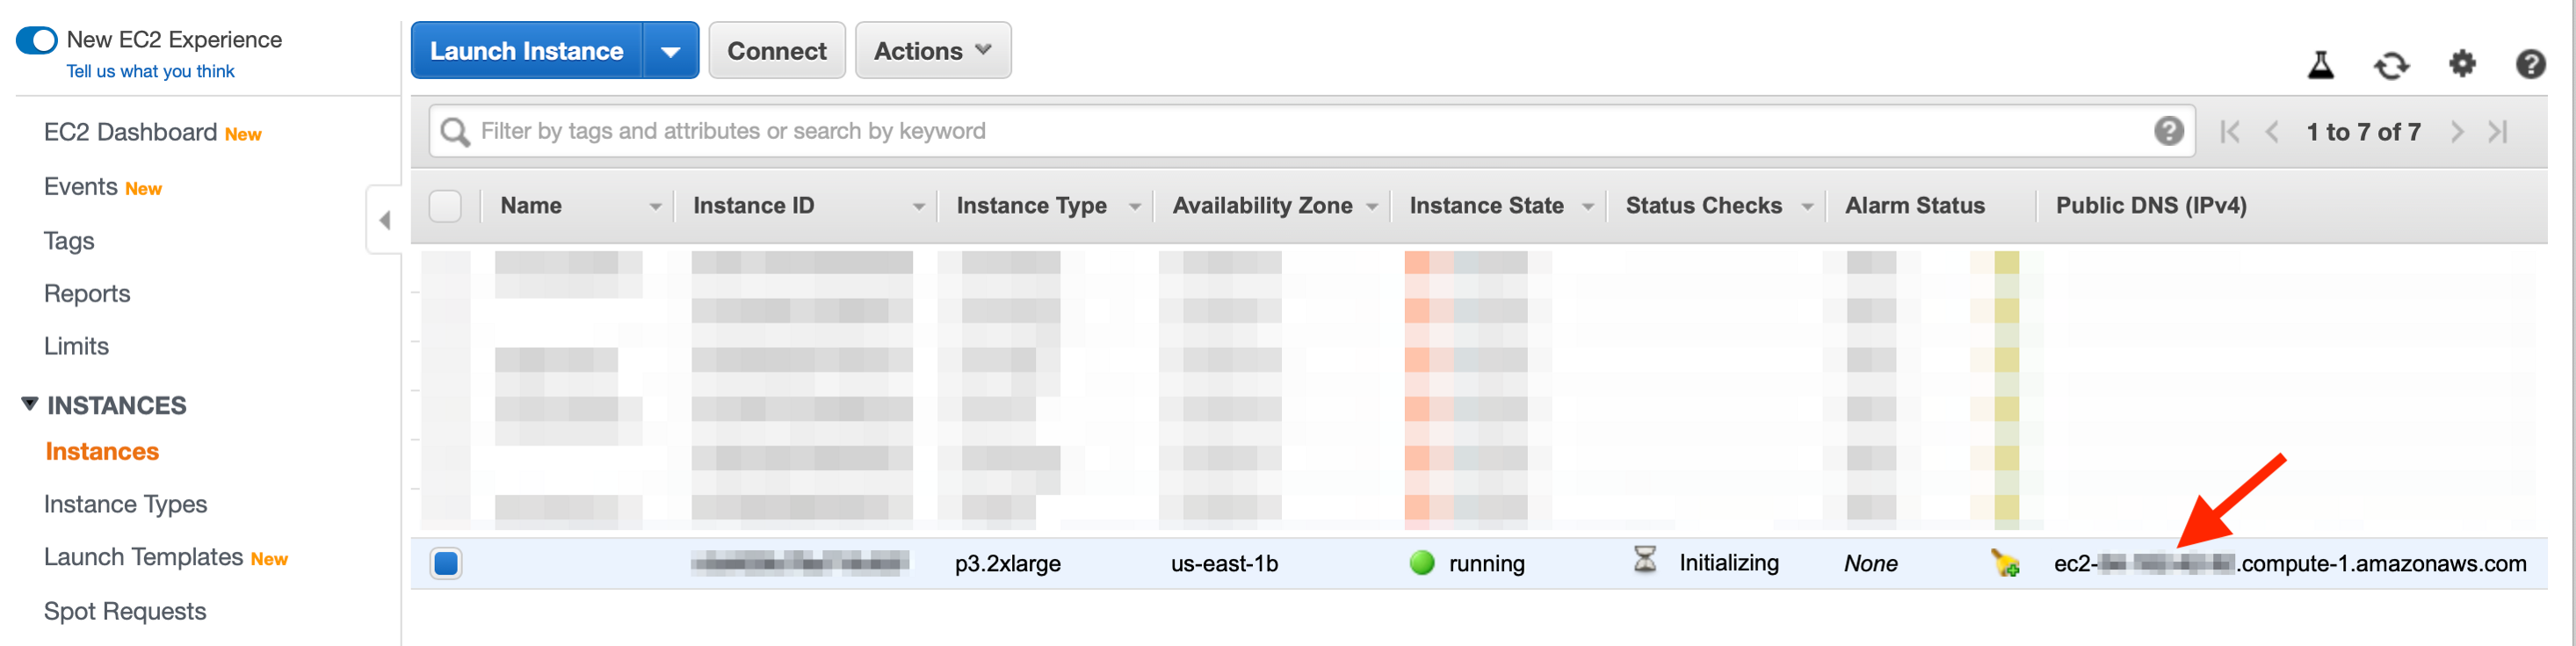
8. Record the address
8.记录地址
The instance is now running! Back at the Instance Dashboard you should write down the Public DNS (IPv4) for this instance (of form: ec2-XX-XXX-X-XX.compute-1.amazonaws.com), you will need this later to access the instance.
实例现在正在运行! 返回到“实例控制板”,您应该写下该实例的公共DNS(IPv4)(格式为:ec2-XX-XXX-X-XX.compute-1.amazonaws.com),稍后将需要它来访问实例。
9. Access the instance via SSH
9.通过SSH访问实例
On your local machine, ssh into the AMI from a terminal. You may need to change permissions of the key (.pem) file first.
在本地计算机上,从终端SSH进入AMI。 您可能需要首先更改密钥( .pem )文件的权限。
chmod 400 /path_to_keys/cosmiq_sn7_baseline.pemssh -i "/path_to_keys/cosmiq_sn7_baseline.pem" ubuntu@ec2-XX-XX-XX-XX.compute-1.amazonaws.com三, 训练和测试基准模型 (III. Train and Test the Baseline Model)
The GPU instance is now up and running, so we can train and test the SpaceNet 6 baseline algorithm, which is pre-installed in a Docker container (entitled cqw_sn6_bl) in the AMI. The command below should be run in the ssh terminal of your instance.
GPU实例现已启动并正在运行,因此我们可以训练和测试SpaceNet 6基准算法,该算法已预先安装在AMI的Docker容器(名为cqw_sn6_bl )中。 以下命令应在您实例的ssh终端中运行。
Attach the docker container
附加Docker容器
nvidia-docker start cqw_sn7_blnvidia-docker attach cqw_sn7_blThis puts us in the the /root directory within the docker container where we can execute the train.sh and test.sh scripts.
这将我们放在docker容器内的/ root目录中,我们可以在其中执行train.sh和test.sh脚本。

2. Train the model
2.训练模型
By default the script runs for 300 epochs (~20 hours). To modify the training time, simply edit the “epochs” line in the yml/sn7_baseline_train.yml file. The training script first pre-processes the data, then applies a VGG-16 + U-Net deep learning model. Training is launched by simply invoking the train.sh script:
默认情况下,脚本运行300个纪元(约20小时)。 要修改训练时间,只需在yml / sn7_baseline_train.yml文件中编辑“ epochs ”行。 训练脚本首先对数据进行预处理,然后应用VGG-16 + U-Net深度学习模型。 只需调用train.sh脚本即可启动培训:
./train.sh /data/trainTraining will proceed either until completion of all epochs, or training is terminated by the user (ctrl+c). The best model is saved as training progresses, so early termination still saves the best model trained to date.
培训将继续进行,直到完成所有纪元为止,或者培训将由用户( ctrl + c )终止。 最佳模型会随着训练的进行而保存,因此提前终止仍然可以保存迄今为止训练的最佳模型。
3. Test the Model
3.测试模型
Testing can be executed either when training is complete (Step 2 above), or using the existing weights file models/sn7_baseline/xdxd_final.pth in the docker container. Testing is invoked with the following command (sn7_baseline_predictions.csv is the name of the output file):
可以在训练完成时(上面的步骤2)或使用docker容器中现有的权重文件模型/sn7_baseline/xdxd_final.pth来执行测试。 使用以下命令调用测试( sn7_baseline_predictions.csv是输出文件的名称):
./test.sh /data/test_public sn7_baseline_predictions.csv4. Copy outputs back locally
4.将输出复制到本地
Inference is now complete, so we now transfer the outputs out of the AMI back to our local machine. First, switch out of the Docker container (ctrl+p ctrl+q) then copy the results from the docker container back to the AMI:
推理现已完成,因此我们现在将输出从AMI传输回本地计算机。 首先,退出Docker容器(ctrl + p ctrl + q),然后将结果从docker容器复制回AMI:
mkdir /home/ubuntu/transferdocker cp cqw_sn7_bl:/root/sn7_baseline_predictions.csv /home/ubuntu/transfer/docker cp cqw_sn7_bl:/root/output /home/ubuntu/transfer/docker cp cqw_sn7_bl:/root/inference_out /home/ubuntu/transfer/Now copy results back to your local machine (for example, to location: /path_to_results/sn7_baseline_aws/). To just get the CSV file of predictions, the command is:
现在,将结果复制回本地计算机(例如,复制到位置: / path_to_results / sn7_baseline_aws / )。 要仅获取预测的CSV文件,命令为:
scp -i "/path_to_keys/cosmiq_sn7_baseline.pem" -r ubuntu@ec2-XX-XX-XX-XX.compute-1.amazonaws.com:/home/ubuntu/transfer/sn7_baseline_predictions.csv /path_to_results/sn7_baseline_aws/Or, to get all the intermediate and output files (masks, etc.), use:
或者,要获取所有中间文件和输出文件(掩码等),请使用:
scp -i "/path_to_keys/cosmiq_sn7_baseline.pem" -r ubuntu@ec2-XX-XX-XX-XX.compute-1.amazonaws.com:/home/ubuntu/transfer /path_to_results/sn7_baseline_aws/5. Inspect Results
5.检查结果
Among the files generated by the SpaceNet 7 baseline are images identifying which pixels are most likely to be parts of buildings.
在SpaceNet 7基准线生成的文件中,有图像标识哪些像素最有可能是建筑物的一部分。
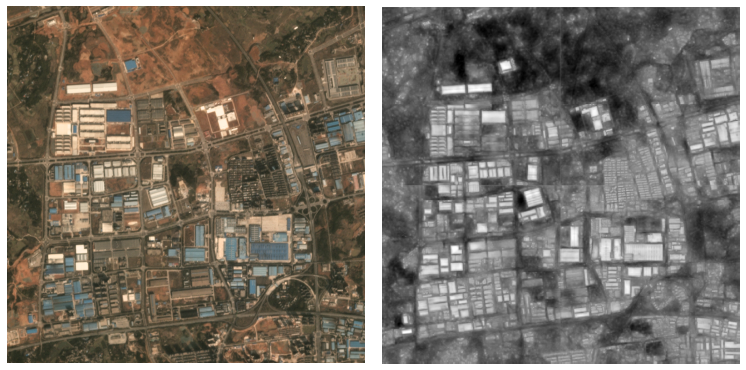
The baseline also creates a CSV file with a geometry and a tracking ID number for each building prediction (see below) — this file yields a score of ~0.158 when entered onto the challenge website.
基准线还会为每个建筑物预测创建一个CSV文件,其中包含几何图形和跟踪ID号(请参见下文),当输入挑战网站时,此文件的得分约为0.158。

Side Note
边注
As an aside, the AMI was built using a fork of the original baseline repo. The original repo runs many of the computations within Jupyter Python notebooks, which the fork repackages as Python scripts. But under the hood, both versions do the same computations in the same way.
顺便说一句,AMI是使用原始基准存储库的分支构建的。 原始存储库在Jupyter Python笔记本中运行许多计算,而fork将其重新打包为Python脚本。 但实际上,两个版本都以相同的方式执行相同的计算。
IV。 结论 (IV. Conclusion)
The SpaceNet 7 Challenge focuses on the difficulties and opportunities of working with time series data. To make this task as approachable as possible, we have previously released a working example solution in the form of the algorithmic baseline. In this post, we’ve released an Amazon Machine Image with everything necessary to use the baseline, along with step-by-step instructions to undertake the deep learning process in the cloud. The baseline and this platform can be an effective way to get started on SpaceNet 7. We encourage the interested reader to register for the challenge, implement this code, and apply for the free AWS compute credits to experiment with and improve upon the baseline model.
SpaceNet 7挑战集中于处理时间序列数据的困难和机遇。 为了使此任务尽可能平易近人,我们之前已以算法基线的形式发布了一个可行的示例解决方案。 在本文中,我们发布了一个Amazon Machine Image,其中包含使用基线所需的一切,以及分步说明以在云中进行深度学习过程。 基准和该平台可以是开始使用SpaceNet 7的有效方法。我们鼓励感兴趣的读者注册挑战,实施此代码,并申请免费的AWS计算积分,以试验并改进基准模型。
翻译自: https://medium.com/the-downlinq/deploying-the-spacenet-7-baseline-on-aws-df756a4d9695
aws上部署hadoop


 750
750


 被折叠的 条评论
为什么被折叠?
被折叠的 条评论
为什么被折叠?
 到【灌水乐园】发言


