使用tensorflow对服装图像进行分类

机器学习中的分类(Classification in Machine Learning)

Classification is a process of categorizing a given set of data into classes. The process starts with predicting the class of given data points where the classes can be referred to as target, label, or categories.

分类是将给定数据集分类为类的过程。 该过程从预测给定数据点的类别开始,其中这些类别可以称为目标,标签或类别。

Classification can be performed on both structured or unstructured data. The main goal of classification is to identify which class/category the new data will fall into and is best used when the output has finite and discrete values.

分类可以在结构化或非结构化数据上执行。 分类的主要目标是确定新数据将属于哪个类别/类别,并在输出具有有限值和离散值时最好使用

The different types of classification algorithms are —

分类算法的不同类型是-

Linear Models

线性模型

  • Logistic Regression

    逻辑回归
  • Support Vector Machines (SVM)

    支持向量机(SVM)

Nonlinear models

非线性模型

  • K-nearest Neighbors (KNN)

    K近邻(KNN)
  • Kernel Support Vector Machines (SVM)

    内核支持向量机(SVM)
  • Naïve Bayes

    朴素贝叶斯
  • Decision Tree Classification

    决策树分类
  • Random Forest Classification

    随机森林分类

什么是神经网络?(What is a neural network?)

In simple terms, Neural networks are multi-layer networks of neurons designed to recognize patterns. The patterns they recognize are numerical, contained in vectors, into which all real-world data, be it images, sound, text, etc., must be transformed.

简单来说,神经网络是旨在识别模式的多层神经元网络。 他们识别的模式是数字,包含在矢量中,所有真实世界的数据(图像,声音,文本等)都必须转换为矢量。

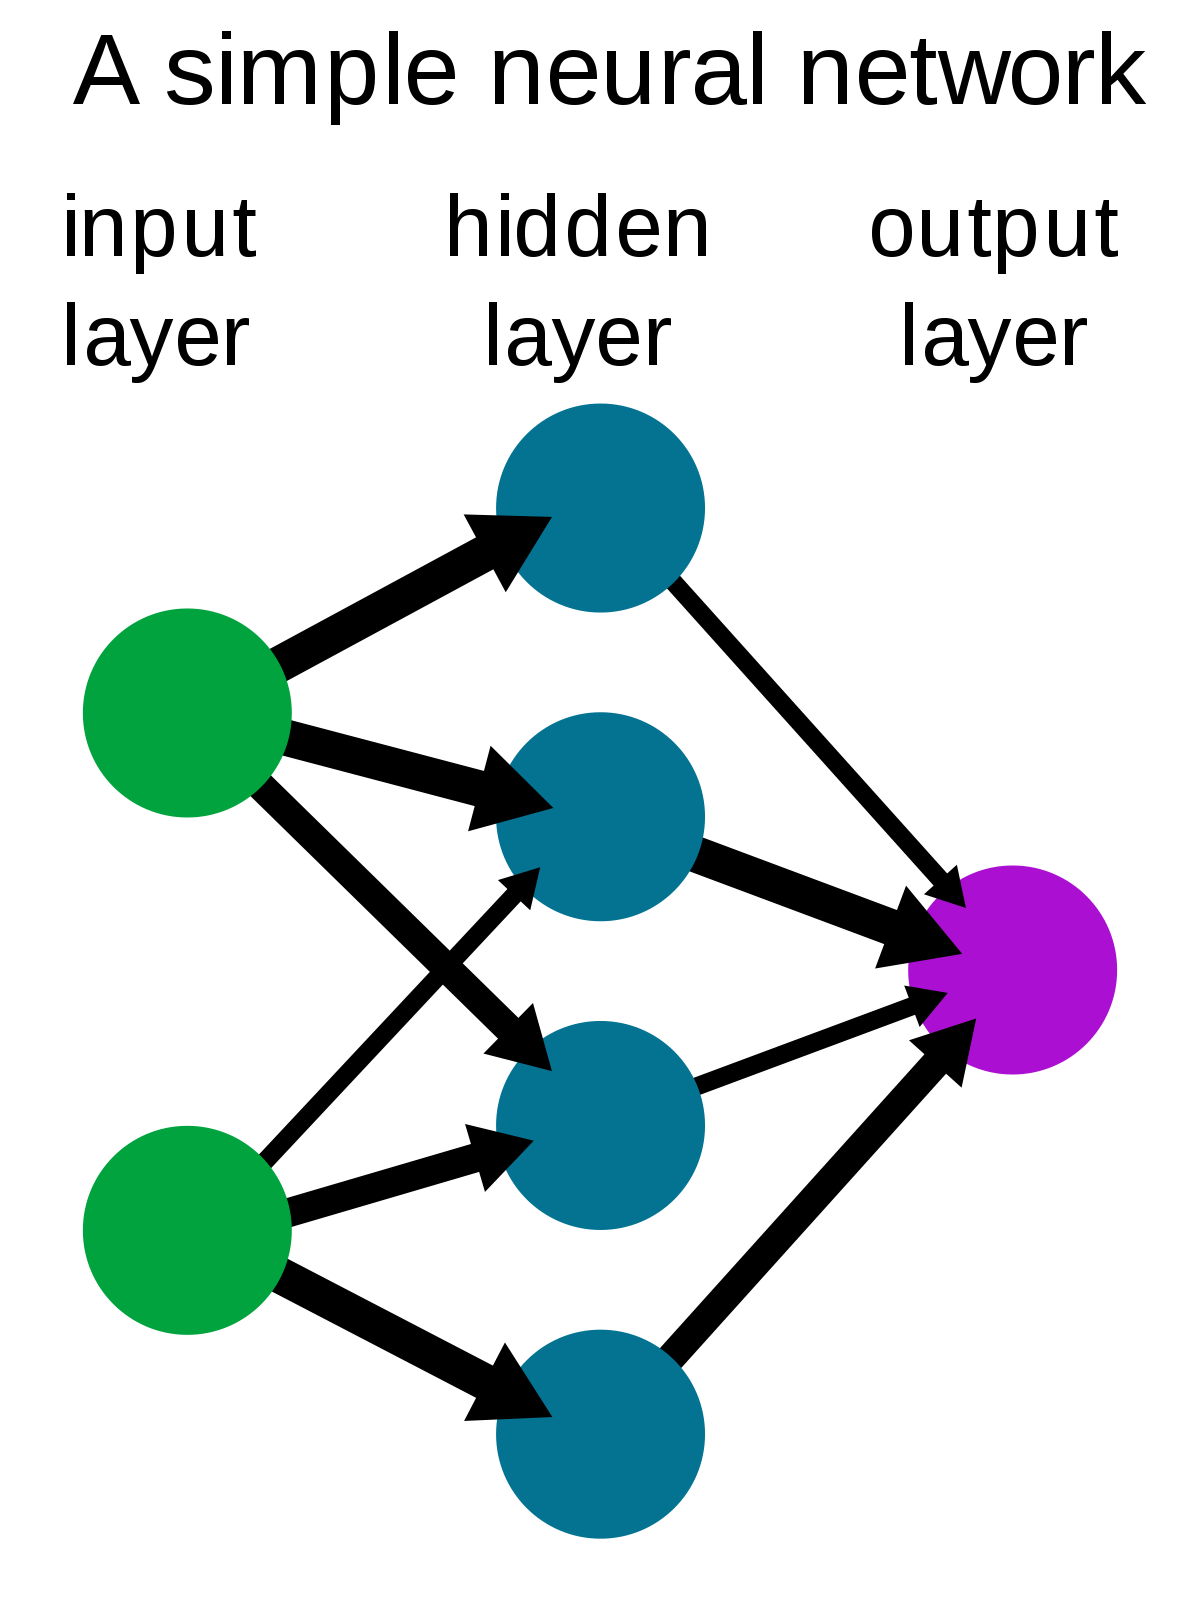
A simple neural network consists of —

一个简单的神经网络由-

  1. Input Layer — this layer takes large volumes of data as input to build the neural network

    输入层-该层将大量数据作为输入来构建神经网络
  2. Hidden layer — this layer processes data by performing complex computations and carries out feature extraction

    隐藏层-该层通过执行复杂的计算来处理数据并进行特征提取
  3. Output Layer — Using suitable activation functions it generates predicted output

    输出层-使用适当的激活功能,它可以生成预测的输出
  4. Arrows — Connect the layers and shows how data travels from the input layer through hidden layers to the output layer.

    箭头—连接各层,并显示数据如何从输入层通过隐藏层传输到输出层。
Image for post
A simple neural network(Image source and credits: Pinterest)
一个简单的神经网络(图片来源和提供者:Pinterest)

什么是张量流? (What is Tensor Flow?)

TensorFlow, developed initially for large numerical computations, is an open-source library developed by Google’s Brain team and written in C++, Python, and CUDA for deep learning and machine learning applications.

TensorFlow最初是为大型数值计算而开发的,是Google的Brain团队开发的开放源代码库,用C ++,Python和CUDA编写,用于深度学习和机器学习应用程序。

Image for post
Example of Image recognition using TensorFlow (Image source and credits: Source Dexter)
使用TensorFlow进行图像识别的示例(图像来源和来源:Source Dexter)

TensorFlow works based on data flow graphs that have nodes and edges. It accepts data in the form Tensors, which are nothing but multi-dimensional arrays of higher dimensions and can handle large amounts of data.

TensorFlow基于具有节点和边缘的数据流图工作。 它接受张量形式的数据,它不过是高维的多维数组,并且可以处理大量数据。

项目—对服装图像进行分类 (Project — Classify images of clothing)

1.导入重要的图书馆(1. Import important Libraries)

We will be using tf.keras, which is TensorFlow’s high-level API for building and training deep learning models. It’s used for fast prototyping and create new layers, metrics, loss functions, and develop state-of-the-art models.

我们将使用tf.keras,这是TensorFlow的高级API,用于构建和训练深度学习模型。 它用于快速制作原型,并创建新的层,度量,损失函数并开发最新模型。

Numpy is a core library for scientific computing in Python and Matplotlib is a library for creating static, animated, and interactive visualizations.

Numpy是Python中科学计算的核心库,而Matplotlib是用于创建静态,动画和交互式可视化的库。

# import TensorFlow, tf.keras, numpy and matplotlib
import tensorflow as tf
from tensorflow import keras
import numpy as np
import matplotlib.pyplot as plt

2.导入数据集 (2. Import the dataset)

We will be using Fashion MNIST dataset in this project. The image contains 70,000 grayscale images in 10 categories, out of which 60,000 images are used to train the network and 10,000 images to evaluate how accurately the network learned to classify images.

我们将在此项目中使用Fashion MNIST数据集。 该图像包含10种类别的70,000张灰度图像,其中60,000张图像用于训练网络,10,000张图像用于评估网络学习对图像进行分类的准确程度。

Image for post
Individual articles of clothing at low resolution (28 by 28 pixels)
低分辨率(28 x 28像素)的单个衣​​物
fashion_mnist = keras.datasets.fashion_mnist
#returns four numpy 28x28 arrays with pixel values ranging from 0 to #255
(train_images, train_labels), (test_images, test_labels) = fashion_mnist.load_data()

Each image is mapped to a single label. Labels are nothing but the array of integers, ranging from 0 to 9 and correspond to the class of the clothing the image represents.

每个图像都映射到一个标签。 标签不过是整数数组,范围从0到9,并且与图像表示的衣服类别相对应。

Image for post
Clothing Labels and Classes
服装标签和分类

Training sets represents the data that the model uses to learn — train_images and train_labels arrays.

训练集表示模型用来学习的数据train_imagestrain_labels数组。

Test sets represent the data that the model uses to test — test_images, and test_labels arrays.

测试集代表的数据,该模型的使用测试- test_images ,和test_labels阵列。

class_names = ['T-shirt/top', 'Trouser', 'Pullover', 'Dress',     
'Coat','Sandal', 'Shirt', 'Sneaker', 'Bag', 'Ankle
boot']

3.数据探索 (3. Data Exploration)

train_images.shape

(60000, 28, 28)

(60000,28,28)

len(train_labels)

60000

60000

test_images.shape

(10000, 28, 28)

(10000、28、28)

len(test_labels)

10000

10000

4.数据预处理 (4. Data Preprocessing)

For both training and test sets, you can see that the pixel values of the images fall in the range of 0 to 255, which needs to be scaled in the range of 0 and 1 before feeding it in the neural network. To do so, divide the values by 255.

对于训练集和测试集,您都可以看到图像的像素值落在0到255的范围内,在将其输入神经网络之前需要将其缩放到0到1的范围内。 为此,将值除以255。

train_images = train_images / 255.0test_images = test_images / 255.0

To verify that the data is in the correct format, display the first 25 images from the training set, and display the class name below each image.

要验证数据的格式正确,请显示训练集中的前25张图像,并在每张图像下方显示班级名称。

plt.figure(figsize=(10,10))
for i in range(25):
plt.subplot(5,5,i+1)
plt.xticks([])
plt.yticks([])
plt.grid(False)
plt.imshow(train_images[i], cmap=plt.cm.binary)
plt.xlabel(class_names[train_labels[i]])
plt.show()
Image for post

5.建立模型 (5. Build the model)

To build the model, first chain the different layers, configure them and then compile the model.

要构建模型,请首先链接不同的层,进行配置,然后编译模型。

model = keras.Sequential([
keras.layers.Flatten(input_shape=(28, 28)),
keras.layers.Dense(128, activation='relu'),
keras.layers.Dense(10)
])

The layers —

图层-

tf.keras.layers.Flatten— transforms the format of the images from a two-dimensional array (28 x 28 pixels) to a one-dimensional array (of 28 * 28 = 784 pixels). Once the pixels are flattened, the network consists of a sequence of two dense layers.

tf.keras.layers.Flatten —将图像的格式从二维数组(28 x 28像素)转换为一维数组(28 * 28 = 784像素)。 像素变平后,网络将由两个密集层组成。

tf.keras.layers.Dense — These 2 layers are dense/fully-connected, neural layers with 128 nodes in the first dense layer, and the second layer returns a logits array with a length of 10.

tf.keras.layers.Dense —这2层是密集/完全连接的神经层,在第一密集层中具有128个节点,第二层返回长度为10的logits数组。

After this compile the model, where —

编译完模型后,其中-

  • Optimizer — This is how the model is updated based on the data it sees and its loss function. Adam is an optimization algorithm that can be used instead of the classical stochastic gradient descent procedure to update network weights iterative based on training data. It’s simple to use.

    优化器-这是基于模型看到的数据及其损失函数来更新模型的方式。 亚当(Adam)是一种优化算法,可以代替经典的随机梯度下降过程来基于训练数据来更新网络权重。 使用简单。
  • Loss function — Loss Function being one of the important components of Neural Networks is nothing but a prediction error of Neural Network. This measures how accurate the model is during training.

    损失函数-损失函数是神经网络的重要组成部分,不过是神经网络的预测误差。 这可以衡量模型在训练过程中的准确性。
  • Metrics — To monitor the training and testing steps, we use metrics. In this example, we will be using accuracy metrics, which indicates nothing but the fraction of the images that are correctly classified.

    指标—为了监控培训和测试步骤,我们使用指标。 在此示例中,我们将使用准确性指标,该指标没有任何意义 但是正确分类的图像比例。

model.compile(optimizer='adam',
loss=tf.keras.losses.SparseCategoricalCrossentropy(from_logits=True),metrics=['accuracy'])

6.模型训练 (6. Model Training)

This happens in 4 steps — Feed the training data, Learn, Predict, Verify the Prediction

这分为4个步骤-提供训练数据,学习,预测,验证预测

#fit the model to the training data 
model.fit(train_images, train_labels, epochs=10)Epoch 1/10
1875/1875 [==============================] - 4s 2ms/step - loss: 1.0486 - accuracy: 0.6656
Epoch 2/10
1875/1875 [==============================] - 4s 2ms/step - loss: 0.6211 - accuracy: 0.7744
Epoch 3/10
1875/1875 [==============================] - 4s 2ms/step - loss: 0.5498 - accuracy: 0.8026
Epoch 4/10
1875/1875 [==============================] - 4s 2ms/step - loss: 0.5096 - accuracy: 0.8185
Epoch 5/10
1875/1875 [==============================] - 4s 2ms/step - loss: 0.4832 - accuracy: 0.8284
Epoch 6/10
1875/1875 [==============================] - 4s 2ms/step - loss: 0.4636 - accuracy: 0.8363
Epoch 7/10
1875/1875 [==============================] - 4s 2ms/step - loss: 0.4485 - accuracy: 0.8418
Epoch 8/10
1875/1875 [==============================] - 4s 2ms/step - loss: 0.4365 - accuracy: 0.8456
Epoch 9/10
1875/1875 [==============================] - 3s 2ms/step - loss: 0.4265 - accuracy: 0.8496
Epoch 10/10
1875/1875 [==============================] - 4s 2ms/step - loss: 0.4175 - accuracy: 0.8539<tensorflow.python.keras.callbacks.History at 0x7faeadc6d048>

You can see that loss and accuracy are calculated in each epoch. The model achieved an accuracy of around 85% on the training data.

您可以看到,损失和准确性是在每个时期计算的。 该模型在训练数据上的准确性达到了约85%

7.评估测试数据的准确性 (7. Evaluate accuracy on test data)

test_loss, test_acc = model.evaluate(test_images,  test_labels, verbose=2)print('\nTest accuracy:', test_acc)

Test accuracy: 0.8379999995231628

测试精度:0.8379999995231628

This is a case of overfitting where the accuracy of the test dataset is less than the accuracy of the training dataset. Overfitting happens when your model “memorizes” the noise and details in the training dataset to a point where it negatively impacts the performance of the model on the new data.

这是过度拟合的情况,其中测试数据集的准确性小于训练数据集的准确性。 当您的模型“记忆”训练数据集中的噪声和细节到对新数据的模型性能产生负面影响的程度时,就会发生过度拟合。

8.预测时间 (8. Prediction time)

probability_model = tf.keras.Sequential([model, 
tf.keras.layers.Softmax()])
predictions = probability_model.predict(test_images)
predictions[0]
#Output is an array of 10 numbers which represent model's confidencearray
([2.0062183e-07, 3.7709762e-11, 7.3624884e-10, 2.9959158e-12, 1.1696175e-09, 3.5686058e-04, 2.6559412e-08, 1.0531254e-03, 7.2562241e-11, 9.9858981e-01], dtype=float32)

You can see which label has the highest confidence value.

您可以看到哪个标签的置信度最高。

np.argmax(predictions[1])
Output : 0

So, the model is most confident that this image is a T-shirt/Top, or class_names[0].

因此,模型最有信心该图像是T恤/上衣或class_names[0]

Let’s plot several images with their predictions.

让我们绘制一些带有预测的图像。

# Plot the first X test images, their predicted labels, and the true #labels.
# Color correct predictions in blue and incorrect predictions in #red.
num_rows = 5
num_cols = 3
num_images = num_rows*num_cols
plt.figure(figsize=(2*2*num_cols, 2*num_rows))
for i in range(num_images):
plt.subplot(num_rows, 2*num_cols, 2*i+1)
plot_image(i, predictions[i], test_labels, test_images)
plt.subplot(num_rows, 2*num_cols, 2*i+2)
plot_value_array(i, predictions[i], test_labels)
plt.tight_layout()
plt.show()
Image for post
Cloth images with their predictions
布图像及其预测

Note: This is a very basic project using TensorFlow (Code Reference: TensorFlow.org). I created this post to give an introduction to the neural network, Tensor Flow, and demonstrate it’s inner working through a project. Many Thanks to Google for providing the TensorFlow library.

注意:这是一个使用TensorFlow的非常基础的项目(代码参考:TensorFlow.org)。 我创建了这篇文章,以介绍神经网络Tensor Flow,并演示其在整个项目中的内部工作。 非常感谢Google提供TensorFlow库。

谢谢阅读。 保持学习 :) (Thanks for reading. Keep Learning :))

获得访问专家视图的权限-订阅DDI Intel (Gain Access to Expert View — Subscribe to DDI Intel)

翻译自: https://medium.com/datadriveninvestor/classify-images-of-clothing-using-tensorflow-7bc71b357739

  • 0
    点赞
  • 14
    收藏
    觉得还不错? 一键收藏
  • 0
    评论

“相关推荐”对你有帮助么?

  • 非常没帮助
  • 没帮助
  • 一般
  • 有帮助
  • 非常有帮助
提交
评论
添加红包

请填写红包祝福语或标题

红包个数最小为10个

红包金额最低5元

当前余额3.43前往充值 >
需支付:10.00
成就一亿技术人!
领取后你会自动成为博主和红包主的粉丝 规则
hope_wisdom
发出的红包
实付
使用余额支付
点击重新获取
扫码支付
钱包余额 0

抵扣说明:

1.余额是钱包充值的虚拟货币,按照1:1的比例进行支付金额的抵扣。
2.余额无法直接购买下载,可以购买VIP、付费专栏及课程。

余额充值