


前端 单个字段的布局
In my previous article, I explained what micro frontends are and how they are useful. In this article, I will explain how we get to implement micro frontends to display various components in a single page using Single SPA, which is an MFE (micro frontend) framework.
在上一篇文章中,我解释了什么是微前端以及它们如何有用。 在本文中,我将解释如何使用Single SPA(一种MFE(微型前端)框架)实现微型前端以在单个页面中显示各种组件。
什么是单一SPA? (What Is Single SPA?)
Single SPA is a framework for bringing together multiple JavaScript MFEs in a frontend application. There are a lot of frameworks present, but this is one of the most popular micro frontends open source projects.
单个SPA是一个框架,用于将多个JavaScript MFE集成到前端应用程序中。 当前有很多框架,但这是最受欢迎的微型前端开放源代码项目之一。
我们要执行什么? (What Are We Going to Implement?)
We’ll be implementing a simple application that consists of three apps, Vanilla JS, React, and Vue app, where each app performs incrementing and decrementing operations. We’ll also make sure we communicate between these apps, i.e., whenever we make changes in any app, the changes get reflected in the other apps as well. Keep in mind that when using MFE frameworks we should always make sure to use DOM/globals to interact, and not any Pub-Sub method.
我们将实现一个简单的应用程序,该应用程序由三个应用程序组成,即Vanilla JS,React和Vue应用程序,其中每个应用程序都执行递增和递减操作。 我们还将确保在这些应用程序之间进行通信,即,每当我们在任何应用程序中进行更改时,这些更改也会反映在其他应用程序中。 请记住,在使用MFE框架时,我们应始终确保使用DOM /全局变量进行交互,而不要使用任何Pub-Sub方法。
让我们潜入 (Let's Dive In)
Assuming that you already have nodeand npm installed in your machine, let’s proceed with the following steps.
假设您已经在计算机中安装了node和npm ,让我们继续以下步骤。
安装所需的软件包 (Installing required packages)
In order to run a server using npm scripts, I’ll first initialize my project directory with this command
为了使用npm脚本运行服务器,我首先使用此命令初始化我的项目目录
npm init -yThis in turn will provide me a package.json file. We will not be creating a React app or Vue app using the CLI methods. Instead, we’ll implement everything manually.
反过来,这将为我提供一个package.json文件。 我们不会使用CLI方法创建React应用或Vue应用。 相反,我们将手动实施所有操作。
To implement micro frontends, single-spa is one of the major packages required. For React, we’ll be requiring packages such as react, react-dom, single-spa-react. For Vue, we require two packages vue and single-spa-vue. And finally, we would require single-spa-html for vanilla JS. There are plenty of packages provided by single-spa. For our app, these packages will be sufficient. Run this command to install these dependencies.
要实现微前端, single-spa是所需的主要软件包之一。 对于React,我们将需要诸如react , react-dom , single-spa-react软件包。 对于Vue,我们需要两个软件包vue和single-spa-vue 。 最后,对于香草JS,我们将需要single-spa-html 。 single-spa提供了很多软件包。 对于我们的应用程序,这些软件包就足够了。 运行此命令以安装这些依赖项。
npm install react react-dom single-spa single-spa-react single-spa-vue vue single-spa-htmlWe need two more sets of packages to proceed. One is Babel. This is used to convert all the fancy new syntax (JSX, etc.) into JS syntax which is accepted by the browser. In simple terms, it transforms syntax. Another set of packages is required for Webpack. Webpack is a module bundler for Javascript. It bundles lots of files into a single file. We can also configure how Webpack should bundle for us.
我们还需要两套软件包才能继续。 一个是通天塔。 这用于将所有新奇的新语法(JSX等)转换为浏览器接受的JS语法。 简单来说,它可以转换语法。 Webpack需要另一套软件包。 Webpack是用于Javascript的模块捆绑器。 它将大量文件捆绑到一个文件中。 我们还可以配置Webpack如何为我们捆绑。
Let’s first install the dependencies for Babel. Run this command to install these development dependencies.
首先让我们安装Babel的依赖项。 运行此命令以安装这些开发依赖项。
npm install --save-dev @babel/core @babel/plugin-proposal-object-rest-spread @babel/plugin-syntax-dynamic-import @babel/preset-env @babel/preset-react babel-loaderNext, follow this command to install dependencies for Webpack.
接下来,按照此命令安装Webpack的依赖项。
npm install --save-dev webpack webpack-cli webpack-dev-server clean-webpack-plugin css-loader html-loader style-loader vue-loader vue-template-compiler配置Babel (Configuring Babel)
In order to configure Babel let’s create a .babelrc in the same directory and paste this code snippet. Basically this code snippet instructs Babel to use certain presets and plugins. There are several other plugins available. Do check out the same in Babel’s website.
为了配置Babel,让我们在同一目录中创建一个.babelrc并粘贴此代码段。 基本上,此代码段指示Babel使用某些预设和插件。 还有其他几个可用的插件。 请在Babel网站上进行检查。
{
    "presets": [
        ["@babel/preset-env", {
        "targets": {
            "browsers": ["last 2 versions"]
        }
        }],
        ["@babel/preset-react"]
    ],
    "plugins": [
        "@babel/plugin-syntax-dynamic-import",
        "@babel/plugin-proposal-object-rest-spread"
    ]
}配置Webpack(Configuring Webpack)
Like Babel, we need another configuration file named webpack.config.js. Here we mention what is the mode, entry point for Webpack to look into, output directory to bundle, and create files there. We also specify loaders, in order to parse .css files, .js files and .vue files. Plugins are used here for Vue and to clean up Webpack every time it's built. Additionally, we use source-map Devtool for debugging and devServer configuration so that we can start a development server that can watch for changes in Webpack. Our file should look similar to this:
与Babel一样,我们需要另一个名为webpack.config.js配置文件。 在这里,我们提到什么模式,Webpack进入的入口点,要捆绑的输出目录并在那里创建文件。 我们还指定了加载程序,以解析.css文件, .js文件和.vue文件。 这里将插件用于Vue,并在每次构建Webpack时对其进行清理。 此外,我们使用source-map Devtool进行调试和devServer配置,以便我们可以启动开发服务器来监视Webpack中的更改。 我们的文件应类似于以下内容:
const path = require('path');
const { CleanWebpackPlugin } = require('clean-webpack-plugin');
const VueLoaderPlugin = require('vue-loader/lib/plugin')


module.exports = {
  mode: 'development',
  entry: {
    'singleSPA.config': './singleSPA.config.js',
  },
  output: {
    publicPath: '/dist/',
    filename: '[name].js',
    path: path.resolve(__dirname, 'dist'),
  },
  module: {
    rules: [
      {
        test: /\.css$/,
        use: ['style-loader', 'css-loader']
      }, {
        test: /\.js$/,
        exclude: [path.resolve(__dirname, 'node_modules')],
        loader: 'babel-loader',
      },
      {
        test: /\.vue$/,
        loader: 'vue-loader'
      }
    ],
  },
  resolve: {
    alias: {
      vue: 'vue/dist/vue.js'
    },
    modules: [path.resolve(__dirname, 'node_modules')],
  },
  plugins: [
    new CleanWebpackPlugin(),
    new VueLoaderPlugin()
  ],
  devtool: 'source-map',
  devServer: {
    historyApiFallback: true
  }
};
As seen above, we’ve mentioned the entry point of the file is singleSPA.config.js. So let’s create that file.
如上所示,我们已经提到文件的入口点是singleSPA.config.js 。 因此,让我们创建该文件。
配置单个SPA (Configuring Single SPA)
Let’s import start function from the single-spa package in this file and let's call the start function at the end of the file. We’ll come back to this file once we start writing our components.
让我们从此文件中的single-spa包中导入start函数,并在文件末尾调用start函数。 一旦开始编写组件,我们将回到该文件。
import { start } from 'single-spa'start()创建商店文件 (Creating a store file)
As said earlier, in Single SPA we can communicate within components using DOM/any global object. So, let’s make use of the window object in order to communicate between the components. Let's create a new file store.js in the same directory and paste this code.
如前所述,在Single SPA中,我们可以使用DOM /任何全局对象在组件内进行通信。 因此,让我们利用window对象在组件之间进行通信。 让我们在同一目录中创建一个新文件store.js并粘贴此代码。
window.myapp = {
    counter: 0,
    incrementor: () => {
        window.myapp.counter += 1;
        window.dispatchEvent(new Event('onIncrement'));
    },
    decrementor: () => {
        window.myapp.counter -= 1;
        window.dispatchEvent(new Event('onDecrement'));
    }
};
This code is self-explanatory. We have an increment, a decrement function, and a counter variable to access the value. We are also dispatching events when we call any of these methods.
此代码是不言自明的。 我们有一个增量,一个减量函数和一个计数器变量来访问该值。 当我们调用这些方法中的任何一个时,我们也将调度事件。
创建组件 (Creating components)
Till now we are done with configuring our app, now let's create three different components. Firstly, let’s create a directory called components. And let's create three directories within components namely react, vue and vanillajs.
到目前为止,我们已经完成了配置应用程序的工作,现在让我们创建三个不同的组件。 首先,让我们创建一个名为components的目录。 让我们在组件中创建三个目录,即react , vue和vanillajs 。
创建一个React组件 (Creating a React component)
Let's create a simple functional component App.js that renders a message from React, the current value of the counter and two buttons to increment and decrement.
让我们创建一个简单的功能组件App.js ,该组件呈现来自React的消息,计数器的当前值以及两个用于递增和递减的按钮。
import React, { useEffect, useState } from 'react'


const App = () => {
    const [val, setVal] = useState(0);


    useEffect(() => {
        window.addEventListener('onIncrement', () => {
            setVal(window.myapp.counter);
        });
        window.addEventListener('onDecrement', () => {
            setVal(window.myapp.counter);
        });
    },[])


    return (
        <>
            <h1>Hello from React</h1>
            <p>Counter is {val}</p>
            <input type="button" onClick={() => window.myapp.incrementor()} value="+"></input>
            <input type="button" onClick={() => window.myapp.decrementor()} value="-"></input>
        </>
    )
}


export default App
Now since our app is created, let’s see how we can use a single SPA to configure the same. Let's create the main index.js file. In this file, we need to call the function exported from single-spa-react package with an object as a parameter consisting of React, ReactDOM, rootComponent, and an additional domElementGetter function. And finally, we need to export three properties of the created instance: bootstrap, mount and unmount. This is a common pattern used in single-spa. Our index.js file should look like this:
现在,既然我们的应用程序已创建,让我们看看如何使用单个SPA来配置相同的SPA。 让我们创建主要的index.js文件。 在此文件中,我们需要调用从single-spa-react包中导出的函数,该对象具有一个对象,该对象由React , ReactDOM , rootComponent和一个附加的domElementGetter函数组成。 最后,我们需要导出所创建实例的三个属性: bootstrap , mount和unmount 。 这是在单spa中使用的常见模式。 我们的index.js文件应如下所示:
import React from 'react';
import ReactDOM from 'react-dom';
import singleSpaReact from 'single-spa-react';
import App from './App';


function domElementGetter() {
  return document.getElementById("react")
}


const reactLifecycles = singleSpaReact({
  React,
  ReactDOM,
  rootComponent: App,
  domElementGetter,
})


export const { bootstrap, mount, unmount } = reactLifecycles创建Vue组件(Creating a Vue Component)
Similarly, within our vue directory let’s create an index.js file and an App.js. We are going to implement pretty much the same but using Vue. So I’ll skip explaining and attach the code snippets below.
同样,在我们的vue目录中,我们创建一个index.js文件和一个App.js 我们将使用Vue实现几乎相同的实现。 因此,我将跳过说明,并在下面附加代码段。
<template>
  <div>
      <h1>Hello from Vue</h1>
      <h4>My value is {{count}}</h4>
      <input type="button" v-on:click="handleIncrement" value="+"></input>
      <input type="button" v-on:click="handleDecrement" value="-"></input>
  </div>
</template>


<script>
export default {
  name: 'app',
  data: () => ({
    count: window.myapp.counter,
  }),
  mounted() {
    window.addEventListener('onIncrement', () => {
      this.count = window.myapp.counter;
    });
    window.addEventListener('onDecrement', () => {
      this.count = window.myapp.counter;
    });
  },
  methods: {
    handleIncrement : () => {
      window.myapp.incrementor();
    },
    handleDecrement : () => {
      window.myapp.decrementor();
    },
  }
}
</script>
import Vue from 'vue';
import singleSpaVue from 'single-spa-vue';
import App from './App.vue'
const vueLifecycles = singleSpaVue({
Vue,
appOptions: {
el: '#vue',
render: r => r(App),
}
});
export const { bootstrap, mount, unmount } = vueLifecycles创建Vanilla JS组件(Creating a Vanilla JS Component)
As mentioned in the official documentation, we’ll make use of single-spa-html to create an instance by passing a template containing an HTML snippet. We’ll also modify the mount function so that we can work with binding once our HTML elements are created. So let’s create everything in an index.js file inside the vanillajs directory.
如官方文档中所述,我们将通过传递包含HTML代码段的模板来利用single-spa-html创建实例。 我们还将修改mount函数,以便在创建HTML元素后就可以使用绑定。 因此,让我们在vanillajs目录内的index.js文件中创建所有内容。
import singleSpaHtml from 'single-spa-html';
const htmlLifecycles = singleSpaHtml({
  template: `<h1>Hello from VanillaJS</h1>
  <h2>Counter value is <span id="counterVal"></span></h2>
  <input type="button" onclick="window.myapp.incrementor()" value="+"></input>
  <input type="button" onclick="window.myapp.decrementor()" value="-"></input>
  `,
})


htmlLifecycles.originalMount = htmlLifecycles.mount;
htmlLifecycles.mount = function(opts, props) {
  return htmlLifecycles.originalMount(opts, props)
    .then(() => {
      const el = document.querySelector('#counterVal');
      el.innerText = window.myapp.counter;
      window.addEventListener('onIncrement', () => {
        el.innerText = window.myapp.counter;
      });
      window.addEventListener('onDecrement', () => {
        el.innerText = window.myapp.counter;
      });
    });
}.bind(htmlLifecycles);


export const { bootstrap, mount, unmount }= htmlLifecycles
That’s pretty much it. Now there are only a few steps remaining. We need to register these components exported in our singleSPA.config.js file, and finally add a few scripts in our package.json to get the server up and running.
就是这样。 现在只剩下几步了。 我们需要在singleSPA.config.js文件中注册这些导出的组件,最后在我们的package.json添加一些脚本来启动和运行服务器。
将组件注册到SPA Config (Registering Components to SPA Config)
This is one of the main steps where we’ll register our components, only then single SPA will know about it. There’s a method called registerApplication that single SPA provides. It basically takes in three parameters. First is the name of the app (here React, Vue, Native JS are considered as three different apps). The second parameter is the application or loading function, which means the start (index.js) file for each app. The final mandatory parameter is the activity function, which tells single SPA when to render that app. Usually we provide paths (URL) and based on it we can tell single SPA when to render it. Here is how our file will look after these changes:
这是注册组件的主要步骤之一,只有单个SPA才能知道这一点。 单个SPA提供了一种称为registerApplication的方法。 它基本上接受三个参数。 首先是应用程序的名称(此处将React,Vue,Native JS视为三个不同的应用程序)。 第二个参数是应用程序或加载功能,这意味着每个应用程序的起始( index.js )文件。 最后一个必选参数是活动功能,该功能告诉单个SPA何时渲染该应用。 通常,我们提供路径(URL),并基于该路径可以告诉单个SPA何时渲染它。 这是这些更改后我们文件的外观:
import { registerApplication, start } from 'single-spa'


registerApplication(
  'vue',
  () => import('./components/vue/index.js'),
  () => location.pathname === "/vue" || location.pathname === "/" ? true : false
);


registerApplication(
  'react',
  () => import('./components/react/index.js'),
  () => location.pathname === "/react" || location.pathname === "/" ? true : false
);


registerApplication(
  'vanillajs',
  () => import('./components/vanillajs/index.js'),
  () => location.pathname === "/vanillajs" || location.pathname === "/" ? true : false
);


start();
Now you’ll be wondering how will it be rendered in the browser. We haven’t done that tiny bit yet. So let’s finish things up. Basically we need an index.html file and certain containers so that the content gets displayed exactly within it. We’ll place this index.html file in our main root directory, and have certain div containers with ids of value that we named our apps when registering, i.e., vue, react, vanillajs. Our index.html should look like this:
现在,您会想知道如何在浏览器中呈现它。 我们还没有做那么一点。 因此,让我们完成一切。 基本上,我们需要一个index.html文件和某些容器,以便将内容准确显示在其中。 我们将这个index.html文件放置在主根目录中,并具有某些div容器,其值ID在注册时已为应用命名,即vue , react , vanillajs 。 我们的index.html应该如下所示:
<!DOCTYPE html>
<html lang="en">
<head>
    <meta charset="UTF-8">
    <meta name="viewport" content="width=device-width, initial-scale=1.0">
    <title>MicroFrontEnds example</title>
    <script src="./store.js"></script>
</head>
<body>
  <div id="react"></div>
  <div id="vue"></div>
  <div id="vanillajs"></div>
  <script src="./dist/singleSPA.config.js"></script>
</body>
</html>
Finally, we include the singleSPA.config.js file as well. Note that we specify a directorydist before it. This is because we specify dist as the output directory in our webpack config file.
最后,我们还包含singleSPA.config.js文件。 注意,我们在它之前指定目录dist 。 这是因为我们在Webpack配置文件中将dist指定为输出目录。
运行我们的服务器 (Running Our Server)
One last step, is to add two scripts in our package.json file. One is to run the webpack dev server and the other is to build the files to a directory. Our final package.json file would look like this:
最后一步是在package.json文件中添加两个脚本。 一种是运行webpack开发服务器,另一种是将文件构建到目录中。 我们最终的package.json文件如下所示:
{
  "name": "microfrontends-example",
  "version": "1.0.0",
  "description": "To demonstrate micro frontends using single SPA",
  "main": "index.js",
  "scripts": {
    "start": "webpack-dev-server --open",
    "build": "webpack --config webpack.config.js -p"
  },
  "author": "Harsha Vardhan",
  "license": "ISC",
  "devDependencies": {
    "@babel/core": "^7.11.6",
    "@babel/plugin-proposal-object-rest-spread": "^7.11.0",
    "@babel/plugin-syntax-dynamic-import": "^7.8.3",
    "@babel/preset-env": "^7.11.5",
    "@babel/preset-react": "^7.10.4",
    "babel-loader": "^8.1.0",
    "clean-webpack-plugin": "^3.0.0",
    "css-loader": "^4.2.2",
    "html-loader": "^1.3.0",
    "style-loader": "^1.2.1",
    "vue-loader": "^15.9.3",
    "vue-template-compiler": "^2.6.12",
    "webpack": "^4.44.1",
    "webpack-cli": "^3.3.12",
    "webpack-dev-server": "^3.11.0"
  },
  "dependencies": {
    "react": "^16.13.1",
    "react-dom": "^16.13.1",
    "single-spa": "^5.5.5",
    "single-spa-html": "^1.1.2",
    "single-spa-react": "^3.0.1",
    "single-spa-vue": "^1.9.0",
    "vue": "^2.6.12"
  }
}
Phew, that’s it. Now let’s test our app by running this command:
ew,就是这样。 现在,通过运行以下命令来测试我们的应用程序:
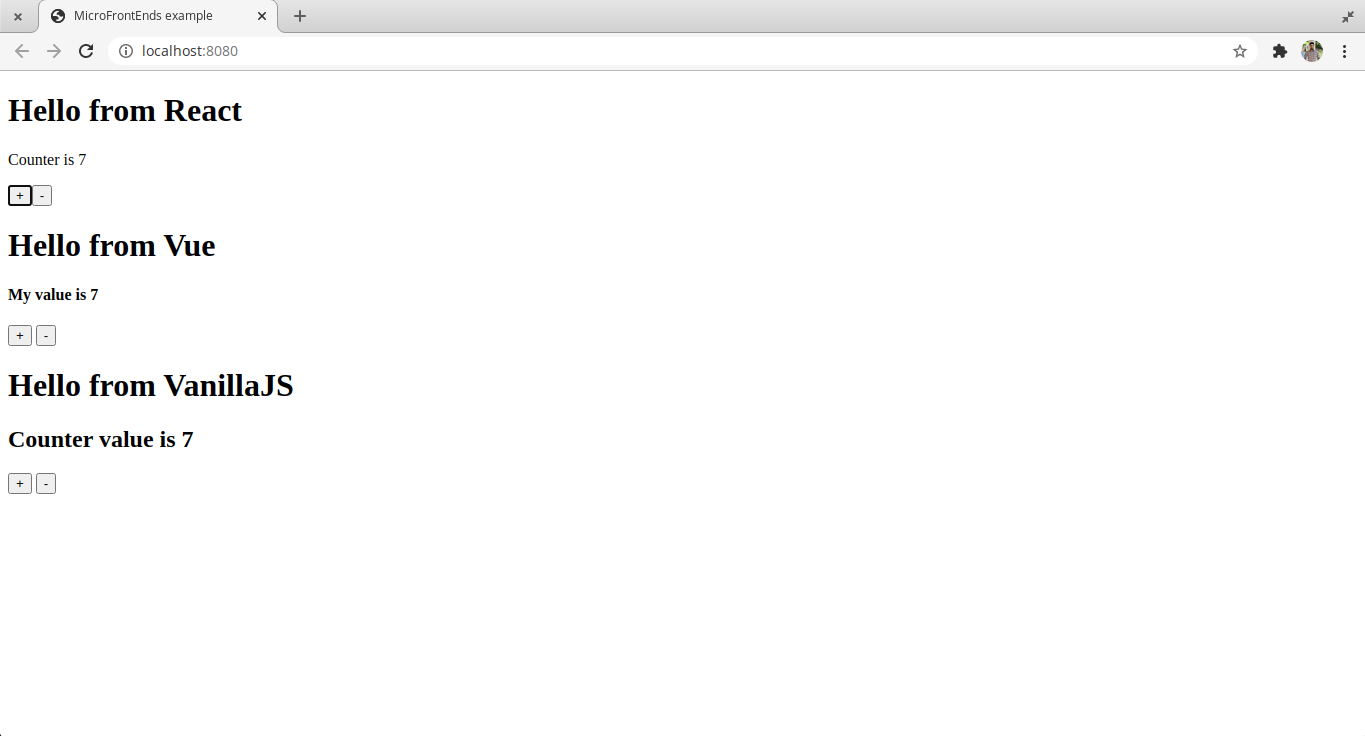
npm startThen, navigate to localhost:8080. You’ll find all three apps on the home page. Try playing around with the increment/decrement buttons and you’ll find out that the counter value is updated in every app. Also try to navigate to localhost:8080/react to display only the React app, /vue to display only the vue app and finally /vanillajs to display the Vanilla JS component alone.
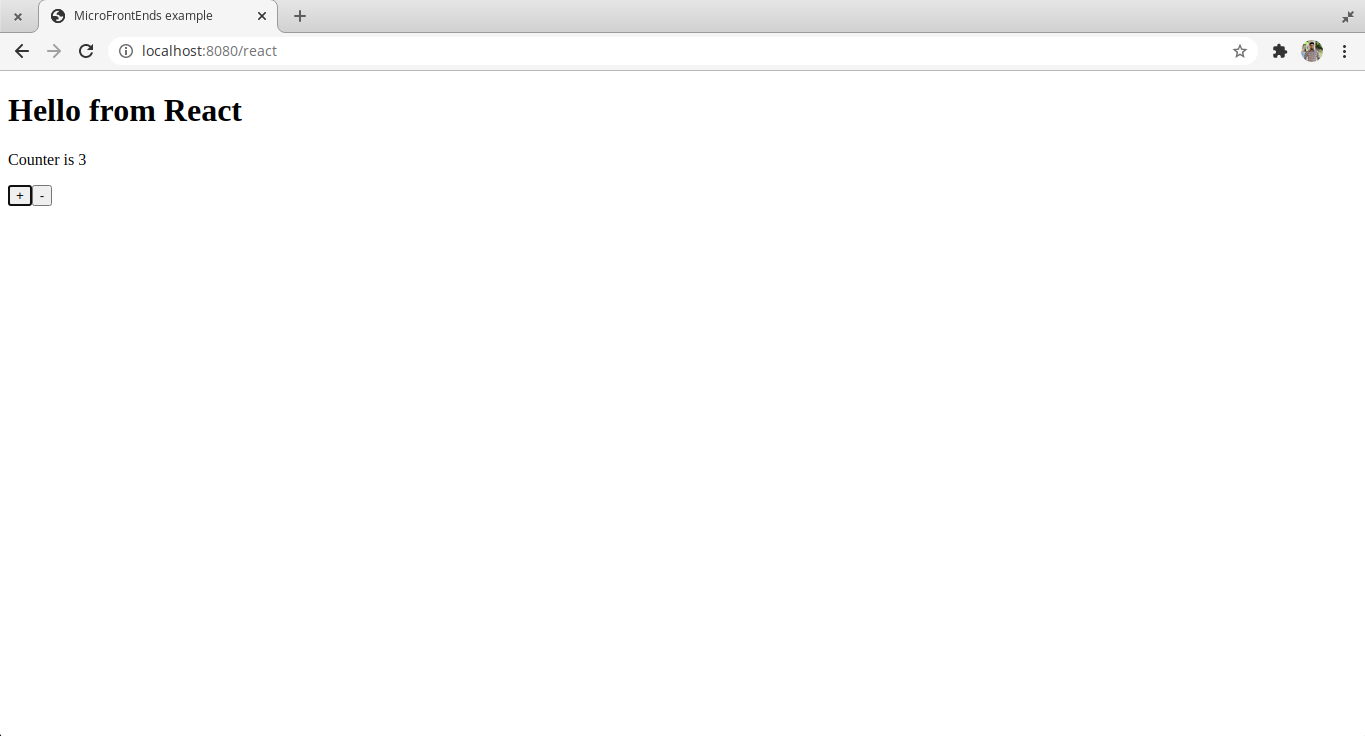
然后,导航到localhost:8080 。 您会在主页上找到所有三个应用程序。 尝试使用递增/递减按钮,您会发现计数器值在每个应用程序中都会更新。 还尝试导航到localhost:8080/react以仅显示React应用程序, /vue显示vue应用程序,最后/vanillajs仅显示Vanilla JS组件。
Here’s a screenshot, when only a single app is rendered.
这是截屏,仅呈现一个应用程序。
最后的想法(Final Thoughts)
So, we have seen how single SPA is used to implement micro frontends. Single SPA offers support for several different ecosystems, like Angular, Ember, Preact, and lots more. If you are interested in exploring more about it, refer to their documentation.
因此,我们已经看到了如何使用单个SPA来实现微前端。 单一SPA为多个不同的生态系统提供支持,例如Angular,Ember,Preact等。 如果您有兴趣探索更多相关信息,请参阅其文档。
Git Repo — https://github.com/harshaktg/microfrontends-single-spa
Git Repo - https://github.com/harshaktg/microfrontends-single-spa
Live Demo — https://microfrontends-single-spa.netlify.app/
现场演示-https : //microfrontends-single-spa.netlify.app/
I hope this article was helpful. Thank you for reading!
希望本文对您有所帮助。 感谢您的阅读!
翻译自: https://medium.com/better-programming/implementing-micro-frontends-using-single-spa-1ac2a3f704a2
前端 单个字段的布局


 被折叠的 条评论
为什么被折叠?
被折叠的 条评论
为什么被折叠?
 到【灌水乐园】发言


