


Redux is a library that is used in almost every React application, but do we even need it? The simple answer to this question will be “Yes, as it helps our state management.” This is not wrong, but do we have an alternative?
Redux 是几乎每个React应用程序都使用的库,但是我们甚至需要它吗? 这个问题的简单答案将是“是的,因为它有助于我们的状态管理。” 这没有错,但是我们有替代方法吗?
Fortunately, we do. As a JavaScript developer, I have come to understand that we aren’t satisfied with just one thing. We need alternatives. That is why React 16.4 offered us the Context API.
幸运的是,我们做到了。 作为一名JavaScript开发人员,我逐渐了解到我们对一件事并不满意。 我们需要其他选择。 这就是为什么React 16.4向我们提供Context API的原因。
This article will help you understand and answer the most common questions about state management:
本文将帮助您了解和回答有关状态管理的最常见问题:
- Why can’t we just use props to manage state (prop chain)? 为什么我们不能只使用道具来管理状态(道具链)?
- What is Redux and why do we use it? 什么是Redux,为什么要使用它?
- How can we configure Redux to our application? 我们如何为我们的应用程序配置Redux?
- What are Context APIs? 什么是上下文API?
- How can we configure Context APIs using Hooks? 我们如何使用Hooks配置Context API?
- And finally, which option is better? 最后,哪种选择更好?
Note: If you already know how Redux works and what a prop chain is, you can skip to the Context API part.
注意:如果您已经知道Redux的工作原理以及prop链是什么,则可以跳到Context API部分。
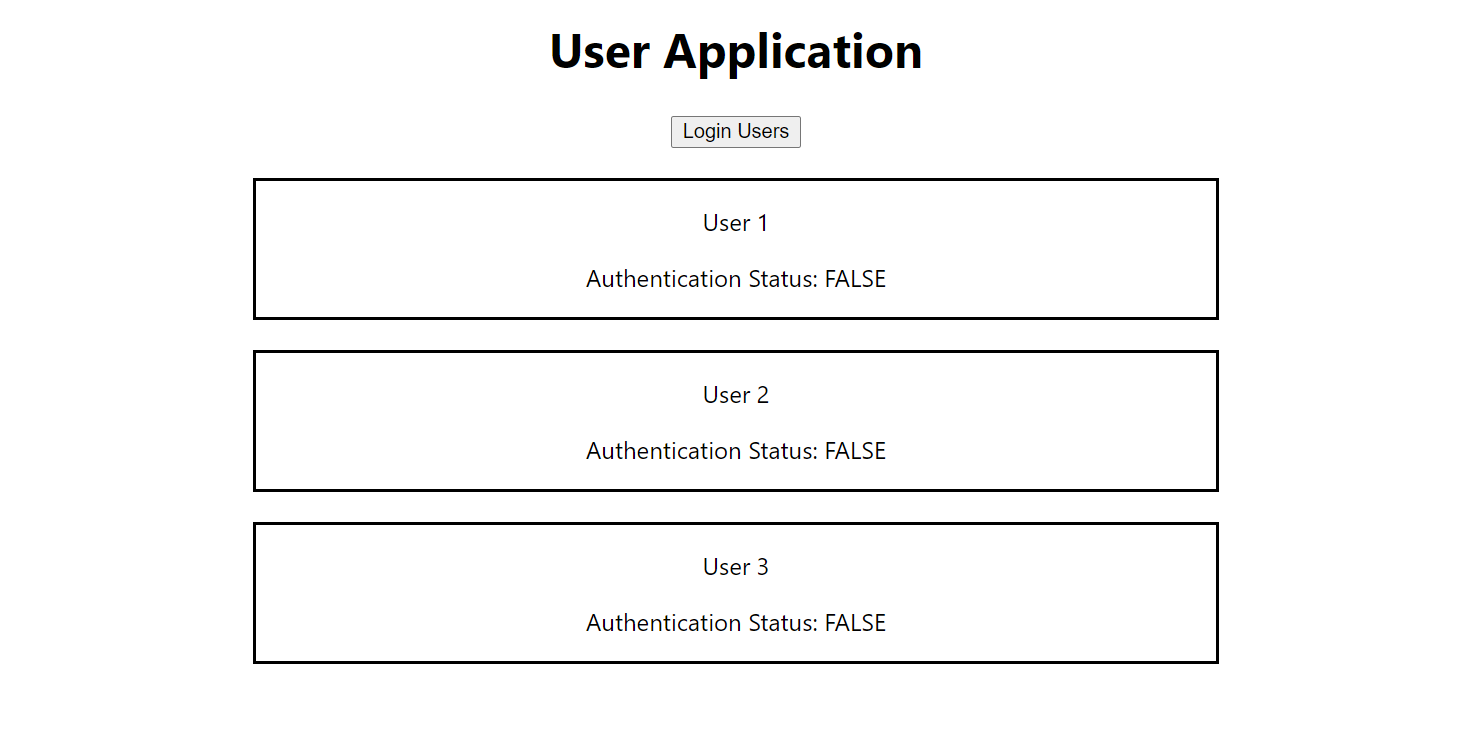
I’ll start with a demo app that will just display multiple users as well as their names and authentication status. For this, we will have three main components: an App component, a Users component, and a User component.
我将从一个演示应用程序开始,该应用程序将只显示多个用户以及他们的姓名和身份验证状态。 为此,我们将具有三个主要组件:一个App组件,一个Users组件和一个User组件。
应用组件 (App Component)
This component (container) will have access to the state. Our state will have a couple of things: a users array and another a boolean field for authentication.
该组件(容器)将有权访问状态。 我们的状态有两件事:一个users数组和另一个用于authentication的布尔字段。
state = {
    users: [
      {id: 1 ,name: "User 1"},
      {id: 2 ,name: "User 2"},
      {id: 3 ,name: "User 3"}
    ],
    isAuthenticated: false
}
We will have a Login Users button inside our App.js. When clicked, it will log in all the users (change their authentication status to true). We will then be passing the users and isAuthenticated flag via props to Users.js.
我们将有一个 App.js登录用户”按钮。 单击后,它将登录所有用户(将其身份验证状态更改为true )。 然后,我们将通过props向Users.js传递用户和isAuthenticated标志。
This is what our app component should look like:
这是我们的应用程序组件应如下所示:
class App extends Component {
state = {
    users: [
      {id: 1 ,name: "User 1"},
      {id: 2 ,name: "User 2"},
      {id: 3 ,name: "User 3"}
    ],
    isAuthenticated: false
  }
loginHandler = () => {
    this.setState({
      isAuthenticated: true
    })
  }
render() {
    return (
      <div className="App">
        <h1>User Application</h1>
        <button onClick={this.loginHandler}>Login Users</button>
        <Users users={this.state.users} isAuth={this.state.isAuthenticated} />
      </div>
    );
  }
}
export default App;用户组件(Users Component)
This component will be a stateless component. Here, we will only map the users coming from the App.js and will pass the values as props to the User.js:
该组件将是无状态组件。 在这里,我们将仅映射来自App.js的用户,并将这些值作为props传递给User.js :
import React from 'react';
import User from './User/User'
const users = (props) => props.users.map((user , index) => {
    return (
        <div className="person">
            <User
                name={user.name}
                isAuthUser={props.isAuth}>
            </User>
        </div>
   )
});用户组件(User Component)
User.js just displays the data received as props from the Users.js:
User.js仅显示从Users.js作为道具接收的数据:
import React from 'react';
import './User.css';
const user = (props) => {
return(
<div className="user">
<p>{props.name}</p>
<p>Authentication Status: {props.isAuthUser.toString().toUpperCase()}</p>
</div>
);
}
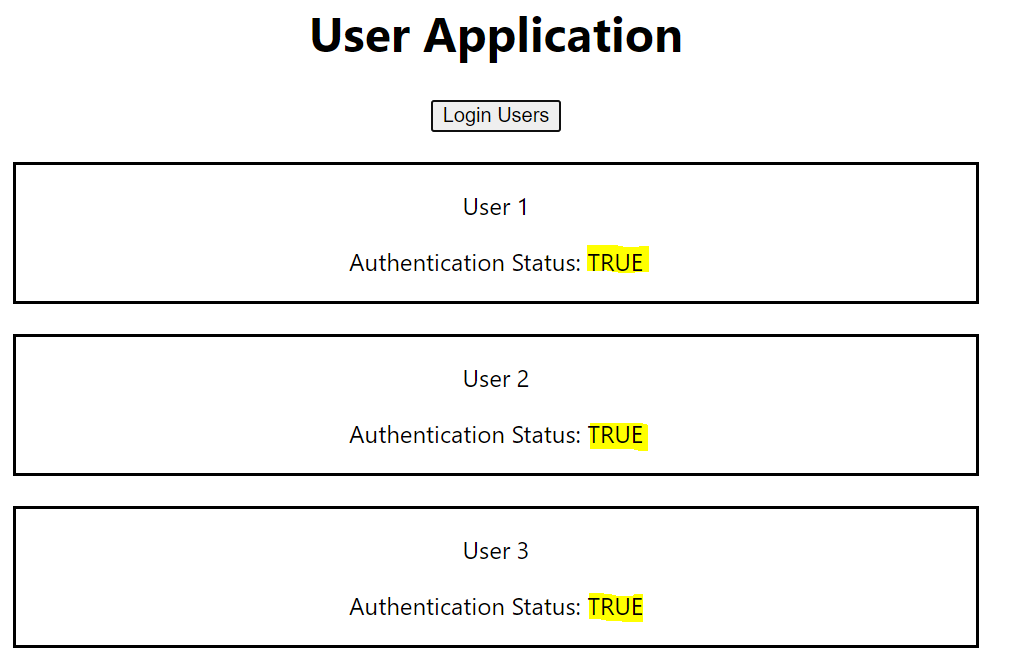
export default user;This is a very basic application. Now when we press the Login User button, we change the authentication status of all three users to true.
这是一个非常基本的应用程序。 现在,当我们按下登录用户按钮时,我们将所有三个用户的身份验证状态更改为true 。
那么这个应用程序有什么问题呢? (So What Is the Problem in This App?)
Well, we can improve one thing for sure. It might not be relevant in such a small application, but is immensely important when it comes to bigger applications. We can solve the prop chain issue.
好吧,我们可以肯定地改善一件事。 在如此小的应用程序中,它可能无关紧要,但是对于较大的应用程序,它却极为重要。 我们可以解决Struts链的问题。
Struts链到底是什么问题? (What is the prop chain problem exactly?)
In our application, we pass the isAuthenticated flag as a prop to Users.js and then again as a prop to User.js .
在我们的应用程序中,我们将isAuthenticated标志作为对Users.js ,然后再次作为对User.js 。
But do we even need the value of isAuthenticated in Users.js? The Users component only forwards the value of isAuthenticated. It does receive the value as a prop but doesn’t really care. This is not so great, as it simply leads to extra redundancy and makes our component less reusable since we’ll always have to pass the value of isAuthenticated to it wherever we might be using the Users component.
但是,我们是否甚至需要Users.js中isAuthenticated的值? Users组件仅转发isAuthenticated的值。 它确实获得了作为支撑的价值,但并不在乎。 这并不是很好,因为它只会导致额外的冗余,并使我们的组件无法重复使用,因为无论我们在哪里使用Users组件,我们都必须始终将isAuthenticated的值传递给它。
抢救救援 (Redux to the rescue)
As mentioned earlier, Redux is a JavaScript library for managing application state.
如前所述,Redux是用于管理应用程序状态JavaScript库。
I’ll try to explain how Redux works, and after that, you might have an idea of how it can solve our prop chain issue.
我将尝试解释Redux的工作原理,然后,您可能会对Redux如何解决我们的支持链问题有所了解。
So Redux works around the idea of having a central state called a store. To change the state, a component has to dispatch an action. The action is then passed on to the reducer, which changes the state of our application.
因此Redux围绕着拥有一个称为商店的中央状态的想法进行工作。 要更改状态,组件必须调度一个动作。 然后,该操作将传递给reducer,后者将更改我们应用程序的状态。
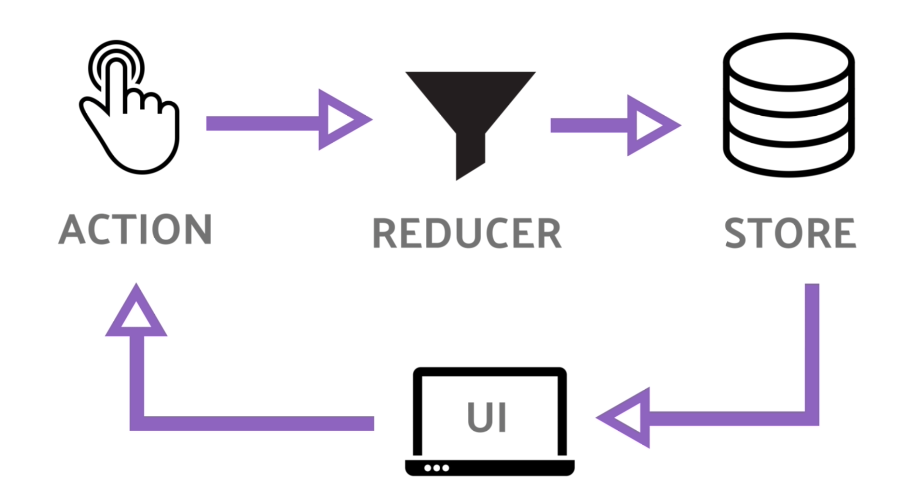
This is only a brief summary of how Redux works. Let’s get back to the question of how it will solve our prop chain problem. To understand this, let’s convert our project using Redux. To connect with Redux using React, we need to follow a certain approach:
这只是Redux工作原理的简短摘要。 让我们回到如何解决我们的Struts链问题的问题。 为了理解这一点,让我们使用Redux转换我们的项目。 要使用React与Redux连接,我们需要遵循某种方法:
The first step here is to install
reduxandreact-reduxto our application.这里的第一步是将
redux和react-redux安装到我们的应用程序中。The second step is to add our store. The store should be created right before our application starts, so
index.jswill be a nice place to add our store. So we willimport { createStrore } from ‘redux’. This store then needs to be stored in a constant variable. Let’s name itstore, where we will call thecreateStorefunction and pass on our reducer.第二步是添加我们的商店。 应该在应用程序启动之前立即创建商店,因此
index.js将是添加我们的商店的好地方。 因此,我们import { createStrore } from 'redux'。 然后需要将该存储存储在一个常量变量中。 让我们将其命名为store,在这里我们将调用createStore函数并传递我们的reducer。Since we need to pass our reducer, we will have to create a file for this reducer and import this file to our
index.js. How will our reducer file look? As mentioned before, the state change can happen only through a reducer. So we will have an initial state present in ourreducer.js. The reducer function has two parameters: the state and the action (which it will receive) from the dispatched action from the component.由于我们需要传递减速器,因此我们必须为此减速器创建一个文件,并将该文件导入到我们的
index.js。 减速器文件的外观如何? 如前所述,状态更改只能通过减速器进行。 因此,我们的reducer.js中将存在一个初始状态。 减速器功能有两个参数:状态和动作 (它将接收)来自组件的分派操作。
const initialState = {
    users: [
        {id: 1 ,name: "User 1"},
        {id: 2 ,name: "User 2"},
        {id: 3 ,name: "User 3"}
    ],
    isAuthenticated: false
}
const reducer = (state = initialState , action) => {
    return state;
}
export default reducer;
Our reducer is currently just returning the state. Now we can import this reducer to our
index.jsand pass on this reducer to thecreateStorefunction (const store = createStore(reducer)). We now have our store created. To connect this store to our React application, we need a special package, which we have already installed (react-redux). With this installed, we will have toimport { Provider } from ‘react-redux’. This provider needs to wrap around our App component. The provider is a helper component that allows us to inject our store to our application.我们的减速器目前正恢复状态。 现在,我们可以将该减速器导入到
index.js,并将该减速器传递给createStore函数(const store = createStore(reducer))。 现在,我们创建了商店。 为了将此商店连接到我们的React应用程序,我们需要一个已经安装的特殊软件包(react-redux)。 安装此程序后,我们将必须import { Provider } from 'react-redux'。 该提供程序需要包装我们的App组件。 提供者 是一个帮助程序组件,它使我们可以将商店注入到应用程序中。
const store = createStore(reducer);
ReactDOM.render(
  <Provider store={store}>
    <App />
  </Provider>,
  document.getElementById('root')
);
Now, how do we get the data from the store? Well, for that we need to connect
App.jswith the store. To do that, we use something calledconnect, which is provided by thereact-reduxpackage.connectis a higher-order function that we use in ourApp.jsexport. However,connectitself is a function that returns a function, which then takes the component as an input (export default connect()(App);). Now for the first function execution ofconnect, we can pass some configuration. More precisely, we pass two pieces of information. First, the part of the whole application state that we need in our component. Second, the actions we need to dispatch from the component. These two configurations are named (not necessarily with the same name, but it is the most common naming convention)mapStateToPropsandmapDispatchToProps. Now we won’t be needing our local state that we used earlier in ourApp.jsand we can also get rid of theloginHandler, as we will handle the login functionality in our reducer, which in turn is dispatched as an action from ourApp.js. The state value can be accessible inside our component now usingthis.props.现在,我们如何从商店中获取数据? 好吧,为此,我们需要将
App.js与商店连接App.js。 为此,我们使用react-redux包提供的名为connect东西。connect是我们在App.js导出中使用的高阶函数。 但是,connect本身是一个返回函数的函数,然后该函数将组件作为输入(export default connect()(App);)。 现在,对于connect的第一个功能执行,我们可以传递一些配置。 更准确地说,我们传递了两条信息。 首先,整个应用程序状态的一部分是我们组件所需要的。 其次,我们需要从组件中分派的动作。 命名这两个配置(不一定使用相同的名称,但这是最常见的命名约定)mapStateToProps和mapDispatchToProps。 现在,我们不再需要先前在App.js使用的本地状态,并且还可以摆脱loginHandler,因为我们将处理我们的reducer中的登录功能,而后者又作为来自我们的动作分派了App.js现在可以使用this.props在我们的组件内部访问状态值。
class App extends Component {
render() {
    return (
      <div className="App">
        <h1>User Application</h1>
        <button onClick={this.props.loginUser}>Login Users</button>
        <Users users={this.props.usr} />
      </div>
    );
  }
}
const mapStateToProps = (state) => {
  return {
    usr: state.users,
    isAuth: state.isAuthenticated
  }
}
const mapDispatchToProps = dispatch => {
  return {
    loginUser: () => dispatch({type: 'LOGIN_USER'})
  }
}
export default connect(mapStateToProps , mapDispatchToProps)(App);- Finally, our reducer will now return the updated state when we press the Login Users button.最后,当我们按下登录用户按钮时,reducer现在将返回更新状态。
const reducer = (state = initialState , action) => {
    if(action.type === 'LOGIN_USER') {
        return {
            ...state,
            isAuthenticated: true
        }
    }
    return state;
}
Now that we have set up Redux in our application, one last thing to do here is passing the value of the
isAuthenticationflag from our central state directly to theUser.jsand not viaUsers.js. How can this be achieved? It’s simple. Since every component can now access the state directly (usingconnect), we can directly access the state value in ourUser.js. Try giving it a shot, but below is a reference if you are unable to do it:既然我们已经在应用程序中设置了Redux,那么最后要做的就是将
isAuthentication标志的值从我们的中央状态直接传递给User.js而不是 通过Users.js。 如何做到这一点? 这很简单。 由于每个组件现在都可以直接(使用connect)访问状态,因此我们可以直接在User.js访问状态值。 尝试一下,但是如果您做不到,请参考以下内容:
class User extends Component {
    render() {
        return(
            <div className="user">
                <p>{this.props.name}</p>
                <p>Authentication Status: {this.props.auth.toString().toUpperCase()}</p>
            </div>
        );
    }
}
const mapStateToProps = state => {
    return {
        auth: state.isAuthenticated
    }
}
export default connect(mapStateToProps , null)(User);
In this way, Redux helps us solve the problem of the prop chain. This might not be relevant in such a small application, but it makes our work a lot easier when using Redux in bigger applications.
这样,Redux可以帮助我们解决道具链的问题。 在这么小的应用程序中这可能无关紧要,但是当在较大的应用程序中使用Redux时,它使我们的工作变得容易得多。
上下文API和useContext挂钩 (Context APIs and useContext Hooks)
Finally, we have now arrived at the interesting part, the Context API. First, let’s find out what exactly it is.
最后,我们现在到达了有趣的部分,即Context API。 首先,让我们找出它到底是什么。
Context APIs come into the picture when we need certain data from a certain state in multiple components, but we don’t want to pass data around multiple layers.
当我们需要来自多个组件中某个状态的某些数据,但是我们不想在多层中传递数据时,上下文API就会出现。
To achieve this, we will create a new file, auth-context.js. In this file, we will create a context object. Access to it will be provided by React.
为此,我们将创建一个新文件auth-context.js 。 在此文件中,我们将创建一个上下文对象。 React将提供对它的访问。
const authContext = React.createContext(); createContext allows us to initialize our context with default values. This createContext is a JavaScript object (technically, it can also be an array, string, number, etc.) that can be passed between different components. Here. we can pass the default value of isAuthenticated.
createContext允许我们使用默认值初始化上下文。 此createContext是一个JavaScript对象(从技术上讲,它也可以是数组,字符串,数字等),可以在不同组件之间传递。 这里。 我们可以传递isAuthenticated的默认值。
Note: We add this for a better autocompletion in our project.
注意:我们添加此代码是为了在项目中实现更好的自动完成。
import React from 'react';const authContext = React.createContext({
    isAuthenticated: false,
});export default authContext;
Now we can import this context anywhere in our application and it needs to wrap all the parts of your application that need access to it. We will have to wrap this by using the context import name and adding .Provider after that.
现在,我们可以将此上下文导入到应用程序中的任何位置,并且需要包装应用程序中需要访问它的所有部分。 我们必须使用context导入名称并在其后添加.Provider来包装它。
This is how our App.js render function should look:
这就是我们的App.js呈现函数的外观:
render() {
    return (
      <div className="App">
          <h1>User Application</h1>
          <button onClick={this.loginHandler}>Login Users</button>
          <AuthContext.Provider value={{ isAuthenticated: this.state.isAuthenticated }}>
            <Users users={this.state.users} />
          </AuthContext.Provider>
      </div>
    );
}
Now we wrap our AuthContext inside our Users component. We then can access the value of isAuthenticated in our Users component and all of its child components (in our case, User.js).
现在,将AuthContext包装在Users组件内。 然后,我们可以在Users组件及其所有子组件(在我们的示例中为User.js )中访问isAuthenticated的值。
There are three ways to achieve this.
有三种方法可以实现此目的。
使用消费者 (Using Consumer)
To achieve this, we can directly go to our User.js. Inside our render function, we can add AuthContext.Consumer. Don’t forget to import AuthContext to the area where we need access to the isAuthenticated flag. This is how our render function will now look. Now this AuthContext.Consumer is our JSX component. Since this is some JavaScript expression, we need to wrap it with curly braces. The only gotcha you have to keep in mind is that the Consumer takes a function as a child between the opening and closing tag, and this function will accept our context object. Finally, to get the isAuthenticated flag, we can get that via context.
为此,我们可以直接转到User.js 在我们的渲染函数中,我们可以添加AuthContext.Consumer 。 不要忘记将AuthContext导入到我们需要访问isAuthenticated标志的区域。 这就是我们的渲染函数现在的外观。 现在,此AuthContext.Consumer是我们的JSX组件。 由于这是一些JavaScript表达式,因此需要用花括号将其包装起来。 您要记住的唯一陷阱是, Consumer在开始标记和结束标记之间采用一个作为子代的函数,并且该函数将接受我们的context对象。 最后,要获取isAuthenticated标志,我们可以通过context获得该标志。
return(
 <div className="user">
   <p>{props.name}</p>
   <AuthContext.Consumer>
   {(context) => <p>Authentication Status:  {context.isAuthenticated.toString().toUpperCase()}</p>}
   </AuthContext.Consumer>
 </div>
);使用contextType(Using contextType)
The issue of using Consumer is that it only runs in the render function, but there is a high chance we need the state value in other parts of our component (e.g. componentDidMount()). We will not have access to our context there. To overcome this problem, React 16.6 introduced us to a special static prop, contextType, which can be used in a class-based component (static contextType = AuthContext). Now, this allows React to automatically connect this component with our context behind the scenes. This gives a new property to us that we can use inside any part of our application: this.context. To now get the authentication status, we just use:
使用Consumer的问题在于它仅在render函数中运行,但是很有可能需要组件其他部分的状态值(例如componentDidMount() )。 我们将无法在那里访问我们的上下文。 为了克服这个问题,React 16.6向我们介绍了一个特殊的静态道具contextType ,可以在基于类的组件中使用它( static contextType = AuthContext )。 现在,这使React可以自动将该组件与幕后的环境联系起来。 这为我们提供了一个新属性,可以在应用程序的任何部分中使用: this.context 。 现在要获取身份验证状态,我们只需使用:
<p>AuthenticationStatus:this.context.isAuthenticated.toString()}</p>使用useContext挂钩 (Using useContext Hook)
Finally, to use this in a function component, we can use the Hook provided by React, useContext.
最后,在 函数组件,我们可以使用React提供的Hook, useContext 。
const authContext = useContext(AuthContext);Now we can use this authContext anywhere in our functional component to get access to isAuthenticated flag.
现在,我们可以在功能组件中的任何位置使用authContext来访问isAuthenticated标志。
<p>AuthenticationStatus: authContext.isAuthenticated.toString()}</p>That’s it. We have now learned how to manage our state using Context APIs.
而已。 现在,我们已经学习了如何使用上下文API管理状态。
哪个更好? (Which Is Better?)
As we have now learned how both Redux and Context APIs work, we can compare them and understand their pros and cons.
现在,我们了解了Redux和Context API的工作原理,我们可以对其进行比较并了解其优缺点。
- Bundle size: The one thing we have to keep in mind is that Redux is a third-package library that is not a part of React, and hence we need to install the dependencies — mainly three of them (redux, react-redux, redux-thunk). Using Redux comes at a cost. Installing these dependencies increases our final bundle size. On the contrary, Context APIs are a part of React, so our bundle size remains the same. 捆绑包大小:我们要记住的一件事是Redux是一个第三方软件包库,它不是React的一部分,因此我们需要安装依赖项-主要是三个依赖项(redux,react-redux,redux -thunk)。 使用Redux需要付费。 安装这些依赖项会增加最终捆绑包的大小。 相反,上下文API是React的一部分,因此我们的捆绑包大小保持不变。
- Boilerplate code: With Redux, we need to have an exhaustive setup, we need to build a store, and we need to dispatch actions. We then need to connect our store with our components. Sometimes, this is a pain for a developer. There is a high chance that one might get lost in the codes and just wander aimlessly with no clue on how to fix anything. Basically, you need to have a hands-on approach to work with Redux. According to me, Context APIs involve less boilerplate codes. With the introduction of React 16.6, we don’t even need the consumer. With just one line of code, you can get access to your context. 样板代码:使用Redux,我们需要进行详尽的设置,需要建立商店,还需要调度操作。 然后,我们需要将商店与组件连接起来。 有时候,这对开发人员来说是痛苦的。 一个人很可能会迷失在代码中,漫无目的地游荡而又不知道如何解决任何问题。 基本上,您需要使用实践方法来使用Redux。 据我说,Context API涉及的样板代码更少。 随着React 16.6的引入,我们甚至不需要消费者。 仅需一行代码,您就可以访问您的上下文。
Handle async code: In Context APIs, triggering an API (async codes) is relatively straightforward to use once you get the hang of it (especially when using Hooks). You also don’t need a package like
redux-thunkto handle asynchronous actions.处理异步代码:在Context API中,一旦掌握了相关知识(尤其是在使用Hooks时),触发API(异步代码)就相对容易使用。 您也不需要
redux-thunk类的包来处理异步操作。
结论 (Conclusion)
With this article, you can now guess why Context APIs can be better than Redux. However, a newer version of Redux is expected to be launched. It will contain less boilerplate code and will be more efficient. Let’s wait to see how that works.
通过本文,您现在可以猜测为什么Context API可以比Redux更好。 但是,预计将发布较新版本的Redux。 它将包含更少的样板代码,并且效率更高。 让我们拭目以待吧。
翻译自: https://medium.com/@ojha.akhil123/why-use-redux-when-we-have-context-api-95be70581148


 422
422

 被折叠的 条评论
为什么被折叠?
被折叠的 条评论
为什么被折叠?
 到【灌水乐园】发言


