


python创建颜色
重点 (Top highlight)
With more sophisticated design tools, design systems are starting to get more and more popular, and with good reason. They help you keep a consistent theme, rules or structure across your file or multiple projects. And, with the features in Sketch and Figma to create master components, it is even more powerful to create or use design a handful of design systems that can be used as a starting point across projects.
随着越来越复杂的设计工具的出现,设计系统已经开始越来越受到人们的欢迎,这是有充分理由的。 它们可帮助您在文件或多个项目中保持一致的主题,规则或结构。 而且,借助Sketch和Figma中的功能来创建主组件,创建或使用设计的少量设计系统甚至可以更强大地用作整个项目的起点。

Creating a design system can be daunting, I should know, as I recently created simplekits.co. But fear not, because we are going to take it step by step and cover some best practices on styling, organisation and component creation.
我应该知道,创建设计系统可能会令人生畏,因为我最近创建了simplekits.co 。 但是不要担心,因为我们将逐步进行介绍,并介绍一些有关样式,组织和组件创建的最佳实践。
我们将涵盖的内容 (What we will cover)
Design systems can vary in terms of what is needed, styling added and components made, so for this series, we will focus on how to construct a few, and that understanding will carry across into other components you may want to know.
设计系统可以根据需要,添加的样式和制造的组件而有所不同,因此,在本系列中,我们将重点介绍如何构造一些组件,并且这种理解将渗透到您可能想知道的其他组件中。
We will also aim to make this design system easily adaptable so that you can create an excellent foundational file that can be used in future projects.
我们还将力求使该设计系统易于适应,以便您可以创建可在将来的项目中使用的出色基础文件。
Just to note, we will be using Figma. The theory applies to sketch, but the way components/symbols work, and the application of styles, colours, etc will vary)
请注意,我们将使用Figma。 该理论适用于草图,但是组件/符号的工作方式以及样式,颜色等的应用会有所不同)
So here are the areas we will cover (I will update the links as they get posted)
所以这是我们将要覆盖的领域 (我将在发布链接时更新链接)
- Colour Styles (This one) 颜色样式(这一个)
- Typography Styles 版式样式
- Complex Buttons 复杂按钮
- Conditional Inputs 条件输入
- Interchangeable Dropdowns 可互换的下拉菜单
- Responsive Cards & Modals 响应卡和模态
I have made a Figma File for you to duplicate and use/follow along if you would rather that than create from scratch
我制作了一个Figma文件供您复制和使用/跟随,如果您愿意而不是从头开始创建
So, without further ado, let’s dive into choosing and setting up colour styles.
因此,事不宜迟,让我们深入研究选择和设置颜色样式。
选择一个调色板。 (Picking a colour palette.)
小学和中学 (Primary and Secondary)
To start off, we are going to choose a primary and secondary colour. If you don’t have one in mind, there are plenty of great tools online to help find colour palettes such as Coolors and ColorHunt.
首先,我们将选择原色和副色。 如果您不介意的话,在线上有很多很棒的工具可以帮助您找到诸如Coolors和ColorHunt之类的调色板。
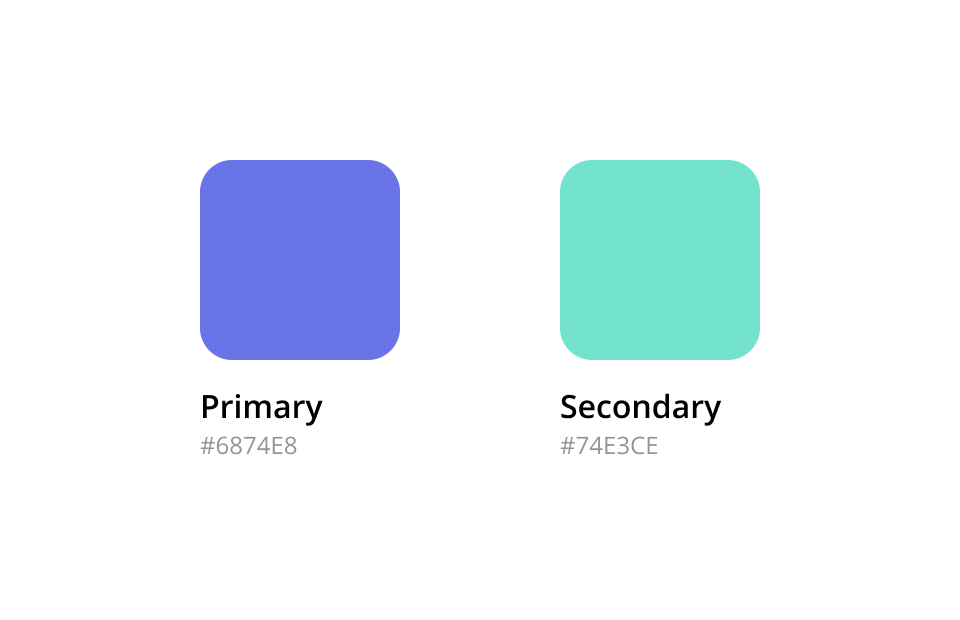
To keep this design system pretty generic, I think I am going to go with a Blue for my primary, and a Green for my secondary.
为了使该设计系统保持通用性,我想我的主要部件将使用蓝色,而次要部件则使用绿色。
色彩和阴影 (Tints & Shades)
Next, we want to create some shades/tints for these colours. It is recommended to have about 5–9 variations. To keep things simple we will create 5, meaning we need 2 darker, and 2 lighter of both the primary and secondary.
接下来,我们要为这些颜色创建一些阴影/色调。 建议大约有5–9个版本。 为了使事情简单,我们将创建5,这意味着我们需要在主色和次色中都加深2点,并加亮2点。
There are a few methods (and tools) for doing this well, and which you choose may change depending on your colour/style/theme you are going for. For this demonstration, let’s use the Hue-Shift method, as this gives our tints and shades a little more depth (Sam Gordon goes over this method in detail here).
有几种方法(和工具)可以很好地做到这一点,并且您选择的方法可能会因要使用的颜色/样式/主题而异。 对于此演示,让我们使用色相移的方法,因为这使我们的色彩和色调更深入一点(山姆·戈登越过此方法进行了详细 点击这里 )。
Essentially to create tints, you move the Hue towards “warmer” colours, decrease saturation slightly and increase brightness slightly.
本质上是要创建色调,您可以将色相移向“暖色”颜色,稍微降低饱和度并稍微增加亮度。
Shades are essentially the opposite, Hue towards cooler colours, decrease saturation and decrease brightness.
阴影本质上是相反的,色调偏向较冷的颜色,降低饱和度并降低亮度。
Here are my primary and secondary colours withs 2 tints and 2 shades.
这是我的原色和中间色,具有2种色调和2种阴影。


You may wonder why I named them 100, 300, 500, 700, 900 instead of 1, 2, 3, 4, 5 or -2, -1, Main, +1, +2.
您可能想知道为什么我将它们命名为100、300、500、700、900,而不是1、2、3、4、5或-2,-1,Main,+ 1,+ 2。
Put simply, it allows me to potentially go back in and add some shades/tints in the future if I like. This setup provides room for an extra 4 tints/shades to easily be added in should I feel the need without having to rename them or work in decimals. Although that being said, I could technically have “100, 150, 200, 250, 300” and so on, but that would be slight overkill.
简而言之,如果我愿意,它可以让我将来重新使用并添加一些阴影/色调。 如果我觉得有必要,而无需重命名它们或使用小数点工作,则此设置提供了额外添加4种色调/阴影的空间。 虽然这样说,但从技术上讲我可以有“ 100、150、200、250、300”等等,但是那有点过分了。
中性/灰度 (Neutrals/Greyscale)
Now, we need to add in our greyscale/neutrals. This would depend upon the theme you are going for, or the branding you want to apply.
现在,我们需要添加灰度/中性。 这取决于您要使用的主题或要应用的品牌。
For my design, I have gone with some cool colours, so I want to inject a little blue/turquoise into my greys and have a very cool, modern vibe.
对于我的设计,我采用了一些很酷的色彩,因此我想在我的灰色中注入一些蓝色/绿松石色,并具有非常酷的现代氛围。
The trick to this is to pick a hue that is around about the same as your primary. (I’m going to move my Hue a little towards my secondary so that it mixes in some green too.) Then move the saturation up and down to get the tints/shades whilst also increase saturation slightly for shades, and decreasing for tints.
诀窍是选择与您的主色调大致相同的色调。 (我将色相向我的辅助色移动一点,以便它也混入一些绿色。)然后上下移动饱和度以获取色度/阴影,同时也为色度稍微增加饱和度,并为色度减小饱和度。

系统/第三级 (System/Tertiary)
Finally, we want some System colours (error, warning, success, etc) as well as some tertiary colours (should the brand call for this). Now, it is time to put into practice what you have learnt. Go and create some complimentary system colours to your chosen primary and create tints/shades for them.
最后,我们需要一些系统颜色(错误,警告,成功等)以及一些第三种颜色(品牌应为此而定)。 现在,是时候将您所学的知识付诸实践了。 去为您选择的原色创建一些免费的系统颜色,并为其创建色调/阴影。
This is important as we will be using these during our inputs section.
这很重要,因为我们将在输入部分中使用它们。
设置样式 (Setting Up Styles)
Now it is time to create our Color Styles within Figma. This will allow us to apply and update our colours in the future, a powerful feature for design kits for both maintenance and initial setup.
现在是时候在Figma中创建我们的颜色样式了。 这将使我们能够在将来应用和更新颜色,这是用于维护和初始设置的设计套件的强大功能。
For generic systems we plan to use on multiple systems (such as simplekits) we will be keeping the naming generic. So rather than “blue and green” we will use “primary” and “secondary”.
对于通用系统,我们计划在多个系统(例如simplekits )上使用,我们将保持通用名称。 因此,我们将使用“主要”和“次要”而不是“蓝色和绿色”。

We will then tack on the shade-number. So, for example, our primary set of colours will look be “Primary/500” Or, if you prefer you can set them by using “Main/Primary-500”. The choice is yours, the important thing is consistency among all naming conventions.
然后,我们将增加阴影编号。 因此,例如,我们的主要颜色将是“ Primary / 500 ”,或者,如果您愿意,可以使用“ Main / Primary-500 ”进行设置。 选择是您的,重要的是所有命名约定之间的一致性。
Voila, you have created your design system colours styles. Now, of course, you can go further with this. Adding opacities, gradients, states, etc. But for a simple generic template, this is a strong starting point.
瞧,您已经创建了设计系统的颜色样式。 现在,您当然可以继续做下去。 添加不透明度,渐变,状态等。但是对于简单的通用模板,这是一个很好的起点。
总结和后续步骤 (Wrapping Up and Next Steps)
Next post we will cover setting up Figma Type Styles. Another powerful feature that is essential for any good Design System.
在下一篇文章中,我们将介绍如何设置Figma字体样式。 另一个强大的功能对于任何好的设计系统都是必不可少的。
I have made a Figma File for you to duplicate and use/follow along if you would rather that than create from scratch
我制作了一个Figma文件供您复制和使用/跟随,如果您愿意而不是从头开始创建
Want a design system without the hassle of creating ever single component yourself? Then check out simplekits, a Design System Kit made with all the core components you could need for any project.
想要一个没有自己创建单个组件麻烦的设计系统? 然后查看简单套件,这是一个设计系统套件,其中包含任何项目可能需要的所有核心组件。
翻译自: https://blog.prototypr.io/creating-design-systems-part-one-colours-52ca7e9f159c
python创建颜色


 2198
2198

 被折叠的 条评论
为什么被折叠?
被折叠的 条评论
为什么被折叠?
 到【灌水乐园】发言


