


 本文详细介绍了一位工程师在将Django项目Docker化过程中的经验教训,包括配置Nginx、uWSGI和Celery,以及创建Dockerfile的步骤。
django创建应用程序
with Celery as a plus
芹菜为佳
For those who already used Docker, you know how everything is smooth and comfortable after the image is appropriately configured and ready to go. But what about the process getting into that state? Either I am doing this wrong, or it requires a LOT of trial and error. It can go without any issues, or it can be very lengthy and time-consuming. That was exactly my experience when creating a Docker image for this Django project.
对于那些已经使用Docker的人,您知道在正确配置映像并准备就绪后,一切都变得平滑舒适。 但是进入该状态的过程又如何呢? 我做错了这件事,或者它需要大量的反复试验 。 它可以没有任何问题,或者可能非常漫长且耗时。 这正是我为该Django项目创建Docker映像时的经验。
I will not cover here what Docker is and how it works, but the main essential steps to Dockerize a Django application ready for production.
我不会在这里介绍Docker是什么以及它如何工作,而是将Docker应用程序准备就绪以进行生产的Docker的主要必要步骤。
The project consists of a Django app, using Python 3.8, served by Nginx, and having Celery as a task manager. It seems pretty straight forward, right? Well, with time, I’ve learned not to trust that.
该项目包含一个Django应用程序,该应用程序使用Python 3.8 ,由Nginx提供服务 ,并具有Celery 作为任务经理。 看起来很简单,对吧? 好吧,随着时间的流逝,我学会了不相信它。
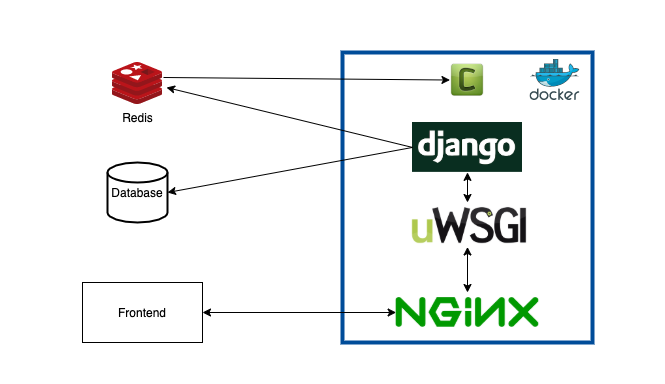
As can be seen in the diagram above, we don’t need to include MySql and Redis images, and they are running on different servers. (EC2 instances).
从上图中可以看出,我们不需要包含MySql和Redis映像,它们在不同的服务器上运行。 (EC2实例)。
So we only need to properly configure Nginx as a proxy server, uWSGI as HTTP Server, and Celery queues and workers.
因此,我们只需要适当地将Nginx配置为代理服务器,将uWSGI配置为HTTP服务器,以及Celery队列和工作器。
Nginx和uWSGI (Nginx and uWSGI)
让我们从uWSGI开始 (Let’s start with uWSGI)
It will be way easier to debug any misconfiguration if you try to run everything before setting up your Dockerfile. This advice is not only for this section but for all the steps in every containerization.
如果您在设置Dockerfile之前尝试运行所有配置,则调试任何配置错误的方法将更加容易。 该建议不仅适用于本节,而且适用于每个容器化中的所有步骤。
uWSGI uses a .ini file to set up our configurations. It can also receive the parameters in the uWSGI CLI, but I strongly advise you to use the file, as it is easier to maintain. I set some extra variables, but you can bootstrap this with only a few (more details here).
uWSGI使用.ini文件来设置我们的配置。 它也可以在uWSGI CLI中接收参数,但是我强烈建议您使用该文件,因为它更易于维护。 我设置了一些额外的变量,但是您可以仅使用几个变量( 这里有更多详细信息)进行引导。
Nothing out of the ordinary there, but sometimes we can mess up some paths, requiring some adjustment. So we can test that by running the following command (don’t forget to activate your python environment):
没有什么不寻常的,但是有时候我们可以弄乱一些路径,需要进行一些调整。 因此,我们可以通过运行以下命令进行测试(不要忘记激活您的python环境):
> $ uwsgi --ini app.ini --venv /usr/localAs long as this command is running, a process is serving your app, as we intended. We can now focus on setting up our Nginx server.
只要此命令在运行,就会按照我们的预期为您的应用提供服务。 现在,我们可以集中精力设置Nginx服务器。
Spice it up with Nginx
用Nginx调味
Now you might ask: “If my app is already being served, why do I need Nginx?”
现在您可能会问:“ 如果已经在提供我的应用程序,为什么我需要Nginx?”
Well, you don’t need it if you won’t have a considerable amount of users accessing your static files, or if you don’t want to have more configuration available to your server. My opinion is: It does not harm you if it is there, as the communication time between uWSGI and Nginx is minimal. They use the uwsgi low-level protocol (not the same as the uWSGI HTTP server). To know more about that, I would suggest this blog post by David Land.
好了,你不需要它,如果你不会有相当数量的用户访问您的静态文件的,或者如果你不希望有提供给您的服务器的详细配置。 我的意见是:它不会伤害您,因为uWSGI与Nginx之间的通信时间非常短。 他们使用uwsgi低层协议(与uWSGI HTTP服务器不同)。 要了解更多信息,我建议David Land撰写此博客文章。
In our Nginx configuration, we will proxy the uWSGI HTTP port 8000 and serve it via port HTTP 80. Here we define where are our static and media folders and include the uwsgi_params, routing it for our uWSGI server port 8000 (same as specified in the socket parameter in the code above).
在我们的Nginx配置中,我们将代理uWSGI HTTP端口8000并通过端口HTTP 80提供服务。在这里,我们定义静态和媒体文件夹在哪里,并包括uwsgi_params,将其路由到uWSGI服务器端口8000(与上面代码中的套接字参数)。
NOTE: I did not configure SSL here because I am doing that on AWS via the Load Balancers. If that is not your case, please properly configure HTTPS port 443 here. You can either use Certbot or follow their documentation for a “manual” approach.
注意:我没有在这里配置SSL,因为我是通过负载均衡器在AWS上进行的。 如果不是您的情况,请在此处正确配置HTTPS端口443。 您可以使用Certbot或按照其文档进行“手动”处理。
And that’s it. Now you can (re)start your Nginx server, and you should be able to access your Django application on port 80 (or 443).
就是这样。 现在您可以(重新)启动Nginx服务器,并且您应该能够在端口80(或443)上访问Django应用程序。
(可选)芹菜任务管理器 ((Optional) Celery Task Manager)
In this project, I needed to have a task manager, so I chose Celery to do the job (mostly because I already used it twice in the past, so no need to learn how to set up a different alternative). So it does not make sense to skip this part, as might be useful to someone, but is skippable if you want to containerize your Django Application.
在这个项目中,我需要有一个任务管理器,所以我选择Celery来完成这项工作(主要是因为我过去已经使用过两次,因此无需学习如何设置其他替代方法)。 因此跳过这部分是没有意义的,因为这可能对某人有用,但是如果要容器化Django应用程序,则可以跳过。
Celery requires a broker, and they have some options for you to consider. In the past, I decided RabbitMQ, but this time I went with Redis, as it is easier to configure. Either way, the default configuration is to be open to the public, so do not forget to properly set up a username and password alongside with other protective measures.
芹菜需要经纪人,他们为您提供一些选择。 过去,我决定使用RabbitMQ,但是这次我选择了Redis,因为它更易于配置。 无论哪种方式,默认配置都将向公众开放,因此不要忘记正确设置用户名和密码以及其他保护措施。
We need two different files to run our Celery daemon. One goes into /etc/init.d/celeryd, and it is the celery daemon bash script — no need to change anything. You can find it here (it was too long to post here).
我们需要两个不同的文件来运行我们的Celery守护程序。 其中一个进入/etc/init.d/celeryd ,它是celery守护程序bash脚本-无需更改任何内容。 您可以在这里找到它(在这里发布太久了)。
The other file is the one you have to configure according to your requirements. In my case, I needed three different queues and workers with concurrency equals to one, and another one with concurrence equals eight.
另一个文件是您必须根据需要配置的文件。 就我而言,我需要三个不同的队列,并且并发性等于1的工作程序,而另一个并发性等于8的工作程序。
> $ /etc/init.d/celeryd startRun the command above to verify if everything is as expected.
运行上面的命令以验证是否一切都如预期。
Docker文件 (Dockerfile)
Now that we verify that all our application components are working correctly outside the Docker context, we are ready to start creating our Dockerfile.
既然我们已经验证了所有应用程序组件在Docker上下文之外都能正常工作,那么就可以开始创建Dockerfile了。
I always try to split it into five different parts:
我总是尝试将其分为五个不同部分:
- Choose the base image; 选择基本图像;
- Install additional necessary third-party libraries; 安装其他必要的第三方库;
- Set ENV variables and create necessary folders; 设置ENV变量并创建必要的文件夹;
- Depending on the framework (install requirements, build the app, etc.); 取决于框架(安装要求,构建应用程序等);
- Copy additional third-party configuration files. 复制其他第三方配置文件。
As the base image, I chose python:3.8-slim-buster, as it is compact.
作为基本图像,我选择了python:3.8-slim-buster,因为它很紧凑。
FROM python:3.8-slim-busterEvery time I need some third-party python package, I always note down its OS library requirements, so this next step is easy to accomplish. The other alternative is to try to install the packages via pip and check for errors (we all have been there at least once).
每当我需要一些第三方python软件包时,我都会记下它的OS库要求,因此下一步很容易完成。 另一种选择是尝试通过pip安装软件包并检查错误(我们都至少到过一次)。
RUN apt-get clean && \apt-get update && \apt-get install -y nginx smbclient default-libmysqlclient-dev \gcc python3-cffi libcairo2 libpango-1.0-0 libpangocairo-1.0-0 \libgdk-pixbuf2.0-0 libffi-dev shared-mime-infoYou probably will need different libraries, but don’t remove Nginx.
您可能需要不同的库,但不要删除Nginx。
Let’s then create our project folder in our image and copy our files there.At this stage, we can also install our dependencies and collect the static files (in case you have it).
然后在映像中创建项目文件夹并在其中复制文件。在此阶段,我们还可以安装依赖项并收集静态文件(如果有的话)。
RUN mkdir /apibetonWORKDIR /apibetonADD . /apibeton/
# the next folders make sense on my project, you might only need the static oneRUN mkdir static && mkdir reports/cacheRUN pip install -r requirements/requirements.txtRUN python manage.py collectstatic
NOTE: if you have some files that you don’t want to include here (i.e., files containing juicy information), don’t forget to add it in the .dockerignore file.
注意:如果您有一些文件不想包含在此处(例如,包含多汁信息的文件),请不要忘记将其添加到.dockerignore文件中。
env
.logs
.circleci
.vscode
My environment variables are set in the AWS EB Software Configuration. If you are not using AWS, you can check how here to do that, but please do not copy any file containing sensitive information into your docker image.
我的环境变量在AWS EB软件配置中设置 。 如果您不使用AWS,则可以在此处查看操作方法,但是请不要将任何包含敏感信息的文件复制到Docker映像中。
From this point, we need to copy the Nginx and Celery configs, and also set the proper file permissions.
至此,我们需要复制Nginx和Celery配置,并设置适当的文件权限。
# only if you need celeryRUN useradd -ms /bin/bash celeryCOPY broker/init.d_celeryd /etc/init.d/celerydCOPY broker/celeryd /etc/default/celeryd# nginx config and script to be runCOPY docker/nginx.conf /etc/nginx/sites-available/defaultCOPY docker/start.sh /usr/local/bin/start.sh# set proper file permissionsRUN chown -R www-data:www-data /apibeton/reports/cache && \chmod u+x /etc/init.d/celeryd && \chmod u+x /etc/default/celeryd && \chmod u+x /usr/local/bin/start.shAs you can see, I am copying a start.sh file. What is it?
如您所见,我正在复制一个start.sh文件。 它是什么?
The last layer of a docker image should set what the container will execute when it starts. And in this case, we need to run uWSGI, Nginx, and Celery daemon (optional). Well, if you opt-out on using Nginx and Celery, this is pretty straight forward, as you need to run the uWSGI command. In my case, I had to run three initial commands. After spending some time checking what the best practice on how to achieve that is, I decided to write a small bash script to do that and run in on the last step.
泊坞窗映像的最后一层应设置容器在启动时将执行的操作。 在这种情况下,我们需要运行uWSGI,Nginx和Celery守护程序(可选)。 好吧,如果您选择退出使用Nginx和Celery,这很简单,因为您需要运行uWSGI命令。 就我而言,我必须运行三个初始命令。 在花了一些时间检查如何实现这一目标的最佳实践之后,我决定编写一个小的bash脚本来完成该任务,并在最后一步中运行。
#!/bin/bash/etc/init.d/celeryd startuwsgi --ini app.ini --venv /usr/localnginx -g 'daemon off;'I set the Nginx with the daemon off, because as long as it runs in a process that will keep the docker image in the UP state.
我将Nginx设置为关闭守护进程,因为只要它在将docker映像保持在UP状态的进程中运行即可。
EXPOSE 80CMD ["/bin/bash", "-c", "start.sh"]The port exposed is port 80, but if you set the HTTPS on Nginx you have to expose port 443
公开的端口是端口80,但是如果在Nginx上设置HTTPS,则必须公开端口443。
The full file should have roughly the following content.
完整文件应大致包含以下内容。
And that is it. You can now build and run your docker container.
就是这样。 现在,您可以构建并运行您的Docker容器。
docker build -t IMAGE_NAME .
docker run --name CONTAINER_NAME -d -p 8080:80 IMAGE_NAME
The Django Application will be available on your machine on port 8080
Django应用程序将在您的计算机上的端口8080上可用
结论 (Conclusion)
In this containerization, I had to search a lot, as (like everyone) I like to follow and understand the best practices. We don’t need re-invent the wheel.
在这种容器化过程中,我不得不进行大量搜索,因为我(像每个人一样)喜欢遵循并了解最佳实践。 我们不需要重新发明轮子。
I don’t want you the spend the same amount of time, so I’ve just tried to compile the most crucial parts on Dockerize, a Django application. I tried to add links whenever I feel that there is some cool additional info.
我不想让您花费相同的时间,因此我只是尝试在Djangoize Dockerize上编译最关键的部分。 每当我觉得有一些很酷的附加信息时,我都尝试添加链接。
If you have a better (or more correct) way to achieve what I did here, feel free to add in the comments. We are always learning :)
如果您有更好(或更正确)的方法来实现我在此处所做的操作,请随时添加评论。 我们一直在学习:)
翻译自: https://medium.com/swlh/dockerize-a-django-application-68e1b5d85d76
django创建应用程序


 3194
3194

 被折叠的 条评论
为什么被折叠?
被折叠的 条评论
为什么被折叠?
 到【灌水乐园】发言


