


排队论游乐场的游乐项目
发展历程 (DEVELOPMENT)
Swift Playgrounds are a wonderful thing. They are fast. They allow you to try quickly your code. They allow you to check your UI in a matter of seconds. They can really speed up your development cycle.
斯威夫特游乐场是一件奇妙的事情。 他们很快。 它们使您可以快速尝试您的代码。 它们使您可以在几秒钟内检查UI。 他们确实可以加快您的开发周期。
This is a brief video of how they can help while prototyping a cell for a collection, for example.
例如,这是一段简短的视频,介绍了他们如何在为收集单元制作原型时提供帮助。
The main gain, in this case, is that you can render your view immediately in the playground. You can change small bits and check how they look. Once you are satisfied with the changes, you can take the playground file and move it to the right place.
在这种情况下,主要的好处是您可以立即在操场上渲染视图。 您可以更改小部分并检查它们的外观。 对更改感到满意后,您可以获取运动场文件并将其移至正确的位置。
However, how can we start using playground in our development cycle, now?
但是,现在如何在开发周期中开始使用游乐场?
Chances are that you are working on a complex application. The application can be composed of different frameworks and potentially it uses also some Pods, leveraging the Cocoapods’ dependency management.
您可能正在处理复杂的应用程序。 该应用程序可以由不同的框架组成,并且可能利用Cocoapods的依赖关系管理使用一些Pod 。
This article guides you to add a playground to your app so that you can prototype your UI and your algorithms faster than ever!
本文指导您将Playground添加到您的应用中,以便您可以比以往更快地原型化UI和算法!
Note: If you are already an expert on Xcode and dependency management, you can skip directly to the “Adding The Playground” section of this article.
注意:如果您已经是Xcode和依赖关系管理的专家,则可以直接跳到本文的“添加游乐场”部分。
创建项目 (Creating the project)
Let’s start with the basics. We have to create an iOS application and, to keep it simple, we can:
让我们从基础开始。 我们必须创建一个iOS应用程序,为了使其简单,我们可以:
- Open Xcode 开启Xcode
Click on
File > New > Project单击
File > New > ProjectSelect
Appfrom the iOS templates从iOS模板中选择
AppGive it a name (I have chosen
PDD)给它
PDD(我选择了PDD)Choose a location on disk and click
Create选择磁盘上的位置,然后单击
Create
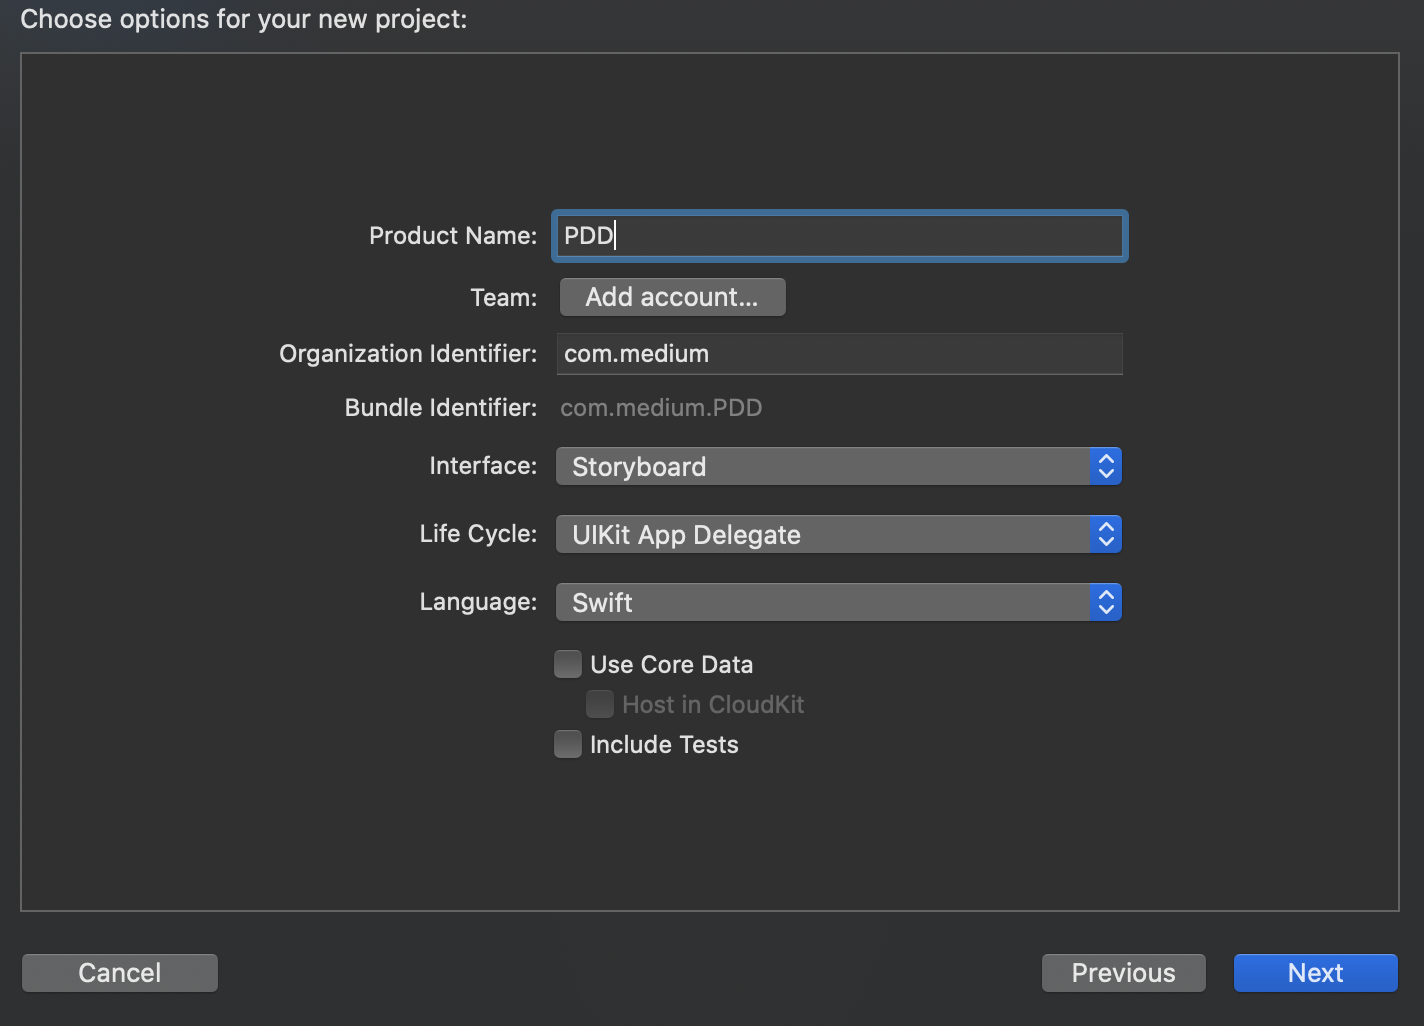
Nothing fancy here. Just the usual stuff to create a new project.
这里没什么好看的。 只是创建一个新项目所需的普通东西。
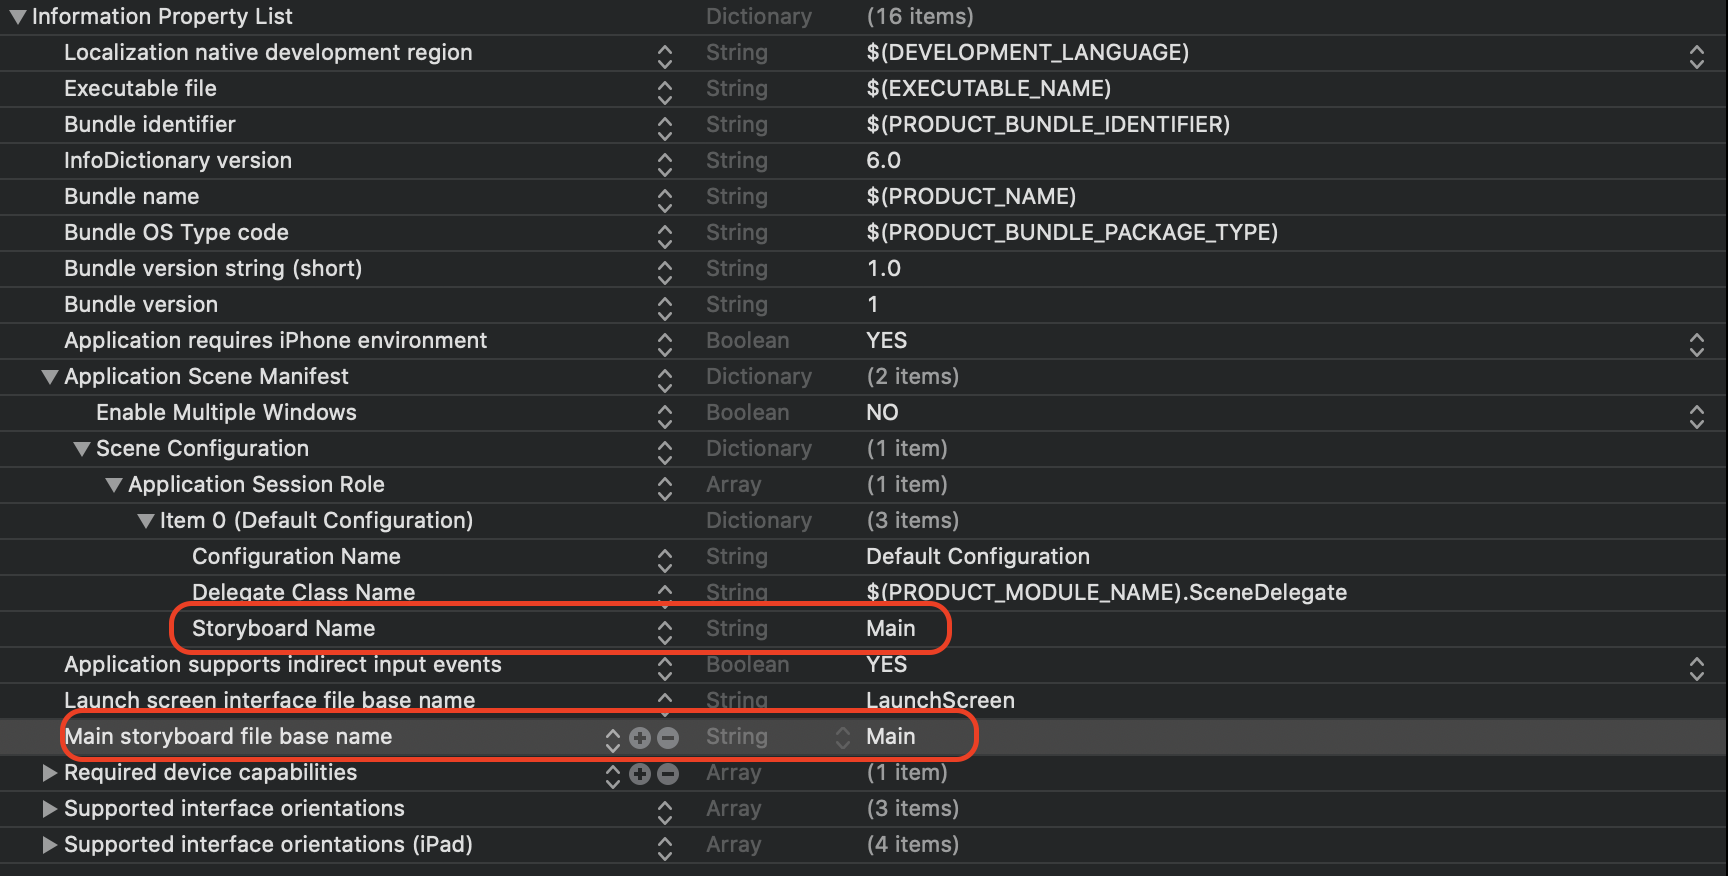
Given that we don’t want to actually use storyboards, let’s clean up a bit the template:
鉴于我们不想实际使用情节提要,让我们来整理一下模板:
Delete the
Main.Storyboardfile删除
Main.Storyboard文件Add the following snippet to the
SceneDelege.swift:将以下代码段添加到
SceneDelege.swift:
class SceneDelegate: UIResponder, UIWindowSceneDelegate {


  var window: UIWindow?


  func scene(_ scene: UIScene, willConnectTo session: UISceneSession, options connectionOptions: UIScene.ConnectionOptions) {

    // change the `_` with `scene`
    guard let scene = (scene as? UIWindowScene) else { return }
    // Add the following lines
    let window = UIWindow(windowScene: scene)
    window.rootViewController = ViewController()
    window.rootViewController?.view?.backgroundColor = .green
    self.window = window
    self.window?.makeKeyAndVisible()
  }
  //...
}
Open the
Info.plistfile and remove the two highlighted entries打开
Info.plist文件并删除两个突出显示的条目
Hit the
Playbutton and make sure that the app builds and runs!点击“
Play按钮,并确保该应用能够生成并运行!
添加框架 (Adding a framework)
We all like modular applications. They have several pros:
我们都喜欢模块化应用程序。 他们有几个优点:
they build faster: unchanged modules are not rebuilt.
它们的构建速度更快 :不会重建未更改的模块。
they encapsulate the logic better: the module exposes only what it wants and requires only what it needs.
它们更好地封装了逻辑 :模块仅公开所需内容,仅公开所需内容。
they foster collaboration: many people can work on different modules and the final integration it’s usually easier.
他们促进了协作:许多人可以在不同的模块上工作,最终集成通常更容易。
they push code reuse: if there is a piece of code that is generic enough and that is used in several places, it’s a good candidate for a module.
他们推动代码重用 :如果有一段通用的代码并在多个地方使用,那么它是模块的理想选择。
However, iOS apps in Xcode do not define a Target that can be imported by other modules. This is true also for the playgrounds: if we want to prototype something in our app, we need it to live in a framework. And that’s another reason why we need to create a framework!
但是,Xcode中的iOS应用未定义可以由其他模块导入的目标 。 对于游乐场也是如此:如果我们想在我们的应用程序中对某些东西进行原型设计,则需要将其存在于框架中。 这就是我们需要创建框架的另一个原因!
So, let’s create a framework where we can implement our UI.
因此,让我们创建一个可以实现UI的框架。
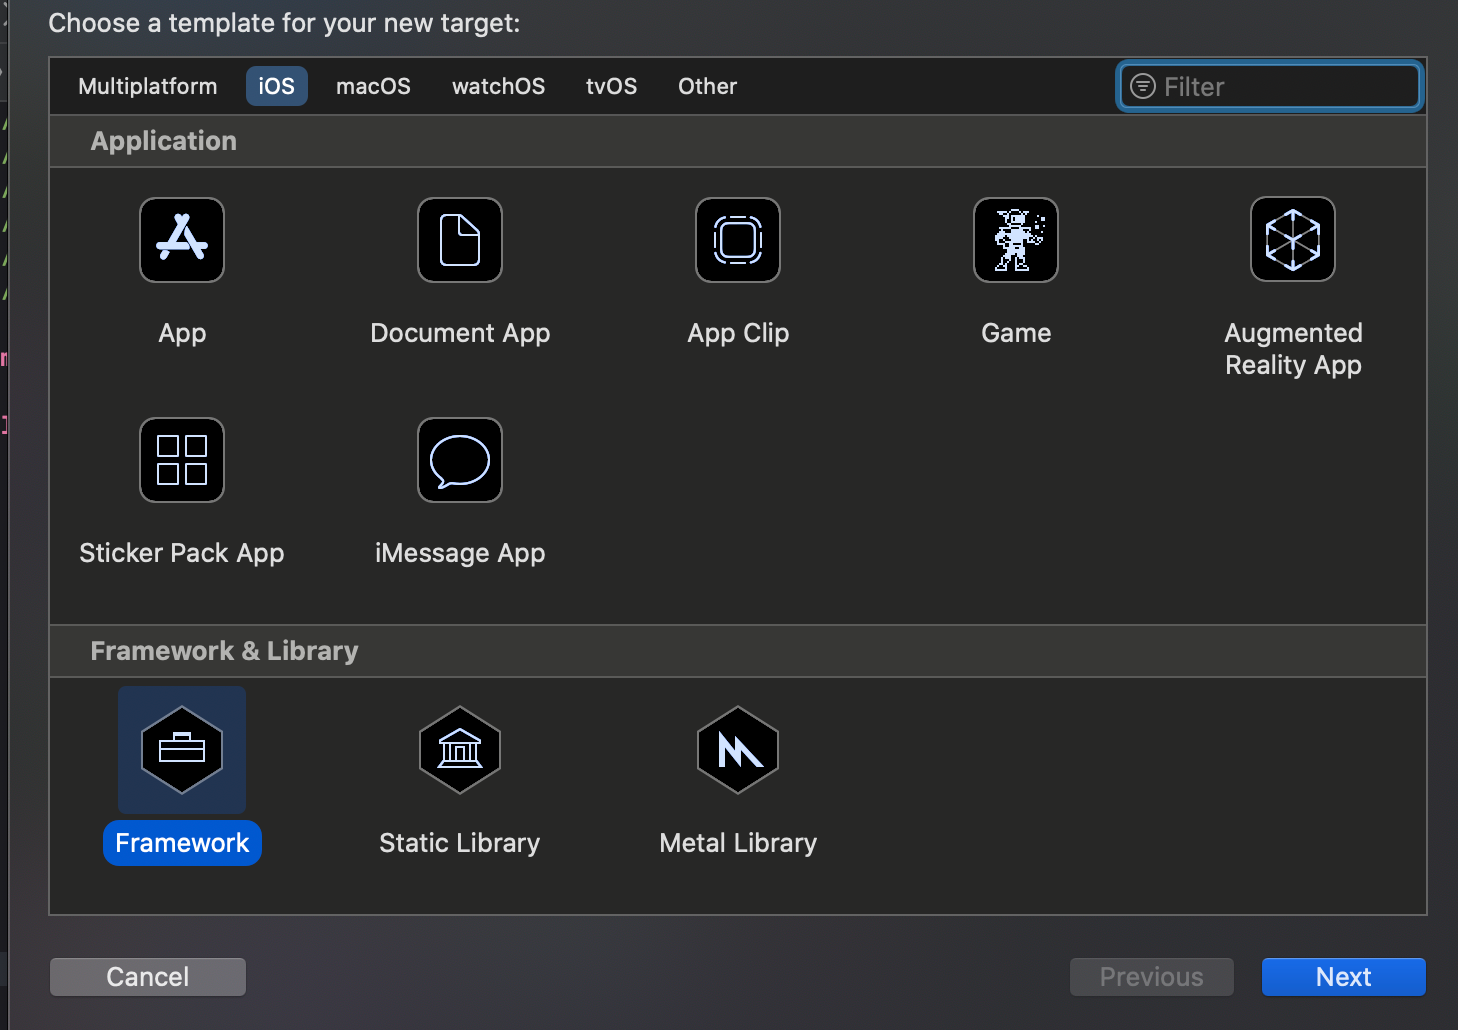
In Xcode, click on
File > New > Target在Xcode中,单击
File > New > TargetScroll down until you find the
Frameworktemplate.向下滚动,直到找到
Framework模板。Select the
Frameworktemplate and click next选择
Framework模板,然后单击下一步Give it a name (I called it
UI)给它起个名字(我叫
UI)Press
Finish按
Finish
Hint: If you have to create a big app, consider creating a separate module for each UX flow or feature… or even for each screen! It really depends on how much you want to push the modularization.
提示:如果必须创建一个大型应用程序,请考虑为每个UX流或功能甚至每个屏幕创建一个单独的模块! 这实际上取决于要推动模块化的程度。
For the sake of this example, let’s take the ViewController.swift file move it to the new framework. If we try to build the project now, we will incur a bunch of failures. To fix them:
为了这个示例,让我们以ViewController.swift文件将其移动到新框架中。 如果我们现在尝试构建项目,将导致很多失败。 要解决它们:
Open the
SceneDelegate.swiftfile and addimport UI打开
SceneDelegate.swift文件并添加import UIOpen the
ViewController.swiftfile and update the code with the following snippet:打开
ViewController.swift文件,并使用以下代码段更新代码:
import UIKit


public class ViewController: UIViewController {


  public override init(nibName nibNameOrNil: String?, bundle nibBundleOrNil: Bundle?) {
    super.init(nibName: nibNameOrNil, bundle: nibBundleOrNil)
  }


  public required init?(coder: NSCoder) {
    fatalError("Not implemented")
  }


  public override func viewDidLoad() {
    super.viewDidLoad()
    // Do any additional setup after loading the view.
  }


}
In this snippet, we just make the ViewController public so that we can create it from the app, and we add the required initializers.
在此代码段中,我们仅将ViewController public以便可以从应用程序中创建它,并添加所需的初始化程序。
Now, we can hit the Play button again and see that the app is running as before.
现在,我们可以再次点击“ Play按钮,以查看该应用程序是否像以前一样运行。
添加一些豆荚 (Adding some pods)
We don’t want to reinvent the wheel. There are many very good libraries out there that can solve common problems in our daily routine.
我们不想重新发明轮子。 有很多很好的库可以解决我们日常工作中的常见问题。
Cocoapods is one of the most famous dependency management and also the one that we use at Bending Spoons every day. Let’s try to integrate a library into our project.
Cocoapods是最著名的依赖性管理之一,也是我们每天在Bending Spoons中使用的一种。 让我们尝试将一个库集成到我们的项目中。
In the root folder of our project, create a file called
Podfile在我们项目的根文件夹中,创建一个名为
Podfile的文件- Copy and paste the following snippet 复制并粘贴以下代码段
- In the terminal, navigate to your project root folder 在终端中,导航到您的项目根文件夹
run the command
pod installand wait for the process to finish运行命令
pod install并等待过程完成
source 'https://cdn.cocoapods.org/'


inhibit_all_warnings!
use_frameworks!


target 'PDD' do
	platform :ios, "13.0"


	pod 'PinLayout', '~> 1.8.0'


	target 'UI' do
		inherit! :complete
	end
end
This process will create an Xcode workspace that has the .xcworkspace extension. This environment is slightly different from the standard project: it basically collects different .xcodeproj so that they can work together.
此过程将创建一个扩展名为.xcworkspace的Xcode工作区。 该环境与标准项目略有不同:它基本上收集了不同的.xcodeproj以便它们可以一起工作。
Let’s open the PDD.xcworkspace and you will see the following situation in the project navigator:
让我们打开PDD.xcworkspace ,您将在项目导航器中看到以下情况:
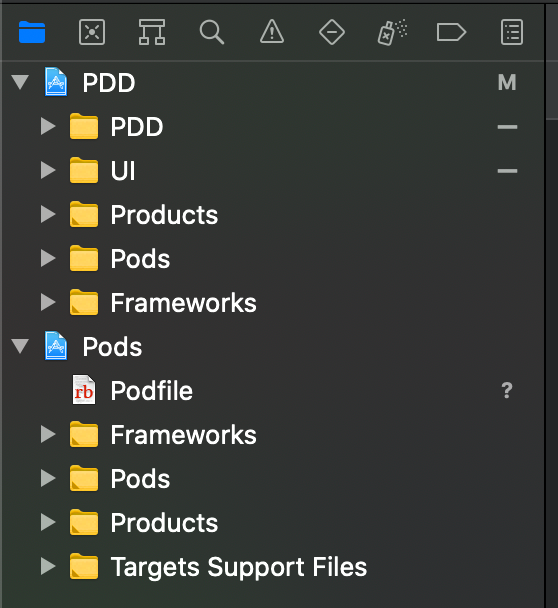
Now, we can access the PinLayout Pod and we can use it to layout elements of our views!
现在,我们可以访问PinLayout Pod,并可以使用它来布局视图元素!
添加游乐场 (Adding the playground)
Given that we want to be really fast when iterating on the UI, we want to add a Playground to the project.
鉴于我们希望在UI上迭代时非常快,因此我们想向项目添加一个Playground。
To start with, let’s create it in the standard way:
首先,让我们以标准方式创建它:
In Xcode click on
File > New > Playground在Xcode中,单击“
File > New > PlaygroundChoose the
SingleViewtemplate and press next选择
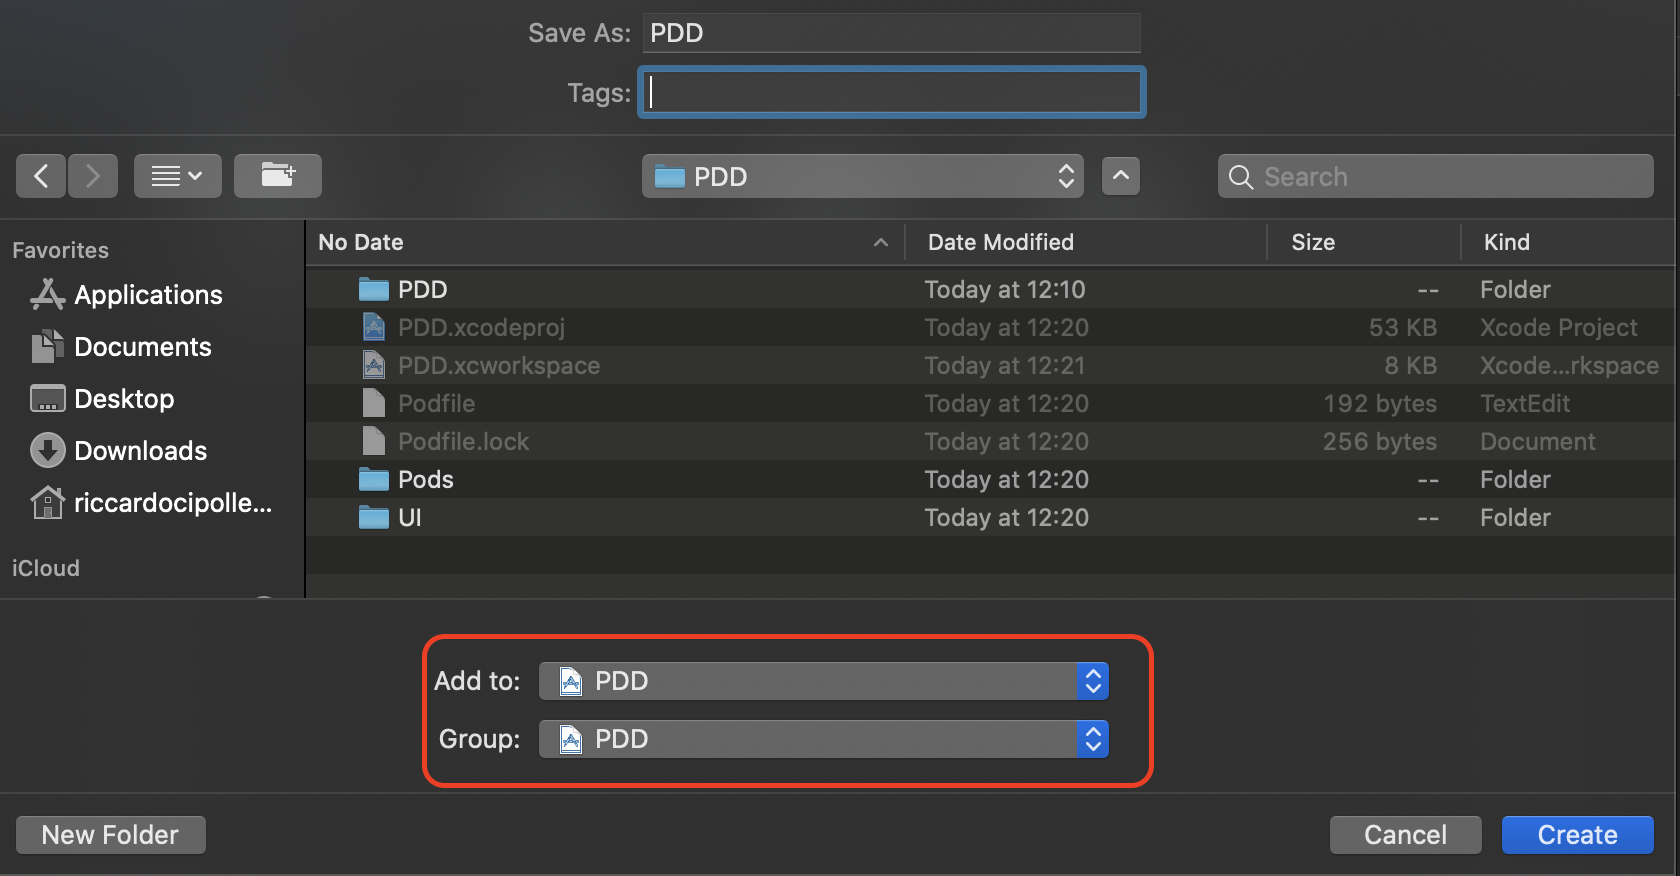
SingleView模板,然后按下一步- Navigate to the same location where you create your project 导航到创建项目的相同位置
Give a name to the Playground (I decided to call it
PDD)给游乐场命名(我决定将其命名为
PDD)In the bottom of the dialog, select your workspace for both the
Add to:and theGroup:options.在对话框的底部,为“
Add to:和“Group:选项选择工作区。Press
Create按
Create
Now Xcode created a new playground we can play with. The playground also supports the liveView feature that helps us in prototyping everything fast.
现在,Xcode创建了一个我们可以玩的新游乐场。 游乐场还支持liveView功能,可帮助我们快速制作所有原型。
However, we now have modified our workspace. What happens if we have to add a new Pod to the project? The pod install command recreates the .xcworkspace and, once opened, the playground is gone!
但是,我们现在已经修改了工作区。 如果我们必须在项目中添加一个新的Pod,会发生什么? pod install命令重新创建.xcworkspace ,一旦打开,游乐场就消失了!
自动添加游乐场 (Adding the playground back automatically)
If we explore a bit what is a .xcworkspace file, we discover that it’s basically a folder which, in particular, contains a file called contents.xcworkspacedata.
如果我们稍微研究一下什么是.xcworkspace文件,我们会发现它基本上是一个文件夹,尤其是其中包含一个名为contents.xcworkspacedata的文件。
This file defines the structure of the workspace. A newly created workspace from the pod install only has the following content:
该文件定义工作空间的结构。 从pod install新建的工作空间仅具有以下内容:
<?xml version="1.0" encoding="UTF-8"?>
<Workspace
   version = "1.0">
   <FileRef
      location = "group:PDD.xcodeproj">
   </FileRef>
   <FileRef
      location = "group:Pods/Pods.xcodeproj">
   </FileRef>
</Workspace>
While a workspace modified by adding a playground has a contents.xcworkspacedata with this content:
虽然通过添加游乐场修改的工作空间具有contents.xcworkspacedata并具有以下内容:
<?xml version="1.0" encoding="UTF-8"?>
<Workspace
   version = "1.0">
   <FileRef
      location = "group:PDD.playground">
   </FileRef>
   <FileRef
      location = "group:PDD.xcodeproj">
   </FileRef>
   <FileRef
      location = "group:Pods/Pods.xcodeproj">
   </FileRef>
</Workspace>
Thus, to automatically add our playground to the workspace, we can cook up a little script (in Swift, of course) we run just after the pod install command.
因此,为了将我们的游乐场自动添加到工作区中,我们可以准备一个小脚本(当然是在Swift中),该脚本在pod install命令之后运行。
The script looks like this one:
该脚本如下所示:
#!/usr/bin/env xcrun --sdk macosx swift


import Foundation


func integratePlayground() {
  do {
    let fs = FileManager.default
    let currentDirectory = fs.currentDirectoryPath

    let content = try fs.contentsOfDirectory(atPath: currentDirectory)

    guard let playground = content.first(where: { $0.hasSuffix(".playground") }) else {
      print("No playground to include")
      return
    }
    guard let workspace = content.first(where: { $0.hasSuffix(".xcworkspace") }) else {
      print("No workspace found")
      return
    }


    let workspaceDataFilePath = currentDirectory.appending("/\(workspace)/contents.xcworkspacedata")
    let workspaceDataContent = try String(contentsOfFile: workspaceDataFilePath)
    var lines = workspaceDataContent.split(separator: "\n").map(String.init)


    guard !lines.contains(where: { $0.contains(playground) }) else {
      print("The playground \(playground) is already embedded into the app")
      return
    }


    guard let firstFileRefIndex = lines.firstIndex(where: { $0.contains("<FileRef") }) else {
      print("Cannot find any <FileRef")
      return
    }
    lines.insert("<FileRef location = \"group:\(playground)\"></FileRef>", at: firstFileRefIndex)
    let newWorkspaceData = lines.joined(separator: "\n")
    try newWorkspaceData.write(toFile: workspaceDataFilePath, atomically: true, encoding: .utf8)


  } catch {
    print("something went wrong:\nError: \(error)")
  }
}


integratePlayground()
To run it, you just have to type swift integrate-playground.swift in the terminal and let the magic happen.
要运行它,您只需要在终端中键入swift integrate-playground.swift并让魔术发生即可。
It basically uses the file manager to retrieve the playground and the xcworkspace. Then it adds the line to include the playground into the workspace. And that’s it: from now on, we will always have our playground to prototype our views and algorithms!
它基本上是使用文件管理器来检索xcworkspace和xcworkspace 。 然后,它添加一行以将游乐场包括到工作区中。 就是这样:从现在开始,我们将始终拥有我们的游乐场来为我们的视图和算法提供原型!
制作视图原型 (Prototyping a view)
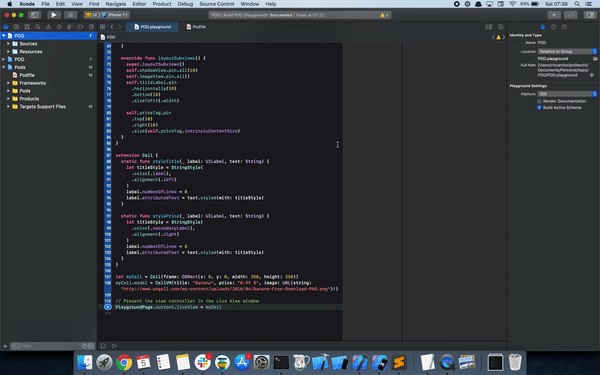
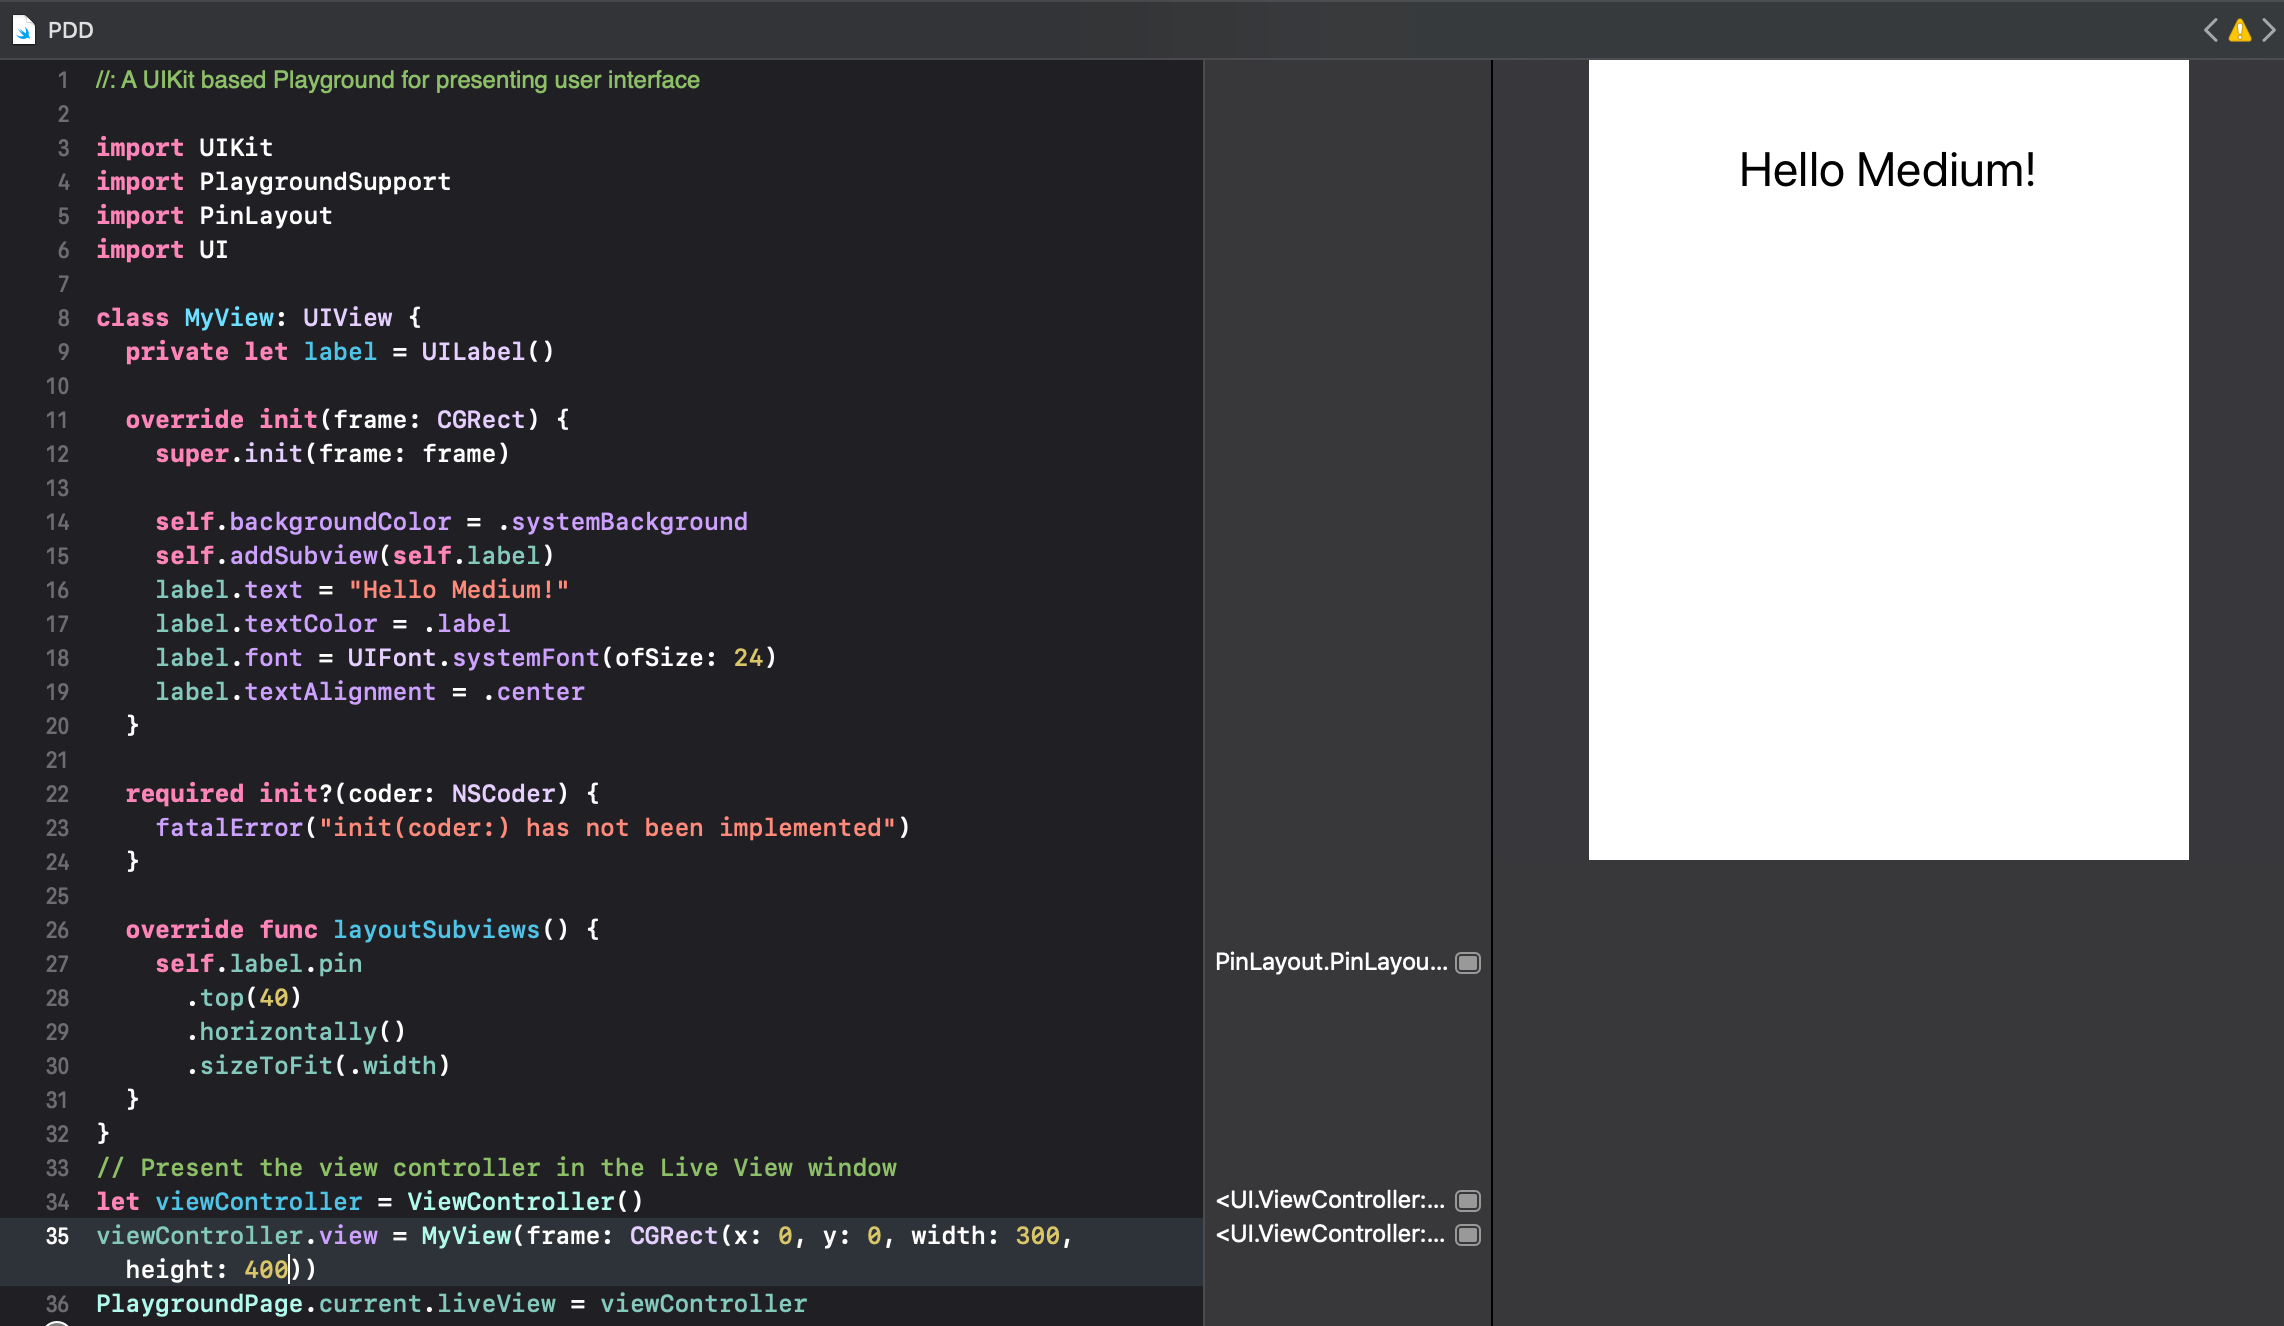
At this point, we can use the playground to prototype whatever we want. For example, we can add the following snippet.
在这一点上,我们可以使用操场来制作所需的原型。 例如,我们可以添加以下代码段。
import PinLayout
import UI


class MyView: UIView {
  private let label = UILabel()


  override init(frame: CGRect) {
    super.init(frame: frame)


    self.backgroundColor = .systemBackground
    self.addSubview(self.label)
    label.text = "Hello Medium!"
    label.textColor = .label
    label.font = UIFont.systemFont(ofSize: 24)
    label.textAlignment = .center
  }


  required init?(coder: NSCoder) {
    fatalError("init(coder:) has not been implemented")
  }


  override func layoutSubviews() {
    self.label.pin
      .top(40)
      .horizontally()
      .sizeToFit(.width)
  }
}
// Present the view controller in the Live View window
let viewController = ViewController()
viewController.view = MyView(frame: viewController.view.frame)
PlaygroundPage.current.liveView = viewController
It basically:
它基本上是:
import PinLayoutimport PinLayoutimport UIimport UIAdd the following code for a view, which uses
PinLayoutto layout the label.为视图添加以下代码,该视图使用
PinLayout布局标签。Create the
ViewControllerfrom theUImodule从
UI模块创建ViewControllerCreate the
MyViewand replace theViewController.view创建
MyView并替换ViewController.viewSet it as the new
liveView.将其设置为新的
liveView。
Finally, we can tun the Playground.
最后,我们可以调整游乐场。
It builds and runs extremely faster than the project. We won’t even have to wait for the simulator to bootstrap, install the app, and run it.
它的构建和运行比项目快得多。 我们甚至不必等待模拟器启动,安装应用程序并运行它。
We can iterate on the UI until it’s final. Once we are happy, we can just copy the code we just wrote into a proper file of the proper module.
我们可以在UI上进行迭代,直到最终完成。 一旦感到满意,我们就可以将刚才编写的代码复制到适当模块的适当文件中。
And that’s it! Fast prototyping in a nutshell!
就是这样! 简而言之,快速原型制作!
结论 (Conclusion)
In this article, we walked through the creation of a project with several dependencies: custom frameworks, pods, and playgrounds. The ideas explained will work also with the Swift Package Manager and other dependencies management systems. We also automated the inclusion of the playground into the workspace: this way, we won’t have to add it back manually every time the workspace is re-created.
在本文中,我们逐步创建了一个具有多个依赖项的项目:自定义框架,吊舱和游乐场。 解释的想法也可以与Swift Package Manager和其他依赖项管理系统一起使用。 我们还自动将游乐场包含到工作空间中:这样,我们不必在每次重新创建工作空间时手动将其重新添加。
At Bending Spoons we do not create our projects manually, but we leverage different tools that create the xcodeproj from other templates. Xcodegen is one of those tools. The ideas expressed in this article apply to projects created with these tools as well.
在“ 弯匙”中,我们不是手动创建项目,而是利用从其他模板创建xcodeproj不同工具。 Xcodegen是这些工具之一。 本文中表达的想法也适用于使用这些工具创建的项目。
Playgrounds are truly powerful. I hope that this article can speed up the development of your next app.
操场真正强大。 我希望本文可以加快您下一个应用程序的开发。
翻译自: https://medium.com/@riccardocipolleschi/playground-driven-development-d71204f926eb
排队论游乐场的游乐项目


 1万+
1万+

 被折叠的 条评论
为什么被折叠?
被折叠的 条评论
为什么被折叠?
 到【灌水乐园】发言


