


tdd测试驱动开发
Hello there! Meet me again! For today, I would like to explain what is TDD. But, if anyone doesn’t know yet about the basic of unit test, please check this post:
你好! 再次见我! 今天,我想解释一下TDD 。 但是,如果尚不了解单元测试的基本知识,请查看以下文章:
If you already understand it, let me introduce to you what are we going to talk about. The first thing is about the early introduction of TDD and how to do it. Next, we will discuss a real case along with code implementation using Node.js. And the last is a final conclusion about the advantages and disadvantages of using TDD. Let’s go!
如果您已经了解它,让我向您介绍我们将要谈论的内容。 第一件事是关于尽早引入TDD以及如何做到这一点。 接下来,我们将讨论一个实际案例以及使用Node.js的代码实现。 最后是关于使用TDD的优缺点的最终结论。 我们走吧!
前言 (PREFACE)
Test-Driven Development known as TDD. TDD simply is development driven by test. We must write the test first and then the working code. TDD is an iterative, incremental way to add value to your code. At the same time, you gain more confidence that the code is viable and working with each new iteration all the way into production. To understand TTD, you have to understand the main cycle of it. See the TDD cycle below:
测试驱动开发,称为TDD 。 TDD只是受测试驱动的开发 。 我们必须先编写测试,然后再编写工作代码。 TDD是一种迭代的 增量方式,可以为代码增加价值。 同时,您将更加自信该代码是可行的,并且可以在生产过程中一直与每个新迭代一起使用 。 要了解TTD,您必须了解它的主要周期。 请参见下面的TDD周期:
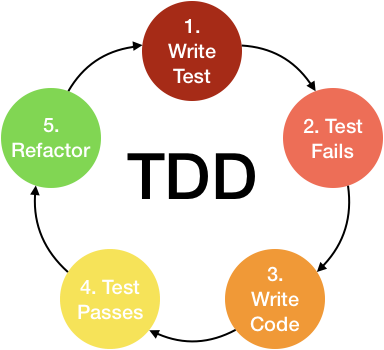
We can conclude from the picture above, The fundamental keyword is a repetition. For simplicity, it can be written like this:
我们可以从上图得出结论,基本关键字是重复 。 为了简单起见,可以这样写:
Fail — Pass — Refactor — Repeat
失败-通过-重构-重复
Now, after you understand the concept, let’s thinking about how to do it. Before doing TDD step by step, I suggest you combine it with this approach called ATDD (Acceptance TDD). This is a testing approach derived from the Test-Driven Development (TDD) methodology, which is quite similar to Behavior-Driven Development (BDD). This approach defines various ways to develop a feature based on its behavior. In most cases, the Given-When-Then approach (Simple English) is used for writing test cases.
现在,在理解了概念之后,让我们考虑如何实现它。 在逐步进行TDD之前,建议您将其与称为ATDD(接受TDD)的这种方法结合起来。 这是一种从测试驱动开发(TDD)方法派生的测试方法,该方法与行为驱动开发(BDD)十分相似 。 该方法定义了基于其行为开发特征的各种方法。 在大多数情况下,使用“ 按时给出”方法(简单英语)来编写测试用例。
But, wait a minute! On the beginning, you are informing us about TDD, now, you mention about ATDD, and now there is a new word called BDD. What is the difference between the three of them?? Haha, don’t worry. There is a good explanation about those differences between them. Check this link. Now, is your curiosity already fulfilled? I am sure you have understood this 😀.
但是,请稍等! 最初,您是在向我们介绍TDD ,现在是在向您介绍ATDD ,现在有了一个新词BDD。 他们三个之间有什么区别? 哈哈,别担心。 关于它们之间的差异,有很好的解释。 检查此链接 。 现在,您的好奇心已经满足了吗? 我相信你已经明白了😀。
Now, let me tell you the six steps to do it:
现在,让我告诉您执行此操作的六个步骤 :
Collect all requirements as detailed as possible.
收集尽可能详细的所有要求。
Before writing the code, write the test first. Make sure every test case that you’ve already gathered at point 1 is included in this test for the expected input and output.
在编写代码之前, 请先编写测试 。 确保已在第1点收集的每个测试用例都包含在该测试中,以用于预期的输入和输出。
Run the test, and make sure the test is failing.
运行测试,并确保测试失败 。
Type the working code as minimum as possible.
键入最少的工作代码。
Feeling that your working code is a little mess? Refactor the code and do some cleaning. As long as the test is still passed, it means there is no problem with the refactored code.
感觉您的工作代码有点混乱? 重构代码并进行一些清理 。 只要测试仍然通过,就意味着重构代码没有问题。
Repeat the process from points 2–5 for other functions.
对于其他功能,请从第2–5点重复该过程 。
The Key to Success
成功的关键
As defined on point 1, you have to gather all the requirements as detail as possible. This part is required to listing all the best / worst-case scenarios. This can be done with discussion when we are at a meeting, sprint planning, etc.
按照第1点的定义,您必须尽可能详细地收集所有需求。 这部分要求列出所有最佳/最坏情况。 这可以讨论 , 当 我们在一个会议上,冲刺规划等来完成。
代码实现(示例) (Code Implementation (Example))
Now, you have understood a bit of what is TDD, the primary cycle of it, and how to do it in six steps. In this section, as I mentioned earlier, we will jump into the real case with the example working code. I am using Node.js as our programming language and mocha (Sinon, chai, etc.) as part of our unit testing.
现在,您已经了解了什么是TDD,它的主要周期以及如何通过六个步骤进行操作。 如前所述,在本节中,我们将通过示例工作代码跳入实际案例。 我将Node.js用作我们的编程语言,并将Mocha(Sinon,chai等)用作我们的单元测试的一部分。
New Story:
新故事:
One day when the meeting is in progress, your product owner requesting a new feature where it should return all campaigns based on the brand id. And, this task will be assigned to you. You have to make sure everything is correct & not cause any unwanted bugs. Therefore, to make it successful, you have decided to gather all the requirements before jump into the code (Step 1). After collecting all the requirements, let’s start with the Input & Output Validation.
会议进行的某一天,您的产品所有者请求一项新功能, 该功能应根据品牌ID返回所有广告系列 。 并且,该任务将分配给您。 您必须确保一切正确且不会引起任何不需要的错误。 因此,为使其成功,您已决定在跳转到代码之前收集所有要求( 步骤1 )。 收集所有需求之后,让我们从输入和输出验证开始。
Validate the Input :
验证输入:
Is it requiring brand_id?
是否需要brand_id?
Is it requiring brand_id?- It’s required.
是否需要brand_id? -这是必需的。
What happens if it’s sending invalid brand_id?
如果发送无效的brand_id,该怎么办?
What happens if it’s sending invalid brand_id?- It should return an error message and tell the user the brand id is invalid
如果发送无效的brand_id,该怎么办? -它应返回错误消息,并告知用户品牌ID无效
Is it accepting one single brand_id/multiple brand_id(s)?
是否接受一个单一的brand_id /多个brand_id?
Is it accepting one single brand_id/multiple brand_id(s)?- It’s accepting single brand id only
是否接受一个单一的brand_id /多个brand_id? -仅接受单一品牌ID
Is it needed to validate certain roles to use this feature?
是否需要验证某些角色才能使用此功能?
Is it needed to validate certain roles to use this feature?- Not for now. All roles can access this feature
是否需要验证某些角色才能使用此功能? - 现在不行。 所有角色都可以使用此功能
Validate the Output :
验证输出:
Define error messages for points 1 and 2. But, because we are using Joi validation, we don’t need to think much further about the error messages.
为点1和2 定义错误消息 。但是,由于我们使用的是Joi验证 ,因此我们无需对错误消息做更多的思考。
Define the API contract (key-value), which will be used for supporting the main apps. In this case, the JSON response will be like this :
定义API合约 (键值),该合约将用于支持主要应用。 在这种情况下, JSON响应将如下所示:
{
  data: {
    name: 'Noddle Festival',
    start_at: '01-08-2020',
    end_at: '01-10-2020',
    products: [
      {
        id: 'abcdefg123456',
        value: 'Chicken Noddle'
      }
    ]
  }
}
Based on the gathered requirement, let’s make a simple scenario using the Given-When-Then approach:
根据收集的需求,让我们使用“ 给定 - 何时-然后”方法进行简单的场景:
Scenario: Input validation not passed
Given:
  The requested params of invalid brand_id / null brand id (empty)
When:
  The requested params have been sent
Then:
  It should return an error messageScenario: Input validation passed
Given:
  The requested params of valid brand_id
When:
  The requested params have been sent
Then:
  It should return a list of all campaigns
Then, it’s time to write those scenarios into your unit testing code.
然后,是时候将这些方案写入单元测试代码中了。
IMPORTANT
重要
Before you write your first test case, you have to :- Prepare all required testing environment → see code line 3–13- Write our base scenario from the Given-When-Then approach → see code line 15–33
在编写第一个测试用例之前,您必须:-准备所有必需的测试环境→请参见代码行3–13 –通过“先给定后”方法编写基本方案→请参见代码行15–33
// Location: controller/__tests__/campaign.mocha.js


require('dotenv').config()


const chai = require('chai')
const sinon = require('sinon')
const sinonChai = require('sinon-chai')
const deepEqualInAnyOrder = require('deep-equal-in-any-order')
const { mockReq, mockRes } = require('sinon-express-mock')
const { expect } = chai
chai.use(sinonChai)
chai.use(deepEqualInAnyOrder)
const campaignController = require('../campaign')


describe.only('Campaign Controller test', function() {
  describe('GetCampaignsByBrandId test', function() {
    describe('Joi validation failed', function() {
      it('throws error if not sending brand_id attr in request params', async function() {
        expect(await campaignController.GetCampaignsByBrandId()).eq(true)
      })


      it('throws error if sending invalid brand_id attr in request params', async function() {
        expect(await campaignController.GetCampaignsByBrandId()).eq(true)
      })
    })


    describe('Joi validation passed', function() {
      it('returns expected results', async function() {
        expect(await campaignController.GetCampaignsByBrandId()).eq(true)
      })
    })
  })
})
After that, create a file inside the controller like the code below. For now, we only return `true` (it can be changed to false, 1, etc. It’s up to you to decide).
之后,像下面的代码一样在控制器内创建一个文件。 目前,我们仅返回“ true”(可以将其更改为false,1等,由您决定)。
// Location: controller/campaign.js


exports.GetCampaignsByBrandId = async (req, res, next) => {
  return true
}
Type “npm run test” in the terminal to make sure it’s running without any error.
在终端中键入“ npm run test”以确保其正在正常运行。
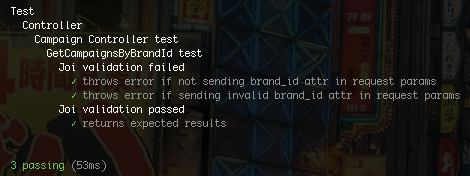
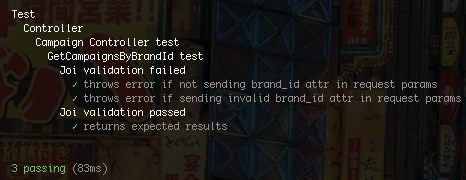
And… Voila! Your tests run successfully. After all unit tests are passed, let’s focus on to our next test case in `Joi validation failed` section.
还有……瞧! 您的测试运行成功。 通过所有单元测试之后,让我们集中讨论“ Joi验证失败”部分中的下一个测试用例。
// Location: controller/__tests__/campaign.mocha.js


// LINE CODE 1 - 11 -> https://gist.github.com/edharmowongso/2a052f5b352bbe0dbfeb5a9dce1bdda8


describe.only('Campaign Controller test', function() {
  describe('GetCampaignsByBrandId test', function() {
    let res,
      next,
      wrongId = '5d0e0ef4ea9baa7fb13ddsadfa',
      fakeId = '5d9afccd7758c65dba4a531c'


    describe('Joi validation failed', function() {
      beforeEach(function() {
        res = mockRes()
        next = sinon.stub()
      })


      it('throws error if not sending brand_id attr in request params', async function() {
        const req = mockReq({
          query: {},
          headers: {}
        })
        await campaignController.GetCampaignsByBrandId(req, res, next)
        expect(next.lastCall.args[0]).match(/"brand_id" is required/gi)
      })


      it('throws error if sending invalid brand_id attr in request params', async function() {
        const req = mockReq({
          query: { brand_id: wrongId },
          headers: {}
        })
        const matchedString = new RegExp(
          `"brand_id" with value "${wrongId}" fails to match the valid mongo id pattern`,
          'gi'
        )
        await campaignController.GetCampaignsByBrandId(req, res, next)
        expect(next.lastCall.args[0]).match(matchedString)
      })
    })


    describe('Joi validation passed', function() {
      it('returns expected results', async function() {
        expect(await campaignController.GetCampaignsByBrandId()).eq(true)
      })
    })
  })
})
Once again, type “npm run test”.
再次输入“ npm run test”。
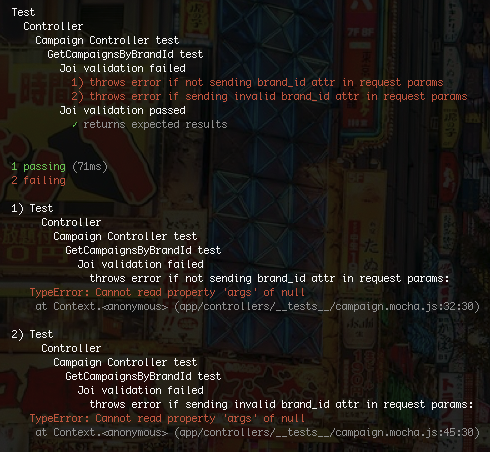
We can see at the screenshot below, those tests are FAILED because we haven’t define validation yet.
我们可以在下面的屏幕截图中看到,这些测试已失败,因为我们尚未定义验证。
Now, let’s make all those tests to PASSED again with this additional code below.
现在,让我们把所有那些低于此额外的代码再次通过测试。
// Location: controller/campaign.js


const Joi = require('@hapi/joi')
Joi.objectId = require('joi-objectid')(Joi)


exports.GetCampaignsByBrandId = async (req, res, next) => {
  try {
    const validatedQuery = await Joi.validate(
      req.query,
      Joi.object().keys({
        brand_id: Joi.objectId().required()
      }),
      { stripUnknown: true }
    )


    return true
  } catch (err) {
    return next(err)
  }
}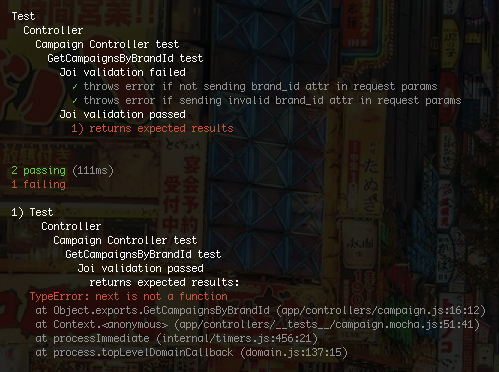
Yap! It’s all PASSED!
没错 全部通过 !
But, something went wrong! Our `Joi validation passed` section is FAILED 😮 ! It’s expected because we don’t send any brand_id on that test scenario 😕.
但是,出了点问题! 我们的“ Joi验证通过”部分已失败 😮! 可以预期,因为我们没有在该测试方案send上发送任何brand_id。
Let’s fix the test case on `Joi validation passed`. In this part, we’ve already known that it needs to query the required data to get the list of campaigns. On the first step, we have to create the mocked modules.
让我们将Joi验证通过的测试用例修复。 在这一部分中,我们已经知道它需要查询所需的数据以获取广告系列列表。 第一步,我们必须创建模拟模块。
// Location: controller/__tests__/mocks/campaign.mockedModules.js


const proxyquire = require('proxyquire')
const sinon = require('sinon')
const {
  mongoose: {
    Types: { ObjectId }
  }
} = require('mongodb-dbmodels')


const FakeModel = () => {
  const FakeMongoModel = props => {
    this.props = props
  }


  FakeMongoModel.find = sinon.stub()


  return FakeMongoModel
}


const Campaign = FakeModel()
const CampaignMockedModules = {
  'mongodb-dbmodels': {
    models: {
      mongo: { campaign: Campaign }
    },
    mongoose: {
      Types: { ObjectId: ObjectId }
    }
  }
}
const CampaignModule = proxyquire('../../campaign', CampaignMockedModules)


module.exports = {
  CampaignMockedModules,
  CampaignModule
}
Then, include this file into campaign.mocha.js. In this step, we can refactor the unit test code like removing const campaignController = require(‘../campaign’) and replace it by using this mockedModules, and any other things that you think the unit test code is “a little messy”.
然后,将此文件包含到campaign.mocha.js中。 在这一步中,我们可以重构单元测试代码,例如删除const campaignController = require('../ campaign')并使用此mockedModules替换它,以及您认为单元测试代码“有些混乱”的任何其他内容。
// Location: controller/__tests__/campaign.mocha.js


// LINE CODE 1 - 11 -> https://gist.github.com/edharmowongso/2a052f5b352bbe0dbfeb5a9dce1bdda8


const {
  CampaignMockedModules: {
    '@pomona/pomona2-dbmodels': {
      models: {
        mongo: { campaign: Campaign }
      }
    }
  },
  CampaignModule: CampaignController
} = require('./mocks/campaign.mockedModules')


describe('Campaign Controller test', function() {
  describe('GetCampaignsByBrandId test', function() {
    let res,
      next,
      wrongId = '5d0e0ef4ea9baa7fb13ddsadfa',
      fakeId = '5d9afccd7758c65dba4a531c'


    describe('Joi validation failed', function() {
      beforeEach(function() {
        res = mockRes()
        next = sinon.stub()
      })


      it('throws error if not sending brand_id attr in request params', async function() {
        const req = mockReq({
          query: {},
          headers: {}
        })
        await CampaignController.GetCampaignsByBrandId(req, res, next)
        expect(next.lastCall.args[0]).match(/"brand_id" is required/gi)
      })


      it('throws error if sending invalid brand_id attr in request params', async function() {
        const req = mockReq({
          query: { brand_id: wrongId },
          headers: {}
        })
        const matchedString = new RegExp(
          `"brand_id" with value "${wrongId}" fails to match the valid mongo id pattern`,
          'gi'
        )
        await CampaignController.GetCampaignsByBrandId(req, res, next)
        expect(next.lastCall.args[0]).match(matchedString)
      })
    })


    describe('Joi validation passed', function() {
      it('returns expected results', async function() {
        const expectedOutput = {
          data: {
            name: 'Noddle Festival',
            start_at: '01-08-2020',
            end_at: '01-10-2020',
            products: [
              {
                id: 'abcdefg123456',
                value: 'Chicken Noddle'
              }
            ]
          }
        }


        const req = mockReq({
          query: { brand_id: fakeId },
          headers: {}
        })


        // stub Campaign.find
        Campaign.find.returns(expectedOutput)


        await CampaignController.GetCampaignsByBrandId(req, res, next)
        expect(res.json.lastCall.args[0]).to.deep.equalInAnyOrder(
          expectedOutput
        )
      })
    })
  })
})
Once again, type in the terminal “npm run test”.
再次输入终端“ npm run test”。

Without no doubt, we can see at the screenshot above, the results test is FAILED because we haven’t load MongoDB for Campaign table query yet. To do so, load MongoDB for Campaign table in our campaign.js.
毫无疑问,我们可以在上面的截图中看到结果测试失败,因为我们尚未加载MongoDB进行Campaign表查询。 为此,请在我们的campaign.js中加载MongoDB for Campaign表。
// Location: controller/campaign.js


const {
  models: {
    mongo: { campaign: Campaign }
  }
} = require('@pomona/pomona2-dbmodels')


const Joi = require('@hapi/joi')
Joi.objectId = require('joi-objectid')(Joi)


exports.GetCampaignsByBrandId = async (req, res, next) => {
  try {
    const validatedQuery = await Joi.validate(
      req.query,
      Joi.object().keys({
        brand_id: Joi.objectId().required()
      }),
      { stripUnknown: true }
    )


    const campaign = await Campaign.find({
      brand_id: validatedQuery.brand_id
    })


    return res.json(campaign)
  } catch (err) {
    return next(err)
  }
}
Yay! Our scenario tests have been PASSED successfully. 😃
好极了! 我们的情景测试已成功通过 。 😃
Now, if you think that you have to refactor/readjust the code because of :
现在,如果您由于以下原因必须重构/重新调整代码:
Better algorithm
更好的算法
Code readability
代码可读性
New requirement regarding this feature, or any other things
有关此功能或任何其他事项的新要求
Just do it! If it’s become failed again, repeat steps 2–5 on six steps section until you feel that there are no changes needed.
去做就对了! 如果再次失败,请在六个步骤部分重复步骤2–5,直到您觉得不需要更改为止。
For Your Information (FYI)
- console.log / debugger is Your Best Partner
- Make your method easy to test.
优势与劣势 (Advantage & Disadvantage)
After a fun and tiring session, I am pretty sure you already know what are you feeling when doing that. Are you feeling frustrated because of the need for spending more time? Or it gives you more productivity? To summary it, here are some of the advantages to be gained from compressing this TDD:
经过一次有趣而累人的会议之后,我很确定您已经知道自己在做那件事时的感受。 您是否因为需要花费更多的时间而感到沮丧? 还是可以提高生产力? 概括起来,这里是压缩此TDD可获得的一些优点:
Helps reduce the amount of time required for rework.
帮助减少返工所需的时间。
Helps explore bugs or errors very quickly.
帮助快速发现错误或错误。
Encourages the development of cleaner and better designs.
鼓励开发更清洁,更好的设计。
Gives the programmer confidence to change the “massive” architecture of an application smoothly.
使程序员有信心平滑地更改应用程序的“大规模”体系结构。
Results in the creation of extensive code that is flexible and easy to maintain.
导致创建灵活且易于维护的大量代码。
Here are some of the disadvantages that will be obtained from compressing this TTD :
这是压缩此TTD可获得的一些缺点:
Spending more time writing a test.
花更多的时间编写测试。
Tests need to be maintained when requirements change.
需求变更时需要维护测试。
All the members of a team need to do it. Unless everyone on the team correctly maintains their tests, the whole system can quickly degrade.
团队的所有成员都需要这样做。 除非团队中的每个人都正确维护他们的测试,否则整个系统会Swift降级。
IMPORTANT
重要
Beware of the Time Schedule!The time required to do this TDD :- On the Developer Perspective: It takes 2X than usual!- On Project Team Perspective: Slow Development
提防时间表! 进行此TDD所需的时间:- 从开发人员的角度来看:比平时花了两倍 !- 从项目团队的角度来看:开发缓慢
So, that’s it. Thank you for reading! I hope this gives you an idea of about the basic concept of TDD, and how to implement it with any programming languages.
就是这样了。 感谢您的阅读! 我希望这能使您对TDD的基本概念以及如何使用任何编程语言实现它有所了解。
References and Further Resources:
参考资料和其他资源:
https://www.knowledgehut.com/blog/agile/6-compelling-benefits-of-tdd-test-driven-development (Benefit of using TDD)
https://www.knowledgehut.com/blog/agile/6-compelling-benefits-of-tdd-test-driven-development (使用TDD的好处)
https://www.testingexcellence.com/pros-cons-test-driven-development/ (Pros & Cons for TDD)
https://www.testingexcellence.com/pros-cons-test-driven-development/(TDD的 利弊)
https://www.simform.com/unit-testing-tdd/ (More detail explanation for TDD Unit Testing)
https://www.simform.com/unit-testing-tdd/ (有关TDD单元测试的更多详细说明)
https://www.browserstack.com/guide/tdd-vs-bdd-vs-atdd (TDD vs BDD vs ATDD)
https://www.browserstack.com/guide/tdd-vs-bdd-vs-atdd(TDD、BDD 和ATDD)
https://www.ukessays.com/essays/computer-science/model-driven-development-vs-test-driven-development-computer-science-essay.php (Analysis for TDD more further)
(If you want to watch the video, I recommend this lecture https://www.youtube.com/watch?v=6pYUzEduLyU)
(如果您想观看视频,我建议您参加本讲座https://www.youtube.com/watch?v=6pYUzEduLyU )
翻译自: https://medium.com/@edharmowongso/test-driven-development-tdd-nodejs-b8de0ea03741
tdd测试驱动开发


 1万+
1万+


 被折叠的 条评论
为什么被折叠?
被折叠的 条评论
为什么被折叠?
 到【灌水乐园】发言


