


springboot微服务
For a matured microservice ecosystem we need a combination of frameworks to co-exist. Frameworks including “centralized configuration”, “service discovery”, “api gateway”, “auto-scalability” are just the few pieces in the complex world of microservices. These patterns/technologies will be covered in subsequent parts of this series — SpringBoot Microservices — Learning through examples.
对于成熟的微服务生态系统,我们需要框架的组合才能共存。 包括“集中式配置”,“服务发现”,“ api网关”,“自动可扩展性”在内的框架只是微服务复杂世界中的少数内容。 这些模式/技术将在本系列的后续部分( SpringBoot微服务)中进行介绍。
The primary objective of this article is to develop a Microservice which can be independently developed, tested and deployed. We will be using SpringBoot as the primary technology for development. Other supporting technologies include — Spring, Spring MVC, MongoDB, Spring Data MongoDB, Maven & Java.
本文的主要目的是开发一种可以独立开发,测试和部署的微服务。 我们将使用SpringBoot作为开发的主要技术。 其他支持技术包括-Spring,Spring MVC,MongoDB,Spring Data MongoDB,Maven和Java 。
The article is divided in following sections
本文分为以下几节
Decomposing Microservices — Helps in understanding the fundamentals to define a Microservice.
分解微服务—帮助您了解定义微服务的基础。
Developing Microservice — Creates a sample Microservice which can be independently developed, tested and deployed
开发微服务 —创建可以独立开发,测试和部署的示例微服务
Testing Microservice — Provides basic understanding on testing a Microservice.
测试微服务 —提供有关测试微服务的基本知识。
Deploying Microservice- Provides basic understanding on deploying a Microservice.
部署微服务-提供有关部署微服务的基本知识。
分解微服务 (Decomposing Microservices)
Before jumping into microservices, we must understand what we are standing against — “The monolith applications”.
在进入微服务之前,我们必须了解我们所反对的东西–“整体应用程序”。
巨石 (The Monolith)
The monolith applications provide a related set of features packaged and deployed together. This restricts the development, maintenance and scalability of an application. Lets take an example of an e-commerce application (something like Magento), which has multitude of features but they are all bundled together in one monolith. The application needs to be broken into smaller services, if we plan to migrate to the microservices world.
整体应用程序提供了打包和部署在一起的一组相关功能。 这限制了应用程序的开发,维护和可伸缩性。 让我们以一个电子商务应用程序(例如Magento )为例,该应用程序具有许多功能,但都捆绑在一起。 如果我们计划迁移到微服务领域,则需要将应用程序分解为较小的服务。
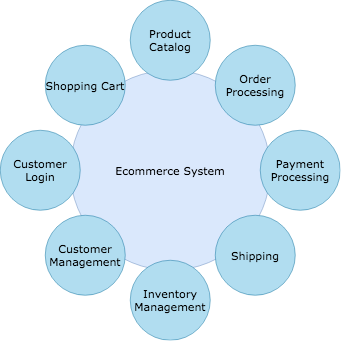
A typical e-commerce application provides features like Shopping Cart, Product Search, Product Catalog, Order Processing, Shipping, etc. The segregation of business functions in the form of independent services is typically based on the domain model. You can find the segregation in the form of modules in the application. Once the segregation is clear from business perspective, we must follow some fundamental principles to create Microservices.
一个典型的电子商务应用程序提供的功能包括购物车,产品搜索,产品目录,订单处理,运输等。 以独立服务形式进行的业务功能隔离通常基于域模型。 您可以在应用程序中以模块的形式找到隔离。 一旦分离是从企业的角度来看清楚,我们必须遵循一些基本原则,以创建微服务。
分解原理 (Principles of decomposition)
Single responsibility principle is the key in deciding over the responsibilities and boundaries of a service. We must ensure their definitions are small and maintainable by a small team, consisting of 5–10 people. Another important principle to keep in mind is “common closure principle” which says — “What affects one, affects all”. The defined service must be cohesive and independent at the same time. It should implement a small set of strongly related functions. The figure below depicts an illustrative segregation of microservices for an e-commerce software.
单一责任原则是决定服务的责任和界限的关键。 我们必须确保它们的定义很小并且可以由5-10人组成的小团队维护。 要牢记的另一个重要原则是“通用封闭原则”,即“影响一个人,影响所有人”。 定义的服务必须同时具有凝聚力和独立性。 它应该实现一小组高度相关的功能。 下图描绘了用于电子商务软件的微服务的示例性隔离。
Do not consider this list as final, as it can be extended in many ways, but it is good enough to develop a preliminary understanding of — “the breakdown into Microservices”.
不要认为此列表是最终列表,因为它可以通过多种方式扩展,但是足以对“微服务的细分”有一个初步的了解。
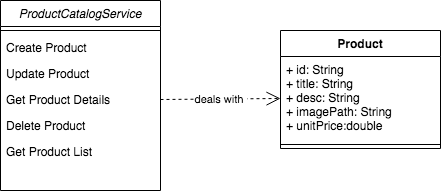
As we have a set of services now, lets take a closer look into one of the services — “Product Catalog Service”. We will be developing this service as part of this exercise. The primary functions of the service include — “adding a product”,”updating a product”, “getting product details”, “deleting a product” and “getting a product list”. All of them are the related functions, dealing with one data entity only — Product. All the function related to product residing in one service makes it cohesive. We have segregated the services but “what about the database?”
由于我们现在拥有一组服务,因此让我们仔细研究其中一项服务-“产品目录服务”。 我们将在此练习中开发此服务。 该服务的主要功能包括-“添加产品”,“更新产品”,“获取产品详细信息”,“删除产品”和“获取产品列表”。 所有这些都是相关功能,仅处理一个数据实体-Product 。 与一项服务中的产品相关的所有功能使其具有凝聚力。 我们已经分离了服务,但是“数据库呢? ”
一服务一数据库 (One Service One Database)
A shared database across multiple services create a tightly coupled environment which we must deal with. The concept of “One Service One Database” comes for rescue here. As per this pattern — all the methods(or functions) of a microservice should modify only one database. This makes the services truly independent.
跨多个服务的共享数据库创建了我们必须处理的紧密耦合的环境。 这里提供了“一个服务一个数据库”的概念。 按照这种模式-微服务的所有方法(或功能)应仅修改一个数据库。 这使服务真正独立。
We can make better decisions in deciding the database for a service based on its needs. For instance a Product Catalog Service can be best dealt with Document oriented database (like MongoDb) and a Shopping Cart Service can be based on the Key value database (like Redis).
在根据数据库的需求确定服务的数据库时,我们可以做出更好的决策。 例如,最好使用面向文档的数据库(例如MongoDb )来处理产品目录服务,而购物车服务可以基于键值数据库(例如Redis )来处理。
开发微服务 (Developing Microservice)
技术领域(Technologies)
We will be using Spring Boot, as the primary technology, to develop our first microservice. Spring Boot makes it easy to create stand-alone, production-grade Spring based Applications that you can just run. In our “Product Catalog Service” all of its CRUD (create, read, update, delete) operations will be exposed as API through HTTP. And the request and response will be exchanged through JSON format.Spring MVC will help us in building the restful service. All the data will be stored using MongoDB database as per the “One Service One Database” pattern we discussed above.
我们将使用Spring Boot作为主要技术来开发我们的第一个微服务。 使用Spring Boot可以轻松地创建可以运行的独立的,基于生产级别的基于Spring的应用程序。 在我们的“产品目录服务”中,其所有CRUD(创建,读取,更新,删除)操作都将通过HTTP作为API公开。 并且请求和响应将通过JSON格式交换。 Spring MVC将帮助我们构建宁静的服务。 按照我们上面讨论的“一种服务一个数据库”模式,所有数据都将使用MongoDB数据库存储。
Before we get our hands dirty, we need to ensure our machine has a compatible platform to run Spring Boot applications. To build our first microservice we need — JDK 11 and Maven 3.x. Once you have them in place, we need to create application folder structure and build configuration. Spring Initializer does the job for us pretty smoothly.
在动手之前,我们需要确保我们的机器具有兼容的平台来运行Spring Boot应用程序。 要构建我们的第一个微服务,我们需要-JDK 11和Maven3.x。 将它们放置到位后,我们需要创建应用程序文件夹结构并构建配置。 Spring Initializer为我们顺利完成了工作。
代码结构和配置 (Code structure and configuration)
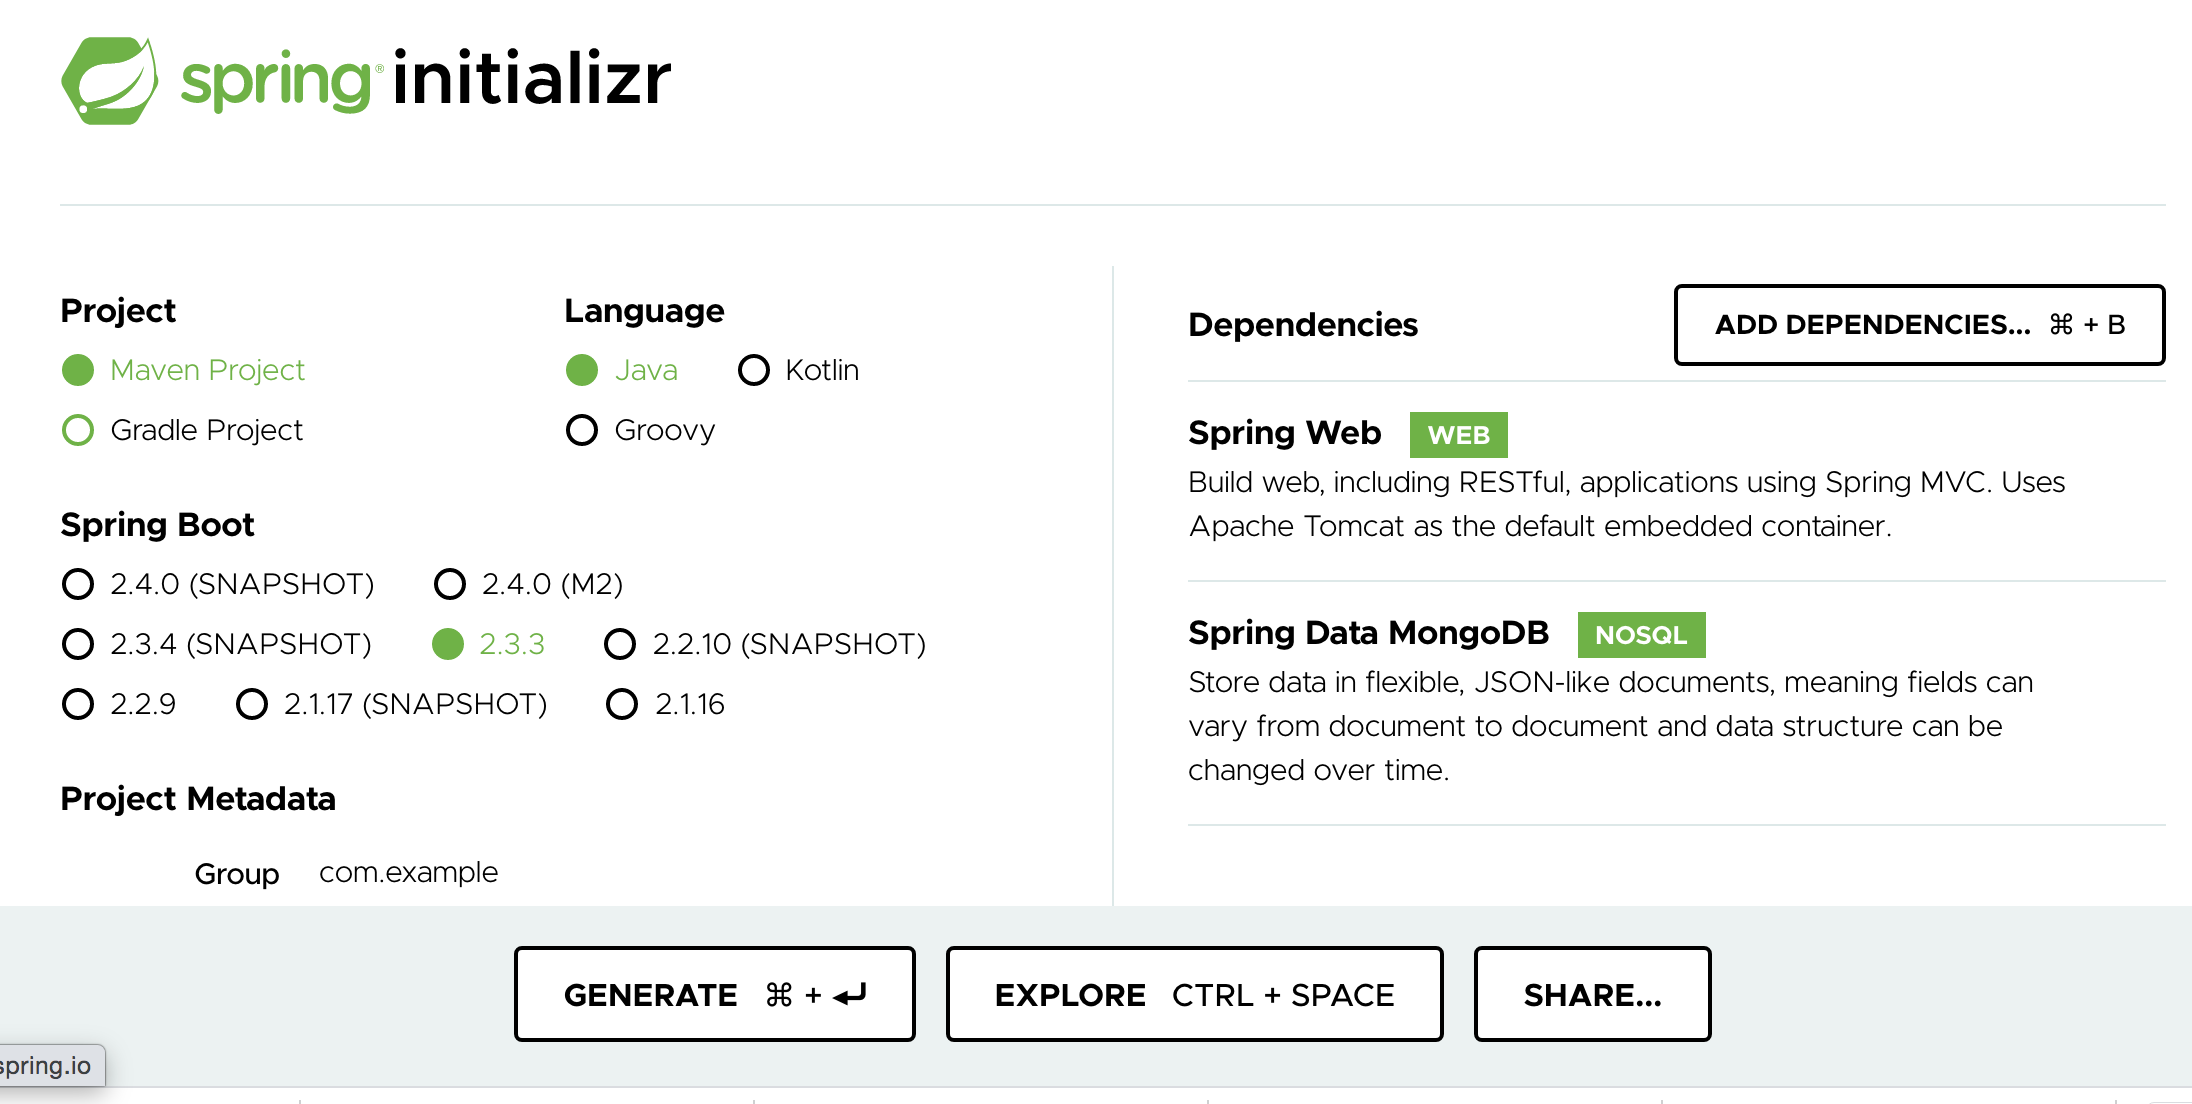
To generate the required structure and configuration, go to https://start.spring.io/. Stick to the default options and add two dependencies — Spring Web & Spring Data MongoDb. Click on the GENERATE button to start downloading the archive. Unzip it at your preferred location. The folder structure looks similar to a typical maven based web project. Lets peek into the core features we are getting out of the box.
要生成所需的结构和配置,请转到https://start.spring.io/ 。 坚持默认选项并添加两个依赖项-Spring Web和Spring Data MongoDb 。 单击GENERATE(生成)按钮开始下载存档。 将其解压缩到您喜欢的位置。 文件夹结构看起来类似于典型的基于Maven的Web项目。 让我们来看看我们即将使用的核心功能。
If you see pom.xml you will find entries of spring-boot-starter-web and spring-boot-starter-data-mongodb. These are the starter libraries helping in getting all the libraries related to Spring Web and Spring Data MongoDB modules. This cuts down significant effort on the developer front to resolve and capture dependencies one by one.
如果看到pom.xml ,则会找到spring-boot-starter-web条目 和spring-boot-starter-data-mongodb 。 这些是入门库,可帮助获取与Spring Web和支持Data MongoDB模块有关的所有库。 这减少了开发人员在解决和捕获依赖关系方面的大量工作。
The initial code structure also generate DemoApplication.java. You can see that the class is annotated with @SpringBootApplication. This is an umbrella annotation which is equivalent to a combination of @Configuration, @ComponentScan and @EnableAutoConfiguration annotations. @ComponentScan and @Configuration are the standard spring annotations to read bean definitions across the source code.
初始代码结构还会生成DemoApplication.java。 您可以看到该类使用@ SpringBootApplication注释。 这是一个伞形注释,等效于@ Configuration , @ ComponentScan和@ EnableAutoConfiguration注释的组合。 @ComponentScan和@Configuration是用于在源代码中读取bean定义的标准spring注释。
Another interesting part of code is the main method. The following statement helps in starting the Spring Boot application.
代码的另一个有趣的部分是main方法。 以下语句有助于启动Spring Boot应用程序。
SpringApplication.run(DemoApplication.class, args);We just need one additional configuration — to configure MongoDB connection details. Its optional though. If we do not give any configuration, the application will connect to your localhost instance. If you already have it installed locally, or you are planning to, you can skip this configuration. I am using an instance which is hosted on the MongoDB cloud space (got it free), which can be configured as below in application.properties . You can install MongoDB locally, if you like.
我们只需要一种附加配置-配置MongoDB连接详细信息。 它是可选的。 如果我们不提供任何配置,则该应用程序将连接到您的localhost实例。 如果已经在本地安装或计划安装,则可以跳过此配置。 我正在使用一个托管在MongoDB云空间上的实例(免费获取),可以在application.properties对其进行如下配置。 您可以根据需要在本地安装MongoDB。
spring.data.mongodb.uri=mongodb+srv://xxx-user:xxx-pwd@cluster0.nrsv6.gcp.mongodb.net/ecommerce?retryWrites=true&w=majorityAs we are set with the skeleton code structure and basic configuration, its time to develop our ProductCatalogService.
有了基本代码结构和基本配置,我们就可以开发ProductCatalogService 。
开发ProductCatalogService (Developing ProductCatalogService)
Create a new class — ProductCatalogService and implement the CRUD operations as you can see below. Following Spring MVC annotations have been used here —
创建一个新类-ProductCatalogService并实现CRUD操作,如下所示。 在这里使用了以下Spring MVC注释-
@RestController— Spring MVC annotation to tag a class as restful service@RestController— Spring MVC注释,用于将类标记为@RestController服务@PostMapping,@GetMapping,@PutMapping,@DeleteMappingare the Spring MVC annotations to represent REST operations — POST, GET, PUT and DELETE.@PostMapping,@GetMapping,@PutMapping,@DeleteMapping是Spring MVC注释,用于表示REST操作@DeleteMapping,GET,PUT和DELETE 。
@RestController
public class ProductCatalogService {@Autowired
    private MongoTemplate mongoTemplate;@PostMapping("/product")
    public Product addProduct(@RequestBody Product product) {
        return mongoTemplate.insert(product);
    }@PutMapping("/product")
    public Product updateProduct(@RequestBody Product product) {
        return mongoTemplate.save(product);
    }@GetMapping("/product/{id}")
    public Product getProductDetails(@PathVariable String id) {
        return mongoTemplate.findById(id, Product.class);
    }@DeleteMapping("/product/{id}")
    public String deleteProduct(@PathVariable String id) {
        Product toDeleteProduct = new Product();
        toDeleteProduct.setId(id);mongoTemplate.remove(toDeleteProduct);
        return "Product Deleted-" + id;
    }@GetMapping("/product")
    public List < Product > getProductList() {
        return mongoTemplate.findAll(Product.class);
    }}
We are using two external classes here
我们在这里使用两个外部类
Product— representing the data entityProduct-代表数据实体MongoTemplate— helper class to store and read data in MongoDbMongoTemplate—帮助程序类,用于在MongoDb中存储和读取数据
@Document(collection = "product")
public class Product {
    @Id
    private String id;
    private String title;
    private String desc;
    private String imagePath;
    private double unitPrice;public String getId() {
        return id;
    }public void setId(String id) {
        this.id = id;
    }
...@Override
    public String toString() {
        return "Product [desc=" + desc + ", id=" + id + ", imagePath=" + imagePath + ", title=" + title + ", unitPrice=" +
            unitPrice + "]";
    }
}
The code is only for illustration. You can download the complete code on Github.
该代码仅用于说明。 您可以在Github上下载完整的代码。
Now you are ready to run your first Microservice based on Spring Boot. Run the command mvn spring-boot:run and access the restful service at http://localhost:8080. You can play around with its CRUD operations with the help of API tools like Postman. In the next section we will see how we can test the API methods in the code itself.
现在,您准备基于Spring启动运行你的第一个微服务。 运行命令mvn spring-boot:run并访问位于http:// localhost:8080的Restful服务。 您可以借助Postman等API工具来尝试其CRUD操作。 在下一节中,我们将看到如何在代码本身中测试API方法。
测试微服务 (Testing Microservice)
With Spring Boot you can execute integration tests with quite ease. If you look at your pom.xml you will find another starter dependency — “spring-boot-starter-test”. This package provides another umbrella for testing libraries including — junit, mockito, spring-test,assertj and few others.
使用Spring Boot,您可以轻松执行集成测试。 如果查看pom.xml,您会发现另一个启动程序依赖项-“ spring-boot-starter-test ”。 该软件包为测试库提供了另一个保护伞,包括-junit,mockito,spring-test,assertj和其他一些库。
We will do the testing with the mock environment. It does not start the embedded web server, instead it creates a similar mock environment based on Spring’s MockMvc. If you are really keen on starting the embedded server, this can be achieved as well. Here is the sample code, where we are trying to validate our ProductCatalogService-Api.
我们将在模拟环境中进行测试。 它不启动嵌入式Web服务器,而是基于Spring的MockMvc创建类似的模拟环境。 如果您真的很想启动嵌入式服务器,那么也可以实现。 这是示例代码,我们试图在其中验证我们的ProductCatalogService- Api。
@SpringBootTest
@AutoConfigureMockMvc
@TestMethodOrder(MethodOrderer.OrderAnnotation.class)
class ProductCatalogApplicationTests {
    @Autowired
    private MockMvc mvc;    private String testProductId = "5f45d17f72774d4b9e53e811";

    @Test
    @Order(1)
    public void testCreateProduct() throws Exception {
        this.mvc.perform(post("/product")
                .contentType(MediaType.APPLICATION_JSON)
                .content("{\"id\":\"" + testProductId + "\",\"title\":\"test-product-2\",\"desc\":\"test product 2\",\"imagePath\":\"gc://image-path\",\"unitPrice\":10.00}")
                .accept(MediaType.APPLICATION_JSON))
            .andExpect(status().isOk());
    }
    ...}
The @SpringBootTest annotation tells Spring Boot to look for a main configuration class (one with @SpringBootApplication, for instance) and use that to start a Spring application context. @AutoConfigureMockMvc annotation that is applied to enable and configure auto-configuration of MockMvc. @Test is the standard JUnit annotation. @TestMethodOrder & @Order is used to ensure the tests run in a specific order. Complete code can be accessed at Github
@SpringBootTest批注告诉Spring Boot寻找一个主要的配置类(例如,一个带有@SpringBootApplication类),然后使用@SpringBootApplication来启动Spring应用程序上下文。 @AutoConfigureMockMvc批注,用于启用和配置MockMvc自动配置。 @Test是标准的JUnit批注。 @TestMethodOrder和@Order用于确保测试以特定顺序运行。 完整的代码可以在Github上访问
You can execute the tests through mvn testcommand. You can include these integration test in your build process as well. An elaborative testing strategy on microservices will be covered separately in this series.
您可以通过mvn test命令执行测试。 您也可以在构建过程中包括这些集成测试。 本系列将分别介绍微服务的详尽测试策略。
部署微服务 (Deploying Microservice)
We did run our application and validated, but it was in the context of development environment. Production environments do not have the build or development tools. They only come with runtime environment. For this we just need jar. Our mvn build command can generate the jar file which we can execute it in any environment, be it a Virtual Machine, Docker Container or the supporting cloud platforms. Typically all the build cycles will use mvn:install command to generate the executable jar.
我们确实运行了应用程序并进行了验证,但这是在开发环境中进行的。 生产环境没有构建或开发工具。 它们仅带有运行时环境。 为此,我们只需要jar 。 我们的mvn build命令可以生成jar文件,该文件可以在任何环境中执行,无论是虚拟机,Docker容器还是支持的云平台。 通常,所有构建周期都将使用mvn:install命令生成可执行jar。
Once we get the executable jar, we can run it in different ways. As Spring Boot based application archive is relatively heavier, its recommended that we unpack it before running it. One way to run an unpacked archive is by starting the appropriate launcher, as follows:
一旦获得了可执行jar,就可以以不同的方式运行它。 由于基于Spring Boot的应用程序存档相对较重,因此建议我们在运行之前解压缩它。 运行解压存档的一种方法是启动适当的启动器,如下所示:
$ jar -xf demo-0.0.1-SNAPSHOT.jar
$ java org.springframework.boot.loader.JarLauncher
Once you have unpacked the jar file, you can also get an extra boost to startup time by running the app with its “natural” main method instead of the JarLauncher. For example:
解压缩jar文件后,您还可以通过使用其“自然”主方法(而不是JarLauncher运行应用程序来增加启动时间。 例如:
$ jar -xf demo-0.0.1-SNAPSHOT.jar
$ java -cp BOOT-INF/classes:BOOT-INF/lib/*  com.example.demo.DemoApplication
At this moment lets go with the assumption that we can deploy our microservice at any server location. We are not jumping into the containerization of our Microservice as of now. We will deal with this topic in the parts of this series.
目前,假设我们可以在任何服务器位置部署微服务。 到目前为止,我们还没有进入微服务的容器化。 我们将在本系列的各个部分中处理这个主题。
下一步 (Next Steps)
We learned to develop, test and deploy our first Microservice based on Spring Boot and MongoDB. This is just a start though. As we progress more into subsequent parts of this series, we will understand the Microservices from a totally different perspective. As I said earlier, this is just one piece of the puzzle.
我们学会了基于Spring Boot和MongoDB开发,测试和部署我们的第一个微服务。 不过,这只是一个开始。 随着我们进一步深入本系列的后续部分,我们将从完全不同的角度理解微服务。 正如我之前所说,这只是难题的一小部分。
In the next article, we will develop components around Centralized Configuration. This is very important as the standard way of configuration , be it the file bundled with application, an external file, or a system variable, it does not work in the microservices world. This new way of configuration enables us to share and update the configuration easily.
在下一篇文章中,我们将围绕集中式配置开发组件。 作为标准配置方式,这是非常重要的,无论是与应用程序捆绑在一起的文件,外部文件还是系统变量,它在微服务领域都不起作用。 这种新的配置方式使我们能够轻松共享和更新配置。
您可以浏览 (You Can Browse)
Next Exercise: Developing Config as a Service
下一练习:将配置开发为服务
Complete Series: Spring Boot Microservices — Learning through Examples
完整系列: Spring Boot微服务—通过示例学习
翻译自: https://medium.com/swlh/springboot-microservices-developing-first-service-fbff8033bb9b
springboot微服务


 322
322


 被折叠的 条评论
为什么被折叠?
被折叠的 条评论
为什么被折叠?
 到【灌水乐园】发言


