


16 Aug: My second article: From Scripts To Prediction API
8月16日:我的第二篇文章: 从脚本到预测API
As advanced beginners, we know quite a lot: EDA, ML concepts, model architectures etc…… We can write a big Jupyter Notebook, click “Restart & Run All” and generate state-of-art results. OK, what next? How can others use/reproduce/scale your results?
作为高级初学者,我们了解很多:EDA,ML概念,模型体系结构等……我们可以编写一个大型的Jupyter Notebook,单击“重新启动并全部运行”并生成最新的结果。 好,接下来呢? 其他人如何使用/复制/缩放结果?
In this article, I will show you how I convert a Jupyter Notebook from Kaggle on the Wine dataset to scripts, share some engineering practices that we can adapt easily and bring benefits right away.
在本文中,我将向您展示如何将Jupyter Notebook从Wine数据集上的Kaggle转换为脚本,分享一些我们可以轻松适应并立即带来收益的工程实践。
For each of them, there is much more to dig in but we will only surface with the basics, show the benefits, and explain the thought process! The goal is to minimize the probability that the engineers roll their eyes when they talk to you.
对于他们每个人,还有很多需要挖掘的东西,但是我们只会浮现基础知识,展示收益并解释思想过程! 目的是最大程度地降低工程师与您交谈时翻白眼的可能性。
Jupyter笔记本 (Jupyter Notebook)
Jupyter Notebook is nice for exploration and prototype but we cannot stay there forever. No engineers [Or no one] wants to read your code and rewrite it. Even you are fortunate enough to have engineering resources, it just slows the whole process down🙁
Jupyter Notebook非常适合用于探索和原型制作,但我们不能永远呆在那里。 没有工程师(或者没有人)想要阅读您的代码并重写它。 即使您幸运地拥有工程资源,也只会减慢整个过程的速度🙁
Somehow we need to adapt engineering practices, make it reproducible, automatable, and deployable! The first step is to convert the notebook to scripts and it is the main theme of this article!
我们需要以某种方式适应工程实践,使其可重现,自动化和可部署! 第一步是将笔记本转换为脚本,这是本文的主题!
All credits of this great notebook in repo go to the original creator!
回购中这款出色笔记本的全部功劳归原始创建者所有!
脚本:ipynb-> .py (Scripts: ipynb -> .py)
Why script? Why can’t we just use the interactive notebook when it is working fine? Let me propose some scenarios to justify why it may be a good idea to use scripts beyond exploration!
为什么要脚本? 为什么不能在交互式笔记本正常工作时使用它? 让我提出一些方案来证明为什么使用脚本而不是探索可能是一个好主意!
- If you want to run 20 big models in parallel, will you open 20 notebooks? 如果要并行运行20个大型型号,是否可以打开20个笔记本?
- Suppose you are willing to open 20 notebooks, how will you configure the hyperparameters? Go to each notebook and find related cells? 假设您愿意打开20个笔记本,那么如何配置超参数? 转到每个笔记本并找到相关的单元格?
- Suppose you manually configure 20 notebooks, how will you analyze the results? Go to each notebook? 假设您手动配置20个笔记本,将如何分析结果? 转到每个笔记本?
- Suppose you can handle 20 notebooks for the first 3 steps, what if you have a great idea but you need to experiment with 200 sets of hyperparameters, are you willing to repeat steps 1–3? 假设您可以在前三个步骤中处理20个笔记本,如果您有个好主意,但需要试验200套超参数,您是否愿意重复步骤1-3?
- Suppose you find a bug in the original notebook and need to rerun everything, are you willing to repeat steps 1–3? 假设您在原始笔记本中发现了一个bug,并且需要重新运行所有内容,是否愿意重复步骤1-3?
If you answer YES to all, then this article is NOT for you, bye and have a good day 😊
如果您对所有人的回答都是“是”,那么本文不适合您,再见,祝您愉快
The way I structure the pipeline is to break it down into etl.py, train.py, and predict.py. Each script has its responsibility and tries to be as atomic as possible such that they can be developed by individual teammates as long as the responsibility is clear.
我结构管道的方法是把它分解成etl.py,train.py和predict.py。 每个脚本都有其责任,并且要尽可能地原子化,以便只要责任明确,就可以由单个队友开发。
etl.py: convert the raw data, do some transformation, create train.csv and test.csv under data folder [train_test_split]
etl.py :转换原始数据,进行一些转换,在数据文件夹[train_test_split]下创建train.csv和test.csv
train.py: use data in train.csv, export a model to model folder [model.fit(X, y)]
train.py :使用train.csv中的数据,将模型导出到模型文件夹[model.fit(X,y)]
predict.py: use data in test.csv and trained model, export the predictions, and evaluate [model.predict(X, y)]
predict.py:在test.csv使用数据和训练模型,导出的预测,并评估[model.predict(X,Y)]
# File structure
.
├── README.md
├── __init__.py
├── autoformat.sh
├── data
│   ├── predict.csv
│   ├── test.csv
│   ├── train.csv
│   └── winequality.csv
├── log
│   ├── etl.log
│   ├── predict.log
│   └── train.log
├── model
│   └── model.pkl
├── notebook
│   └── prediction-of-quality-of-wine.ipynb
├── requirement.txt
└── scripts
    ├── config.yml
    ├── etl.py
    ├── predict.py
    ├── test_train.py
    ├── test_utility.py
    ├── train.py
    └── utility.py
If I mess up something, I will not try to figure out why [imagine state mutation in Jupyter because you random run the cells], I will just run the script again and see.
如果我搞砸了,我将不会尝试找出原因(在Jupyter中想象状态突变,因为您随机运行单元格),我将再次运行脚本并查看。
# Run in command line, as simple as this :)$ python3 ./scripts/etl.py
$ python3 ./scripts/train.py
$ python3 ./scripts/predict.py
Great, we can load and run the scripts in the command line! But as we mentioned in the scenarios above [№2], how can we configure the hyperparameters then ?_?
太好了,我们可以在命令行中加载和运行脚本! 但是,正如我们在上述[№2]的场景中提到的那样,那么如何配置超参数?
配置文件作为输入:单击 (Config file as input: click)
The principle is to try not to touch the code, I have created another config.yml to contain all the configurations and load them via click. In this way, every new model is just another configuration, this ensures the reproductivity and avoids manually changing the code [and introduce bugs 🙁 ].
原理是尽量不要碰代码,我创建了另一个config.yml来包含所有配置,并通过click加载它们。 这样,每个新模型都只是另一种配置,这确保了可重复性,并且避免了手动更改代码[并引入错误🙁]。
# config.yml example, I only use this to configure the scripts
etl:
  raw_data_file: "data/winequality.csv"
  processed_path: "data"
  test_size: 0.2
  random_state: 42train:
  processed_train: "data/train.csv"
  ensemble_model: "RandomForestClassifier"
  model_config: {n_estimators: 300}
  model_path: "model/model.pkl"predict:
  model_path: "model/model.pkl"
  processed_test: "data/test.csv"
  predicted_file: "data/predict.csv"
  export_result: True
Inside the script, I created a utility function to parse the configuration file
在脚本内部,我创建了一个实用程序函数来解析配置文件
def parse_config(config_file):
    with open(config_file, "rb") as f:
        config = yaml.safe_load(f)
    return config
Then we can load the configurations to the scripts in an extensible way!
然后,我们可以以可扩展的方式将配置加载到脚本中!
@click.command()@click.argument("config_file", type=str, default="scripts/config.yml")
def etl(config_file):
    config = parse_config(config_file)
    raw_data_file = config["etl"]["raw_data_file"]
    processed_path = Path(config["etl"]["processed_path"]).......DO SOMETHING.......
If we have 20 models with a similar architecture, we can just prepare 20 configurations, that’s it
如果我们有20个具有相似架构的模型,那么我们只需准备20个配置即可
无打印:正在记录 (No print: logging)
We can now combine the script and configuration in the command line environment! How can I get the outputs? In the Jupyter world, I will print and see but it means I need to scan through a long long notebook, what if I have many models? Is there any concrete way to collect the outputs in a file?
现在,我们可以在命令行环境中结合脚本和配置! 如何获得输出? 在Jupyter的世界中,我将进行打印和查看,但这意味着我需要浏览一个很长的笔记本,如果我有很多型号怎么办? 有什么具体方法可以将输出收集到文件中?
Let print go, learn logging! Logging module in Python does what its name suggests, do logging in Python. We can define and log the things we are interested in, for example, which stage of the script [for debug], a summary of the metrics [for evaluation], I extracted a piece from model prediction and evaluation as an example
放手打印,学习日志记录 ! Python中的日志记录模块按照其名称的含义执行操作,在Python中进行日志记录。 我们可以定义并记录我们感兴趣的事物,例如,脚本的哪个阶段[用于调试],度量的摘要[用于评估],我从模型预测和评估中提取了一部分作为示例
This piece of code will generate the log similar to the one below
这段代码将生成类似于以下内容的日志
Learn more about logging from this article! https://www.machinelearningplus.com/python/python-logging-guide/
从本文中了解有关日志记录的更多信息! https://www.machinelearningplus.com/python/python-logging-guide/
Aside:
在旁边:
Logging is great but still if we have 100 experiments, we will get 100 log files 🙁 Even they are concrete, we may not want to read them one by one, is there any better way to evaluate? Below are some potential solutions:
日志记录很好,但是如果我们有100个实验,我们将获得100个日志文件🙁即使它们是具体的,我们也可能不想一一阅读,有没有更好的评估方法? 以下是一些可能的解决方案:
- Yet another script, utilize grep or regex, parse and extract the key information [but what if someone changes the format or spelling!?] 还有一个脚本,利用grep或regex,解析并提取关键信息[但是如果有人更改格式或拼写该怎么办!?]
Yet another tool, checkout MLFlow or ModelDB! [Logging is only one of the features of both products]
再现性问题:Conda env (Reproducibility matters: Conda env)
Yo, things seem good now! I can push to GitHub and my friends/colleagues can clone and run in their computer 😊
哟,现在看来情况不错! 我可以推送到GitHub,而我的朋友/同事可以克隆并在他们的计算机中运行😊
Oh wait……..their computer……..what if we are using different versions? It is common because every package has many versions, eg: sklearn. The APIs / interfaces may change over time [and breaks the code 🙁 ], how can we ensure we are using the same package?
哦等等.....他们的电脑.....如果我们使用的是其他版本? 这很常见,因为每个软件包都有许多版本,例如: sklearn 。 API /接口可能会随时间变化[并破坏代码🙁],我们如何确保使用相同的程序包?
Short answer: Conda env, check out Matt’s article
简短答案:Conda env,请查看Matt的文章
I list out some useful commands below, just enough for our needs
我在下面列出了一些有用的命令,足以满足我们的需求
# In terminal# Create the environment
$ conda create — name YOU_CHANGE_THIS python=3.7 -y# Activate it
$ conda activate YOU_CHANGE_THIS# Install the needed package
$ pip install –r requirements.txt# # ## # ## # ## # ## # ## # ##
# # # Do your development # # #
# # ## # ## # ## # ## # ## # ### Deactivate and back to normal environment
$ conda deactivate# This will remove the environment, do it when you finish the project?
$ conda remove –name YOU_CHANGE_THIS –all
*in requirements.txt, you should always specify the version! If you don’t specify it, it will try to download the latest one, but your latest maybe not my latest and lose the whole point of using Conda env
*在requirements.txt中,您应始终指定版本! 如果您不指定它,它将尝试下载最新版本,但是您的最新版本可能不是我的最新版本,从而失去了使用Conda env的全部意义。
# this is what I have inside requirements.txt
pytest==5.3.5
pandas==1.0.1
Click==7.0
scikit-learn==0.22.1
black==19.10b0
isort==4.3.21
PyYAML==5.2
不要破坏您以前的代码:pytest (Don’t break your previous code: pytest)
In the software / ML world, change is the constant, we change something whenever we work. But how can we ensure the new change doesn’t break the existing one [especially those you wrote a few months before]?
在软件/ ML世界中,变化是不变的,只要我们工作,我们都会进行更改。 但是我们如何确保新的变更不会破坏现有的变更(尤其是您几个月前写的变更)?
Unit tests are here to help 😊 We can write the test cases for each function to ensure they have the expected behavior. Unit tests cannot prove program correctness but they can safeguard the scenarios you listed!
单元测试可为您提供帮助😊我们可以为每个功能编写测试用例,以确保它们具有预期的行为。 单元测试不能证明程序的正确性,但是可以保护您列出的方案!
For example, the code below asserts the type and output dimension are as expected. It seems silly and simple but if your load_data function becomes more complex, you will appreciate something safeguard you all the way [especially if you want to change something, don’t ask me how I know]!
例如,下面的代码断言类型和输出维符合预期。 看起来很愚蠢和简单,但是如果您的load_data函数变得更加复杂,您将一路欣赏一些可以保护您的方法[特别是如果您想更改某些内容,请不要问我怎么知道]!
To run the unit test, simply run pytest in the terminal and you should see the output like this
要运行单元测试,只需在终端中运行pytest ,您应该会看到这样的输出
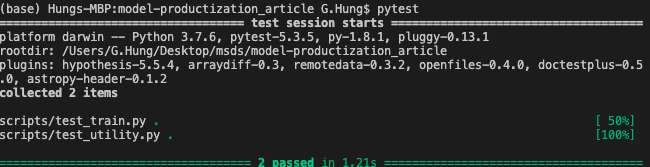
Cool, we can run pytest before we push to GitHub and try to maintain a workable program! But human isn’t reliable, what if we forget to run pytest before push and break the code!? How can we protect ourselves from this situation?
太酷了,我们可以在推送到GitHub并尝试维护可行的程序之前运行pytest! 但是人类是不可靠的,如果我们忘记在推送和破坏代码之前运行pytest呢? 在这种情况下,我们如何保护自己?
如果可能,不要依靠人:持续集成 (If possible, don’t rely on human: Continuous Integration)
What if the program itself can run the unit tests automatically when we push/create pull request? Then it can stop the merge if it cannot pass the tests! If you heard of continuous integration, this is part of the feature! Popular products in the market are CircleCI / TravisCI / jenkins, but I am lazy, I don’t want to do any extra configuration work if not needed so we will use relatively new GitHub Action for that 😊
如果在推送/创建请求请求时程序本身可以自动运行单元测试该怎么办? 如果无法通过测试,则可以停止合并! 如果您听说过持续集成,那么这就是该功能的一部分! 市场上流行的产品是CircleCI / TravisCI / jenkins,但是我很懒,如果不需要,我不想做任何额外的配置工作,因此我们将为此使用相对较新的GitHub Action。
In the past, I think the engineers are so smart, how can they remember the syntax and come up with a script like this [it is simple already] on their own? Don’t think in that way, most people just copy & modify the template as I do [there is a template called Publish Python package under CI workflows in GitHub Actions]
过去,我认为工程师是如此聪明,他们如何才能记住语法并独自提出这样的脚本(已经很简单)? 不要以这种方式思考,大多数人都像我一样复制和修改模板[GitHub Actions中CI工作流下有一个名为Publish Python package的模板]
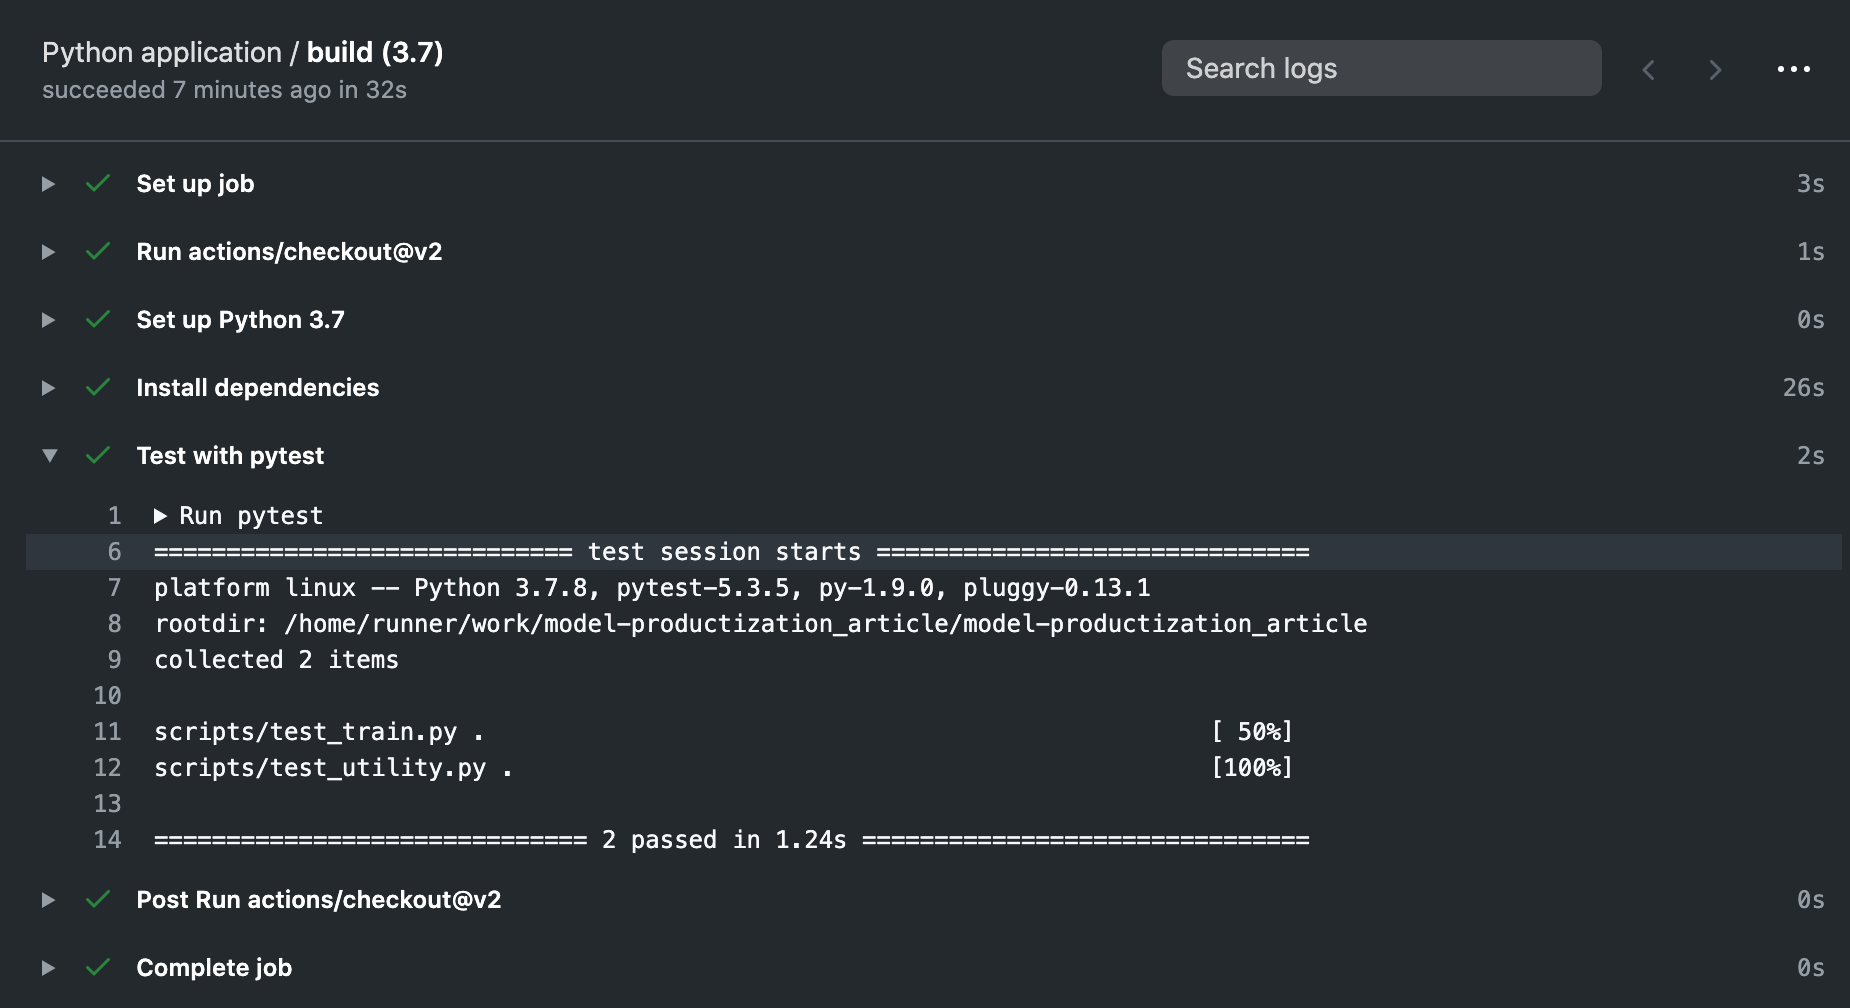
Now you see it! The scripts, package versions, and pytest work together to ensure the package versions are right and the program is workable! They will safeguard us when we develop incrementally, they will say NO if the code breaks the unit tests. If we find a bug, we can include that as another test case to ensure we don’t commit the same mistake twice!
现在您看到了! 脚本,软件包版本和pytest可以一起使用,以确保软件包版本正确且程序可行! 当我们逐步开发时,它们将保护我们,如果代码破坏了单元测试,他们将拒绝。 如果发现错误,可以将其作为另一个测试用例,以确保我们不会两次犯相同的错误!
Can you do the same in Jupyter Notebook with the same level of confidence?
您可以在Jupyter Notebook中以相同的置信度执行相同的操作吗?
Code Style matters: black, isort
代码样式很重要:黑色,isoort
Have you heard of pep8? It is the style convention to write Python, there are many (good) points but honestly, please don’t test me on that, my brain cannot remember them all!
您听说过pep8吗? 这是编写Python的样式惯例,有很多(好的)要点,但是老实说,请不要对此进行测试,我的大脑无法记住所有这些内容!
I remember in one of my classes, my professor requires us to use pycodestyle it is a tool to check the code style, then I got these messages and fix them one by one. For example:
我记得在我的一堂课中,我的教授要求我们使用pycodestyle这是一种检查代码样式的工具,然后我得到了这些消息并逐一修复。 例如:
$ pycodestyle --first optparse.py
optparse.py:69:11: E401 multiple imports on one line
optparse.py:77:1: E302 expected 2 blank lines, found 1
optparse.py:88:5: E301 expected 1 blank line, found 0
I think it is a good tool but kind of incomplete, if you can find my problems, why don’t you just correct that for me and save my time?
我认为这是一个很好的工具,但还不完善,如果您能找到我的问题,为什么不为我改正一下以节省时间呢?
Simply run this and the script will do the rest!# If you get permission error, you can try
# chmod +rx autoformat.sh
$ ./autoformat.sh
结论 (Conclusions)
Things are good for local now! I can push them to GitHub and my friends can clone and run it in their computer
事情现在对当地人有好处! 我可以将他们推送到GitHub,而我的朋友可以在他们的计算机中克隆并运行它
BUT! We know the important (bad) messages usually start with BUT/HOWEVER, eg: job application rejections 🙁
但! 我们知道重要的(坏的)消息通常以BUT / HOWEVER开头,例如:作业申请被拒绝🙁
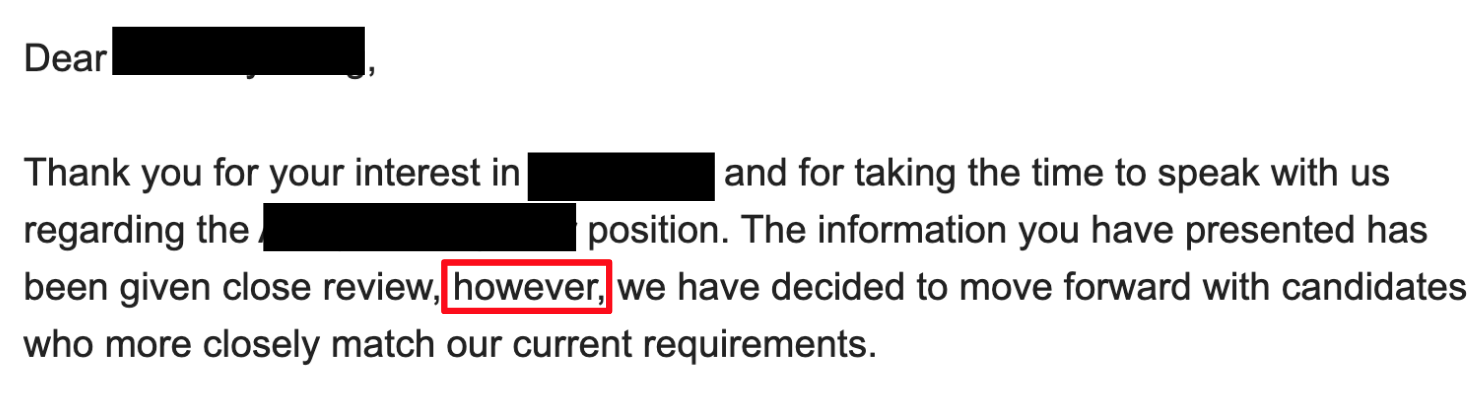
BUT what if we want to productionalize the model ?_?
但是,如果我们要对模型进行生产化怎么办?
Q: Firstly, what it means by productionalize?
问:首先,生产化意味着什么?
A: In a narrow sense, it means model consumption, I give you the input, you return me the output [maybe in JSON form], eg: web endpoint / API. We need to have a server [another computer] to host the models and endpoints, I don’t want to use my computer to host it or the whole product will rely on my poor Macbook🙁
答:从狭义上讲,这意味着模型消耗,我给您输入,您将输出返回给我[也许以JSON形式],例如:Web端点/ API。 我们需要有一个服务器[另一台计算机]主办的模型和终点,我不想用我的电脑主机,或整个产品将依靠我那可怜的MacBook🙁
I highlighted two words above and they are exactly the challenges
我在上面强调了两个词,而这恰恰是挑战
1.How to find another computer to host the models?
1.如何找到另一台计算机来托管模型?
Short answer: Either buy a computer OR rent one from cloud provider [eg: AWS, Azure, GCP], then we can claim we know CLOUD COMPUTING 😊
简短的答案:要么购买一台计算机,要么向云提供商租用一台计算机(例如:AWS,Azure,GCP),那么我们可以声称我们知道云计算COMP
2.What if another computer isn’t MacOS, how can I ensure my code is working there?
2.如果另一台计算机不是MacOS,该怎么办?
Short answer: Docker
简短答案:Docker
To wrap up, we:
最后,我们:
a. start from a Jupyter Notebook
b. Code conversion [ipynb to .py]
c. Make the scripts configurable [Click]
d. Include logging [logging]
e. Make sure the local environment is the same [Conda env]
f. Include unit test and basic CI [pytest, GitHub Action]
g. Autoformat the script style [black, isort]
I hope file tree structure with annotations can show you the code evolution, don’t be scared by many folders because they are developed step-by-step, if you understand the thought process, it is pretty straightforward!
我希望带有注释的文件树结构可以向您显示代码的演变过程,不要被许多文件夹吓到,因为它们是一步一步开发的,如果您了解思想过程,那就非常简单了!
.
├── README.md
├── __init__.py
├── .github/workflows         [f]
├── autoformat.sh             [g]
├── data
│   ├── predict.csv           [b]
│   ├── test.csv              [b]
│   ├── train.csv             [b]
│   └── winequality.csv
├── log
│   ├── etl.log               [d]
│   ├── predict.log           [d]
│   └── train.log             [d]
├── model
│   └── model.pkl             [b]
├── notebook
│   └── prediction-of-quality-of-wine.ipynb [a]
├── requirement.txt           [e]
└── scripts
    ├── config.yml            [c]
    ├── etl.py                [b, c]
    ├── predict.py            [b, c]
    ├── test_train.py         [f]
    ├── test_utility.py       [f]
    ├── train.py              [b, c]
    └── utility.py
Something we mentioned but didn’t elaborate:
我们提到但未详细说明的内容:
-> Databricks’s MLFlow / VertaAI’s ModelDB
-> Databricks的MLFlow / VertaAI的ModelDB
Something we can discuss more:
我们可以讨论更多的内容:
- Model deployment in cloud [AWS] 云中的模型部署[AWS]
- Containerization [Docker] 容器化[Docker]
Now we have built a solid foundation, these scripts are in the form that we can reuse it further! Imagine how can you do this with Jupyter Notebook?
现在我们已经建立了坚实的基础,这些脚本的形式可以进一步重用! 想象一下如何使用Jupyter Notebook做到这一点?
I understand what it feels like when someone said you should try ABC / XYZ but they don’t explain why or how to evolve from scratch, I hope this article can contribute a little bit :)
我了解有人说您应该尝试ABC / XYZ,但他们没有解释为什么或如何从头开始发展时的感觉,我希望本文能有所作为:)
If this article is useful, you can leave some comments
如果本文有用,则可以留下一些评论
OR you can star my repo!
或者你可以给我的仓库加注星号!
OR my LinkedIn [Welcome but please leave a few words to indicate you are not zombie]!
或我的LinkedIn (欢迎使用,请留下几句话以表明您不是僵尸)!
I learned most of these things from my internship @ Manifold AI
我从实习中获得了大部分这些东西,这是在Manifold AI
翻译自: https://towardsdatascience.com/from-jupyter-notebook-to-sc-582978d3c0c


 1961
1961

 被折叠的 条评论
为什么被折叠?
被折叠的 条评论
为什么被折叠?
 到【灌水乐园】发言


