


coordinator
SwiftUI is very powerful for building an interactive UI at a fast pace. However, there are a couple of limitations still there such as some native API from UIKit like MKMapView from MapKit or search bar and other UIKit API. I will provide a tutorial for making a MapView in SwiftUI by using UIViewRepresentable as well as putting callback to the SwiftUI if we have clicked the annotation.
SwiftUI在快速构建交互式UI方面非常强大。 但是,仍然存在一些限制,例如UIKit的一些本机API,例如MapKit的MKMapView或搜索栏以及其他UIKit API。 我将提供一个使用UIViewRepresentable在SwiftUI中制作MapView的教程,以及如果我们单击了批注就向SwiftUI回调的方法。
Some quick knowledge about several items below:
有关以下几项的一些快速知识:
- UIViewRepresentable : A wrapper for a UIKit view that you use to integrate that view into your SwiftUI view hierarchy UIViewRepresentable:UIKit视图的包装,用于将其集成到SwiftUI视图层次结构中
Coordinator : A SwiftUI view that represents a UIKit view controller can define a
Coordinatortype that SwiftUI manages and provides as part of the representable view’s context协调器:代表UIKit视图控制器的SwiftUI视图可以定义SwiftUI管理并作为可表示视图上下文的一部分提供的
Coordinator类型。- MapKit : UIKit API for Map behavior such as MKMapView and Annotation View and other native Map behavior MapKit:UIKit API,用于Map行为,例如MKMapView和Annotation View以及其他本机Map行为
First of all, we need to make our Model for displaying the item inside the map. The model we can put title and it’s coordinate (latitude and longitude).
首先,我们需要创建模型以在地图内显示项目。 我们可以放置标题的模型及其坐标(纬度和经度)。
final class Checkpoint: NSObject, MKAnnotation {
    let title: String?
    let countryCode: String?
    let coordinate: CLLocationCoordinate2D
    init(title: String?, countryCode: String?, coordinate: CLLocationCoordinate2D) {
        self.title = title
        self.countryCode = countryCode
        self.coordinate = coordinate
    }
}
In the code above, the Checkpoint class is a class that represent our map point in the view. Once this model has been created let’s move to the creation of MapView
在上面的代码中,Checkpoint类是代表视图中地图点的类。 创建此模型后,让我们继续创建MapView
Create a new struct of MapView and make it conform to UIViewRepresentable.
创建一个新的MapView结构并使其符合UIViewRepresentable。
import UIKit
import MapKit
import SwiftUI
struct MapView: UIViewRepresentable {

    // 1.
    var annotationOnTap: (_ title: String) -> Void

    // 2.
    @Binding var checkpoints: [Checkpoint]

    /// 3. Used internally to maintain a reference to a MKMapView
    /// instance when the view is recreated.
    let key: String
    private static var mapViewStore = [String : MKMapView]()

    // 4.
    func makeUIView(context: Context) -> MKMapView {
        if let mapView = MapView.mapViewStore[key] {
            mapView.delegate = context.coordinator
            return mapView
        }
        let mapView = MKMapView(frame: .zero)
        mapView.delegate = context.coordinator
        MapView.mapViewStore[key] = mapView
        return mapView
    }
    // 5.
    func updateUIView(_ uiView: MKMapView, context: Context) {
        uiView.addAnnotations(checkpoints)
    }

    // 6.
    func makeCoordinator() -> MapCoordinator {
        MapCoordinator(self)
    }
}- AnnotationOnTap is a completion to notify SwiftUI if we have clicked an annotation from MKMapView AnnotationOnTap是在我们单击MKMapView中的注释时通知SwiftUI的完成
- @Binding is a property wrapper for checkpoints model that we need for this MapView for displaying each dot of the location @Binding是检查点模型的属性包装器,我们需要此MapView来显示位置的每个点
- This key is for storing a single MKMapView instance in the memory. Using mapViewStore for handling if there is an existing instance of MKMapView on this particular screen. Why do we need this? There is a bug on MKMapView (UIKit) if we move to another screen and SwiftUI rerendering the struct of the SwiftUI View that contains this MapView it will create new MapView instead of reusing it while the old one still on the memory. It causes some bottleneck on rendering UI part for both SwiftUI and UIKit on the same point and it can cause a crash after several times. 此项用于在内存中存储单个MKMapView实例。 如果在此特定屏幕上存在MKMapView的现有实例,则使用mapViewStore进行处理。 我们为什么需要这个? 如果我们转到另一个屏幕,并且SwiftUI重新渲染包含此MapView的SwiftUI View的结构,则MKMapView(UIKit)上会有一个错误,它将创建新的MapView,而不是在旧的ViewView仍在内存中时重新使用它。 这会导致在同一点上为SwiftUI和UIKit渲染UI部件造成一些瓶颈,并且可能在几次后导致崩溃。
- This one overriding function from UIViewRepresentable to return the expected view UIViewRepresentable中的这一覆盖函数可返回期望的视图
- This one overriding function from UIViewRepresentable to attach a new view or do some additional layouting. In this case, we add the checkpoint to each annotation UIViewRepresentable的这一替代功能可以附加新视图或进行一些其他布局。 在这种情况下,我们将检查点添加到每个注释中
- This one also overriding function form UIViewRepresentable for coordinator which for mapping the delegation logic on MKMapViewDelegate 这个也为协调员覆盖的函数形式UIViewRepresentable,用于将委托逻辑映射到MKMapViewDelegate
Okay once that view has been set up, now we can make the logic for notifying back to SwiftUI. We can not apply delegate in SwiftUI, so there is a Coordinator to put the business logic layer of pure Swift logic. Let make the MapCoordinator class.
好的,一旦建立了该视图,现在我们就可以做出通知SwiftUI的逻辑。 我们不能在SwiftUI中应用委托,因此有一个协调器来放置纯Swift逻辑的业务逻辑层。 让我们创建MapCoordinator类。
final class MapCoordinator: NSObject, MKMapViewDelegate {    // 1.
    var parent: MapView
    init(_ parent: MapView) {
        self.parent = parent
    }

    deinit {
        print("deinit: MapCoordinator")
    }    // 2.
    func mapView(_ mapView: MKMapView, didSelect view: MKAnnotationView) {
        view.canShowCallout = true
        let btn = UIButton(type: .detailDisclosure)
        view.rightCalloutAccessoryView = btn
    }

    // 3.
    func mapView(_ mapView: MKMapView, annotationView view: MKAnnotationView, calloutAccessoryControlTapped control: UIControl) {
        guard let capital = view.annotation as? Checkpoint, let placeName = capital.title else { return }
        parent.annotationOnTap(placeName)
    }

}- We need a reference to the MKMapView here for the coordinator able to return back the handler/logic we attach on it 我们需要这里的MKMapView引用,以便协调器能够返回我们附加在其上的处理程序/逻辑
- This one is the delegate function from MKMapView (Put MKMapViewDelegate on this class as well) for displaying the rightCalloutAccesoryView 这是MKMapView的委托函数(也将MKMapViewDelegate放在此类上)用于显示rightCalloutAccesoryView的委托函数。
- This one is for telling if we click on the accessory control and we will return back the placeName through the handler on the MapView 这是告诉我们是否单击附件控件,然后通过MapView上的处理程序返回placeName。
Once this has been set up now we can easily use the MapView on our SwiftUI.
设置完成后,我们现在可以轻松地在SwiftUI上使用MapView。
struct SearchView: View {
@ObservedObject var viewModel: SearchViewModel = SearchViewModel()
var body: some View {
VStack {
MapView(annotationOnTap: { title in
print("Title clicked", title)
}, checkpoints: $viewModel.checkpoints, key: "SearchView")
.frame(height: UIScreen.main.bounds.height)
.offset(x: 0, y: 350)
}
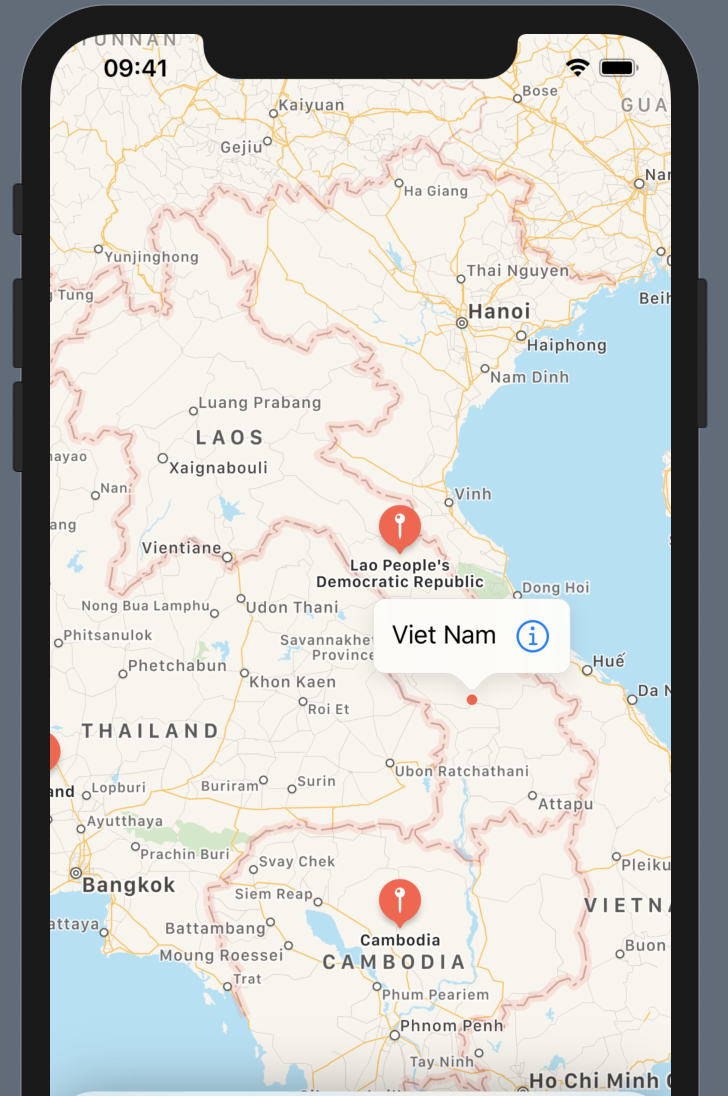
}}As you can see above we just need to pass the checkpoints model and key (can be anything) and viola, we can get the MapView working. See the result as the image below!
如您在上面看到的,我们只需要传递检查点模型和键(可以是任何东西)和中提琴,就可以使MapView正常工作。 结果如下图所示!
Find me on GitHub : abadikaka, Linkedin: Michael
在GitHub上找到我: abadikaka ,Linkedin: Michael
Reference:
参考:
- Apple documentation 苹果文档
翻译自: https://medium.com/macoclock/mapview-swiftui-with-annotationview-and-coordinator-70a305cf657
coordinator


 377
377

 被折叠的 条评论
为什么被折叠?
被折叠的 条评论
为什么被折叠?
 到【灌水乐园】发言


