


In this article, we will discuss the step-by-step process of implementing the OAuth Authorization Code Grant in a Vue.js app. We’ll use FusionAuth as the IdP and also show you how to configure FusionAuth.
在本文中,我们将讨论在Vue.js应用中实现OAuth授权代码授予的分步过程。 我们将使用FusionAuth作为IdP,并向您展示如何配置FusionAuth。
At the end, your app will be able to:
最后,您的应用将能够:
- Log users in 登录用户
- Log users out 注销用户
- Read user data from FusionAuth 从FusionAuth读取用户数据
- Write user data to FusionAuth 将用户数据写入FusionAuth
We will use Express for our backend server, which will act as a middleware between our Vue client and FusionAuth. It will securely store the access token, client id, client secret, and other information.
我们将Express用于我们的后端服务器,它将充当Vue客户端和FusionAuth之间的中间件。 它将安全地存储访问令牌,客户端ID,客户端密码和其他信息。
Prerequisites
先决条件
- Knowledge of Vue and Express concepts. 了解Vue和Express概念。
- Docker (optional, but preferred for installing FusionAuth). Docker(可选,但首选用于安装FusionAuth)。
- Node(12.x)/NPM on your local machine. 本地计算机上的Node(12.x)/ NPM。
- Any code editor of your choice. 您选择的任何代码编辑器。
You’ll also want to make sure your system meets the memory, storage and CPU requirements for FusionAuth.
您还需要确保系统满足FusionAuth的内存,存储和CPU要求 。
If you get stuck at any time, feel free to refer to the finished app’s GitHub repository.
如果您随时遇到困难,请随时参考完成的应用程序的GitHub存储库 。
使用Docker Compose设置FusionAuth (Setting up FusionAuth with Docker Compose)
If you don’t already have FusionAuth installed, we recommend the Docker Compose option for the quickest setup:
如果尚未安装FusionAuth,建议您使用Docker Compose选项进行最快的设置:
curl -o docker-compose.yml https://raw.githubusercontent.com/FusionAuth/fusionauth-containers/master/docker/fusionauth/docker-compose.yml
curl -o .env https://raw.githubusercontent.com/FusionAuth/fusionauth-containers/master/docker/fusionauth/.env
docker-compose up
Check out the FusionAuth download page for other installation options (rpm, deb, etc) if you don’t have Docker installed. You can also follow the FusionAuth Installation Guide for more detailed steps.
如果您未安装Docker,请查看FusionAuth下载页面以获取其他安装选项(rpm,deb等)。 您也可以按照《 FusionAuth安装指南》中的步骤进行操作。
Once FusionAuth is running (the default address is http://localhost:9011/), create a new application. This tutorial uses an application named fusionauth-vue-example.
FusionAuth运行后(默认地址为http:// localhost:9011 /),创建一个新的应用程序。 本教程使用一个名为fusionauth-vue-example的应用程序。
Then, configure your application. There are only two configuration settings that you need to change for this tutorial. In your application’s OAuth tab:
然后,配置您的应用程序。 对于本教程,只需更改两个配置设置。 在应用程序的OAuth标签中:
Set
Authorized redirect URLstohttp://localhost:9000/oauth-callback. This is the Express server URL that will handle processing the FusionAuth callback after a user signs in.将
Authorized redirect URLs设置为http://localhost:9000/oauth-callback。 用户登录后,这是Express服务器URL,将用于处理FusionAuth回调。Set
Logout URLtohttp://localhost:8081. This is the URL where the FusionAuth server will redirect us after logout. It is also where the Vue app lives. After logout a user ends up on the main landing page of the application.将
Logout URL设置为http://localhost:8081。 这是注销后FusionAuth服务器将重定向到我们的URL。 这也是Vue应用程序的所在地。 注销后,用户最终进入该应用程序的主登录页面。
Click Save.
点击保存 。
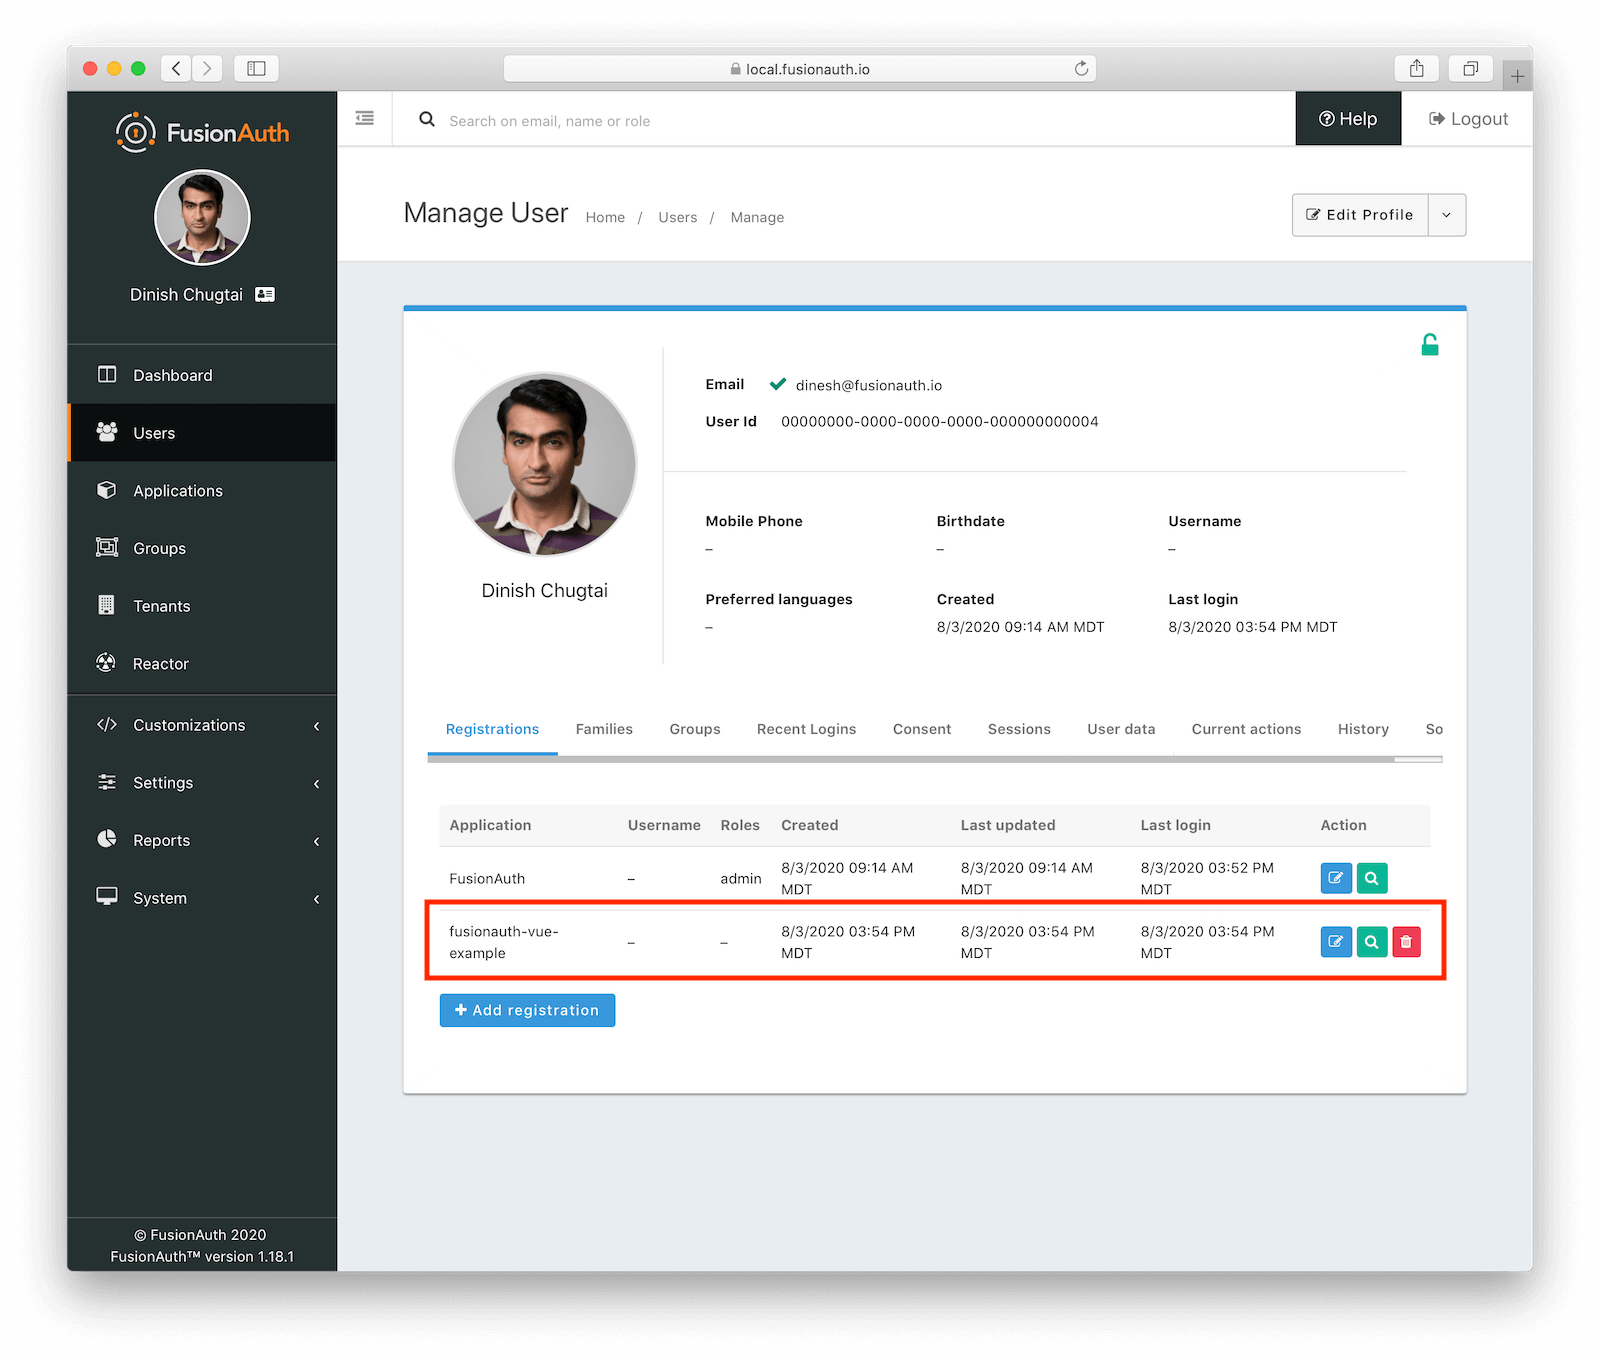
Next, add our current user to the new application. Select Users on the dashboard, select Manage and go to the Registration tab. Then click Add Registration, and add yourself to the application you just created.
接下来,将当前用户添加到新应用程序中。 在仪表板上选择“ 用户 ”,选择“ 管理”,然后转到“ 注册”选项卡。 然后单击Add Registration ,并将您自己添加到刚创建的应用程序中。
Finally, navigate to Settings and then API Keys. You should have an API key present, but feel free to create one. For this tutorial, we won’t limit permissions, but you should for production deployments. Record the API key value for later.
最后,导航至“设置” ,然后导航至“ API密钥” 。 您应该有一个API密钥,但是随时可以创建一个。 对于本教程,我们将不限制权限,但是您应该将其用于生产部署。 记录API密钥值以备后用。
We won’t cover this today, but you can create multiple applications and configure multi-tenancy in FusionAuth. This would be useful if you had multiple applications and wanted all their user data to be stored in FusionAuth.
我们今天将不介绍此内容,但是您可以在FusionAuth中创建多个应用程序并配置多租户。 如果您有多个应用程序,并且希望将其所有用户数据存储在FusionAuth中,这将非常有用。
Now you’re done configuring FusionAuth. We can start working on our initial Vue app.
现在,完成了FusionAuth的配置。 我们可以开始使用最初的Vue应用了。
项目结构 (Project structure)
Here is what this project directory looks like:
该项目目录如下所示:
fusionauth-example-vue
├─client
└─server
All the Express or server-side code will be in the server folder, and our Vue app will reside in the client folder. You don’t need to create the folders right now; we will be doing so in the next steps.
所有Express或服务器端代码都将位于server文件夹中,而我们的Vue应用程序将位于client文件夹中。 您无需立即创建文件夹; 我们将在后续步骤中这样做。
创建Vue应用 (Creating the Vue app)
We will use the official Vue CLI to initialize our project. This is the best way to scaffold Single Page Applications (SPAs). It provides batteries-included build setups for a modern front-end workflow. It takes only a few minutes to get up and running with hot-reload, lint-on-save, and production-ready builds. You can read more about the Vue CLI here.
我们将使用官方的Vue CLI初始化我们的项目。 这是搭建单页应用程序(SPA)的最佳方法。 它为现代的前端工作流提供了包含电池的构建设置。 只需几分钟就可以启动并重新运行热保存,保存时不掉毛和可用于生产的构建。 您可以在此处阅读有关Vue CLI的更多信息。
Before we create our Vue app, I recommend installing the official Vue.js browser extension to make debugging and inspection easier. You can download it here.
在创建Vue应用程序之前,建议您安装官方的Vue.js浏览器扩展程序,以使调试和检查更加容易。 您可以在此处下载 。
Use the following command to install Vue CLI globally:
使用以下命令来全局安装Vue CLI:
$ npm install -g @vue/cli
# OR
$ yarn global add @vue/cli
Now, create a project by running the following command inside the project directory:
现在,通过在项目目录中运行以下命令来创建项目:
$ vue create clientYou will be prompted to pick a preset. You can choose the default preset which comes with a basic Babel + ESLint setup or a manual option, by choosing Manually select features. The latter will allow you to customize features according to your needs. This project will use the default preset. You can learn more about it here.
系统将提示您选择一个预设。 通过选择手动选择功能 ,您可以选择Babel + ESLint基本设置或手动选项随附的默认预设 。 后者将允许您根据需要自定义功能。 该项目将使用默认预设。 您可以在此处了解更多信息 。
Once the project is initialized, start the development server by running the following command:
项目初始化后,通过运行以下命令启动开发服务器:
$ cd client
$ npm run serve -- --port 8081
Open a browser up and look at http://localhost:8081/. This is how your app will look:
打开浏览器,然后查看http:// localhost:8081 /。 这是您的应用程序的外观:
删除示例代码 (Remove the sample code)
Now you need to clean up and remove some of the sample code that the CLI generated.
现在,您需要清理并删除CLI生成的一些示例代码。
Based on the configuration you choose, you might see different project structures. If you are not sure how to clean it up, just stick to this example.
根据您选择的配置,您可能会看到不同的项目结构。 如果您不确定如何清除它,请坚持以下示例。
Delete components, views, router, and assets folders in src and then modify your main.js file to look like this:
删除src components , views , router和assets文件夹,然后将main.js文件修改为如下所示:
import Vue from 'vue';
import App from './App.vue';Vue.config.productionTip = false;new Vue({
  render: (h) => h(App),
}).$mount('#app');
Next, modify your App.vue file to look like this:
接下来,将您的App.vue文件修改为如下所示:
<template>
  <div id='app'>
  </div>
</template><script>
export default {
  name: 'app',
  components: {
  },
};
</script><style>
</style>
Visiting http://localhost:8081/ will show you a blank screen now.
访问http:// localhost:8081 /现在将显示空白屏幕。
FUN FACT: You can load environment variables in most SPA templates like Vue or React without installing any extra dependencies. A minor difference for Vue is that you must add
VUE_APP_in front of every environment variable. You can read more about this in the Modes and Environment Variables Vue documentation.有趣的事实:您可以在大多数SPA模板(例如Vue或React)中加载环境变量,而无需安装任何其他依赖项。 Vue的一个小区别是您必须在每个环境变量的前面添加
VUE_APP_。 您可以在Modes和Environment Variables Vue文档中阅读有关此内容的更多信息。
Let’s set aside the client for a bit, and focus on the Express server
让我们暂时搁置客户端,然后专注于Express服务器
使用Express作为我们的后端服务器 (Using Express as our backend server)
We will use Express.js as our backend server. It is a popular library that is widely used by developers.
我们将使用Express.js作为我们的后端服务器。 这是一个流行的库,已被开发人员广泛使用。
FUN FACT: The letter E in stacks like MERN, MEVN, or MEAN stands for Express.
有趣的事实:在像MERN,MEVN,或平均代表快堆字母e。
Inside our root directory, we will create another folder named server and initialize a NodeJS application in it. Run the following command in your root application directory:
在根目录中,我们将创建另一个名为server文件夹,并在其中初始化NodeJS应用程序。 在根应用程序目录中运行以下命令:
$ mkdir server
$ cd server
$ npm init -y
$ npm install express cors morgan nodemon dotenv axios express-session query-string
We installed a lot of packages, so let’s look at them:
我们安装了很多软件包,所以让我们看一下:
cors — This is a middleware that helps us to make cross-origin requests.
cors-这是一个中间件,可以帮助我们提出跨域请求。
morgan — This is an HTTP request logger middleware for node.js, you can use this for production.
morgan —这是用于node.js的HTTP请求记录器中间件,您可以将其用于生产。
nodemon — Restarting server every time we make a change is a hassle. Nodemon automatically restarts the node application when file changes are detected.
nodemon —每次进行更改时都重新启动服务器很麻烦。 检测到文件更改时,Nodemon自动重新启动节点应用程序。
dotenv — This loads environment variables from an
.envfile. We will use this to secure our API key and client configuration.dotenv —从
.env文件加载环境变量。 我们将使用它来保护我们的API密钥和客户端配置。axios — This allows us to make HTTP requests.
axios-这使我们可以发出HTTP请求。
express-session — This stores our access token securely.
express-session-这安全地存储了我们的访问令牌。
query-string — This is used to stringify form data that we send using
axios.query-string —用于对我们使用
axios发送的表单数据进行字符串化。
Since we have installed nodemon, to use it inside package.json simply add the following scripts:
由于我们已经安装了nodemon ,要在package.json使用它,只需添加以下脚本:
//...
"scripts": {
  "start": "node index.js",
  "dev": "nodemon index.js"
},
//...
Next, set up your environment variables. Inside the server folder create a .env file and store your configuration, such as client information, ports, or API credentials in it:
接下来,设置您的环境变量。 在server文件夹中,创建一个.env文件并在其中存储您的配置,例如客户端信息,端口或API凭据:
SERVER_PORT = 9000
FUSIONAUTH_PORT = 9011
CLIENT_ID = 'c8642b18-5d1d-42b4-89fb-a37a5b750186'
CLIENT_SECRET = 'oo06PflPxQrpfxqP8gY9ioOmfzQxARIW5R3BjJrlbS4'
REDIRECT_URI = 'http://localhost:9000/oauth-callback'
APPLICATION_ID = 'c8642b18-5d1d-42b4-89fb-a37a5b750186'
API_KEY = 'Dy9bphElA3L3_ayW86T5KvrZkyK1Gj5EDV_2m9i39ow'
You might notice that every environment variable is in CAPITAL LETTERS. It’s not a rule, just a convention to separate environment variables from variables in code.
您可能会注意到,每个环境变量都在大写字母中。 这不是规则,只是将环境变量与代码中的变量分开的约定。
REDIRECT_URI is the same as the URL you configured in the FusionAuth Authorized redirect URLs field. APPLICATION_ID is the same as the CLIENT_ID. You can change SERVER_PORT to whatever port you want; this tutorial will use port 9000 for the Express server. Use the API key you created above.
REDIRECT_URI与您在“ FusionAuth Authorized redirect URLs字段中配置的URL相同。 APPLICATION_ID与CLIENT_ID相同。 您可以将SERVER_PORT更改为所需的任何端口。 本教程将使用Express服务器的端口9000 。 使用上面创建的API密钥。
Now, you may wonder where to get all this information for your .env file. Go to the application that you made earlier in the FusionAuth dashboard and click the View button. It is the green magnifying glass. You can copy/paste CLIENT_ID and CLIENT_SECRET from there:
现在,您可能想知道从哪里获取.env文件的所有这些信息。 进入之前在FusionAuth信息中心中创建的应用程序,然后单击“ View按钮。 这是绿色的放大镜。 您可以从此处复制/粘贴CLIENT_ID和CLIENT_SECRET :

Below is the code for a basic Express server. Notice that we use the dotenv package by adding the following code inside our index.js file:
以下是基本Express服务器的代码。 请注意,我们通过在index.js文件中添加以下代码来使用dotenv软件包:
//...
require("dotenv").config();
//...
We can then read environment variables by writing process.env. in front of the environment variable’s name whenever we need them in our code.
然后,我们可以通过编写process.env.来读取环境变量process.env. 只要我们在代码中需要它们,就在环境变量的名称前面。
Since the .env file is ignored by git because of the .gitignore file, you will notice an .env.example file in the source code. To run on your local machine, rename that file to .env and add your Client Id, Client Secret, etc.
由于.env文件由于.gitignore文件而被git忽略。因此,您会在源代码中注意到一个.env.example文件。 要在本地计算机上运行,请将文件重命名为.env并添加您的客户端ID,客户端密钥等。
Here is the sample code for an Express server that makes use of all our installed packages:
以下是使用我们所有已安装软件包的Express服务器的示例代码:
const express = require("express");
const cors = require("cors");
const morgan = require("morgan");// dotenv
require("dotenv").config();const app = express();// Use our middlewares
app.use(cors({ origin: true, credentials: true }));
app.use(morgan("common"));
app.use(express.json());// Provide a default port
const port =  process.env.SERVER_PORT || 3000;// Listen to server
app.listen(port, () => {
  console.log(`Listening on port ${port}`);
});
To access our server from the browser, we need the cors middleware. Remember to use the options { origin: true, credentials: true } with app.use(cors()) call. You can read more about this here.
要从浏览器访问我们的服务器,我们需要cors中间件。 请记住在app.use(cors())调用中使用选项{ origin: true, credentials: true } 。 您可以在此处了解更多信息。
Run the following command, in a new terminal window, to start the development server:
在新的终端窗口中运行以下命令以启动开发服务器:
$ npm run devThis might be the only time we will start the server; since we have installed nodemon, the server will restart every time it detects a file change.
这可能是我们启动服务器的唯一时间。 由于我们已经安装了nodemon ,因此服务器将在每次检测到文件更改时重新启动。
Head over to http://localhost:9000/; you will see an error!
转到http:// localhost:9000 /; 您会看到一个错误!
FUN FACT: This is actually to be expected, since we have not created any routes yet.
有趣的事实:这实际上是可以预期的,因为我们还没有创建任何路线。

In your terminal, you can see morgan in action. Whenever a request is made to our server, it will log it in the terminal like this:
在终端中,您可以看到正在运行的morgan 。 每当对我们的服务器发出请求时,它都会将其记录在终端中,如下所示:
::ffff:127.0.0.1 - - [10/Jul/2020:08:48:21 +0000] "GET / HTTP/1.1" 404 139This can be useful in debugging an application both in development and in production.
这对于在开发和生产中调试应用程序都是有用的。
Create a simple route for our main page by adding this to the index.js file:
通过将其添加到index.js文件,为我们的主页创建一个简单的路由:
//...
// Main Page
app.get("/", (req, res) => {
  res.send({
   message:"FusionAuth Example With Vue"
  });
});
//...
Now you will see a response should you visit http://localhost:9000/:
现在,如果您访问http:// localhost:9000 /,您将看到一个响应:
{
  "message": "FusionAuth Example With Vue"
}
为我们的Vue应用创建登录 (Creating sign in for our Vue app)
We will start creating sign in functionality for our application. Our Vue application is empty, mostly because we removed the boilerplate. Let’s add a heading and a container where we will render different components.
我们将开始为我们的应用程序创建登录功能。 我们的Vue应用程序为空,主要是因为我们删除了样板。 让我们添加一个标题和一个容器,在其中我们将渲染不同的组件。
Inside client/src/App.vue add the following:
在client/src/App.vue添加以下内容:
<template>
  <div id='app'>
    <header>
      <h1>FusionAuth Example Vue</h1>
    </header>
    <div id = 'container'></div>
  </div>
</template>
<script>
export default {
  name: 'app',
  components: {
  },
};
</script>
<style>
h1 {
  text-align: center;
  font-size: 40px;
  font-family: Arial, Helvetica, sans-serif;
}
#container{
  box-sizing: border-box;
  border: 5px solid gray;
  border-radius: 15%;
  width: 400px;
  height: 400px;
  margin: auto;
}
</style>
CSS will not be covered in this tutorial; it is up to you to beautify this application with custom CSS or UI libraries.
本教程不会介绍CSS。 您可以使用自定义CSS或UI库美化此应用程序。
Here is how your app will look:
这是您的应用外观:

Based on whether the user is logged in or not, we should show different messages. For example, a message that says “Welcome, dinesh@fusionauth.io” should only be displayed if the user dinesh@fusionauth.io is logged in.
根据用户是否登录,我们应该显示不同的消息。 例如,仅当用户dinesh@fusionauth.io登录时,才应显示“欢迎使用dinesh@fusionauth.io”消息。
We will hard code this response first, and then later modify the code to display the response we get from FusionAuth.
我们将首先对该响应进行硬编码,然后再修改代码以显示从FusionAuth获得的响应。
Create a new file called Greeting.vue in the src folder. We will add logic to check whether a user is logged in or not; we will use Conditional Rendering. If email is present, the user is logged in, otherwise they are not. You can read more about this here.
在src文件夹中创建一个名为Greeting.vue的新文件。 我们将添加逻辑以检查用户是否已登录; 我们将使用条件渲染。 如果存在email ,则表明用户已登录,否则未登录。 您可以在此处了解更多信息 。
<template>
  <div class="greet">
    <h3 v-if="email">Welcome  </h3>
    <h3 v-else>You are not logged in</h3>
  </div>
</template>
<script>
export default {
  name: 'Greet',
  props: ["email"],
};
</script>
<style >
*{
  margin-top:30px;
  text-align: center;
  font-size: 20px;
  font-family: 'Courier New', Courier, monospace;
}
</style>
You will notice something weird in the above code, we are using email to check whether the user is logged in or not. But where is the email value coming from?
您会在上面的代码中注意到一些奇怪的东西,我们正在使用email检查用户是否登录。 但是email价值从何而来?
We are passing email as a prop from App.vue. Hence why there is a prop field in the <script> section. It might not make sense as to why we are doing this now but remember we will have other components in our app which will need the response data that we get from the server. Instead of calling for the same data in each individual component, it will be better to request it in our central App.vue file and then pass the required data as props to other components.
我们正在传递来自App.vue email作为道具。 因此,为什么在<script>部分中有一个prop字段。 对于我们为什么现在这样做,可能没有任何意义,但请记住,我们的应用程序中将包含其他组件,这些组件将需要从服务器获取的响应数据。 与其在每个单独的组件中调用相同的数据,不如在我们的中央App.vue文件中请求它,然后将所需的数据作为道具传递给其他组件,将更好。
Next, we need to import this file in App.vue and send the data to the <Greet /> component. This is done with v-bind:
接下来,我们需要将此文件导入App.vue ,并将数据发送到<Greet />组件。 这是通过v-bind :
<template>
  <div id='app'>
    <header>
      <h1>FusionAuth Example Vue</h1>
    </header>
    <div id = 'container'>
      <Greet v-bind:email="email" />
    </div>
  </div>
</template>
<script>
import Greet from './Greeting';
export default {
  name: 'app',
  components: {
      Greet,
  },
  data(){
    return {
      email : 'dinesh@fusionauth.io'
    }
  }
};
</script>
<style>
h1 {
  text-align: center;
  font-size: 40px;
  font-family: Arial, Helvetica, sans-serif;
}
#container{
  box-sizing: border-box;
  border: 5px solid gray ;
  border-radius: 15%;
  width: 400px;
  height: 400px;
  margin: auto;
}
</style>
In your browser, go to http://localhost:8081/; you will see Welcome dinesh@fusionauth.io:
在浏览器中,转到http:// localhost:8081 /; 您将看到Welcome dinesh@fusionauth.io :

Now comment out email in the App.vue data() call.
现在,在App.vue data()调用中注释掉email 。
//...
data(){
return {
//email : "dinesh@fusionauth.io"
}
}
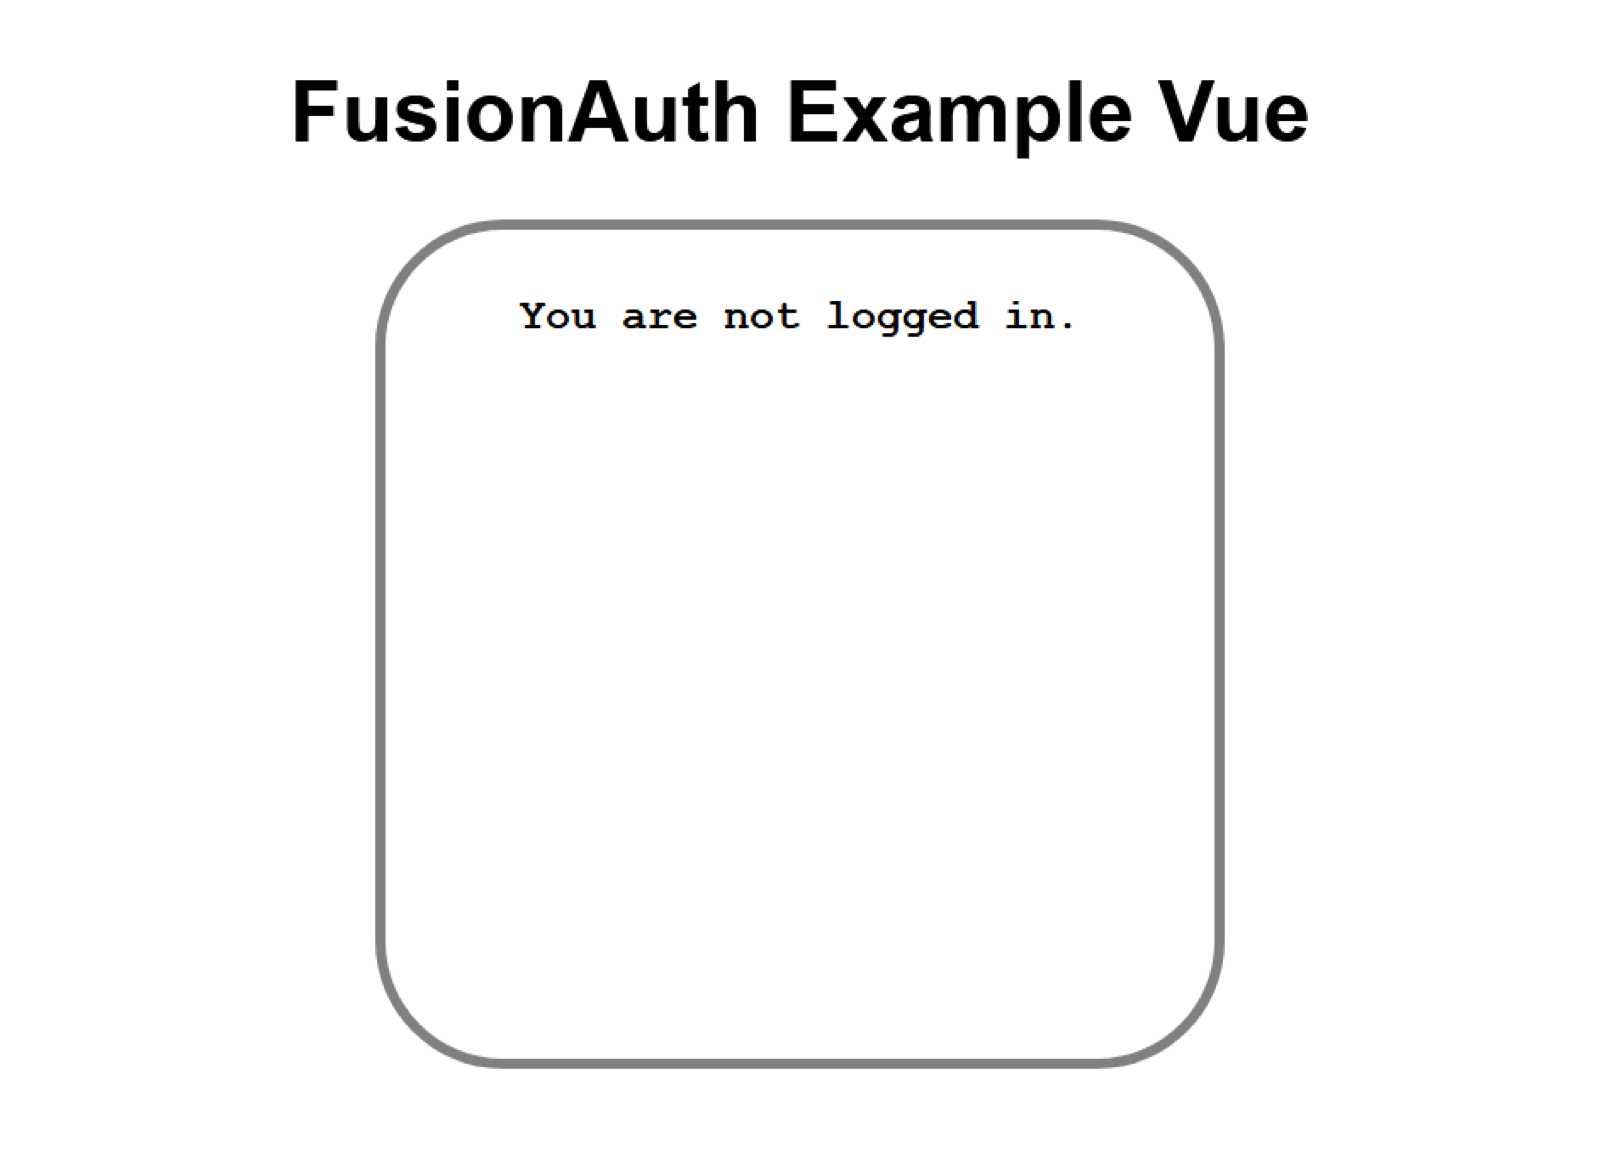
//...Again head over to http://localhost:8081/. As you can see, since we have removed email, we are now seeing the “you are not not logged in” message.
再次转到http:// localhost:8081 /。 如您所见,由于我们已经删除了email ,所以现在看到“您尚未登录”消息。
Great, the client works! We will now implement the same logic based on data from the server.
太好了,客户可以工作! 现在,我们将基于服务器中的数据实现相同的逻辑。
从Express服务器获取用户信息 (Getting user info from the Express server)
We will create a user route in our Express server to send fake user data to our application. Then, we will replace it with real data based on a request to FusionAuth.
我们将在Express服务器中创建user路由,以将伪造的用户数据发送到我们的应用程序。 然后,根据对FusionAuth的请求,将其替换为实际数据。
In your server folder, create a new folder, routes, and inside that folder create a new file named user.js.
在server文件夹中,创建一个新文件夹, routes ,并在该文件夹中创建一个名为user.js的新文件。
server
├──node_modules
├──routes
│  └─user.js
├──index.js
├──package.json
└─package-lock.json
Create a new get route in user.js with this code:
使用以下代码在user.js创建新的get路线:
const express = require('express');
const router = express.Router();
router.get('/', (req, res) => {
  res.send({
    user: {
      email: 'dinesh@fusionauth.io'
    }
  });
});
module.exports = router;
To have Express expose this route, add the following to our index.js file:
要让Express公开此路由,请将以下内容添加到我们的index.js文件中:
app.use('/user', require('./routes/user'))Go to http://localhost:9000/user, and you will see the following response:
转到http:// localhost:9000 / user,您将看到以下响应:
{
  "user": {
    "email": "dinesh@fusionauth.io"
  }
}
Remember, a real User object returned from FusionAuth will have more properties than just an email address. It will look something like this:
请记住,从FusionAuth返回的真实 User对象将具有更多属性,而不仅仅是电子邮件地址。 它看起来像这样:
{
  active: true,
  applicationId: '1ac76336-9dd9-4048-99cb-f998af681d3e',
  aud: '1ac76336-9dd9-4048-99cb-f998af681d3e',
  authenticationType: 'PASSWORD',
  email: 'dinesh@fusionauth.io',
  email_verified: true,
  exp: 1594893748,
  iat: 1594890148,
  iss: 'acme.com',
  roles: [],
  sub: 'abdee025-fa3c-4ce2-b6af-d0931cfb4cea'
}
Inside our App.vue file, we will use the mounted() lifecycle hook to make a call to the server for our needed data:
在App.vue文件中,我们将使用App.vue mounted()生命周期挂钩对服务器调用所需的数据:
//...
mounted() {
  fetch(`http://localhost:9000/user`, {
    credentials: "include" // fetch won't send cookies unless you set credentials
  })
  .then(response => response.json())
  .then(data=> console.log(data));
}
//...
Here is the output of the above code in the console:
这是控制台中上述代码的输出:
{
  "user": {
    "email": "dinesh@fusionauth.io"
  }
}
We can now use this object to check if the user is logged in or not. We will need to first define email as null in the data() function. If a response is received from the server, we will update the email property with the received value. In this case, that is an object with a property of email, so we’ll make sure to dereference it so that the email property is set to an email address, and not a JavaScript object.
现在,我们可以使用此对象检查用户是否登录。 我们首先需要在data()函数中将email定义为null 。 如果从服务器收到响应,我们将使用接收到的值更新email属性。 在这种情况下,这是一个具有email属性的对象,因此我们将确保取消引用它,以便将email属性设置为电子邮件地址,而不是JavaScript对象。
<template>
  <div id="app">
    <header>
      <h1>FusionAuth Example Vue</h1>
    </header>
    <div id="container">
      <Greet v-bind:email="email" />
    </div>
  </div>
</template>
<script>
import Greet from "./Greeting";
export default {
  name: "app",
  components: {
    Greet
  },
  data() {
    return {
      email: null
    };
  },
  mounted() {
    fetch(`http://localhost:9000/user`, {
      credentials: "include" // fetch won't send cookies unless you set credentials
    })
      .then(response => response.json())
      .then(data => (this.email = data.user.email));
  }
};
</script>
<style>
h1 {
  text-align: center;
  font-size: 40px;
  font-family: Arial, Helvetica, sans-serif;
}
#container {
  box-sizing: border-box;
  border: 5px solid gray;
  border-radius: 15%;
  width: 400px;
  height: 400px;
  margin: auto;
}
</style>
The output of the above is the same as when we have hardcoded the email value in data():
上面的输出与我们在data()硬编码email值时的输出相同:

If we comment out email in server/routes/user.js, we will see the “You are not logged in” message in our application. We can change the email in server/routes/user.js and see the corresponding DOM changes as well:
如果我们在server/routes/user.js注释掉email ,我们将在应用程序中看到“您尚未登录”消息。 我们可以在server/routes/user.js更改电子邮件,并查看相应的DOM更改:
user: {
  email: 'richard@fusionauth.io'
}
从FusionAuth发送数据 (Sending data from FusionAuth)
Finally, we will pull data from FusionAuth, rather than using hardcoded values. For this, we will first need to create a login route; how can we send user data if there is no user logged in?
最后,我们将从FusionAuth中提取数据,而不是使用硬编码值。 为此,我们首先需要创建一个login路径; 如果没有用户登录,我们如何发送用户数据?
Create a new file server/routes/login.js and add this route to index.js.
创建一个新文件server/routes/login.js并将此route添加到index.js 。
server
├──node_modules
├──routes
│  ├─login.js
│  └─user.js
├──index.js
├──package.json
└─package-lock.json
In index.js, add the login route:
在index.js ,添加登录路径:
//...
// Routes
app.use('/user', require('./routes/user'))
app.use('/login', require('./routes/login'))
//...
Here is the code for login.js:
这是login.js的代码:
const express = require('express');
const router = express.Router();router.get('/', (req, res) => {  const stateValue = Math.random().toString(36).substring(2,15) + Math.random().toString(36).substring(2,15) + Math.random().toString(36).substring(2,15) + Math.random().toString(36).substring(2,15) + Math.random().toString(36).substring(2,15) + Math.random().toString(36).substring(2,15);  req.session.stateValue = stateValue  res.redirect(`http://localhost:${process.env.FUSIONAUTH_PORT}/oauth2/authorize?client_id=${process.env.CLIENT_ID}&redirect_uri=${process.env.REDIRECT_URI}&response_type=code&state=${stateValue}`);
});
module.exports = router;
One important thing to notice is the endpoint to which we are making requests: /oauth2/authorize. This endpoint will provide us with an Authorization Code, which we will discuss in a bit. You can read more about it here.
需要注意的重要一件事是我们向其发出请求的端点: /oauth2/authorize 。 该端点将为我们提供一个授权码,稍后我们将对其进行讨论。 您可以在此处了解更多信息 。
Another thing is the stateValue or the state parameter, which is generally used as a Cross Site Request Forgery (CSRF) protection token. Any value provided in this field must be returned on a successful redirect, and if it isn’t present, the communication may have been compromised. We will later use this value in the oauth-callback route. You can read more about this here.
另一件事是stateValue或state参数,通常用作跨站点请求伪造(CSRF)保护令牌。 在成功重定向后,必须返回此字段中提供的任何值,如果不存在该值,则可能是通信受到了损害。 稍后,我们将在oauth-callback路由中使用此值。 您可以在此处了解更多信息 。
Let’s discuss the other parameters we have used above. redirect_uri informs FusionAuth where to redirect the user after login. response_type tells FusionAuth which OAuth grant we’re using (Authorization Code in this example).
让我们讨论上面使用的其他参数。 redirect_uri通知FusionAuth登录后将用户重定向到何处。 response_type告诉FusionAuth我们正在使用哪个OAuth授权(此示例中为授权代码)。
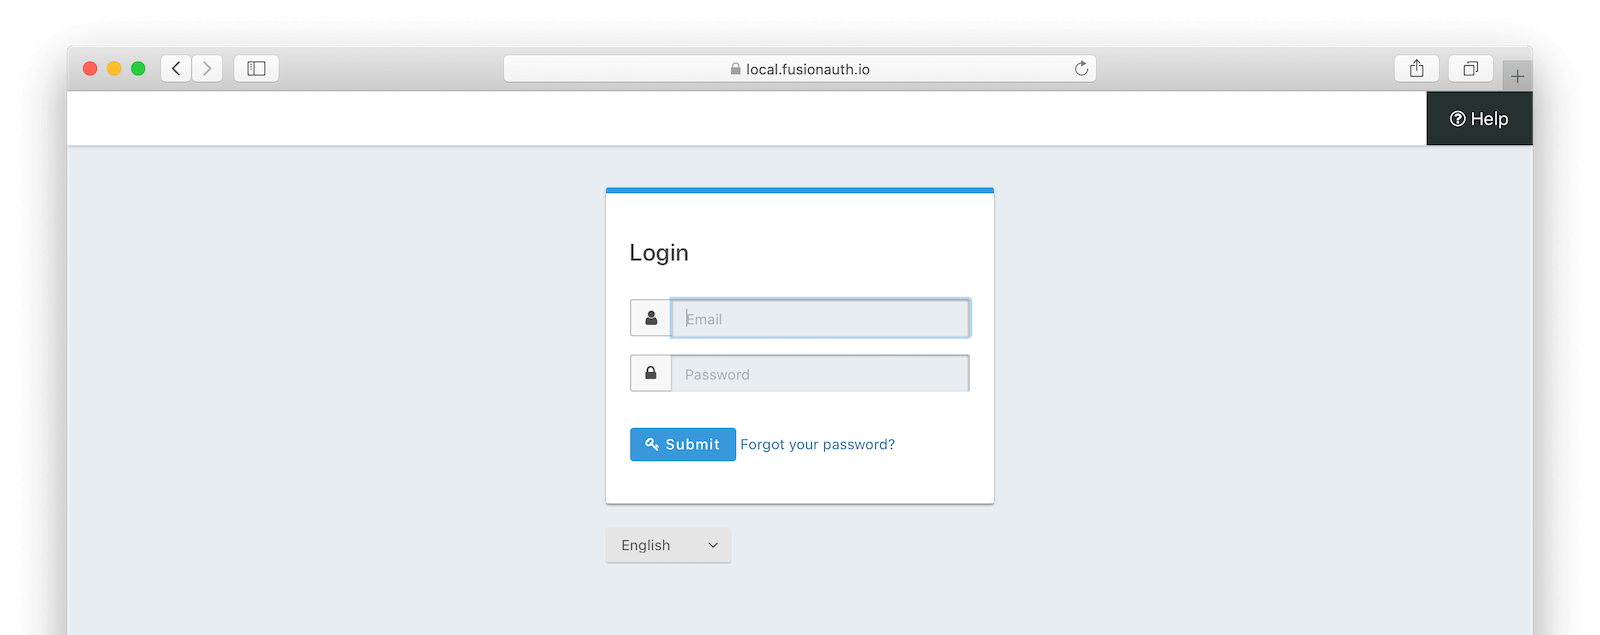
Try navigating to http://localhost:9000/login. If everything is correct, you will see an invalid_client error. Yes, your code is working fine, no need to recheck.
尝试浏览至http:// localhost:9000 / login。 如果一切正确,您将看到invalid_client错误。 是的,您的代码运行正常,无需重新检查。
If you take another look at login.js, you will find that REDIRECT_URI is set to the value of http://localhost:9000/oauth-callback in our .env file. But we haven’t actually created that route yet. So this error makes sense. We’re actually logged in because we signed into the FusionAuth dashboard during our setup of FusionAuth.
如果再看一下login.js ,您将发现.env文件中的REDIRECT_URI设置为http://localhost:9000/oauth-callback的.env 。 但我们实际上尚未创建该路线。 所以这个错误是有道理的。 我们实际上已登录,因为我们在设置FusionAuth时登录了FusionAuth信息中心。
If you were using a new browser or an incognito window, you might see the login screen instead:
如果您使用的是新浏览器或隐身窗口,则可能会看到登录屏幕:
为授权码授予创建OAuth回调 (Creating an OAuth callback for the Authorization Code grant)
Now, let’s get rid of the error by creating an oauth-callback route. Inside routes create a new file, oauth-callback.js.
现在,通过创建oauth-callback路由来消除错误。 在routes内部创建一个新文件oauth-callback.js 。
Add this route to index.js:
将此路由添加到index.js :
//...
// Routes
app.use('/user', require('./routes/user'))
app.use('/login', require('./routes/login'))
app.use('/oauth-callback', require('./routes/oauth-callback'))
//...
During the redirect, the /oauth-callback route will receive an Authorization Code from FusionAuth. It will be something like this (notice the string after code=):
重定向过程中, /oauth-callback路由将接收来自FusionAuth的授权码。 将会是这样(注意code=之后的字符串):
http://localhost:9000/oauth-callback?code=SSXVv3xkNTKEhnY4XzjUVvRZp7eyhgCuuREAgSeByrw&locale=en&userState=AuthenticatedThis Authorization Code is not sufficient to access user information. For that we will need an access_token. To get an access_token we will make a post request to /oauth2/token endpoint with this Authorization Code.
该授权码不足以访问用户信息。 为此,我们将需要一个access_token 。 要获取access_token我们将使用此授权码向/oauth2/token端点发出发布请求。
After we make that request, we need to store the access_token. We can’t store it in an in-memory variable because we need it for future requests. We need a secure storage mechanism that doesn’t expose it to our Vue client, because that is running a browser which is vulnerable to XSS exploits. We will store this access_token using the express-session middleware; we need to import express-session.
发出该请求后,我们需要存储access_token 。 我们无法将其存储在内存变量中,因为将来需要使用它。 我们需要一种不会将其公开给Vue客户端的安全存储机制,因为该机制运行的浏览器容易受到XSS攻击。 我们将使用express-session中间件存储此access_token 。 我们需要导入express-session 。
//...
const session = require("express-session")
//...
Then, we need to add the following to index.js. It might be worth checking out the Express Session docs for more information.
然后,我们需要将以下内容添加到index.js 。 可能有必要查看Express Session文档以获取更多信息。
//...
// configure sessions
app.use(session(
  {
    secret: '1234567890', // don't use this secret in prod :)
    resave: false,
    saveUninitialized: false,
    cookie: {
      secure: 'auto',
      httpOnly: true,
      maxAge: 3600000
    }
  })
);
//...
Now, we can get back to writing the oauth-callback.js file. We’ll make the post request to receive the access_token. Don’t let the code below confuse you, we will discuss it piece by piece.
现在,我们可以重新编写oauth-callback.js文件。 我们将发布请求以接收access_token 。 不要让下面的代码使您感到困惑,我们将逐步讨论它。
const express = require("express");
const router = express.Router();
const axios = require("axios").default;
const qs = require("query-string");const config = {
  headers: {
    "Content-Type": "application/x-www-form-urlencoded",
  },
};
const url = `http://localhost:${process.env.FUSIONAUTH_PORT}/oauth2/token`;router.get("/", (req, res) => {
// State from Server
const stateFromServer = req.query.state;
if (stateFromServer !== req.session.stateValue) {
  console.log("State doesn't match. uh-oh.");
  console.log(`Saw: ${stateFromServer}, but expected: &{req.session.stateValue}`);
  res.redirect(302, '/');
  return;
}
  //post request to /token endpoint
  axios
    .post(
      url,
      qs.stringify({
        client_id: process.env.CLIENT_ID,
        client_secret: process.env.CLIENT_SECRET,
        code: req.query.code,
        grant_type: "authorization_code",
        redirect_uri: process.env.REDIRECT_URI,
      }),
      config
    )
    .then((result) => {      // save token to session
      req.session.token = result.data.access_token;
      console.log(result)
      //redirect to Vue app
     res.redirect(`http://localhost:8081`);
    })
    .catch((err) => {
      console.error(err);
    });
});
module.exports = router;
We start with standard code for a route just like login.js. And then we import axios and querystring. We then use an if statement to check the state parameter; if it does not match, we log an error message.
我们从标准代码开始,就像login.js一样。 然后我们导入axios和querystring 。 然后,我们使用if语句检查state参数; 如果不匹配,我们将记录一条错误消息。
We use axios to make post requests to oauth2/token endpoint; this is the complete URL that we will request:
我们使用axios向oauth2/token端点发出发布请求; 这是我们将要求的完整URL:
const url = `http://localhost:${process.env.FUSIONAUTH_PORT}/oauth2/token`;Another thing you will notice is the config variable. The oauth2/token endpoint requires form-encoded data, which is why we are explicitly setting the content type in the header:
您会注意到的另一件事是config变量。 oauth2/token终结点需要表单编码的数据,这就是为什么我们在标头中显式设置内容类型的原因:
//...
const config = {
  headers: {
    "Content-Type": "application/x-www-form-urlencoded",
  },
};
//...
Now, let’s talk about the body of the request. If you go through the FusionAuth docs, you will find there are standard request parameters expected by the oauth2/token endpoint. Some are optional and some are required. The code is the Authorization Code that we received from oauth2/authorize endpoint and grant_type tells FusionAuth we’re using the Authorization Code Flow.
现在,让我们谈谈请求的主体。 如果您查看FusionAuth文档 ,则会发现oauth2/token端点需要标准请求参数。 有些是可选的,有些是必需的。 该code是我们从oauth2/authorize端点收到的授权代码,并且grant_type告诉FusionAuth我们正在使用授权代码流。
//...
qs.stringify({
  client_id: process.env.CLIENT_ID,
  client_secret: process.env.CLIENT_SECRET,
  code: req.query.code,
  grant_type: "authorization_code",
  redirect_uri: process.env.REDIRECT_URI,
})
//...
The query-string library stringifies this request object as you can see below. This saves us from doing this manually and makes code more readable:
query-string库对该请求对象query-string化,如下所示。 这使我们免于手动执行此操作,并使代码更具可读性:
// the stringified parameters
'client_id=1ac76336-9dd9-4048-99cb-f998af681d3e&client_secret=NLmIgHC65zHeHOPlQMmOMG4Nberle41GT85RUgijdqA&code=e_oTyBn_7WPTPgtFUjvEZk6TwBBLYajRi8NMixQehd0&grant_type=authorization_code&redirect_uri=http%3A%2F%2Flocalhost%3A9000%2Foauth-callback'
After a successful post request, we use the .then() method to access the response from the endpoint. We store the access_token received in the session with the name token. The above code has logs this response so that you can see it for debugging. We are only concerned with the data.access_token value, though other information is returned. After storing this access_token we redirect to our Vue App. Here’s an example of what might be returned after a successful request to the token endpoint:
成功的发布请求后,我们使用.then()方法访问端点的响应。 我们使用名称token存储在会话中收到的access_token 。 上面的代码记录了此响应,以便您可以看到它进行调试。 尽管只返回了其他信息,但我们只关心data.access_token值。 存储此access_token我们将重定向到我们的Vue应用。 这是成功请求token端点后可能返回的示例:
data: {
  access_token: 'eyJhbGciOiJIUzI1NiIsInR5cCI6IkpXVCIsImtpZCI6IjcxNDcxZGE3ZiJ9.eyJhdWQiOiIxYWM3NjMzNi05ZGQ5LTQwNDgtOTljYi1mOTk4YWY2ODFkM2UiLCJleHAiOjE1OTQ4ODkzODAsImlhdCI6MTU5NDg4NTc4MCwiaXNzIjoiYWNtZS5jb20iLCJzdWIiOiJhYmRlZTAyNS1mYTNjLTRjZTItYjZhZi1kMDkzMWNmYjRjZWEiLCJhdXRoZW50aWNhdGlvblR5cGUiOiJQQVNTV09SRCIsImVtYWlsIjoiYXNodXNpbmdoMTU2NzNAZ21haWwuY29tIiwiZW1haWxfdmVyaWZpZWQiOnRydWUsImFwcGxpY2F0aW9uSWQiOiIxYWM3NjMzNi05ZGQ5LTQwNDgtOTljYi1mOTk4YWY2ODFkM2UiLCJyb2xlcyI6W119.Dcktd6933XI7iDEsH2RbR49lse-Mamx7B5k1q4hSz_o',
  expires_in: 3599,
  token_type: 'Bearer',
  userId: 'abdee025-fa3c-4ce2-b6af-d0931cfb4cea'
}
You can see what an access_token looks like; it’s a JWT. The axios request ends with a catch block to handle any errors we may encounter.
您可以看到access_token外观; 这是JWT。 axios请求以catch块结尾,以处理我们可能遇到的任何错误。
Head over to http://localhost:9000/login. If everything goes well, you will end up on your Vue application homepage because that is what we have set in redirect_uri. You should see the response in the console (the terminal where you are running your server), as you were already logged in.
转到http:// localhost:9000 / login。 如果一切顺利,您将最终进入Vue应用程序主页,因为这是我们在redirect_uri设置的。 您已经登录,您应该在控制台(运行服务器的终端)中看到响应。
添加登出路线 (Adding a logout route)
So, we have a login route that the signs in a user and then redirects back to our Vue app. Before we add links in our Vue app, let’s create a logout route in the Express server. Then we’ll be able to easily add them both to the Vue app.
因此,我们有一个login路径,可以login用户,然后重定向回我们的Vue应用程序。 在我们的Vue应用程序中添加链接之前,让我们在Express服务器中创建logout路由。 然后,我们可以轻松地将它们都添加到Vue应用程序中。
Inside server/routes create a new file named logout.js.
在server/routes内部,创建一个名为logout.js的新文件。
server
├──node_modules
├──routes
│  ├─login.js
│  ├─oauth-callback.js
│  ├─logout.js
│  └─user.js
├──index.js
├──package.json
└─package-lock.json
Add then add this route to index.js:
添加,然后将此路由添加到index.js :
//...
// Routes
app.use('/user', require('./routes/user'))
app.use('/login', require('./routes/login'))
app.use('/logout', require('./routes/logout'))
app.use('/oauth-callback', require('./routes/oauth-callback'))
//...
Inside the logout.js file add the following code:
在logout.js文件中,添加以下代码:
const express = require('express');
const router = express.Router();
router.get('/', (req, res) => {
  // delete the session
  req.session.destroy();
  // end FusionAuth session
  res.redirect(`http://localhost:${process.env.FUSIONAUTH_PORT}/oauth2/logout?client_id=${process.env.CLIENT_ID}`);
});
module.exports = router;
Compared to oauth-callback.js, this is pretty simple. We first destroy the Express server-side session (and therefore the token we stored) and then redirect to the oauth2/logout endpoint with our CLIENT_ID.
与oauth-callback.js相比,这非常简单。 我们首先破坏Express服务器端会话(并因此破坏我们存储的token ),然后使用CLIENT_ID重定向到oauth2/logout端点。
Head over to http://localhost:9000/logout and you will be logged out. Navigate to http://localhost:9000/login and you will see the login page. After you sign in, you’ll arrive back at your Vue application.
转到http:// localhost:9000 / logout ,您将注销。 导航到http:// localhost:9000 / login ,您将看到登录页面。 登录后,您将返回到Vue应用程序。
You might wonder why after logging out we redirect back to our Vue app, yet we didn’t do anything like that in the logout.js file. This is happening because we configured the main entry point to our Vue app as the Logout URL in FusionAuth.
您可能想知道为什么注销后我们重定向回我们的Vue应用程序 ,而在logout.js文件中却没有做任何类似的事情。 发生这种情况是因为我们将Vue应用程序的主要入口点配置为FusionAuth中的注销URL。
检索用户数据 (Retrieving user data)
We have been using fake user data up until now. Since we now have access_token stored in the session, we can use it to request user data from FusionAuth.
到目前为止,我们一直在使用伪造的用户数据。 由于现在已经在会话中存储了access_token ,因此我们可以使用它来从FusionAuth请求用户数据。
Modify the user.js file contents to be:
将user.js文件内容修改为:
const express = require("express");
const router = express.Router();
const axios = require("axios");
const qs = require("querystring");
router.get("/", (req, res) => {
  // token in session -> get user data and send it back to the vue app
  if (req.session.token) {
    axios
      .post(
        `http://localhost:${process.env.FUSIONAUTH_PORT}/oauth2/introspect`,
        qs.stringify({
          client_id: process.env.CLIENT_ID,
          token: req.session.token,
        })
      )
      .then((result) => {
        let introspectResponse = result.data;
        // valid token -> get more user data and send it back to the Vue app
        if (introspectResponse) {
          // GET request to /registration endpoint
          axios
            .get(
              `http://localhost:${process.env.FUSIONAUTH_PORT}/api/user/registration/${introspectResponse.sub}/${process.env.APPLICATION_ID}`,
              {
                headers: {
                  Authorization: process.env.API_KEY,
                },
              }
            )
            .then((response) => {
              res.send({
                introspectResponse: introspectResponse,
                body: response.data.registration,
              });
            })
        }
      // expired token -> send nothing
        else {
          req.session.destroy();
          res.send({});
        }
      })
      .catch((err) => {
        console.log(err);
      });
  }
  // no token -> send nothing
  else {
    res.send({});
  }
});
module.exports = router;
Let’s examine this code. First, we check if an access_token is present and then make a POST request to oauth2/introspect endpoint which requires the Client Id and the token. Like the oauth2/token endpoint, this endpoint expects form-encoded data, so we again are using the query-string library.
让我们检查一下这段代码。 首先,我们检查是否存在access_token ,然后向需要客户端ID和令牌的oauth2/introspect端点发出POST请求。 像oauth2/token端点一样,该端点需要表单编码的数据,因此我们再次使用query-string库。
When this request is successful, we get a response object. This contains user data.
成功完成此请求后,我们将获得一个响应对象。 其中包含用户数据。
Here’s an example of the JSON:
这是JSON的示例:
{
  active: true,
  applicationId: '9d5119d4-71bb-495c-b762-9f14277c116c',
  aud: '9d5119d4-71bb-495c-b762-9f14277c116c',
  authenticationType: 'PASSWORD',
  email: 'richard@fusionauth.io',
  email_verified: true,
  exp: 1594904052,
  iat: 1594900452,
  iss: 'acme.com',
  roles: [],
  sub: 'abdee025-fa3c-4ce2-b6af-d0931cfb4cea'
}
Then we make another request to gather more user information. This time we make a GET request to the /api/user/registration endpoint. This API requires the User Id, which is the same as the sub value provided by the introspect endpoint. The response to the GET request contains the user data property, which has the information we need. Note that this is not standard, but the response from the /oauth2/introspect endpoint is.
然后,我们再次发出请求以收集更多的用户信息。 这次我们向/api/user/registration端点发出GET请求。 该API需要用户ID,该ID与introspect端点提供的sub值相同。 GET请求的响应包含用户data属性,该属性包含我们所需的信息。 请注意,这不是标准的,但是来自/oauth2/introspect端点的响应是。
When this final request is successful, we send all the data to our Vue client via res.send(). Here is what the response from /api/user/registration call looks like:
最终请求成功后,我们将通过res.send()将所有数据发送到Vue客户端。 /api/user/registration调用的响应如下所示:
{
  "applicationId": "9d5119d4-71bb-495c-b762-9f14277c116c",
  "data": "",
  "id": "c756e203-ea1f-491e-9446-b70ed4eecc17",
  "insertInstant": 1594898302209,
  "lastLoginInstant": 1594900452281,
  "username": "ashu",
  "usernameStatus": "ACTIVE",
  "verified": true
}
The API key that we are passing in the Authorization HTTP header is not part of OAuth standard. You need it to call non-standard endpoints like the User Registration API. We added this to show how you can use the API key if you decide to access endpoints protected by that key.
我们在Authorization HTTP标头中传递的API密钥不是OAuth标准的一部分。 您需要它来调用非标准端点,例如User Registration API 。 我们添加了此内容,以显示如果您决定访问受该密钥保护的端点,那么如何使用API密钥。
显示用户数据 (Showing user data)
The Express server can now access user’s information stored in FusionAuth. The next step is to display that data. In our App.vue file we modify the mounted() method, since this time we are getting a response object that contains data from both the introspect and registration endpoints.
Express服务器现在可以访问存储在FusionAuth中的用户信息。 下一步是显示该数据。 在我们的App.vue文件中,我们修改了mounted()方法,因为这一次我们得到一个响应对象,其中包含来自introspect和registration端点的数据。
We just need to add one line in App.vue. Instead of data.user.email, this time it will be data.introspectResponse.email. While we are doing this, let’s define body as null in data() and store the body field of the response object inside it.
我们只需要在App.vue添加一行App.vue 。 这次将不是data.user.email ,而是data.introspectResponse.email 。 当我们这样做,让我们定义body作为空data()和存储body里面的响应对象的领域。
//...
data() {
  return {
    email: null,
    body: null,
  };
},
mounted() {
  fetch(`http://localhost:9000/user`, {
    credentials: "include" // fetch won't send cookies unless you set credentials
  })
  .then((response) => response.json())
  .then((data) => {
    this.email = data.introspectResponse.email;
    this.body= data.body;
  });
}
//...
Everything else remains the same. We are now getting user information from FusionAuth in our application instead of fake user data.
其他一切保持不变。 现在,我们从应用程序中的FusionAuth获取用户信息,而不是假用户数据。
Go through the login process once again, and you should see “Welcome [your email address]” after successful authentication.
再次执行登录过程,成功认证后,您应该会看到“ Welcome [您的电子邮件地址]”。
在Vue中添加登录和注销 (Adding sign in and sign out in Vue)
We have previously created the server endpoints for login and logout. Let’s add them to our Vue application. Create a new file named Login.vue and add the following:
我们先前已经创建了用于login和logout的服务器端点。 让我们将它们添加到我们的Vue应用程序中。 创建一个名为Login.vue的新文件,并添加以下内容:
<template>
  <h1 v-if="email"><a href='http://localhost:9000/logout'>Sign Out</a></h1>
  <h1 v-else><a href='http://localhost:9000/login'>Sign In</a></h1>
</template>
<script>
export default {
  name: "Login",
  props: ["email"],
};
</script>
According to the above code, if the user is not logged in, the Sign In text will be displayed, otherwise a Sign Out message will be shown. email is expected to be passed from App.vue as a prop here, so let’s do that. In our App.vue file, first import the Login component:
根据上面的代码,如果用户未登录,则将显示“ Sign In文本,否则将显示“ Sign Out消息。 email预计将从App.vue作为道具从App.vue传递出去,所以让我们这样做。 在我们的App.vue文件中,首先导入Login组件:
//...
import Login from "./Login";
//...
And then add this to components:
然后将其添加到components :
//...
components: {
  Greet,
  Login
}
//...
And finally use it inside the <template> tags, passing email as a property:
最后在<template>标记内使用它,将email作为属性传递:
//...
<div id="container">
  <Greet v-bind:email="email" />
  <Login v-bind:email="email" />
</div>
//...
We can now log in and log out with a click. Here’s the application when you are signed out:
现在,我们可以单击登录并注销。 这是您注销后的应用程序:

And here’s the application when you are signed in (if you signed up with richard@fusionauth.io):
这是您登录时的应用程序(如果您使用richard@fusionauth.io ):

更改用户信息 (Changing user info)
This last section deals with setting FusionAuth user data from our Vue application.
最后一部分介绍如何从我们的Vue应用程序中设置FusionAuth用户数据。
We will create the /set-user-data route; inside routes add a set-user-data.js file and add this code to it:
我们将创建/set-user-data路由; 在routes内部添加一个set-user-data.js文件,并向其中添加以下代码:
const express = require("express");
const router = express.Router();
const axios = require("axios");
const qs = require("query-string");
router.post("/", (req, res) => {
  // POST request to /introspect endpoint
  axios
    .post(
      `http://localhost:${process.env.FUSIONAUTH_PORT}/oauth2/introspect`,
      qs.stringify({
        client_id: process.env.CLIENT_ID,
        token: req.session.token,
      })
    )
    .then((response) => {
      let introspectResponse = response.data;
      // PATCH request to /registration endpoint
      axios.patch(
        `http://localhost:${process.env.FUSIONAUTH_PORT}/api/user/registration/${introspectResponse.sub}/${process.env.APPLICATION_ID}`,
        {
          registration: {
            data: req.body,
          },
        },
        {
          headers: {
            Authorization: process.env.API_KEY,
          },
        }
      ).catch(err=>{
          console.log(err)
      })
    })
    .catch((err) => {
      console.error(err);
    });});
module.exports = router;
To ensure that we are updating the user currently logged in, we find the token from our FusionAuth server by making a POST request to the oauth/introspect endpoint; this is similar to what we did in the user route.
为了确保我们正在更新当前登录的用户,我们通过向oauth/introspect端点发出POST请求,从我们的FusionAuth服务器中找到令牌; 这类似于我们在user路线中所做的。
Once this request is successful, we make a PATCH request to /api/user/registration API. If you go through the User Registration docs, you will find that this API accepts both PUT and PATCH requests. Here we are using PATCH since we only want to update a single part of the user registration object and PATCH will merge the request parameters into the existing object.
成功完成此请求后,我们会向/api/user/registration API发出PATCH请求。 如果您浏览了User Registration docs ,您将发现此API接受PUT和PATCH请求。 这里我们使用PATCH,因为我们只想更新用户注册对象的单个部分,而PATCH会将请求参数合并到现有对象中。
The data to send is stored inside the registration object which takes its value from req.body. This registration represents a user’s association with an application. The data attribute allows us to store arbitrary key value data related to a user’s registration in an application.
要发送的data存储在registration对象内部,该registration对象从req.body获取其值。 该registration表示用户与应用程序的关联。 data属性允许我们在应用程序中存储与用户注册有关的任意键值数据。
We are using PATCH in communicating from Express to FusionAuth, but we will be sending user data from our Vue app to the Express server via JSON in the body of a POST HTTP message.
我们正在使用PATCH从Express到FusionAuth进行通信,但是我们将通过POST HTTP消息正文中的JSON将用户数据从Vue应用发送到Express服务器。
从Vue设置用户数据 (Setting user data from Vue)
Now that we have created our server route for updating user data, let’s create a text-area in our Vue app. Users will type data there and it will be sent to the server when the Submit button is clicked.
现在,我们已经创建了用于更新用户数据的服务器路由,让我们在Vue应用程序中创建一个text-area 。 用户将在此处键入数据,然后单击“ Submit按钮将其发送到服务器。
In client/src create a new file named Update.vue and add the following to it:
在client/src创建一个名为Update.vue的新文件, Update.vue其中添加以下内容:
<template>
  <form>
    <textarea
      v-model="userData"
      placeholder="Update FusionAuth user data."
    ></textarea>
    <button type="submit" class="button">Submit</button>
  </form>
</template>
<script>
export default {
  name: "Update",
  data() {
    return {
      userData: "",
    };
  },
</script>
<style>
textarea {
  display: block;
  margin-left: auto;
  margin-right: auto;
}
button {
  margin-left: auto;
  margin-right: auto;
  margin-top: 5px;
}
</style>
One of the cool features of Vue is that by using v-model="userData" and initializing userData to be a blank string in the data() function, two-way data binding is configured between the textarea element and the userData property.
Vue的很酷的功能之一是,通过使用v-model="userData"并将userData初始化为data()函数中的空白字符串,可以在textarea元素和userData属性之间配置双向数据绑定。
We can now access whatever we type in textarea in userData. You can read more about it here.
现在,我们可以访问在userData中的textarea中键入的任何内容。 您可以在此处了解更多信息 。
Add this component to App.vue. It does not make sense to show this component when the user is not logged in, however. To hide it, add v-if="email" to this component. It will check to see if email is present or not. Therefore this component will hide itself if the user is logged out.
将此组件添加到App.vue 。 但是,当用户未登录时,显示此组件没有任何意义。 要隐藏它,请将v-if="email"添加到此组件。 它将检查是否存在email 。 因此,如果用户注销,此组件将隐藏自身。
<Update v-if="email" />We still haven’t configured the Submit button. Let’s do so to send whatever we type in our textarea to our server to be stored. Create a function update inside the methods() section.
我们仍然没有配置Submit按钮。 让我们将在textarea键入的任何内容发送到服务器进行存储。 在methods()部分中创建一个函数update 。
//...
methods: {
  update: function() {
    fetch(`http://localhost:9000/set-user-data`, {
      credentials: "include",
      method: "POST",
      headers: {
        "Content-Type": "application/json",
      },
      body: JSON.stringify({
        userData: this.userData,
      }),
    }).catch((err) => {
        console.log(err);
      });
      this.userData=''
  },
},
//...
In the above function, we use fetch() to POST JSON-encoded data to Express. If you are familiar with fetch(), you will see that this is a simple POST request, nothing fancy. You can read more about it here.
在上面的函数,我们使用fetch()到POST JSON编码的数据来表示。 如果您熟悉fetch() ,那么您会发现这是一个简单的POST请求,没什么花哨的。 您可以在此处了解更多信息 。
Once we have sent userData to our server, we reset the textarea by setting userData equal to '', since it is a two-way binding. To bind this function to the submit event we will add the following to the form tag:
将userData发送到服务器后,我们通过将userData设置为''来重置textarea ,因为它是双向绑定。 为了将此功能绑定到submit事件,我们将以下内容添加到form标签:
<form @submit.prevent="update">
  //
</form>
FUN FACT: Using
.preventstops the page from reloading whenever the Submit button is clicked.
.prevent事实:每当单击“提交”按钮时,使用.prevent停止重新加载页面。
Here is how our application looks now:
这是我们的应用程序现在的外观:

Go to your Vue app and type some text in the textarea and click the Submit button. If you log in to the FusionAuth dashboard, you can now see the text you added is stored in FusionAuth. It is under the User data tab in your user account details.
转到您的Vue应用,然后在textarea键入一些文本,然后单击“提交”按钮。 现在登录FusionAuth信息中心,可以看到添加的文本已经保存在FusionAuth中。 它在您的用户帐户详细信息中的“ 用户数据”选项卡下。
结论 (Conclusion)
Congrats, you have built a Vue application which allows a user to log in, log out, and modify their user data. This article is a foundation for implementing OAuth using FusionAuth. There are a bunch of other features, components, and routes that you could add to expand this application.
恭喜,您已经构建了一个Vue应用程序,该应用程序允许用户登录,注销和修改其用户数据。 本文是使用FusionAuth实施OAuth的基础。 您可以添加许多其他功能,组件和路由来扩展此应用程序。
Again, here’s the code that you can fork and experiment with.
同样,这是您可以进行分叉和试验的代码 。
Here are a few ideas of what you can do next:
以下是您接下来可以做什么的一些想法:
Secure your server using a middleware like Helmet
使用头盔之类的中间件保护服务器安全
Explore third party authentication options such as Google, Twitter, or others.
Originally published at https://fusionauth.io.
最初发布在 https://fusionauth.io 。
翻译自: https://medium.com/@FusionAuth/how-to-securely-implement-oauth-in-vue-js-57d08724efe1


 3213
3213


 被折叠的 条评论
为什么被折叠?
被折叠的 条评论
为什么被折叠?
 到【灌水乐园】发言


