


firebase推送
This article will help you implement firebase web push notifications without using any packages in your project for latest version 7.18.0 or above.
本文将帮助您实现Firebase Web推送通知,而无需在项目中使用最新版本7.18.0或更高版本的任何程序包。
介绍 (INTRODUCTION)
Firebase uses cloud services for its notification services on Android,IOS & Web.Firebase Cloud Messaging or FCM run on basic principles of tokens, which is uniquely generated for each device & later used for sending messages to respective devices.
Firebase在Android,IOS和Web上的通知服务使用云服务.Firebase Cloud Messaging或FCM基于令牌的基本原理运行, 令牌是为每个设备唯一生成的,后来用于向各个设备发送消息。
Web Push Notification uses javascript to call firebase methods and generate the token.This article will explain how to implement firebase cloud messaging ,right from setting up project.
Web Push Notification使用javascript调用firebase方法并生成令牌。本文将直接从设置项目开始,说明如何实现firebase云消息传递。
Note-FCM only works for Https server
Note-FCM仅适用于Https服务器
1.注册Firebase应用 (1.Register Firebase App)
Go to link https://console.firebase.google.com/u/0/ and click create project.
转到链接https://console.firebase.google.com/u/0/ ,然后单击创建项目。
2.Enter your project name ,& continue once name is checked by google for its uniqueness
2.输入项目名称,一旦Google检查了名称的唯一性,请继续
3.Enter the information asked such as country and accept terms & conditions and continue.Wait for some time till project is created.
3.输入询问的信息(例如国家/地区)并接受条款和条件并继续。请等待一段时间直到创建项目。
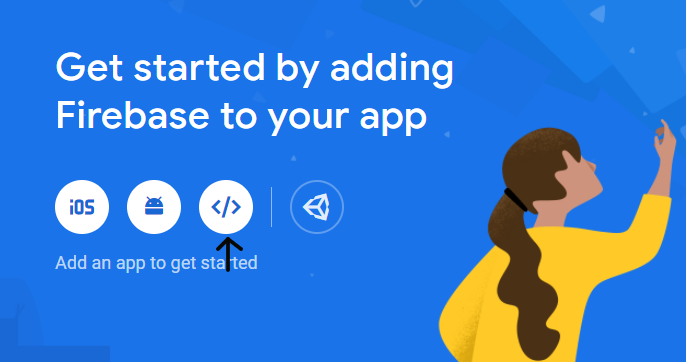
4.Add app to your project,it can be anything from Android,IOS,Web,Unity.For this article we need web app so click on web icon represented as </>
4.添加应用程序到您的项目中,它可以是Android,IOS,Web,Unity中的任何内容。对于本文,我们需要Web应用程序,因此请单击表示为</>的Web图标
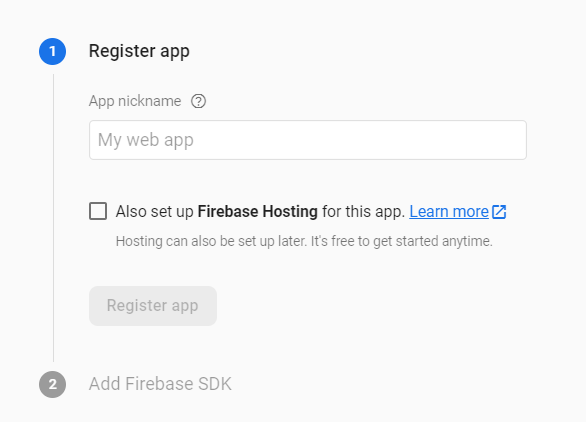
5.Add a nick-name to your app,this nick-name is only for user and internal use ,which means it is useful just to differentiate between apps in a project from perspective of user.
5.为您的应用程序添加一个昵称,该昵称仅供用户和内部使用,这意味着从用户角度区分项目中的应用程序很有用。
You can add hosting for project if your project is already not running on https server else you can skip this step.
如果您的项目尚未在https服务器上运行,则可以为项目添加托管,否则可以跳过此步骤。
Click on Register app
点击注册应用
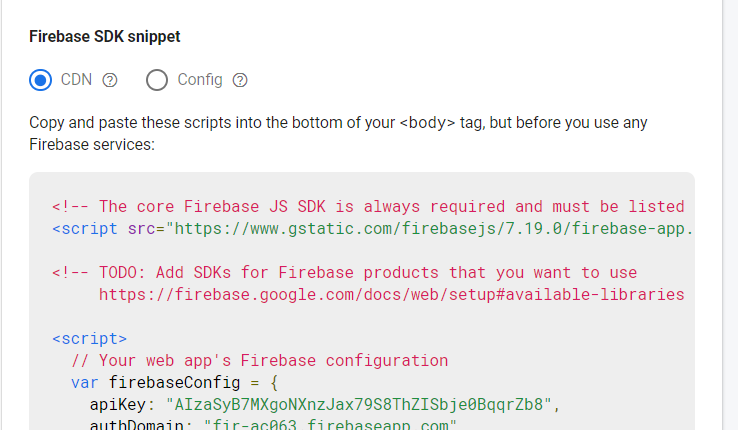
6.After your app is Registered you will be presented with Firebase SDK,which look like the code written below,you may copy this now,if not it can also be used later from settings,steps for which will be described in next section.
6.注册您的应用程序后,您将看到Firebase SDK,它看起来像下面的代码,您可以立即复制它,如果没有,也可以在以后的设置中使用,有关步骤将在下一节中介绍。
<!-- The core Firebase JS SDK is always required and must be listed first -->
<script src="https://www.gstatic.com/firebasejs/7.18.0/firebase-app.js"></script>General
<!-- TODO: Add SDKs for Firebase products that you want to use
     https://firebase.google.com/docs/web/setup#available-libraries -->For Messaging<script src="https://www.gstatic.com/firebasejs/7.18.0/firebase-messaging.js"></script>Do not copy below code as it is,values will be different for your app.
<script>
  // Your web app's Firebase configuration
    var firebaseConfig = {
  apiKey: "AIzaSyDOCAbC123dEf456GhI789jKl01-MnO",
  authDomain: "myapp-project-123.firebaseapp.com",
  databaseURL: "https://myapp-project-123.firebaseio.com",
  projectId: "myapp-project-123",
  storageBucket: "myapp-project-123.appspot.com",
  messagingSenderId: "65211879809",
  appId: "1:65211879909:web:3ae38ef1cdcb2e01fe5f0c",
};
  };
  // Initialize Firebase
  firebase.initializeApp(firebaseConfig);
</script>
2.将Firebase添加到您的项目中。 (2.Add firebase to your Project.)
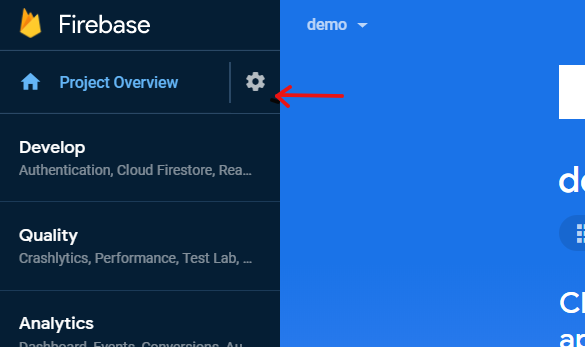
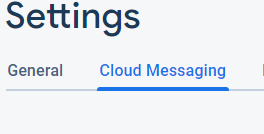
On dashboard , go to you side bar and click settings icon.Refer image below.Click project Settings.
在信息中心上,转到侧边栏,然后单击设置图标。 请参考下图。 单击项目设置。
2.Once Setting page(General Settings) is opened you scroll down to bottom of page and copy the code displayed for CDN selected.
2.打开设置页面(常规设置)后,向下滚动到页面底部,然后复制为所选CDN显示的代码。
3.Add this code to your HTML file at the end after body tag and add CDN script for firebase messaging , as shown in code below.
3.将此代码添加到body标记后的末尾HTML文件中,并添加用于Firebase消息传递的CDN脚本,如以下代码所示。
<body>
----
----Your Page Contents
----
</body>
<script src="https://www.gstatic.com/firebasejs/7.18.0/firebase-app.js"></script><script src="https://www.gstatic.com/firebasejs/7.18.0/firebase-messaging.js"></script>//Do not copy below code as it is values will be different for your app.
<script>// Your web app's Firebase configuration
    var firebaseConfig = {
  apiKey: "AIzaSyDOCAbC123dEf456GhI789jKl01-MnO",
  authDomain: "myapp-project-123.firebaseapp.com",
  databaseURL: "https://myapp-project-123.firebaseio.com",
  projectId: "myapp-project-123",
  storageBucket: "myapp-project-123.appspot.com",
  messagingSenderId: "65211879809",
  appId: "1:65211879909:web:3ae38ef1cdcb2e01fe5f0c",
};
  }; // Initialize Firebase
  firebase.initializeApp(firebaseConfig);
</script>
3.运行Firebase服务 (3.Running Firebase Service)
- For the code mentioned above, add the lines in code below ,after firebase initialize line. 对于上述代码,在firebase初始化行之后,在下面的代码中添加行。
// Initialize Firebase
firebase.initializeApp(firebaseConfig);const messaging=firebase.messaging();//Custom function made to run firebase service
getStartToken();//This code recieve message from server /your app and print message to console if same tab is opened as of project in browser messaging.onMessage(function(payload){
console.log("on Message",payload);
});
2.The code below can be written in separate js file included in your html page or can be appended to code above in <script> tag.
2.下面的代码可以写在HTML页面中包含的单独的js文件中,也可以在<script>标记中附加到上面的代码中。
messaging.getToken() retrieves token by called firebase sdk,if token is found ,we send it to server for storage,else we ask for permission to user to send him notification by calling method RequestPermission(),which is custom function.
messages.getToken()通过调用firebase sdk检索令牌,如果找到令牌,则将其发送到服务器进行存储,否则我们通过调用方法RequestPermission()来请求用户向他发送通知,该方法是自定义函数。
setTokenSentToServer() is also a custom function which uses local storage to set value of sendTokenToServer==1 if token is already sent to server and 0 if token is not sent to server some error is occured while sending to sever or retrieving it from firebase SDK
setTokenSentToServer()也是一个自定义函数,如果令牌已发送到服务器,则使用本地存储设置sendTokenToServer的值== 1;如果令牌未发送到服务器,则设置为0;如果将令牌发送到服务器或从Firebase SDK检索,则会发生一些错误
function getStartToken(){
messaging.getToken().then((currentToken) => {if (currentToken) {
sendTokenToServer(currentToken);
}
else {
// Show permission request.
RequestPermission();
setTokenSentToServer(false);
}
}).catch((err) => {
setTokenSentToServer(false);
});}function RequestPermission(){messaging.requestPermission()
.then(function(permission){
if (permission === 'granted') {
console.log("have Permission");//calls method again and to sent token to server
getStartToken();
 }
 else{console.log("Permission Denied");}
.catch(function(err){
console.log(err);
})}function sendTokenToServer(token){
if (!isTokensendTokenToServer()) {$.ajax({url: URL,type: 'POST',data: {//whatever you wanna send
push_token:token,},success: function (response) {
setTokenSentToServer(true);
},
error: function (err) {
setTokenSentToServer(false);
},});
}}function isTokensendTokenToServer() {return window.localStorage.getItem('sendTokenToServer') === '1';
}
function setTokenSentToServer(sent) {
window.localStorage.setItem('sendTokenToServer', sent ? '1' : '0');
}
3.从项目发送消息 (3.Send Message from Project)
1.Sending Mesaging Pre-requirements
1. 发送消息预定要求
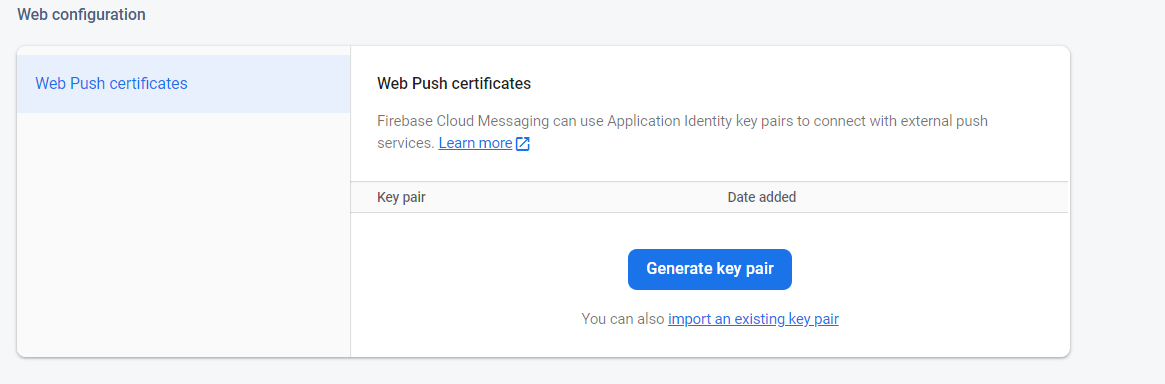
a.For vapidKey go to settings on firebase console,click cloud messaging ,scroll down to bottom of page in Web Configuration section click on button Generate Key Pair.
对于vapidKey,请转到firebase控制台上的设置 , 单击“云消息传递” , 然后在“ Web配置”部分中向下滚动到页面底部,单击“ 生成密钥对”按钮。
b.Code to send message from your project ,refer Google on how to send API request from your respective programming language.
b。从您的项目发送消息的代码,请向Google咨询如何从您各自的编程语言发送API请求。
METHOD-POST
方法后
URL-https://fcm.googleapis.com/fcm/send
网址-https : //fcm.googleapis.com/fcm/send
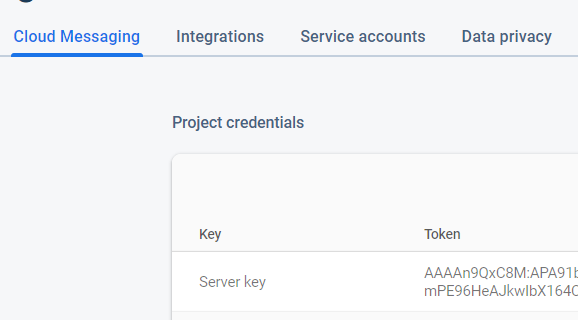
HEADERS-send with authorization using key which can be found on Settings>Cloud Messaging,look for project credentials section and copy server key.
HEADERS- 使用密钥发送授权,该密钥可以在“设置”>“云消息”中找到,查找项目凭证部分并复制服务器密钥。
to-Token you saved on in your database for user .
to- Token,您保存在数据库中供user使用。
registeration_ids-if sending to multiple device
registeration_ids- 如果发送到多个设备
c.To read about diiferent messages and fcm_options you can refer to this url https://firebase.google.com/docs/cloud-messaging/concept-options
c。要了解有关不同消息和fcm_options的信息,请参阅以下网址https://firebase.google.com/docs/cloud-messaging/concept-options
d.If you want send in FCM notifications in you format you can refer to link https://firebase.google.com/docs/cloud-messaging/js/first-message and see notification message format
d。如果要以您的格式发送FCM通知,可以参考链接https://firebase.google.com/docs/cloud-messaging/js/first-message并查看通知消息格式
e.for this article i will be using data messages/custom/without predefined key-value pairs.
e。 对于本文,我将使用数据消息/自定义/没有预定义的键值对。
Note-Data send is json format
注意-数据发送为json格式
f.my data look like
F。 我的数据看起来像
{"registration_ids":{token1,token2,token3},"data":{ "title":"demo","body":this is demo data","clickUrl":"https://google.com"}}5,增加服务人员 (5.Add Service Worker)
Add a Service-Worker file by name (don’t change the name) firebase-messaging-sw.js in your project root folder or public folder such as opening link-https://your-url/firebase-messaging-sw.js gives you content of file.
在您的项目根文件夹或公用文件夹(例如, 打开链接 -https :// your-url / firebase-messaging-sw )中,按名称( 不要更改名称 )添加fire-worker文件firebase-messaging-sw.js 。 js 给你文件的内容。
- payload is data you send you recieve when api request will be sent. 有效负载是您将在api请求发送时收到的数据。
- You will not require notification event listener if message is send through standard FCM notification message ,fcm will handle it itself. 如果通过标准FCM通知消息发送消息,则不需要通知事件侦听器,fcm会自行处理。
importScripts('https://www.gstatic.com/firebasejs/7.18.0/firebase-app.js');
importScripts('https://www.gstatic.com/firebasejs/7.18.0/firebase-messaging.js');// Your web app's Firebase configuration
    var firebaseConfig = {
  apiKey: "AIzaSyDOCAbC123dEf456GhI789jKl01-MnO",
  authDomain: "myapp-project-123.firebaseapp.com",
  databaseURL: "https://myapp-project-123.firebaseio.com",
  projectId: "myapp-project-123",
  storageBucket: "myapp-project-123.appspot.com",
  messagingSenderId: "65211879809",
  appId: "1:65211879909:web:3ae38ef1cdcb2e01fe5f0c",
};firebase.initializeApp(firebaseConfig);
const messaging = firebase.messaging();messaging.usePublicVapidKey(ABp.........BS5A);messaging.onBackgroundMessage(function(payload) {
const notificationTitle = payload.data.title;
const notificationOptions = {
body: payload.data.message,
icon:'PATH TO ICON IF ANY',
data: { url:payload.data.onClick }, //the url which we gonna use later};
return self.registration.showNotification(notificationTitle,notificationOptions);});//Code for adding event on click of notificationself.addEventListener('notificationclick', function(event) {let url = event.notification.data.url;event.notification.close(); event.waitUntil(clients.matchAll({type: 'window'}).then( windowClients => {// Check if there is already a window/tab open with the target URLfor (var i = 0; i < windowClients.length; i++) {var client = windowClients[i];// If so, just focus it.if (client.url === url && 'focus' in client) {return client.focus();}}// If not, then open the target URL in a new window/tab.if (clients.openWindow) {return clients.openWindow(url);}}));});
这些是将Firebase Web Push添加到项目中所需的唯一步骤。 (These are the only steps you will need to add firebase web push to your project.)
Press Clap if this article really helped you.
如果本文确实对您有帮助,请按Clap。
翻译自: https://medium.com/analytics-vidhya/firebase-web-push-notifications-26352b136814
firebase推送


 971
971


 被折叠的 条评论
为什么被折叠?
被折叠的 条评论
为什么被折叠?
 到【灌水乐园】发言


