


numpy 旋转 图像增强
These days, we are spoiled with high end libraries. When It comes to Image Processing and advanced libraries such as OpenCV Rotating Image may sound like a very easy task using inbuilt functions.I am not telling you to code everything from scratch, However, an understanding about how things work will make you a better programmer. So let’s get started.
牛逼 HESE日子里,我们都被宠坏了与高端库。 对于图像处理和高级库(例如OpenCV Rotating Image)来说,使用内置函数听起来很容易。我并不是在告诉您从头开始编写所有代码,但是,了解如何工作将使您成为一个更好的程序员。 因此,让我们开始吧。
位图 (BITMAPS)
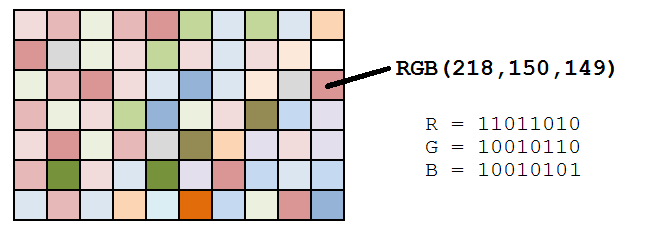
A typical computer image these days uses 24 bits to represent the color of each pixel. Eight bits are used to store the intensity of the red part of a pixel (00000000 through 11111111), giving 256 distinct values. Eight bits are used to store the green component, and eight bits are used to store the blue component.
如今,典型的计算机图像使用24位来表示每个像素的颜色。 八位用于存储像素红色部分的强度( 00000000至11111111 ),给出256个不同的值。 八位用于存储绿色分量,八位用于存储蓝色分量。
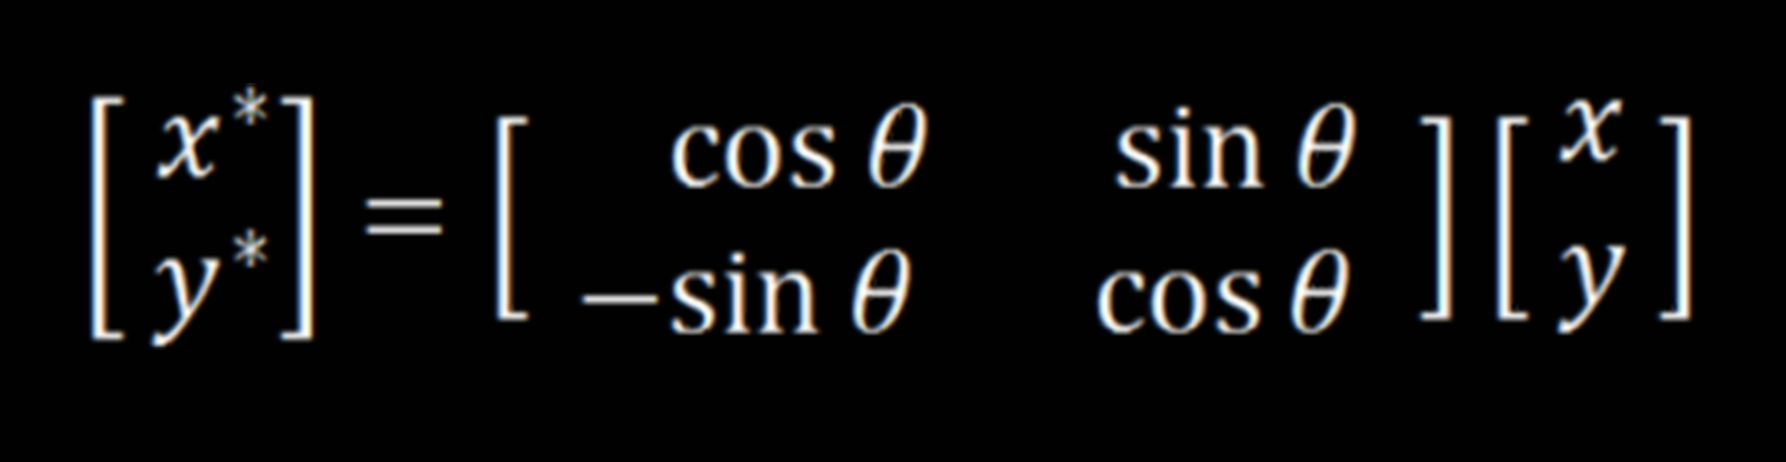
Each pixel has a coordinate pair (x,y) describing its position on two orthogonal axes from defined origin O.It is around this origin we are going to rotate this image.What we need to do is take the RGB values at every (x,y) location, rotate it as needed, and then write these values in the new location, considering (x,y) with respect to the origin we assumed.The new location is obtained by using the transformation matrix.
每个像素都有一个坐标对(x,y),描述了它在从定义的原点O开始的两个正交轴上的位置。围绕该原点,我们将旋转该图像。我们需要做的是在每个(x ,y)位置,根据需要旋转它,然后将这些值写入新位置,并考虑相对于我们假设的原点的(x,y)。使用转换矩阵获得新位置。
When image will be rotated ,the dimension of the frame containing it will change so to find the new dimensions we use this formula,
当图像旋转时,包含图像的框架的尺寸将发生变化,因此要使用此公式查找新的尺寸,
new_width=|old_width×cosθ|+|old_height×sinθ|
new_width = | old_width×cosθ | + | old_height×sinθ |
new_height=|old_height×cosθ|+ |old_row×sinθ|
new_height = | old_height×cosθ | + | old_row×sinθ |
now let’s code it
现在让我们编码
ALIASING
混叠
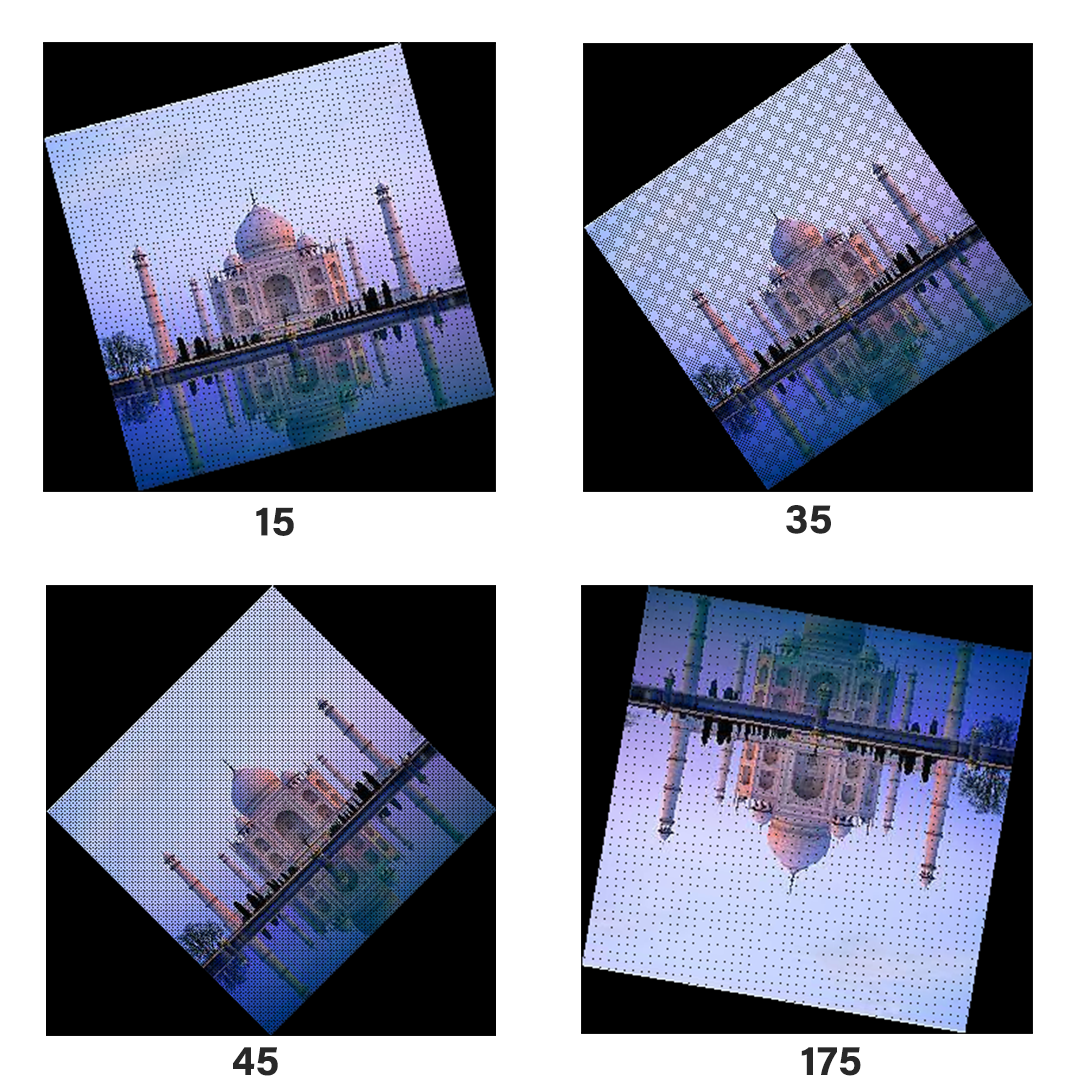
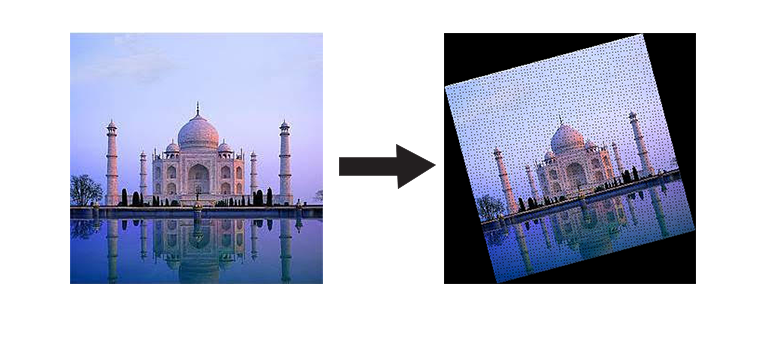
So our resultant image is rotated by 15 degrees ,so it really worked,but what are those black dots?This is a problem called aliasing.Multiplying by sines and cosines on the integer coordinates of the source image gives real number results, and these have to be rounded back to integers again to be plotted. Sometimes this number rounding means the same destination location is addressed more than once, and sometimes certain pixels are missed completely. When the pixels are missed, the background shows through. This is why there are holes.The aliasing problem gets worse when angles are closesr to the diagonals. Here are a few examples of images at different rotations:
因此我们将结果图像旋转了15度,它确实起作用了,但是那些黑点是什么呢?这是一个别名问题。在源图像的整数坐标上乘以正弦和余弦得出实数结果,这些结果再次四舍五入为整数以进行绘制。 有时,此数字舍入意味着对同一目标位置的寻址不止一次,有时某些像素完全丢失。 当像素丢失时,背景将显示出来。 这就是为什么有Kong的原因。当角度接近对角线时,混叠问题会变得更糟。 以下是一些不同旋转图像的示例:
What can we do about this? There are a variety of solutions. One of them is to oversample the source image. We can pretend that each of the original source pixels is really a grid of n x n smaller pixels (all of the same color), and calculate the destination coordinates of each of these subpixels and plot these
我们该怎么办? 有多种解决方案。 其中之一是对源图像进行过采样。 我们可以假设每个原始源像素实际上是n × n个较小像素(都具有相同颜色)的网格,然后计算这些子像素中每个像素的目标坐标并绘制这些像素
A more refined way is called Area Mapping. For this, you invert the problem, and for each destination pixel, you find which four partial source pixels that it was created from. The color for the destination is calculated by the area-weighted average of the four source pixels (The source pixels that contribute more to the destination pixel have a greater influence on its color). This algorithm not only ensures that there are no gaps in the destination, but also appropriately averages the colors (ensuring both a smoother image and also keeping the average brightness of the rotated image constant).
一种更完善的方法称为区域映射 。 为此,您可以将问题反转,并为每个目标像素找到创建该像素的四个部分源像素。 通过四个源像素的面积加权平均值计算出目标的颜色(对目标像素贡献更大的源像素对其颜色的影响更大)。 该算法不仅确保目标上没有间隙,而且可以适当地平均颜色(既确保图像更平滑,又保持旋转图像的平均亮度恒定)。
However, there is a more elegant method, and this is the method that was used many years ago when computing power (and memory) were at a premium and every processor cycle worth its weight in gold. It is called the three shear rotation method.
但是,还有一种更优雅的方法,这是很多年前使用的方法,当时计算能力(和内存)非常宝贵,并且每个处理器周期都具有其价值。 称为三剪切旋转法。
三剪 (THREE SHEARS)
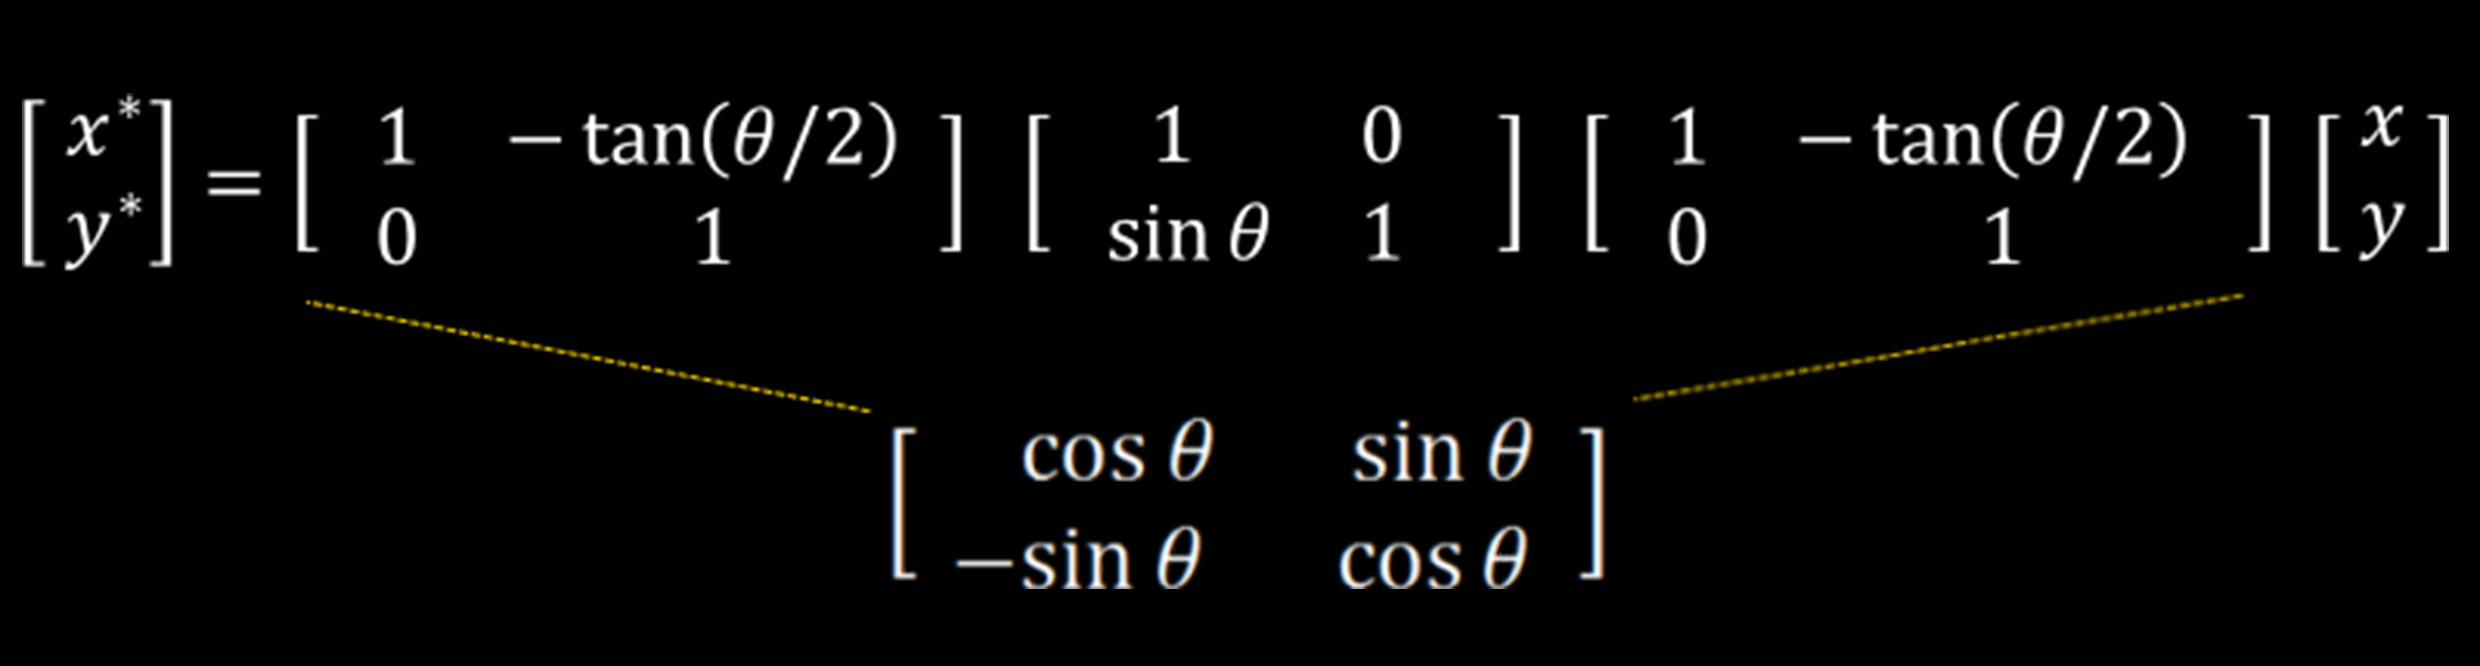
These method works by expanding 2D rotation matrix into three different matrices.
这些方法通过将2D旋转矩阵扩展为三个不同的矩阵来工作。
There are some interesting properties of this matrix:-
这个矩阵有一些有趣的特性:
- The three matrices are all shear matrices 这三个矩阵都是剪切矩阵
- The first and the last matrices are the same 第一个和最后一个矩阵相同
- The determinant of each matrix is same (each stage is conformal and keeps the area the same). 每个矩阵的行列式相同(每个阶段都是保形的,并且使面积相同)。
- 4. As the shear happens in just one plane at time, and each stage is conformal in area, no aliasing gaps appear in any stage. 4.由于剪切力一次仅在一个平面上发生,并且每个阶段的面积都是共形的,因此在任何阶段都不会出现锯齿间隙。
note: Shear matrix shown above rotates in clockwise direction so we need to take angle in negative values to assess for that.
注意:上面显示的剪切矩阵沿顺时针方向旋转,因此我们需要将角度取负值进行评估。
So let’s code the shear transformation
所以让我们编写剪切转换的代码
import numpy as np
from PIL import Image
import math


def shear(angle,x,y):
    '''
    |1  -tan(𝜃/2) |  |1        0|  |1  -tan(𝜃/2) |
    |0      1     |  |sin(𝜃)   1|  |0      1     |

    '''
    # shear 1
    tangent=math.tan(angle/2)
    new_x=round(x-y*tangent)
    new_y=y

    #shear 2
    new_y=round(new_x*math.sin(angle)+new_y)      #since there is no change in new_x according to the shear matrix


    #shear 3
    new_x=round(new_x-new_y*tangent)              #since there is no change in new_y according to the shear matrix


    return new_y,new_x


image = np.array(Image.open("test.png"))             # Load the image
angle=-int(input("Enter the angle :- "))                # Ask the user to enter the angle of rotation


# Define the most occuring variables
angle=math.radians(angle)                               #converting degrees to radians
cosine=math.cos(angle)
sine=math.sin(angle)


height=image.shape[0]                                   #define the height of the image
width=image.shape[1]                                    #define the width of the image


# Define the height and width of the new image that is to be formed
new_height  = round(abs(image.shape[0]*cosine)+abs(image.shape[1]*sine))+1
new_width  = round(abs(image.shape[1]*cosine)+abs(image.shape[0]*sine))+1


# define another image variable of dimensions of new_height and new _column filled with zeros
output=np.zeros((new_height,new_width,image.shape[2]))
image_copy=output.copy()


# Find the centre of the image about which we have to rotate the image
original_centre_height   = round(((image.shape[0]+1)/2)-1)    #with respect to the original image
original_centre_width    = round(((image.shape[1]+1)/2)-1)    #with respect to the original image


# Find the centre of the new image that will be obtained
new_centre_height= round(((new_height+1)/2)-1)        #with respect to the new image
new_centre_width= round(((new_width+1)/2)-1)          #with respect to the new image


for i in range(height):
    for j in range(width):
        #co-ordinates of pixel with respect to the centre of original image
        y=image.shape[0]-1-i-original_centre_height
        x=image.shape[1]-1-j-original_centre_width


        #Applying shear Transformation
        new_y,new_x=shear(angle,x,y)


        '''since image will be rotated the centre will change too,
            so to adust to that we will need to change new_x and new_y with respect to the new centre'''
        new_y=new_centre_height-new_y
        new_x=new_centre_width-new_x


        # adding if check to prevent any errors in the processing
        if 0 <= new_x < new_width and 0 <= new_y < new_height and new_x>=0 and new_y>=0:
            output[new_y,new_x,:]=image[i,j,:]                          #writing the pixels to the new destination in the output image


pil_img=Image.fromarray((output).astype(np.uint8))                       # converting array to image
pil_img.save("rotated_image.png")                                                 # saving the image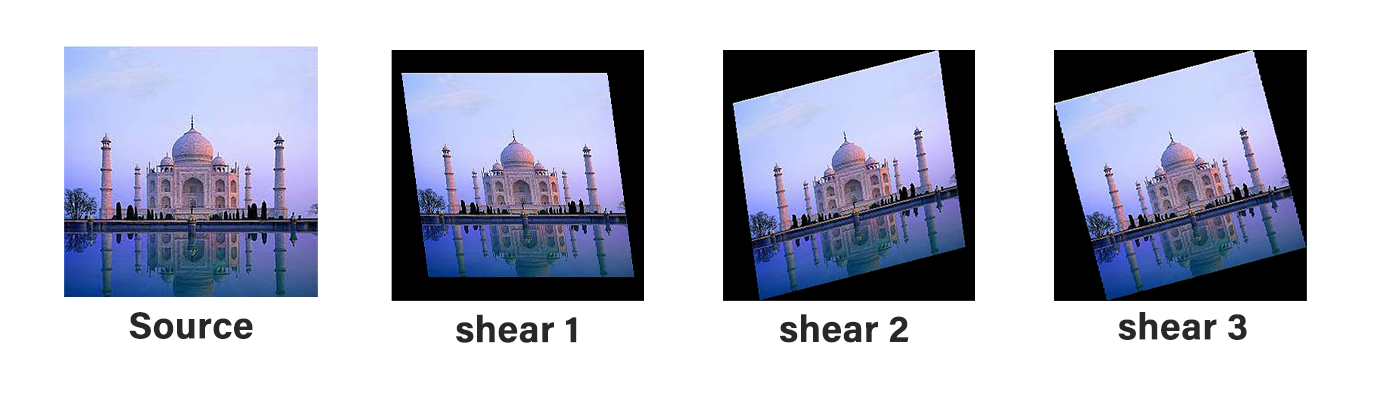
In the first shear operation, raster columns are simply shifted up and down relative to each other. The shearing is symmetric around the center of the image. It’s analogous to shearing a deck of playing cards.
在第一个剪切操作中,光栅列只是简单地相对于彼此上下移动。 剪切在图像中心周围对称。 这类似于剪切一副扑克牌。
The second shear operation does a similar thing on the previous image, but this time does the shearing left to right.
第二次剪切操作在上一张图像上执行类似的操作,但是这次从左到右进行剪切。
The final shear is the same as the first operation; this time applied to the intermediate image.
最终剪切力与第一次操作相同; 这次应用于中间图像。
No gaps! How elegant is that? We just rotated an image an arbitrary amount (smoothly) using three shear operations!
没有差距! 那有多优雅? 我们仅使用三个剪切操作就将图像旋转了任意数量(平滑)!
In times-past, when floating point and trig calculations were expensive, these properties were very important. Because only one plane was being modified at once, no additional memory was needed as the code could simple walk down the raster line making the changes it needed. Pretty cool.
过去,当浮点和触发器的计算非常昂贵时,这些属性非常重要。 由于一次只能修改一个平面,因此不需要额外的内存,因为代码可以简单地沿着栅格线移动,进行所需的更改。 很酷
numpy 旋转 图像增强


 被折叠的 条评论
为什么被折叠?
被折叠的 条评论
为什么被折叠?
 到【灌水乐园】发言


