


nodejs 推送
Notifications about new articles, price changes, product offers are expanding interactivity scope of mobile applications.
关于新文章,价格变化,产品报价的通知正在扩大移动应用程序的交互范围。
A notification is a message that pops up on the user’s device. Notifications can be triggered locally by an open application, or they can be “pushed” from the server to the user even when the app is not running. They allow your users to opt-in to timely updates and allow you to effectively re-engage users with customized content.¹
通知是一条在用户设备上弹出的消息。 通知可以由打开的应用程序本地触发,也可以从服务器向用户“推送”通知,即使应用程序未运行也是如此。 它们使您的用户可以选择及时更新,并允许您通过自定义内容有效地重新吸引用户。¹
Push notifications are great marketing tools because they help to increase user-to-app interactivity level.
推送通知是出色的营销工具,因为它们有助于提高用户到应用程序的交互程度。
In this article we are going to explore how we can send push notifications from NodeJS backend application to Flutter Android application, using FCM messages. Device tokens will be stored in MySQL database and in the NodeJS, we are going to validate input.
在本文中,我们将探讨如何使用FCM消息将推送通知从NodeJS后端应用程序发送到Flutter Android应用程序。 设备令牌将存储在MySQL数据库和NodeJS中,我们将验证输入。
At the bottom of this article, you can see sample applications and feel free to check them out.
在本文的底部,您可以看到示例应用程序,可以随时对其进行检出。
创建NodeJS后端应用 (Creating NodeJS backend App)
In this section, we are going to build NodeJS backend application that will be responsible for storing push device tokens and sending push notifications.
在本节中,我们将构建NodeJS后端应用程序,该应用程序将负责存储推送设备令牌和发送推送通知。
Backend app will have the following dependencies in ‘package.json’:
后端应用在“ package.json”中具有以下依赖关系:
and by executing:
并通过执行:
npm installwe are going to install these dependencies.
我们将安装这些依赖项。
Next point is to create ‘App.js’, which will be the starting point of our NodeJS app:
下一步是创建“ App.js”,这将是我们的NodeJS应用程序的起点:
In the ‘App.js’ we can see that we are going to create few routes for handling requests for displaying homepage, sending messages, and storing device token.
在“ App.js”中,我们可以看到我们将创建一些路由来处理显示主页,发送消息和存储设备令牌的请求。
It’s also very important to set up ‘.env’ file with appropriate configuration values:
使用适当的配置值设置“ .env”文件也非常重要:
In order to send FCM push notifications from our NodeJS app, we need to make new Firebase Project and generate ‘serverKey’:
为了从NodeJS应用发送FCM推送通知,我们需要创建新的Firebase项目并生成“ serverKey”:
1. Create a new Firebase Project (via https://console.firebase.google.com/).
1.创建一个新的Firebase项目(通过https://console.firebase.google.com /)。
2. Click on ‘Project Overview > Project Settings’ page.
2.单击“项目概述>项目设置”页面。
3. In the ‘Settings’ page, click on ‘Cloud Messaging’ tab. Copy ‘Server key’ value and paste it as a value of ‘FCM_SERVER_KEY’ key, inside of ‘.env’ file.
3.在“设置”页面中,单击“云消息传递”选项卡。 复制“服务器密钥”值,并将其粘贴为“ .env”文件内部的“ FCM_SERVER_KEY”密钥值。
The next step in creating our NodeJS backend app is to create data models.
创建NodeJS后端应用程序的下一步是创建数据模型。
npx sequelize initBy executing the command from above, we have initialized folder where model files will be stored and initial database configuration. The next step is to adjust the database configuration.
通过从上面执行命令,我们已经初始化了将存储模型文件的文件夹以及初始数据库配置。 下一步是调整数据库配置。
The first step in the configuration of the way how data will be stored and retrieved, using ‘sequelize’ library is to specify ‘.sequelizerc’ file with the following content:
使用“ sequelize”库配置数据存储和检索方式的第一步是指定“ .sequelizerc”文件,其内容如下:
The above lines ensures that MySQL configuration is fetched from ‘config/config.js’ file with the following content:
以上几行确保从“ config / config.js”文件中获取具有以下内容MySQL配置:
So, in ‘config.js’ we have specified that we are going to use MySQL database with connection data loaded from ‘.env’ file.
因此,在“ config.js”中,我们指定了要使用从“ .env”文件加载的连接数据MySQL数据库。
The last step of database configuration is to replace the following line from ‘models/index.js’:
数据库配置的最后一步是替换“ models / index.js”中的以下行:
const config = require(__dirname + "/../config/config.json")[env];to:
至:
const config = require(__dirname + "/../config/config")[env];By now we have successfully implemented all the configuration steps from above and we are confident to invoke a command that will generate data model ‘PushDevice’ with appropriate attributes.
到目前为止,我们已经成功地实现了上面的所有配置步骤,并且我们有信心调用将生成具有适当属性的数据模型“ PushDevice”的命令。
npx sequelize-cli model:generate --name PushDevice --attributes uuid:string,token:String,platform:enum:'{android,ios}'in ‘models/pushdevice.js’ and appropriate migration in ‘migrations’ folder.
在“模型/pushdevice.js”中进行相应的迁移,并在“迁移”文件夹中进行适当的迁移。
We need to migrate our ‘PushDevice’ into MySQL database, by execute the following command:
我们需要通过执行以下命令将“ PushDevice”迁移到MySQL数据库:
npx sequelize db:migrateVery nice, so far we have made models and we have prepared everything for storing ‘PushDevice’ data in MySQL database.
很好,到目前为止,我们已经建立了模型,并且已经准备好一切用于在MySQL数据库中存储“ PushDevice”数据的方法。
Next step is to create our main layout (in ‘views/index.ejs’):
下一步是创建主布局(在“ views / index.ejs”中):
In order to send a message, we are going to use JQuery POST method, which will be created in a separate JS file (stored in ‘public/js/index.js’ file):
为了发送消息,我们将使用JQuery POST方法,该方法将在单独的JS文件(存储在“ public / js / index.js”文件中)中创建:
In the script above we can see that in ‘sendMessage’ method we are creating POST request to NodeJS backend URL for handling of send push notification messages.
在上面的脚本中,我们可以看到在“ sendMessage”方法中,我们正在向NodeJS后端URL创建POST请求,以处理发送推送通知消息。
In the next step we are going to create ‘routes/index.js’ file with methods that will handle different route options:
在下一步中,我们将使用处理不同路由选项的方法创建“ routes / index.js”文件:
Method ‘sendMessage’ checks if ‘message’ parameter is valid, fetches android devices token and sending ‘gcm.Message’ message via ‘gcm.Sender’ object.
方法“ sendMessage”检查“ message”参数是否有效,获取android设备令牌并通过“ gcm.Sender”对象发送“ gcm.Message”消息。
In ‘sendToken’ method we are validating if all parameters are valid and created a new ‘PushDevice’ object in MySQL database.
在“ sendToken”方法中,我们将验证所有参数是否有效,并在MySQL数据库中创建一个新的“ PushDevice”对象。
Very nice!
非常好!
We have implemented NodeJS Push notification server and we can start the NodeJS app by executing:
我们已经实现了NodeJS Push通知服务器,我们可以通过执行以下命令来启动NodeJS应用程序:
nodemon App.jsIn the next step, we are going to create a Flutter Android app.
下一步,我们将创建Flutter Android应用。
创建Flutter Android应用 (Creating Flutter Android App)
In this step, we are going to create a Flutter Android application that will be able to receive push notifications. In order to our app to be able to receive push notification, we need to make a Firebase App setup:
在这一步中,我们将创建一个Flutter Android应用程序,它将能够接收推送通知。 为了使我们的应用能够接收推送通知,我们需要进行Firebase应用设置:
1. In project level ‘build.gradle’ add the following dependencies:
1.在项目级别“ build.gradle”中添加以下依赖项:
classpath 'com.android.tools.build:gradle:3.5.3'
classpath 'com.google.gms:google-services:4.3.2'
2. In app-level ‘build.gradle’ add the following dependency to the bottom of file:
2.在应用程序级别的“ build.gradle”中,将以下依赖项添加到文件底部:
apply plugin: 'com.google.gms.google-services'3. In app-level ‘build.gradle’ make sure that ‘applicationId’ is set to the same package name that we have specified in Firebase Android setup process.
3.在应用程序级别的“ build.gradle”中,确保将“ applicationId”设置为与我们在Firebase Android设置过程中指定的相同的程序包名称。
applicationId "com.zsasko.flutterpushsample"We need to configure Firebase for Android in order to get push notifications in our Flutter Android app.
我们需要为Android配置Firebase,以便在Flutter Android应用中获取推送通知。
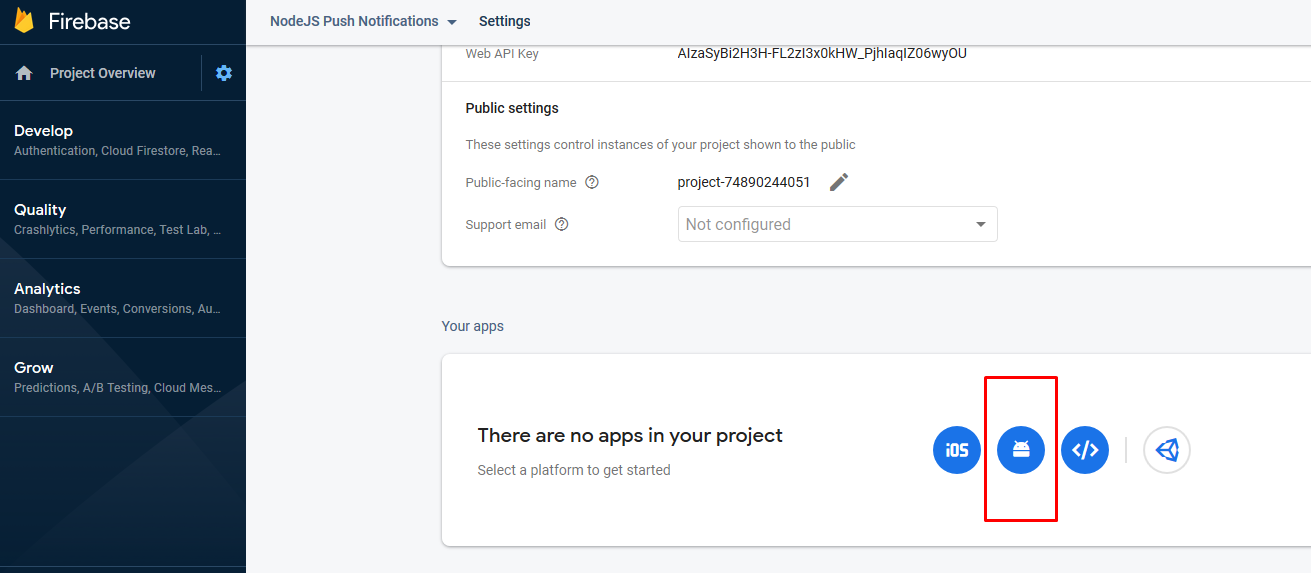
4. In Firebase console click on ‘Project Overview > Project Settings’ and on the bottom of ‘General’ tab, you can find ‘Your Apps’ section. In this section click on ‘Android’ icon in order to start wizard for adding Firebase into Flutter Android project.
4.在Firebase控制台中,单击“项目概述>项目设置”,然后在“常规”选项卡的底部,找到“您的应用程序”部分。 在此部分中,单击“ Android”图标,以启动将Firebase添加到Flutter Android项目的向导。
5. In the ‘Add Firebase to Android app’ dialog, put the package name that will be used in the Flutter app and proceed with wizard.
5.在“将Firebase添加到Android应用程序”对话框中,放入将在Flutter应用程序中使用的程序包名称,然后继续执行向导。

6. In the next step, click ‘Download google-services.json’ and put his file in ‘app’ folder:
6.在下一步中,单击“下载google-services.json”并将其文件放在“ app”文件夹中:

4. We are going to create custom ‘Application’ class with the following content:
4.我们将创建具有以下内容的自定义“应用程序”类:
and assign it to ‘android:name’ property of ‘application’ manifest tag:
并将其分配给“应用程序”清单标签的“ android:name”属性:
<application
 android:label="push_notification_flutter_sample"android:name=".Application"
 android:icon="@mipmap/ic_launcher">
5. In manifest, inside of ‘MainActivity’ add the following intent filter:
5.在清单的“ MainActivity”内部添加以下意图过滤器:
<intent-filter>
 <action android:name="FLUTTER_NOTIFICATION_CLICK" />
 <category android:name="android.intent.category.DEFAULT" />
</intent-filter>
6. In ‘dependencies’ section of app ‘build.gradle’ add the following dependencies:
6.在应用程序“ build.gradle”的“依赖项”部分中,添加以下依赖项:
implementation 'com.google.firebase:firebase-messaging:20.2.4'
implementation 'com.google.firebase:firebase-analytics:17.5.0'
Very nice, so far we have specified all the required initial setup required for receiving push notifications in Flutter Android apps.
很好,到目前为止,我们已经指定了在Flutter Android应用中接收推送通知所需的所有必需的初始设置。
Dependencies that will be used in the Flutter app are the following:
Flutter应用中将使用的依赖项如下:
firebase_messaging: ^7.0.0
http: ^0.12.2
intl: ^0.16.1
and by executing the following command, we are going to install these dependencies:
通过执行以下命令,我们将安装这些依赖项:
flutter pub getThe next step is to create Flutter Android app layout and appropriate methods for subscribing and handling push notification response.
下一步是创建Flutter Android应用布局以及用于订阅和处理推送通知响应的适当方法。
Method ‘sendTokenToServer’ sends push device token to our NodeJS backend application so when the user sends a message from the backend app, it will be sent to our exact device.
方法“ sendTokenToServer”将推送设备令牌发送到我们的NodeJS后端应用程序,因此,当用户从后端应用程序发送消息时,它将被发送到我们的确切设备。
Object ‘_firebaseMessaging’ is responsible for receiving push notifications.
对象“ _firebaseMessaging”负责接收推送通知。
Class ‘MessageItem’ (stored in ‘model/message_item.dart’) will be used for generating list view items:
类“ MessageItem”(存储在“ model / message_item.dart”中)将用于生成列表视图项:
Data model for parsing notification data (file named ‘model/notification_data.dart’):
用于解析通知数据的数据模型(名为“ model / notification_data.dart”的文件):
Folder ‘test’ we can delete since we don’t need to make any Unit tests.
我们可以删除文件夹“ test”,因为我们不需要进行任何单元测试。
DEVELOPER TIP: If you want to access NodeJS backend that’s running on ‘localhost’ from your physical device, you can download an app called ‘ngrok’.
开发者提示:如果要从物理设备访问在“本地主机”上运行的NodeJS后端,则可以下载一个名为“ ngrok”的应用程序。
Start the app by executing the following command:
通过执行以下命令来启动应用程序:
ngrok http 5000which will create ‘Forwarding’ URL that we can reuse in ‘sendTokenToServer’ method and we’ll be able to use our physical device instead of emulator for receiving push messages.
它将创建“转发” URL,我们可以在“ sendTokenToServer”方法中重用该URL,并且我们将能够使用物理设备而不是模拟器来接收推送消息。

We can now start our Flutter Android app in an emulator/physical device and send push notification from the NodeJS app.
现在,我们可以在仿真器/物理设备中启动Flutter Android应用,并从NodeJS应用发送推送通知。
Congratulations!
恭喜你!

You have implemented NodeJS backend app for sending push notifications and simple Flutter Android app for receiving push notifications :)
您已经实现了用于发送推送通知的NodeJS后端应用程序和用于接收推送通知的简单Flutter Android应用程序:)
Source code of sample applications created in this article:
本文创建的示例应用程序的源代码:
[1]: “Introduction to Push Notifications”, Google Developers, https://developers.google.com/web/ilt/pwa/introduction-to-push-notifications. Accessed 26 Aug. 2020.
[1]:“推送通知简介”,Google Developers, https://developers.google.com/web/ilt/pwa/introduction-to-push-notifications 。 于2020年8月26日访问。
nodejs 推送


 387
387

 被折叠的 条评论
为什么被折叠?
被折叠的 条评论
为什么被折叠?
 到【灌水乐园】发言


