


app无法解析js脚本
背景故事 (Background Story)
I recently wanted to share my new Tensorflow JS model with my colleagues at office to get their feedback. Rather than handing them a folder of HTML and JavaScript files, I wanted to deploy it as an internal static site for a better user experience. There are several hosting services to easily achieve this, but as my model is confidential it should only be accessible by company employees. I didn’t want to spin up an entire server side system to take care of authorization, but instead want to achieve this with minimal changes to my static HTML file. My company is subscribed to GSuite services (docs, sheets, drive etc.) which is what I chose to deploy the site securely. If you wish to publicly deploy your model via Firebase hosting, checkout this codelab by Jason Mayes.
我最近想与我的办公室同事分享我的新Tensorflow JS模型,以获取他们的反馈。 我不想将它们交给HTML和JavaScript文件的文件夹,而是希望将其部署为内部静态站点,以获得更好的用户体验。 有几种托管服务可以轻松实现这一目标,但是由于我的模型是保密的,因此只能由公司员工访问。 我不想启动整个服务器端系统来处理授权,而是想通过对静态HTML文件进行最小的更改来实现此目的。 我的公司已订阅GSuite服务(文档,表格,驱动器等),这是我选择安全地部署站点的选择。 如果您希望通过Firebase托管公开部署模型,请查看Jason Mayes的 此代码实验室 。
After reading this article you’ll be able to deploy your Python Tensorflow model as a Tensorflow JS (tfjs) model to run on users’ devices directly. The web page is served via Google App Script with permission levels of your choice. Google drive is used as a model store, which again lets you control who has access to the model files. Security can be important here as the model, which can be a confidential entity, is downloaded onto the user’s device and can be modified at their will. This article’s main focus is the deployment of a ML model and assumes the reader has a basic understanding of web development and machine learning. In an another article I shared how to train a digit recognition model directly on the browser using web workers and touch upon some basics of machine learning along the way. In that article I also shared some pros & cons of deploying the models directly on users’ devices.
阅读本文后,您将能够将Python Tensorflow模型部署为Tensorflow JS(tfjs)模型,以直接在用户的设备上运行。 该网页是通过Google App脚本提供的,具有您选择的权限级别。 Google驱动器用作模型存储,它再次使您可以控制谁有权访问模型文件。 安全性在这里很重要,因为该模型可以是机密实体,可以下载到用户的设备上并可以随意修改。 本文的主要重点是ML模型的部署,并假定读者对Web开发和机器学习有基本的了解。 在另一篇文章中,我分享了如何使用Web Worker在浏览器上直接训练数字识别模型,以及在此过程中涉及一些机器学习的基础知识。 在那篇文章中,我还分享了直接在用户设备上部署模型的利弊。
Please note that this approach only works with Tensorflow Keras model, due to the lack of support to load GraphDef models via tfjs.io.browserFiles API which we depend on. Now that we know the why and what behind this idea, lets get to the exciting part…
请注意,由于缺乏通过 tfjs.io.browserFiles API 加载GraphDef模型的支持,该方法仅适用于Tensorflow Keras模型 。 现在我们知道了这个想法的原因和背后,让我们进入令人兴奋的部分……
解决方案概述 (Solution Overview)
- Train & export your Tensorflow Keras model 训练并导出您的Tensorflow Keras模型
- Convert the Python model to Javascript 将Python模型转换为Javascript
- Load and serve the model from Google Drive via app-script using tfjs 使用tfjs通过app-script从Google云端硬盘加载并提供模型
- Deploy it as a secure website 将其部署为安全的网站
1.训练一个简单的模型 (1. Train a simple model)
To follow along you can either create a tf keras model from scratch in seconds as shown in the notebook below or use your own. This is a dummy model which is trained to simply multiply the given input with 3. It is not useful in practice, but has all the ingredients to put the point across.
要继续学习,您可以在几秒钟内从头开始创建tf keras模型,如下面的笔记本所示,也可以使用自己的模型。 这是一个虚拟模型,经过训练可以将给定的输入简单地乘以3。它在实践中没有用,但具有所有要点。
Download the trained 3_table_model.h5 model file from Google Colab (how?) or feel free to use the one I trained directly from here.
从Google Colab下载经过培训的3_table_model.h5模型文件( 如何? ),或者可以直接使用我直接从此处培训的模型文件。
2. Python模型→JavaScript模型 (2. Python Model → JavaScript Model)
Tensorflow JS team created a wonderful converter which walks us through the process of converting various types of Python models to be runnable in JavaScript. Install their tool and follow the steps mentioned here.
Tensorflow JS团队创建了一个很棒的转换器,它引导我们完成将各种类型的Python模型转换为可在JavaScript中运行的过程。 安装他们的工具,然后按照此处提到的步骤进行操作。
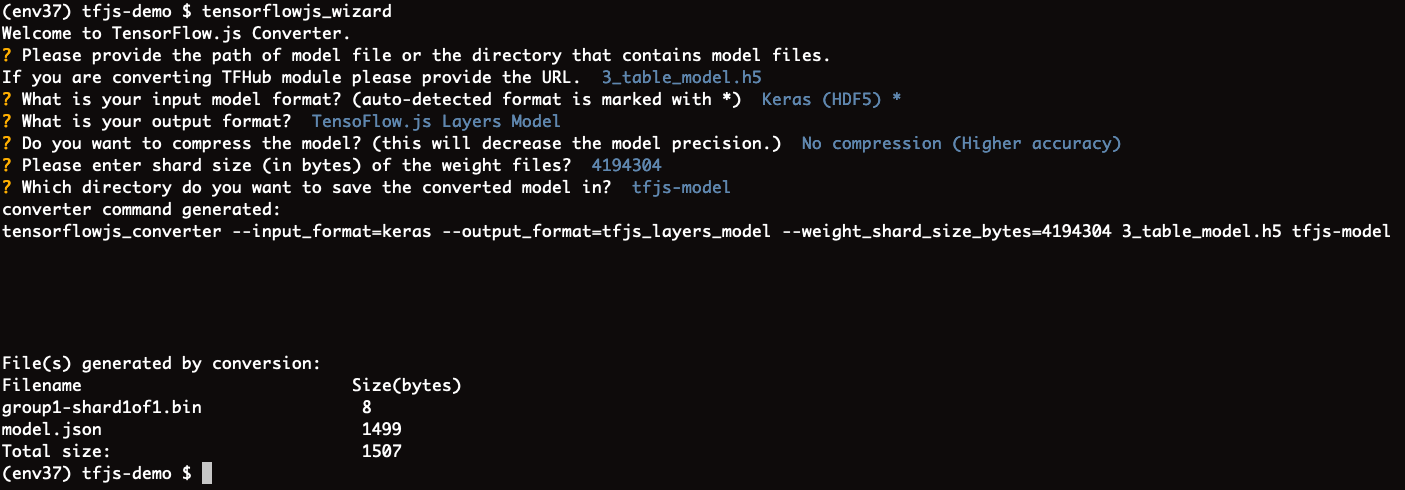
You can download our 3 multiplier converted model folder from here directly and follow along.
您可以直接从此处下载我们的3乘数转换模型文件夹,然后继续进行。
3.️️使用Google App Script服务模型 (3. ️️Serve the model with Google App Script)
We are finally at the crux of this post. Upload your converted tfjs model folder to Google Drive and set permissions appropriately. This is our first line of defense 👮♀️ in terms of security for our model. I set it as viewable to anyone in my company.
我们终于在这篇文章的症结所在。 将转换后的tfjs模型文件夹上传到Google云端硬盘,并适当设置权限。 就模型的安全性而言,这是我们的第一道防线。 我将其设置为对公司中的任何人都可见。
The converted tfjs model folder has a model.json file and one or more .bin files. model.json files has the meta data about the model and its architecture. The bin files are the weights of our model that are sharded / split for optimal transfer across the wire.
转换后的tfjs模型文件夹包含一个model.json文件和一个或多个.bin文件。 model.json文件包含有关模型及其架构的元数据。 bin文件是我们模型的权重,这些权重经过分片/分割以实现跨导线的最佳传输。
Create a new App Script project on https://script.google.com/home. The Code.gs file fetches our models from Drive and also serves the base HTML file as shown below,
在https://script.google.com/home上创建一个新的App Script项目。 Code.gs文件从云端硬盘获取我们的模型,并提供基本HTML文件,如下所示,
In the loadModelFromDrive(), we return the mode.json file f as a JSON string and the only (in our case) binary file f2 as a bytes array. If you have more bin files, read and transform them in a similar manner.
在loadModelFromDrive()中 ,我们将mode.json文件f作为JSON字符串返回,并且将唯一的(对于我们而言)二进制文件f2作为bytes数组返回 。 如果您有更多的bin文件,请以类似的方式读取和转换它们。
Create a new HTML file called index.html from the File menu. This is where we call the loadModelFromDrive(), run the model and respond to user events.
从文件菜单中创建一个名为index.html的新HTML文件。 在这里,我们调用loadModelFromDrive(),运行模型并响应用户事件。
The interesting part is how we consume the model files and pass them to tf.loadLayersModel(). TFJS team provided several helper IO methods to load our model,
有趣的部分是我们如何使用模型文件并将其传递给tf.loadLayersModel() 。 TFJS小组提供了几种辅助IO方法来加载我们的模型,
- public or authenticated URL 公开网址或经过身份验证的网址
- IndexedDB 索引数据库
- Local storage 本地存储
HTML File inputs
HTML文件输入
- Custom IO 自定义IO
As the Drive API provides us with the file contents, we wrap them up as JavaScript Files, cleverly mimicking them as user HTML file inputs (option 4). As the model.json is a JSON string, we can easily create a JS File object out of it by mentioning its MIME type,
由于Drive API为我们提供了文件内容,我们将它们包装为JavaScript 文件 ,并巧妙地模仿它们作为用户HTML文件输入(选项4)。 由于model.json是JSON字符串,因此我们可以轻松地通过提及其MIME类型来创建JS File对象,
const modelJson = new File([modelFiles[0]], "model.json", { type: "application/json" })The weights file however needs to be read in as raw bytes and then wrapped as a JS File object. This is because the app script’s file object is different from JS file object. Therefore to create one from the other we have to reduce the result to the common denominator, which is the OS level raw bytes. The loadModelFromDrive() in the app-script above returns a Byte[] array. To consume it we use JS TypedArrays like so,
然而,权重文件需要作为原始字节读取,然后包装为JS File对象。 这是因为应用程序脚本的文件对象与JS 文件对象不同。 因此,要从另一个创建一个,我们必须将结果简化为公分母,即OS级原始字节。 上面应用脚本中的loadModelFromDrive()返回Byte []数组 。 要使用它,我们像这样使用JS TypedArrays ,
const modelWeights = new File([Uint8Array.from(modelFiles[1])], "group1-shard1of1.bin")These data structures are recently introduced in JavaScript to deal with media (canvas, image, audio, video etc.) data. But luckily they came in handy to manage our ML model files as well!
这些数据结构最近在JavaScript中引入,用于处理媒体(画布,图像,音频,视频等)数据。 但幸运的是,它们也可以方便地管理我们的ML模型文件!
Congratulations! your model is now ready to make predictions using model.predict(). The complete script which shows other pieces like UI, prepare input for predictions, show alerts to the user etc. is available here.
恭喜你! 您的模型现在可以使用model.predict()进行预测了。 完整的脚本,它显示了其他作品一样的用户界面,用于预测准备输入,显示提醒用户等可在这里 。
一些可选的尝试 (Some optional things to try)
to improve the experience could be to
改善体验可能是
- Save the model to browser’s IndexedDB the first time it is downloaded from drive. When the user visits your site again, the model can be loaded from their device itself, without having to make a network round trip. 首次从驱动器下载模型时,将模型保存到浏览器的IndexedDB中。 当用户再次访问您的站点时,可以从他们的设备本身加载模型,而不必进行网络往返。
Use preact or similar to create a more modern component based app
使用preact或类似方法创建基于组件的更现代的应用程序
Use clasp to manage your app-script code locally in your favorite editor and publish it to git. I published this code at https://github.com/Nithanaroy/tfjs-drive-deploy/tree/master in the same manner.
使用clasp在您喜欢的编辑器中本地管理您的应用脚本代码,并将其发布到git。 我以相同的方式在https://github.com/Nithanaroy/tfjs-drive-deploy/tree/master上发布了此代码。
4.安全部署🚀🔒 (4. Deploy Securely 🚀🔒)
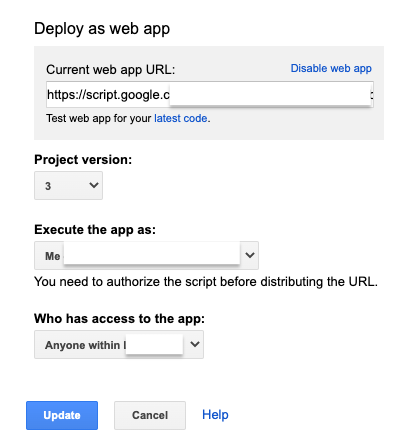
This is the easiest step of all and one of the primary reasons for choosing app-script in the first place. Select “Deploy as web app” option from “Publish” menu on the app-script UI and choose the settings that suit your needs. In my my case, I enabled access to users from my company.
这是所有步骤中最简单的步骤,也是首先选择app-script的主要原因之一。 从应用程序脚本UI的“发布”菜单中选择“作为Web应用程序部署”选项,然后选择适合您需要的设置。 就我而言,我启用了访问公司用户的权限。
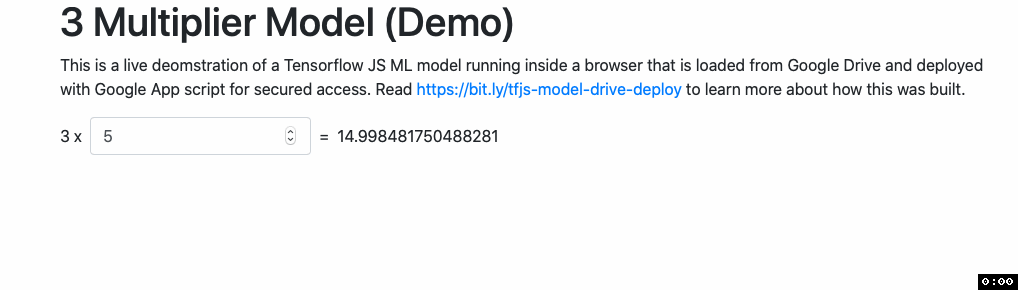
That’s all friends. All the files used in each of the steps are available here. And here is the hosted site with our toy model.
那就是所有的朋友。 每个步骤中使用的所有文件都在这里 。 这是我们的玩具模型的托管站点 。
What did you build and deploy with tfjs? There is an active community on LinkedIn where developers from around the world, share their creative projects with tfjs. Check it out and get inspired!
您使用tfjs构建和部署了什么? LinkedIn上有一个活跃的社区,来自世界各地的开发人员可以与tfjs分享他们的创意项目。 看看并获得启发!
Big thanks to Jason Mayes for suggesting several alternatives to this approach and to Ping Yu for clarifying how loadLayersModel() works under the hood.
非常感谢Jason Mayes为该方法提出了几种替代方案 ,并感谢Ping Yu阐明了loadLayersModel()的工作原理。
app无法解析js脚本


 被折叠的 条评论
为什么被折叠?
被折叠的 条评论
为什么被折叠?
 到【灌水乐园】发言


