


 这篇博客探讨了如何在Node.js环境中结合TypeScript和Mongoose库,利用正则表达式有效地匹配XML文档中的特定节点。内容源于对原文的翻译。
正则表达式匹配xml节点
Typescript is a superset of javascript. when we are writing typescript we are still writing javascript, except in this case we are writing javascript with a type system. So, in Summary, Typescript is Javascript plus type checking. The final source code for this tutorial can be found HERE
Typescript是javascript的超集。 当我们编写打字稿时,我们仍在编写javascript,除了在这种情况下,我们正在编写带有类型系统的javascript。 因此,在摘要中, Typescript是Javascript加类型检查 。 本教程的最终源代码可以在这里找到
为什么要打字稿? (Why Typescript?)
Typescript introduced a type system to javascript and these are the advantages that bring to us during development.
Typescript在javascript中引入了类型系统,这些是在开发过程中带给我们的优势。
- Typescript can help us catch errors during development 打字稿可以帮助我们在开发过程中发现错误
- Typescript makes our Javascript code easier to read and debug Typescript使我们的Javascript代码更易于阅读和调试
- Typescript is open source. Typescript是开源的。
There are many more reasons to use typescript, and you can find out more about that in this article: https://dzone.com/articles/what-is-typescript-and-why-use-it
还有更多使用打字稿的原因,您可以在本文中找到更多有关打字稿的原因: https : //dzone.com/articles/what-is-typescript-and-why-use-it
This tutorial assumes you already have some knowledge of Node.js and you want to know how to use typescript with Node.js
本教程假定您已经对Node.js有所了解,并且想知道如何将Typescript与Node.js结合使用
Also, I Recommend VScode as a code editor because VSCode includes typescript language support.
另外,我建议将VScode用作代码编辑器,因为VSCode包含打字机语言支持。
入门 (Getting Started)
Create a new folder for your app, you can call it anything, on your terminal navigate to the newly created folder and run this command
为您的应用程序创建一个新文件夹,您可以对其进行任何命名,在终端上导航到新创建的文件夹并运行此命令
npm init -ythis will create a package.json file for us.
这将为我们创建一个package.json文件。
install the following dependencies
安装以下依赖项
npm install typescript --save-devnpm install express body-parser --saveThe next thing is to create a tsconfig file for typescript,
接下来是为打字稿创建tsconfig文件,
run this command on the terminal
在终端上运行此命令
npx tsc --initif you are having issues with this or this is throwing an error, install typescript globally like this:
如果您对此有疑问或抛出错误,请像下面这样全局安装Typescript:
npm install typescript -gthen run the command again,
然后再次运行命令,
This will create the tsconfig file for us, tsconfig specifies the root folder and the compiler option to compile our typescript code down to javascript. we can always edit this file to modify the default configuration, but we’ll go with the default configuration in this tutorial.
这将为我们创建tsconfig文件, tsconfig指定根文件夹和编译器选项,以将我们的打字稿代码编译为javascript。 我们总是可以编辑该文件来修改默认配置,但是在本教程中将使用默认配置。
Now that we have installed typescript and we have our configuration file, let’s get started with creating our express server
现在我们已经安装了打字稿并拥有了配置文件,让我们开始创建快递服务器。
设置服务器 (Setup the server)
create a new folder and call it src, in our src folder create a new file index.ts, open the file and add the following code:
创建一个新文件夹并将其命名为src,在我们的src文件夹中创建一个新文件index.ts,打开该文件并添加以下代码:
You should notice your code editor flagging your code, hover on the express module and you should see something like this:
您应该注意到您的代码编辑器正在标记您的代码,将鼠标悬停在express模块上,您应该看到类似以下内容:
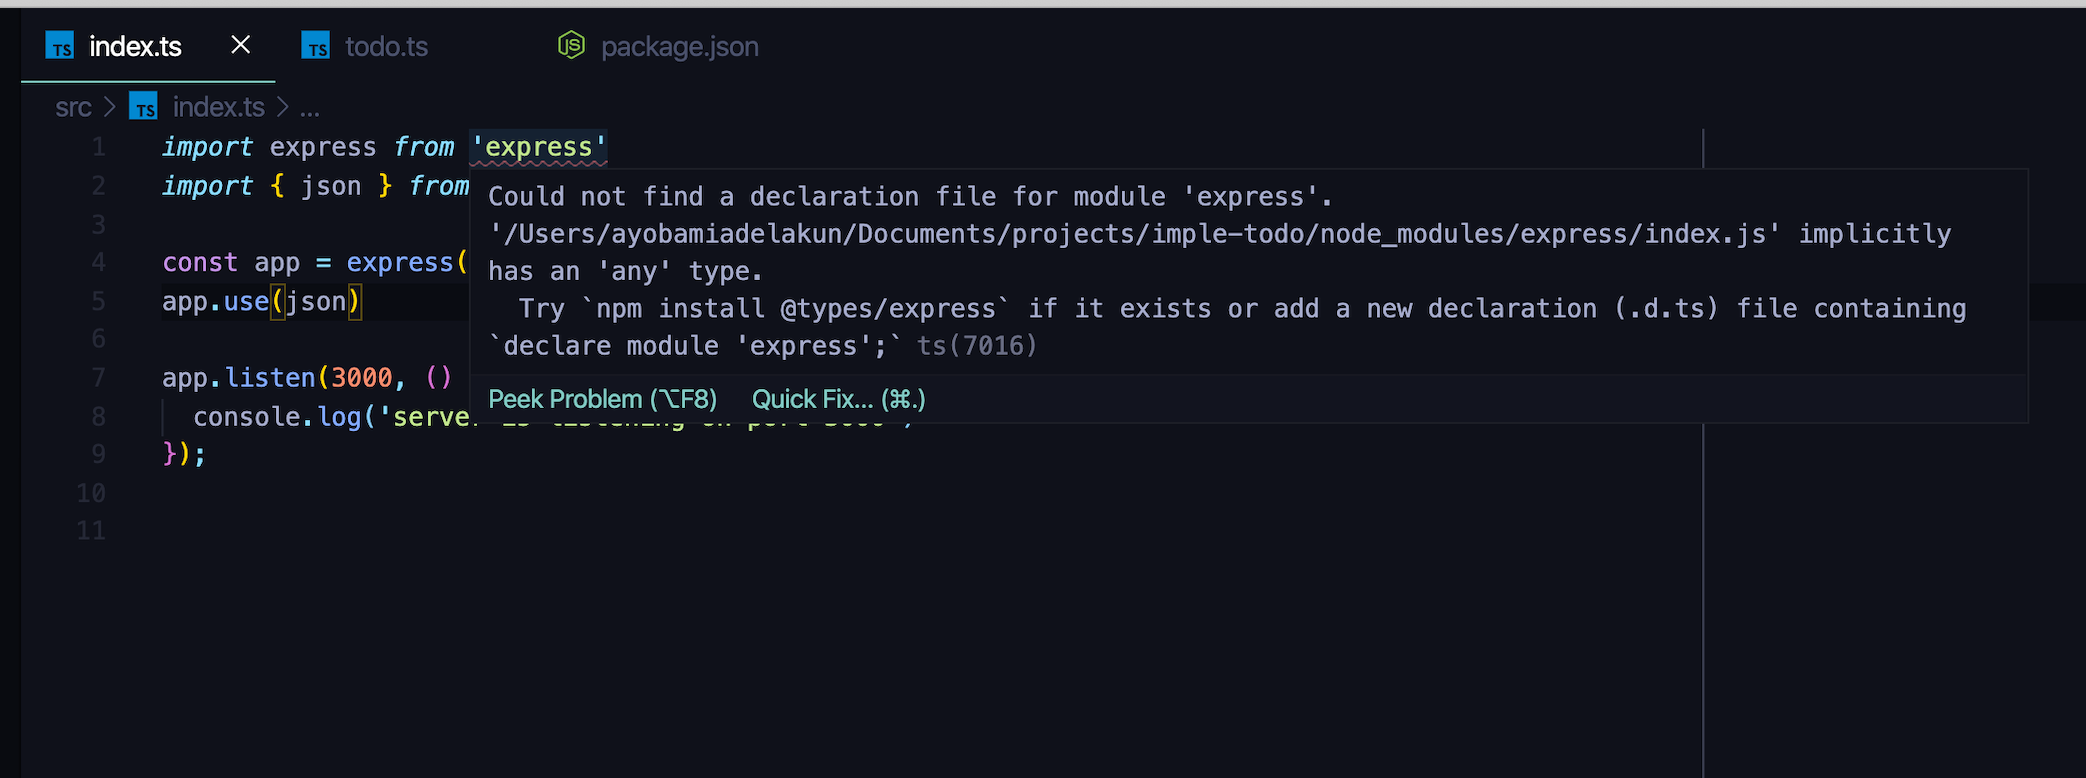
This is because we do not have a type definition file for our express package, typescript analyzes our code for errors. when we install and import a third-party module, typescript doesn’t know the type required for this module, we need to install a type definition file to inform typescript about the types, arguments, and return types of this package. the type definition file always ends in .d.ts, in the case of our express package, for instance, we need to install the @types/express module to inform typescript about the types and other information required by our express package, let’s do that now
这是因为我们的快递包没有类型定义文件,打字稿会分析我们的代码是否有错误。 当我们安装和导入第三方模块时,typescript不知道该模块所需的类型 ,我们需要安装一个类型定义文件以将该包的type , arguments和return类型告知Typescript。 类型定义文件始终以.d.ts结尾 ,例如,对于我们的express包,我们需要安装@ types / express模块以告知typescript我们express包所需的类型和其他信息,让我们那现在
npm install @types/express --save-devYou will notice that as soon as we installed this package the error goes away because typescript now has access to the type definition file, and now it can use this file to check our code for errors and the types required when we work with the express package.
您会注意到,一旦安装了此软件包,该错误就会消失,因为typescript现在可以访问类型定义文件了,现在它可以使用该文件检查我们的代码中是否存在错误以及使用Express软件包时所需的类型。 。
Also, Notice that we are not using commonjs require function, instead, we are using the import statement to import our code, typescript prefers to use the import statement over the require statement, otherwise, we’ll see an error thrown, you can try this on your own.
另外,请注意,我们没有使用commonjs require函数,而是使用import语句导入我们的代码,typescript倾向于使用import语句而不是require语句,否则,将抛出错误,您可以尝试这是你自己的。
Now, in our package.json file, let’s create our start script, add the following
现在,在我们的package.json文件中,让我们创建启动脚本,添加以下内容

Note that Node cannot run our typescript code directly, so we have to compile it down to Javascript, but with the help of a package ts-node we can run typescript directly with node, but we are going to use ts-node-dev instead because it will watch our files for any changes and restart the server, just like nodemon. let’s install this package
请注意, Node无法直接运行我们的打字稿代码,因此我们必须将其编译为Javascript,但是在ts-node包的帮助下,我们可以直接在node上运行打字稿,但是我们将改用ts-node-dev因为它将监视我们文件中的所有更改并重新启动服务器,就像nodemon一样。 让我们安装这个软件包
npm install ts-node-dev --save-devNow let’s update our start script to use this package
现在,让我们更新启动脚本以使用此软件包

Now let’s start our server
现在启动服务器
npm startIf you see something like this, then we are good to go.
如果您看到这样的内容,那么我们很好。
server is listening on port 3000设置路线 (Setup our routes)
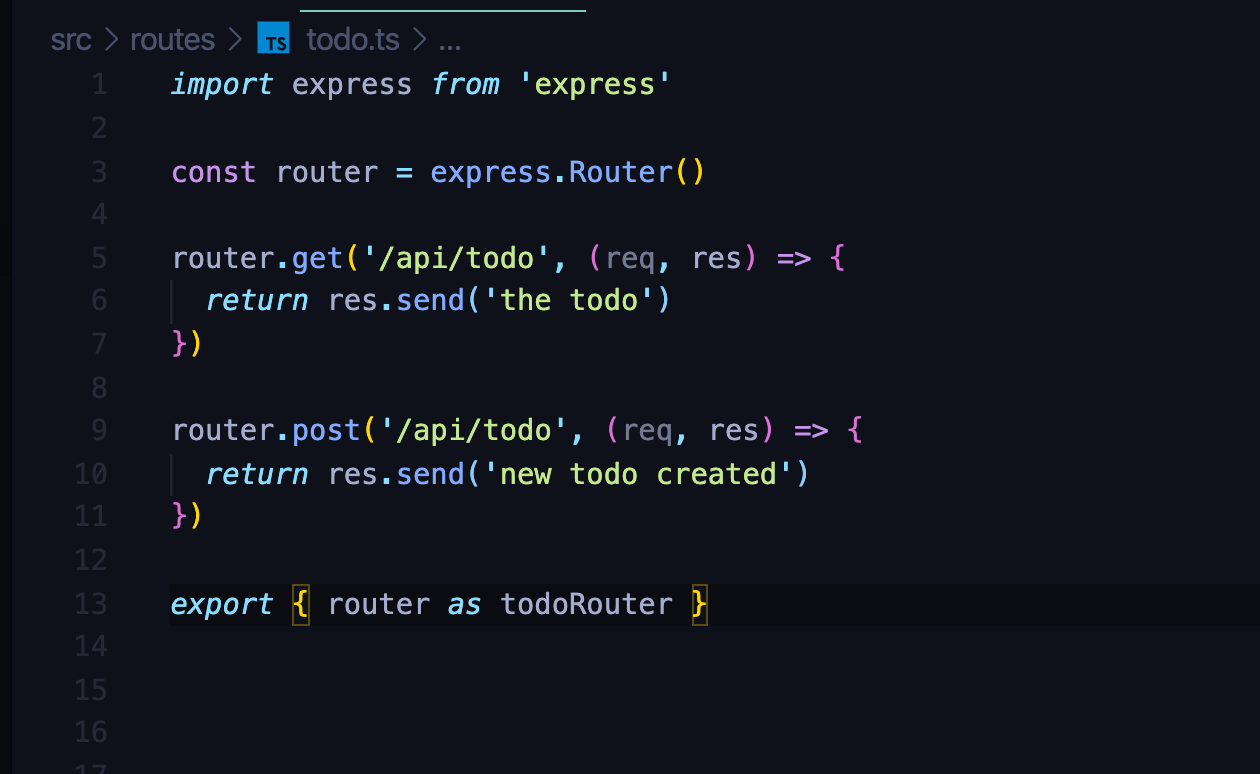
In the src folder, create a new folder and call it routes, inside the routes folder, create a new file and call it todo.ts, include the following code
在src文件夹中,创建一个新文件夹并将其命名为routes,在routes文件夹中,创建一个新文件并将其命名为todo.ts,包括以下代码
Now, back in our index.ts file, let’s register the route. Add the following code to import the todoRouter.t
现在,回到我们的index.ts文件,让我们注册路由。 添加以下代码以导入todoRouter.t

Then register it in our express app like this:
然后像这样在我们的快速应用中注册它:

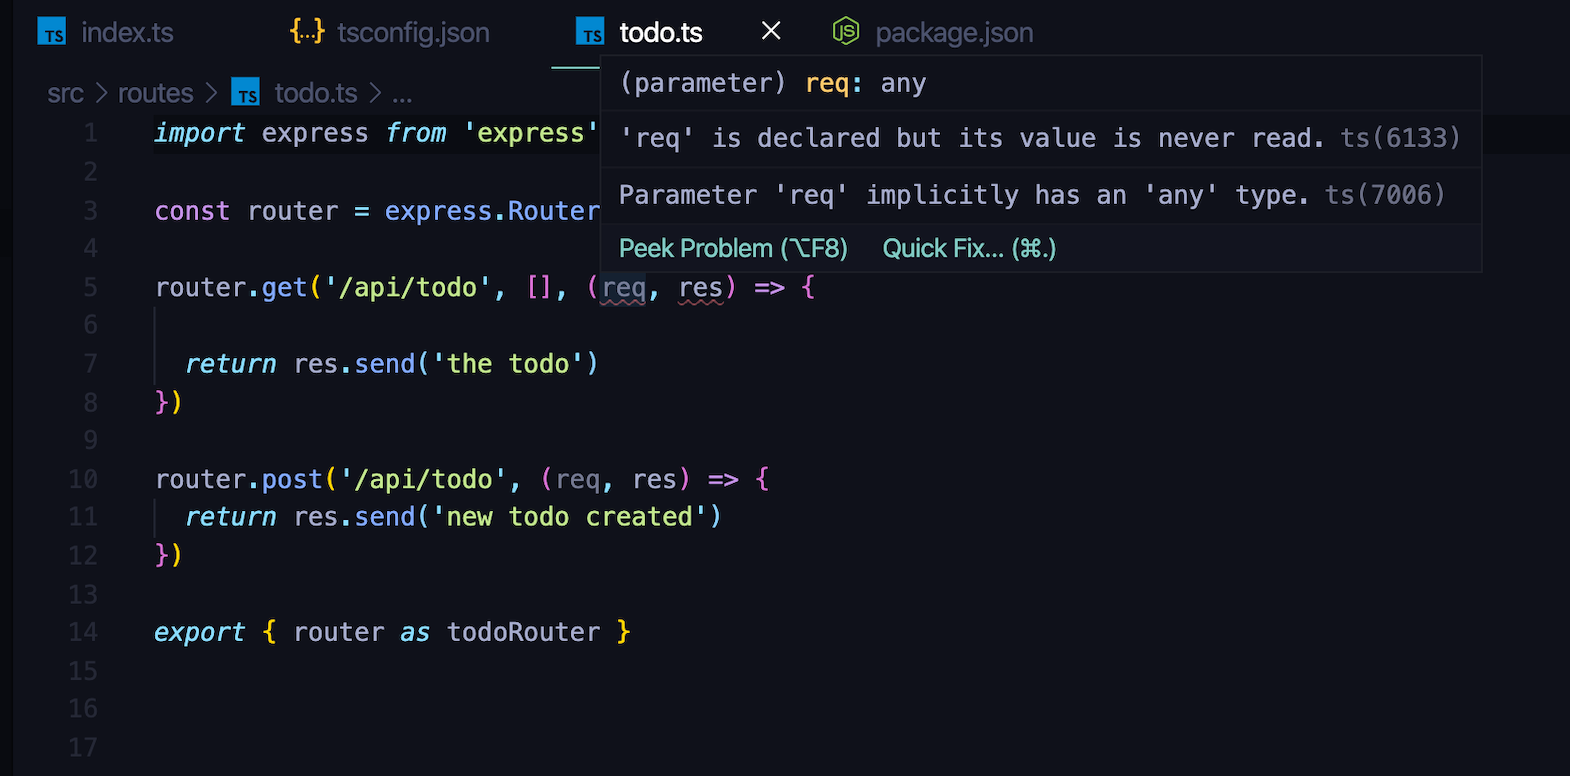
In route/todo.ts, hover on the req and res parameter, you will notice that req has an implicit type of Request and res has an implicit type of Response. if you pass in a middleware, say, for instance, an empty an array and you hover on the req and res property again, you should see that they have an implicit type of any.
在route / todo.ts中,将鼠标悬停在req和res参数上,您会注意到req具有隐式的Request类型,而res具有隐式的Response类型。 如果传入一个中间件 (例如,一个空数组)并且再次将鼠标悬停在req和res属性上,则应该看到它们具有任何类型的隐式类型。
See line 5 for the updated code
请参阅第5行以获取更新的代码
The implicit type of any means we can assign values of any data type to our req and res property and typescript will be fine with it. we do not want this in our application, we want typescript to tell us or catch this error whenever we knowingly or unknowingly try to assign values of any type, be it string, number, etc to req and res property. we want the req and res property to only be of type express.Request and type express.Response respectively. To do this we have to import the types from our express app. in todo.ts file. include the following code in routes/todo.ts.
任何隐式类型都意味着我们可以将任何数据类型的值分配给我们的req和res属性,而打字稿就可以了。 我们不希望在应用程序中使用它,我们希望当我们有意或无意地尝试为req和res属性分配任何类型的值(例如字符串,数字等)时,键入脚本告诉我们或捕获此错误。 我们希望req和res属性分别仅是express.Request类型和express.Response类型。 为此,我们必须从Express应用程序中导入类型。 在todo.ts文件中。 在route / todo.ts中包含以下代码。

Now, let's include the Request and Response types to our route function parameters, in the same file, include the following code:
现在,让我们在同一文件中将请求和响应类型包含到路由函数参数中,并包含以下代码:

okay, Now let’s test this out with postman
好的,现在让我们与邮递员一起测试一下
make a request to the get endpoint
向获取端点发出请求
localhost:3000/api/todo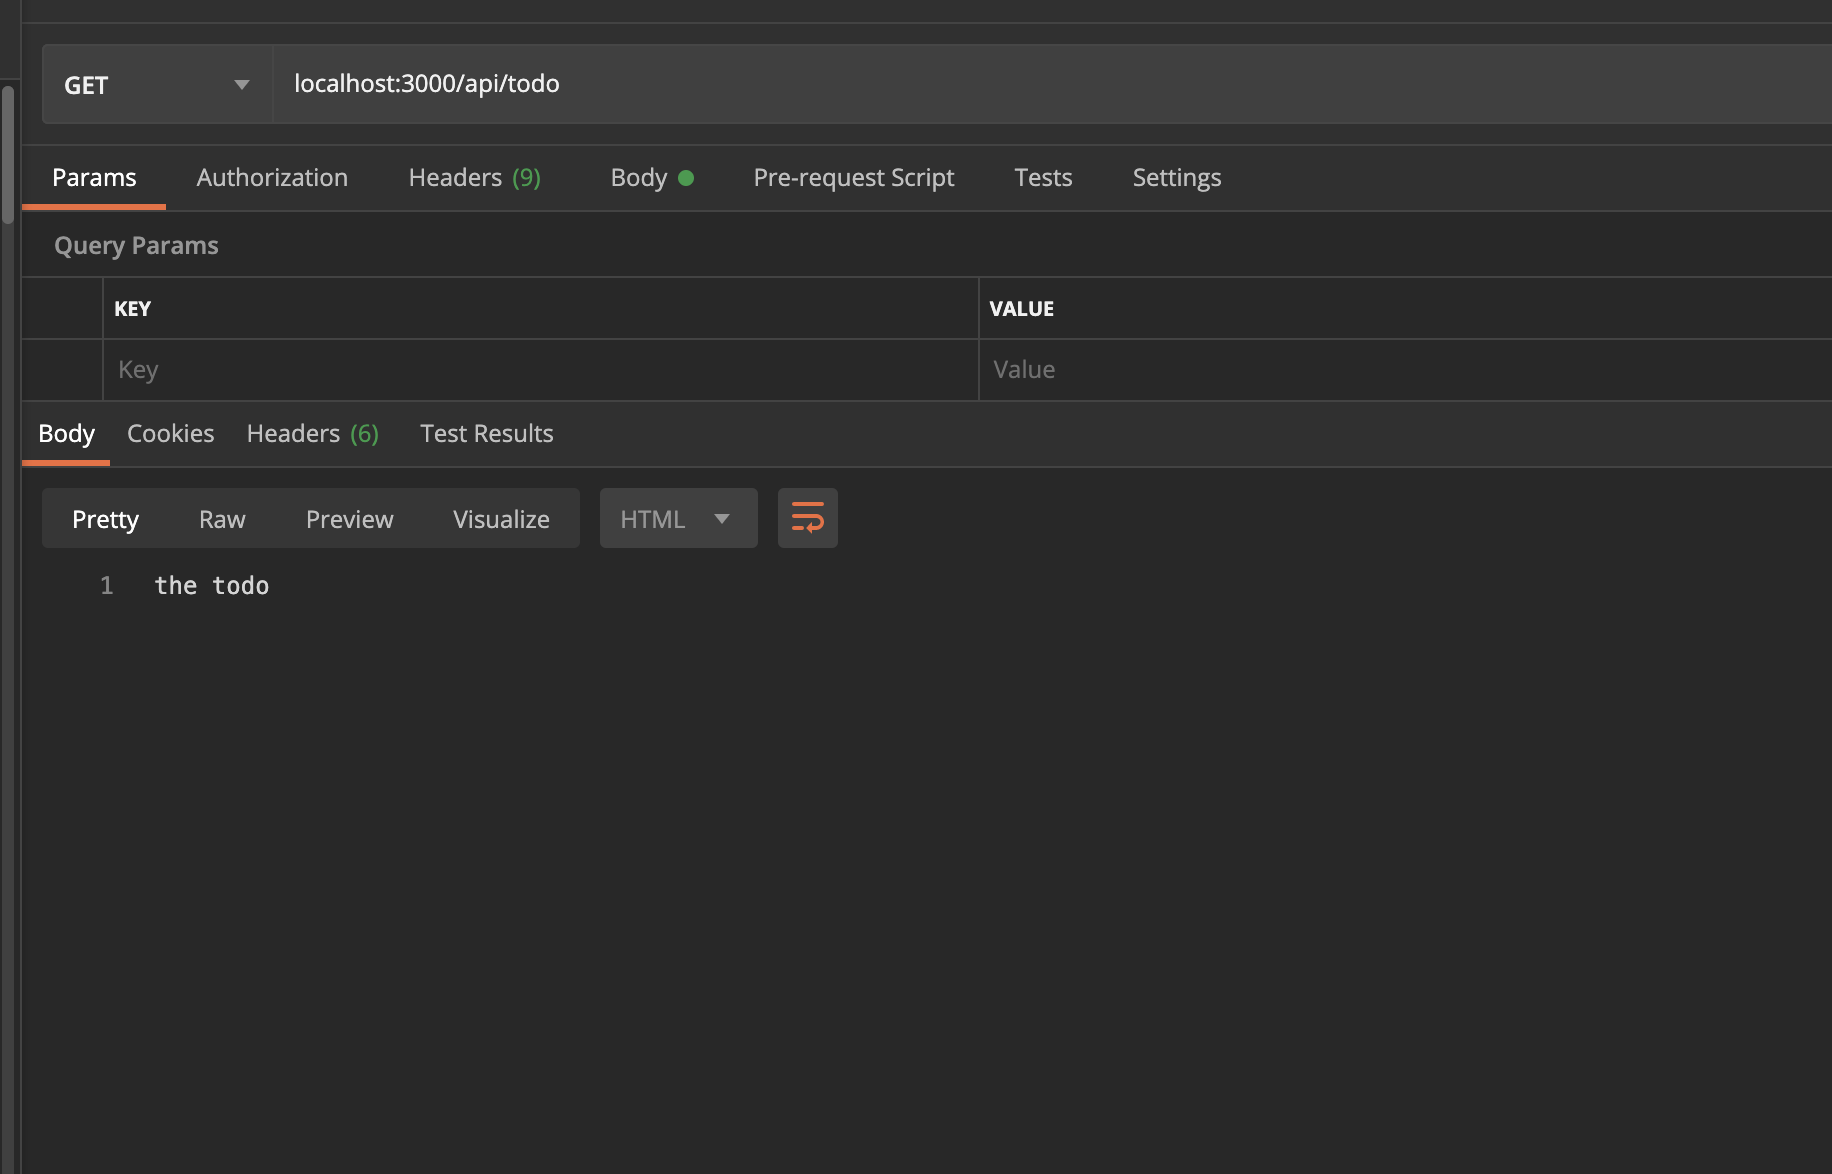
if you get the same response as me, then we are good to go.
如果您得到与我相同的答复,那么我们很好。
配置Mongoose以实现数据持久性 (Configuring Mongoose for data persistence)
There are a few issues when using typescript with mongoose, we are going to discuss them in this tutorial and the fix to make typescript work well with mongoose.
将typescript与mongoose结合使用时会遇到一些问题,我们将在本教程中进行讨论,并提出使typescript与mongoose配合使用的修复方法。
The first issue is around creating a new document. say, for instance, we created a new mongoose model and we want to create a new instance of that model, assume the model is Todo, we’ll create a new instance of the model like this:
第一个问题是关于创建新文档。 例如,我们创建了一个新的猫鼬模型,并且想要创建该模型的新实例,假设该模型是Todo,我们将像下面这样创建该模型的新实例:
new Todo({title: 'new title', description: 'some description'})As you can see, the title is a type of string, the description is also a type of string, if we assign a number to the title field while we expect it to be a string, typescript will not catch this error, and we’ll not be notified, which goes against one of the reasons why we are using typescript in the first place, which is to catch errors during development.
如您所见,标题是字符串的类型,描述也是字符串的类型,如果我们在希望它是字符串的同时为标题字段分配一个数字 ,则打字稿将不会捕获此错误,并且不会被通知,这与我们首先使用打字稿的原因之一有关,那就是在开发过程中捕获错误。
Also, we can add a new property that is not declared in our schema to the model instance above and typescript will be fine, we can make mistakes like this if we have a typo while typing the property of the model instance, say for instance, instead of title , we typed titl like this:
另外,我们可以在上面的模型实例中添加未在架构中声明的新属性,而打字稿就可以了,如果在键入模型实例的属性时遇到错字,我们可能会犯类似的错误,例如,代替title ,我们这样输入titl :
new Todo({tit: 'new title', description: 'some description'})Typescript will not catch this error and we’ll not be notified, also if we include an extra property like this:
Typescript将不会捕获此错误,也不会通知我们,即使我们包含这样的额外属性也是如此:
new Todo({title: 'new title', description: 'some description', hour: 3 })Typescript will also not catch this error, although we do not require the property “hour” from our schema definition.
尽管我们不需要架构定义中的“ 小时”属性,但Typescript也不会捕获此错误。
Also, another issue arises when we create a new instance of our mongoose model like this:
同样,当我们创建这样的猫鼬模型的新实例时,还会出现另一个问题:
const todo = new Todo({title: 'new title', description: 'some description'})and we console.log Todo like this:
我们使用console.log Todo这样:
console.log(todo)mongoose may return something like this
猫鼬可能会返回这样的内容
{title: 'new title', description: 'some description', createdAt: '', updatedAt: ''}As you can see from the result, mongoose returns additional properties(createdAt, updatedAt) which typescript may not be aware of, we need a wat to tell typescript that there may be some additional properties that get created behind the scenes by mongoose when we create a new instance of our model. We’ll be looking at these issues and creating a fix for them, but before continue, let’s connect our application to the database first.
从结果中可以看到,猫鼬会返回打字稿可能不知道的其他属性(createdAt,updatedAt) ,我们需要花点时间告诉打字稿在创建时,猫鼬会在幕后创建一些其他属性我们模型的新实例。 我们将研究这些问题并为它们创建修复程序,但是在继续之前,让我们先将应用程序连接到数据库。
连接到MongoDB (Connect to MongoDB)
Please make sure you have MongoDB installed on your computer before proceeding further.
在继续下一步之前,请确保计算机上已安装MongoDB 。
Install mongoose,
安装猫鼬,
npm install mongooseNow let’s import mongoose in our index.ts file, add the following code
现在让我们在index.ts文件中导入猫鼬,添加以下代码

Typescript is flagging our mongoose package. if we hover over it we’ll see that typescript is telling us that it cannot find a file declaration for mongoose module. As discussed earlier on, we need to install type definitions for all our installed packages, just like we did with express. for mongoose run this to install the type definitions.
Typescript正在标记我们的猫鼬包。 如果将鼠标悬停在它上面,我们将看到typescript告诉我们它找不到mongoose模块的文件声明。 如前所述,我们需要为所有已安装的软件包安装类型定义 ,就像对express一样 。 对于猫鼬,运行此命令以安装类型定义。
npm install @types/mongoose --save-devYou shouldn’t see the error again after this installation.
安装完成后,您不应再看到该错误。
Now let’s connect our application to a database.
现在,让我们将应用程序连接到数据库。
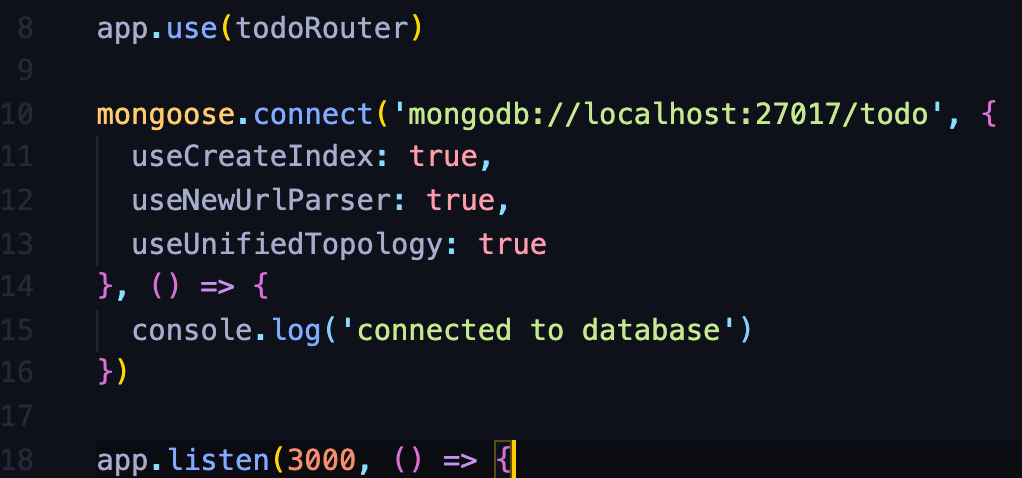
run npm start again, if you see this on your terminal then we are good to go:
再次运行npm start ,如果您在终端上看到此消息,那么我们就可以开始了:
connected to database使打字稿与猫鼬兼容 (Make typescript work with mongoose)
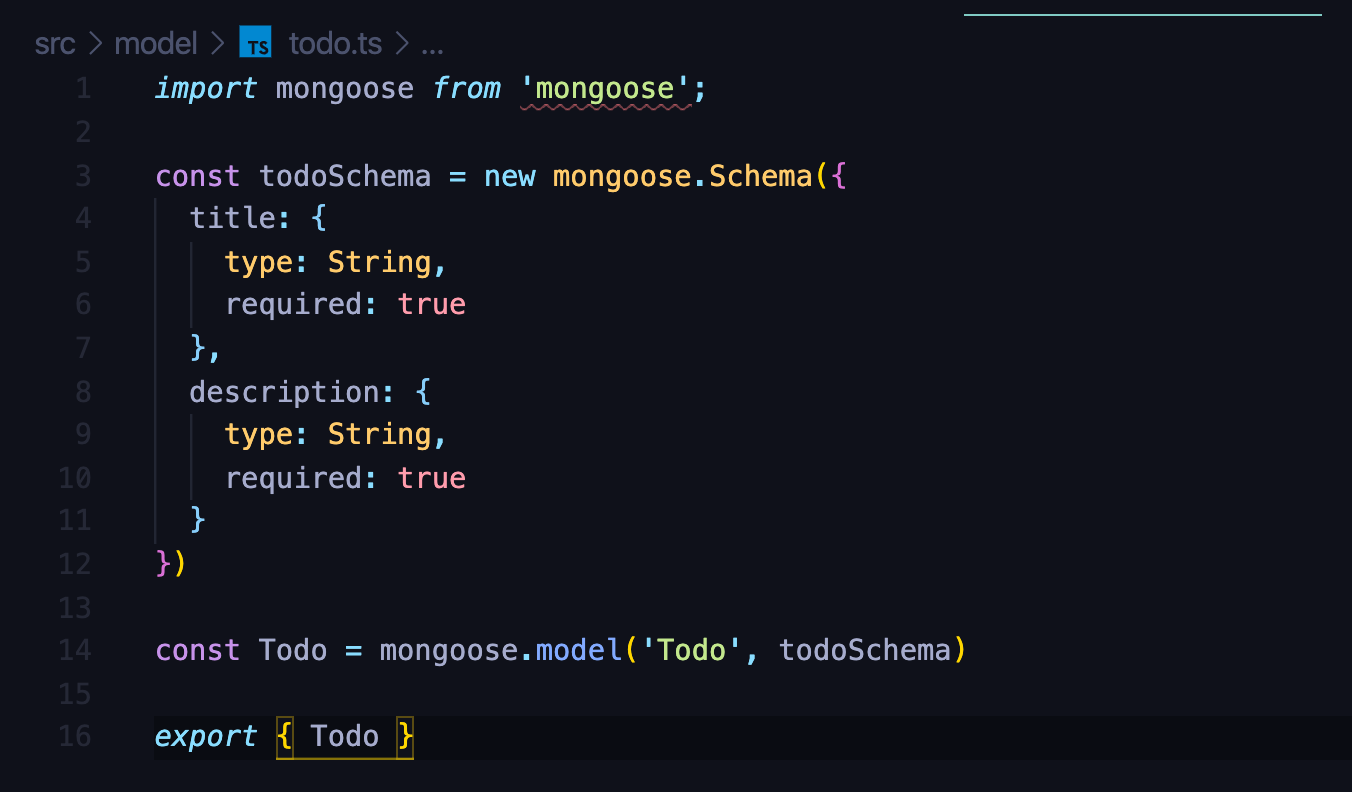
In our src folder, create a new folder and call it models.
在我们的src文件夹中,创建一个新文件夹,并将其命名为models 。
mkdir src/modelsIn the models folder, create a new file and call it todo.ts, open the file and include the following code:d
在models文件夹中,创建一个新文件并将其命名为todo.ts ,打开该文件并包含以下代码:d
Now lets’s create different instances of our model the wrong way and watch as typescript allow us to go ahead with this:
现在让我们以错误的方式创建模型的不同实例,并观察打字稿允许我们继续进行以下操作:
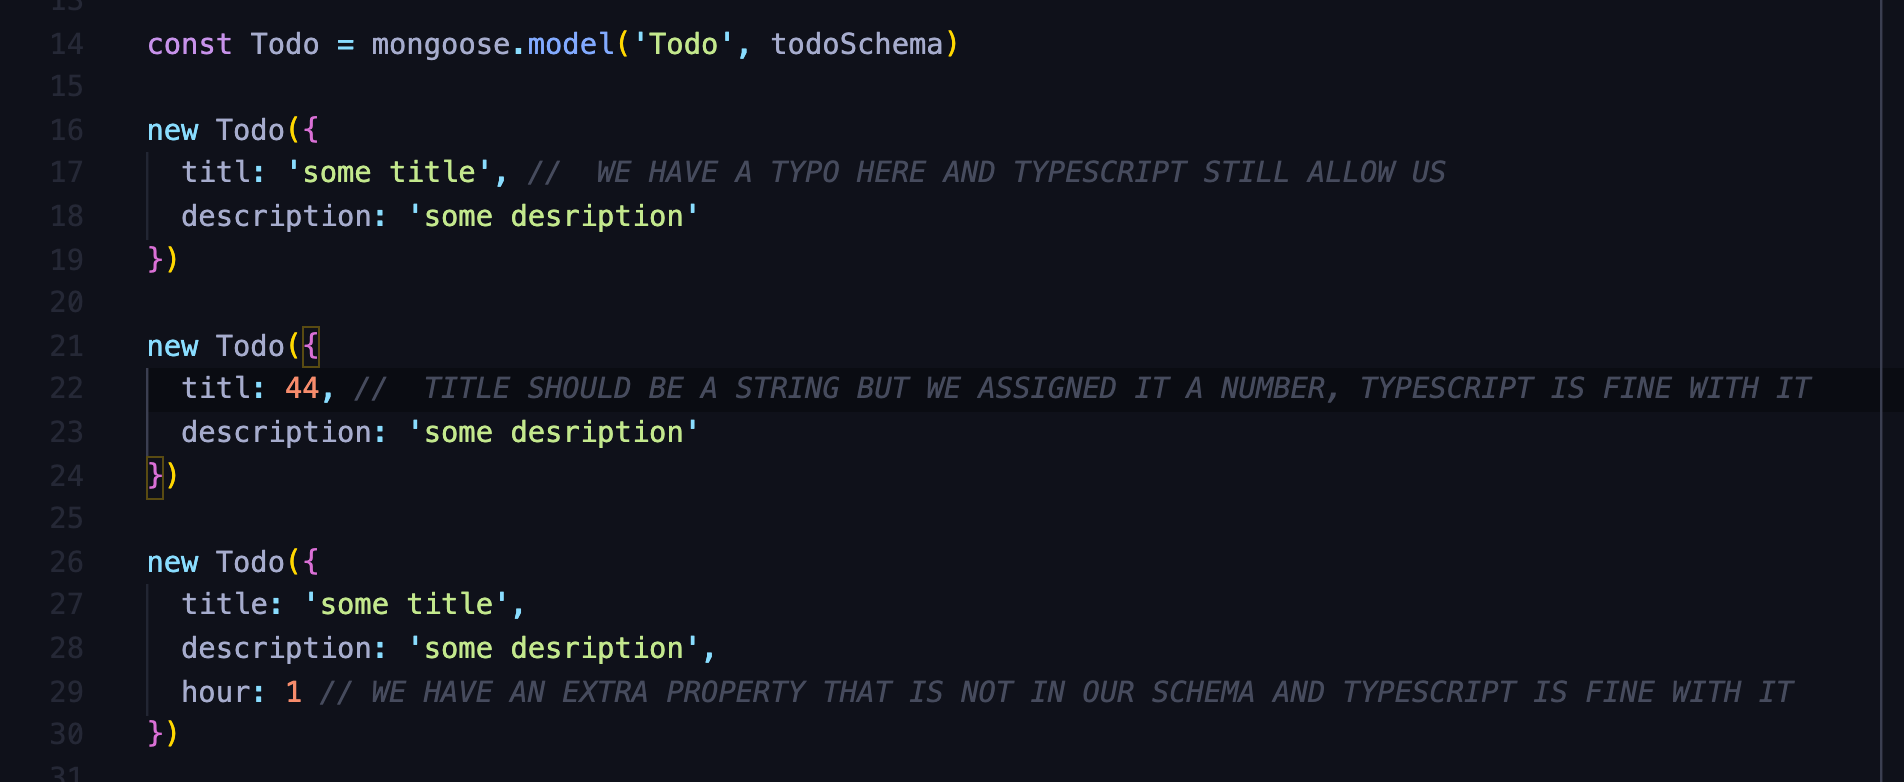
Please read the comment in the code for more information on the wrong thing we are doing in these lines of codes.
请阅读代码中的注释,以获取有关我们在这些代码行中所做的错误操作的更多信息。
第一个问题:使打字稿了解我们在模型实例中期望的属性和数据类型。 (The first issue: make typescript aware of the properties and data types that we expect in our model instance.)
To solve this we are going to be making use of an interface.
为了解决这个问题,我们将使用一个接口。
what is an interface ?
什么是接口?
An interface is a syntactical contract that an entity should conform to. In other words, an interface defines the syntax that any entity must adhere to(definition from tutorialspoint). this means that an interface defines the shape of an object, the properties it should have, the type of the properties, and functions.
接口是实体应遵守的语法契约。 换句话说,接口定义了任何实体都必须遵守的语法( 来自tutorialspoint的定义 )。 这意味着接口定义了对象的形状,对象应具有的属性,属性的类型和功能。
For our Todo, the schema contains title which is a string, and description which is a string. we are going to help typescript to understand this by defining an interface for this model, by so doing, typescript will be aware of the properties that our todo expects.
对于我们的Todo , 模式包含标题 ( 字符串 )和描述 ( 字符串) 。 我们将通过为此模型定义一个接口来帮助Typescript理解这一点,这样做Typescript将了解我们的待办事项期望的属性。
in models/todo.ts include the following codes:
在models / todo.ts中包含以下代码:
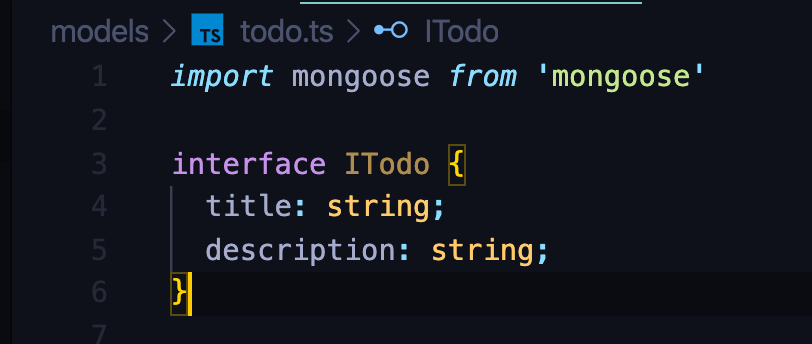
The above code is how we create an interface in typescript, the ITodo is a contract which defines the properties and the data types that are required in our Todo. We have only defined this interface, we are not using it yet.
上面的代码是我们在打字稿中创建接口的方式, ITodo是一个合同,它定义了Todo所需的属性和数据类型 。 我们仅定义了此接口,尚未使用它。
Now, to make use of this interface, we would create some little trick for creating an instance of our model, instead of creating our model instances directly by writing
现在,要使用此接口,我们将创建一些小技巧来创建模型实例,而不是通过编写直接创建模型实例
new Todo({ title: 'some title', description: 'some description' })we would define this instance in a function, this function will take the new todo object as a parameter,
我们将在函数中定义此实例,该函数将新的todo对象作为参数,
Note: We make use of an interface the same way we define types for properties and functions. so if I have a function that takes a parameter called name which should be a type of string, I’ll do something like this:
注意:我们使用接口的方式与定义属性和函数的类型的方式相同。 因此,如果我有一个函数接受名为name的参数,该参数应该是字符串类型,那么我将执行以下操作:
function test(name: string) {}As you can see, name is a parameter, and it should be a string according to the function above, the same way, if I am to use my todo Interface in this function on the name parameter then the function will look like this:
如您所见, name是参数,根据上面的函数,它应该是一个字符串 ,以同样的方式,如果我要在name参数上的此函数中使用我的todo接口,则该函数将如下所示:
function test(name: ITodo) {}This means our name parameter is expecting an argument which must be an object that contains a property title, which must be a string, and description property which must also be a string, remember these are properties listed in our ITodo interface.
这意味着我们的name参数需要一个参数,该参数必须是一个包含属性title的对象 ,该对象必须是一个字符串 ,而description属性也必须是一个string ,请记住,这些都是我们ITodo接口中列出的属性。
interface ITodo { title: string; description: string;}Anything other than this typescript will show an error.
除此打字稿外,其他任何内容都将显示错误。
Now let’s create the mystery function that we have been talking about. we’ll call the function “build”, and we’ll call this function every time we want to create a new instance of our Todo. in our model/todo.ts, include the following code:
现在让我们创建我们一直在谈论的神秘函数。 我们将函数称为“ build ”,并且每次要创建Todo的新实例时都将调用此函数。 在我们的模型/todo.ts中,包含以下代码:
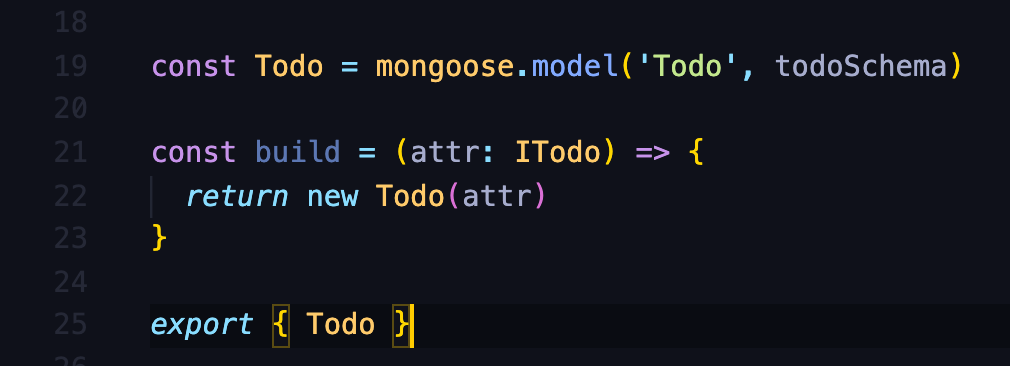
As you can see, we have a build function, which has a parameter attr, attr is a parameter of type ITodo, Remember we defined ITodo as an interface above, this means attr expects an object which must contain a title property which must be a string and a description property which must also be a string. this parameter is what we passed into our Todo Model to create a new instance of this model. Now typescript is aware of the object that must be passed into our model instance and will throw an error if something else is provided.
如您所见,我们有一个构建函数,其中有一个参数attr,attr是典型的ITodo参数,记住我们将ITodo定义为上面的接口,这意味着attr期望一个对象必须包含title属性,且必须为字符串和说明属性,该属性也必须是字符串。 Ť他的参数是我们传递给我们的Todo模型来创建此模型的一个新实例。 现在,打字稿意识到必须将其传递到我们的模型实例中的对象,如果提供了其他内容,则会引发错误。
let’s test this out, if I call the build function and pass in wrong property values as we did above, typescript will throw an error this time around, in our model/todo.ts, include the following code:
让我们测试一下,如果我像上面那样调用build函数并传递了错误的属性值,那么typescript这次将在我们的model / todo.ts中抛出错误,包括以下代码:
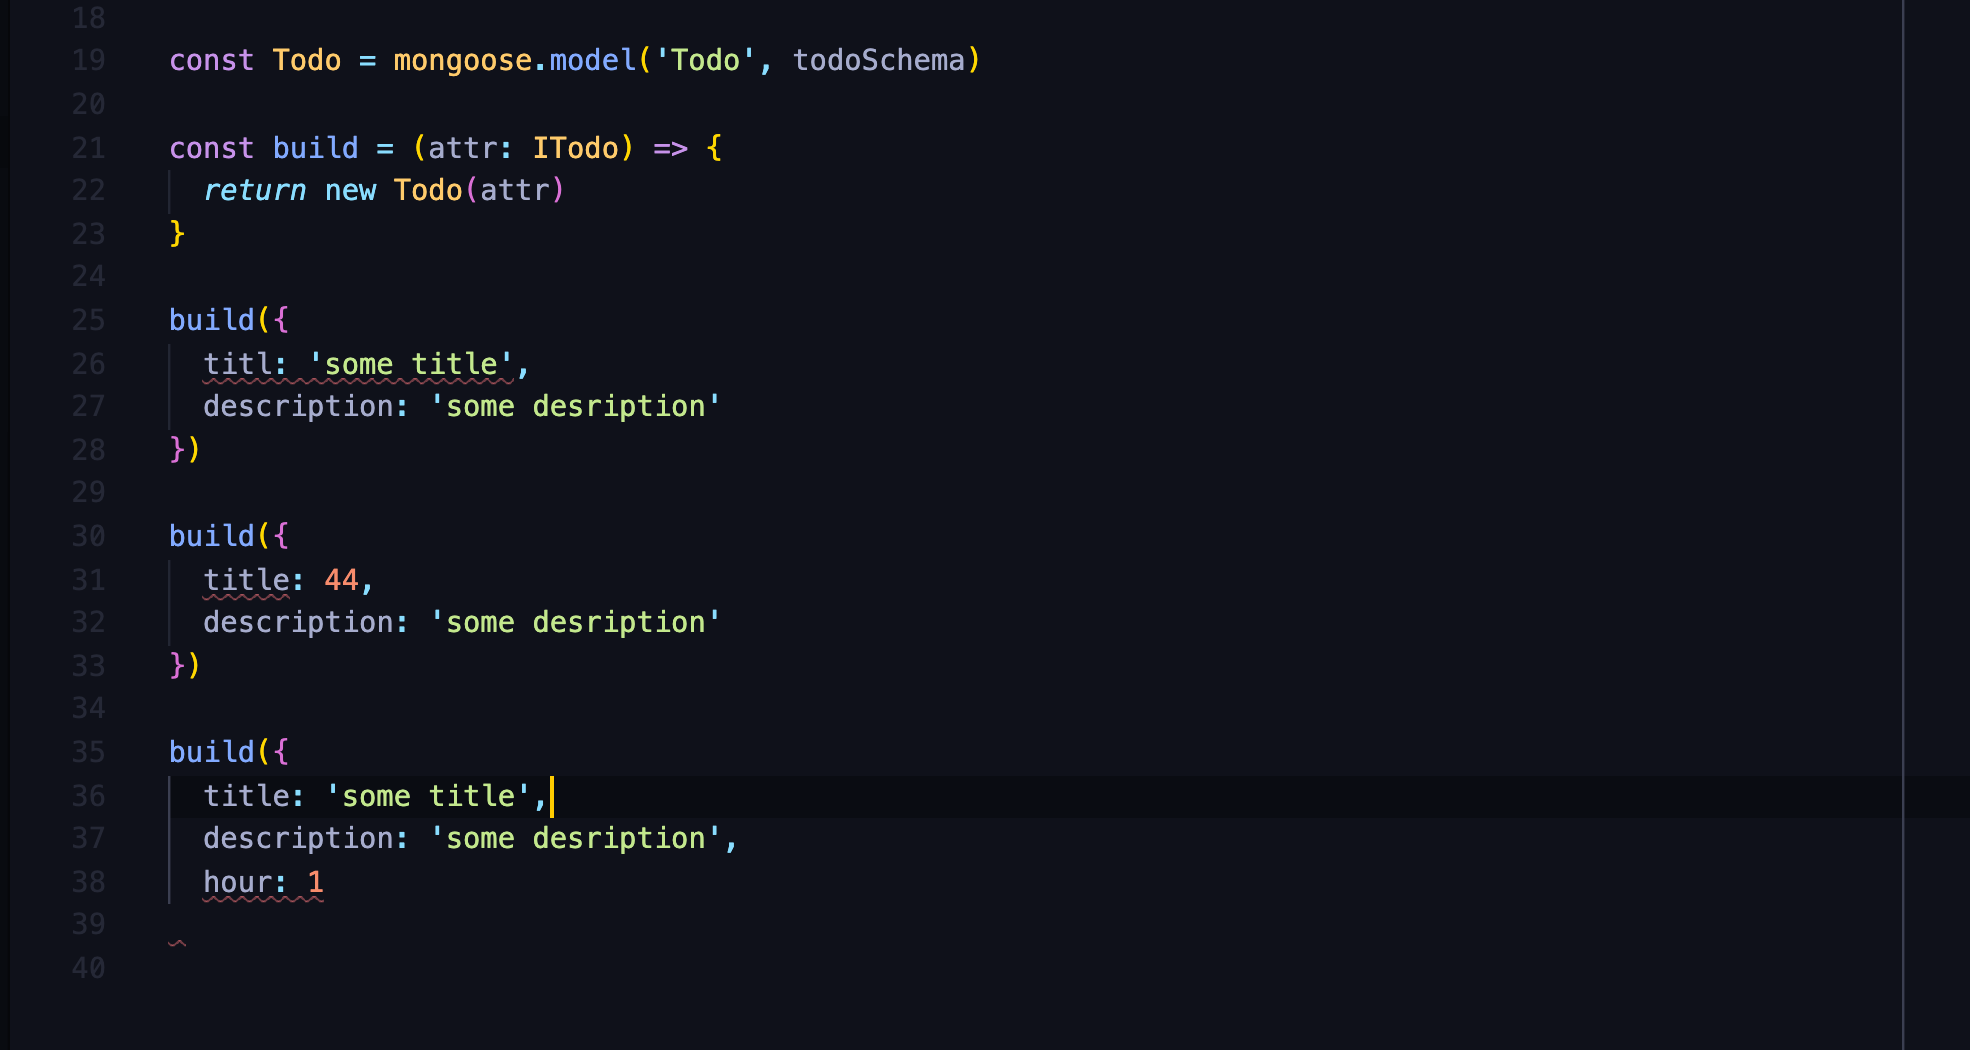
As you can see, we have typescript flagging our code this time around as we attempt to create a new instance of our Todo model with wrong information using the build functions.
如您所见,这次我们尝试使用构建函数使用错误的信息来创建Todo模型的新实例时,我们使用打字稿标记了我们的代码。
hover on the first one and you will see that typescript is trying to tell us that titl, cannot be assigned to our parameter because our ITodo interface does not have it defined. Now we have been able to make typescript aware of the type and properties of our model instance arguments
悬停在第一个,你会看到,打字稿是想告诉我们,TITL,不能分配给我们的参数,因为我们ITodo接口没有它定义。 现在,我们已经能够使打字稿了解模型实例参数的类型和属性 。
We can still make some slight improvement to our code, how do we do this, instead of having to call our build function directly, we can make the function into our Todo model so we can do something like this:
我们仍然可以对代码进行一些细微的改进,我们如何做到这一点,而不必直接调用构建函数,我们可以将该函数放入Todo模型中,这样我们可以执行以下操作:
new Todo.build({
  title: '',  description: ''})
This will be better as we will only export our Todo Model being confident that we have the build function to create a new instance of our Todo model
这样会更好,因为我们只会导出我们的Todo模型,并确信我们具有构建功能来创建Todo模型的新实例
Now how do we do this ?
现在我们该怎么做?
To do this, we are going to attach the build function to the statics property of our todoSchema, like this:
要做到这一点,我们要构建的功能附加到我们todoSchema的静态属性,就像这样:
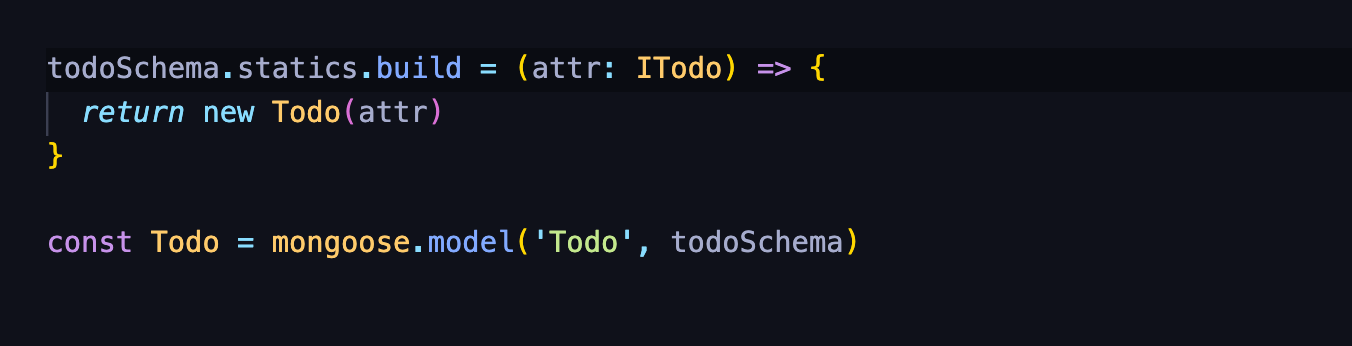
Now we can call build directly on our Todo model, but we are going to encounter a problem when we attempt to use this, let’s see:
现在我们可以直接在Todo模型上调用build,但是当我们尝试使用它时会遇到一个问题,让我们看看:

As you can see, we have typescript flagging our build function, this is because typescript does not recognise this code below as a valid code
如您所见,我们有打字稿标记我们的构建函数,这是因为打字稿无法将下面的代码识别为有效代码
todoSchema.statics.build = (attr: ITodo) => { return new Todo(attr)}this is yet another weird thing with typescript and mongoose, typescript does not understand what it means to assign a property to statics object of the todoSchema, although this is valid javascript, typescript does not understand it. to solve this, we have to give a little more information to typescript, and we are going to do that by defining the properties that our Todo model will have in an interface. This interface will tell typescript that we will have a build function in the Todo model. in our models/todo.ts file, include the following code:
这又是与打字稿和猫鼬另一个奇怪的事情,打字稿不明白这意味着什么,以静态的todoSchema的对象分配的属性,虽然这是有效JavaScript,打字稿不理解。 为了解决这个问题,我们必须为typescript提供更多信息,而我们将通过定义Todo模型在接口中具有的属性来做到这一点。 该接口将告诉打字稿我们将在Todo模型中具有构建功能。 在我们的models / todo.ts文件中,包括以下代码:

Notice that we are defining our interface a little differently here, this is because we just want to add the build function to our existing Todo model, to do that, we are extending the existing model interface, the extend keyword means, “take all properties of the existing mongoose.Model interface, add them to our new interface, TodoModelInterface”, then we include the build function as part of the properties in the TodoModelInterface, now the TodoModelInterface contains all the properties of our mongoos.Model interface and the build function
请注意,我们在这里定义接口有些不同,这是因为我们只想将构建函数添加到现有的Todo模型中,为此,我们扩展了现有模型接口, extend关键字的意思是“ 获取所有属性”。的现有mongoose.Model接口,将它们添加到我们的新接口TodoModelInterface中 ,然后将构建函数作为属性的一部分包含在TodoModelInterface中 ,现在TodoModelInterface包含了mongoos.Model接口和构建函数的所有属性
Also, Notice the angle bracket <any>, I am not going to go deep into the details of this, this is called generics in typescript, you can read more about it, but imagine it like a function definition that takes in a parameter and a function call that takes in an argument, in this case, we are calling the mongoose.Model interface and it needs additional information(the argument we passed in) that will be used in the interface body(mongoos.Model interface), the argument we are passing, in this case, is a type(generics take in types as arguments), and it is a type of “any”, we’ll be changing this later, but let’s see the reason why we are passing in the “any” type for now.
另外,请注意尖括号<any>,我将不深入介绍它,它在打字稿中被称为泛型 ,您可以阅读更多有关它的信息,但可以想象它像一个接受参数的函数定义,一个带有参数的函数调用,在这种情况下,我们正在调用mongoose.Model接口,它需要其他信息( 我们传入的参数 )将在接口主体( mongoos.Model interface )中使用,该参数在这种情况下,我们传递的是一个类型( 泛型以类型作为参数 ),并且它是“ any”的类型,我们稍后将进行更改,但让我们看看为什么传递“任何”类型。
Note: Generic take in types as arguments
注意: 泛型采用类型作为参数
Hover on the Model property and press command and then click, this will take you to the type definition file for this interface,
将鼠标悬停在Model属性上,然后按command,然后单击 ,这将带您进入该接口的类型定义文件,

You will see that the first generic parameter is T and it extends Document, since we don’t have our mongoose document type defined yet we’ll use type any, for now, remember I told you to imagine generics like a function declaration and function call, imagining it this way will help us understand what we are attempting to do in this tutorial.
您将看到第一个泛型参数是T,并且它扩展了Document ,因为我们没有定义猫鼬的文档类型,但是我们将使用any类型,就目前而言,记得我告诉过您想象泛型如函数声明和函数调用,以这种方式进行想象将有助于我们理解本教程中要尝试做的事情。
In our TodoModelInterface, notice how we defined the build function, we defined the function, the parameter and the data type we expect, in this case, our custom data type of ITodo, then we also specify the type of data we want the function to return, in this case, we want the function to return a data of type any, we will also be updating this later. Type any means the data can be of any type.
在我们的T odoModelInterface中,请注意我们如何定义构建函数,定义了函数, 参数和期望的数据类型 ,在这种情况下,我们定义了ITodo的自定义数据类型,然后还指定了我们想要函数的数据类型要返回,在这种情况下,我们希望函数返回任何类型的数据,我们也将在以后进行更新。 输入任何类型表示数据可以是任何类型。
To use this newly created model interface, we will go to the part of our code where we created our model, I am talking about here:
要使用这个新创建的模型接口,我们将转到我们创建模型的代码部分,我在这里谈论的是:

If you are on Mac, press command then click on model, For windows users, try CTRL instead(if it doesn’t work please check on google). This should take you to the type definition file for that model function, you should see something like this:
如果您使用的是Mac,请按Command键,然后单击“模型”。对于Windows用户,请改用CTRL(如果无法使用,请在Google上查看)。 这应该带您到该模型函数的类型定义文件,您应该看到类似以下内容:

Check line 292 in the screenshot above, you will see that we have a function model, I told you to imagine generics as a function, you will see that we have an angle bracket in front of the function model, these are generic properties, but imagine them as function parameters, as you can see the first one is T and it extends Document, this means whatever we pass to our model function as the first generic argument must be a mongoose document, since we have not defined this yet, we’ll pass in type any, for now. Take a look at the second parameter, you will see that it extends Model, that means that the second generic argument we’ll be passing to our model function must be a mongoose model, and we have our todoModelInterface defined already, so we’ll pass that in, let’s do that now
在上面的屏幕截图中检查第292行,您将看到我们有一个函数模型,我告诉您将泛型想象为一个函数,您会看到我们在函数模型前面有一个尖括号,这些是泛型属性 ,但是将它们想象为函数参数,如您所见,第一个是T并扩展了Document ,这意味着作为第一个通用参数传递给模型函数的任何内容都必须是猫鼬文档 ,因为我们尚未定义它,因此,现在,将输入any 。 看一下第二个参数,您将看到它扩展了Model ,这意味着我们将传递给模型函数的第二个通用参数必须是猫鼬模型,并且我们已经定义了todoModelInterface ,因此我们将传递进去,现在就开始做

as soon as we do that, over on our code
一旦这样做,就结束我们的代码
Todo.build({})You will see that the initial error has gone, this is because we now have the build function defined in our model interface for our Todo model. if you see an error now, it will only be that we should pass in the required property of title and description to the object passed to the build function. let’s do that:
您会看到初始错误已经消失,这是因为我们现在在模型接口中为Todo模型定义了构建函数。 如果您现在看到错误,则仅是我们应该将所需的title和description属性传递给传递给build函数的对象。 让我们这样做:
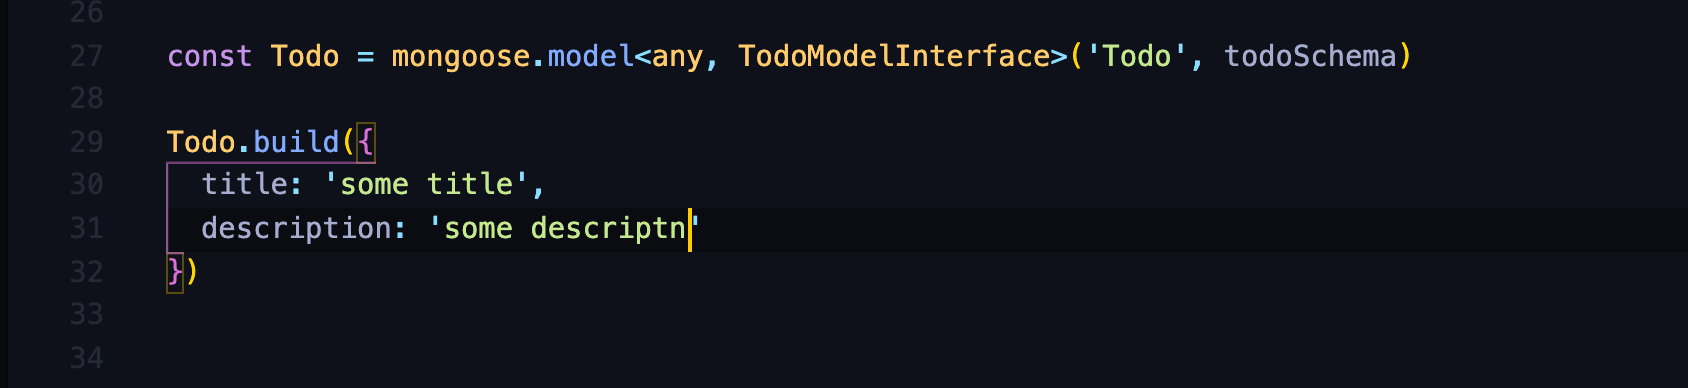
As soon as we did this you can see that the error is completely gone
这样做后,您会发现错误已完全消失
Now this works fine, and this solves two of our problems that relate to properties and data types.
现在,它可以正常工作,并且解决了我们与属性和数据类型有关的两个问题。
Now moving to the last issue, we mentioned earlier on in this tutorial that mongoose returns additional information when we create a new Document in the database, and we gave the example of some properties that may be added to our document, and they include createdAt, and updatedAt.
现在转到最后一个问题,我们在本教程的前面已经提到过,当在数据库中创建新Document时, 猫鼬会返回其他信息,并给出了一些可能会添加到文档中的属性的示例,其中包括createdAt,和updatedAt。
Also, recall that we passed in a type of any to our extended mongoose.Model interface, from our inspection we realised that this should be a mongoose Document but since we did not have it defined at the moment we passed in a type of any, also notice that our build function returns a type of any. All things being equal, our build function creates a new instance of our model and returns a new document, but since we do not have a new document defined yet, we used the type of any as a placeholder.
另外,回想一下我们在扩展的mongoose.Model接口中传入了any类型,从检查中我们意识到这应该是Mongoose Document,但是由于我们在传入any时没有定义它,还请注意,我们的build函数返回any的类型。 在所有条件都相同的情况下,我们的构建函数会创建模型的新实例并返回新文档,但是由于尚未定义新文档,因此我们将any的类型用作占位符。
What we need to do now is to define an interface for our documents, this interface will define the properties that we want to be contained in our Todo document or that we expect to be returned when we create a new document. Let’s do that, in the same file routes/todo.ts, type this code:
现在,我们需要为文档定义一个接口,该接口将定义我们要包含在Todo 文档中或希望在创建新文档时返回的属性。 为此,请在同一文件route / todo.ts中输入以下代码:
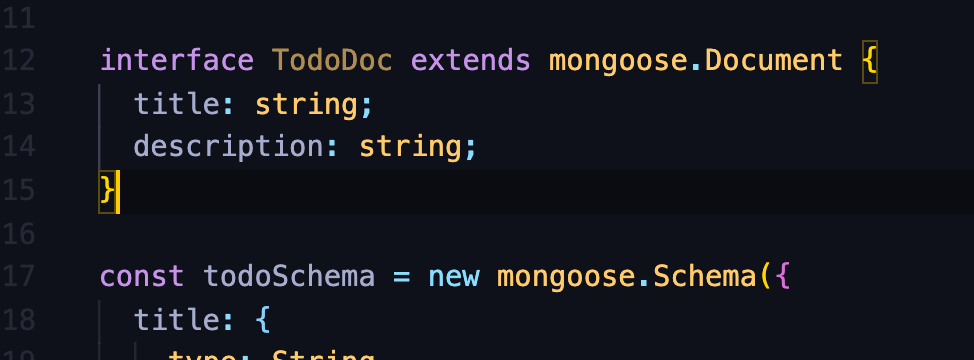
Like the explanation we gave above, we are extending the existing Document interface, the extend keyword means, “take all properties of the existing mongoose.Document interface, add them to our new interface TodoDoc”, then we include some other properties such as title and description as part of the properties in the TodoDoc, now the TodoDoc contains all the properties of our mongoos.Document interface and title, which is a string, and description which is also a string, if mongoose adds extra properties such as createdAt and updatedAt, then we’ll define them in the TodoDoc interface like we defined title and description. but in our case, these extra properties are not added
像上面的解释一样,我们扩展了现有的Document接口, extend关键字的意思是“ 获取现有mongoose.Document接口的所有属性,将它们添加到我们的新接口TodoDoc中 ”,然后包括一些其他属性,例如title和说明作为TodoDoc属性的一部分,现在TodoDoc包含我们mongoos.Document接口和称号 ,这是一个字符串 ,和描述的所有属性,这也是一个字符串 ,如果猫鼬增加了额外的属性,如createdAt和updatedAt ,然后我们将在TodoDoc界面中定义它们,就像定义标题和描述一样 。 但在我们的例子中,这些额外的属性未添加
Now to apply this interface, we’ll go to the part of our code where are creating our model, remember the first generic argument is a type of any, from our inspection earlier on we realised it should be a document, but since we didn't have a document interface defined yet we decided to use the type any, now we can use the TodoDoc instead of type any
现在要应用此接口,我们将转到代码中创建模型的部分,请记住第一个通用参数是any的类型,从我们之前的检查中我们意识到它应该是一个文档,但是由于我们没有还没有定义文档接口,但是我们决定使用any类型,现在我们可以使用TodoDoc代替any类型
Also, in our TodoModelInterface, our build function should return a document, but we are returning a type of any, now we can update it to use the TodoDoc interface
另外,在我们的TodoModelInterface中 ,我们的构建函数应该返回一个文档 ,但是我们返回的是any的类型,现在我们可以对其进行更新以使用TodoDoc接口

In the same TodoModelInterface, you will realise that the mongoose.Model also has a generic argument of type any, from our inspection we realised that this should also be a mongoose Document, let’s update it now to use our TodoDoc
在同TodoModelInterface,你会发现,在mongoose.Model也有类型的通用参数中 的任何 ,从我们的观察,我们意识到,这也应该是猫鼬的文件 ,让我们更新,现在使用我们TodoDoc

Now let’s use our Todo Model in our route files,
现在让我们在路线文件中使用Todo模型,
in models/todo.ts, export the todo model like this:
在models / todo.ts中 ,导出todo模型,如下所示:

in our route/todo.ts, import the Todo model like this:
在我们的route / todo.ts中 ,导入Todo模型,如下所示:

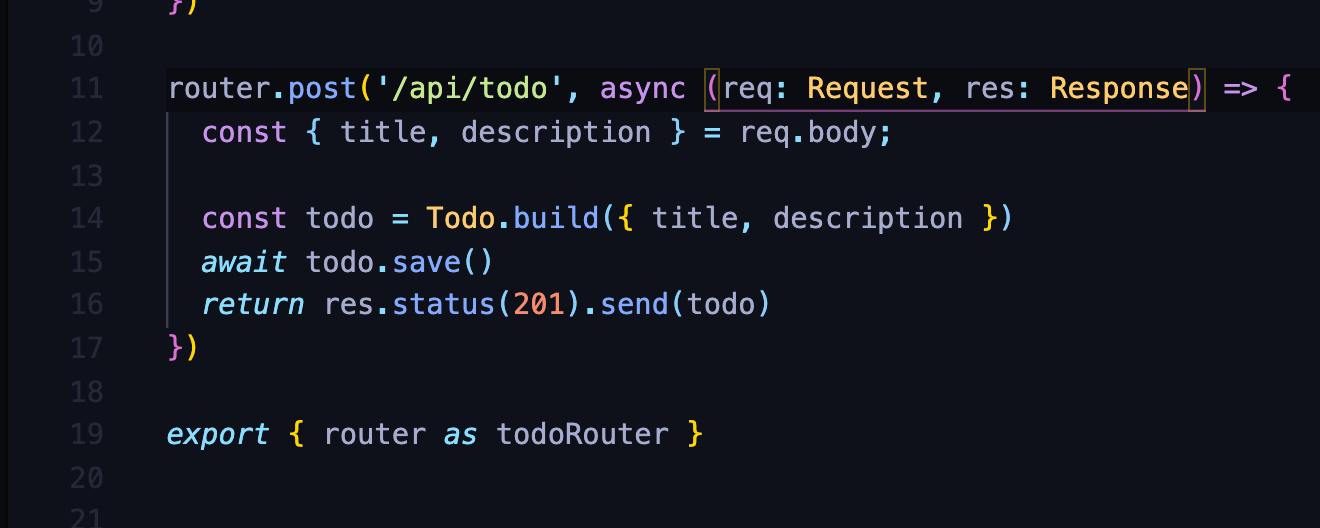
Now, let’s create a todo, remember we have a post function for creating todo, let’s update that code, type the following update in router.post
现在,让我们创建一个待办事项,记住我们有一个用于创建待办事项的post函数,让我们更新该代码,在router.post中键入以下更新
You can test this out by yourself on postman.
您可以自己在邮递员上进行测试。
Also, let’s update our router.get funcrtion, type the following code:
另外,让我们更新router.get函数,输入以下代码:

I tested these routes out on postman and it all worked fine for me, hopefully, it works for you too.
我在邮递员上测试了这些路线,对我来说一切正常,希望对你也有用。
This brings us to the end of this tutorial.
这使我们到了本教程的结尾。
In this tutorial we have learnt the following:
在本教程中,我们学习了以下内容:
- what typescript is 什么是打字稿
- why we use typescript 为什么我们使用打字稿
- how to use typescript with Node/express 如何在Node / express中使用打字稿
- Issues with using typescript and Mongoose and the fixes for them. 使用打字稿和猫鼬的问题及其修复方法。
- What interfaces are 什么是接口
- how to declare an interface 如何声明接口
- how to add types to function, variables, parameters 如何向函数,变量,参数添加类型
- What generics are 什么是泛型
- how to add generic types to functions 如何向函数添加泛型类型
I’m open to suggestions and corrections on this tutorial, For the more experienced ones, If there is anything you think I didn’t explain quite well or any contribution you will like to make to this tutorial to make it better, kindly drop your comments in the comment section, I’ll be glad to learn from you too, and the rest of us reading this article would also have an opportunity to learn from your experience.
我愿意接受本教程的建议和更正,对于经验更丰富的建议和更正,如果您认为我没有很好地解释任何事情,或者您想对本教程做出更好的贡献,请放弃。在评论部分的评论中,我也很高兴向您学习,我们阅读本文的其他人也将有机会学习您的经验。
If you have learnt anything from this tutorial, please follow me on TWITTER, for notifications when I post new articles. Also, if you do not learn anything new and you think I deserve a follow, kindly follow on TWITTER 😀😊.
如果您从本教程中学到了什么,请在TWITTER上关注我,以在我发表新文章时获得通知。 另外,如果你不学习任何新的东西,你觉得我应该有一个跟踪,请遵循TWITTER 😀😊。
I’ll be glad if you follow me on medium too 😁. just hit the follow button at the top of the article.
如果您也跟随我,我会很高兴😁。 只需点击文章顶部的关注按钮即可。
I have the code to this article on github, you can fork it here, and you can follow me too.
我在github上有本文的代码,您可以在此处进行分叉,也可以关注我。
Thank you for your time spent going through this article, I really hope I have helped someone to learn a few things about typescript and how to get started using it with Node.js/Express and Mongoose
感谢您花时间阅读本文,我真的希望我能帮助别人学习有关打字稿的一些知识,以及如何开始使用Node.js / Express和Mongoose进行打字。
Cheers! 💖💖
干杯! 💖💖
翻译自: https://medium.com/swlh/typescript-with-mongoose-and-node-express-24073d51d2ee
正则表达式匹配xml节点


 1463
1463

 被折叠的 条评论
为什么被折叠?
被折叠的 条评论
为什么被折叠?
 到【灌水乐园】发言


