


vue中组件之间的通信
Despite the usual intros I’ve seen in this kind of articles, I’m not going to go into describing of Vue here. If you are here, it means you know what VueJS is, or at least you’ve heard of it, and you want to learn more about it. So, let’s get right into it.
尽管我在此类文章中看到了通常的介绍,但在这里我将不再介绍Vue。 如果您在这里,则意味着您知道VueJS是什么,或者至少您听说过VueJS,并且想进一步了解它。 所以,让我们开始吧。
Note: With Vue 3 around the corner, there are some changes coming, but the core concepts of components and communication between them will not change and all these principles will still apply when the v3 hits the metaphorical shelves.
注意:随着Vue 3的到来,会有一些变化,但是组件的核心概念以及组件之间的通信不会改变,并且当v3出现在隐喻的架子上时,所有这些原理仍然适用。
Note 2: This might be a bit longer article than you’re used to.
注意2:这篇文章可能比您以往更长。
关于组件的一句话 (A word about components)
If you are familiar with components in VueJS, you can probably skip this part, because it’s essentially an intro for the beginners.
如果您熟悉VueJS中的组件,则可以跳过这一部分,因为它本质上是初学者的入门。
You can think of the components as the building blocks of your application. If you’ve worked on any project before, you probably noticed that web pages and apps can be broken down into smaller chunks that can often be reused with small alterations or no changes at all. That’s exactly the point of components — building the app using smaller parts and combining them together. As VueJS documentation says, the components are an abstraction that lets us build large-scale applications composed of small, self-contained and often reusable components.
您可以将组件视为应用程序的构建块。 如果您以前从事过任何项目,您可能会注意到网页和应用程序可以细分为较小的块,这些块通常可以进行很小的更改或根本没有更改就可以重复使用。 这就是组件的关键点-使用较小的部分构建应用程序并将它们组合在一起。 正如VueJS文档所说,这些组件是一种抽象,使我们能够构建由小型,独立且经常可重用的组件组成的大规模应用程序。
For better understanding, take a look at the diagram below, it’s a similar diagram to the one on the official VueJS documentation website:
为了更好地理解,请看下面的图,它与VueJS官方文档网站上的图类似:
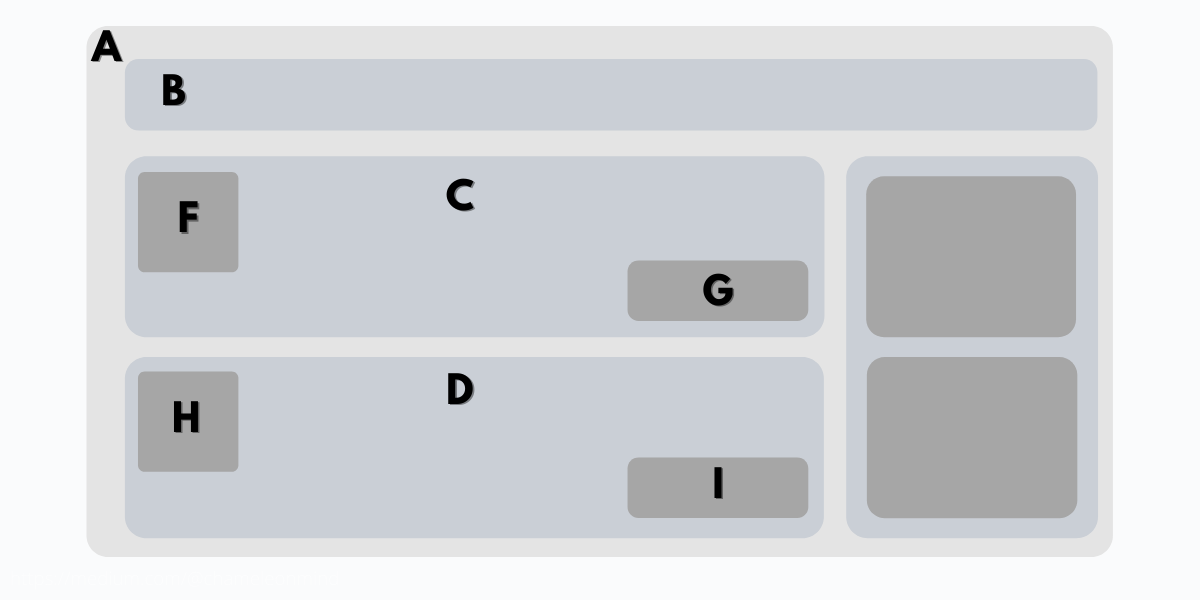
As you can see, components can be a part of other components, and also can contain other components. We can refer to the components as parent and child components, depending on where they are located. On the illustration above, component A is a parent component to the components B, C and D, and component C is a parent of the component F and G. Components B, C, D are child components of component A, and F and G are child components of component C.
如您所见,组件可以是其他组件的一部分,也可以包含其他组件。 根据组件的位置,我们可以将它们称为父组件和子组件。 在上面的说明中,组件A是组件B,C和D的父组件 ,而组件C是组件F和G的父组件。组件B,C,D是组件A的子组件 ,而F和G是组件C的子组件。
When building the apps with VueJS, every .vue file that you create is a component and it’s essentially a Vue instance with some predefined options. Each of these components has their own methods, data, props, computed etc, and when added in your app will have its scope.
使用VueJS构建应用程序时,您创建的每个.vue文件都是一个组件,并且实质上是具有某些预定义选项的Vue实例。 这些组件中的每一个都有自己的方法,数据,属性,计算等,并且在您的应用中添加时将具有其范围。
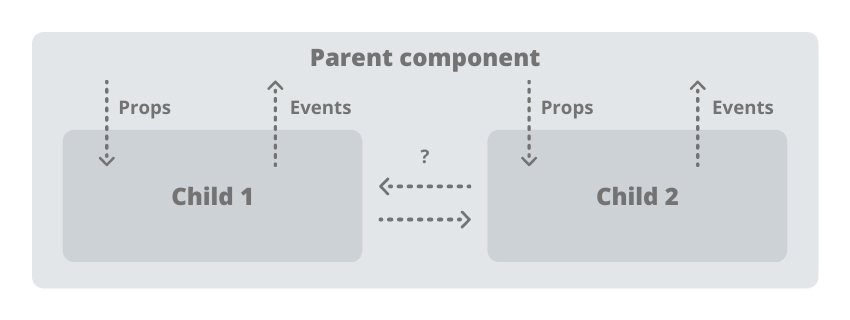
Although components are sometimes self-contained, and do not have any information going in or out, there are times when you need them to communicate with other parts of your application, for example with parent component, their child components or with other components that are located somewhere far away it the component tree. They could be sending some data, or receiving it, or reacting to the changes that you made in some other components.
尽管有时组件是独立的,并且没有任何输入或输出的信息,但是有时您仍需要它们与应用程序的其他部分进行通信,例如与父组件,其子组件或与其他组件通信。位于远离组件树的某个位置。 他们可能正在发送或接收数据,或者对您在其他组件中所做的更改做出React。
For more information about components and component registration, take a look at the official VueJS documentation.
Based on their place in app structure, let’s see what are the ways to communicate between the components.
根据它们在应用程序结构中的位置,让我们看看在组件之间进行通信的方式是什么。
亲子沟通 (Parent to child communication)
This is one of the most common scenarios — you have a parent component from which you want to pass some data to child component. For example, you have an API call in parent component and want to send the results to a child, or you have multiple instances of the same component as children and want to pass them different data.
这是最常见的方案之一-您有一个父组件,您希望从中将一些数据传递给子组件。 例如,您在父组件中有一个API调用,并且想要将结果发送给子组件,或者您有多个与该子组件相同的组件实例,并希望向他们传递不同的数据。
There are several ways that you can pass data to child component or manipulate existing data in child instance, and we’ll cover them all, but the best way to do this would be using props.
您可以通过多种方式将数据传递到子组件或在子实例中操作现有数据,我们将介绍所有内容,但是最好的方法是使用props 。
道具 (Props)
Props are custom attributes which you can use to pass any data to a child component — strings, objects, arrays, numbers, even functions. Once passed, they become a property on that component instance and you can use them inside it. You can have as many props as you want, but keep in mind that a component with a lot of props might become hard to read and maintain. If you need to pass a lot of different data, combine them into an object, and then pass them as a single prop.
道具是自定义属性,您可以使用它们将任何数据传递给子组件-字符串,对象,数组,数字甚至函数。 一旦通过,它们将成为该组件实例的属性,您可以在其中使用它们。 您可以根据需要拥有任意数量的道具,但是请记住,带有很多道具的组件可能会变得难以阅读和维护。 如果您需要传递许多不同的数据,请将它们组合到一个对象中,然后将它们作为一个道具传递。
Remember that passing data with props has a one-way data flow, which means that data “flows” from the parent to child and not the other way around, so if you update the bound prop in parent component it will be updated in child component. You really shouldn’t be trying to mutate the prop you passed directly in child component, as this is a huge anti-pattern, and fortunately Vue will give you a console warning if you attempt something like this.
请记住,通过props传递数据具有单向数据流,这意味着数据是从父级流向子级的,而不是相反的,因此,如果在父级组件中更新绑定的prop,它将在子级组件中进行更新。 。 您真的不应该尝试更改直接在子组件中传递的prop,因为这是一个巨大的反模式,而且幸运的是,如果您尝试进行此类操作,Vue会向您发出控制台警告。
We’ll get to updating props from child in a little bit, but first let’s take a look at the following example.
我们将稍微更新一下孩子的道具,但首先让我们看一下以下示例。
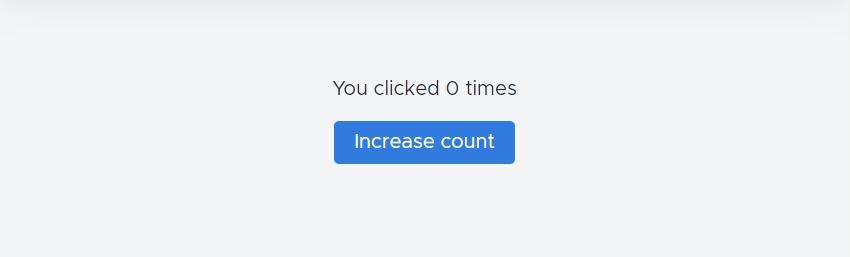
The text with click count is a separate component, and button is in a parent component.
具有点击计数的文本是一个单独的组件,而按钮位于父组件中。
We’re going with the simplest example — we have a component that contains the sentence and the button is in parent component, that will update the counter when we click it.
我们以最简单的示例为例-我们有一个包含句子的组件,而按钮位于父组件中,单击该组件将更新计数器。
There is not much going on here, but the code for our click-counter component could look something like this:
这里没有太多的事情发生,但是我们的点击计数器组件的代码可能看起来像这样:
<template>
  <div class="click-counter">
    You clicked {{$props.counter}} {{$props.counter !== 1 ? 'times' : 'time'}}
  </div>
</template>


<script>
export default {
  name: 'ClickCounter',
  props: {
    counter: {
      type: [String, Number],
      default: 0
    }
  }
}
</script>
And then our parent component, where we have our button and method for updating click count, could look like this:
然后,我们的父组件(具有用于更新点击计数的按钮和方法)如下所示:
<template>
  <div class="home">
    <click-counter :counter="clickCount"/>
    <button @click="increaseCounter">Increase count</button>
  </div>
</template>


<script>
import ClickCounter from '../components/ClickCounter'

export default {
  name: 'Home',
  components: { ClickCounter },
  data () {
    return {
      clickCount: 0
    }
  },
  methods: {
    increaseCounter () {
      this.clickCount++
    }
  }
}
</script>
As you can see, we assigned the clickCount variable to a prop counter and are updating it when we click the button. Thanks to reactivity in Vue, this value will be automatically updated after each click and as the change is detected.
如您所见,我们将clickCount变量分配给了prop 计数器,并在单击按钮时对其进行了更新。 由于Vue具有React性,因此每次单击后以及检测到更改后,该值都会自动更新。
This is a fairly simple and straightforward example, but you get the gist. You should use this pattern whenever possible, as it is the cleanest way to pass data to children components. Also, I would advise that whenever you’re using the prop values in your children components you write them as $props.propName. Props, data variables and computed values cannot have the same name, so you cannot duplicate them, but it is a good practice to write this way because you will know where your values are coming from just by looking at the code.
这是一个非常简单明了的示例,但是您可以理解要点。 您应该尽可能使用此模式,因为这是将数据传递给子组件的最干净的方法。 另外,我建议您每当在子组件中使用prop值时, 都应将它们写为$ props.propName 。 道具,数据变量和计算值不能具有相同的名称,因此您不能重复它们,但是以这种方式编写是一种好习惯,因为您只需查看代码就可以知道值的来源。
直接访问儿童财产 (Direct access to children properties)
Direct access is another way to access and update values in children components and you could sometimes encounter the need for this pattern, but it’s best to avoid using it altogether, as it can become confusing what is changing your values and where you’re doing it. So, if you can do it with props, go for props.
直接访问是访问和更新子组件中值的另一种方法,您有时可能会遇到这种模式的需要,但是最好避免完全使用它,因为它可能会使更改值和更改位置变得混乱。 因此,如果可以使用道具来做,那就去买道具。
But let’s see how this would work on our example above. I will have to change the components a little bit, so our counter is not using the prop anymore, but scoped variable from child component.
但是,让我们看看如何在上面的示例中使用它。 我将不得不稍微更改组件,因此我们的计数器不再使用prop,而是使用子组件的作用域变量。
<template>
  <div class="click-counter">
    You clicked {{counter}} {{counter !== 1 ? 'times' : 'time'}}
  </div>
</template>


<script>
export default {
  name: 'ClickCounter',
  data () {
    return {
      counter: 0
    }
  }
}
</script>
<template>
<div class="home">
<click-counter ref="clickCounter"/>
<button @click="increaseCounter">Increase count</button>
</div>
</template>
<script>
import ClickCounter from '../components/ClickCounter'
export default {
name: 'Home',
components: { ClickCounter },
methods: {
increaseCounter () {
this.$refs.clickCounter.counter++
}
}
}
</script>As you can see in method increaseCounter in Home.vue component, I’m accessing directly the variable inside child component, using ref, and updating it with new value.
正如你可以在方法increaseCounter在Home.vue成分看,我直接访问的子组件内的变量,使用参考,并用新的值更新它。
You could access counter value using $children instance property.
您可以使用$ children实例属性访问计数器值。
increaseCounter () {  this.$children[0].counter++
}
But don’t do this — it can look straightforward in this simple example, but once you have multiple child components their order in $children cannot be guaranteed, and you could have a hard time tracking your changes.
但是不要这样做-在这个简单的示例中看起来很简单,但是一旦您拥有多个子组件,就不能保证它们在$ children中的顺序,并且可能很难跟踪您的更改。
孩子与父母的沟通 (Child to parent communication)
Continuing from our example above, let’s say we want to display a message in our parent component once our counter reaches 5 clicks. If we are using props to pass a value to our child component, parent component is also aware of the value of counter, so you would place logic that displays a message when counter reaches 5 inside parent component too. But let’s do something different in this example — let’s create a watcher in our child component that will tell a parent component when to show a message.
继续上面的示例,假设我们希望计数器达到5次点击后在父组件中显示一条消息。 如果我们使用道具将值传递给子组件,则父组件也知道counter的值,因此您也可以在父组件内部计数器达到5时放置一个显示消息的逻辑。 但是,让我们在此示例中做一些不同的事情-让我们在子组件中创建一个观察程序,该监视程序将告诉父组件何时显示消息。
The best way to do this would be by using events.
最好的方法是使用事件 。
大事记 (Events)
As I said earlier, normally, a logic should be a little bit different for the following example, but we will flip it just for this example. As you can see below, I added a watcher in <click-counter> component, that emits an event limit-reached to a parent component telling it that a message should be displayed.
就像我之前说的,通常,下面的示例的逻辑应该有所不同,但是我们仅将其翻转为该示例。 如下所示,我在<click-counter>组件中添加了一个观察程序,该监视程序向父组件发出事件限制到达的事件,告诉该事件应显示一条消息。
Note that similar to props that flow in one way, downward from parent to child, you can think of events also flowing in one way, but upward, from child to parent.
请注意,类似于以一种方式(从父级到子级向下流动)的道具,您可以想到事件也以一种方式(但从子级到父级向上流动)流动。
Back to our example, in our parent component, I added a new line that is hidden until the showMessage property is set to true along with a method that will be triggered once the event is fired.
回到我们的示例中,在父组件中,我添加了一条隐藏的新行,直到showMessage属性设置为true为止,同时还有一种方法将在事件触发后触发。
<template>
  <div class="click-counter">
    You clicked {{$props.counter}} {{$props.counter !== 1 ? 'times' : 'time'}}
  </div>
</template>


<script>
export default {
  name: 'ClickCounter',
  props: {
    counter: {
      type: [String, Number],
      default: 0
    }
  },
  watch: {
    counter: {
      handler (newVal) {
        if (newVal > 5) {
          this.$emit('limit-reached')
        }
      }
    }
  }
}
</script>
<template>
<div class="home">
<click-counter :counter="clickCount" @limit-reached="showMessage"/>
<button @click="increaseCounter">Increase count</button>
<p class="message" v-show="messageShown">You have clicked button more than 5 times!</p>
</div>
</template>
<script>
import ClickCounter from '../components/ClickCounter'
export default {
name: 'Home',
components: { ClickCounter },
data () {
return {
clickCount: 0,
messageShown: false
}
},
methods: {
increaseCounter () {
this.clickCount++
},
showMessage () {
this.messageShown = true
}
}
}
</script>As soon as our prop counter in child component reaches 6, watcher will catch that and emit the event to our parent component, triggering method showMessage that changes property messageShown from false to true and displaying our message below the button.
一旦子组件中的prop 计数器达到6,观察者将捕获该事件并将事件发送给父组件,触发方法showMessage将messageShown属性从false更改为true,并在按钮下方显示我们的消息。
Events can also carry any data that we want to pass to a parent component, you simply include it as a second parameter after the name of event, but that is a whole other area and I will leave that for some future text.
事件还可以携带我们要传递给父组件的任何数据,您只需将其作为事件名称之后的第二个参数包含进去,但这是整个其他区域,我将在以后的内容中保留。
this.$emit('limit-reached', anyData)直接访问父级属性 (Direct access to parent properties)
Similar to what we did when we directly accessed a variable inside the child component, we can do something alike in the reverse situation. This is, again, considered bad practice, as you are breaking the separation of concerns pattern and changing the values outside of components where they are located, so try to avoid it.
与我们直接访问子组件内部的变量时所做的类似,在相反的情况下我们可以做类似的事情。 再一次,这被认为是不好的做法,因为您正在打破关注点分离的模式,并在它们所位于的组件外部更改值,因此请避免使用它。
For this example, instead of emitting a custom event, we will directly access showMessage variable in parent component and set it to true.
对于此示例,我们将直接访问父组件中的showMessage变量并将其设置为true,而不是发出自定义事件。
<template>
  <div class="click-counter">
    You clicked {{$props.counter}} {{$props.counter !== 1 ? 'times' : 'time'}}
  </div>
</template>


<script>

export default {
  name: 'ClickCounter',
  props: {
    counter: {
      type: [String, Number],
      default: 0
    }
  },
  watch: {
    counter: {
      handler (newVal) {
        if (newVal > 5) {
          this.$parent.messageShown = true
        }
      }
    }
  }
}
</script>
<template>
<div class="home">
<click-counter :counter="clickCount"/>
<button @click="increaseCounter">Increase count</button>
<p class="message" v-show="messageShown">You have clicked button more than 5 times!</p>
</div>
</template>
<script>
import ClickCounter from '../components/ClickCounter'
export default {
name: 'Home',
components: { ClickCounter },
data () {
return {
clickCount: 0,
messageShown: false
}
},
methods: {
increaseCounter () {
this.clickCount++
}
}
}
</script>You may encounter a situation where it may seem easier to do things this way instead of emitting an event, but in that case you will have to decide if you should go with the easier solution and possibly encounter a problem later, unable to find what’s changing your values, or go with a solution that involves slightly more typing but that would be easier to maintain later. I would always opt for the latter.
您可能会遇到这样一种情况,即用这种方法而不是发出事件似乎更容易,但是在这种情况下,您将不得不决定是否应采用更简单的解决方案,以后可能会遇到问题,无法找到正在发生的变化您的价值观,或者选择一种解决方案,该解决方案涉及更多的键入内容,但以后更易于维护。 我总是选择后者。
全通讯 (Omni-communication)
We’ve seen how you can communicate between parent and child components, but what do you do when you want to pass data between different components on the same level? Or components on different levels, but not related to each other?
我们已经了解了如何在父组件和子组件之间进行通信,但是当您想在同一级别的不同组件之间传递数据时该怎么办? 还是组件处于不同级别,但彼此之间不相关?
Sure, you could emit data from one child to parent, and then catch that event and pass a prop to another child, getting into prop-drilling trap, but that’s not really efficient.
当然,您可以将数据从一个孩子传给父母,然后捕获该事件,然后将一个道具传递给另一个孩子,进入钻探陷阱,但这并不是很有效。
In such cases, we can also use events or Vuex.
在这种情况下,我们也可以使用事件或Vuex。
$ root发出 ($root emit)
The thing with custom events emitted from child is that they will travel only up to parent level, or more accurately — they will be emitted on child instance and then you can listen on parent level for those events. Now, in cases such as our little example, $root emit doesn’t make much sense, but let’s say you want to catch an event emitted from grand-grand-grand-child, or some such deeply nested component, it would be tedious to emit custom event to parent, and then make that parent to emit event to its parent and so on. In these cases it would be better to use $root.$emit or your own custom event bus (we’ll cover that later).
从子级发出的自定义事件的原因是它们只会传播到父级,或更准确地说,它们将在子实例上发出,然后您可以在父级侦听这些事件。 现在,在诸如我们的小示例之类的情况下,$ root发出并没有多大意义,但假设您要捕获从grand-grand-child-child或某些此类深层嵌套的组件发出的事件,那将很乏味向父对象发送自定义事件,然后使该父对象向其父对象发送事件,依此类推。 在这些情况下,最好使用$ root。$ emit或您自己的自定义事件总线(稍后再介绍)。
Just a small digression here, remember how we used $child and $parent in our previous examples? Those represent component instances relative to where they were used. $root is also a component instance, but it’s the root instance (usually App.vue) and it will be the same no matter where you used it.
这里只是一个小题外话,还记得我们在前面的示例中如何使用$ child和$ parent吗? 这些代表相对于使用它们的位置的组件实例。 $ root也是一个组件实例,但是它是根实例(通常是App.vue),无论您在何处使用它都相同。
To emit a root event, we would do something like this
要发出根事件,我们将执行以下操作
this.$root.$emit(‘my-custom-event’)That event will be then emitted on root instance and to catch it, we need to set a listener to root instance also. This is usually done in created hook, and the code can look something like this:
然后,该事件将在根实例上发出并捕获,我们还需要为根实例设置一个侦听器。 这通常是在创建的挂钩中完成的,代码看起来可能像这样:
created () {
  this.$root.$on('my-custom-event', () => {
    // do something on this event
  }
}
As the root instance is the same in all other components, you can set this listener wherever you need it — it will work in both parent and child components.
由于根实例在所有其他组件中都是相同的,因此您可以在任何需要的地方设置此侦听器-它在父组件和子组件中都可以使用。
Now, I don’t think this is a bad practice per se, but you should be careful when using it, it can be slow in a big project and there are better solutions in these situations, like Vuex or custom event bus.
现在,我认为这本身并不是一个坏习惯,但是在使用它时应该小心,它在大型项目中可能会变慢,并且在这种情况下有更好的解决方案,例如Vuex或自定义事件总线。
自定义事件总线 (Custom event bus)
When you have multiple components that need to communicate with each other, custom event bus is a nice and easy way to achieve this.
当您有多个需要相互通信的组件时,自定义事件总线是实现此目标的简便方法。
Let’s see how that would work on our previous example. First, you need to create an ES6 module that imports Vue and exports it as a constant.
让我们看看在前面的示例中该如何工作。 首先,您需要创建一个导入Vue并将其导出为常量的ES6模块。
import Vue from 'vue'


const CustomEventBus = new Vue()
export default CustomEventBus
Then, you need to import that into both your child component that will emit custom event, and the component that should receive it. I’m using child and parent components here, but this will work between any two components.
然后,您需要将其导入将发出自定义事件的子组件和应接收该事件的组件。 我在这里使用子级和父级组件,但这在任何两个组件之间都可以使用。
<template>
  <div class="click-counter">
    You clicked {{$props.counter}} {{$props.counter !== 1 ? 'times' : 'time'}}
  </div>
</template>


<script>
import CustomEventBus from '../config/customEventBus'
export default {
  name: 'ClickCounter',
  props: {
    counter: {
      type: [String, Number],
      default: 0
    }
  },
  watch: {
    counter: {
      handler (newVal) {
        if (newVal > 5) {
          CustomEventBus.$emit('custom-event')
        }
      }
    }
  }
}
</script>
<template>
<div class="home">
<click-counter :counter="clickCount"/>
<button @click="increaseCounter">Increase count</button>
<p class="message" v-show="messageShown">You have clicked button more than 5 times!</p>
</div>
</template>
<script>
import ClickCounter from '../components/ClickCounter'
import CustomEventBus from '../config/customEventBus'
export default {
name: 'Home',
components: { ClickCounter },
created () {
CustomEventBus.$on('custom-event', () => {
this.showMessage()
})
},
data () {
return {
clickCount: 0,
messageShown: false
}
},
methods: {
increaseCounter () {
this.clickCount++
},
showMessage () {
this.messageShown = true
}
}
}What we did here is we created a separate Vue instance which we are using to attach our custom events. It’s sort of like a separate, empty lane where you can send and catch events.
我们在这里所做的是创建了一个单独的Vue实例,该实例用于附加自定义事件。 这有点像一个单独的空白通道,您可以在其中发送和捕获事件。
You can see it’s similar to $root event, but here we are not attaching events to our main Vue instance, so performance should be better, especially in large projects.
您可以看到它类似于$ root事件,但是这里我们没有将事件附加到我们的主要Vue实例,因此性能应该更好,尤其是在大型项目中。
The main danger here is if you duplicate your event names, so it’s a good idea to come up with a strategy to avoid that, for example, make a convention for naming your events so you know what they do and where they come from. In our example, we could name our event as ‘counter:limit-reached’. That way we know what it does and it’s less likely we’ll duplicate our event name.
这里的主要危险是,如果您重复事件名称,那么想出一个避免这种情况的策略是个好主意,例如,制定一个命名事件的约定,这样您就可以知道它们的作用以及它们的来源。 在我们的示例中,我们可以将事件命名为“ counter:limit-reached”。 这样我们就知道它在做什么,并且我们不太可能重复我们的事件名称。
Also, although there is no limit on how many new Vue instances and event buses you can create, it’s probably best to keep it at just one.
同样,尽管可以创建多少个新的Vue实例和事件总线没有限制,但最好将其保持在一个。
威克斯 (Vuex)
You have probably heard by now about Vuex. It’s a well-known state management pattern and library for VueJS that is design to tackle the more complex projects where you have multiple components sharing and using the same data.
您现在可能已经听说了Vuex。 这是VueJS的著名状态管理模式和库,旨在解决更复杂的项目,在这些项目中您需要多个组件共享并使用相同的数据。
You can think of it as a local storage for your application, only it’s more powerful. With it, you can store, modify and read data from one component, and react to those changes in another component that could be far away in a component tree.
您可以将其视为应用程序的本地存储,只是功能更强大。 使用它,您可以存储,修改和读取一个组件中的数据,并对另一个组件中的更改做出React,这些更改可能在组件树中距离很远。
Vuex is another kind of monster and there’s simply no room here to write about everything it can do, but if you are writing anything more complex than a to do list app, it’s likely you’re gonna need it.
Vuex是另一种怪物,这里简直没有空间来写它可以做的所有事情,但是如果您编写的内容比待办事项应用程序还要复杂,那么您可能会需要它。
When working with it, I’d like to suggest that you always use Vuex modules, it’s a great way to keep you code organized and easier to maintain.
在使用它时,我想建议您始终使用Vuex模块,这是使代码井井有条且易于维护的好方法。
So, how can we use it in the example we had so far? I’m going to show you how to do it with modules, although it’s a bit of overkill for this example, you should get the idea of its advantages.
那么,如何在到目前为止的示例中使用它呢? 我将向您展示如何使用模块来完成此操作,尽管此示例有些过分,但您应该了解其优点。
First, this is how the code structure for Vuex with modules looks in most of my projects. You can see I have a folder ‘store’ and in it a folder named ‘modules’ where I keep my modules in charge for different parts of the application. Lastly, there’s an ‘index.js’ file that imports all this and connects everything.
首先,这就是我的大多数项目中带有模块的Vuex的代码结构的外观。 您可以看到我有一个文件夹“ store”,在其中有一个名为“ modules”的文件夹,在该文件夹中,我的模块负责应用程序的不同部分。 最后,有一个“ index.js”文件,可导入所有内容并连接所有内容。

This is how our module for counter can look like — it has a state for both counter and message, getters that we’ll use to show our state and actions that will commit the changes:
这就是我们的计数器模块的样子—它具有计数器和消息的状态,我们将使用getter来显示状态以及将提交更改的动作:
export default {
  namespaced: true,
  state: {
    numberOfClicks: 0,
    messageShown: false
  },
  getters: {
    getNumberOfClicks: state => state.numberOfClicks,
    isMessageShown: state => state.numberOfClicks > 5
  },
  mutations: {
    INCREASE_CLICK_NUMBER (state) {
      state.numberOfClicks++
    }
  },
  actions: {
    increaseClicks ({ commit }) {
      commit('INCREASE_CLICK_NUMBER')
    }
  }
}
And imported in index.js for store
并导入到index.js中进行存储
import Vue from 'vue'
import Vuex from 'vuex'
import counter from './modules/counter'


Vue.use(Vuex)


export default new Vuex.Store({
  modules: {
    counter
  }
})
Let’s see how our components will look like when adapted to use Vuex
让我们看看我们的组件在适应使用Vuex时的外观
<template>
  <div class="click-counter">
    You clicked {{getNumberOfClicks}} {{getNumberOfClicks !== 1 ? 'times' : 'time'}}
  </div>
</template>


<script>
import { mapGetters, mapActions } from 'vuex'
export default {
  name: 'ClickCounter',
  computed: {
    ...mapGetters('counter', ['getNumberOfClicks'])
  },
  methods: {
    ...mapActions('counter', ['showMessage'])
  }
}
</script>
<template>
<div class="home">
<click-counter/>
<button @click="increaseClicks">Increase count</button>
<p class="message" v-show="isMessageShown">You have clicked button more than 5 times!</p>
</div>
</template>
<script>
import ClickCounter from '../components/ClickCounter'
import { mapGetters, mapActions } from 'vuex'
export default {
name: 'Home',
components: { ClickCounter },
computed: {
...mapGetters('counter', ['isMessageShown'])
},
methods: {
...mapActions('counter', ['increaseClicks'])
}
}
</script>As you can see, I got rid of all the login in components, it’s all controlled by Vuex now. I can call action to increase clicks or show the current number of it without having to pass any props or events and from any component I want (as long as I include mapActions and mapGetters Vuex helpers).
如您所见,我摆脱了组件中的所有登录,现在全部由Vuex控制。 我可以调用action来增加点击次数或显示其当前数量,而不必传递任何道具或事件以及不需要的任何组件(只要我包括mapActions和mapGetters Vuex帮助器)。
最后,结束! (Finally, the end!)
I hope that I was able to explain in an understandable way different concepts of communication between components and that you will be able to use this in your apps. Of course, it all boils down to the needs of your application, you will probably not use all of these in your app, but whatever you use, keep it consistent.
我希望我能够以一种可以理解的方式来解释组件之间通信的不同概念,并且您将能够在您的应用程序中使用它。 当然,所有这些都归结为应用程序的需求,您可能不会在应用程序中使用所有这些功能,但是无论使用什么,都要保持一致。
While writing this I remembered a few more crazy ways to pass data, like accessing the DOM element directly and changing value, or sending it to data attributes, but that’s simply absurd to do with modern JS frameworks.
在撰写本文时,我想起了一些更疯狂的方式来传递数据,例如直接访问DOM元素并更改值,或将其发送到数据属性,但这与现代JS框架完全荒谬。
Remember to keep things simple, but always keep in mind code maintainability — you or your colleagues must be able to recognize what the code does and how it’s doing it.
记住要使事情简单,但要始终牢记代码的可维护性-您或您的同事必须能够识别代码的作用及其执行方式。
翻译自: https://medium.com/the-innovation/communication-between-components-in-vuejs-b41d9e8be9c4
vue中组件之间的通信


 131
131

 被折叠的 条评论
为什么被折叠?
被折叠的 条评论
为什么被折叠?
 到【灌水乐园】发言


