


I recently came across this situation where I had to deep link an app in React Native. After googling a lot, I realised that there’s a lack of up-to-date tutorials out there. So as I had a bunch of issues trying to figure this out I decided to write something on that subject.
我最近遇到了这种情况,我不得不在React Native中深度链接一个应用程序。 经过大量的搜索之后,我意识到那里缺少最新的教程。 因此,当我遇到很多问题要弄清楚这一点时,我决定就该主题写一些东西。
So the point here is to create a link that should led us directly to our app and also be able to takes us to some specific section inside of it. For example, if you want to share some content on the app, all you’ll have to do is to share a link that should be something like nameapp://post/{id}. So that link should open the app and navigate us to some specific post inside our app, that’s our goal.
因此,这里的重点是创建一个链接,该链接应将我们直接带到我们的应用程序,并能够将我们带到其中的某些特定部分。 例如,如果您想在应用程序上共享某些内容,您要做的就是共享一个链接,该链接应该类似于nameapp:// post / {id} 。 因此,该链接应打开该应用程序,并导航到我们应用程序内的某个特定帖子,这就是我们的目标。
I’d like to take as reference the article written by Nader Dabit that helped me a lot to build my own deep link. Now let’s write an updated version using React Hooks, functional components and all that new good stuff.
我想参考Nader Dabit撰写的文章,该文章对我建立自己的深层链接有很大帮助。 现在,让我们使用React Hooks,功能组件和所有这些新的好东西来编写更新的版本。
First of all we create a new RN project, at the moment I write this article the latest stable version is 0.62.2.
首先,我们创建一个新的RN项目,目前,我撰写本文时,最新的稳定版本是0.62.2。
npx react-native init DeepLink --version 0.62.2Once the project is created lets install react-navigation package to handle our navigation. As we are using version 5.x we have to install it as follows:
创建项目后,让我们安装react-navigation软件包来处理我们的导航。 在使用5.x版本时,我们必须按以下步骤安装它:
npm install @react-navigation/nativenpm install react-native-reanimated react-native-gesture-handler react-native-screens react-native-safe-area-context @react-native-community/masked-viewnpm install @react-navigation/stacknpx pod-install iosAdd this line at the very top of your entry file (index.js or App.js) to initialise the package:
在输入文件(index.js或App.js)的最顶部添加以下行以初始化程序包:
import 'react-native-gesture-handler';Now the project is ready to go. if you’re getting any issue installing the package please check react navigation docs. Now we go ahead and create Home.js and Post.js files. Let’s start by our routing at App.js file by creating a simple navigation stack and importing the files we just created.
现在该项目已准备就绪。 如果您在安装软件包时遇到任何问题,请查看react navigation docs 。 现在,我们继续创建Home.js和Post.js文件。 让我们从创建App.js文件的路由开始,创建一个简单的导航堆栈并导入我们刚刚创建的文件。
设置基础项目 (Setting Up the Base Project)
// App.js
import React from 'react';
import { NavigationContainer } from '@react-navigation/native';
import { createStackNavigator } from '@react-navigation/stack';
import Home from './Home';
import Post from './Post';const Stack = createStackNavigator();const App = () => {
 return (
   <NavigationContainer>
     <Stack.Navigator initialRouteName={'Home'}>
       <Stack.Screen name="Home" component={Home} />
       <Stack.Screen name="Post" component={Post} />
     </Stack.Navigator>
   </NavigationContainer>
  );
};export default App;
At the Home.js file we're going to create a list of posts in order to navigate inside of each of them. So we have a simple list, each item has a press event where we pass the element itself as parameter to our Post.js file. So, our Home should look like this:
在Home.js文件中,我们将创建一个帖子列表,以便在每个帖子的内部进行导航。 因此,我们有一个简单的列表,每个项目都有一个press事件,我们将元素本身作为参数传递给Post.js文件。 因此,我们的首页应如下所示:
// Home.js
import React, { useEffect } from 'react';import { View, FlatList, TouchableOpacity, Text, Image, StyleSheet, Linking, Platform } from 'react-native';const posts = [
 {
   id: 1,
   character: "Michael Scott",
   quote: "That's what she said.",
   pic: require("./assets/michael-scott.jpeg")
 },
 {
   id: 2,
   character: "Dwight Schrute",
   quote: "Any time I'm about to do something, I think to myself 'Would an idiot do that?' and if the answer is yes, I do not do that thing.",
   pic: require("./assets/dwight-schrute.jpg")
  },
  {
   id: 3,
   character: "Andy Bernard",
   quote: "I'm always thinking one step ahead, like a carpenter who makes stairs.",
   pic: require("./assets/andy-bernard.jpg")
  },
  {
   id: 4,
   character: "Kelly Kapoor",
   quote: "I am one of the few people who looks hot eating a cupcake.",
   pic: require("./assets/kelly-kapoor.jpg")
  },
  {
   id: 5,
   character: "Kevin Malone",
   quote: "When I President, they see. They see.",
   pic: require("./assets/kevin-malone.jpg")
  },
  {
   id: 6,
   character: "Angela Martin",
   quote: "I think green is kind of whorish.",
   pic: require("./assets/angela-martin.jpeg")
  }
]const Home = ({ navigation }) => {useEffect(() => {
      Linking.getInitialURL().then(url => {
         navigateHandler(url);
      });
      if (Platform.OS === 'ios') {
         Linking.addEventListener('url', handleOpenURL);
      }
      return () => {
         if (Platform.OS === 'ios') {
           Linking.removeEventListener('url', handleOpenURL);
         }
      };
   }, [])   const handleOpenURL = (event) => {
      navigateHandler(event.url);
   }   const navigateHandler = async (url) => {
      if (url) {
         const { navigate } = navigation;
         const route = url.replace(/.*?:\/\//g, '');
         const id = route.match(/\/([^\/]+)\/?$/)[1];
         const post = posts.find(item => item.id === id);
         navigate('Post', { post: post });
      }
   }   const { row, image, title, separator, container } = styles;
   return (
      <View style={container}>
        <FlatList
          data={posts}
          keyExtractor={(item) => item.id.toString()}
          renderItem={({ item }) => (
            <TouchableOpacity onPress={() => navigation.navigate('Post', { post: item })}>
              <View style={row}>
                <Image source={item.pic} style={image} resizeMode="cover" />
                <Text style={title}>{item.character}</Text>
              </View>
            </TouchableOpacity>
           )}
          ItemSeparatorComponent={() => (
             <View style={separator} />
          )}
        />
      </View>
    );
};const styles = StyleSheet.create({
  container: {
     flex: 1,
     backgroundColor: 'white'
  },
  row: {
     flexDirection: 'row',
     alignItems: 'center'
  },
  image: {
     height: 80,
     width: 80
  },
  title: {
     fontSize: 16,
     color: 'black',
     margin: 10
  },
  separator: {
     backgroundColor: "rgba(0,0,0,0.5)",
     height: 0.5,
     width: '100%'
  }
})export default Home;
In Post.js all we have to do is to get the parameter from the route and display the post we chose.
在Post.js中,我们要做的就是从路径中获取参数并显示我们选择的帖子。
// Post.js
import React from 'react';
import { View, Image, Text, StyleSheet } from 'react-native';const Post = ({ route }) => {
const { post } = route.params;
const { container, quote, image } = styles;
return (
<View style={container}>
<Image source={post.pic} style={image} resizeMode="cover" />
<Text style={quote}>"{post.quote}"</Text>
</View>
);
};const styles = StyleSheet.create({
container: {
flex: 1,
backgroundColor: 'white'
},
image: {
height: 200,
width: '100%'
},
quote: {
fontSize: 16,
color: 'black',
margin: 20,
textAlign: 'center',
fontStyle: 'italic'
},
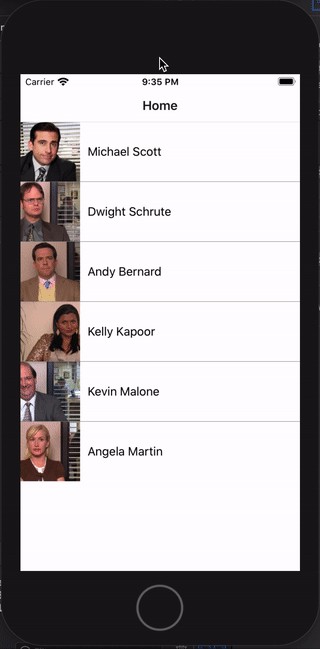
})export default Post;So now our app should be as nice as this:
所以现在我们的应用程序应该像这样:
Now we're ready to start playing with deep linking.
现在,我们准备开始使用深层链接。
As you may have noticed, in Home.js file, the section bellow will be responsible to catch the url when our first component is being mounted, then once we got the url all we have to do is to parse it and get the post id.
您可能已经注意到,在Home.js文件中,下面的部分将在安装第一个组件时负责捕获url,然后一旦获得url,我们要做的就是解析它并获取发布ID。 。
In this piace of code we catch the url inside useEffect when the component is mounted. If we are on iOS we add the event listener handleOpenURL to catch the event that contains the url and then call the our navigateHandler function and remove it in the arrow function return if the component is about to unmount. On the other hand, if we are on Android we call navigateHandler function immediately through Linking.getInitialURL function, so there we parse the url to extract the id from it and navigate passing it as parameter to the Post component.
在这一系列代码中,安装组件时,我们在useEffect中捕获了URL。 如果我们在iOS上,我们添加监听handleOpenURL事件捕捉包含URL事件,然后调用我们的navigateHandler功能,如果组件即将卸载删除箭头函数返回。 在另一方面,如果我们在Android上,我们称之为navigateHandler功能立即通过Linking.getInitialURL功能,所以我们解析URL,从中提取的ID和导航将它作为参数传递给邮政组件。
// Home.js...useEffect(() => {
      Linking.getInitialURL().then(url => {
         navigateHandler(url);
      });
      if (Platform.OS === 'ios') {
         Linking.addEventListener('url', handleOpenURL);
      }
      return () => {
         if (Platform.OS === 'ios') {
           Linking.removeEventListener('url', handleOpenURL);
         }
      };
   }, [])const handleOpenURL = (event) => {
      navigateHandler(event.url);
   }const navigateHandler = async (url) => {
      if (url) {
         const { navigate } = navigation;
         const route = url.replace(/.*?:\/\//g, '');
         const id = route.match(/\/([^\/]+)\/?$/)[1];
         const post = posts.find(item => item.id == id);
         navigate('Post', { post: post });
      }
   }...
配置iOS (Configuring iOS)
1.编辑Info.plist (1. Editing Info.plist)
Now we're gonna open up the .xcworkspace file that lives inside our /ios folder and edit the info.plist file.
现在,我们将打开/ ios文件夹中的.xcworkspace文件,然后编辑info.plist文件。
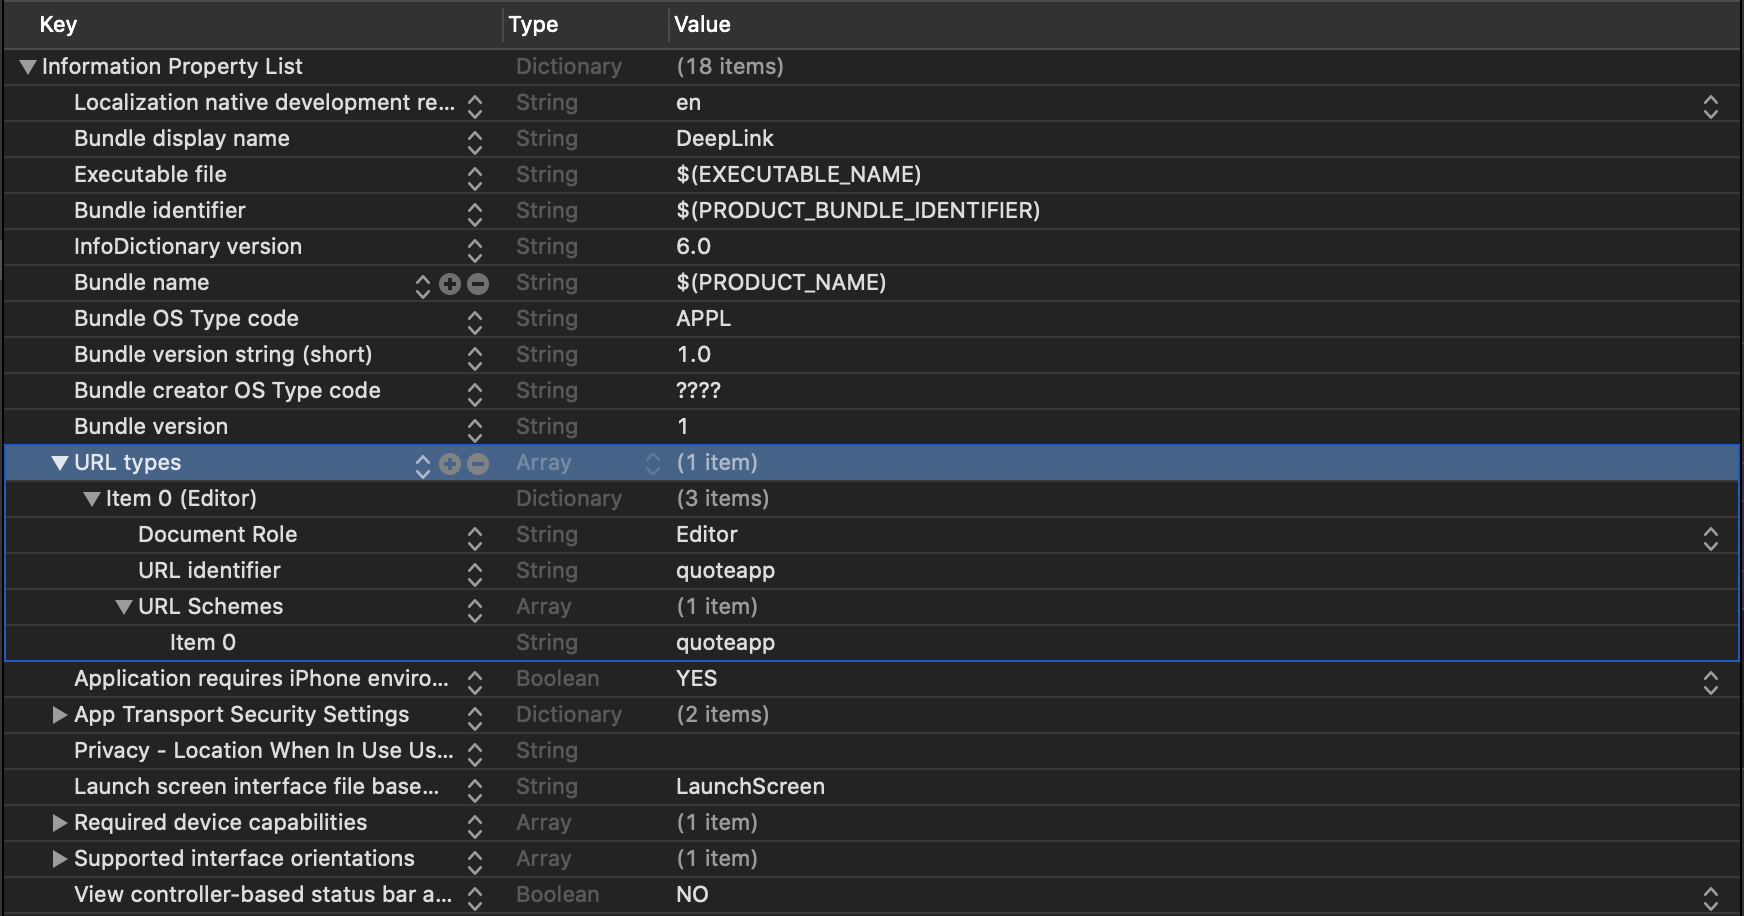
By default it comes as a property list so you'll have to create a new property called URL types. We expand it, create an URL identifier and give it the value of the domain for the deep linking, so in this app our url will be something like quoteapp://…
默认情况下,它作为属性列表出现,因此您必须创建一个称为URL types的新属性。 我们将其展开,创建一个URL标识符,并为其提供深层链接的域值,因此在此应用中,我们的url将类似于quoteapp://…。
Finally we create another property called URL Schemes, we expand it and for the item 0 we set again our domain name: quoteapp. In the end our info.plist should look like this.
最后,我们创建另一个名为URL Schemes的属性,将其展开,并为项目0再次设置域名:quoteapp。 最后,我们的info.plist应该看起来像这样。
Instead of that, if you want, you can right click on the info.plist file, choose to open it as source code and add these following lines to it:
相反,如果需要,可以右键单击info.plist文件,选择将其作为源代码打开,并在其中添加以下几行:
//info.plist
...
<key>CFBundleURLTypes</key>
<array>
  <dict>
    <key>CFBundleTypeRole</key>
    <string>Editor</string>
    <key>CFBundleURLName</key>
    <string>quoteapp</string>
    <key>CFBundleURLSchemes</key>
      <array>
        <string>quoteapp</string>
      </array>
  </dict>
</array>
... 2.编辑AppDelegate.m (2. Editing AppDelegate.m)
At the top of the AppDelegate.m we import the following line:
在AppDelegate.m的顶部,我们导入以下行:
#import <React/RCTLinkingManager.h>And right after @implementation AppDelegate we add this code:
在@implementation AppDelegate之后,我们添加以下代码:
- (BOOL)application:(UIApplication *)application openURL:(NSURL *)url
  sourceApplication:(NSString *)sourceApplication annotation:(id)annotation
{
  return [RCTLinkingManager application:application openURL:url
                      sourceApplication:sourceApplication annotation:annotation];
}


// Only if your app is using [Universal Links](https://developer.apple.com/library/prerelease/ios/documentation/General/Conceptual/AppSearch/UniversalLinks.html).
- (BOOL)application:(UIApplication *)application continueUserActivity:(NSUserActivity *)userActivity
 restorationHandler:(void (^)(NSArray * _Nullable))restorationHandler
{
 return [RCTLinkingManager application:application
                  continueUserActivity:userActivity
                    restorationHandler:restorationHandler];
}3.编辑信息标签(3. Editing the Info tab)
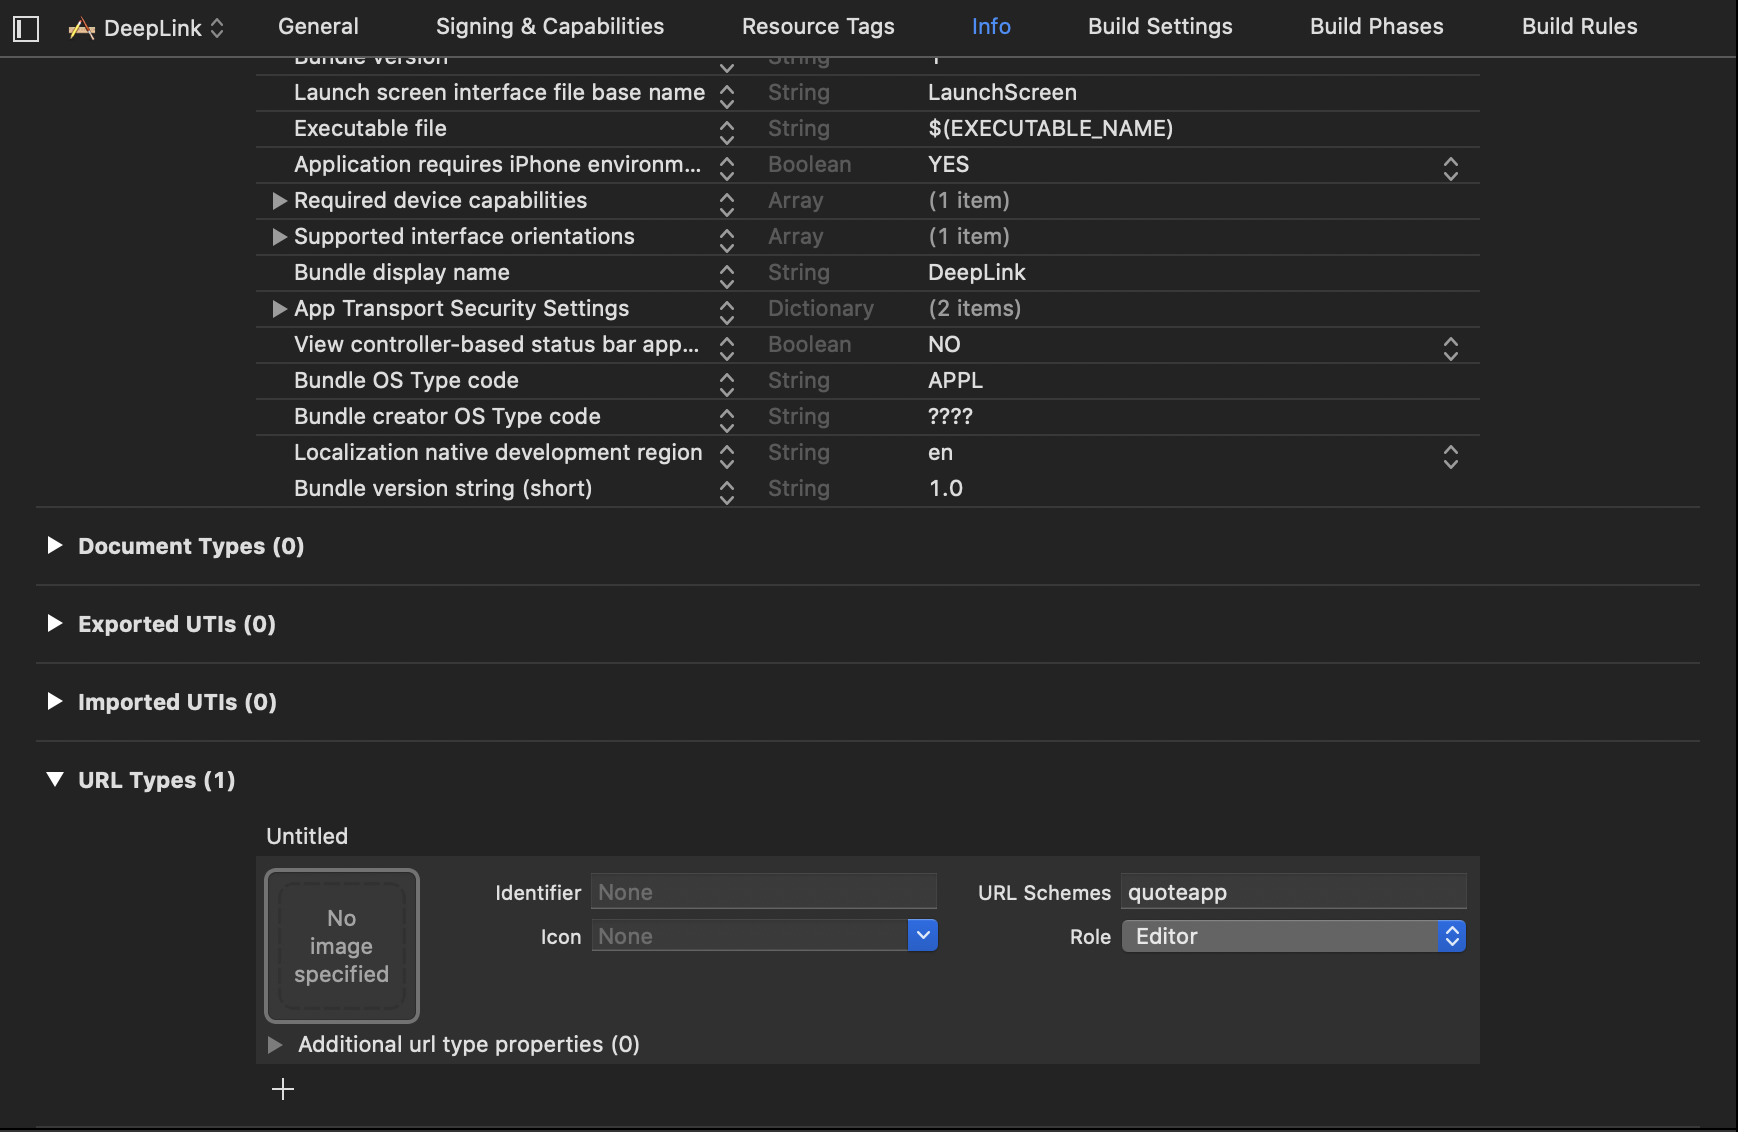
At the top of the project navigator in Xcode, click on the Info tab. You'll find the the section URL Types, so we fill the URL Schemes with your app's domain name.
在Xcode项目导航器的顶部,单击“信息”选项卡。 您会在“ URL类型”部分中找到,因此我们在URL方案中填充了您应用的域名。
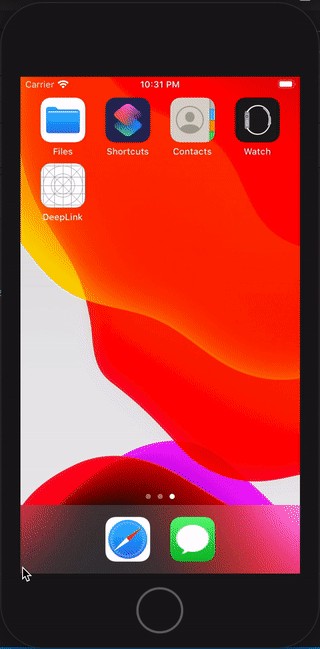
So there should be it, now we can navigate to the following link. Let's give it a try and open up the navigator adding the following url:
这样就可以了,现在我们可以导航到以下链接。 让我们尝试一下,打开导航器并添加以下URL:
quoteapp://post/1So this should navigate us to the post with id 1, hence, our first post, that contains our first quote.
因此,这应该将我们导航到ID为1的帖子,因此是我们的第一篇帖子,其中包含我们的第一句引号。
配置Android (Configuring Android)
1.编辑AndroidManifest.xml (1. Editing AndroidManifest.xml)
For Android is a much simpler process. The main configuration we have to do is on AndroidManifest.xml file which you can find in android/app/src/main/AndroidManifest.xml.
对于Android,这是一个简单得多的过程。 我们要做的主要配置是在AndroidManifest.xml文件中,您可以在android / app / src / main / AndroidManifest.xml中找到该文件。
So within the activity tag you'll add another <intent-filter> tag block where the <data> tag should contain your domain's name(quoteapp) as scheme and the app's section as post in this case, so we'll be able to use the same domain quoteapp://post we used in iOS.
因此,在活动标记内,您将添加另一个< intent-filter>标记块,在这种情况下,< data>标记应包含您域名的名称(quoteapp)作为方案,而应用部分应作为帖子,这样我们就可以使用我们在iOS中使用的相同域quoteapp:// post 。
...
<intent-filter android:label="filter_react_native">
<action android:name="android.intent.action.VIEW" />
<category android:name="android.intent.category.DEFAULT" />
<category android:name="android.intent.category.BROWSABLE" />
<data android:scheme="quoteapp" android:host="post" />
</intent-filter>
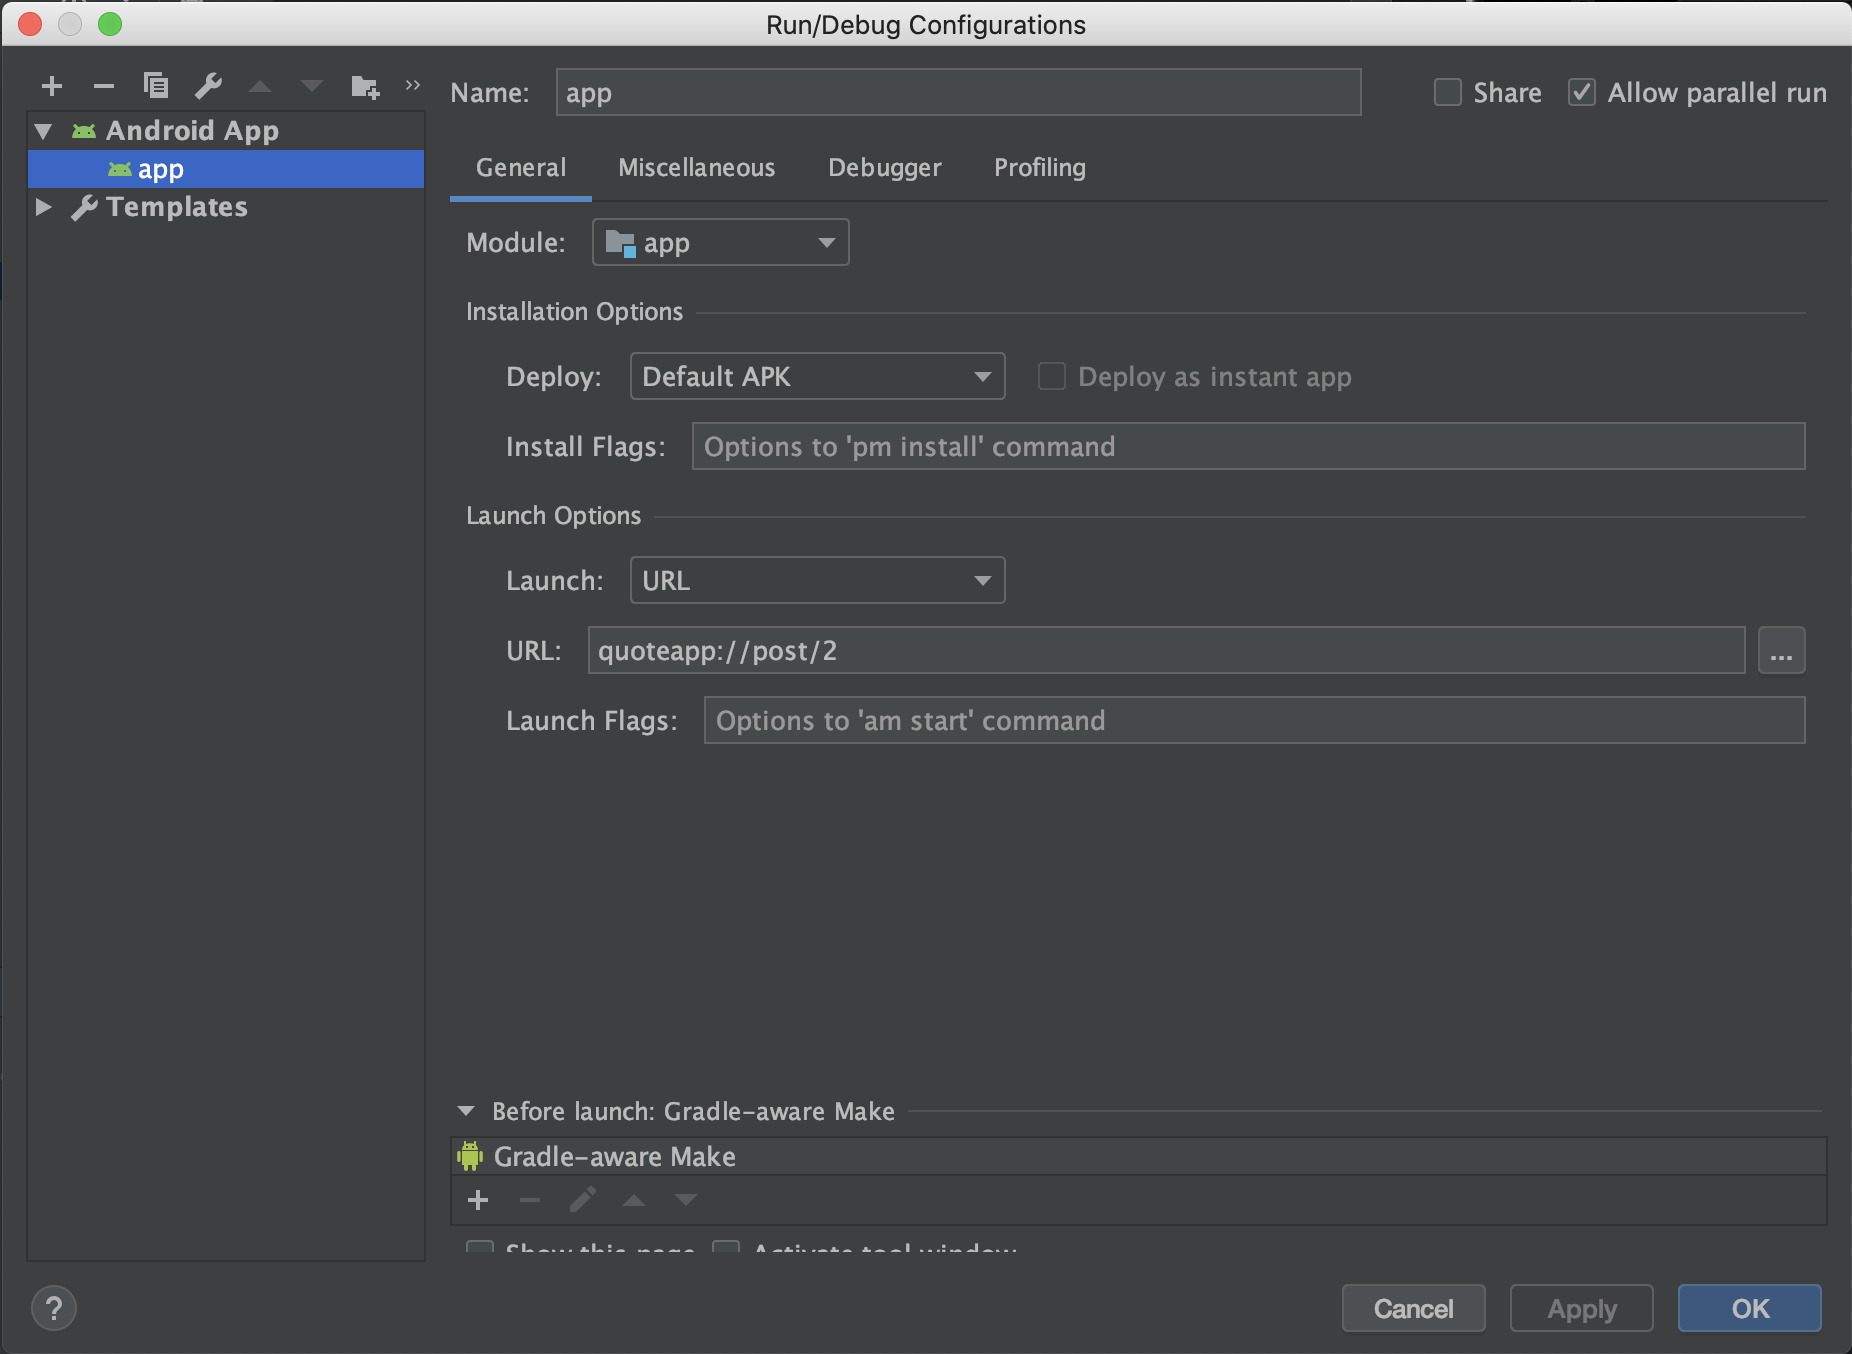
...To test it out you'll have to open the project on Android Studio instead of running it on browser, because it won't work. So, once you have the project open, click on Run -> Edit Configurations and change Launch Option. Set Launch to URL and right below it set the URL as your app domain's name.
要对其进行测试,您将不得不在Android Studio上打开该项目,而不是在浏览器上运行该项目,因为它将无法正常工作。 因此,打开项目后,单击运行->编辑配置,然后更改启动选项。 将启动设置为URL,然后在其下方将URL设置为您的应用程序域的名称。
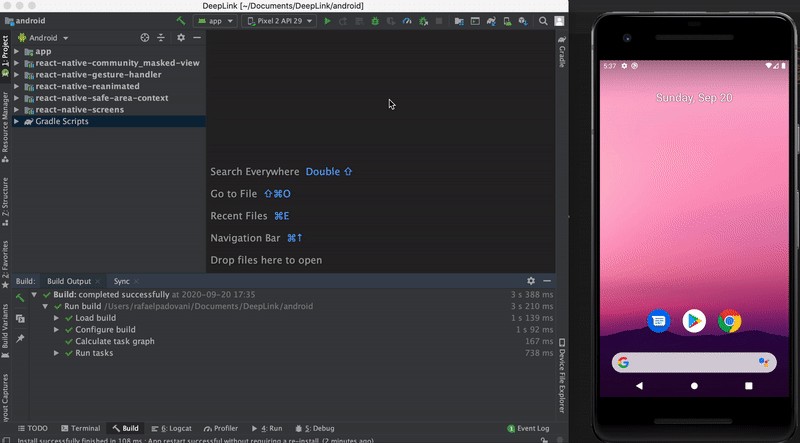
Now every time you run your app, Android is going to use that URL to launch the app instead of the default activity. Once the app is open through that URL we are able to catch it in our useEffect hook when component is mounted so you'll be able navigate as we want. So now if you run the app through Android Studio it should be working nicely:
现在,每次您运行应用程序时,Android都会使用该URL来启动应用程序,而不是默认活动。 通过该URL打开应用程序后,我们便可以在安装组件时在useEffect挂钩中捕获该应用程序,以便您可以根据需要进行导航。 因此,现在如果您通过Android Studio运行该应用程序,则应该可以正常运行:
So that's it. With these configurations it should work both in background mode or even if the app is killed.
就是这样了。 通过这些配置,它应该可以在后台模式下运行,甚至即使该应用被终止也可以运行。
I hope you have enjoyed this article and that it could be useful as well. Don't forget to share it and help the community, especially if you know someone who's struggling with deep links in React Native.
希望您喜欢这篇文章,并且对您有所帮助。 不要忘记分享它并为社区提供帮助,特别是如果您认识某个人在React Native中与深层链接作斗争时。
翻译自: https://medium.com/@rafael.rpadovani/creating-deep-links-in-react-native-f6680dd959a9


 2895
2895

 被折叠的 条评论
为什么被折叠?
被折叠的 条评论
为什么被折叠?
 到【灌水乐园】发言


