


react状态管理
React技巧(React Tips)
In this article we will explore two ways of tracking state using a simple registration form.
在本文中,我们将探讨使用简单的注册表单跟踪状态的两种方法。
The user enters their name, email address and a password and we keep track of state in two different ways.
用户输入他们的姓名,电子邮件地址和密码,然后我们以两种不同的方式跟踪状态。
- The first way will be to use the useState hook for each input field. 第一种方法是对每个输入字段使用useState挂钩。
- The second way will be to use a user object and a single useState hook with the user object. 第二种方法是将用户对象和单个useState挂钩与用户对象一起使用。
Both are valid ways but the second may be preferred for larger forms.
两种方法都是有效的方法,但是对于较大的形式,第二种方法可能是首选。
让我们开始吧 (Let’s Get Started)
You can use an existing React project (I often keep a “SandBox” application for experimenting) or bootstrap a new project.
您可以使用现有的React项目(我经常保留一个“ SandBox”应用程序进行实验)或引导一个新项目。
创建一个新项目 (Creating a New Project)
- Create a directory in which to place your application.创建用于放置应用程序的目录。
- Start VS Code (or desired editor) and open the folder you just created. 启动VS Code(或所需的编辑器),然后打开刚刚创建的文件夹。
- Open a Terminal window and enter this code to bootstrap our React app. 打开一个终端窗口并输入以下代码以引导我们的React应用程序。
npx create-react-app usestate-formsNext we need to change in to this directory and run npm start to start the development server to verify it is running our React app. By default this will be on localhost port 3000.
接下来,我们需要切换到该目录并运行npm start来启动开发服务器,以验证它是否正在运行我们的React应用。 默认情况下,它将位于本地主机端口3000上。
4. After your application has been bootstrapped type the following in the Terminal.
4.启动应用程序后,在终端中键入以下内容。
cd usestate-forms
npm start
You should see something similar to the image below.
您应该看到类似于下图的内容。

Use CTRL +C to stop the development server and close the browser tab.
使用CTRL + C停止开发服务器并关闭浏览器选项卡。
We will also install bootstrap to afford us some simple styling.
我们还将安装bootstrap以提供一些简单的样式。
1. Type the following in the Terminal window to install bootstrap.
1.在“终端”窗口中键入以下内容以安装引导程序。
npm install bootstrap2. Open App.js and replace the default code with the streamlined code below.
2.打开App.js并将默认代码替换为下面的简化代码。
import React,{useState} from 'react'
import './App.css'const App=()=> {return (
    <div className="App">
     <h1>User Registration</h1>
    </div>
  );
}
export default App;
2. Save and restart the development server.
2.保存并重新启动开发服务器。
npm startYou should just see only the words “User Registration” in the browser.
您应该只在浏览器中看到“用户注册”字样。
创建注册表单组件 (Creating the Registration Form Component)
Create a component in the src folder named RegistrationForm.js
在名为RegistrationForm .js的src文件夹中创建一个组件
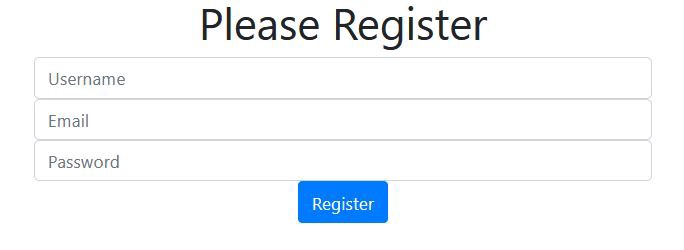
- Add this code to create three input fields in a form along with a Submit button.添加此代码以在表单中创建三个输入字段以及一个Submit按钮。
import React, { useState } from 'react'
import bootstrap from '../node_modules/bootstrap/dist/css/bootstrap.min.css'const RegistrationForm=()=>{return  (

    <div className='row justify-content-center'><div className='col-md-4'>
        <h1>Please Register</h1>
        <form>
            <input
            type="text"
            placeholder="Username"
            name="userName"
            className='form-control'

            />
            <input
            type="email"
            placeholder="Email"
            className='form-control'
            name="email"


            />
            <input
            type="password"
            placeholder="Password"
            name="password"
            className='form-control'

            />

            <input type="submit" value="Register"
             className='btn btn-primary'/>
        </form></div></div>)}
export default RegistrationForm
3. Now import the RegistrationForm component in to App.js
3.现在将RegistrationForm组件导入到App .js中
import React, { useState, useRef , useEffect} from 'react';
import './App.css'import RegistrationForm from './RegistrationForm';const App=()=>{

  return (
    <div className="App">          <RegistrationForm/>   </div>
  );
}export default App;
Save and your application should update to show our Registration Form.
保存,您的应用程序应更新以显示我们的注册表。
治国之道(First Technique Of Managing State)
In the first technique we will track the state of each input separately. This will be done by having a useState hook for each input.
在第一种技术中,我们将分别跟踪每个输入的状态。 这将通过对每个输入使用useState挂钩来完成。
This technique allows us to track state for every input individually. The advantage of this is we do not have to worry about losing state of an input. Yes, you can lose state of an input. This can happen with the second technique if you are not careful.
这种技术使我们可以分别跟踪每个输入的状态。 这样做的好处是我们不必担心丢失输入状态。 是的,您可能会丢失输入状态。 如果您不小心,第二种技术可能会发生这种情况。
First we will create three state values and their setters and then invoke the setters from the onChange event of the appropriate input and use arrow functions to set the state.
首先,我们将创建三个状态值及其设置器,然后从适当输入的onChange事件中调用设置器,并使用箭头函数设置状态。
const [userName, setUserName] = useState("")
const [email, setEmail] = useState("")
const [password, setPassword] = useState("")
and
和
onChange={ev=>{setUserName(ev.target.value)}}
onChange={ev=>{setEmail(ev.target.value)}}
onChange={ev=>{setPassword(ev.target.value)}}- Make the following changes to your RegistrationForm. 对您的RegistrationForm进行以下更改。
import React, { useState } from 'react'
import bootstrap from '../node_modules/bootstrap/dist/css/bootstrap.min.css'const RegistrationForm=()=>{

    const [userName, setUserName] = useState("")
    const [email, setEmail] = useState("")
    const [password, setPassword] = useState("")

    return  (

    <div className='row justify-content-center'><div className='col-md-4'>
        <h1>Please Register</h1>
        <form>
            <input
            type="text"
            placeholder="Username"
            name="userName"
            className='form-control'
            onChange={ev=>{setUserName(ev.target.value)}}
            value={userName}
            />
            <input
            type="email"
            placeholder="Email"
            className='form-control'
            name="email"
            onChange={ev=>{setEmail(ev.target.value)}}
            value={email}

            />
            <input
            type="password"
            placeholder="Password"
            name="password"
            className='form-control'
            onChange={ev=>{setPassword(ev.target.value)}}
            value={password}
            />

            <input type="submit" value="Register"
            className='btn btn-primary'/>
        </form></div></div>)}
export default RegistrationForm
As the user types, the onChange event is triggered and the value being typed is passed in the event (ev) to the state setter for that input. If you do not want to set state for every keystroke, you could use the onBlur event.
当用户键入时,会触发onChange事件,并将键入的值在事件(ev)中传递到该输入的状态设置器。 如果不想为每个按键设置状态,则可以使用onBlur事件。
How do we truly know state is being captured?
我们如何真正知道正在捕获状态?
To verify state is being set, add the following between the last two divs.
要验证是否设置了状态,请在最后两个div之间添加以下内容。
</div>
        {JSON.stringify(userName)}
        {JSON.stringify(email)}
        {JSON.stringify(password)}
</div>
Save and when you type, and move between fields, you will see the values on the screen.
保存,然后键入,并在字段之间移动,您将在屏幕上看到值。
尝试这个! (Try This!)
Comment out the onChange event and the value={} for each input and now try typing. You can type just fine, but state is not managed!
注释掉onChange事件和每个输入的value = {},然后尝试输入。 您可以键入很好,但是状态不受管理!
Also note that you do not have to use an arrow function for the event handler. You could have a JavaScript function and just put that in the onChange. This is useful if you want to perform operations on the data as it is entered. Then set the state in the function. For example, for userName you might have a function like this.
另请注意,您不必为事件处理程序使用箭头功能。 您可能具有JavaScript函数,只需将其放在onChange中即可。 如果要在输入数据时对数据执行操作,这将很有用。 然后在功能中设置状态。 例如,对于userName,您可能具有这样的功能。
const userNameHandler=(ev)=>{
// Do stuff
setUserName(ev.target.value)
}
const userNameHandler = {ev)=> { // 做东西setUserName(ev.target.value) }
and the onChange lie this.
而onChange就是这个。
onChange={userNameHandler}
onChange = {userNameHandler}
Finally we should have handle an onSubmit event for the form by creating a handler for this. Modify the RegistrationForm with the items in bold.
最后,我们应该为此创建一个处理程序来处理表单的onSubmit事件。 用粗体项目修改RegistrationForm。
import React, { useState } from 'react'
import bootstrap from '../node_modules/bootstrap/dist/css/bootstrap.min.css'const RegistrationForm=()=>{
    const [userName, setUserName] = useState("")
    const [email, setEmail] = useState("")
    const [password, setPassword] = useState("")

     const formHandler=(ev)=>{        ev.preventDefault();        if (userName==='' || email==='' || password===''){
            alert('Please fill in all fields')       }else{
            alert(`Welcome ${userName}`)
            setUserName('')
            setEmail('')
            setPassword('')
        }
    }
    return  (

    <div className='row justify-content-center'><div className='col-md-4'>
        <h1>Please Register</h1>
        <form onSubmit={formHandler}>
            <input
            type="text"
            placeholder="Username"
            name="userName"
            className='form-control'
            onChange={ev=>{setUserName(ev.target.value)}}
            value={userName}
            />
            <input
            type="email"
            placeholder="Email"
            className='form-control'
            name="email"
            onChange={ev=>{setEmail(ev.target.value)}}
            value={email}

            />
            <input
            type="password"
            placeholder="Password"
            name="password"
            className='form-control'
            onChange={ev=>{setPassword(ev.target.value)}}
            value={password}
            />

            <input type="submit" value="Register"
            className='btn btn-primary'/>
        </form></div>

    </div>)}
export default RegistrationForm
The first line of formHandler is ev.preventDefault(). This is important to make sure the page isn’t being reloaded (default behavior) if you were to actually send this data somewhere.
formHandler的第一行是ev.preventDefault ()。 如果要实际将数据发送到某个地方,这对于确保不重新加载页面(默认行为)非常重要。
In case you were wondering why we had value={userName}, etc. for each input. It was so we could clear the form after submit, e.g, setUserName(‘’), etc.
如果您想知道为什么每个输入都有value = {userName}等。 这样我们就可以在提交后清除表单,例如setUserName('')等。
治国之道 (Second Technique Of Managing State)
In the second technique we will not have a useState hook to capture state for each input individually but a user object, userObj, containing userName, email and password; and a single useState to update this object.
在第二种技术中,我们将没有useState挂钩来分别捕获每个输入的状态,而是拥有一个包含userName,email和password的用户对象userObj。 和一个useState来更新此对象。
For this you can create a RegistrationForm2.js, copy the code from RegistrationForm and alter it. If you do this, don’t forget to import RegistrationForm2 in App.js
为此,您可以创建RegistrationForm2.js,从RegistrationForm复制代码并进行更改。 如果这样做,请不要忘记在App.js中导入RegistrationForm2
I am going to modify the existing RegistrationForm.js.
我将修改现有的RegistrationForm.js。
- In RegistrationForm, we delete the useState statements, the onChange events and value={} statements for each input as well as the contents of the formHandler function. Finally we create a user object, userObj. 在RegistrationForm中,我们为每个输入以及formHandler函数的内容删除useState语句,onChange事件和value = {}语句。 最后,我们创建一个用户对象userObj。
import React, { useState } from 'react'
import bootstrap from '../node_modules/bootstrap/dist/css/bootstrap.min.css'const userObj = {
  userName: "",
  email: "",
  password: ""
};const RegistrationForm=()=>{


    const formHandler=(ev)=>{

    }

    return  (

    <div className='row justify-content-center'><div className='col-md-4'>
        <h1>Please Register</h1>
        <form onSubmit={formHandler}>
            <input
            type="text"
            placeholder="Username"
            name="userName"
            className='form-control'

            />
            <input
            type="email"
            placeholder="Email"
            className='form-control'
            name="email"


            />
            <input
            type="password"
            placeholder="Password"
            name="password"
            className='form-control'

            />

            <input type="submit" value="Register"
            className='btn btn-primary'/>
        </form></div>

    </div>)}
export default RegistrationForm
Notice the user object, userObj, above the class definition. This will be used to initialize our state as well as clear the form after submit.
注意类定义上方的用户对象userObj。 这将用于初始化我们的状态以及在提交后清除表单。
We will create a single useState statement as follows.
我们将如下创建单个useState语句。
const [user, setUser] = useState(userObj)user is our state object. It has three keys, userName, email and password. Each initialized set to an empty string.
用户是我们的状态对象。 它具有三个键,用户名,电子邮件和密码。 每个初始化的集都为一个空字符串。
We will also set our onChange as the following for each input. Note that we will have to write the function handleInputChange.
我们还将为每个输入将onChange设置为以下内容。 注意,我们将必须编写功能handleInputChange 。
onChange={handleInputChange}We will set the value of each input to correspond to the user object and the appropriate key.
我们将设置每个输入的值以对应于用户对象和适当的键。
value={user.userName}
value={user.email}
value={user.password}
2. Modify the RegistrationForm to incorporate the changes above and create a handleInputChange stub.
2.修改RegistrationForm以合并上面的更改,并创建一个handleInputChange存根。
import React, { useState } from 'react'
import bootstrap from '../node_modules/bootstrap/dist/css/bootstrap.min.css'const userObj = {
  userName: "",
  email: "",
  password: ""
};const RegistrationForm=()=>{

    const [user, setUser] = useState(userObj)
    const formHandler=(ev)=>{
    }    const handleInputChange=(ev)=> {
    }

    return  (

    <div className='row justify-content-center'><div className='col-md-4'>
        <h1>Please Register</h1>
        <form onSubmit={formHandler}>
            <input
            type="text"
            placeholder="Username"
            name="userName"
            className='form-control'
            onChange={handleInputChange}
            value={user.userName}
            />
            <input
            type="email"
            placeholder="Email"
            className='form-control'
            name="email"
            onChange={handleInputChange}
            value={user.email}

            />
            <input
            type="password"
            placeholder="Password"
            name="password"
            className='form-control'
            onChange={handleInputChange}
            value={user.password}
            />

            <input type="submit" value="Register"
            className='btn btn-primary'/>
        </form></div>

    </div>)}
export default RegistrationForm
重要! (Important!)
Unlike useState in class components, which automatically merges all items being tracked in state when only one is being changed, useState does not do this. This means that if we make a change to only one input, email for example, in the handleInputChange, we will lose the state of userName and password. Unless…
与类组件中的useState不同,后者仅在更改一个状态时自动合并处于状态的所有跟踪项,而useState则不会这样做。 这意味着,如果我们仅更改一个输入(例如,在handleInputChange中的电子邮件),则将丢失userName和password的状态。 除非…
We use the spread operator with our user object
我们将散布运算符与我们的用户对象一起使用
You will also see now why we gave each input a name attribute.
您现在还将看到为什么我们给每个输入一个name属性。
The handleInputChange will look like this.
handleInputChange将看起来像这样。
const handleInputChange=(ev)=> {

    setUser({
      ...user,
      [ev.target.name]:ev.target.value
    })
}
Breaking this down. As data is typed in to a field, handleInputChange is invoked. We call setUser and use the spread operator to bring in any existing state values for the user object.
分解下来。 在将数据输入到字段中时,将调用handleInputChange。 我们调用setUser并使用spread操作符为用户对象引入任何现有状态值。
We then look at the name property of the input ([ev.target.name]), which MUST match the name in the user object, and set that to the value being typed in to the input field ([ev.target.value].)
然后,我们查看输入的名称属性([ev.target.name]),该属性必须与用户对象中的名称匹配,并将其设置为在输入字段中键入的值([ev.target.value] ]。)
3. Your code will look like this. I’ve added {JSON.stringify(user)} between the last two divs so we can verify state is tracked.
3.您的代码将如下所示。 我在最后两个div之间添加了{JSON.stringify(user)},以便我们验证状态是否被跟踪。
import React, { useState } from 'react'
import bootstrap from '../node_modules/bootstrap/dist/css/bootstrap.min.css'const userObj = {
  userName: "",
  email: "",
  password: ""
};const RegistrationForm=()=>{

    const [user, setUser] = useState(userObj)
    const formHandler=(ev)=>{
    }   const handleInputChange=(ev)=> {
    setUser({
      ...user,
      [ev.target.name]:ev.target.value
    })
   }

    return  (

    <div className='row justify-content-center'><div className='col-md-4'>
        <h1>Please Register</h1>
        <form onSubmit={formHandler}>
            <input
            type="text"
            placeholder="Username"
            name="userName"
            className='form-control'
            onChange={handleInputChange}
            value={user.userName}
            />
            <input
            type="email"
            placeholder="Email"
            className='form-control'
            name="email"
            onChange={handleInputChange}
            value={user.email}

            />
            <input
            type="password"
            placeholder="Password"
            name="password"
            className='form-control'
            onChange={handleInputChange}
            value={user.password}
            />

            <input type="submit" value="Register"
            className='btn btn-primary'/>
        </form></div>
       {JSON.stringify(user)}
    </div>)}
export default RegistrationForm
Save and try it out!
保存并尝试一下!
Finally we will add the onSubmit for the form. Notice how we clear the form.
最后,我们将为表单添加onSubmit。 注意我们如何清除表格。
import React, { useState } from 'react'
import bootstrap from '../node_modules/bootstrap/dist/css/bootstrap.min.css'const userObj = {
    userName: "",
    email: "",
    password: ""
  };const RegistrationForm=()=>{

    const [user, setUser] = useState(userObj)

    const formHandler=(ev)=>{    ev.preventDefault();
        if (user.userName==='' || user.email==='' ||   user.password===''){
            alert('Please fill in all fields')        }else{
            alert(`Welcome ${user.userName}`)
            setUser(userObj)
        }
    }const handleInputChange=(ev)=> {

        setUser({
          ...user,
          [ev.target.name]:ev.target.value
        })
    }

    return  (

    <div className='row justify-content-center'><div className='col-md-4'>
        <h1>Please Register</h1>
        <form onSubmit={formHandler}>
            <input
            type="text"
            placeholder="Username"
            name="userName"
            className='form-control'
            onChange={handleInputChange}
            value={user.userName}
            />
            <input
            type="email"
            placeholder="Email"
            className='form-control'
            name="email"
            onChange={handleInputChange}
            value={user.email}

            />
            <input
            type="password"
            placeholder="Password"
            name="password"
            className='form-control'
            onChange={handleInputChange}
            value={user.password}
            />

            <input type="submit" value="Register"
            className='btn btn-primary'/>
        </form></div>
       {JSON.stringify(user)}
    </div>)}
export default RegistrationForm
结论 (Conclusion)
Managing state in React can be a complicated process. However, for a simple form, or set of input fields, it is not too difficult and as we have seen. We now have a couple of options depending on the complexity of your form.
在React中管理状态可能是一个复杂的过程。 但是,对于一个简单的表单或一组输入字段,这并不太困难,正如我们所看到的。 现在,根据您表格的复杂程度,我们有两种选择。
The first technique affords the ability to work with the input data at a very granular level. Especially if you create handlers for each input.
第一种技术提供了在非常细粒度的级别上处理输入数据的能力。 特别是如果您为每个输入创建处理程序。
The second technique allows for streamlining the state management process.
第二种技术可以简化状态管理过程。
Thank you for reading and coding along!
感谢您的阅读和编码!
You may also enjoy,
您可能还会喜欢,
react状态管理


 992
992

 被折叠的 条评论
为什么被折叠?
被折叠的 条评论
为什么被折叠?
 到【灌水乐园】发言


