


espresso框架特点
Page Object Model in Software Testing is not a new concept. Some people heard about it, others wanted to switch over and implement it, but it all comes down to the specific needs of the client. In some cases, it may be worth utilizing it, while in other cases it creates an unnecessary overhead.
软件测试中的 页面对象模型不是一个新概念。 有些人听说过它,另一些人则想切换并实施它,但这全都取决于客户的特定需求。 在某些情况下,可能值得利用它,而在其他情况下,它会产生不必要的开销。
Today we are going to create a basic Espresso test framework to execute Android UI Test Cases on it. The main goal of this tutorial is to show the basic mechanisms behind the Page Object Model (POM).
今天,我们将创建一个基本的Espresso测试框架,以在其上执行Android UI测试用例 。 本教程的主要目的是展示页面对象 模型 (POM)背后的基本机制。
页面对象:基础 (Page Object: The Basics)
First of all, what is a Page Object? This concept is based on the idea that every UI element (page or fragment) of the application has a separate implementation of the methods. This allows us to write a reusable code that is easy to modify when necessary.
首先 ,什么是页面对象 ? 该概念基于以下想法:应用程序的每个UI元素(页面或片段)都有方法的单独实现。 这使我们可以编写可重复使用的代码,在必要时可以轻松对其进行修改。
Secondly, why would we need it? Having tests using Page Object Method pattern allows us to make readable code that new team members can understand and write code faster.
其次 ,我们为什么需要它? 使用Page Object Method模式进行测试可以使我们编写可读的代码,使新团队成员可以更快地理解和编写代码。
Finally, with the right approach, it’s possible to make an automation testing available to non-technical team members. There is a big potential when it comes to improving the test infrastructure.
最后 ,采用正确的方法,可以使非技术团队成员可以进行自动化测试。 改进测试基础结构具有很大的潜力。
POM概念的重要性 (The importance of POM concept)
Since we have an understanding of what do we want to be implemented the framework, let do it on a real project created in Android Studio.
由于我们了解了要实现该框架的内容,因此请在Android Studio中创建的真实项目中进行操作。
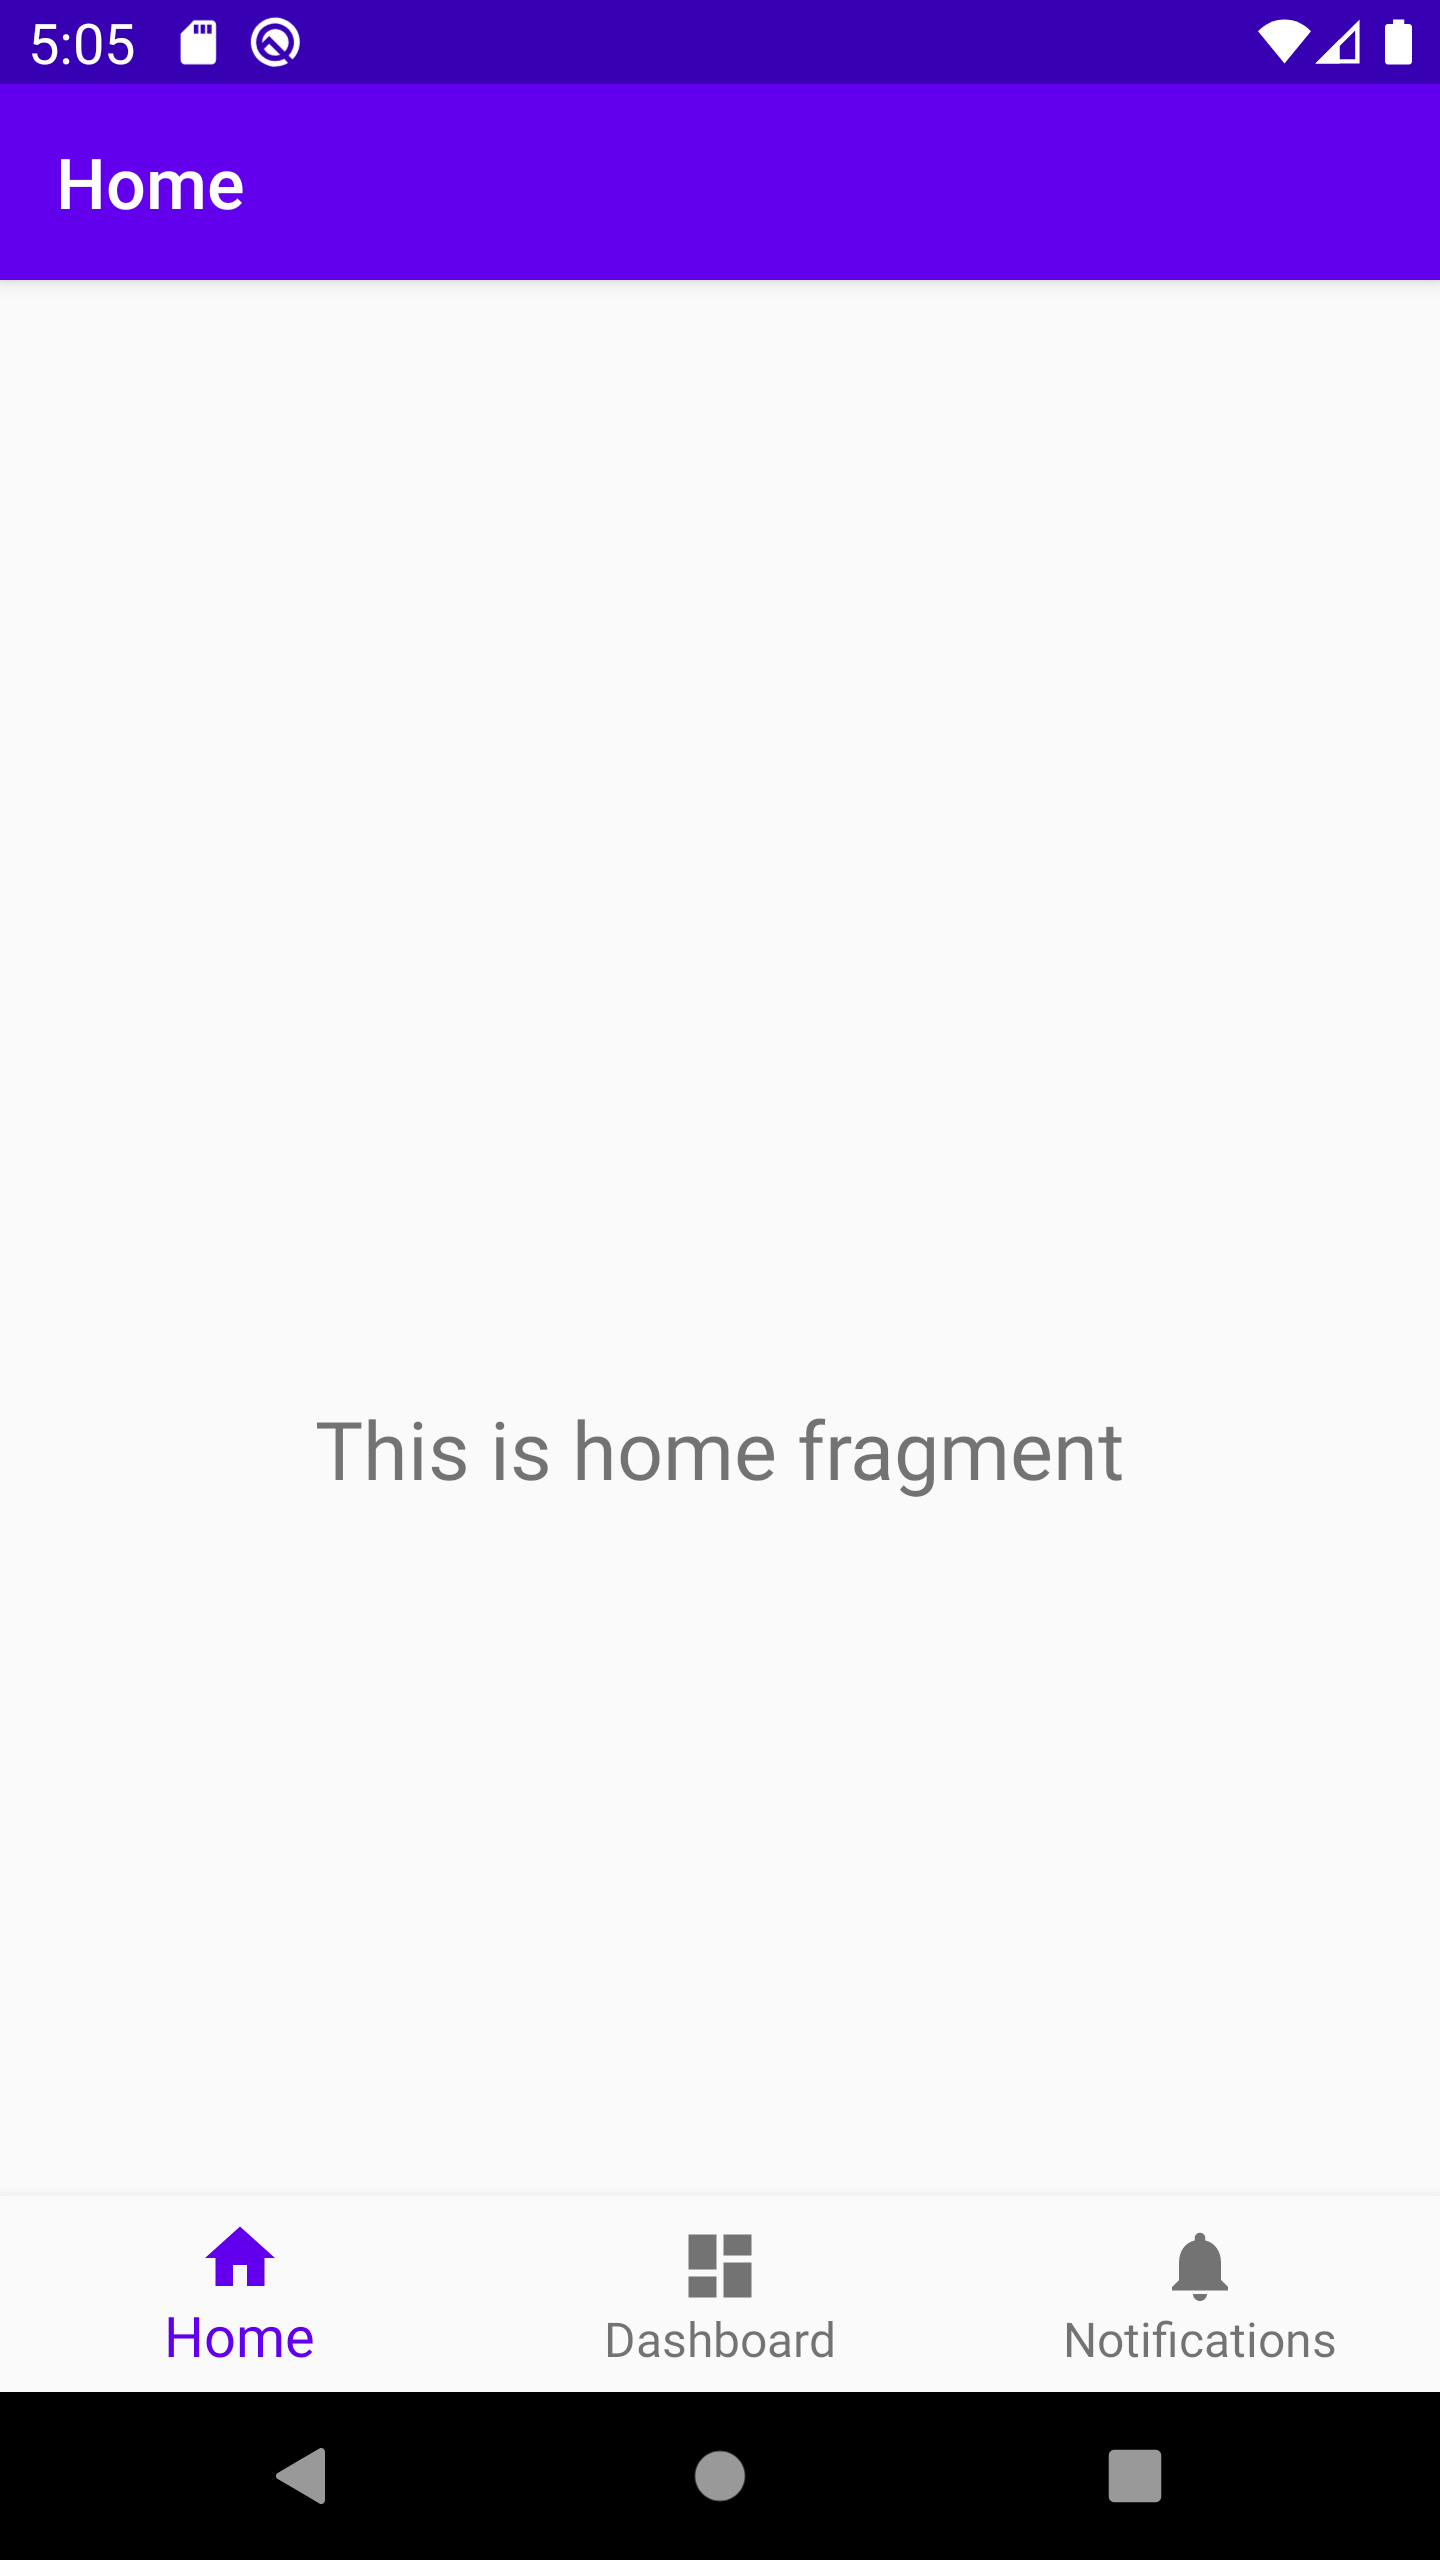
We will be refactoring the existing Espresso project that we worked on in the past. This project had 3 pages: Home page, Dashboard, and Notifications. Our test class was clicking each of those buttons and confirming that it worked.
我们将重构过去工作的现有Espresso项目。 该项目有3页: 主页 , 仪表板和通知 。 我们的测试班级是单击每个按钮并确认其有效。
The code that has performed all those actions looked like this:
执行所有这些操作的代码如下所示:
@Testpublic void clickButtonHome(){onView(withId(R.id.navigation_home)).perform(click()).check(matches(isDisplayed())); }@Testpublic void clickButtonDashboard(){onView(withId(R.id.navigation_dashboard)).perform(click()).check(matches(isDisplayed())); }@Testpublic void clickButtonNotification(){onView(withId(R.id.navigation_notifications)).perform(click()).check(matches(isDisplayed())); }As we can see, it’s nothing complicated here. We are just calling the click() method and confirm that the button is displayed. We have 3 test cases in this example, but imagine if it was 300 test cases and we wanted to modify something. It could have made us rewrite a lot of repeatable code.
我们可以看到,这里并不复杂。 我们只是调用click()方法并确认按钮已显示。 在这个例子中,我们有3个测试用例,但是假设它是300个测试用例,我们想修改一些东西。 它可能使我们重写了许多可重复的代码。
实现页面对象模型 (Implementing the Page Object Model)
Instead, we are going to use the Page Object pattern here and develop our tests manageable from the beginning. To do that we need to create the basic structure of the framework and decide what should be done from the beginning.
相反 ,我们将在这里使用Page Object模式,并从一开始就开发可管理的测试。 为此,我们需要创建框架的基本结构并从一开始就决定应该做什么。
We are going to create 6 classes here and each class would serve the specific purpose:
我们将在这里创建6个类,每个类将用于特定目的:
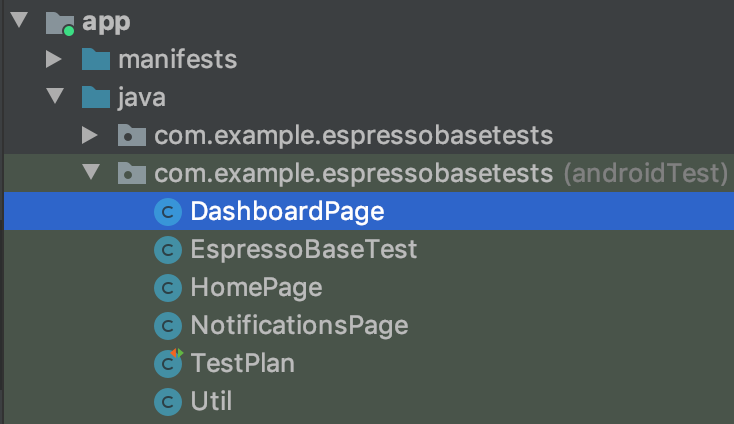
EspressoBaseTest: This would be our main (base) class for storing methods that we are going to execute. For example, the method click() would go there.
EspressoBaseTest:这将是我们的主(基类),用于存储要执行的方法。 例如,方法click()会去那里。
TestPlan: This class would serve as the main class used to adjust and execute our test cases. We would call our methods from here.
TestPlan:该类将用作调整和执行我们的测试用例的主要类。 我们将从这里调用我们的方法。
Util: This class is typically used to execute helper-methods. The main idea behind it would be calling additional methods unrelated to our EspressoBaseTest, but that would enhance executing our tests. For example, our method responsible for logging the output of the test results would be implemented there. Additionally, we could add methods for taking screenshots or videos of failed test cases and writing them to a specific location in the file system.
实用程序:此类通常用于执行辅助方法 。 其背后的主要思想是调用与EspressoBaseTest不相关的其他方法,但这将增强执行测试的能力。 例如,将在此处实施负责记录测试结果输出的方法。 此外,我们可以添加方法以获取失败的测试用例的屏幕快照或视频 ,并将其写入文件系统中的特定位置。
DashboardPage: Methods specific to a Dashboard page. We would be storing Resource IDs of the UI elements used on that page.
DashboardPage:特定于Dashboard页面的方法。 我们将存储该页面上使用的UI元素的资源ID。
HomePage: The same applies to a home page. We would be storing the page locators here and get those values by executing specific methods.
主页:主页也是如此。 我们将在此处存储页面定位器,并通过执行特定方法来获取这些值。
NotificationsPage: Finally, our third page is Notifications. As you might have thought, the same logic applies here.
NotificationsPage:最后,我们的第三页是Notifications。 您可能已经想到过,这里也适用相同的逻辑。
We have 3 methods that manage the test execution and 3 methods that represent the UI of each of the application pages. No magic here, we are just simplifying the process and make it maintainable in the future.
我们有3种方法来管理测试执行和 代表每个应用程序页面的UI的3种方法 。 这里没有魔术,我们只是在简化过程并使其在将来可维护。
Those are the steps that you need to perform to start creating our project in Android Studio:
这些是开始在Android Studio中创建项目所需执行的步骤:
Create a new project following the guide in the previous tutorial. Specify the Bottom Navigation Activity as a template.
按照上一教程中的指南创建一个新项目。 将底部导航活动指定为模板。
Add dependency to the end of Gradle file (app-level): androidTestImplementation ‘com.android.support.test:rules:1.0.2’
将依赖项添加到Gradle文件(应用程序级)的末尾 : androidTestImplementation'com.android.support.test:rules:1.0.2'
Create 6 classes: EspressoBaseTest, TestPlan, Util, DashboardPage, HomePage, NotificationsPage.
创建6个类: EspressoBaseTest , TestPlan , Util , DashboardPage , HomePage , NotificationsPage 。
After that, we need to implement our EspressoBaseTest. Here is what the code would look like:
之后 ,我们需要实现EspressoBaseTest 。 代码如下所示:
public class EspressoBaseTest {public static void clickButton(Integer resourceId){onView(withId(resourceId)).perform(click()).check(matches(isDisplayed()));} }As you can see, we are taking a Resource ID as input and performing a click on it. The same way as we did before, but now this part of code became reusable.
如您所见,我们正在将“ 资源ID”作为输入并单击它。 和以前一样,但是现在这部分代码可以重用了。
The next thing we need to do is to implement our methods for each page. Those methods would be storing our values for necessary Resource IDs.
我们需要做的下一件事是为每个页面实现我们的方法。 这些方法将存储我们必要的Resource ID的值。
We are going to start with the Dashboard page.
我们将从仪表板页面开始。
Since the only ID that we are accessing is the button itself, we are writing the method to return that resource:
由于我们要访问的唯一ID是按钮本身,因此我们正在编写方法来返回该资源:
public class DashboardPage extends EspressoBaseTest {public static int getDashboardButton() {return R.id.navigation_dashboard;} }It’s easy to understand. The only question you might ask is why we are inheriting the EspressoBaseClass? Well, we would like to extend our class to have our click method available.
很容易理解。 您可能要问的唯一问题是,为什么我们要继承EspressoBaseClass ? 好吧,我们想扩展我们的类以使我们的click方法可用。
This way, each time we would like to access the method we would be using the method available in the EspressoBaseTest. If we need to make a class-specific implementation we could always add this logic later.
这样,每次我们想访问该方法时,都将使用EspressoBaseTest中可用的方法。 如果我们需要进行特定于类的实现,那么以后总是可以添加此逻辑。
Also, notice that we are declaring the getDashboardButton() method static so that we could use is this method without creating an instance of the class each time.
另外,请注意,我们声明了getDashboardButton()方法为静态方法,以便我们可以使用此方法而无需每次都创建类的实例。
We need to repeat the same logic with our two remaining classes:
我们需要对其余两个类重复相同的逻辑:
HomePage class:
主页类:
public class HomePage extends EspressoBaseTest {public static int getHomePageButton() {return R.id.navigation_home;} }NotificationsPage class:
NotificationsPage类:
public class NotificationsPage extends EspressoBaseTest {public static int getNotificationsPageButton() {return R.id.navigation_notifications;} }Util class would be used for creating log entries in the log when necessary. We will use Log.v method that is already available in the Android Framework:
必要时,将使用Util类在日志中创建日志条目。 我们将使用Android框架中已经可用的Log.v方法:
public class Util {// Enable or Disable Log Outputstatic boolean logEnabled = false;public static void logTest(String log){if (logEnabled) {Log.v(“Espresso Test”, log);} } }We have almost all the pieces that we need except one thing: the actual test cases for each scenario that we would like to execute. We have already created the TestPlan class and we just need to write an implementation for it:
除了一件事情,我们几乎拥有了所有需要的部分:我们要执行的每种方案的实际测试用例。 我们已经创建了TestPlan类,我们只需要为其编写一个实现:
public class TestPlan {@Rulepublic ActivityTestRule<MainActivity> activityActivityTestRule = new ActivityTestRule<>(MainActivity.class);@Test()public void clickDashboardPageButton(){DashboardPage.clickButton(DashboardPage.getDashboardButton());Util.logTest(“Dashboard button pressed”); }@Testpublic void clickHomePageButton(){HomePage.clickButton(HomePage.getHomePageButton());Util.logTest(“Home button pressed”); }@Testpublic void clickNotificationsPageButton(){NotificationsPage.clickButton(NotificationsPage.getNotificationsPageButton());Util.logTest(“Notifications button pressed”); } }What has changed, comparing to the initial implementation?
与初始实施相比,发生了什么变化?
1) We have hidden the implementation under the method clickButton()
1)我们在clickButton()方法下隐藏了实现
2) Resource IDs are now stored in each respective class
2)现在, 资源ID分别存储在每个类中
3) We are following a pattern [Page Name].[Method]
3)我们遵循的是[页面名称]模式。[方法]
运行测试:行动! (Running the tests: Action!)

To confirm that our test cases can be executed now, we just need to right-click on the TestPlan class and select “Run Test Plan”. Since we have @Test annotations in our test plan, Android Studio runs those as tests and prints the results at the end of execution.
为了确认我们的测试用例现在可以执行,我们只需要右键单击TestPlan类并选择“ Run Test Plan ”。 由于我们的测试计划中包含@Test批注,因此Android Studio会将其作为测试运行,并在执行结束时打印结果。
结论 (Conclusion)
This is a very basic way of defining Page Objects. This could be simplified further or another design pattern might be applied, but hopefully, this article would serve as an example of how the Page Object concept could contribute to your Android project.
这是定义Page Objects的非常基本的方法。 可以进一步简化它,也可以应用其他设计模式,但是希望本文将作为Page Object概念如何为您的Android项目做出贡献的示例。

espresso框架特点


 4614
4614

 被折叠的 条评论
为什么被折叠?
被折叠的 条评论
为什么被折叠?
 到【灌水乐园】发言


