


firebase 数据存储
我们正在建立的 (What we’re building)
We’ll see how to build a flutter app for iOS/Android that allows users to view and share videos. In my previous post I showed how to do this with Publitio as our video storage API. In this tutorial we’ll use Firebase Cloud Storage to host the videos instead. We’ll also add client-side encoding and HLS support, so the client can stream the videos with adaptive bitrate.
我们将看到如何为iOS / Android构建一个Flutter应用程序,该应用程序允许用户查看和共享视频。 在我以前的文章中,我展示了如何使用Publitio作为我们的视频存储API来执行此操作。 在本教程中,我们将使用Firebase Cloud Storage托管视频。 我们还将添加客户端编码和HLS支持,以便客户端可以以自适应比特率流式传输视频。
堆栈 (The stack)
Flutter — For making cross platform apps.
Flutter —用于制作跨平台应用程序。
Firebase Cloud Firestore — For storing video metadata (urls) and syncing between clients (without writing server code).
Firebase Cloud Firestore —用于存储视频元数据(URL)并在客户端之间同步(无需编写服务器代码)。
Firebase Cloud Storage — For hosting the actual videos.
Firebase云存储 —用于托管实际视频。
FFmpeg — For running client-side video encoding.
FFmpeg —用于运行客户端视频编码。
为什么要进行客户端编码? (Why client-side encoding?)
In most video workflows there will be a transcoding server or serverless cloud function, that encodes the video into various resolutions and bitrates for optimal viewing in all devices and network speeds.
在大多数视频工作流程中,将使用转码服务器或无服务器云功能,将视频编码为各种分辨率和比特率,以在所有设备和网络速度下实现最佳观看效果。
If you don’t want to use a transcoding server or API (which can be quite pricey), and depending on the kind of videos your app needs to upload and view, you can choose to forego server side transcoding altogether, and encode the videos solely on the client. This will save considerable costs, but will put the burden of encoding videos on the clients.
如果您不想使用转码服务器或API(价格可能非常昂贵),并且根据您的应用需要上传和观看的视频类型,可以选择完全放弃服务器端转码,然后对视频进行编码完全由客户决定。 这样可以节省可观的成本,但是会给客户端增加视频编码的负担。
Even if you do use some server-side transcoding solution, you’ll probably want to perform minimal encoding on the client. The raw video sizes (especially on iOS), can be huge, and you don’t want to be wasteful of the user’s data plan, or force them to wait for WiFi unnecessarily.
即使您确实使用了某些服务器端代码转换解决方案,您也可能希望在客户端上执行最少的编码。 原始视频的大小(尤其是在iOS上)可能很大,并且您不想浪费用户的数据计划,也不必强迫他们不必要地等待WiFi。
To see how to do server-side encoding using Cloud Functions and a dedicated API, read the next post
要了解如何使用Cloud Functions和专用API进行服务器端编码,请阅读下一篇文章
视频编码入门 (Video encoding primer)
Here is a short primer on some terms we’re going to use.
这是我们要使用的某些术语的简短入门。
X264编解码器/编码器 (X264 Codec / Encoder)
This is the software used to encode the video into the H.264/MPEG-4 AVC format. There are many other codecs, but seeing as the H.264 format is currently the only one that is natively supported on both iOS and Android, this is what we’ll use.
这是用于将视频编码为H.264 / MPEG-4 AVC格式的软件。 还有许多其他编解码器,但是鉴于H.264格式是当前唯一受iOS和Android原生支持的格式,因此我们将使用这种格式。
自适应比特率流 (Adaptive bitrate streaming)
A method to encode the video into multiple bitrates (of varying quality), and each bitrate into many small chunks. The streaming protocol will allow the player to choose which quality the next chunk will be, according to network speed. So if you go from WiFi to cellular data, your player can adapt the bitrate accordingly, without reloading the entire video.
一种将视频编码为多个比特率(质量各不相同),并将每个比特率编码为许多小块的方法。 流协议将允许播放器根据网络速度选择下一个块的质量。 因此,如果您从WiFi转到蜂窝数据,则播放器可以相应地调整比特率,而无需重新加载整个视频。
There are many streaming protocols, but the one that’s natively supported on iOS and Android is Apple’s HLS — HTTP Live Streaming. In HLS, the video is split to chunks in the form of .ts files, and an .m3u8 playlist file for pointing to the chunks. For each quality, or variant stream, there is a playlist file, and a master playlist to rule them all 💍.
流协议很多,但是iOS和Android原生支持的协议是Apple的HLS -HTTP Live Streaming。 在HLS中,视频以.ts文件和一个.m3u8播放列表文件的形式分为多个块,以指向这些块。 对于每种质量或变体流 ,都有一个播放列表文件和一个主播放列表来将它们全部统治💍。
构型 (Configurations)
安装flutter_ffmpeg (Installing flutter_ffmpeg)
We’ll use the flutter_ffmpeg package to run encoding jobs on iOS/Android. flutter_ffmpeg requires choosing a codec package, according to what you want to use. Here we'll use the min-gpl-lts package, as it contains the x264 codec, and can be used in release builds.
我们将使用flutter_ffmpeg包在iOS / Android上运行编码作业。 flutter_ffmpeg需要根据您要使用的内容选择编解码器package 。 在这里,我们将使用min-gpl-lts软件包,因为它包含x264编解码器,并且可以在发行版本中使用。
Add the following to your android/build.gradle:
将以下内容添加到您的android/build.gradle :
ext {
  flutterFFmpegPackage = "min-gpl-lts"
}
And in your Podfile replace this line:
并在您的Podfile替换以下行:
pod name, :path => File.join(symlink, 'ios')with this:
有了这个:
if name == 'flutter_ffmpeg'
  pod name+'/min-gpl-lts', :path => File.join(symlink, 'ios')
else
  pod name, :path => File.join(symlink, 'ios')
云存储配置 (Cloud Storage configuration)
If you’ve already setup firebase in your project, as discussed in the previous post, then you just need to add the cloud_firestore package.
如果您已经在项目中设置了cloud_firestore 文章中所述 ,则只需添加cloud_firestore包。
Now we need to configure public read access to the video files, so that we can access them without a token (see comment). For this example I’ve added no authentication to keep things simple, so we’ll allow public write access too, but this should be changed in a production app. So in Firebase Console, go to Storage -> Rules and change it to:
现在,我们需要配置对视频文件的公共读取访问,以便我们无需令牌即可访问它们(请参阅注释 )。 在此示例中,我没有添加身份验证来简化操作,因此我们也允许公共写访问,但是应该在生产应用程序中对此进行更改 。 因此,在Firebase控制台中,转到“存储”->“规则”,然后将其更改为:
service firebase.storage {
  match /b/{bucket}/o {
    match /{allPaths=**} {
      allow read; allow write;
    }
  }
}
客户端视频处理阶段 (Stages in client side video processing)
This is the sequence of steps we’ll have to do for each video:
这是我们必须对每个视频执行的步骤序列:
Get raw video path from
image_picker从
image_picker获取原始视频路径- Get aspect ratio 获取宽高比
- Generate thumbnail using ffmpeg 使用ffmpeg生成缩略图
- Encode raw video into HLS files 将原始视频编码为HLS文件
- Upload thumbnail jpg to Cloud Storage 将缩略图jpg上传到Cloud Storage
- Upload encoded files to Cloud Storage 将编码文件上传到Cloud Storage
- Save video metadata to Cloud Firestore 将视频元数据保存到Cloud Firestore
Let’s go over every step and see how to implement it.
让我们遍历每一个步骤,看看如何实现它。
编码提供者 (Encoding Provider)
We’ll create an EncodingProvider class that will encapsulate the encoding logic. The class will hold the flutter_ffmpeg instances needed.
我们将创建一个EncodingProvider类,该类将封装编码逻辑。 该类将flutter_ffmpeg所需的flutter_ffmpeg实例。
class EncodingProvider {
  static final FlutterFFmpeg _encoder = FlutterFFmpeg();
  static final FlutterFFprobe _probe = FlutterFFprobe();
  static final FlutterFFmpegConfig _config = FlutterFFmpegConfig();
...
}
产生缩图 (Generating thumbnail)
We’ll use the encoder to generate a thumbnail which we’ll save later to Cloud Storage. We’re telling FFmpeg to take one frame (-vframes option) out of videoPath (-i option) with size of width x height (-s option). We check the result code to ensure the operation finished successfully.
我们将使用编码器生成缩略图,然后将其保存到Cloud Storage。 我们告诉FFmpeg的把一帧( -vframes选项)出来的videoPath ( -i选项)的大小width x height ( -s选项)。 我们检查结果代码以确保操作成功完成。
static Future<String> getThumb(videoPath, width, height) async {
  assert(File(videoPath).existsSync());


  final String outPath = '$videoPath.jpg';
  final arguments =
      '-y -i $videoPath -vframes 1 -an -s ${width}x${height} -ss 1 $outPath';

  final int rc = await _encoder.execute(arguments);
  assert(rc == 0);
  assert(File(outPath).existsSync());


  return outPath;
}
获取视频长度和宽高比 (Getting video length and aspect ratio)
We’ll use FlutterFFprobe.getMediaInformation and calculate the aspect ratio (needed for the flutter video player) and get video length (needed to calculate encoding progress):
我们将使用FlutterFFprobe.getMediaInformation并计算纵横比(颤动视频播放器需要)并获取视频长度(需要计算编码进度):
static Future<Map<dynamic, dynamic>> getMediaInformation(String path) async {
  return await _probe.getMediaInformation(path);
}


static double getAspectRatio(Map<dynamic, dynamic> info) {
  final int width = info['streams'][0]['width'];
  final int height = info['streams'][0]['height'];
  final double aspect = height / width;
  return aspect;
}


static int getDuration(Map<dynamic, dynamic> info) {
  return info['duration'];
}
编码视频 (Encoding the video)
Now for the actual video encoding. For this example I used the parameters from this excellent HLS tutorial. We’re creating two variant streams, one with 2000k bitrate, and one with 365k bitrate. This will generate multiple fileSequence.ts files (video chunks) for each variant quality stream, and one playlistVariant.m3u8 file (playlist) for each stream. It will also generate a master.m3u8 that lists all the playlistVariant.m3u8 files.
现在进行实际的视频编码。 对于此示例,我使用了这个出色的HLS教程中的参数。 我们创建了两个变体流,一个与2000k比特率,另一个是365k比特率。 这将为每个变体质量流生成多个fileSequence.ts文件(视频块),并为每个流生成一个playlistVariant.m3u8文件(播放列表)。 它还将生成一个master.m3u8 ,其中列出了所有playlistVariant.m3u8文件。
static Future<String> encodeHLS(videoPath, outDirPath) async {
  assert(File(videoPath).existsSync());


  final arguments =
  '-y -i $videoPath '+
  '-preset ultrafast -g 48 -sc_threshold 0 '+
  '-map 0:0 -map 0:1 -map 0:0 -map 0:1 '+
  '-c✌0 libx264 -b✌0 2000k '+
  '-c✌1 libx264 -b✌1 365k '+
  '-c:a copy '+
  '-var_stream_map "v:0,a:0 v:1,a:1" '+
  '-master_pl_name master.m3u8 '+
  '-f hls -hls_time 6 -hls_list_size 0 '+
  '-hls_segment_filename "$outDirPath/%v_fileSequence_%d.ts" '+
  '$outDirPath/%v_playlistVariant.m3u8';


  final int rc = await _encoder.execute(arguments);
  assert(rc == 0);


  return outDirPath;
}
Note: This is a simple encoding example, but the options are endless. For a complete list: https://ffmpeg.org/ffmpeg-formats.html
注意:这是一个简单的编码示例,但是选项无穷无尽。 有关完整列表: https : //ffmpeg.org/ffmpeg-formats.html
显示编码进度 (Showing encoding progress)
Encoding can take a long time, and it’s important to show the user that something is happening. We’ll use FFmpeg’s enableStatisticsCallback to get the current encoded frame's time, and divide by video duration to get the progress. We'll then update the _progress state field, which is connected to a LinearProgressBar.
编码可能需要很长时间,并且向用户显示正在发生的事情很重要。 我们将使用FFmpeg的enableStatisticsCallback来获取当前编码帧的时间,然后除以视频时长以获取进度。 然后,我们将更新_progress状态字段,该字段连接到LinearProgressBar 。
class _MyHomePageState extends State<MyHomePage> {
  double _progress = 0.0;
  ...


  @override
  void initState() {
    EncodingProvider.enableStatisticsCallback((int time,
        int size,
        double bitrate,
        double speed,
        int videoFrameNumber,
        double videoQuality,
        double videoFps) {
      if (_canceled) return;


      setState(() {
        _progress = time / _videoDuration;
      });
    });


    ...


    super.initState();
  }


  _getProgressBar() {
    return Container(
      padding: EdgeInsets.all(30.0),
      child: Column(
        crossAxisAlignment: CrossAxisAlignment.center,
        mainAxisAlignment: MainAxisAlignment.center,
        children: <Widget>[
          Container(
            margin: EdgeInsets.only(bottom: 30.0),
            child: Text(_processPhase),
          ),
          LinearProgressIndicator(
            value: _progress,
          ),
        ],
      ),
    );
  }
上载档案 (Uploading the files)
Now that encoding is done, we need to upload the files to Cloud Storage.
编码完成后,我们需要将文件上传到Cloud Storage。
将单个文件上传到Cloud Storage (Uploading a single file to Cloud Storage)
Uploading to Cloud Storage is quite straightforward. We get a StorageReference into the path where we want the file to be stored with FirebaseStorage.instance.ref().child(folderName).child(fileName). Then we call ref.putFile(file), and listen to the event stream with _onUploadProgress, where we update the _progress state field like we did with the encoding. When the uploading is done, the await taskSnapshot.ref.getDownloadURL() will return the url we can use to access the file.
上传到Cloud Storage非常简单。 我们将StorageReference放入要使用FirebaseStorage.instance.ref().child(folderName).child(fileName)存储文件的路径。 然后,我们调用ref.putFile(file) ,并使用_onUploadProgress监听事件流,就像在编码中一样,在其中更新_progress状态字段。 上传完成后, await taskSnapshot.ref.getDownloadURL()将返回可用于访问文件的URL。
Future<String> _uploadFile(filePath, folderName) async {
  final file = new File(filePath);
  final basename = p.basename(filePath);


  final StorageReference ref =
      FirebaseStorage.instance.ref().child(folderName).child(basename);
  StorageUploadTask uploadTask = ref.putFile(file);
  uploadTask.events.listen(_onUploadProgress);
  StorageTaskSnapshot taskSnapshot = await uploadTask.onComplete;
  String videoUrl = await taskSnapshot.ref.getDownloadURL();
  return videoUrl;
}


void _onUploadProgress(event) {
  if (event.type == StorageTaskEventType.progress) {
    final double progress =
        event.snapshot.bytesTransferred / event.snapshot.totalByteCount;
    setState(() {
      _progress = progress;
    });
  }
}
修复HLS文件 (Fixing the HLS files)
Now we need to go over all the generated HLS file (.ts and .m3u8), and upload them into the Cloud Storage folder. But before we do, we need to fix them so that they point to the correct urls relative to their place in Cloud Storage. This is how the.m3u8 files are created on the client:
现在,我们需要遍历所有生成的HLS文件( .ts和.m3u8 ),并将它们上传到Cloud Storage文件夹中。 但是在我们这样做之前,我们需要对其进行修复,以使它们指向相对于其在Cloud Storage中的位置的正确URL。 这是在客户端上创建.m3u8文件的方式:
#EXTM3U
#EXT-X-VERSION:3
#EXT-X-TARGETDURATION:3
#EXT-X-MEDIA-SEQUENCE:0
#EXTINF:2.760000,
1_fileSequence_0.ts
#EXT-X-ENDLIST
Notice the line 1_fileSequence_0.ts. This is the relative path to the .ts chunk in the playlist. But when we upload this to a folder, it's missing the folder name from the URL. It's also missing the ?alt=media query parameter, that's required to get the actual file from Firebase, and not just the metadata. This is how it should look like:
注意行1_fileSequence_0.ts 。 这是播放列表中.ts块的相对路径。 但是,当我们将其上传到文件夹时,URL中缺少文件夹名称。 它还缺少?alt=media查询参数,这是从Firebase中获取实际文件所必需的,而不仅仅是元数据。 它应该是这样的:
#EXTM3U
#EXT-X-VERSION:3
#EXT-X-TARGETDURATION:3
#EXT-X-MEDIA-SEQUENCE:0
#EXTINF:2.760000,
video4494%2F1_fileSequence_0.ts?alt=media
#EXT-X-ENDLIST
So we need a function for adding these two things to each .ts entry, and also to each .m3u8 entry in the master playlist:
因此,我们需要一个函数来将这两件事添加到每个.ts条目以及主播放列表中的每个.m3u8条目:
void _updatePlaylistUrls(File file, String videoName) {
  final lines = file.readAsLinesSync();
  var updatedLines = List<String>();

  for (final String line in lines) {
    var updatedLine = line;
    if (line.contains('.ts') || line.contains('.m3u8')) {
      updatedLine = '$videoName%2F$line?alt=media';
    }
    updatedLines.add(updatedLine);
  }
  final updatedContents = updatedLines.reduce((value, element) => value + '\n' + element);


  file.writeAsStringSync(updatedContents);
}
上载HLS文件 (Uploading the HLS files)
Finally we’ll go through all the generated files and upload them, fixing the .m3u8 files as necessary:
最后,我们将浏览所有生成的文件并上传它们,并根据需要修复.m3u8文件:
Future<String> _uploadHLSFiles(dirPath, videoName) async {
final videosDir = Directory(dirPath);
var playlistUrl = '';
final files = videosDir.listSync();
int i = 1;
for (FileSystemEntity file in files) {
final fileName = p.basename(file.path);
final fileExtension = getFileExtension(fileName);
if (fileExtension == 'm3u8') _updatePlaylistUrls(file, videoName);
setState(() {
_processPhase = 'Uploading video file $i out of ${files.length}';
_progress = 0.0;
});
final downloadUrl = await _uploadFile(file.path, videoName);
if (fileName == 'master.m3u8') {
playlistUrl = downloadUrl;
}
i++;
}
return playlistUrl;
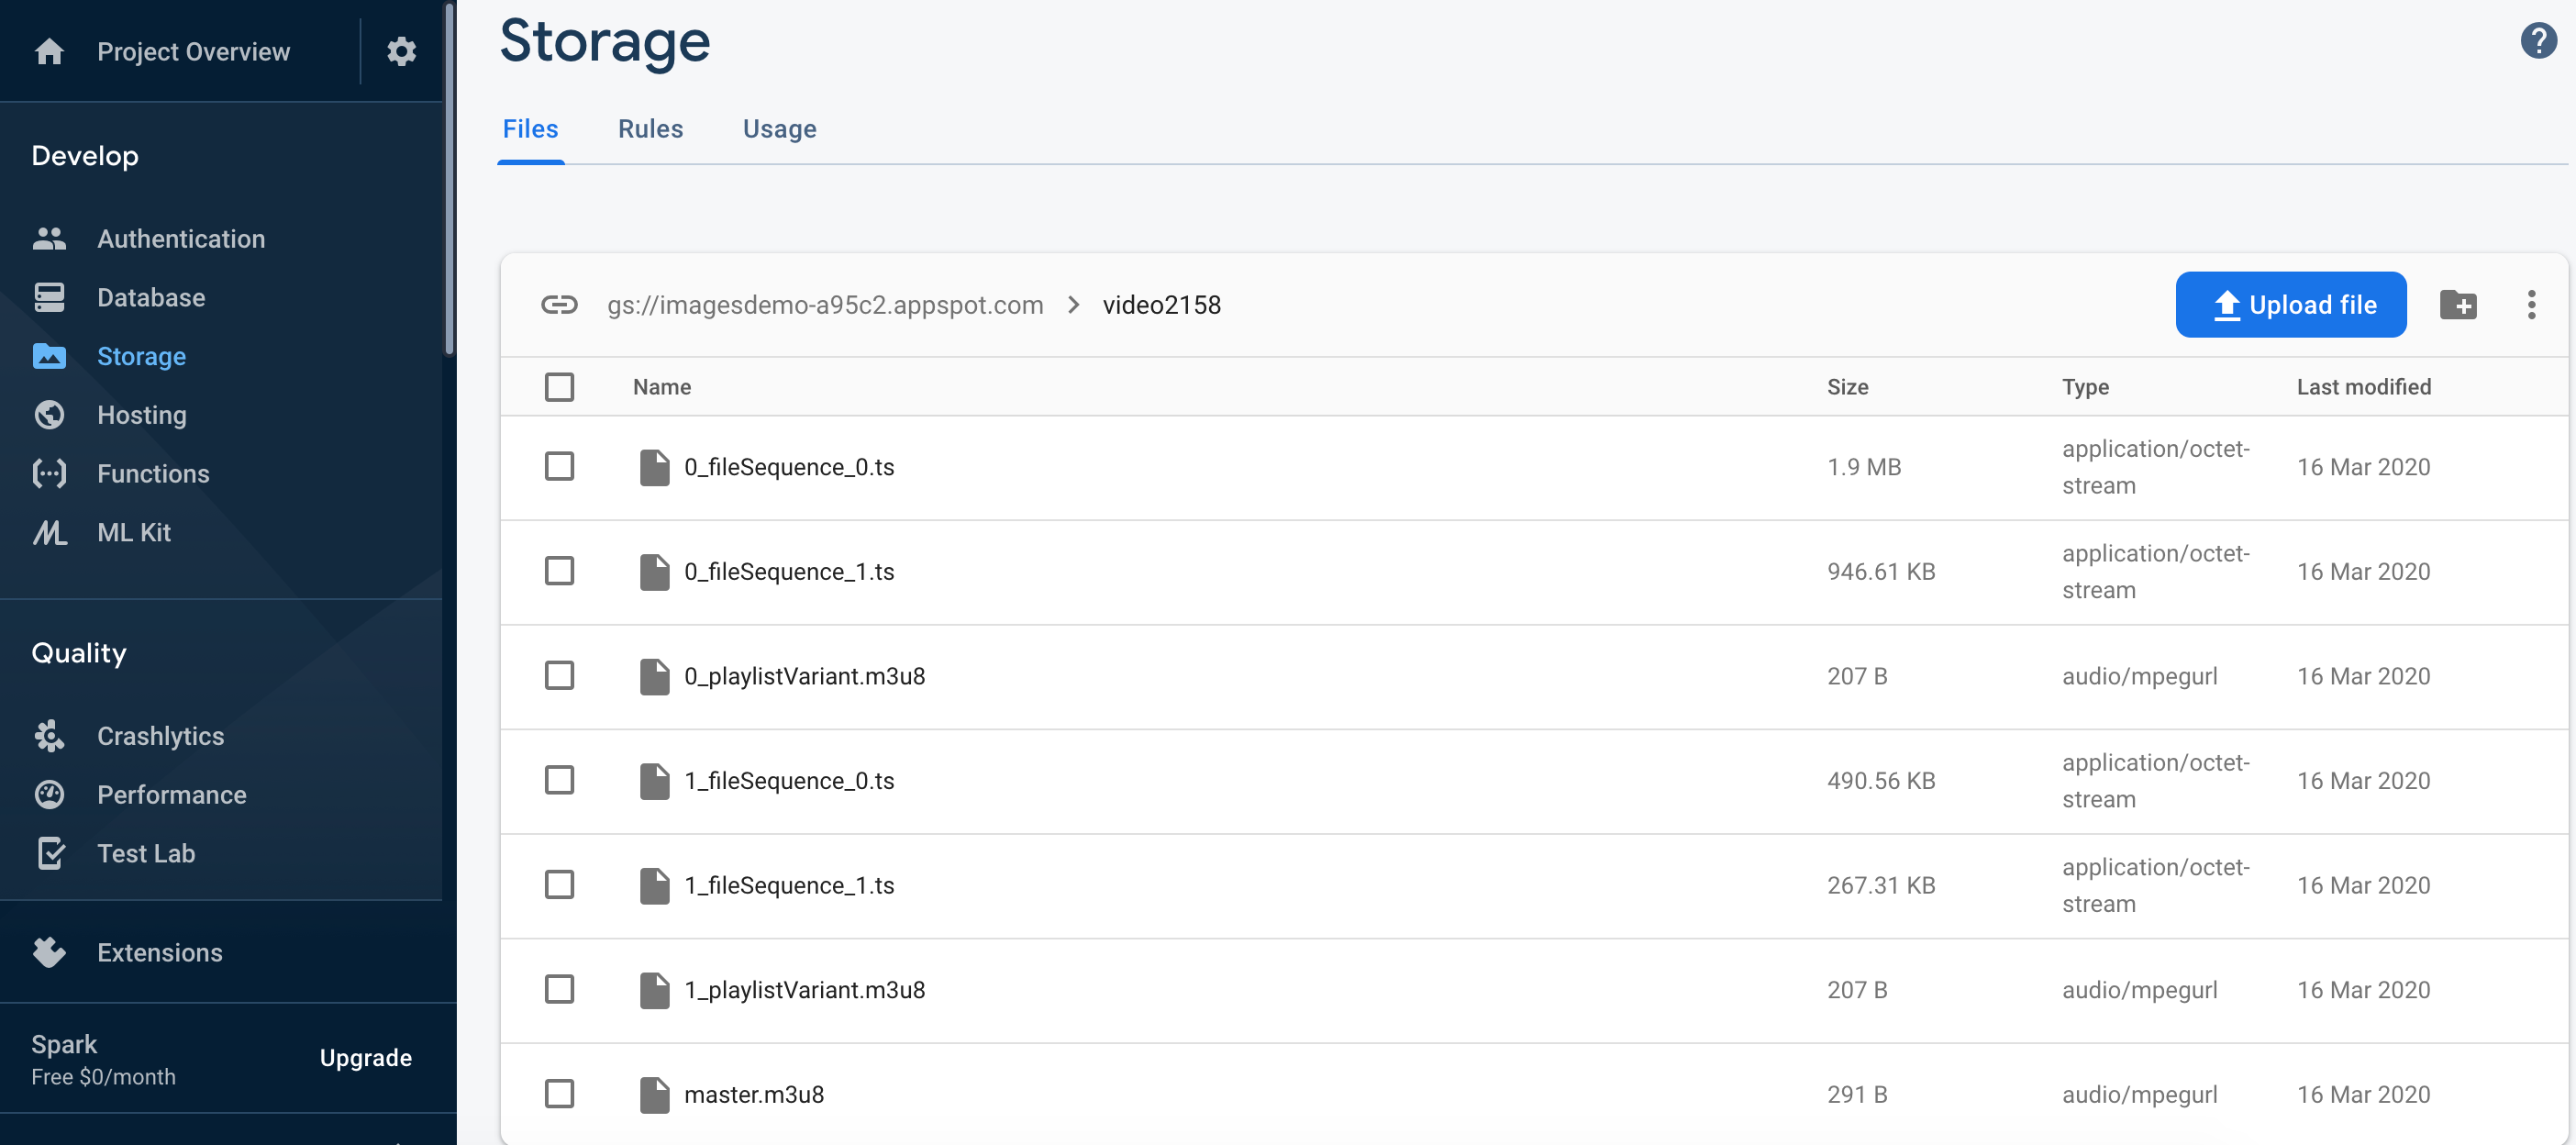
}This is how the uploaded files look like in Cloud Storage:
这是上传文件在Cloud Storage中的样子:
将元数据保存到Firestore (Saving metadata to Firestore)
After we have the video’s storage url, we can save the metadata in Firestore, allowing us to share the videos instantly between users. As we saw in the previous post, saving the metadata to Firestore is easy:
拥有视频的存储URL后,我们可以将元数据保存在Firestore中,从而使我们可以在用户之间即时共享视频。 如上一篇文章所述 ,将元数据保存到Firestore很容易:
await Firestore.instance.collection('videos').document().setData({
  'videoUrl': video.videoUrl,
  'thumbUrl': video.thumbUrl,
  'coverUrl': video.coverUrl,
  'aspectRatio': video.aspectRatio,
  'uploadedAt': video.uploadedAt,
  'videoName': video.videoName,
});
This is how the video document looks like in Firestore:
这是视频文档在Firestore中的外观:

放在一起 (Putting it all together)
Now putting it all together in a processing function that goes through all the stages we’ve seen and updates the state to display the current job status (the rawVideoFile input comes from the image_picker output):
现在将它们放到一个处理函数中,该处理函数经历了我们已经看到的所有阶段并更新状态以显示当前作业状态( rawVideoFile输入来自image_picker输出):
Future<void> _processVideo(File rawVideoFile) async {
    final String rand = '${new Random().nextInt(10000)}';
    final videoName = 'video$rand';
    final Directory extDir = await getApplicationDocumentsDirectory();
    final outDirPath = '${extDir.path}/Videos/$videoName';
    final videosDir = new Directory(outDirPath);
    videosDir.createSync(recursive: true);


    final rawVideoPath = rawVideoFile.path;
    final info = await EncodingProvider.getMediaInformation(rawVideoPath);
    final aspectRatio = EncodingProvider.getAspectRatio(info);


    setState(() {
      _processPhase = 'Generating thumbnail';
      _videoDuration = EncodingProvider.getDuration(info);
      _progress = 0.0;
    });


    final thumbFilePath =
        await EncodingProvider.getThumb(rawVideoPath, thumbWidth, thumbHeight);


    setState(() {
      _processPhase = 'Encoding video';
      _progress = 0.0;
    });


    final encodedFilesDir =
        await EncodingProvider.encodeHLS(rawVideoPath, outDirPath);


    setState(() {
      _processPhase = 'Uploading thumbnail to firebase storage';
      _progress = 0.0;
    });
    final thumbUrl = await _uploadFile(thumbFilePath, 'thumbnail');
    final videoUrl = await _uploadHLSFiles(encodedFilesDir, videoName);


    final videoInfo = VideoInfo(
      videoUrl: videoUrl,
      thumbUrl: thumbUrl,
      coverUrl: thumbUrl,
      aspectRatio: aspectRatio,
      uploadedAt: DateTime.now().millisecondsSinceEpoch,
      videoName: videoName,
    );


    setState(() {
      _processPhase = 'Saving video metadata to cloud firestore';
      _progress = 0.0;
    });


    await FirebaseProvider.saveVideo(videoInfo);


    setState(() {
      _processPhase = '';
      _progress = 0.0;
      _processing = false;
    });
  }
显示视频列表 (Showing the video list)
We saw in the previous post how to listen to Firestore and display a ListView of videos. In short, we used snapshots().listen() to listen to the update stream, and ListView.builder() to create a list that reacts to changes in the stream, via the _videos state field.
我们在上一篇文章中看到了如何收听Firestore和显示视频的ListView。 简而言之,我们使用snapshots().listen()监听更新流,并使用ListView.builder()创建一个列表,该列表通过_videos状态字段对流中的更改做出React。
For each video we display a Card containing a adeInImage.memoryNetwork showing the video's thumbUrl, and next to it the videoName and uploadedAt field. I've used the timeago plugin to display the upload time in a friendly way.
对于每一个视频,我们显示Card包含adeInImage.memoryNetwork显示视频的thumbUrl ,和它旁边的videoName和uploadedAt领域。 我使用了timeago插件以友好的方式显示上传时间。
_getListView() {
    return ListView.builder(
        padding: const EdgeInsets.all(8),
        itemCount: _videos.length,
        itemBuilder: (BuildContext context, int index) {
          final video = _videos[index];
          return GestureDetector(
            onTap: () {
              Navigator.push(
                context,
                MaterialPageRoute(
                  builder: (context) {
                    return Player(
                      video: video,
                    );
                  },
                ),
              );
            },
            child: Card(
              child: new Container(
                padding: new EdgeInsets.all(10.0),
                child: Stack(
                  children: <Widget>[
                    Row(
                      crossAxisAlignment: CrossAxisAlignment.start,
                      children: <Widget>[
                        Stack(
                          children: <Widget>[
                            Container(
                              width: thumbWidth.toDouble(),
                              height: thumbHeight.toDouble(),
                              child: Center(child: CircularProgressIndicator()),
                            ),
                            ClipRRect(
                              borderRadius: new BorderRadius.circular(8.0),
                              child: FadeInImage.memoryNetwork(
                                placeholder: kTransparentImage,
                                image: video.thumbUrl,
                              ),
                            ),
                          ],
                        ),
                        Expanded(
                          child: Container(
                            margin: new EdgeInsets.only(left: 20.0),
                            child: Column(
                              crossAxisAlignment: CrossAxisAlignment.start,
                              mainAxisSize: MainAxisSize.max,
                              children: <Widget>[
                                Text("${video.videoName}"),
                                Container(
                                  margin: new EdgeInsets.only(top: 12.0),
                                  child: Text(
                                      'Uploaded ${timeago.format(new DateTime.fromMillisecondsSinceEpoch(video.uploadedAt))}'),
                                ),
                              ],
                            ),
                          ),
                        ),
                      ],
                    ),
                  ],
                ),
              ),
            ),
          );
        });
  }
And there we have it:
我们终于得到它了:

局限性 (Limitations)
k (Jank)
Video encoding is a CPU-intensive job. Because flutter is single-threaded, running ffmpeg encoding will cause jank (choppy UI) while it’s running. The solution is of course to offload the encoding to a background process. Regrettably, I haven’t found a way to do this easily with flutter_ffmpeg. If you have a working approach for long-running video encoding jobs in the background, please let me know! (To mitigate the jank effects, you can show an encoding progress bar, and not allow any other use of the UI until it’s done.)
视频编码是一项占用大量CPU的工作。 因为flutter是单线程的,所以运行ffmpeg编码会在运行时引起混乱(不稳定的UI)。 解决方案当然是将编码转移到后台进程。 遗憾的是,我还没有找到使用flutter_ffmpeg轻松实现此目的的方法。 如果您有在后台长时间运行视频编码作业的有效方法,请告诉我! (为减轻这种讨厌的效果,您可以显示一个编码进度条,并且在完成之前不允许对UI进行任何其他使用。)
过早终止 (Premature termination)
Another problem with long encoding / uploading jobs, is that the OS can decide to close your app’s process when it’s minimized, before the job has completed. You have to manage the job status and restart / resume the job from where it stopped.
长编码/上传作业的另一个问题是,在作业完成之前,操作系统可以决定在最小化应用程序时关闭该程序。 您必须管理作业状态,并从停止的位置重新启动/恢复作业。
公开访问存储的视频 (Public access to stored videos)
HLS serving from Cloud Storage with this method requires public read access for all files. If you need authenticated access to the videos, you’ll have to find a way to dynamically update the .m3u8 playlist with the Firebase token each time the client downloads the file (because the token will be different).
使用这种方法从Cloud Storage服务的HLS需要对所有文件进行公共读取访问。 如果您需要对视频进行身份验证的访问权,则每次客户端下载文件时,都必须找到一种使用Firebase令牌动态更新.m3u8播放列表的方法(因为令牌会有所不同)。
快取 (Caching)
The flutter video_player plugin doesn't currently support caching. You can try to use this fork which supports caching (I use it in my app), but I haven't tested it with HLS.
flutter video_player插件当前不支持缓存。 您可以尝试使用支持缓存的分叉 (我在应用程序中使用了它),但是我尚未使用HLS对其进行测试。
To use it, add this in `pubspec.yaml`:
要使用它,请将其添加到pubspec.yaml中:
video_player:
  git:
    url: git://github.com/syonip/plugins.git
    ref: a669b59
    path: packages/video_player
结语 (Wrap Up)
I think this is a good DIY approach to hosting videos, for two main reasons:
我认为这是一种很好的DIY托管视频的方法,主要有两个原因:
- Minimal amount of coding — there’s no server code to write or maintain. 最少的编码-无需编写或维护服务器代码。
- Very cheap — If you’re working on a side project and want to start with zero cost, you can. Firebase’s free plan has 1GB storage and 10 GB/month transfer limit, which is good to start with. 非常便宜-如果您正在进行辅助项目,并且希望以零成本开始,则可以。 Firebase的免费计划具有1GB的存储空间和每月10GB的传输限制,这是一个很好的开始。
Thanks for reading! As always, full source code can be found on GitHub.
谢谢阅读! 与往常一样,可以在GitHub上找到完整的源代码。
If you have any questions, please leave a comment!
如有任何疑问,请发表评论!
Originally published at https://www.learningsomethingnew.com.
firebase 数据存储


 448
448

 被折叠的 条评论
为什么被折叠?
被折叠的 条评论
为什么被折叠?
 到【灌水乐园】发言


