


In Android, we generally code the navigation logic using Intent to travel between activities and fragment transactions to navigate between fragments. Google’s Navigation Architecture Component simplifies navigation in the Android app. In this piece, we discuss both the basic and the advanced way of using the Navigation component.
在Android中,我们通常使用Intent在活动之间移动和fragment transactions在片段之间进行导航的方式对导航逻辑进行编码。 Google的导航架构组件可简化Android应用中的导航。 在本文中,我们将讨论使用Navigation组件的基本方法和高级方法。
有什么问题? (What Was the Problem?)
When developing the apps with multiple fragments we tend to do a lot of fragment transactions to navigate between them. Writing these fragment transactions and handling the back stack takes a certain amount of effort. If you don’t implement it the right way, another major issue is the IllegalStateException that can occur.
在开发具有多个片段的应用程序时,我们倾向于做很多片段事务以在它们之间导航。 编写这些碎片事务并处理后向堆栈需要一定的工作量。 如果您没有以正确的方式实现它,则另一个主要问题是IllegalStateException 可能会发生。
解 (Solution)
In order to make navigation easier, Google has introduced the Navigation component. With the help of the navigation component, it will be easy to code the navigation between fragments and handling cases like back stack, exception cases, etc. Let’s start exploring the Navigation component.
为了简化导航,Google引入了Navigation组件。 借助Navigation组件,可以轻松地在片段和处理案例之间进行导航编码,例如处理后向堆栈,异常案例等。让我们开始探索Navigation组件。
什么是导航组件? (What is the Navigation Component?)
The Navigation component is a set of libraries, a plugin, and tooling that simplifies Android navigation. Android Jetpack’s Navigation component helps us to implement navigation, from simple button clicks to more complex patterns, such as app bars and the navigation drawer. The Navigation component also ensures a consistent and predictable user experience by adhering to an established set of principles.
Navigation组件是一组库,一个插件和可简化Android导航的工具。 Android Jetpack的Navigation组件可帮助我们实现导航 ,从简单的按钮单击到更复杂的模式,例如应用程序栏和导航抽屉。 Navigation组件还通过遵循一套既定的原则来确保一致且可预测的用户体验。
The Navigation component consists of three key parts.
Navigation组件由三个关键部分组成。
导航图 (Navigation graph)
This is a new resource type — an XML file that contains all navigation-related information in one centralized location. This includes all the individual content areas in your app, called destinations, as well as the possible paths a user can take through your app.
这是一种新的资源类型-一个XML文件,在一个集中位置包含所有与导航有关的信息。 这包括应用程序中所有单独的内容区域(称为目标),以及用户可以通过您的应用程序执行的可能路径。

The Navgraph from the navigation editor can be visualized as above. The screens above are called destinations — they’re are nothing but fragments. The arrows between these destinations are called actions — they define the paths the user can take navigate.
导航编辑器中的Navgraph可以如上所述可视化。 上面的屏幕称为目的地-它们不过是片段。 这些目标之间的箭头称为动作-它们定义了用户可以导航的路径。
导航主机 (NavHost)
This is an empty container that displays destinations from your navigation graph. The Navigation component contains a default NavHost implementation NavHostFragment, which displays fragment destinations.
这是一个空容器,显示导航图中的目的地。 Navigation组件包含默认的NavHost实现NavHostFragment ,该实现显示片段目的地。
导航控制器 (NavController)
An object that manages app navigation within a NavHost. The NavController orchestrates the swapping of destination content in the NavHost as users move through your app.
在NavHost中管理应用程序导航的对象。 当用户在您的应用中移动时, NavHost在NavController协调目标内容的交换。
Note: The navigation graph can be visualized in the new Navigation Editor available from Android Studio 3.3. This awesome feature lets us see all the navigations in one place
注意:可以在 Android Studio 3.3中提供 的新 导航编辑器中 可视化导航图 。 这项出色的功能使我们可以在一处查看所有导航
好处 (Benefits)
The Navigation component provides a number of other benefits, including:
Navigation组件提供了许多其他好处,包括:
- Handling fragment transactions. 处理碎片交易。
Handling
UpandBackactions correctly by default.处理
Up和Back正确的行动默认。- Providing standardized resources for animations and transitions. 提供动画和过渡的标准化资源。
- Implementing and handling deep linking. 实施和处理深层链接。
- Including navigation UI patterns, such as navigation drawers and bottom navigation, with minimal additional work. 包括导航UI模式,例如导航抽屉和底部导航,而无需进行额外的工作。
Safe Args — a Gradle plugin that provides type safety when navigating and passing data between destinations.
Safe Args-一个Gradle插件,在目的地之间导航和传递数据时提供类型安全。
ViewModelsupport — you can scope aViewModelto a navigation graph to share UI-related data between the graph’s destinations.ViewModel支持-您可以将ViewModel范围ViewModel在导航图上,以在图的目标之间共享与UI相关的数据。
例 (Example)
Let’s look at how this component works by creating a simple example. We’ll create a simple Activity with two fragments and check how we can use Navigation component to navigate between these fragments
让我们通过创建一个简单的示例来查看此组件的工作方式。 我们将创建一个包含两个片段的简单Activity ,并检查如何使用Navigation组件在这些片段之间导航
第1步 (Step 1)
Create a new project with androidx support or refactor your codebase to support androidx. AndroidX is the open-source project that the Android team uses to develop, test, package, version and release libraries within Jetpack. Check out more at Androidx OverView.
创建一个具有androidx支持的新项目,或重构您的代码库以支持androidx。 AndroidX是Android团队用来在Jetpack中开发,测试,打包,版本和发布库的开源项目。 进一步了解Androidx OverView 。
第2步 (Step 2)
Add dependencies in build.gradle.
在build.gradle添加依赖build.gradle 。
dependencies {
  def nav_version = "2.3.0-alpha02"
  // Java language implementation
  implementation "androidx.navigation:navigation-fragment:$nav_version"
  implementation "androidx.navigation:navigation-ui:$nav_version"
  // Kotlin
  implementation "androidx.navigation:navigation-fragment-ktx:$nav_version"
  implementation "androidx.navigation:navigation-ui-ktx:$nav_version"
  // Dynamic Feature Module Support
  implementation "androidx.navigation:navigation-dynamic-features-fragment:$nav_version"
  // Testing Navigation
  androidTestImplementation "androidx.navigation:navigation-testing:$nav_version"
}
These are different dependencies for different requirements. Choose as per your requirement.
这些是针对不同需求的不同依赖项。 根据您的要求选择。
第三步 (Step 3)
Create a navigation graph.
创建一个导航图。
To add a navigation graph to your project:
要将导航图添加到项目中:
- In the project window, right-click on the res directory and select New > Android Resource File. The New Resource File dialog appears. 在项目窗口中,右键单击res目录,然后选择“新建”>“ Android资源文件”。 出现“新资源文件”对话框。
- Type a name in the File name field, such as “nav_graph”. 在“文件名”字段中输入名称,例如“ nav_graph”。
- Select Navigation from the Resource type drop-down list, and then click OK. 从资源类型下拉列表中选择导航,然后单击确定。
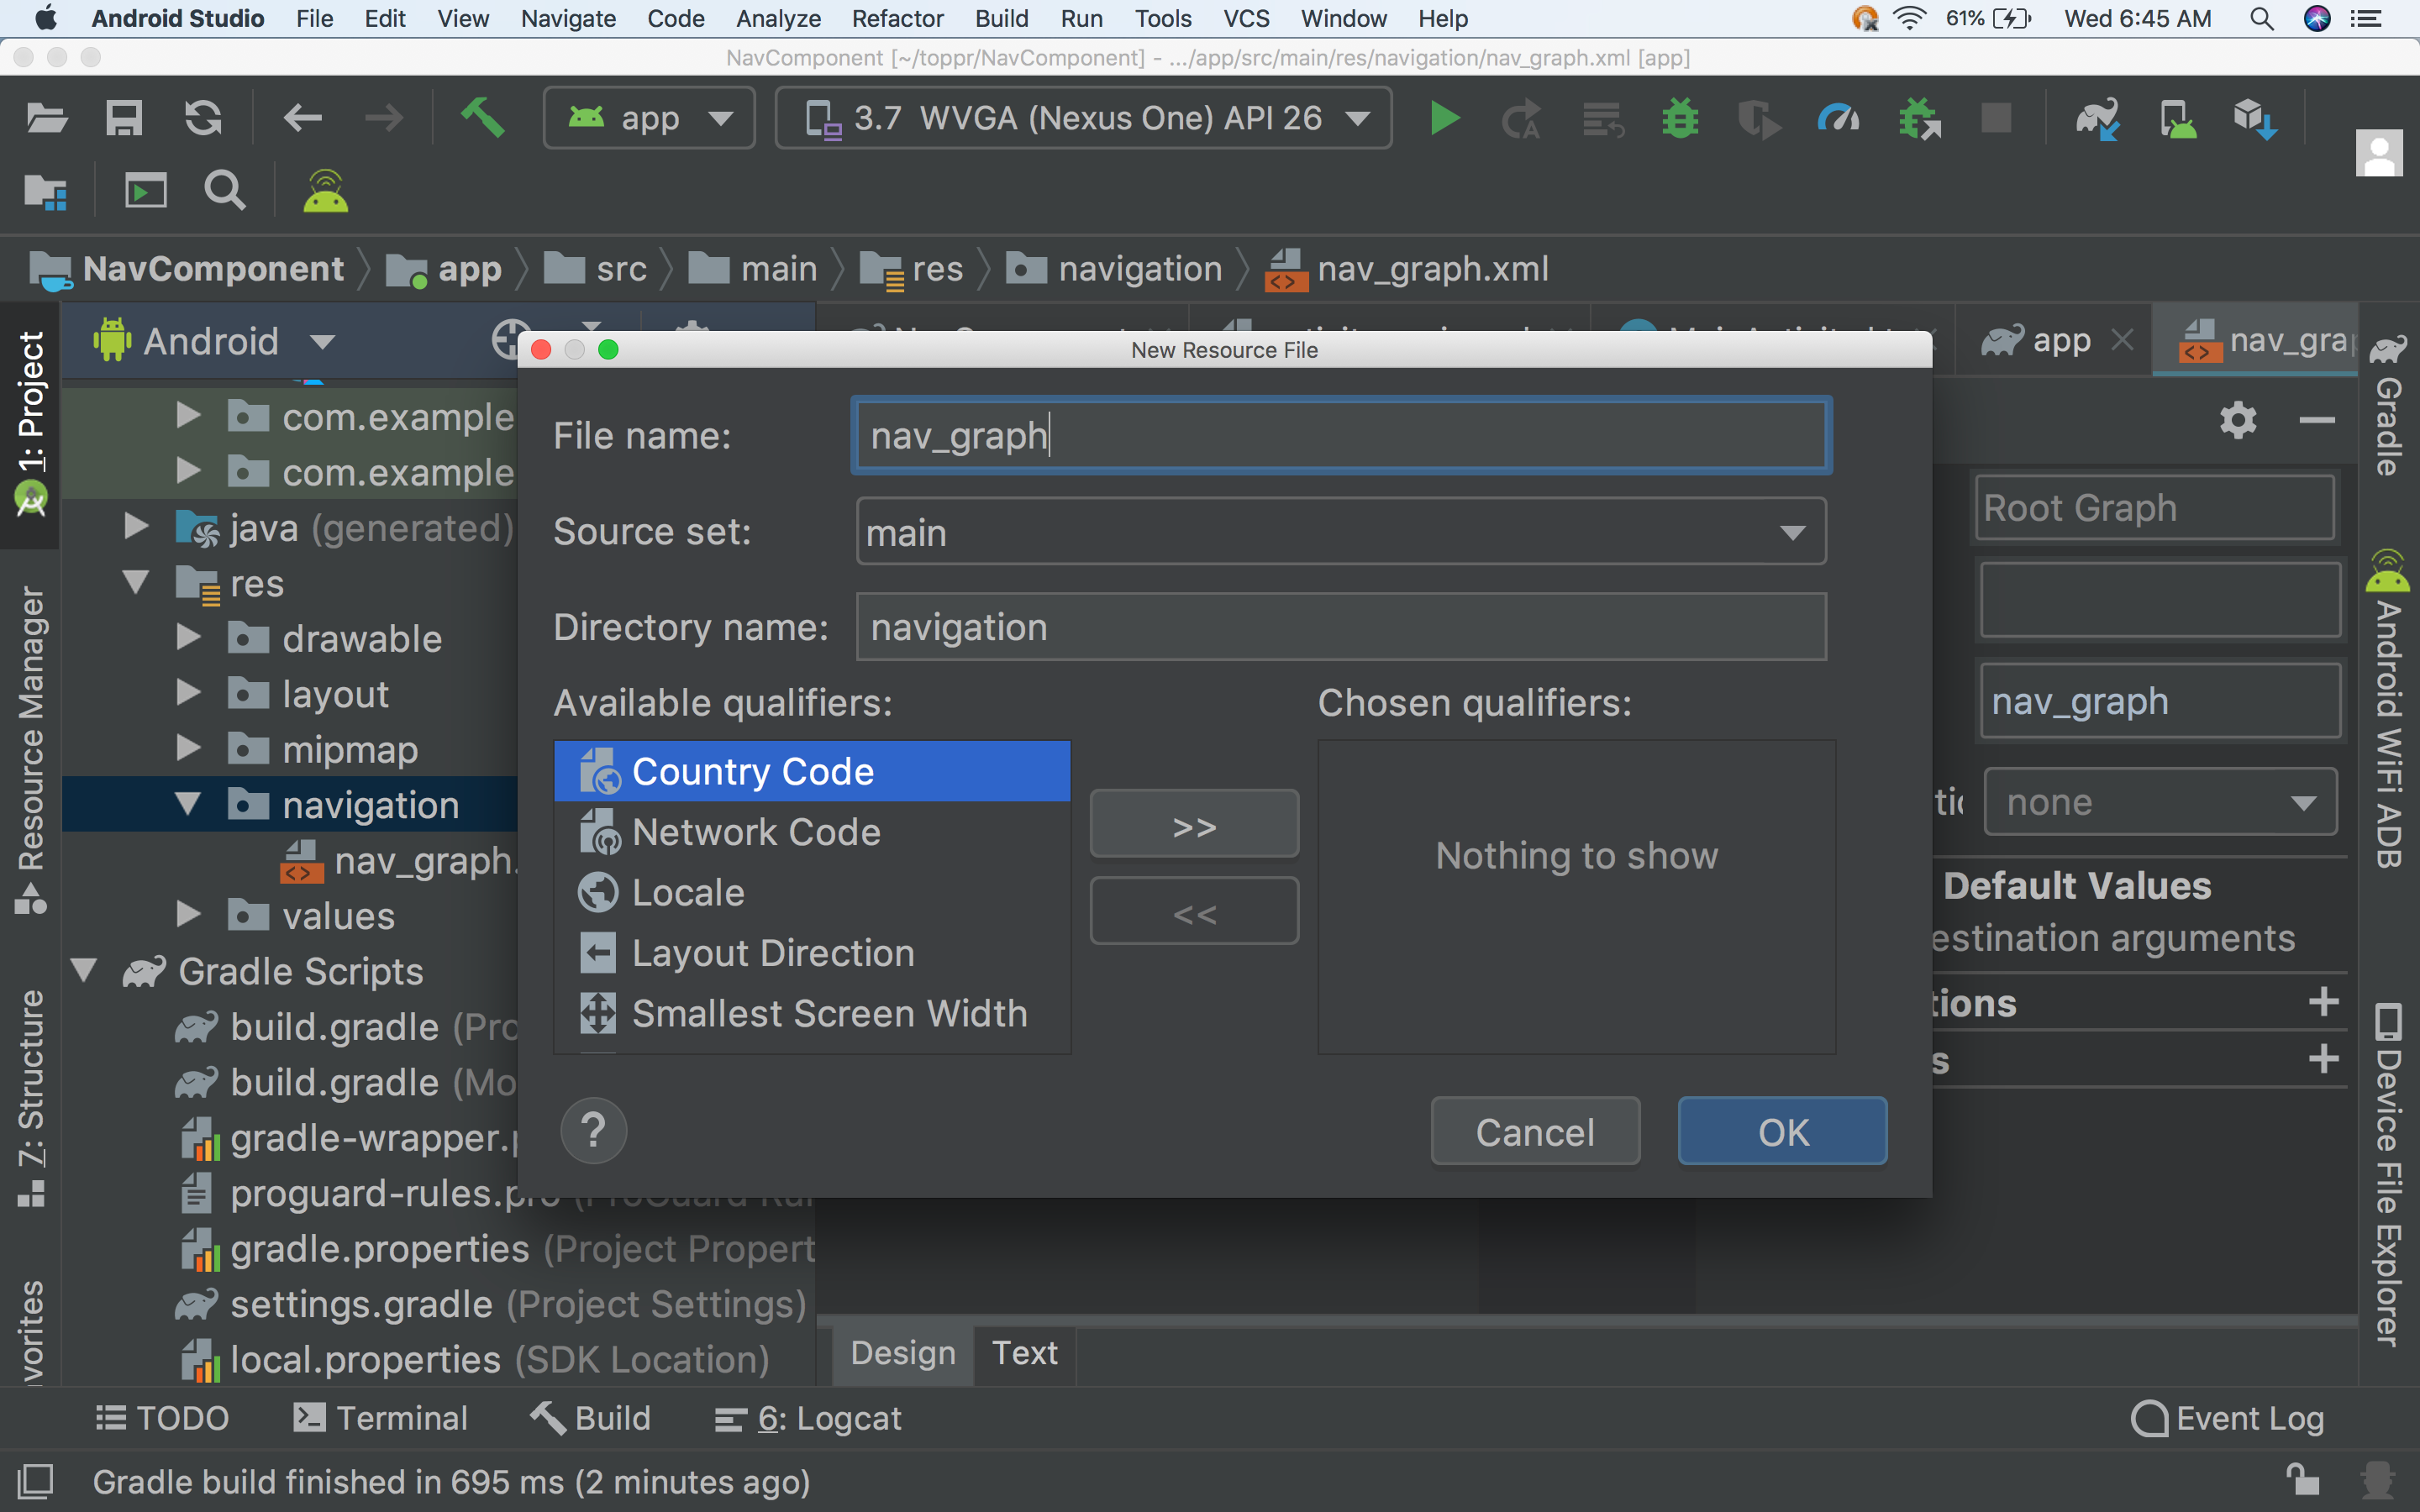
When you add your first navigation graph, Android Studio creates a navigation resource directory within the res directory. This directory contains your navigation graph resource file. The file created will looking something like this:
添加第一个导航图时,Android Studio会在res目录中创建一个navigation资源目录。 该目录包含您的导航图资源文件。 创建的文件将如下所示:
<?xml version="1.0" encoding="utf-8"?>
<navigation xmlns:android="http://schemas.android.com/apk/res/android"
    xmlns:app="http://schemas.android.com/apk/res-auto"
    android:id="@+id/nav_graph"></navigation>
The <navigation> element is the root element of a navigation graph. As you add destinations and connecting actions to your graph, you can see the corresponding <destination> and <action> elements here as child elements. If you have nested graphs, they appear as child <navigation> elements.
<navigation>元素是导航图的根元素。 在向图形添加目标并连接动作时,您可以在此处看到相应的<destination>和<action>元素作为子元素。 如果您有嵌套图 ,则它们将显示为子<navigation>元素。
第三步 (Step 3)
Add a NavHost to an activity XML file
将NavHost添加到活动XML文件
Anatomy of a nav_host_fragment:
nav_host_fragment解剖:
The
android:namethe attribute contains the class name of yourNavHost. implementation.android:name属性包含NavHost的类名称。 实施。The
app:navGraphattribute associates theNavHostFragmentwith a navigation graph. The navigation graph specifies all of the destinations in thisNavHostFragmentto which users can navigate.app:navGraph属性将NavHostFragment与导航图相关联。 导航图指定此NavHostFragment中用户可以导航到的所有目的地。The
app:defaultNavHost=”true”attribute ensures that yourNavHostFragmentintercepts the system Back button. Note that only oneNavHostcan be the default. If you have multiple hosts in the same layout (two-pane layouts, for example), be sure to specify only one defaultNavHost.app:defaultNavHost=”true”属性可确保您的NavHostFragment拦截系统的“后退”按钮。 请注意,只有一台NavHost可以是默认值。 如果在同一布局中有多个主机(例如,两窗格布局),请确保仅指定一个默认NavHost。
第4步 (Step 4)
Add destinations and paths in nav_graph.
在nav_graph添加目的地和路径。
Before adding destinations create two fragments and their XMLs:
在添加目标之前,请创建两个片段及其XML:

Now create the XML file for FragmentOne class.
现在为FragmentOne类创建XML文件。
Similarly, create the second fragment. Now let’s add the destinations to the nav_graph.
同样,创建第二个片段。 现在,将目的地添加到nav_graph 。
Anatomy of a destination:
目的地剖析:
The
Typefield indicates whether the destination is implemented as a fragment, activity, or other custom class in your source code.“
Type字段指示目标是在源代码中实现为片段,活动还是其他自定义类。The
Labelfield contains the name of the destination’s XML layout file.Label字段包含目标的XML布局文件的名称。The
IDfield contains the ID of the destination which is used to refer to the destination in code.ID字段包含目标的ID,该目标用于在代码中引用目标。The
Classdropdown shows the name of the class that is associated with the destination. You can click this dropdown to change the associated class to another destination type.“
Class下拉列表显示与目标关联的类别的名称。 您可以单击此下拉列表,将关联的类更改为其他目标类型。
From the navigation editor, the view will be as follows:
在导航编辑器中,视图将如下所示:

Now add NavHost to the activity_main XML file:
现在将NavHost添加到activity_main XML文件中:
<androidx.constraintlayout.widget.ConstraintLayout
    xmlns:android="http://schemas.android.com/apk/res/android"
    xmlns:app="http://schemas.android.com/apk/res-auto"
    xmlns:tools="http://schemas.android.com/tools"
    android:layout_width="match_parent"
    android:layout_height="match_parent"
    tools:context=".MainActivity">
    <fragment
        android:id="@+id/nav_host_fragment"
        android:name="androidx.navigation.fragment.NavHostFragment"
        android:layout_width="match_parent"
        android:layout_height="match_parent"
        app:defaultNavHost="true"
        app:navGraph="@navigation/nav_graph" />
</androidx.constraintlayout.widget.ConstraintLayout>
Our MainActivity will look like this:
我们的MainActivity将如下所示:
package com.example.navigationsampleimport android.support.v7.app.AppCompatActivity
import android.os.Bundle
import androidx.navigation.findNavControllerclass MainActivity : AppCompatActivity() {    override fun onCreate(savedInstanceState: Bundle?) {
        super.onCreate(savedInstanceState)
        setContentView(R.layout.activity_main)
    }    override fun onSupportNavigateUp() = findNavController(R.id.nav_host_fragment).navigateUp()}
That’s it — we’re done.
就这样-我们完成了。
Hit the run button and check out the magic of the Navigation component:
点击运行按钮,并查看Navigation组件的魔力:

Behind the magic is a single line of code in fragment one, that actions on the button click — so there’s no need for the fragment transactions.
魔术的背后是片段1中的一行代码,只需单击按钮即可执行操作-因此无需片段事务。
btn_next.setOnClickListener {view.findNavController().navigate(R.id.action_fragment1_to_fragment2)}We need to find the NavController and give it the action ID we specified in XML.
我们需要找到NavController并NavController提供我们在XML中指定的操作ID。
其他须知 (Additional Things to know)
With each navigation action, a destination is added to the back stack.
通过每个导航操作,将目的地添加到后堆栈中。
In the previous implementation, when we move from fragment one to fragment two and click back press on fragment two we come back to fragment one.
在先前的实现中,当我们从片段1移到片段2并单击并按回片段2时,我们回到片段1。
But suppose that in the case of a splash fragment this was not the expected behavior. In that case, we need to add additional attributes to action in the nav_graph or we had the option of adding these properties programmatically using NavOptions. NavOptions stores special options for navigating actions.
但是,假设在飞溅片段的情况下,这不是预期的行为。 在那种情况下,我们需要在nav_graph添加其他属性以进行操作,或者我们可以选择使用NavOptions编程方式添加这些属性。 NavOptions存储用于导航动作的特殊选项。
Let’s check the properties at XML:
让我们检查XML的属性:
For the above-mentioned Splash issue, we need to use two different properties:
对于上述飞溅问题,我们需要使用两个不同的属性:
app:popUpTo="@id/fragmentOne"app:popUpToInclusive="true"On adding these properties to nav_graph, it’s modified as below:
将这些属性添加到nav_graph , 修改如下:
The result would be like something this:
结果将是这样的:

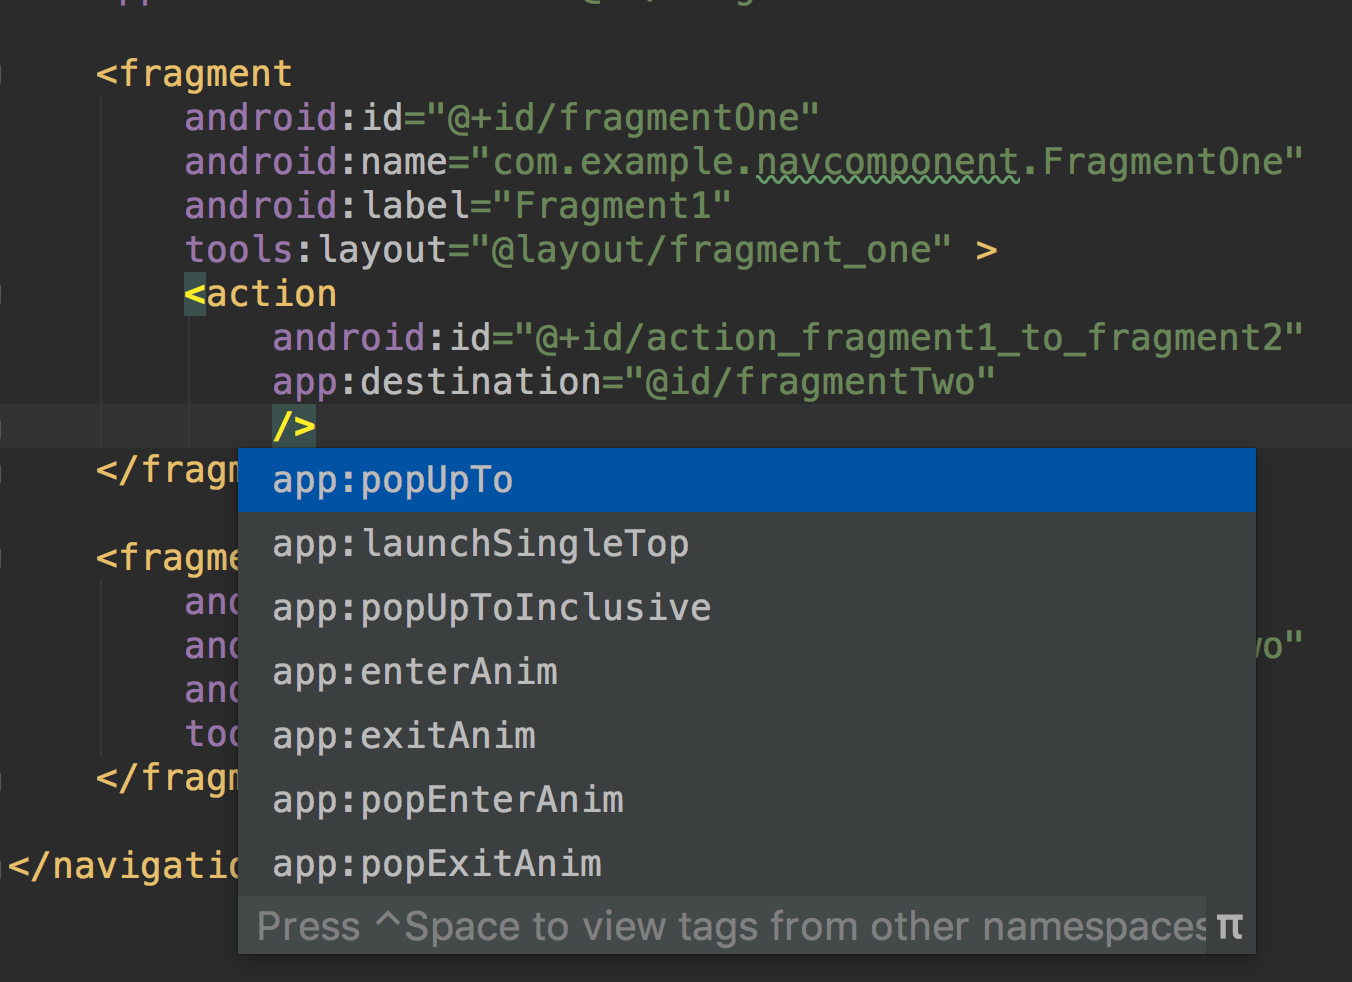
动作剖析 (Anatomy of an action)
<action android:id="@+id/next_action"app:destination="@+id/flow_step_one"app:enterAnim="@anim/slide_in_right"app:exitAnim="@anim/slide_out_left"app:popEnterAnim="@anim/slide_in_left"app:popExitAnim="@anim/slide_out_right"app:popUpTo="@id/fragmentOne"app:popUpToInclusive="true"The
idfield contains the ID of the action which is used by to NavHost where to navigationid字段包含NavHost导航到的操作的ID。There are four animation types —
app:enterAnim, app:exitAnim, app:popEnterAnim, app:popExitAnimthat we can specify while the fragment initial addition and removal and the same thing while poping from other fragments共有四种动画类型
app:enterAnim, app:exitAnim, app:popEnterAnim, app:popExitAnim,我们可以在片段初始添加和移除时指定它们,而从其他片段app:enterAnim, app:exitAnim, app:popEnterAnim, app:popExitAnim可以指定相同的东西The
app:popUpToattribute is used to signify the poping option of the current fragment until where it should pop back from the current action. This pops all non-matching destinations from the back stack until this destination is found.该
app:popUpTo属性用于表示当前片段的弹出选项,直到它应从当前操作弹出。 这将从后堆栈中弹出所有不匹配的目标,直到找到该目标为止。The
app:popUpToInclusivethis option is to specify the poping option whether to include the current instance or not该
app:popUpToInclusive此选项用于指定弹出选项是否包含当前实例The
app:launchSingleTopis used whether this navigation action should launch as single-top (i.e., there will be at most one copy of a given destination on the top of the back stack). This functions similarly to howandroid.content.Intent.FLAG_ACTIVITY_SINGLE_TOPworks with activities.app:launchSingleTop用于此导航操作是否应作为单顶启动(即,后堆栈顶部最多有一个给定目标的副本)。 此功能类似于android.content.Intent.FLAG_ACTIVITY_SINGLE_TOP如何处理活动。
Note: If you don’t use app:popUpToInclusive while frequently navigating between fragments, your back stack would contain two or more instances of a particular destination.
注意:如果您不使用 app:popUpToInclusive 尽管经常在片段之间导航,但是后退堆栈将包含特定目的地的两个或多个实例。
To achieve the Splash behavior programmatically we can use NavOptions builder. On the button click, we need to specify the NavController:
要以编程方式实现飞溅行为,我们可以使用NavOptions构建器。 在按钮上单击,我们需要指定NavController :
btn_next.setOnClickListener {view.findNavController().navigate(R.id.action_fragment1_to_fragment2,null, NavOptions.Builder()
            .setPopUpTo(R.id.fragmentOne, true)
            .build())}
Learn more about NavOptions.
了解有关NavOptions的更多信息。
如何在片段之间传递参数 (How to Pass Arguments Between Fragments)
It’s common when navigating between fragments to share data between them. One of the easiest ways is to use a shared ViewModel. The other way is like sending arguments and reading them back to the destination. As we’re using the Navigation component, lets now check out how to share the data between two fragments using the safe args plugin.
在片段之间导航以在它们之间共享数据时很常见。 最简单的方法之一是使用共享的ViewModel 。 另一种方法是发送参数并将其读回目的地。 当我们使用Navigation组件时,现在让我们看看如何使用safe args在两个片段之间共享数据。 插入。
安全Args (Safe Args)
The Safe Args plugin generates code that allows us to do type-safe navigation and argument passing. Safe args allows you to get rid of code like this when passing values between destinations: TK
的 安全Args 插件生成允许我们执行的代码 类型安全的导航和参数传递。 安全参数可让您在目标之间传递值时摆脱如下代码:TK
Firstly, to add Safe Args to your project, include the following classpath in your top-level build.gradle file:
首先,要将Safe Args添加到您的项目中,请在顶级build.gradle文件中包含以下classpath :
buildscript {
    repositories {
        google()
    }
    dependencies {
        def nav_version = "2.3.0-alpha01"
        classpath "androidx.navigation:navigation-safe-args-gradle-plugin:$nav_version"
    }
}
To generate Java language code suitable for Java or mixed Java and Kotlin modules, add this line to your app or module’s build.gradle file:
要生成适用于Java或Java和Kotlin混合模块的Java语言代码,请将此行添加到您的应用或模块的 build.gradle文件中:
apply plugin: "androidx.navigation.safeargs"Alternatively, to generate Kotlin code suitable for Kotlin-only modules add this line:
或者,要生成适用于仅Kotlin模块的Kotlin代码,请添加以下行:
apply plugin: "androidx.navigation.safeargs.kotlin"After adding the above line our app-level build.gradle will look something like this:
添加以上行后,我们的应用程序级别build.gradle将如下所示:
apply plugin: 'com.android.application'
apply plugin: 'kotlin-android'
apply plugin: 'kotlin-android-extensions'
apply plugin: "androidx.navigation.safeargs.kotlin" // add this
After you enable Safe Args, the plugin generates code that contains classes and methods for each action we’ve defined. For each action, Safe Args also generates a class for each originating destination — the destination from which the action originates. The generated class name is a combination of the originating destination class name and the word “Directions”. For example, if the destination is named FragmentOne, the generated class is named FragmentOneDirections.
启用Safe Args后,插件会生成代码,其中包含我们定义的每个操作的类和方法。 对于每个动作,Safe Args还会为每个原始目的地(该动作所源自的目的地)生成一个类。 生成的类名称是原始目标类名称和单词“ Directions”的组合。 例如,如果目的地名为FragmentOne ,则生成的类名为FragmentOneDirections 。
The generated class contains a static method for each action defined in the originating destination. This method takes any defined action parameters as arguments and returns a NavDirections object that you can pass to navigate(). We can find generated code in the generated folder.
生成的类包含针对原始目标中定义的每个操作的静态方法。 此方法将所有已定义的操作参数作为参数,并返回一个NavDirections对象,您可以将其传递给NavDirections navigate() 。 我们可以在生成的文件夹中找到生成的代码。

As an example, assume we have a navigation graph with a single action that connects the originating destination, FragmentOne, to a receiving destination, FragmentTwo.
例如,假设我们有一个导航图,该导航图具有一个将原始目的地FragmentOne连接到接收目的地FragmentTwo 。
Safe Args generates a FragmentOneDirections class with a single method, actionFragmentOneToFragmentTwo() that returns a NavDirections object. This returned NavDirections object can then be passed directly to navigate(), as shown in the following example:
安全Args使用单个方法actionFragmentOneToFragmentTwo()生成一个FragmentOneDirections类,该方法返回NavDirections对象。 然后,可以将返回的NavDirections对象直接传递给navigate() ,如以下示例所示:
In FragmentOne it creates arguments to pass it using the Directories object:
在FragmentOne它创建参数以使用Directories对象传递它:
btn_next.setOnClickListener {val action = FragmentOneDirections.actionFragment1ToFragment2("Android") view.findNavController().navigate(action)}In fragment Two it receives the args:
在片段2中,它接收args :
override fun onActivityCreated(savedInstanceState: Bundle?) {
    super.onActivityCreated(savedInstanceState)
    val args: FragmentTwoArgs by navArgs()
    args.let {Toast.makeText(activity!!,it.name,Toast.LENGTH_SHORT).show()}}
You can find the generated code in the build folder:
您可以在build文件夹中找到生成的代码:

支持的参数类型 (Supported argument types)

结论 (Conclusion)
By now you should have basic knowledge of implementing the Navigation component, so try to eliminate the legacy of fragment transactions.
到目前为止,您应该已经具有实现Navigation组件的基本知识,因此请尝试消除片段事务的遗留问题。


 2055
2055

 被折叠的 条评论
为什么被折叠?
被折叠的 条评论
为什么被折叠?
 到【灌水乐园】发言


