


mysql 库比对
Easily pick a Date or a Time in your Flutter app
在Flutter应用中轻松选择日期或时间
I wrote a routine to quickly and easily pick a date or time in your Flutter app. It wasn’t an original concept but based on the work by developer, Miguel Ruivo. While working on my latest project, you see, I was looking for a means to pick a date and a time using Cupertino (iOS-style) widgets. That’s when I stumbled upon Miguel’s NativeCupertinoPicker.dart. It works with the CupertinoDatePicker class which supplies an iOS-style DateTime picker.
我编写了一个例程,可以快速轻松地在Flutter应用中选择日期或时间。 这不是最初的概念,而是基于开发人员Miguel Ruivo的工作。 您会看到,在处理我的最新项目时,我正在寻找一种使用Cupertino(iOS风格)小部件来选择日期和时间的方法。 那是我偶然发现Miguel的NativeCupertinoPicker.dart的时候 。 它与CupertinoDatePicker类一起使用,该类提供了iOS风格的DateTime选择器。
If I didn’t have Miguel’s work as a foundation of my own work, I wouldn’t have the time now to write about it here and share it with you. See how this works? I openly credit Miguel Ruivo here and now for my own contribution.
如果我没有将Miguel的作品作为自己作品的基础,那么我现在没有时间在这里写下它并与您分享。 看看这是如何工作的? 我在此公开地赞扬Miguel Ruivo所做的贡献。
That’s the power of open source in this day and age. For example, we’re a fledgling community of developers, and our shared efforts contribute to that community as a whole. I’ll pay it forward now and offer the routine, showCupertinoDatePicker.dart, to our fledging Flutter community. Like Ruivo’s routine, my routine also utilizes the CupertinoDatePicker class which, in turn, works with the showCupertinoModalPopup function to display a circular ‘spinner’ at the bottom of the screen of your mobile app.
这就是当今时代开源的力量。 例如,我们是一个新兴的开发人员社区,我们的共同努力为整个社区做出了贡献。 我现在将其支付,并向我们刚刚起步的Flutter社区提供例程showCupertinoDatePicker.dart 。 像Ruivo的例程一样,我的例程也利用CupertinoDatePicker类 , 该类又与showCupertinoModalPopup函数一起在移动应用程序屏幕的底部显示圆形“旋转器”。
Many of you will now take a copy of this routine and get on with your day. You’ve got deadlines, and besides, your manager will be coming around your desk shortly. Yes, take it and make it your own. I’ll invite the rest of you to stick around, and I’ll explain how to use this routine in your next Flutter app.
现在,您中的许多人将复制此例程,然后开始自己的一天。 您有最后期限,此外,您的经理很快就会到您的办公桌旁走来。 是的,把它做成自己的。 我将邀请其他人继续学习,并在下一个Flutter应用程序中说明如何使用此例程。
仅屏幕截图。 单击要点。 (Screenshots Only. Click For Gists.)
As always, I prefer using screenshots over gists to show code in my articles. I find them easier to work with, and easier to read. However, you can click/tap on them to see the code in a gist or in Github. Ironically, it’s better to read this article about mobile development on your computer than on your phone. Besides, we program mostly on our computers; not on our phones. For now.
与往常一样,我更喜欢使用屏幕截图而不是要点来在文章中显示代码。 我发现它们更易于使用和阅读。 但是,您可以单击/点击它们以查看要点或Github中的代码。 具有讽刺意味的是,最好在计算机上阅读这篇文章,而不是在手机上阅读有关移动开发的文章。 此外,我们主要在计算机上编程; 不在我们的手机上。 目前。
没有运动图片没有社交媒体 (No Moving Pictures No Social Media)
Note, there will be gif files in this article demonstrating aspects of the topic at hand. However, it’s said viewing such gif files is not possible when reading this article on platforms like Instagram, Facebook, etc. Please, be aware of this and maybe read this article on medium.com
请注意,本文中将有gif文件,演示手头主题的各个方面。 但是,据说在Instagram,Facebook等平台上阅读本文时,无法查看此类gif文件。请注意这一点,并可能在medium.com上阅读此文章
Let’s begin.
让我们开始。
Android与iOS (Android vs iOS)
I’m currently working on an app for a client. Of course, it’s written in Flutter and will perform on an Android phone as well as an iPhone. Below, are screenshots of the same entry screen in the app I’m working on. Clicking on the date field or on the time field will display the appropriate means to pick another date or time depending on the platform. Easy peasy.
我目前正在为客户开发应用程序。 当然,它是用Flutter编写的,可以在Android手机和iPhone上执行。 以下是我正在处理的应用程序中相同输入屏幕的屏幕截图。 单击日期字段或时间字段将显示根据平台选择其他日期或时间的适当方法。 十分简单。
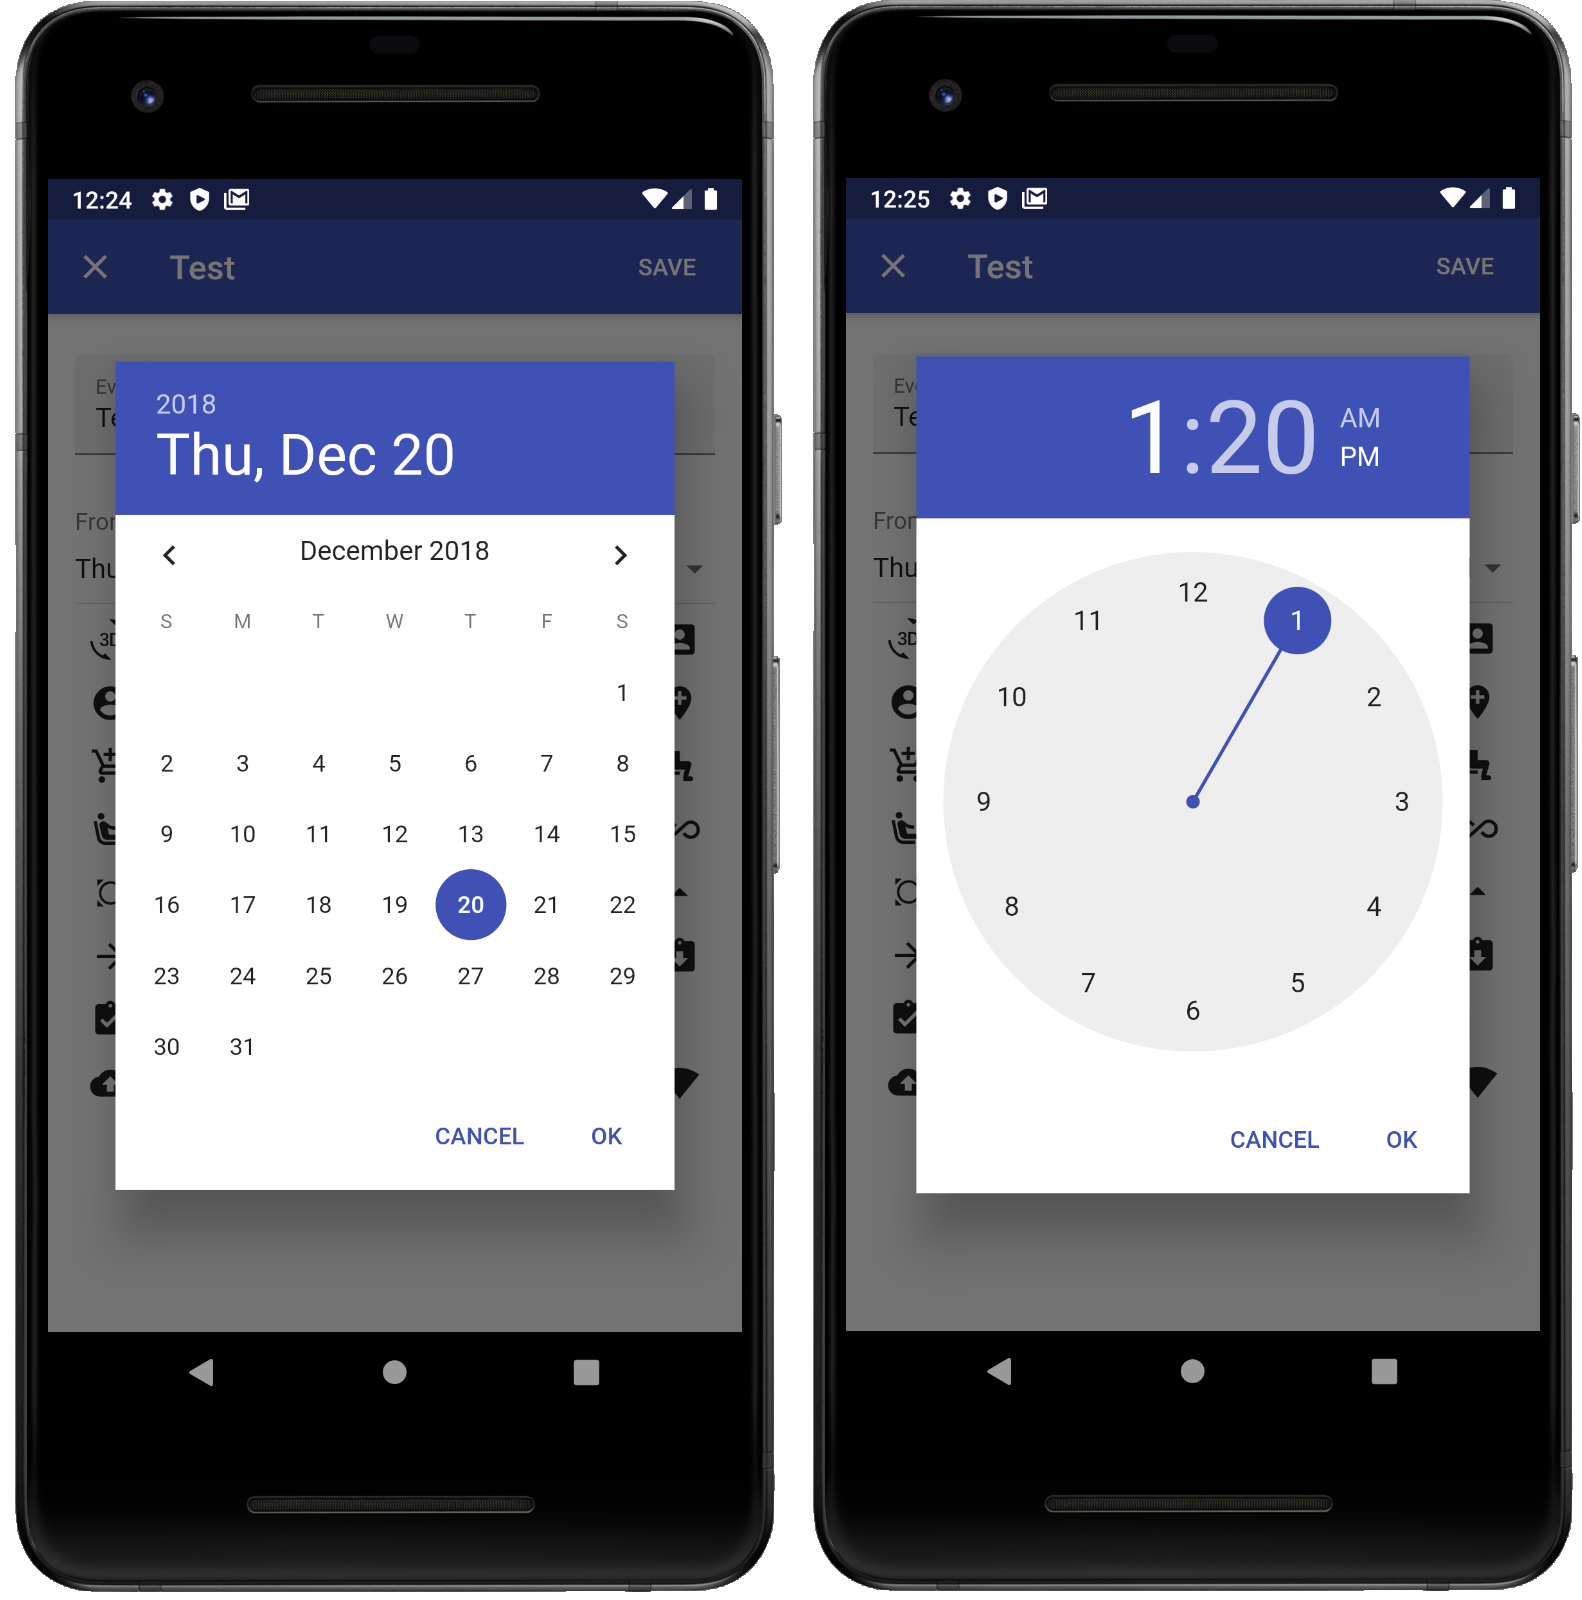
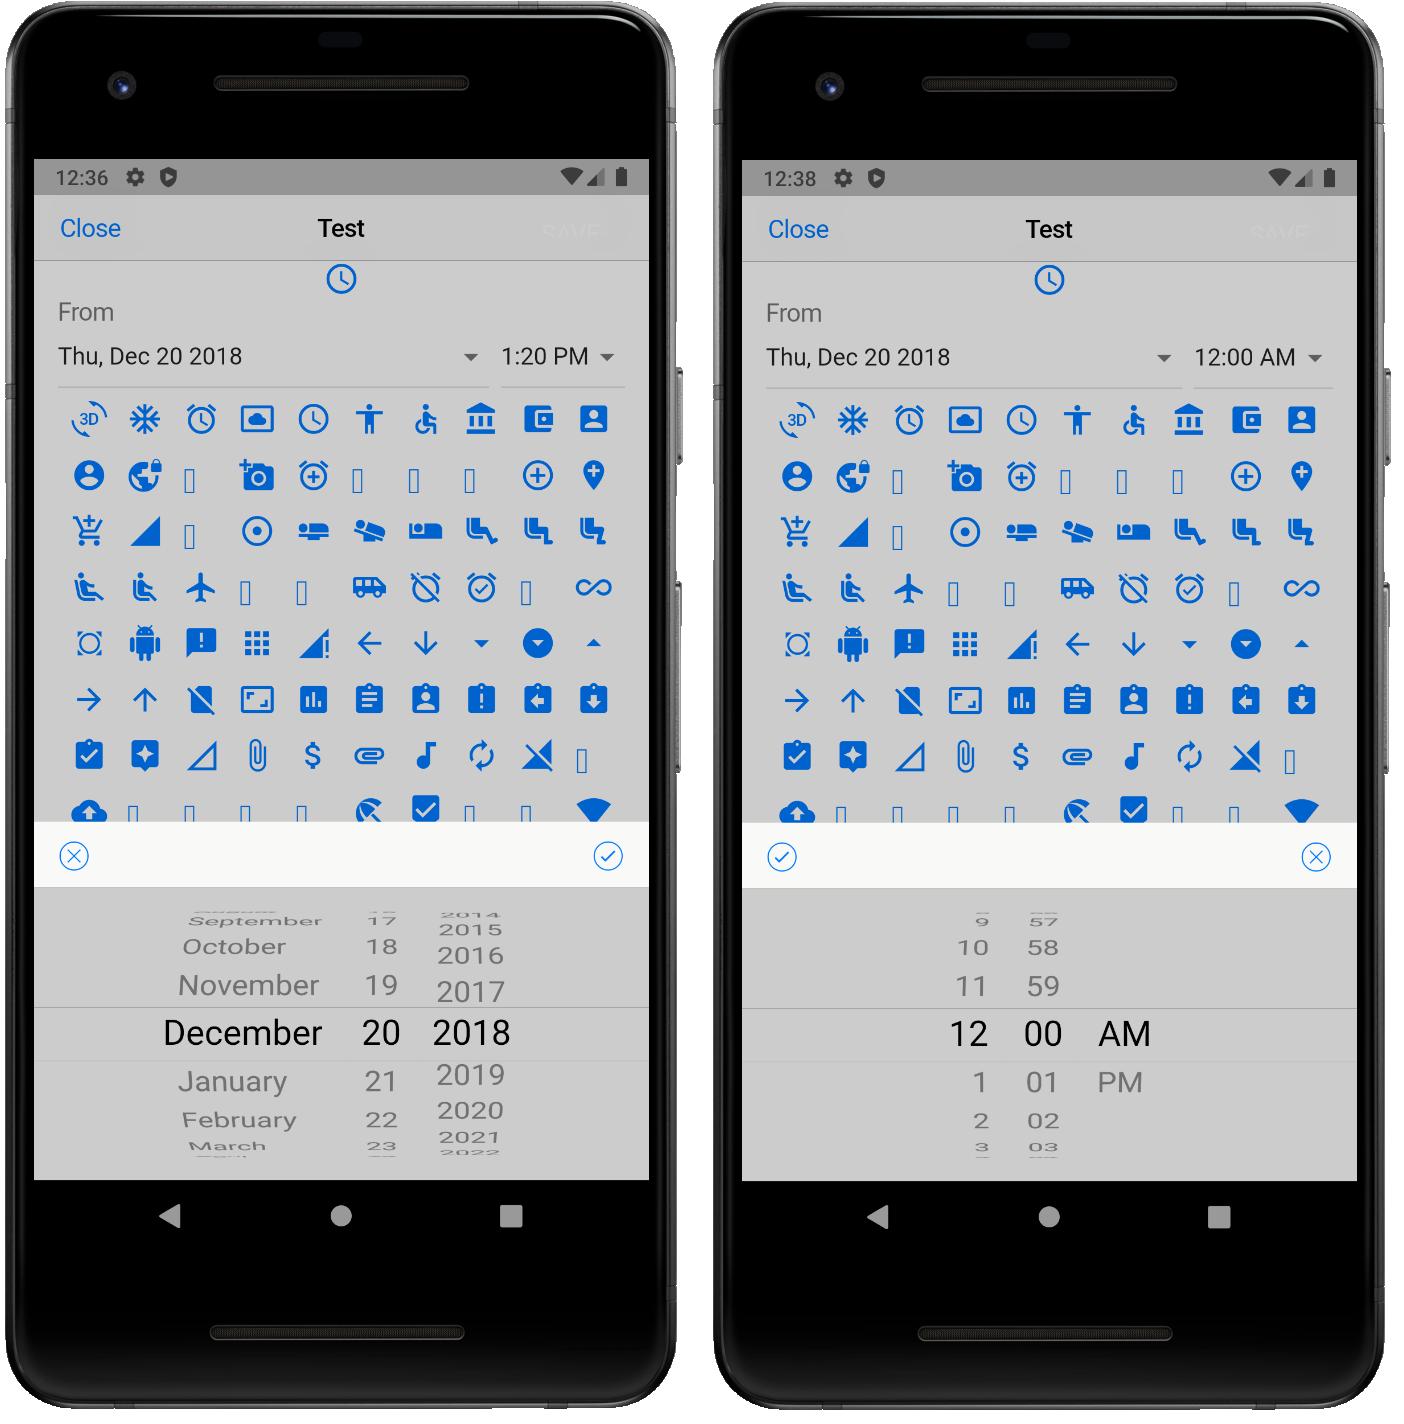
As you see, the Material theme is used for Android phones, and the Cupertino theme is used for iPhones. This article will concentrate on the Cupertino version of the DateTime picker. I’ve written its Android counterpart, but I’m not going to share that one. Kidding. I’ll get around to that another day. Besides, like my Cupertino version examined here, there’s really nothing to the Android version. It just works with functions already provided by Flutter: the showDatePicker function and the showTimePicker function. In the case of this Cupertino version, it works with Flutter’s CupertinoDatePicker class and showCupertinoModalPopup function. Let’s take a look now at how these two are used in my provided routine.
如您所见, Material主题用于Android手机,而Cupertino主题用于iPhone。 本文将重点介绍DateTime选择器的Cupertino版本。 我已经编写了与之对应的Android,但是我不会分享它。 开玩笑的 我会改天。 此外,就像我在这里检查的Cupertino版本一样,Android版本实际上没有任何内容。 它仅可与Flutter已提供的功能一起使用: showDatePicker函数和showTimePicker函数。 对于此Cupertino版本,它可与Flutter的CupertinoDatePicker类和showCupertinoModalPopup 函数一起使用 。 现在让我们看一下我提供的例程中如何使用这两个。
选择一个日期 (Pick a Date)
Below is the code you would write, for example, when your user taps on the date field to open up the date picker. My routine, showCupertinoDatePicker, has all the same parameters found in Flutter’s CupertinoDatePicker class. It further includes the parameters found in the function, showCupertinoModalPopup. In other words, you have all the parameters needed to work with these two components. So again, my routine just gets these components together so you can pick a date or a time or even a DateTime value. Take a look at the code below.
下面是您要编写的代码,例如,当用户点击日期字段以打开日期选择器时。 我的例程showCupertinoDatePicker具有在Flutter的CupertinoDatePicker类中发现的所有相同参数。 它还包括在函数showCupertinoModalPopup中找到的参数。 换句话说,您拥有使用这两个组件所需的所有参数。 再一次,我的例程将这些组件放在一起,以便您可以选择日期或时间,甚至是DateTime值。 看一下下面的代码。
  onTap: () {
    showCupertinoDatePicker(context,
        mode: CupertinoDatePickerMode.date,
        initialDateTime: date,
        leftHanded: false,
        onDateTimeChanged: (DateTime date) {
          DateTime result;
          if (date.year > 0) {
             result = DateTime(date.year, date.month, date.day,
                time.hour, time.minute);
          } else { // The user has hit the cancel button.
             result = initDate;
          }
          onChanged(result);
    });
  },
)
Note, this code is to pick a date and so the named parameter, mode, is passed the value, CupertinoDatePickerMode.date. Further, there is the required named parameter, onDateTimeChanged. It’s a voidCallback function anticipating a parameter of type DateTime. Hence, as you see in the code above, an anonymous function is defined to receive such a DateTime value, and in this case, returns this DateTime result to a function called, onChange(). Note, the parameter, leftHanded: false. We’ll get around to that parameter shortly.
注意,此代码是选择一个日期,因此命名参数mode会被传递值CupertinoDatePickerMode.date 。 此外,还有必需的命名参数onDateTimeChanged。 这是一个voidCallback函数,用于预期DateTime类型的参数。 因此,如您在上面的代码中所见,定义了一个匿名函数来接收这样的DateTime值,并且在这种情况下,将此DateTime结果返回给名为onChange ()的函数。 注意,参数leftHanded:false 。 我们将很快讨论该参数。
选择时间 (Pick a Time)
As above, the code below is involved when the user taps on the time field. This time, it is to pick …well…a time, and so the named parameter, mode, is passed the value, CupertinoDatePickerMode.time, which will then display the time and not a date to the user. Again, in this case, the required callback function for the parameter, onDateTimeChanged, is defined to accept the time picked by the user.
如上所述,当用户点击时间字段时,将涉及以下代码。 这一次,是要选择……好吧……一个时间,然后将已命名的参数mode传递给值CupertinoDatePickerMode.time ,然后它将向用户显示时间而不是日期。 同样,在这种情况下,参数onDateTimeChanged所需的回调函数被定义为接受用户选择的时间。
  onTap: () {
    showCupertinoDatePicker(context,
        mode: CupertinoDatePickerMode.time,
        initialDateTime: time,
        leftHanded: false,
        onDateTimeChanged: (DateTime time) {
      DateTime result;
      if (time.hour > 0 || time.minute > 0) {
        result = DateTime(date.year, date.month, date.day,
            time.hour, time.minute);
      } else { // The user has hit the cancel button.
        result = DateTime(date.year, date.month, date.day,
            initTime.hour, initTime.minute);
      }
      onChanged(result);
    });
  },
功能 (The Function)
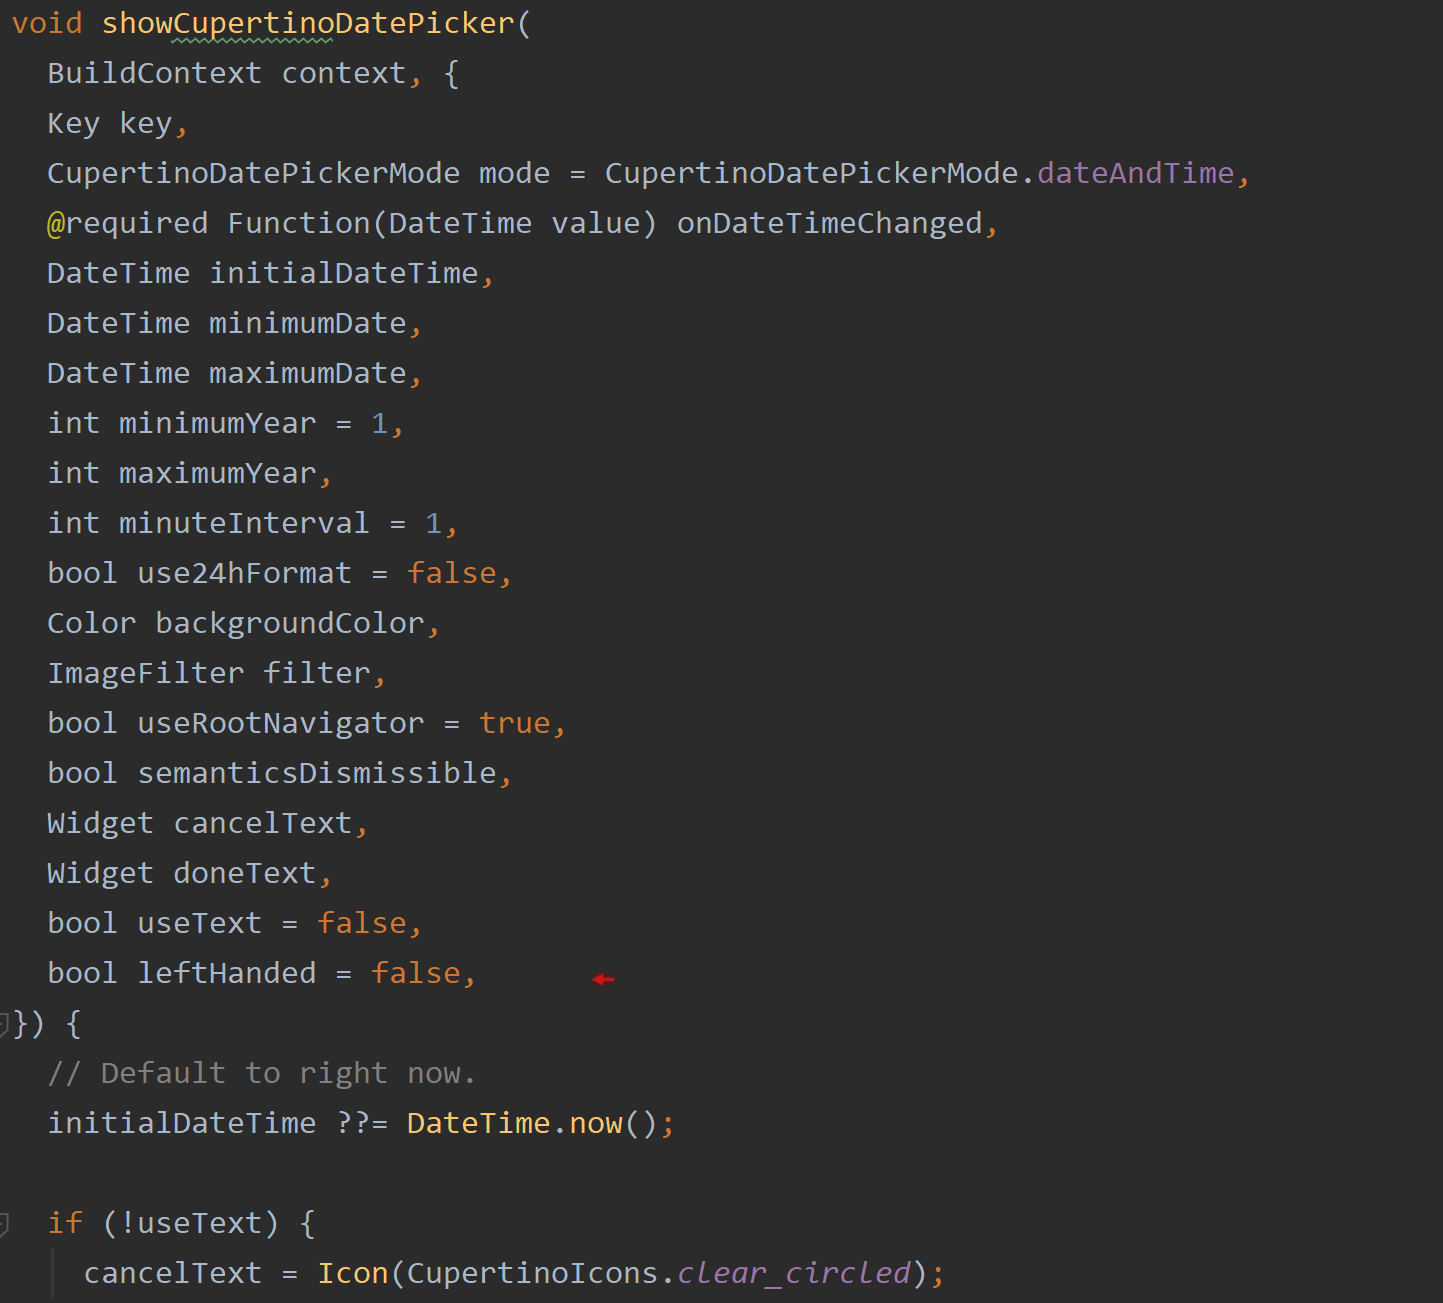
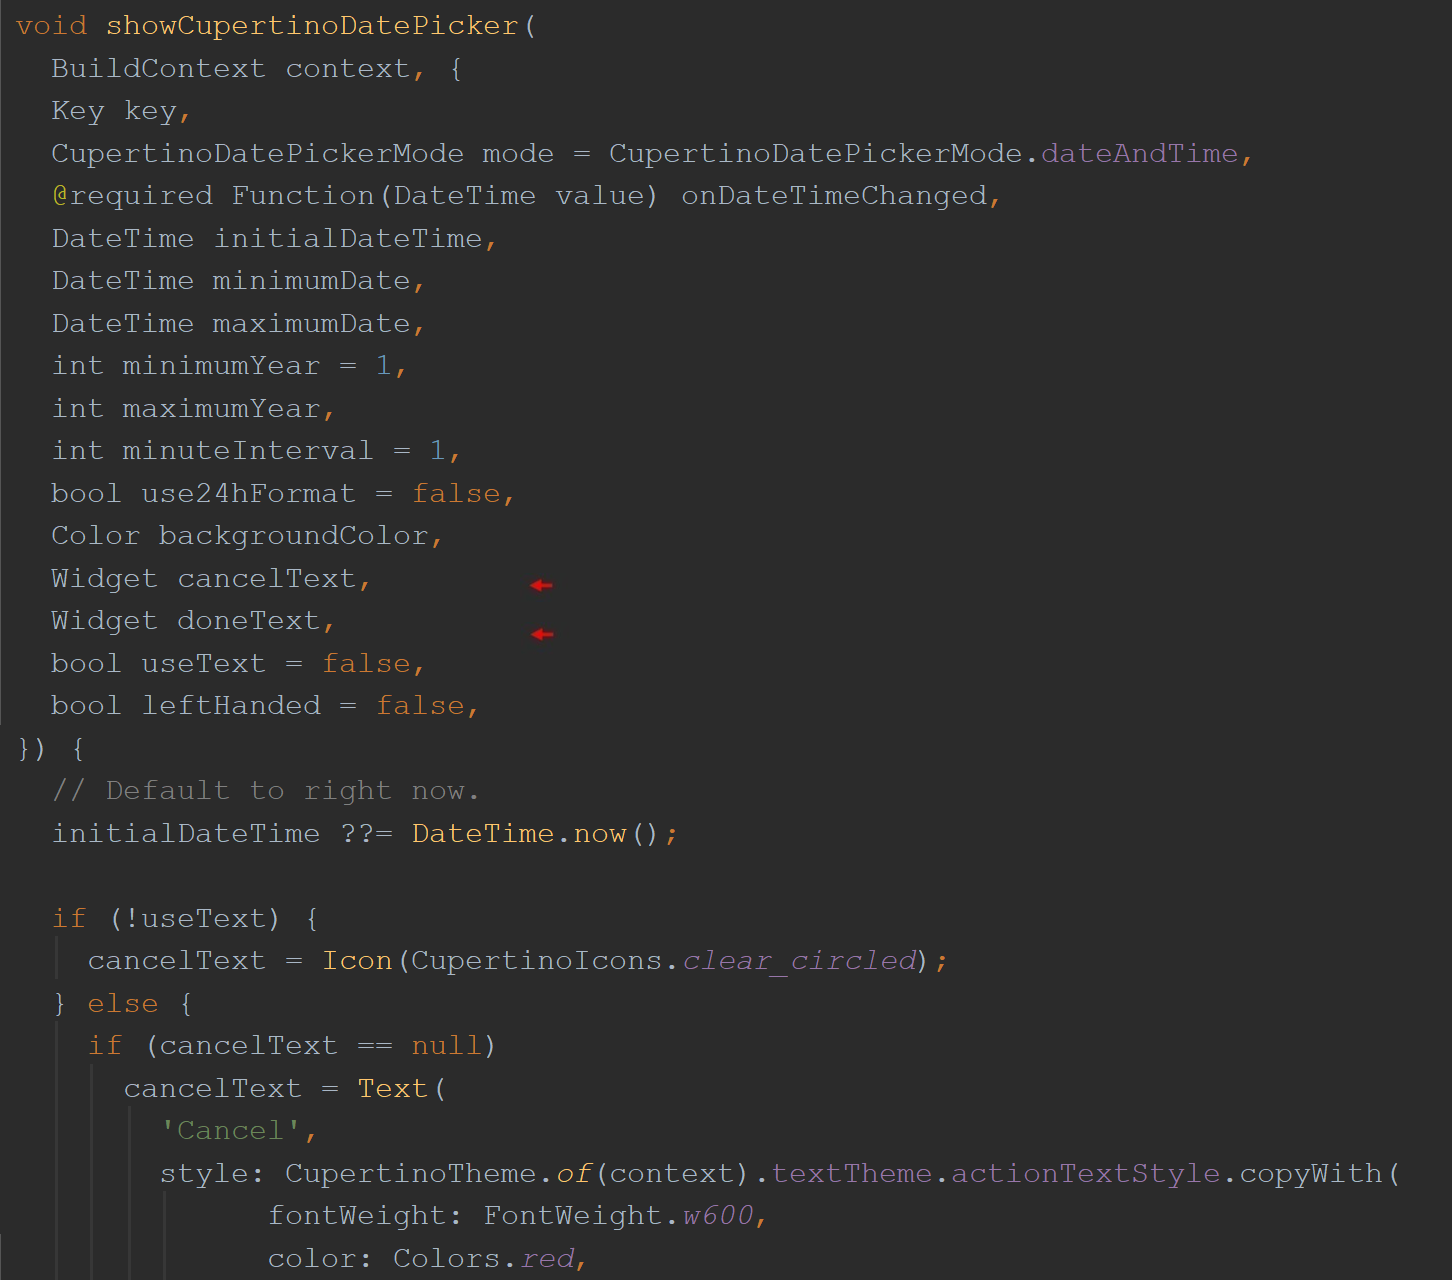
Below is a screenshot of the routine itself and its many parameters. Again these are the same parameters found with the CupertinoDatePicker class and the showCupertinoModalPopup function with some additional parameters particular to this routine. Let’s take a look at these particular parameters now.
下面是例程本身及其许多参数的屏幕截图。 同样,这些是在CupertinoDatePicker类和showCupertinoModalPopup函数中发现的相同参数,以及此例程特有的一些其他参数。 现在让我们看一下这些特定的参数。
左手或右手 (Left or Right Handed)
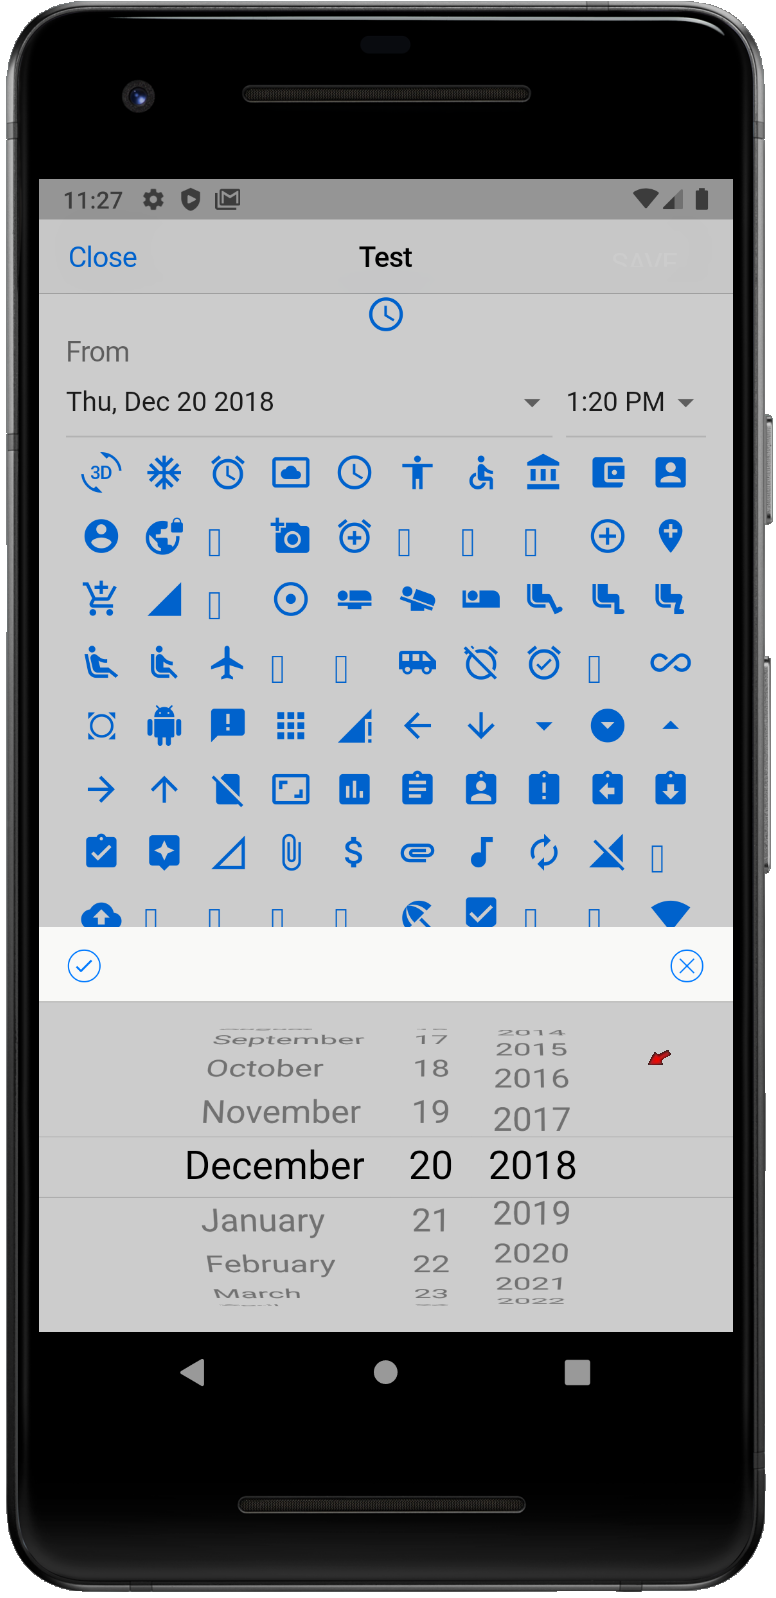
The named parameter, leftHanded, can be set to true when you want to switch the buttons around. In the screenshot below, the ‘Save’ button is on the right. However, you have the means to switch it with the Cancel button and be displayed instead on the left. A feature severely lacking with mobile apps.
当您要切换按钮时,可以将命名参数leftHanded设置为true。 在下面的屏幕截图中,“保存”按钮在右侧。 但是,您可以使用“取消”按钮进行切换,并显示在左侧。 移动应用严重缺乏的功能。

文字或无文字 (Text or No Text)
I’ve intentionally used icons to represent the two buttons. Doing so then makes the routine more receptive to international use. There’s no Localization to worry about. One icon saves the selected data or time, and the other icon will cancel the operation. However, if you pass the named parameter, useText, with the boolean value of true, then default English labels are used instead. The code displayed below now includes this named parameter, useText. Further down is then a screenshot of the app now displaying text.
我故意使用图标来表示两个按钮。 这样做可以使例行程序更易于接受国际使用。 无需担心本地化。 一个图标保存选择的数据或时间,另一个图标将取消操作。 但是,如果您传递的命名参数useText的布尔值为true,则将使用默认的英语标签。 现在,下面显示的代码包括此命名参数useText。 接下来,是现在显示文本的应用程序的屏幕截图。
  showCupertinoDatePicker(context,
     mode: CupertinoDatePickerMode.date,
     initialDateTime: date,
//     leftHanded: true,
     useText: true,
     onDateTimeChanged: (DateTime date) {
     DateTime result;
     if (date.year > 0) {
        result = DateTime(date.year, date.month,
                        time.hour, time.minute);
     } else {
        result = initDate;
     }
     onChanged(result);
  });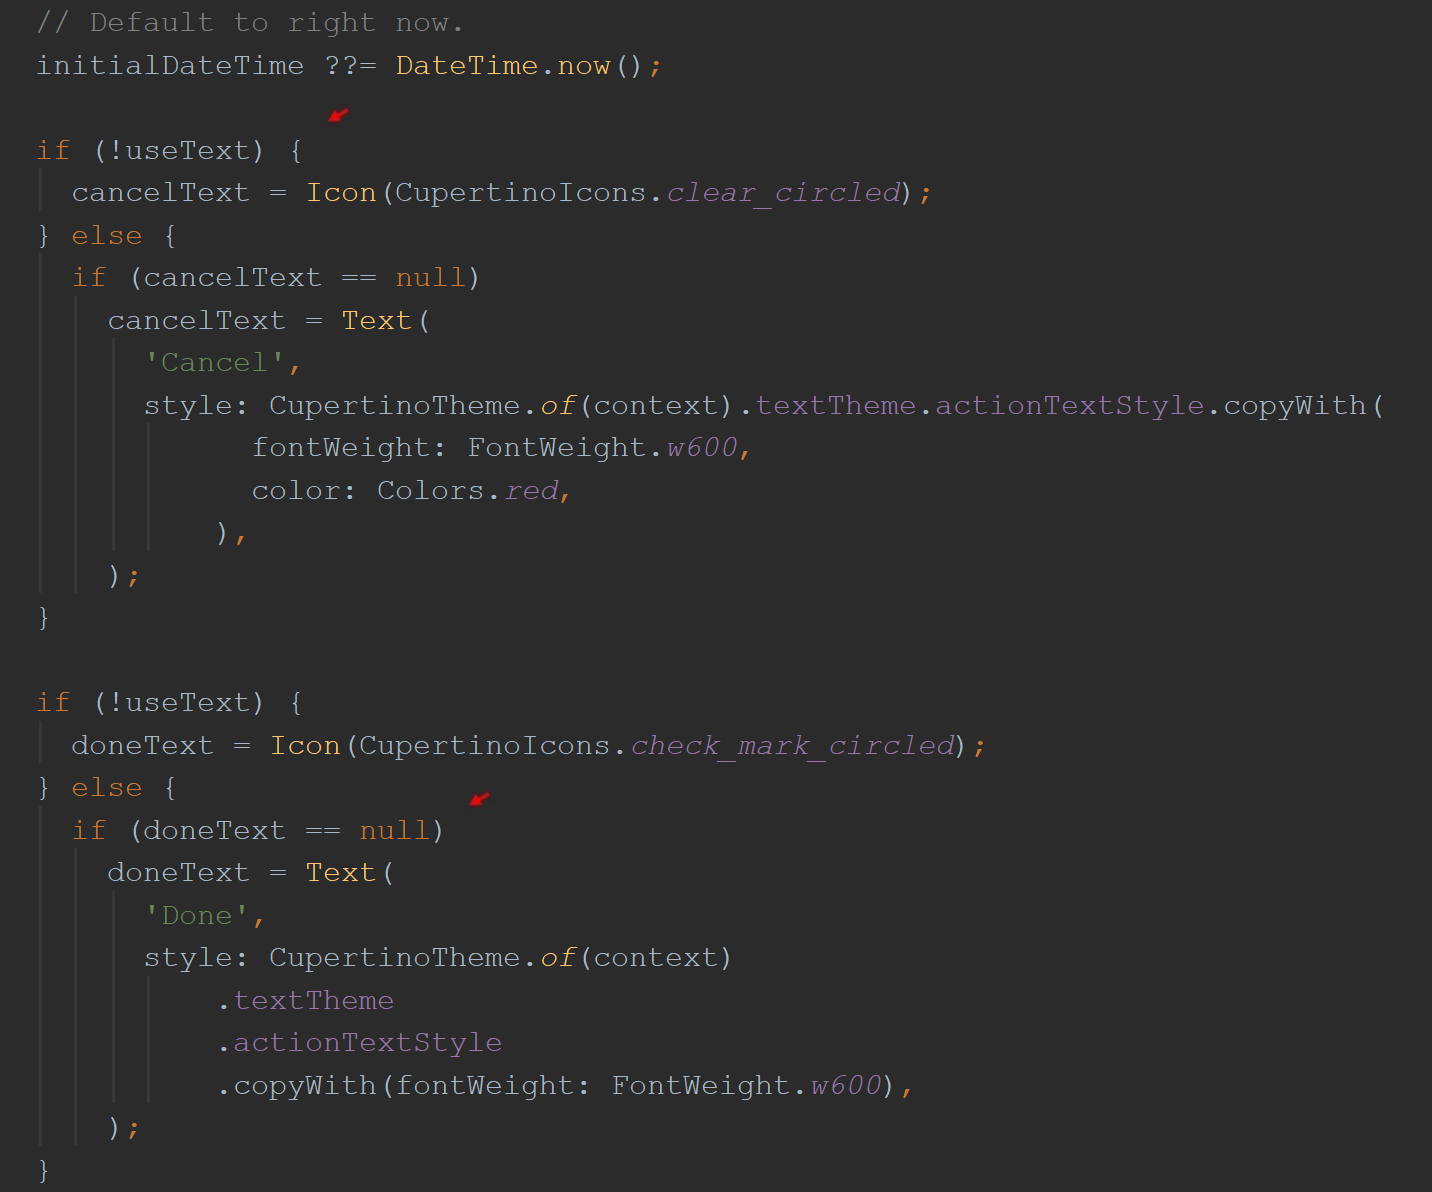

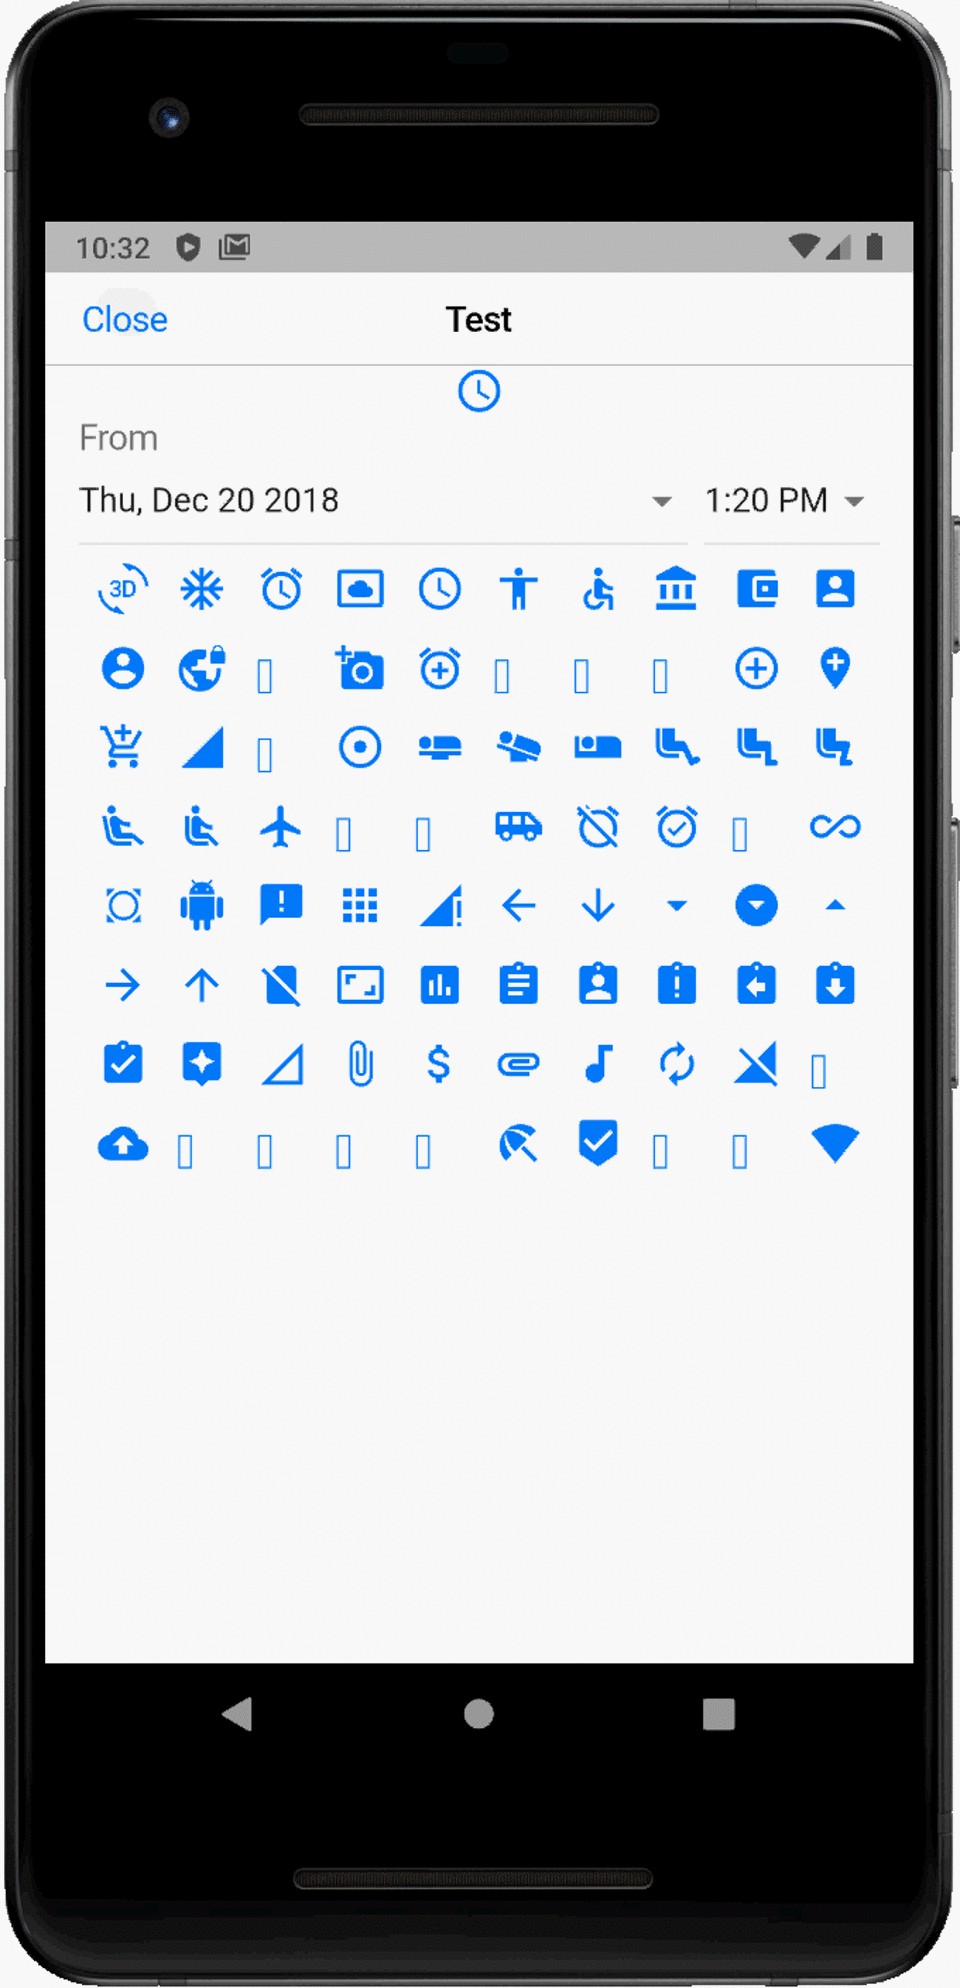
Of course, you’re free to pass in your own labels — implementing Localization if so required. The English labels are only there if no other labels were provided to the name parameters, cancelText and doneText. They’re highlighted in the screenshot below. Note, the English labels are gone again.
当然,您可以自由传递自己的标签-如果需要,可以实施Localization。 仅当没有为名称参数cancelText和doneText提供其他标签时,英文标签才在那里。 它们在下面的屏幕快照中突出显示。 注意,英文标签又消失了。

Further along in the routine, you see where the cancel button is defined. Since it is the cancel button, it’s here where the ‘default’ DateTime value is supplied. This makes it clear to the caller routine that the operation has been cancelled. Next to it, the ‘done’ button is defined. That button is a little simpler as it merely closes the window with the function, Navigator.of(context).pop().
在例程的后面,您将看到取消按钮的定义位置。 由于它是取消按钮,因此在此处提供了“默认” DateTime值。 这使调用者例程清楚该操作已被取消。 在其旁边,定义了“完成”按钮。 该按钮稍微简单一点,因为它仅使用Navigator.of(context).pop()函数关闭了窗口。

取消值 (The Cancel Value)
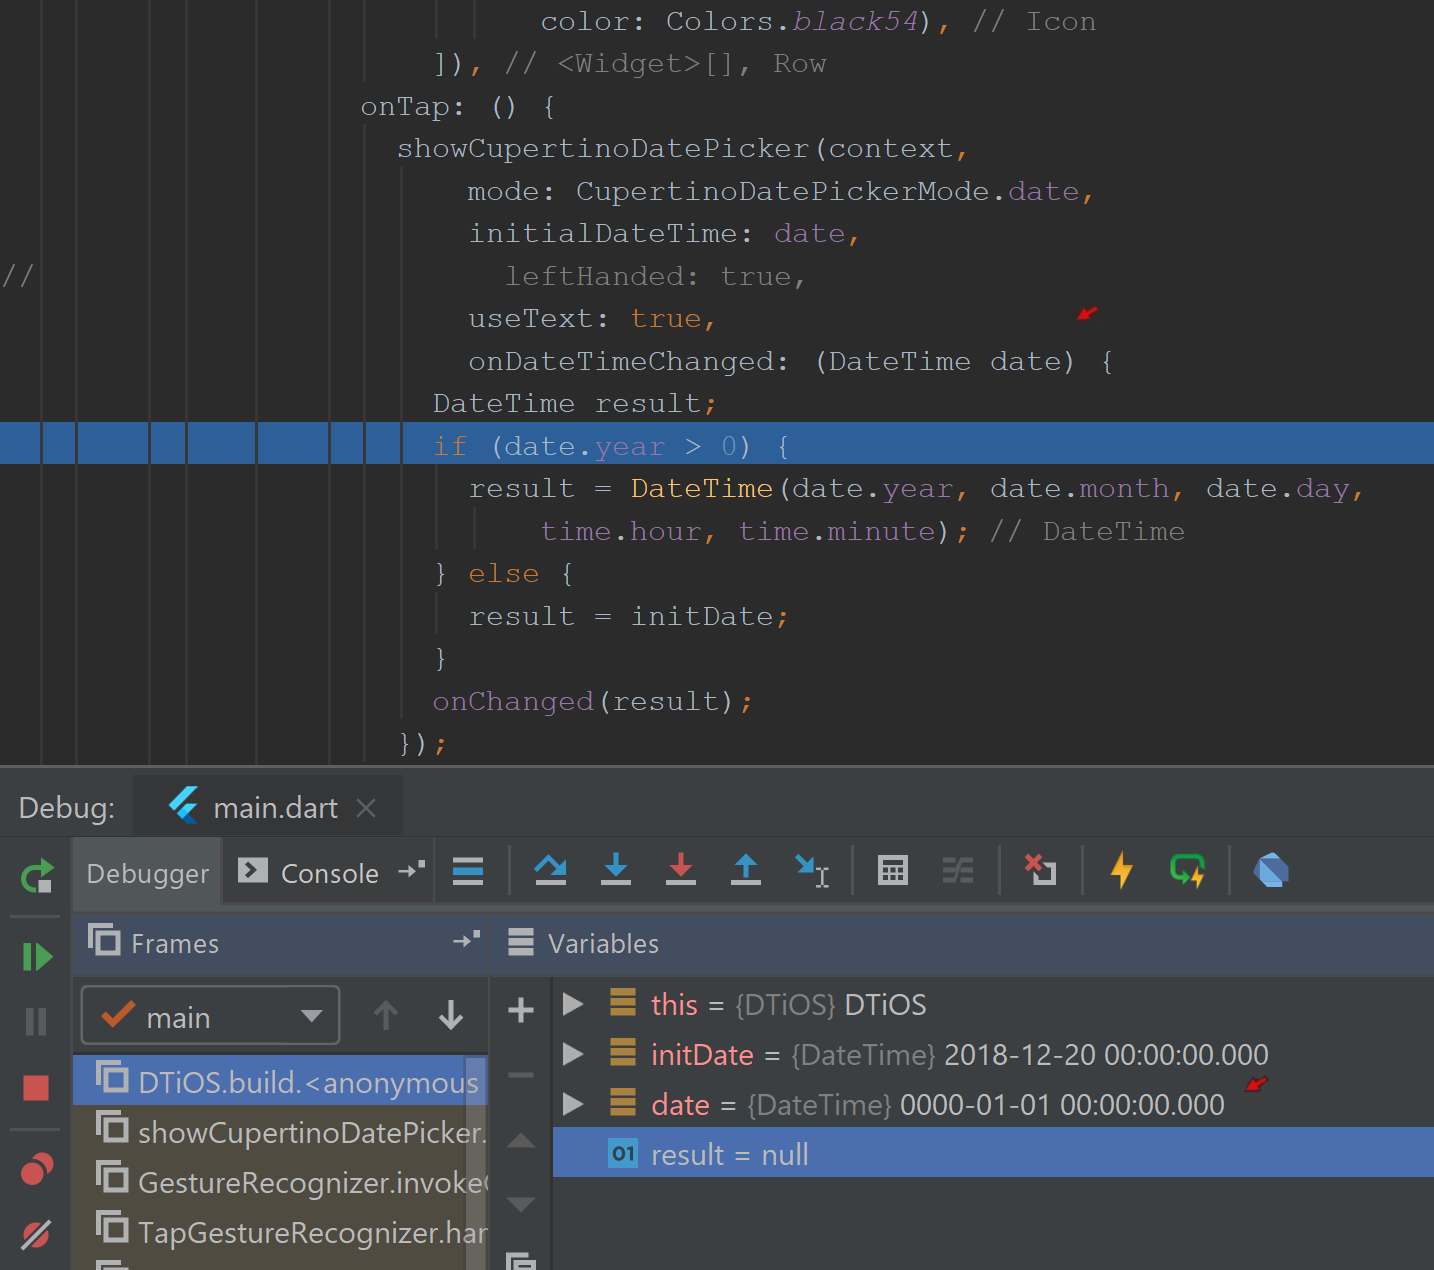
When the cancel button is pressed, the DateTime returned is given an explicit value: 0000–01–01 00:00:00.000. Again, making it clear to the caller routine that the operation has been cancelled. For example, to test for a cancelled operation, you could test if the year is zero or not, if(date.year > 0). The screenshot below has a breakpoint in Android Studio conveying such a test for a cancel button press. In the screenshot below, again, if the year is not greater than zero, the ‘initial date’ to reassigned to the result.
当按下取消按钮时,返回的DateTime被赋予一个明确的值: 0000–01–01 00:00:00.000 。 再次,使调用者例程清楚该操作已被取消。 例如,要测试取消的操作,可以测试年份是否为零, if(date.year> 0) 。 下面的屏幕截图在Android Studio中有一个断点,传达了对取消按钮按下的测试。 再次在下面的屏幕快照中,如果年份不大于零,则将“初始日期”重新分配给结果。
显示您的日期时间 (Show Your DateTime)
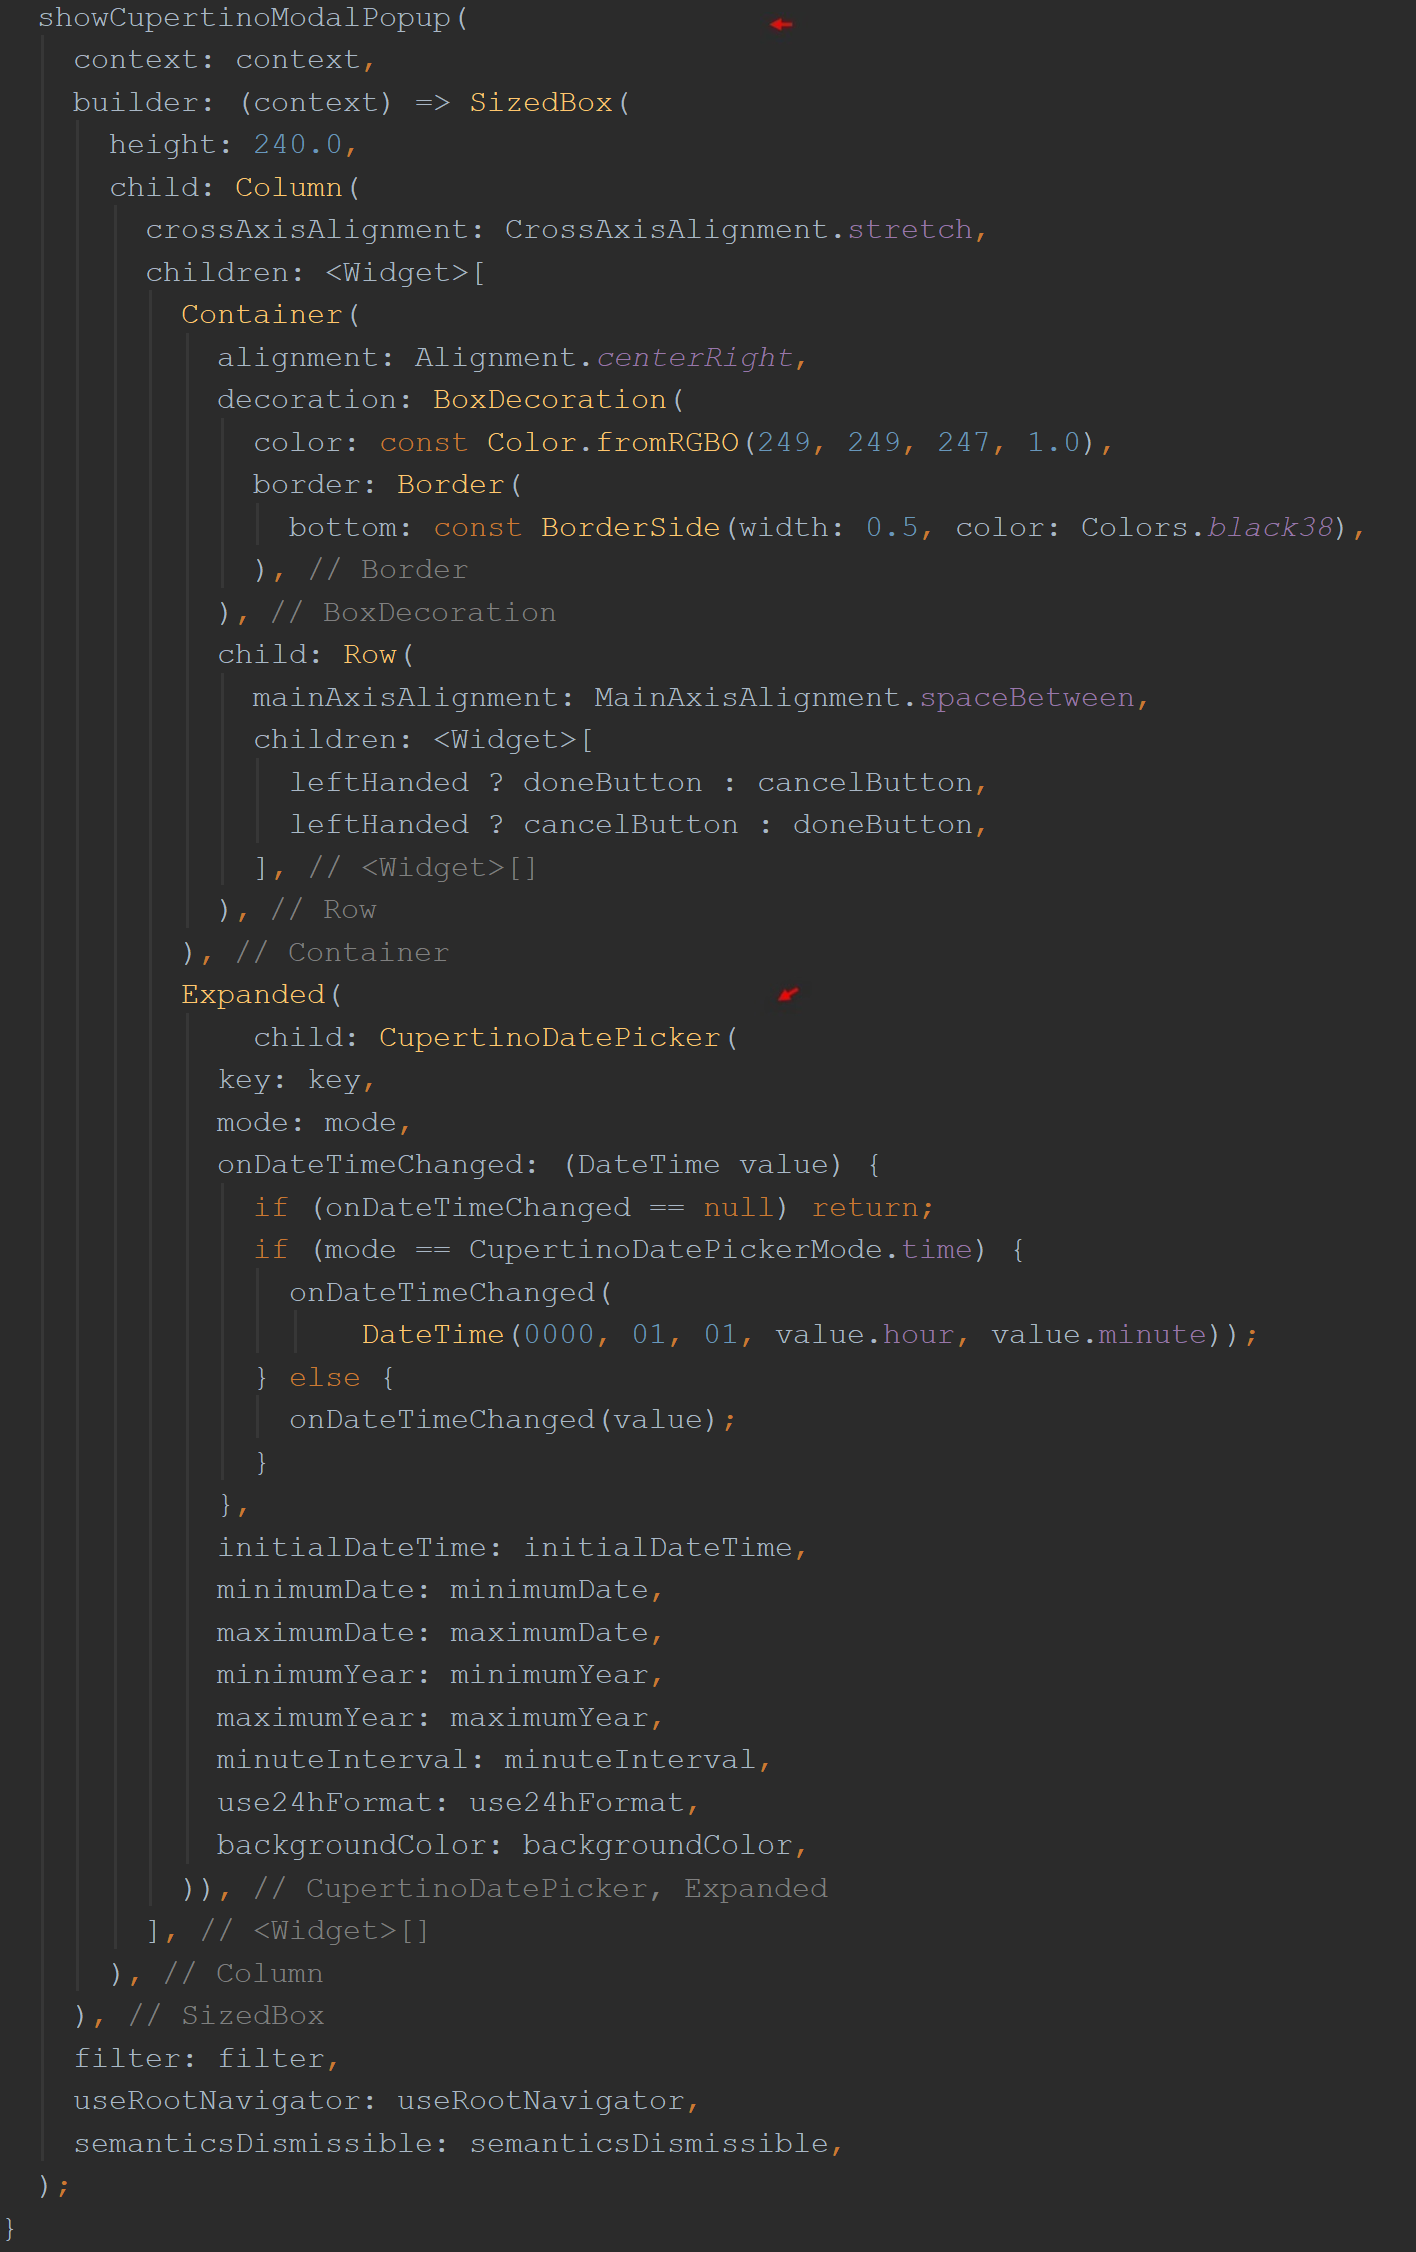
What follows further along in the code, is the call to the very function, showCupertinoModalPopup(), itself. It also involves the CupertinoDatePicker class — that actually displays the DateTime picker. You can see the many parameters originally taken in by my routine are passed along to these two components. By the way, I pretty much blatantly copied this stretch of code from Miguel Ruivo’s own work. Cheers Miguel. See how this all works?
在代码中紧随其后的是对函数本身showCupertinoModalPopup ()的调用。 它还涉及CupertinoDatePicker类,该类实际上显示DateTime选择器。 您可以看到我的例程最初采用的许多参数都传递给了这两个组件。 顺便说一下,我几乎公然复制了Miguel Ruivo自己的作品中的这段代码。 干杯米格尔。 看看这一切如何运作?
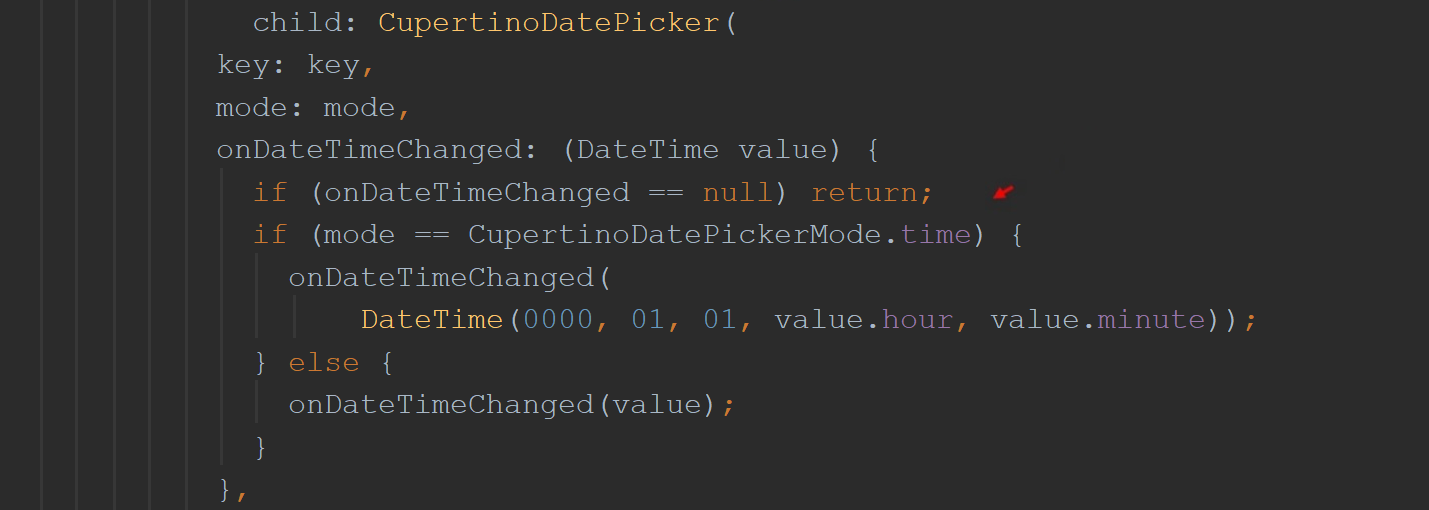
Note, my routine has its own onDateTimeChanged() function used to perform some preparations before returning the DateTime value. If in ‘time mode’ for example, only the hour and minute values are returned. The date portion is set to its default value since only ‘the time’ portion is required in this mode. As you see in a closer screenshot of the onDateTimeChanged() function below, it then calls the onDateTimeChanged() function that is required to be passed in by the user.
注意,我的例程有自己的onDateTimeChanged ()函数,用于在返回DateTime值之前执行一些准备工作。 例如,如果处于“时间模式”,则仅返回小时和分钟值。 日期部分设置为其默认值,因为在此模式下仅需要“时间”部分。 如您在下面的onDateTimeChanged ()函数的屏幕截图中所看到的 ,然后它调用用户需要传递的onDateTimeChanged ()函数。
弹出选择器 (Popup The Picker)
Below is a screenshot of Flutter’s showCupertinoModalPopup function. It creates an ‘iOS-style’ popup that slides up from the bottom of the screen. It has a scrollable ‘circular’ interface and is a modal window which means it prevents the user from interacting with the rest of the app when displayed.
下面是Flutter的showCupertinoModalPopup函数的屏幕截图。 它会创建一个“ iOS样式”弹出窗口,该弹出窗口从屏幕底部向上滑动。 它具有可滚动的“圆形”界面,并且是一个模式窗口,这意味着它可以防止用户在显示时与应用程序的其余部分进行交互。

采摘者 (The Picker)
Flutter has the class, CupertinoDatePicker with its Cupertino theme in the library, cupertino.dart. We‘ll now take a quick look at the class itself.
Flutter在库cupertino.dart中具有其Cupertino主题的CupertinoDatePicker类。 现在,我们将快速查看类本身。
import 'package:flutter/cupertino.dart'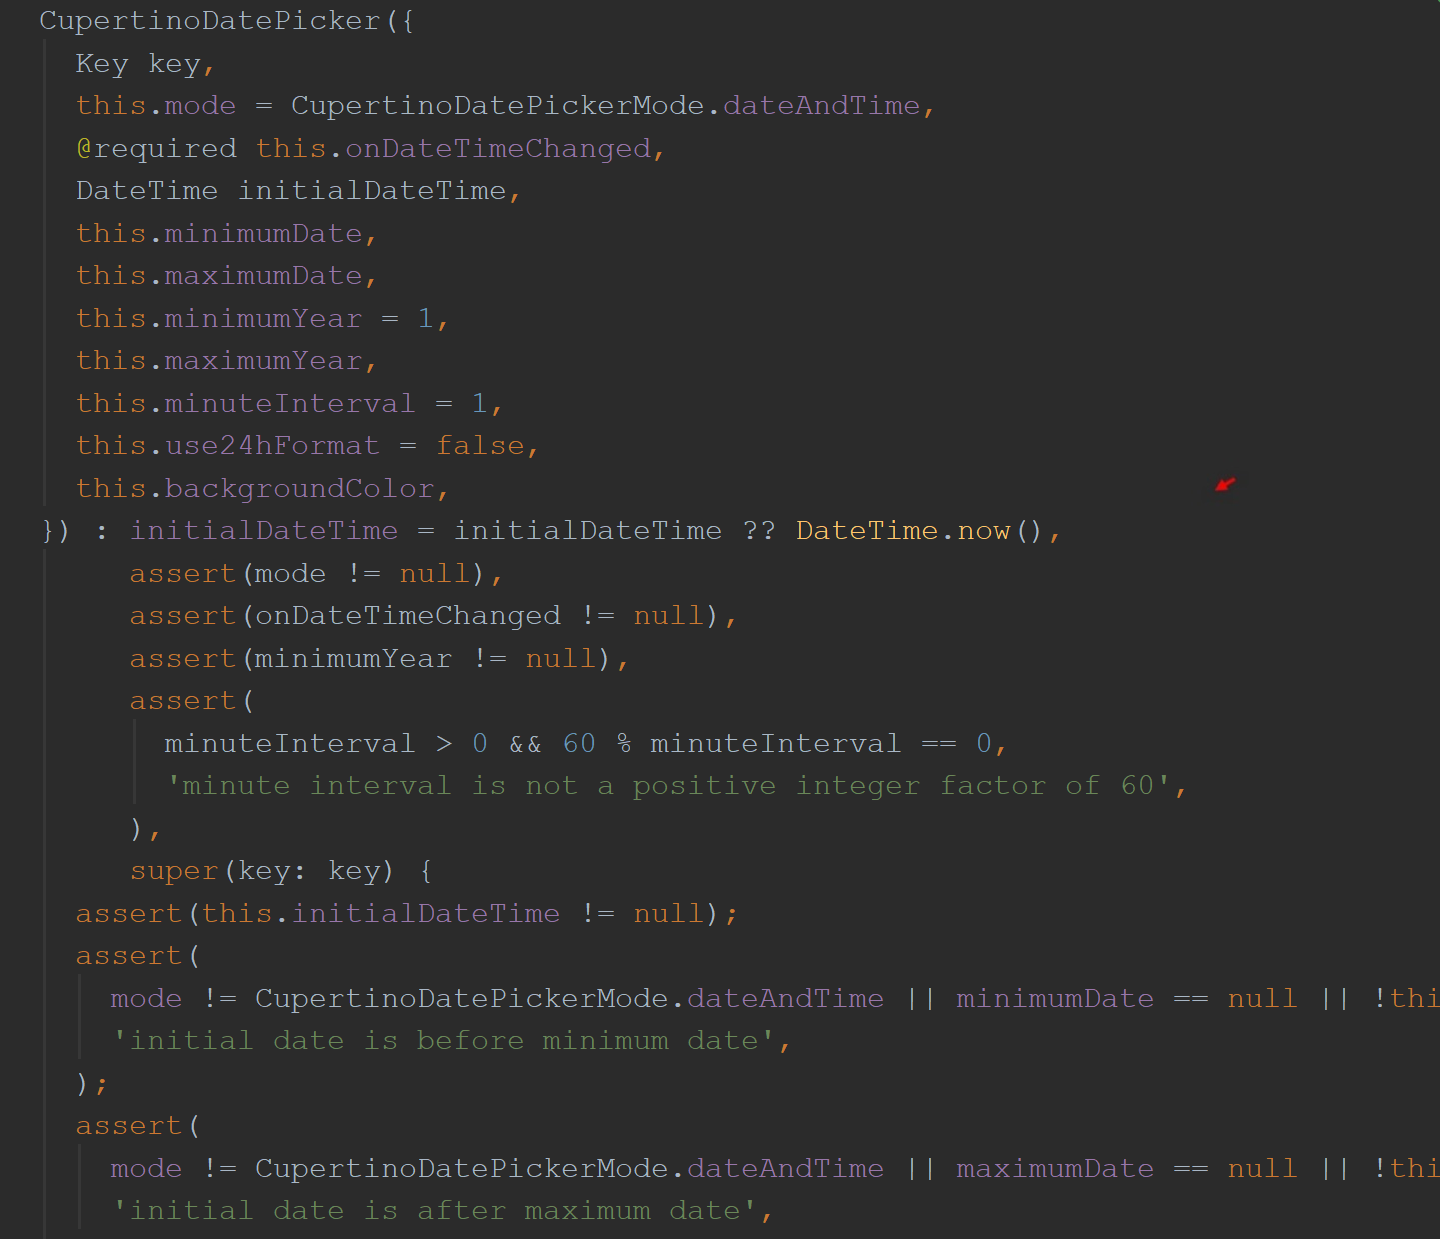
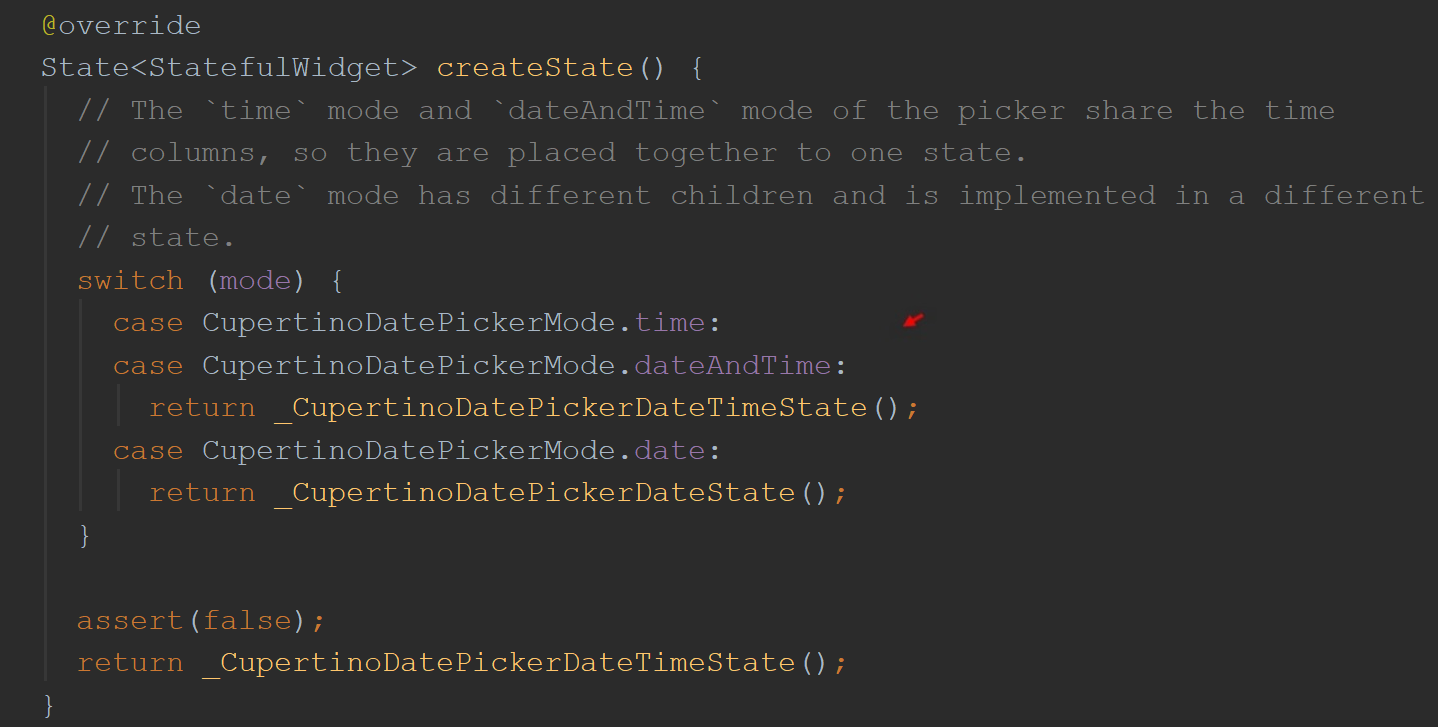
Note, CupertinoDatePicker class is a StatefulWidget, and so you can see in its createState() function below, depending on the mode, that the appropriate State object is then instantiated. Picking a date demands its own State object it would seem.
注意,CupertinoDatePicker类是一个StatefulWidget,因此您可以在下面的createState ()函数中(根据模式)看到适当的State对象被实例化。 选择一个日期需要它自己的状态对象。
建立格式 (Build Your Format)
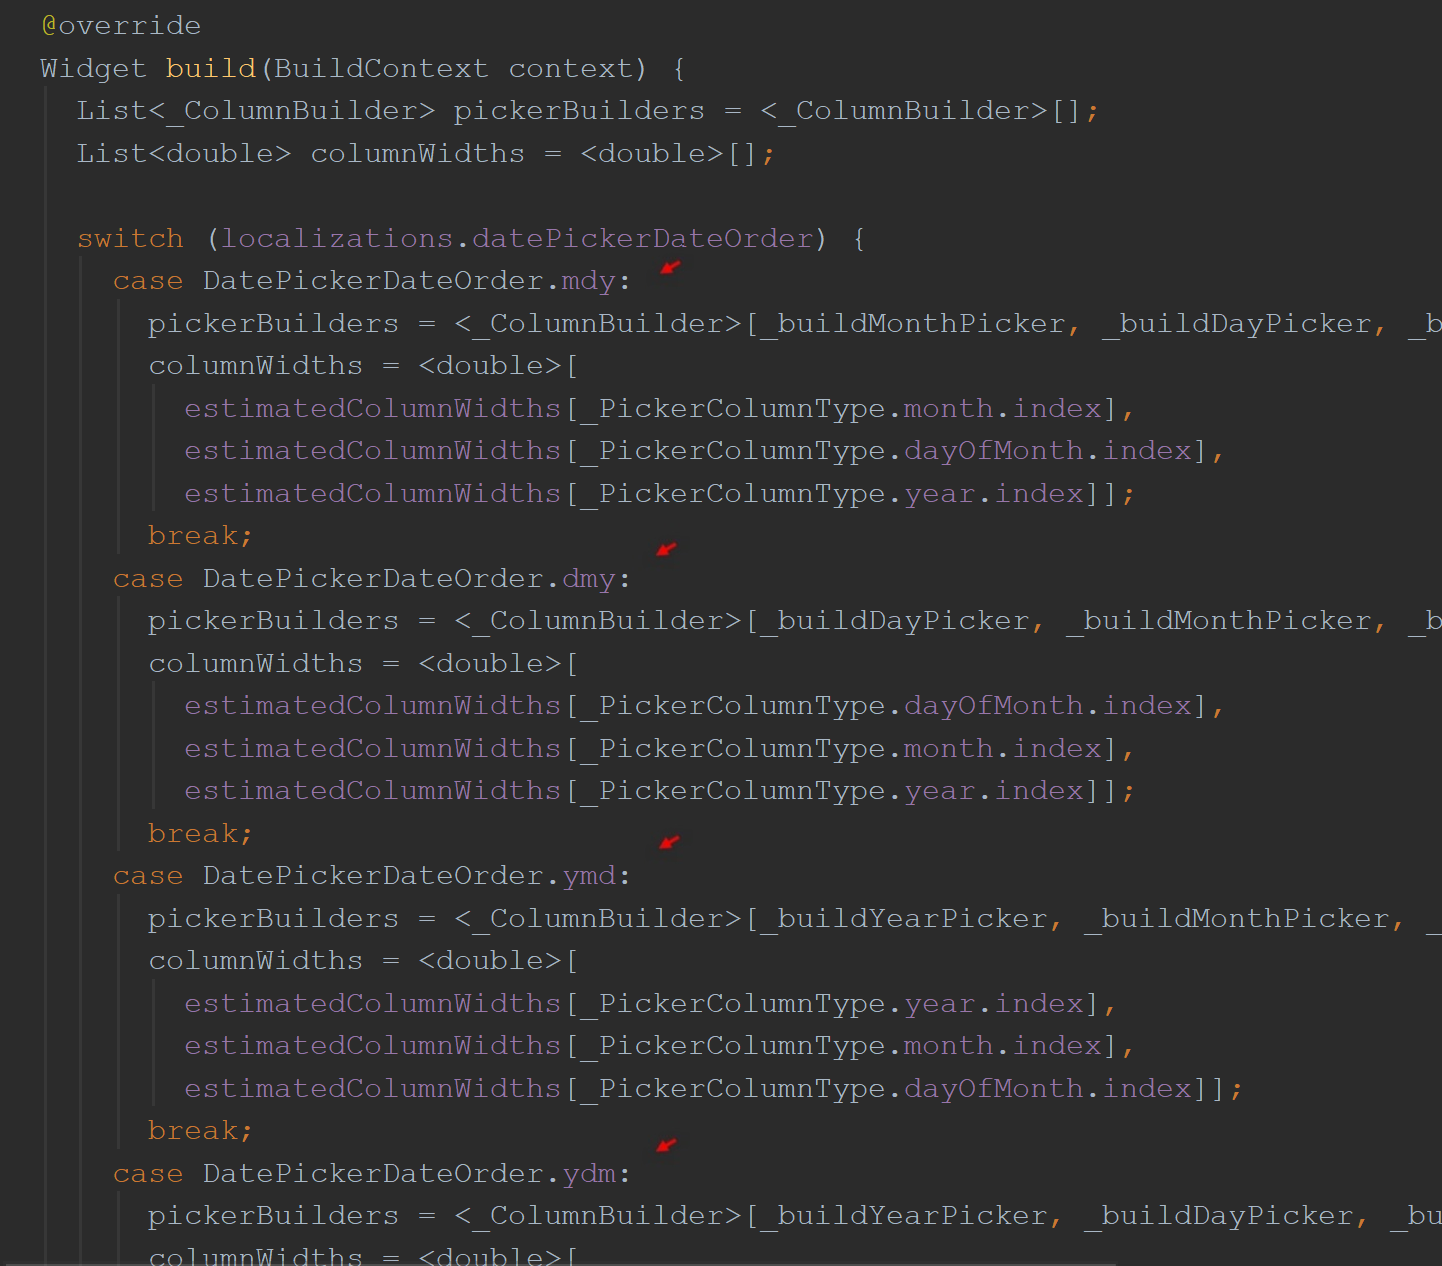
The date format in this particular State object is then defined in its build() function. It’s based on the Localization settings of your app. (i.e. Where on planet Earth you happen to be running your app will determine the date format.) Note, you can see in the screenshot below, the date picker has its parameter, useText, set to its default value, false, and its parameter, leftHanded, set to true with the icon buttons switched around.
然后,在其特定的State对象的build ()函数中定义日期格式。 它基于您应用的本地化设置。 (即,您在地球上的哪个位置恰好在运行应用程序将确定日期格式。)请注意,您可以在下面的屏幕快照中看到日期选择器的参数useText设置为默认值false和参数, leftHanded ,设置为true,并切换图标按钮。
Let’s leave it here for now. You’ve got the idea, and more importantly, you’ve got this little routine now to display a Cupertino DateTime circular spinner picker thingy. Great! It’s just a little something for others to use. I needed something like this, and I didn’t have it. I looked around and found Miguel’s NativeCupertinoPicker.dart. I took it; made it my own —changed it a bit for my own needs, and there you have it! This article was really a rallying cry to all other Flutter developers to share what they wrote. This is all in the effort to make Flutter to ‘go to’ platform for future cross-platform development.
让我们暂时留在这里。 您已经有了这个主意,更重要的是,您现在有了这个小例程,可以显示Cupertino DateTime圆形微调器选择器。 大! 这只是供他人使用的一点东西。 我需要这样的东西,但我没有。 我环顾四周,发现Miguel的NativeCupertinoPicker.dart 。 我拿了; 自己制作-可以根据自己的需要进行更改,就可以使用! 对于所有其他Flutter开发人员来说,分享他们所写的内容,这篇文章确实是一个集会号召。 这一切都是为了使Flutter能够“走上”未来的跨平台开发平台。
Cheers.
干杯。

翻译自: https://medium.com/@greg.perry/cupertino-datetime-picker-b8ee3eadd3cd
mysql 库比对


 1583
1583

 被折叠的 条评论
为什么被折叠?
被折叠的 条评论
为什么被折叠?
 到【灌水乐园】发言


