


osg着色语言着色
Learn how to colorize icons with your NounPro subscription and Adobe Illustrator.
了解如何使用NounPro订阅和Adobe Illustrator为图标着色。
For those who want to level up their black and white Noun Project icons with a splash of color, unlocking the power of a NounPro subscription and Adobe Illustrator offers robust options for customization.
对于那些想要用彩色斑点来提升其黑白Noun Project图标的用户,请解锁NounPro订阅的功能,并且Adobe Illustrator提供了强大的自定义选项。
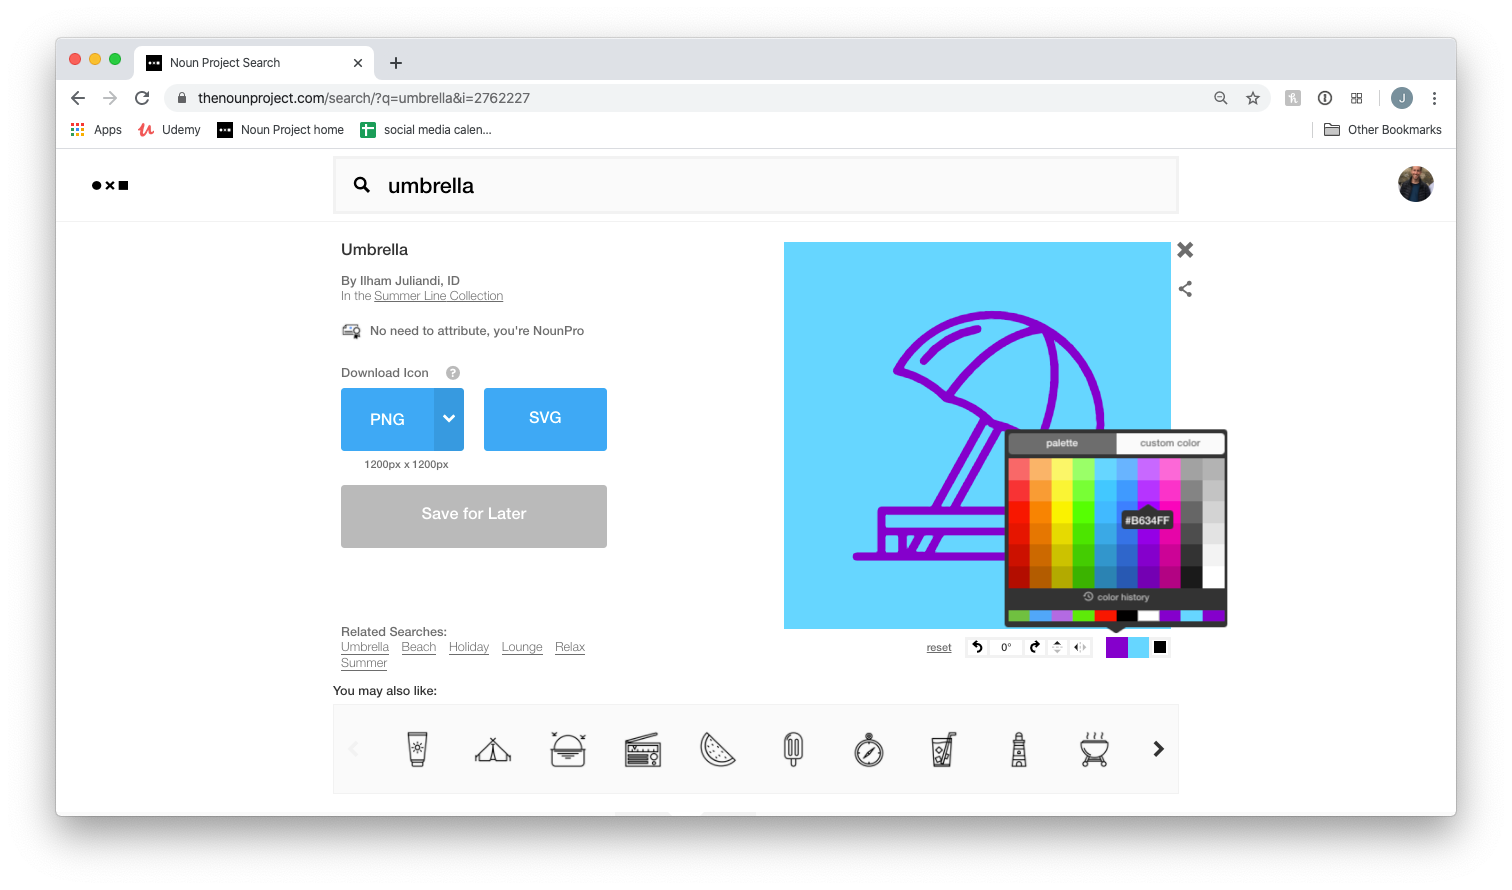
A NounPro account allows you to instantly change the color of an icon directly on the Noun Project site or via the Noun Project Mac App. When you select an icon, beneath the icon you’ll see the option to change the foreground color (the “fill” of the shape which by default will be black) as well as the background color (which by default is transparent). For changing the icon color and background color, you can select a color from the provided palette of options, or select the “Custom Color” option to add a HEX value of your choice. You can even rotate your chosen icon and add a background shape, such as a circle, ring, or rounded rectangle.
使用NounPro帐户 ,您可以直接在Noun Project网站上或通过Noun Project Mac App立即更改图标的颜色。 当您选择一个图标时,在该图标下方,您将看到一个选项,用于更改前景色(形状的“填充”,默认情况下为黑色)和背景色(默认情况下为透明)。 要更改图标颜色和背景颜色,可以从提供的选项调色板中选择一种颜色,或者选择“自定义颜色”选项以添加所需的十六进制值。 您甚至可以旋转所选的图标并添加背景形状,例如圆形,环形或圆形矩形。
Once you’ve set your color and shape preferences, you’ll find that they’ll apply to every new icon you pull up to download unless you change them. This is a handy hack that will allow you to quickly add several new icons to a project where you want all of the icons you’re using to be uniform, without having to edit each icon individually.
设置颜色和形状首选项后,除非更改它们,否则它们将应用于您拉出下载的每个新图标。 这是一个方便的技巧,可让您快速将几个新图标添加到项目中,以使您要使用的所有图标统一,而不必分别编辑每个图标。
In certain cases, you may want to fill in icons with multiple colors or customize them even more. A design tool like Adobe Illustrator CC will let you quickly and easily work with these vector shapes, and with Noun Project’s Adobe Add-On, you can drag-and-drop icons straight onto your Illustrator artboard without having to leave your workflow.
在某些情况下,您可能需要用多种颜色填充图标或对它们进行更多自定义。 诸如Adobe Illustrator CC之类的设计工具可让您快速轻松地处理这些矢量形状,并且借助Noun Project的Adobe Add-On ,您可以将图标直接拖放到Illustrator画板上,而无需离开工作流程。
在Adobe Illustrator中下载适用于Adobe的Noun Project加载项和带有Live Paint的颜色 (Download the Noun Project Add-On for Adobe and Color with Live Paint in Adobe Illustrator)
First, download the Noun Project Add-On for Adobe and launch Illustrator.
首先, 下载 Adobe 的Noun Project附加组件并启动Illustrator。
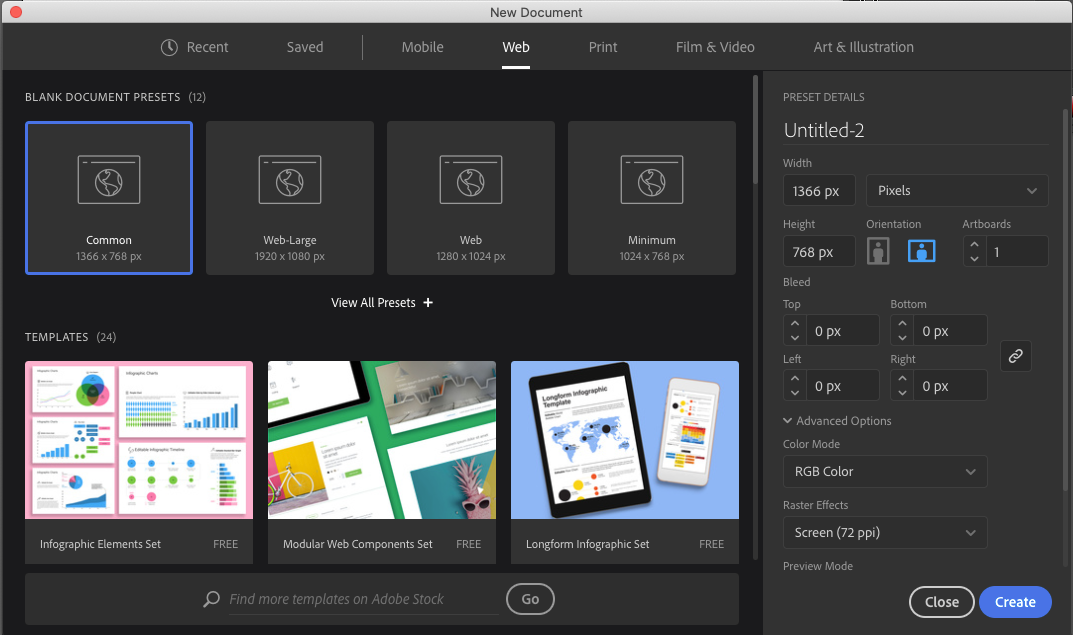
Next, start a new document. You can use any of Adobe’s provided templates, or build your own based on what you might want to create.
接下来,启动一个新文档。 您可以使用Adobe提供的任何模板,也可以根据要创建的模板构建自己的模板。
Note: For digital art, make sure the “Color Mode” under “PRESET DETAILS” is set to RGB Color, and the Raster Effects (resolution) is set to “Screen (72 ppi).” For this example, we’ve used their “Common” template for web, 1366 x 786 px.
注意:对于数字艺术,请确保将“预设详细信息”下的“色彩模式”设置为RGB颜色,并将“光栅效果”(分辨率)设置为“屏幕(72 ppi)”。 在此示例中,我们将其“通用”模板用于网络(1366 x 786像素)。
Then, navigate to Window > Extensions > Noun Project to launch the Noun Project extension window. It works just like Noun Project’s Mac App, and if you’re a NounPro subscriber you will have access to unlimited icons and the same customization tools.
然后,导航至窗口>扩展> Noun Project以启动Noun Project扩展窗口。 它的工作原理与Noun Project的Mac App相似,如果您是NounPro订户,则可以访问无限的图标和相同的自定义工具。
In the Noun Project extension window, enter a search term for your icon and click “enter” (for this example, we’re using Umbrella icon by Ilham Juliandi). Find an icon that you like, and while hovering your cursor over the icon, click the black “Insert” prompt and the icon will appear on your artboard.
在Noun Project扩展窗口中,为图标输入搜索词,然后单击“输入”(在本示例中,我们使用的是Ilham Juliandi的Umbrella图标 )。 找到所需的图标,然后将光标悬停在该图标上,单击黑色的“插入”提示,该图标将出现在画板上。
Because we’re working with vectors, the size of the icon won’t matter and you can scale it up or down as much as you want without losing resolution. Be sure to use the Selection Tool (“V,” the black cursor) to move and scale the icon, rather than Direct Selection (“A”). A square bounding box should appear when you click your icon, and you can then drag the corners of the box in or out (while holding Shift) to scale proportionally.
因为我们正在处理矢量,所以图标的大小无关紧要,您可以根据需要放大或缩小它的大小而不会损失分辨率。 确保使用选择工具(“ V”,黑色光标)移动和缩放图标,而不是直接选择(“ A”)。 单击图标时,将出现一个正方形的边界框,然后可以将框的角移入或移出(按住Shift键的同时)以按比例缩放。
使用Live Paint创建图标的可着色区域 (Create Colorable Regions of Your Icon with Live Paint)
The Live Paint button (K) will automatically identify closed shapes (like the white spaces within your icon) and individually color them as you click. Make sure that the entire icon is selected (with V) and go to Object > Live Paint > Create. This will help Illustrator recognize all the shapes within your object as areas that can be colored.
实时绘制按钮(K)将自动识别闭合的形状(如图标中的空白),并在单击时分别为其着色。 确保选中整个图标(使用V),然后转到“对象”>“ Live Paint”>“创建”。 这将有助于Illustrator将对象内的所有形状识别为可以着色的区域。
Before you hit Live Paint (K), go to Windows > Colors, or find the paint palette icon on the right-hand toolbar to make sure your Colors window is open. There are several ways to manually pick a color from here — from the whole RBG Spectrum window, or the individual RBG sliders. When you’ve selected the color you’d like to use first, while in Live Paint mode, you can hover over a region of your icon that will flash with an outline so you know it can be colored, then simply click!
按下Live Paint(K)之前,请转至Windows>颜色,或在右侧工具栏上找到调色板图标以确保您的“颜色”窗口已打开。 有几种方法可以从此处手动选择颜色-从整个RBG光谱窗口或单个RBG滑块。 选择了要首先使用的颜色后,在“实时绘画”模式下,您可以将鼠标悬停在图标上会闪烁轮廓的区域上,以便知道它可以着色,然后单击即可!

通过颜色主题更和谐地上色 (Color More Harmoniously with Color Themes)
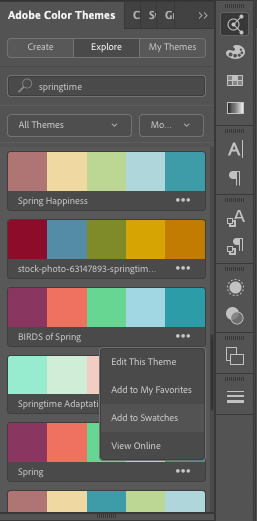
One of the most aesthetically pleasing ways to color in your icon is to search for a preexisting Color Theme. Adobe users can contribute their own themes based on common principles of color harmony, so you can easily produce an artwork with colors that go well together.
在图标上从美学上最令人愉悦的着色方法之一是搜索预先存在的颜色主题。 Adobe用户可以根据色彩协调的通用原则贡献自己的主题,因此您可以轻松制作出具有很好搭配色彩的艺术品。
Open up Color Themes on the right-hand toolbar, or find it through Window > Color Themes. The middle tab of the window, “Explore,” will display some of the most popular color themes that fellow graphic designers are using. You can also search for your own theme (say, “Springtime” or “Flowers”) to find a palette that evokes those keywords. When you find one that you like, click the three dots (…) next to it and click “Add To Swatches.” This way, when you navigate back to your Swatches (Window > Swatches) you’ll have the colors saved so you can keep referring to the same ones for consistency.
在右侧工具栏上打开“颜色主题”,或通过“窗口”>“颜色主题”找到它。 窗口的中间选项卡“探索”将显示其他图形设计师正在使用的一些最受欢迎的颜色主题。 您还可以搜索自己的主题(例如,“春天”或“花朵”)以找到唤起这些关键字的调色板。 当您找到所需的一个时,请单击其旁边的三个点(…),然后单击“添加到色板”。 这样,当您导航回到色板(“窗口”>“色板”)时,将保存颜色,以便始终引用相同的颜色以保持一致性。

As you color, you may notice that your cursor has both a Live Paint icon and three small colored boxes above it — these boxes indicate the current swatch you’re using (in the center), and you can use your left and right arrow keys to quickly switch between colors as they appear in your swatches.
上色时,您可能会注意到光标上同时有一个“实时绘图”图标和三个小彩色框-这些框指示您正在使用的当前色板(在中间),并且您可以使用向左和向右箭头键可以快速在样本中显示的颜色之间进行切换。
Note that you can use Live Paint not only with solid colors, but patterns and gradients as well. The easiest way to continue exploring the options is to add any gradient or pattern of your choosing to your swatches so you can easily find it later.
请注意,不仅可以将Live Paint与纯色一起使用,还可以将图案和渐变一起使用。 继续探索这些选项的最简单方法是向您的色板添加您选择的任何渐变或图案,以便您以后可以轻松找到它。
使用“重新着色图稿”尝试不同的颜色变化 (Use “Recolor Artwork” to Try Different Color Variations)
Let’s say you’ve found a color theme you like, but you want to try a couple of different variations by swapping out what colors go where within your icon. You can tell Illustrator to instantly find all instances of one color, and swap them out with another color. Here’s how:
假设您找到了喜欢的颜色主题,但是您想通过换掉图标中的颜色来尝试几种不同的颜色。 您可以告诉Illustrator立即找到一种颜色的所有实例,然后将它们换成另一种颜色。 这是如何做:
First, make a copy of your icon in case you want to compare the two side-by-side. With the icon selected (with V), hold down alt while clicking and dragging the icon to create a copy.
首先,如果要同时比较两个图标,请复制图标。 选择图标(带有V)后,在按住Alt的同时单击并拖动图标以创建副本。
Go to Edit > Edit Colors > Recolor Artwork. This will bring up a window that displays your swatch colors in rows of “Current Color” with an arrow to pointing to “New Color.” This means it will take all instances of a color in the first “Current” column, and turn them into the “New” color you can designate in the second.
转到编辑>编辑颜色>为图稿重新着色。 这将打开一个窗口,该窗口在“当前颜色”行中显示您的色板颜色,并带有指向“新颜色”的箭头。 这意味着它将在第一个“当前”列中获取所有颜色实例,然后将其转换为第二个中可以指定的“新”颜色。
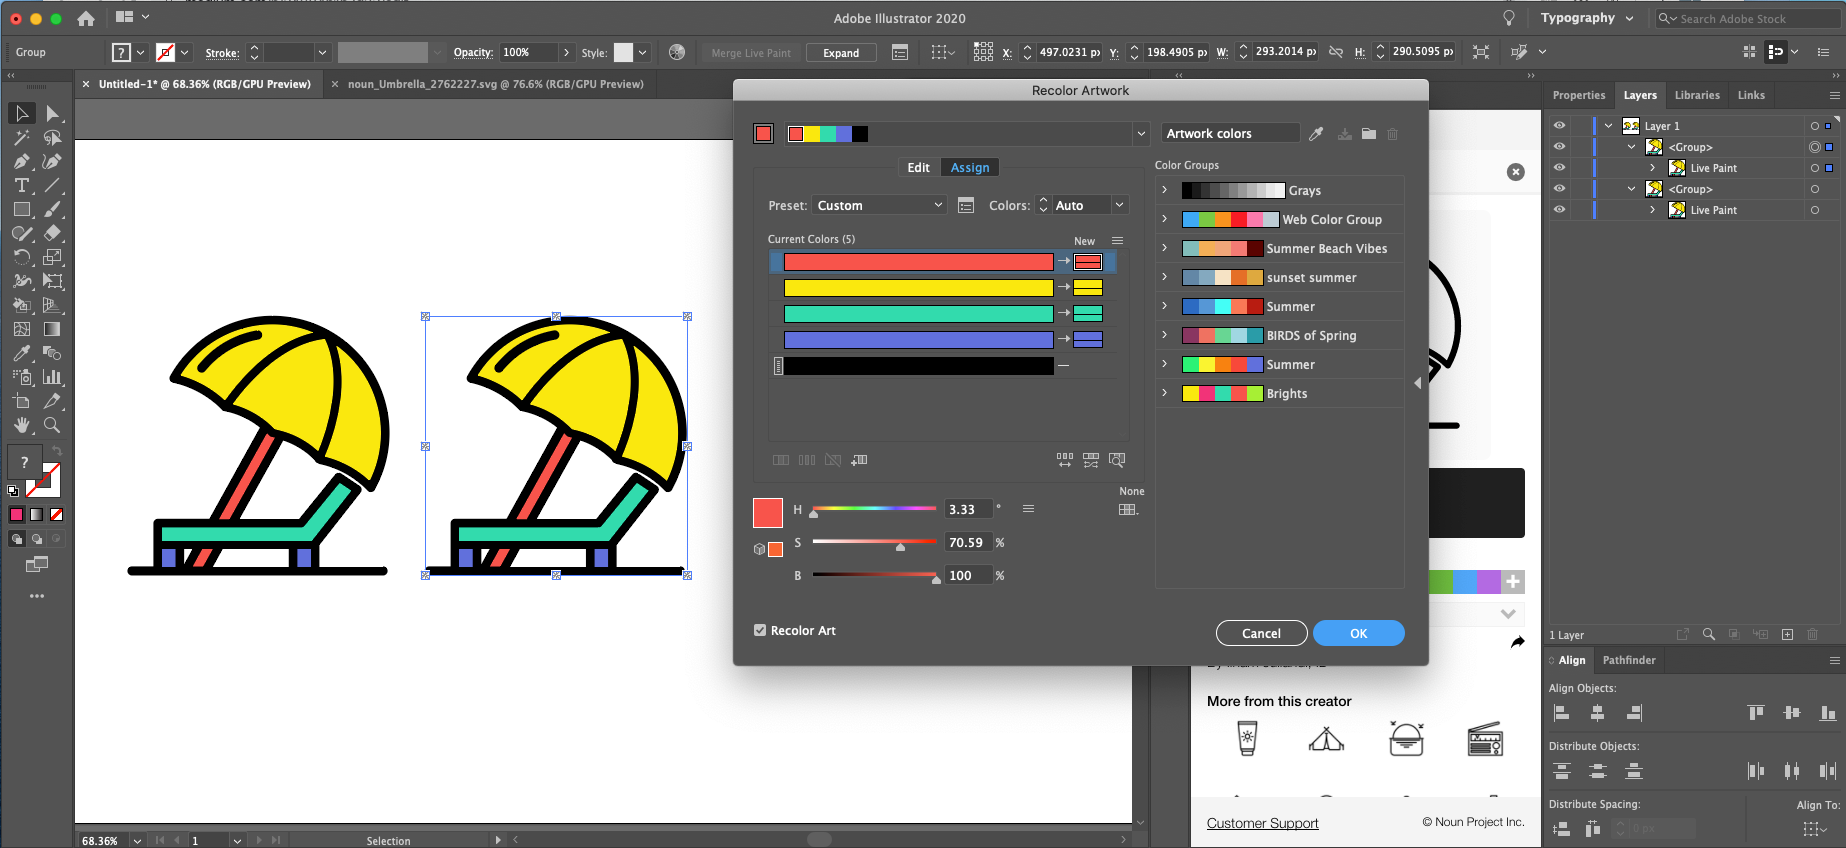
One way to quickly swap colors out is to simply click a colored box in the “New” column and drag it into a different row — those will swap out the colors as they appear on your artwork, as demonstrated below:
快速换出颜色的一种方法是,只需单击“新建”列中的一个彩色框,然后将其拖到其他行中即可—如下所示,这些颜色将换出它们在您的图稿中出现的颜色:
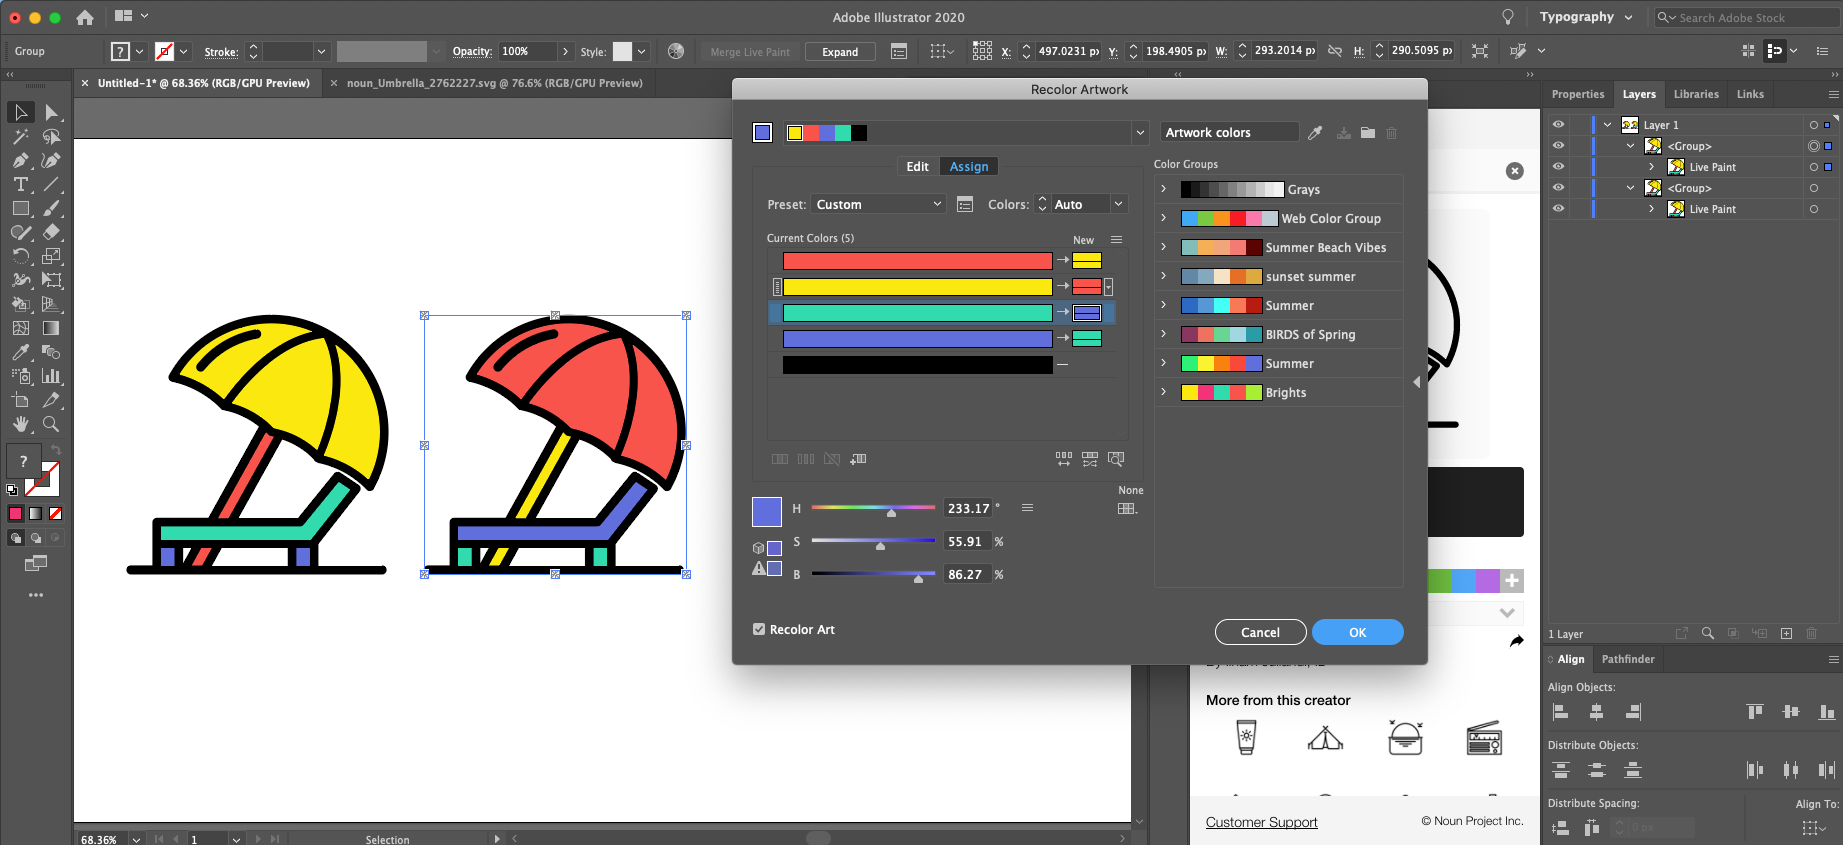
You can play around with this functionality to your heart’s content, using your preexisting swatches or manually picking new colors to replace your current ones. You can even hit the “Randomly Change Color Order” at the bottom of the color list in this window to explore surprising new variations.
您可以使用现有的色板或手动选择新的颜色来替换当前的颜色,以随心所欲地使用此功能。 您甚至可以点击此窗口颜色列表底部的“随机更改颜色顺序”来探索令人惊讶的新变化。
Digital coloring using a tool like Adobe Illustrator is a great way to quickly produce spectacular digital artwork and instantly experiment with color combinations.
使用Adobe Illustrator之类的工具进行数字着色是一种快速制作壮观的数字艺术品并立即尝试颜色组合的好方法。
渴望获得更多家庭手Craft.io品和艺术创意吗? 在我们的博客上扩展更多教程的范围。 (Hungry for more at-home craft projects and art ideas? Scope out further tutorials on our blog.)
翻译自: https://blog.thenounproject.com/explore-digital-coloring-24884b1b7d23
osg着色语言着色


 699
699

 被折叠的 条评论
为什么被折叠?
被折叠的 条评论
为什么被折叠?
 到【灌水乐园】发言


