


 本文详细介绍如何在SwiftUI应用中设置应用内购,包括在iOS13和Swift5.x环境下使用StoreKit框架的步骤。从创建应用标识符、设置银行关系到在AppStoreConnect上配置产品,再到实现购买逻辑和恢复购买,提供了全面的教程。
A quick disclaimer: This article is based on iOS 13 and Swift 5.x. I should also mention for beginners in this domain that the StoreKit framework can only be used if you are a registered Apple developer.
快速免责声明:本文基于iOS 13和Swift5.x。 我还应该为该领域的初学者提到StoreKit框架仅在您是注册的Apple开发人员时才能使用。
StoreKit will not work on the simulator either. You will need a real device to test this code. Use these compiler directives to turn off the functionality if you’re testing other features at the same time:
StoreKit也无法在模拟器上运行。 您将需要一个真实的设备来测试此代码。 如果要同时测试其他功能,请使用以下编译器指令关闭功能:
#if targetEnvironment(simulator)
// your simulator code
#else
// your real device code
#endif
Onwards and upwards then. Now, in-app purchases are the compromise that most apps use these days to let your user get a taste of your app for free but still provide you with a means of getting paid for your work. They do so by making parts of it chargeable via in-app purchases. They also remain somewhat controversial since they’ve been used and abused.
然后向上和向上。 现在,应用内购买是当今大多数应用所使用的一种折衷方案,它可以让您的用户免费试用您的应用,但仍为您提供一种为工作付费的方式。 他们通过在应用内购买使部分内容收费来做到这一点。 由于它们已经被使用和滥用,因此它们仍然引起争议。
But before we jump into coding, you need an identifier for your app. If you don’t have one, you need to create one in the Developer portal.
但是在我们进行编码之前,您需要为您的应用程序添加一个标识符。 如果您没有,则需要在Developer Portal中创建一个。
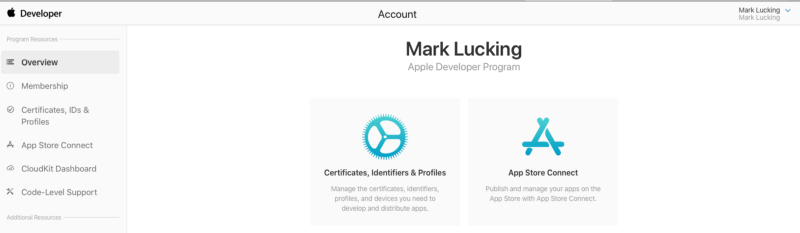
You’re after Certificates, Identifiers & Profiles:
您需要证书,标识符和配置文件:

Once there, you need to create an identifier for your app. So you’ll be looking at a screen much like this:
到达那里后,您需要为您的应用创建标识符。 因此,您将看到一个非常像这样的屏幕:
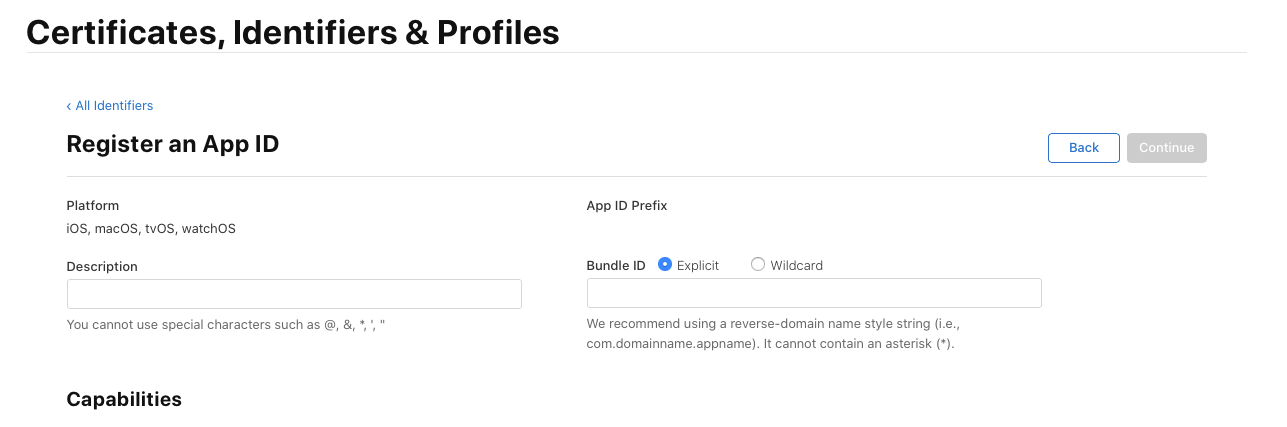
Obviously, the most important field here is the Bundle ID. This needs to match the ID you put into your project. Once created, you need to switch sites and log into App Store Connect, where you’ll find yourself looking at this page:
显然,这里最重要的字段是Bundle ID。 这需要匹配您放入项目中的ID。 创建完成后,您需要切换站点并登录App Store Connect ,在这里您会发现自己在此页面上:
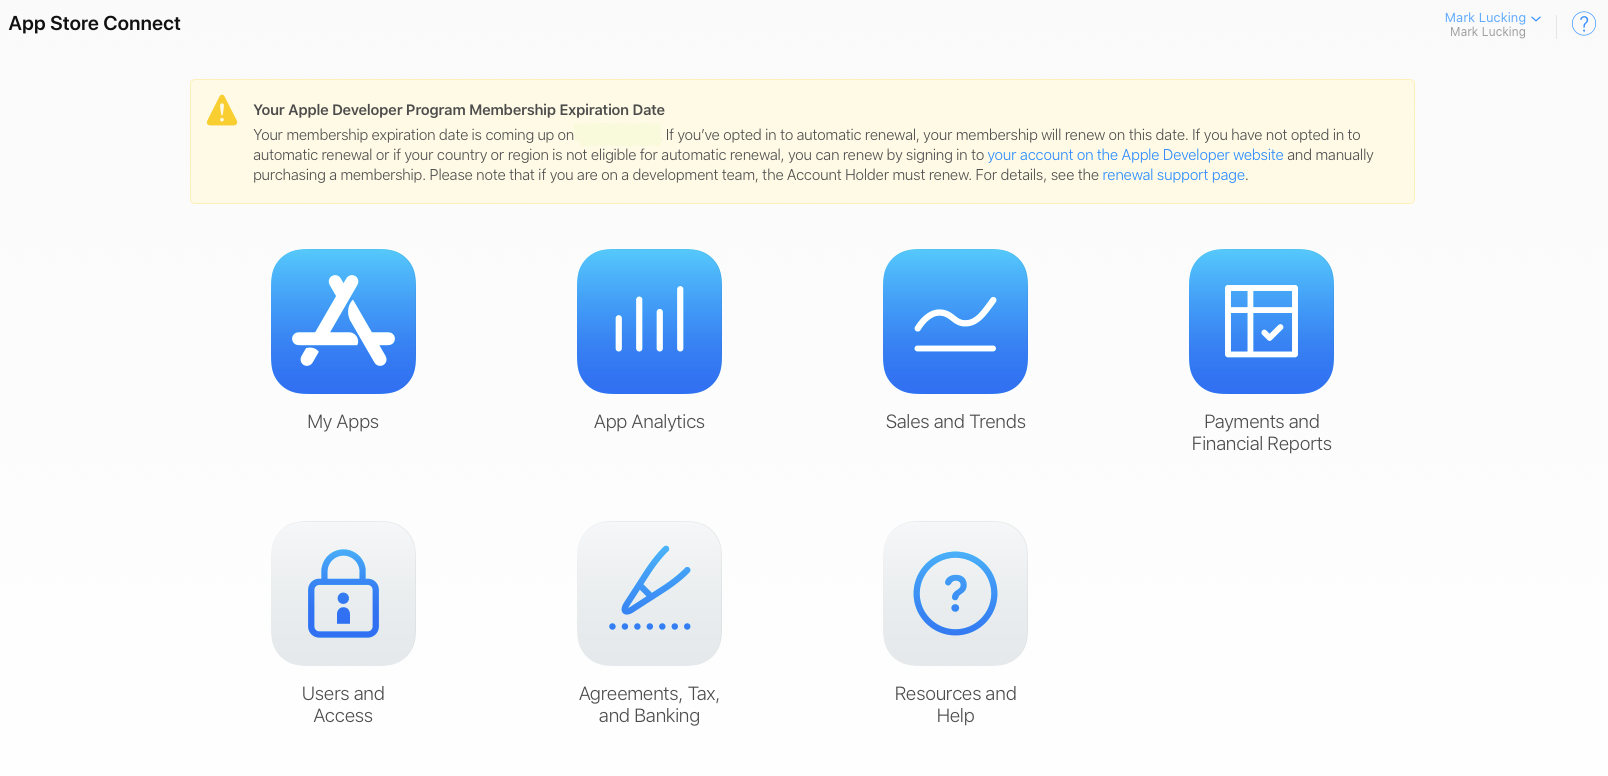
There are three buttons here that are central to the plan. The first is Agreements, Tax, and Banking. Obviously, if you hope to get paid by Apple, you need to make sure this section is complete.
这里有三个按钮是计划的中心。 首先是协议,税收和银行业务。 显然,如果您希望获得Apple的付款,则需要确保此部分完成。
Note: Apple frequently change the agreements — at least once a year, sometimes more. They will warn you when you log in. You need to keep accepting them or else other things will stop working.
注意:Apple经常更改协议-至少每年一次,有时更多。 登录时,它们会警告您。您需要继续接受它们,否则其他操作将停止。
Next, you should take a look at the Users and Access page that looks like this right now:
接下来,您应该看看现在看起来像这样的“用户和访问”页面:
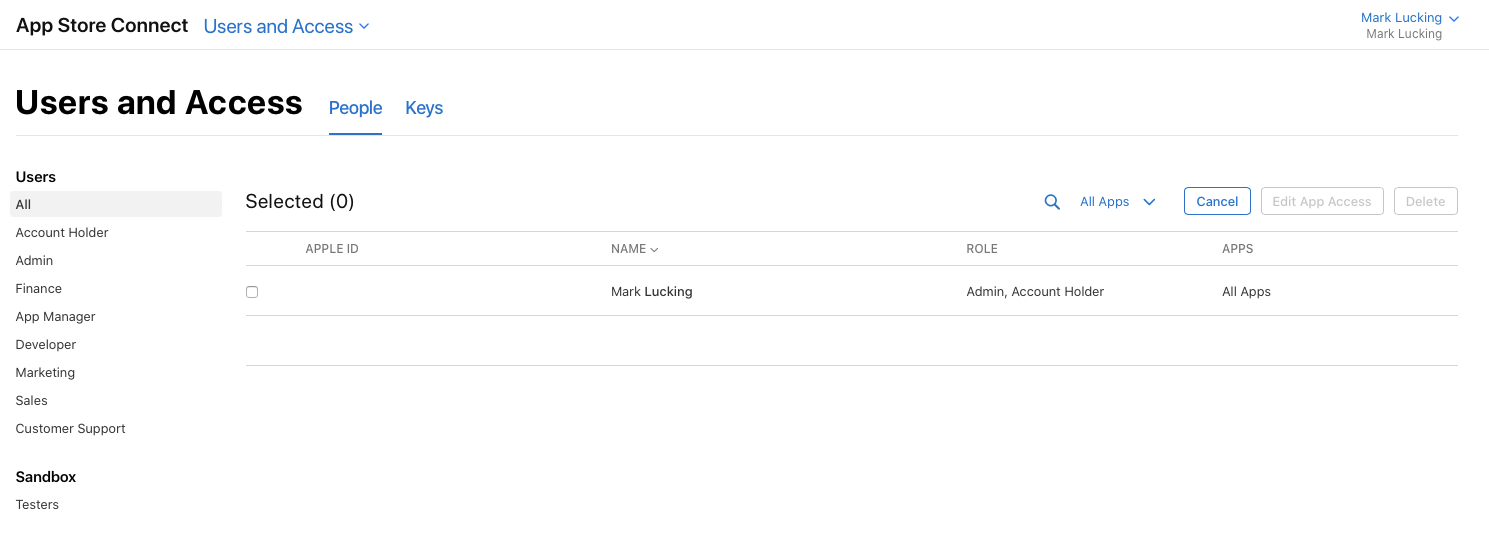
We’re interested in the lower left-hand corner: the Sandbox users. You need to click on here and add at least one so that you can test your in-app purchases. Unfortunately, a slightly irritating aspect of StoreKit is that your test user is going to need a second Apple ID. No problem, but you cannot use the same email address you do for your principal Apple ID. You need a second one.
我们对左下角感兴趣:沙盒用户。 您需要单击此处并添加至少一个,以便可以测试您的应用内购买。 不幸的是,StoreKit的一个令人讨厌的方面是您的测试用户将需要第二个Apple ID。 没问题,但是您不能使用与您的主要Apple ID相同的电子邮件地址。 您需要第二个。
Having created your test account and set up your e-banking relationship with Apple, you’re ready to proceed to the My Apps button:
创建测试帐户并建立与Apple的电子银行关系后,您就可以继续执行“我的应用程序”按钮了:

Once there, you need to click on the + in the top left and create a record for your new app:
到达那里后,您需要单击左上角的+并为新应用创建一条记录:
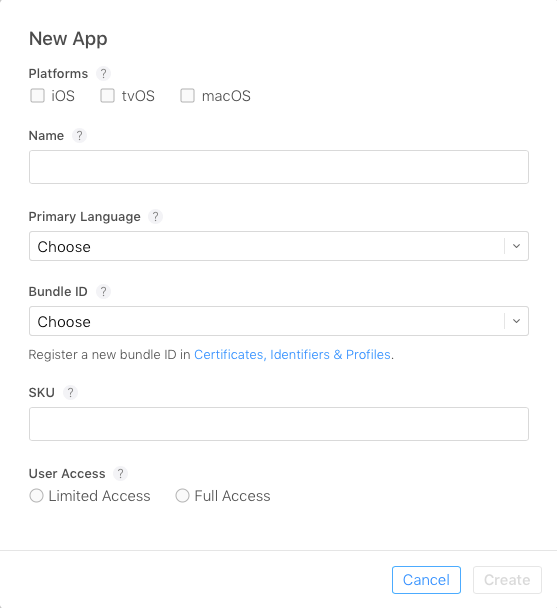
The most important field here again is the Bundle ID. This needs to match the Bundle ID in your project. Remember, you just created an identifier on the Developer website earlier.
同样,这里最重要的字段是捆绑包ID。 这需要匹配您项目中的Bundle ID。 记住,您刚才在Developer网站上创建了一个标识符。
So, you’ve done the app identifier, the banking, and the app record. Now you can create your in-app purchases on the same site. Click on My Apps:
因此,您已经完成了应用程序标识符,银行业务和应用程序记录。 现在,您可以在同一网站上创建应用内购买。 点击我的应用程序:

In the Features tab, we’re looking for In-App Purchases:
在功能标签中,我们正在寻找应用内购买:
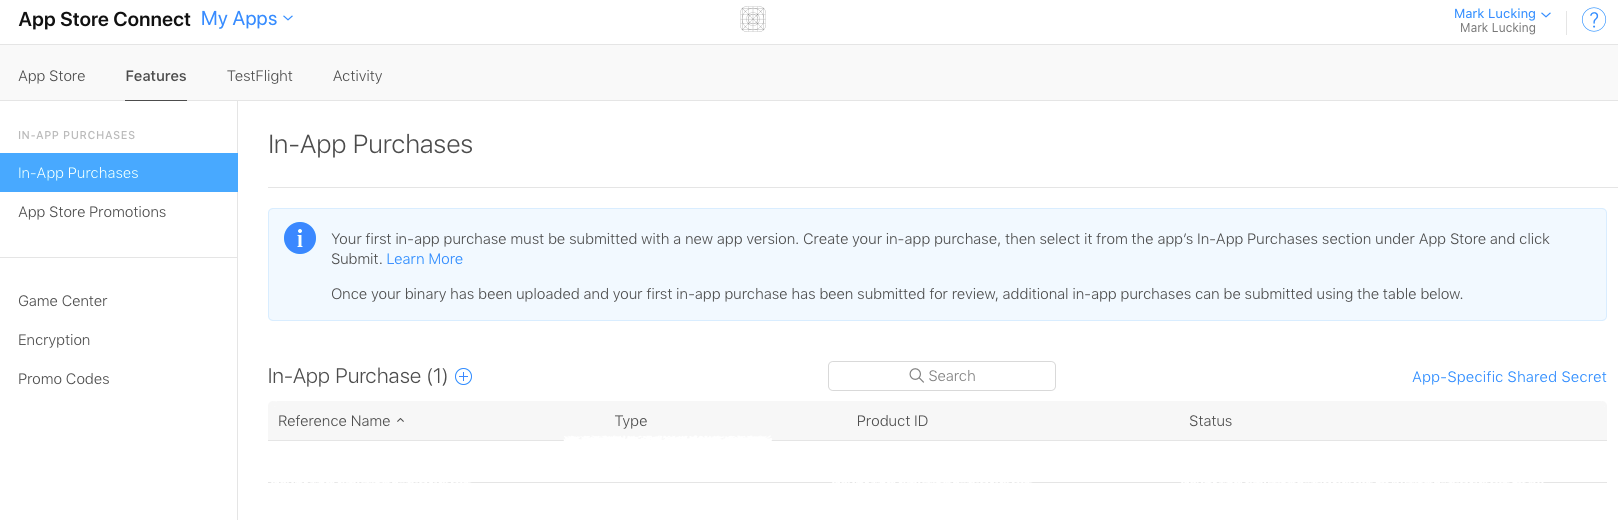
OK, in-app purchases come in four flavors:
好的,应用内购买有四种口味:
- Consumables that they need to pay for again and again. 他们需要一次又一次付费的消耗品。
- Non-consumables that they pay for once and once only. 他们一次只支付一次的非消耗品。
- Subscriptions that will renew automatically. 订阅将自动续订。
- Subscriptions that will not renew. 不会续订的订阅。
I’m going to focus on the first two in this article. Implementing this is much like in the iCloud framework with boatloads of template code, only it is a tad more challenging at times.
我将重点介绍本文的前两个。 像在带有大量模板代码的iCloud框架中实施此操作一样,有时这样做更具挑战性。
We’re going to start with consumables. They are a good place to start because you can test them over and over again. One of the drawbacks you’ll quickly find with the other flavors is that there is no reset. Once you create a non-consumable and purchase it within your app, you’ve got it. You won’t be able to test purchasing it again unless you create a different test account or a different non-consumable. That’s another aspect of StoreKit that can be a little annoying.
我们将从消耗品开始。 它们是一个很好的起点,因为您可以反复测试它们。 您会很快发现其他口味的缺点之一是没有重置。 一旦创建了非消耗品并在您的应用程序中购买它,就可以了。 除非您创建其他测试帐户或其他非消耗品,否则您将无法再次测试购买。 那是StoreKit的另一个方面,可能有点令人讨厌。
Click on the + sign and add a consumable and a non-consumable:
单击+号,然后添加消耗品和非消耗品:
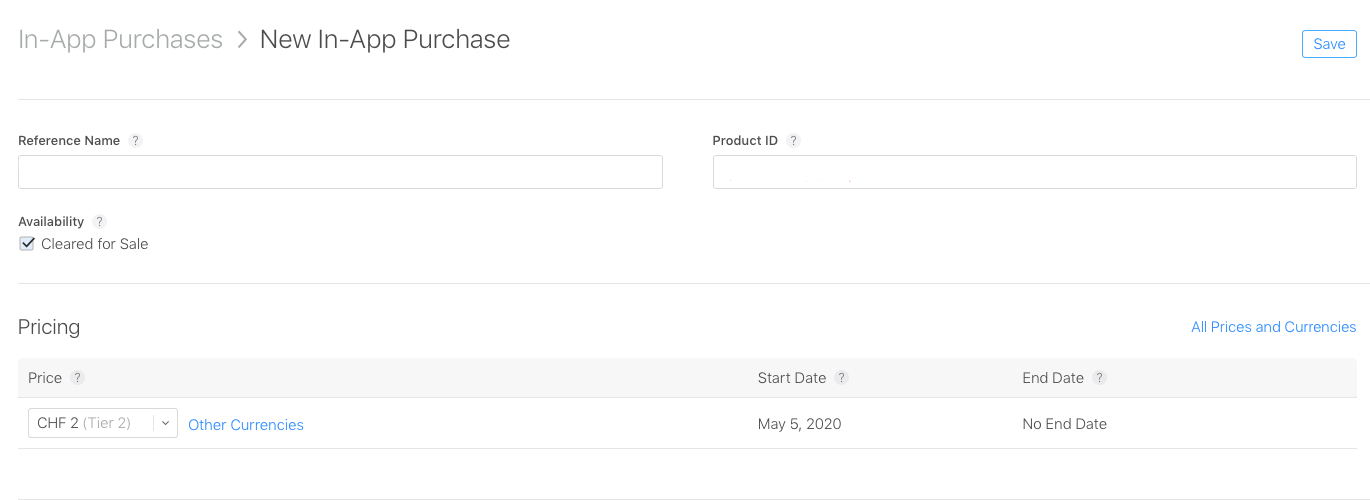
The Product ID you give here is very important. We’re going to be referring to it in our code later. Note that it isn’t related to the project ID, although Apple recommend you use a reverse domain name scheme to make sure it is unique to your app and the world at large.
您在此处提供的产品ID非常重要。 我们将在稍后的代码中引用它。 请注意,它与项目ID无关,尽管Apple建议您使用反向域名方案以确保它对您的应用乃至整个世界都是唯一的。
At last, we’re ready to start doing some coding. I assumed when I started this article that you had created a project. You must have, having gotten this far. I already called mine market.
最后,我们准备开始进行一些编码。 在开始本文时,我假设您已经创建了一个项目。 到此为止,您必须拥有。 我已经叫矿山市场了。
Open the project and create a new class named IAPManager.swift. Import StoreKit and the new Combine frameworks and create a singleton so that every time you reference it in your project, you can be sure you’re looking at the same instance:
打开项目并创建一个名为IAPManager.swift的新类。 导入StoreKit和新的Combine框架并创建一个单例,以便每次在项目中引用它时,都可以确保查看的是同一实例:
import StoreKit
import Combine
class IAPManager: NSObject {
  static let shared = IAPManager()
  private override init() {
    super.init()
  }
}
We need a means of referencing the Product IDs we added earlier in this article as well — the IDs I spoke about that are unique to this app and indeed the world at large. To keep things simple, I am going to do so with a simple array here. I added two products to my app, but I am going to add three here. I going to do so because I want to generate an error, as mad as that may seem right now:
我们还需要一种引用我们在本文前面添加的产品ID的方法-我谈到的ID对于该应用乃至整个世界都是唯一的。 为了使事情简单,我将在这里使用一个简单的数组来实现。 我在应用程序中添加了两个产品,但是我将在此处添加三个产品。 我这样做是因为我想产生一个错误,就像现在看起来那样疯狂:
func returnProductIDs() -> [String]? {
  return ["ch.cqd.apple","ch.cqd.orange","ch.cqd.banana"]
}
Yes, these look suspiciously like magic numbers — and indeed they are poor coding practice — but I’m going to use them because I need a middle ground between too simple and too complex. I want to focus on the protocol/template code.
是的,它们看起来像魔术数字一样可疑-确实它们是不好的编码习惯-但我将使用它们,因为我需要在太简单和太复杂之间取得一个中间立场。 我想专注于协议/模板代码。
Beyond poor coding practice, there is a second even more important reason this isn’t a good idea. That is because you might want to start selling “passion fruit” or “pears” in your market in the future, and if you hardcode code like this into your app, you’ll need to re-release the app.
除了不良的编码实践之外,还有另一个更重要的原因,那就是这不是一个好主意。 这是因为您将来可能希望在市场上开始销售“百香果”或“豌豆”,并且如果将这样的代码硬编码到您的应用中,则需要重新发布该应用。
Moving on, we need to download the SKProduct version/details from the store. We need those details to make purchases. Create a method to do just that:
继续,我们需要从商店下载SKProduct版本/详细信息。 我们需要这些详细信息才能进行购买。 创建一个方法来做到这一点:
func getProductsV5() {
  let productIDs = Set(returnProductIDs())
  let request = SKProductsRequest(productIdentifiers: Set(productIDs))
  request.delegate = self
  request.start()
}
This will return a set of valid Product IDs. If it finds none, it will return an error. If you give it a mixed list of Product IDs — some good, some bad — it will return only the good ones and the bad one, indicating which is which.
这将返回一组有效的产品ID。 如果找不到,将返回错误。 如果给它一个混合的产品ID列表-好的,有些不好-它只会返回好的和坏的,表明是哪一个。
Now the SKProductRequest call relies on a delegate callback we need to add to the mix. Add this extension to the IAPManager class:
现在, SKProductRequest调用依赖于我们需要添加到混合中的委托回调。 将此扩展添加到IAPManager类中:
extension IAPManager: SKProductsRequestDelegate, SKRequestDelegate {
  func productsRequest(_ request: SKProductsRequest, didReceive response: SKProductsResponse) {
    let badProducts = response.invalidProductIdentifiers
    let goodProducts = response.products
    if goodProducts.count > 0 {
      productsDB.shared.items = response.products
    print("bon ",productsDB.shared.items)
  }
  print("badProducts ",badProducts)
}
Although it might seem a little stupid, it’ll be good coding practice to deal with both cases in our code: a case where we find the product code we defined and a case where we didn’t. Obviously, it makes no sense. Why would you request a product you had not defined? But in a more complex real-world scenario, you may make a mistake and it’s better to catch it sooner rather than later. You should add this method too to catch a failure:
尽管看起来有些愚蠢,但这是在我们的代码中处理这两种情况的良好编码实践:一种情况是找到我们定义的产品代码,另一种情况是没有找到。 显然,这没有任何意义。 为什么要索取尚未定义的产品? 但是在更复杂的现实世界中,您可能会犯一个错误,最好早点而不是晚点地发现它。 您也应该添加此方法来捕获失败:
func request(_ request: SKRequest, didFailWithError error: Error) {
  print("didFailWithError ",error)
  purchasePublisher.send(("Purchase request failed ",true))
}
Finally, you can catch the completion of the process through this method to help you understand what is happening:
最后,您可以通过此方法来捕获过程的完成,以帮助您了解正在发生的事情:
func requestDidFinish(_ request: SKRequest) {
  print("request did finish")
}
We should implement this template code from Apple. It returns the price we attached to each item in the local currency:
我们应该从Apple实施此模板代码。 它以当地货币返回我们附加到每个项目的价格:
func getPriceFormatted(for product: SKProduct) -> String? {
  let formatter = NumberFormatter()
  formatter.numberStyle = .currency
  formatter.locale = product.priceLocale
  return formatter.string(from: product.price)
}
But wait, there’s an error. I didn’t define the productDB, did I? I left it out because it is very much a SwiftUI structure we need to pull into the picture here. It will be an ObservableObject. When you update it, it needs to signal to the SwiftUI interface that it has something to say.
但是,等等,这是一个错误。 我没有定义productDB ,对吗? 我省略了它,因为它是我们需要在此处显示的SwiftUI结构。 这将是一个ObservableObject。 当您对其进行更新时,它需要向SwiftUI界面发出信号,表明它有话要说。
Add this new class to your IAPManager:
将此新类添加到您的IAPManager中:
final class productsDB: ObservableObject, Identifiable {
  static let shared = productsDB()
  var items:[SKProduct] = []
  {
    willSet {
      DispatchQueue.main.async {
        self.objectWillChange.send()
      }
    }
  }
}
Now when our product list changes, it will update this, which will in turn update our interface in SwiftUI that will be watching this space.
现在,当我们的产品列表更改时,它将对此进行更新,这又将更新我们正在监视该空间的SwiftUI中的界面。
OK, over to SwiftUI at last. We can create this view to create a buying list:
好的,最后转到SwiftUI。 我们可以创建此视图以创建购买清单:
struct BuyView: View {
  @Binding var purchased:Bool
  @ObservedObject var products = productsDB.shared
  var body: some View {
  List {
    ForEach((0 ..< self.products.items.count), id: \.self) { column in
      Text(self.products.items[column].localizedDescription)
        .onTapGesture {
          //purchaseV5(self.products.items[column])
      }
    }
  }
 }
}
And indeed call it with this code from our main ContentView:
实际上,可以从我们的主ContentView中使用以下代码来调用它:
BuyView(purchased: self.$purchased)You’re all set now to go shopping for your virtual fruit. You can at this point compile and run the program. If we got everything right, it will display a list of products you can tap on to buy.
现在,您已经准备好购买虚拟水果。 此时,您可以编译并运行该程序。 如果一切正确,它将显示您可以点击购买的产品列表。
Pause. We’re ready now to implement a purchasing option, which I fear is going to involve quite a few more methods.
暂停。 我们现在准备实施购买选项,我担心它将涉及很多其他方法。
Firstly, we need to set up a monitoring process. We do so with these two methods:
首先,我们需要建立一个监控过程。 我们使用以下两种方法进行操作:
func startObserving() {
  SKPaymentQueue.default().add(self)
}
func stopObserving() {
  SKPaymentQueue.default().remove(self)
}
These need to be added to your appDelegate.swift file. You need to start watching the queue when the app starts and stop watching it when it stops:
这些需要添加到您的appDelegate.swift文件中。 您需要在应用启动时开始观察队列,并在其停止时停止观察队列:
func application(_ application: UIApplication, didFinishLaunchingWithOptions launchOptions: [UIApplication.LaunchOptionsKey: Any]?) -> Bool {
IAPManager.shared.startObserving()
return true
}
func applicationWillTerminate(_ application: UIApplication) {
IAPManager.shared.stopObserving()
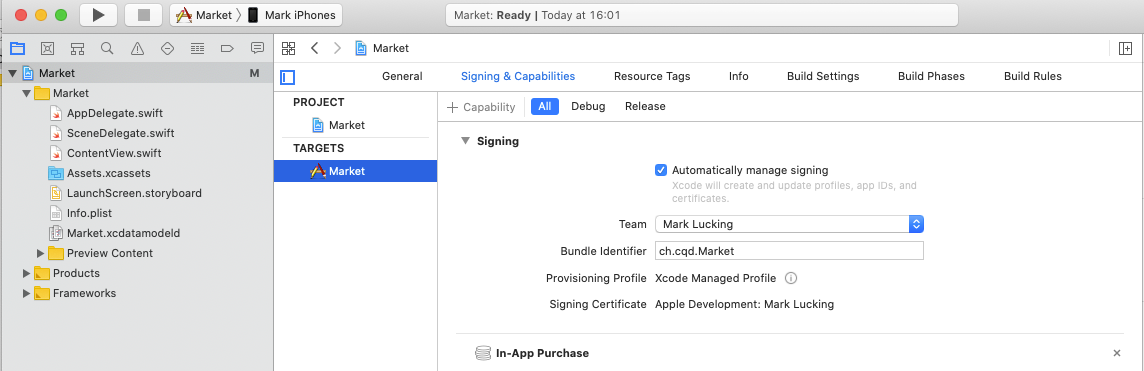
}Note that you need to make sure you have added in-app purchases to the capabilities of your app too. You do so through the Signing & Capabilities tab when clicked on the targets.
请注意,您还需要确保已将应用内购买添加到应用的功能中。 单击目标上的“签名和功能”选项卡即可。
Now before calling the in-app purchase, the next thing you need to do is check that purchases are allowed. It’s most certainly a possibility that they are not, with parents able to disable and lock this capability on iOS devices these days. Use this code to do so:
现在,在调用应用程序内购买之前,接下来要做的就是检查是否允许购买。 如今,父母肯定可以在iOS设备上禁用和锁定此功能,这很可能是事实并非如此。 使用此代码可以这样做:
func canMakePayments() -> Bool {
  return SKPaymentQueue.canMakePayments()
}
Next, we need to implement a means to actually buy something. Do so with this code:
接下来,我们需要实现一种实际购买商品的方法。 使用以下代码执行此操作:
func purchaseV5(product: SKProduct) -> Bool {
  if !IAPManager.shared.canMakePayments() {
    return false
  } else {
    let payment = SKPayment(product: product)
  SKPaymentQueue.default().add(payment)
  }
  return true
}
It is a tad confusing at this point because what you’re doing here is adding a request to a queue — a queue that you’re watching with the observation methods you just added to the appDelegate.
这一点有点令人困惑,因为您在这里所做的是将请求添加到队列中-您正在使用刚刚添加到appDelegate中的观察方法观察队列。
That request is to buy something.
那个要求是买东西。
OK, now we need to address the payment queue and adopt the SKPaymentTransactionObserver protocol by implementing its required method, namely SKPaymentTransactionObserver. This is a rather monstrous piece of code:
好了,现在我们需要解决支付队列,并采用SKPaymentTransactionObserver通过实施其所需的方法,即协议SKPaymentTransactionObserver 。 这是一段相当大的代码:
extension IAPManager: SKPaymentTransactionObserver {
  func paymentQueue(_ queue: SKPaymentQueue, updatedTransactions transactions: [SKPaymentTransaction]) {
     transactions.forEach { (transaction) in
      switch transaction.transactionState {
      case .purchased:
        SKPaymentQueue.default().finishTransaction(transaction)
        purchasePublisher.send(("Purchased ",true))
      case .restored:
        totalRestoredPurchases += 1
        SKPaymentQueue.default().finishTransaction(transaction)
        purchasePublisher.send(("Restored ",true))
      case .failed:
        if let error = transaction.error as? SKError {
          purchasePublisher.send(("Payment Error \(error.code) ",false))
          print("Payment Failed \(error.code)")
        }
        SKPaymentQueue.default().finishTransaction(transaction)
      case .deferred:
        print("Ask Mom ...")
        purchasePublisher.send(("Payment Diferred ",false))
      case .purchasing:
        print("working on it...")
        purchasePublisher.send(("Payment in Process ",false))
      default:
        break
      }
    }
  }
}
What does all this do? It is reasonably self-explanatory, I hope. In short, it checks each case on the queue for each buy request you placed with the server and sends the status back to the SwiftUI interface through the purchasePublisher PassThruSubject that looks like this:
这一切是做什么的? 我希望这是不言而喻的。 简而言之,它将检查队列中是否存在与服务器一起发出的每个购买请求的情况,并通过purchasePublisher PassThruSubject将状态发送回SwiftUI界面,如下所示:
let purchasePublisher = PassthroughSubject<(String, Bool), Never>()It is a tuple that contains the success of the operation along with a message to the user. Now we’re almost done, only you’re not going to get your app through a review yet. Sure, you can buy things, but what happens when you replace your device with a new one? You need another button and a few more methods.
它是一个元组,其中包含操作成功以及给用户的消息。 现在我们差不多完成了,只有您还没有通过审核的过程。 当然,您可以买东西,但是用新设备替换设备会怎样? 您需要另一个按钮和更多方法。
This one to launch the process:
这个启动过程:
func restorePurchasesV5() {
  totalRestoredPurchases = 0
  SKPaymentQueue.default().restoreCompletedTransactions()
}
And these two that sort out the process on the queue and deal with any errors that come up:
这两个对队列中的进程进行分类并处理出现的任何错误:
func paymentQueueRestoreCompletedTransactionsFinished(_ queue: SKPaymentQueue) {
    if totalRestoredPurchases != 0 {
        purchasePublisher.send(("IAP: Purchases successfull restored!",true))
    } else {
        purchasePublisher.send(("IAP: No purchases to restore!",true))
    }
  }


  func paymentQueue(_ queue: SKPaymentQueue, restoreCompletedTransactionsFailedWithError error: Error) {
    if let error = error as? SKError {
        if error.code != .paymentCancelled {
            purchasePublisher.send(("IAP Restore Error: " + error.localizedDescription,false))
        } else {
            purchasePublisher.send(("IAP Error: " + error.localizedDescription,false))
        }
    }
  }
You’ll need to add another button to your SwiftUI interface to make this work too:
您还需要在SwiftUI界面中添加另一个按钮,以使这项工作也有效:
Button("Restore") {
  IAPManager.shared.restorePurchasesV5()
}
And there you have it: an example of how to implement in-app purchases with SwiftUI.
在那里,您将获得:如何使用SwiftUI实施应用内购买的示例。


 550
550

 被折叠的 条评论
为什么被折叠?
被折叠的 条评论
为什么被折叠?
 到【灌水乐园】发言


