


 本文详细介绍了如何在Ubiquiti设备与DD-WRT路由器上配置IPv6 6rd协议,以实现IPv4到IPv6的过渡,提升网络连接的效率和兼容性。
ipv6 6rd
This posts walks through how to create an isolated network which has access to the IPv6 Internet via 6RD using Ubiquiti EdgeMax equipment and a router running DD-WRT. 6RD (Rapid Deployment) is a method to reach the IPv6 Internet by tunneling over an IPv4 network, similar to 6to4.
本文介绍如何创建一个隔离的网络,该网络使用Ubiquiti EdgeMax设备和运行DD-WRT的路由器通过6RD访问IPv6互联网。 6RD(快速部署)是一种通过与6to4相似的IPv4网络建立隧道来访问IPv6 Internet的方法。
While 6to4 is primarily used to connect different “IPv6 islands” together, 6RD was designed to allow a service provider connected to the IPv6 Internet in its core network to provide IPv6 services in the access layer based on its own registered IPv6 public address space without deploying native dual- stack (simultaneous IPv4 and IPv6 connectivity).
6to4主要用于将不同的“ IPv6岛”连接在一起,而6RD旨在允许连接到其核心网络中的IPv6 Internet的服务提供商基于其自身注册的IPv6公共地址空间在访问层中提供IPv6服务,而无需进行部署本机双堆栈(同时进行IPv4和IPv6连接)。
A service provider’s access layer (where end users connect to the network) frequently lags behind the rest of the network in technology due to the enormous cost of upgrading equipment that services the customers. Older equipment may not support IPv6, so tunneling IPv6 over IPv4 is a necessity. Over time, this will become a non-issue as access-layer technologies are upgraded. Chapter 7 of “IPv6 Essentials, 3rd Edition” by Silvia Hagen goes into excellent detail on the background and operation of 6RD.
由于升级为客户服务的设备的巨大成本,服务提供商的访问层(最终用户连接到网络的终端)在技术上经常落后于网络的其余部分。 较旧的设备可能不支持IPv6,因此有必要在IPv4上建立IPv6隧道。 随着时间的推移,随着接入层技术的升级,这将不再是问题。 Silvia Hagen撰写的“ IPv6 Essentials,第3版”的第7章详细介绍了6RD的背景和操作。
My setup is with a Ubiquiti EdgeMax-series EdgeRouter 4, EdgeSwitch 8–150w, and a NetGear R7000 running DD-WRT as a wireless access point (WAP).
我的设置是使用Ubiquiti EdgeMax系列EdgeRouter 4,EdgeSwitch 8–150w和运行DD-WRT作为无线访问点(WAP)的NetGear R7000。
Why not a Ubiquiti WAP also? I am a big fan of Ubiquiti gear, and have several WAPs deployed in my company (and they work really well). I used to have a full Meraki stack (router, switch, AP), and was pretty happy with that. But, when the license expired, it was a pretty difficult pill to swallow to relicense when I could spend just a little bit more money and acquire better hardware with more features, and most important: no licensing to deal with.
为什么也没有Ubiquiti WAP? 我是Ubiquiti设备的忠实拥护者,并且在公司中部署了多个WAP(非常有效)。 我曾经有完整的Meraki堆栈(路由器,交换机,AP),对此感到非常满意。 但是,当许可证过期时,当我可以花更多一点钱并获得具有更多功能的更好的硬件(最重要的是:没有许可要处理)时,很难再下一个许可证。
When I bought the router and switch, I was considering buying a Ubiquiti AP also, but I have a not-too-old NetGear R7000 router that I converted into an access point. The R7000 has 802.11ac Wave 1 triple-chain hardware, and by installing DD-WRT, I am able to create multiple wireless networks in segmented VLANs. Perfect for this project!
当我购买路由器和交换机时,我也在考虑购买Ubiquiti AP,但是我有一台不太旧的NetGear R7000路由器,我将其转换为接入点。 R7000具有802.11ac Wave 1三链硬件,并且通过安装DD-WRT,我能够在分段VLAN中创建多个无线网络。 非常适合该项目!
My initial plan was to merely set up 6RD so every connected device would have IPv6 Internet access. Even though 6RD is based on your service provider’s own public IPv6 address space, many ISPs (particularly in the United States) are very large and cover vast geographic areas, such as is the case with my current ISP (CenturyLink). Netflix does not appreciate this (geo-blocking). It then occurred to me that in reality, I am the only one who cares about IPv6 Internet access right now, so why don’t I create my own isolated IPv6-capable network?
我最初的计划是仅设置6RD,以便每个连接的设备都可以访问IPv6 Internet。 尽管6RD基于服务提供商自己的公共IPv6地址空间,但是许多ISP(尤其是在美国)非常大,并且覆盖广阔的地理区域,例如我目前的ISP(CenturyLink)就是这种情况。 Netflix不喜欢这种方式(地理封锁)。 然后我想到,实际上,我是目前唯一关心IPv6互联网访问的人,那么为什么不创建自己的隔离的支持IPv6的网络呢?
Part of 6RD configuration is determining what your IPv6 prefixes will be. You will need this in order to assign static IPv6 addresses in various parts of the configuration. Your 6RD prefixes are based on your provider’s 6RD prefix and your public IPv4 address. CenturyLink uses 2602::/24 for its base prefix, with the following 32 bits consisting of your public IPv4 address converted to hexadecimal. Each IPv4 octet becomes two hexadecimal digits. For example, I’ll choose a random CenturyLink IPv4 address 71.222.12.34 which becomes 47.de.0c.22. You can do the conversion in your head**, with a programmer’s calculator, or with this handy shell script (which can also be issued within the Ubiquiti CLI):
6RD配置的一部分是确定IPv6前缀将是什么。 您将需要此配置,以便在配置的各个部分中分配静态IPv6地址。 您的6RD前缀基于提供商的6RD前缀和公共IPv4地址。 CenturyLink使用2602 :: / 24作为其基本前缀,其后的32位包含转换为十六进制的公共IPv4地址。 每个IPv4八位位组都变为两个十六进制数字。 例如,我将选择一个随机的CenturyLink IPv4地址71.222.12.34,它将变为47.de.0c.22。 您可以使用程序员的计算器或此便捷的Shell脚本(也可以在Ubiquiti CLI中发布)在脑海中**进行转换:
IP='71.222.12.34'
printf "2602:%02x:%02x%02x:%02x00::/56\n" $(echo $IP | tr . ' ')
2602:47:de0c:2200::/56 is the result in this case. There are a few points to note. Since the 6RD prefix is 24 bits and the hex-converted IPv4 address portion is 32 bits, the address could be written like this: 2602:0047:de0c:2200::/56. Because we are working with a /56, this means you can create 256 /64 prefixes, 00 through FF.
在这种情况下,结果为2602:47:de0c:2200 :: / 56。 有几点需要注意。 由于6RD前缀为24位,而十六进制转换的IPv4地址部分为32位,因此地址可以这样写:2602:0047:de0c:2200 :: / 56。 因为我们使用的是/ 56,所以这意味着您可以创建256/64前缀(00到FF)。
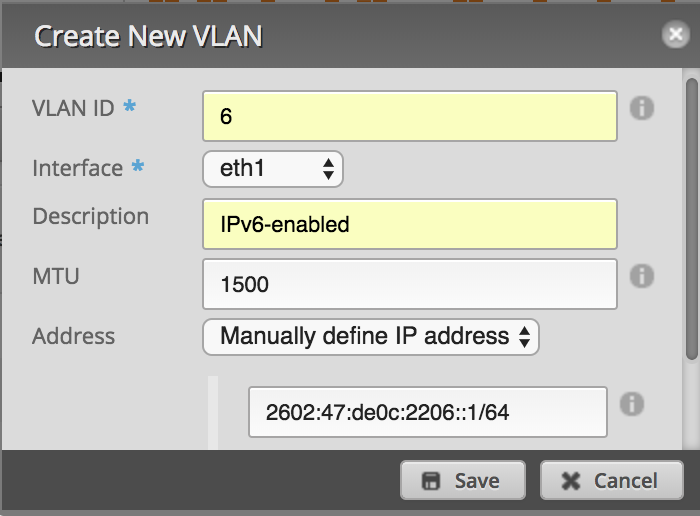
The first major configuration step is to prepare the Ubiquiti EdgeMax router. I am using eth0 as the DHCP-enabled WAN-facing interface which holds my public IPv4 address. My LAN-facing interface is eth1, which connects to port 1 on my EdgeSwitch. Since my goal is to create an isolated network, I created a new VLAN from the EdgeRouter GUI Dashboard page by clicking “Add Interface > Add VLAN”. I created VLAN 6, associated it with the LAN-facing eth1 interface, and assigned two addresses, 2602:47:de0c:2206::1⁄64 (subnet 06) and 10.6.6.1⁄24. If you desire IPv6-only connectivity, do not configure an IPv4 address.
第一个主要配置步骤是准备Ubiquiti EdgeMax路由器。 我将eth0用作启用了DHCP且面向WAN的接口,其中包含我的公共IPv4地址。 我面向LAN的接口是eth1,该接口连接到EdgeSwitch的端口1。 由于我的目标是创建一个隔离的网络,因此我通过单击“添加接口>添加VLAN”从EdgeRouter GUI仪表板页面创建了一个新的VLAN。 我创建了VLAN 6,将其与面向LAN的eth1接口相关联,并分配了两个地址2602:47:de0c:2206 :: 1⁄64(子网06)和10.6.6.1⁄24。 如果需要仅使用IPv6的连接,请不要配置IPv4地址。
My 6RD configuration was modified from this information by Chris Cowart. While I am on a CenturyLink gigabit fiber connection like Chris, I am using different interfaces and not using PPPoE. The Ubiquiti EdgeMax series currently offers limited configuration capabilities in the GUI, so the CLI is required.
我的6RD配置已由Chris Cowart根据此信息进行了修改。 当我使用像Chris这样的CenturyLink千兆光纤连接时,我使用的是不同的接口,而不是使用PPPoE。 Ubiquiti EdgeMax系列当前在GUI中提供有限的配置功能,因此需要CLI。
First, a generic IPv6 firewall is put in place which accepts only ICMPv6 traffic and previously-established connections inbound. The CenturyLink 6RD border router IPv4 address is defined, and IP protocol 41 (IPv6 tunneled over IPv4) is allowed. Then, a tunnel interface is configured. EdgeOS (and many others) define this as a Simple Internet Transition (SIT) tunnel type. The tunnel has its MTU adjusted to account for the 20-byte overhead of IPv6 in IPv4 tunneling. IPv6 default routing is configured, and the eth1 VLAN 6 interface is set up to start sending IPv6 RA’s. The “blackhole” route is similar to a static route to Null0 in the Cisco world.
首先,放置一个通用IPv6防火墙,该防火墙仅接受ICMPv6流量和以前建立的入站连接。 定义了CenturyLink 6RD边界路由器的IPv4地址,并允许使用IP协议41(通过IPv4隧道传输的IPv6)。 然后,配置隧道接口。 EdgeOS(以及许多其他操作系统)将其定义为简单Internet转换(SIT)隧道类型。 调整了隧道的MTU,以解决IPv4隧道中IPv6的20字节开销。 配置了IPv6默认路由,并设置了eth1 VLAN 6接口以开始发送IPv6 RA。 “黑洞”路由类似于到Cisco世界中通往Null0的静态路由。
# Full credit to Chris Cowart for the original configuration!
# https://github.com/cpcowart/ubiquiti-scripts/blob/master/centurylink-6rd.md# Generic IPv6 firewall allowing ICMPv6 and previously-established
# connections inbound, and blocking everything else.
set firewall ipv6-name internet6-in enable-default-log
set firewall ipv6-name internet6-in rule 10 action accept
set firewall ipv6-name internet6-in rule 10 description 'Allow established connections'
set firewall ipv6-name internet6-in rule 10 log disable
set firewall ipv6-name internet6-in rule 10 state established enable
set firewall ipv6-name internet6-in rule 10 state related enable
set firewall ipv6-name internet6-in rule 20 action drop
set firewall ipv6-name internet6-in rule 20 log enable
set firewall ipv6-name internet6-in rule 20 state invalid enable
set firewall ipv6-name internet6-in rule 30 action accept
set firewall ipv6-name internet6-in rule 30 log disable
set firewall ipv6-name internet6-in rule 30 protocol icmpv6# IPv6 firewall rule to allow IPv6 over IPv4 traffic from CenturyLink's
# 6RD border router.
set firewall name internet-in rule 100 source address 205.171.2.64
set firewall name internet-in rule 100 protocol 41
set firewall name internet-in rule 100 action accept# Create 6RD tunnel interface toward CL's 6RD BR and associate the interface
# with the IPv6 firewall. MTU set to 1480 to account for 20-byte
# tunnel overhead (subtract 8 when using PPPoE). Using local-ip 0.0.0.0
# enables access to the tunnel from any IPv6-enabled interface.
set interfaces tunnel tun0 description 'CenturyLink 6RD Tunnel'
set interfaces tunnel tun0 encapsulation sit
set interfaces tunnel tun0 firewall in ipv6-name internet6-in
set interfaces tunnel tun0 firewall local ipv6-name internet6-in
set interfaces tunnel tun0 local-ip 0.0.0.0
set interfaces tunnel tun0 mtu 1480
set interfaces tunnel tun0 multicast enable
set interfaces tunnel tun0 remote-ip 205.171.2.64
set interfaces tunnel tun0 ttl 255# The tunnel IPv6 address only needs to be a /128, and can be anything
# within the entire 2602:47:de0c:2200::/56 (except the other router addresses)
set interfaces tunnel tun0 address 2602:47:de0c:2200::/128# Discard local unknown IPv6 addresses, and send all other unknowns
# out the tunnel toward the 6RD border router.
set protocols static route6 2602:47:de0c:2200::/56 blackhole
set protocols static interface-route6 ::/0 next-hop-interface tun0# Enable IPv6 RA's on the eth1 VLAN 6 interface.
set interfaces ethernet eth1 vif 6 ipv6 dup-addr-detect-transmits 1
set interfaces ethernet eth1 vif 6 ipv6 router-advert cur-hop-limit 64
set interfaces ethernet eth1 vif 6 ipv6 router-advert managed-flag false
set interfaces ethernet eth1 vif 6 ipv6 router-advert max-interval 30
set interfaces ethernet eth1 vif 6 ipv6 router-advert other-config-flag false
set interfaces ethernet eth1 vif 6 ipv6 router-advert prefix '::/64' autonomous-flag true
set interfaces ethernet eth1 vif 6 ipv6 router-advert prefix '::/64' on-link-flag true
set interfaces ethernet eth1 vif 6 ipv6 router-advert prefix '::/64' valid-lifetime 600
set interfaces ethernet eth1 vif 6 ipv6 router-advert reachable-time 0
set interfaces ethernet eth1 vif 6 ipv6 router-advert retrans-timer 0
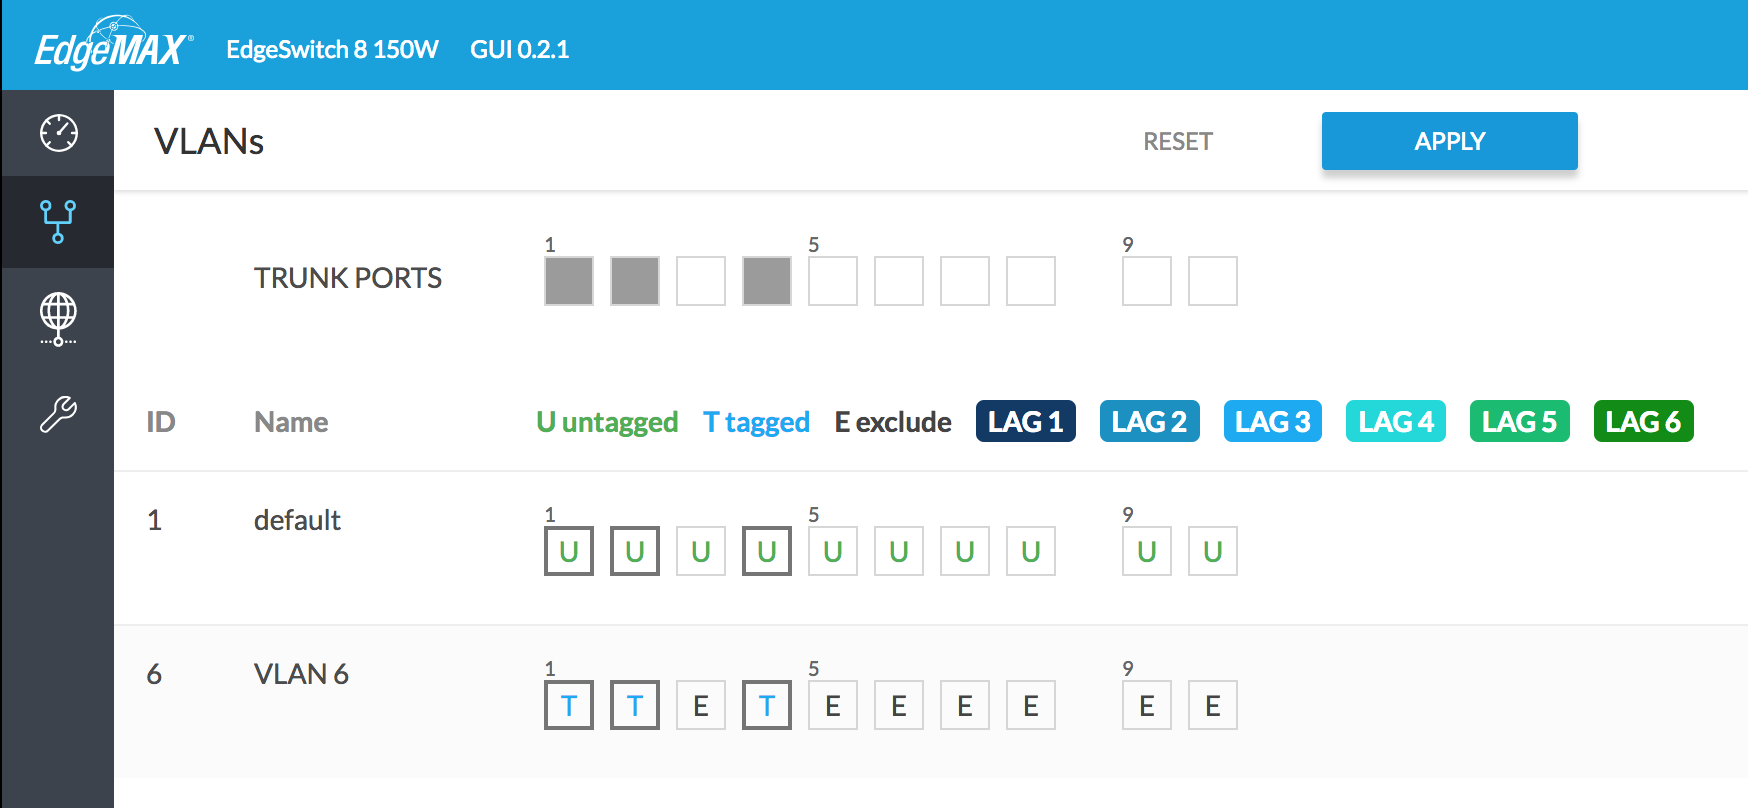
set interfaces ethernet eth1 vif 6 ipv6 router-advert send-advert trueThe second major configuration step is to create a new VLAN on the EdgeSwitch, and enable tagging on the appropriate ports. This can all be done within the GUI. Click the VLANs tab, enter a number in the “New VLAN ID” box (6 in this case), and click the plus sign. Designate the appropriate ports as trunks, and enable tagging for VLAN 6. In my case, port 1 goes to the EdgeRouter, port 2 goes to my R7000 WAP, and port 4 goes to my ESXi server. On the ESXi server, by creating a new port group and associating it with VLAN 6, virtual machines will have access to the IPv6 Internet as well. Click the “Apply” button when finished.
第二个主要的配置步骤是在EdgeSwitch上创建一个新的VLAN,并在适当的端口上启用标记。 所有这些都可以在GUI中完成。 单击VLAN选项卡,在“新VLAN ID”框中输入一个数字(在本例中为6),然后单击加号。 将适当的端口指定为中继,并为VLAN 6启用标记。在我的情况下,端口1进入EdgeRouter,端口2进入我的R7000 WAP,端口4进入我的ESXi服务器。 在ESXi服务器上,通过创建新的端口组并将其与VLAN 6关联,虚拟机也将可以访问IPv6 Internet。 完成后,单击“应用”按钮。
The third and final major configuration step is to prepare the R7000 router. I started from the stock NetGear firmware, and updated it to the latest R7000 DD- WRT firmware via chk file. This entire section took the longest as I ran into several issues that I will detail here (and hopefully save you some time!). Upgrading from the stock firmware reset all settings.
第三步也是最后的主要配置步骤是准备R7000路由器。 我从库存的NetGear固件开始,然后通过chk文件将其更新为最新的R7000 DD-WRT固件 。 当我遇到几个问题时,整个章节花费了最长的时间,我将在这里详细介绍(并希望为您节省一些时间!)。 从库存固件升级会重置所有设置。
To begin the DD-WRT configuration process, I logged in to the SSID “dd-wrt” using the password printed on the bottom of the router. The router has only a baseline configuration and is acting as a DHCP server with the IP address 192.168.1.1 at this point. Open this address in a web browser to continue with the configuration.
为了开始DD-WRT配置过程,我使用路由器底部印制的密码登录到SSID“ dd-wrt”。 路由器仅具有基线配置,并且此时充当IP地址为192.168.1.1的DHCP服务器。 在Web浏览器中打开此地址以继续配置。
The first thing I did was configure DD-WRT to participate as a regular WAP (and not a router), like it was doing previously with the stock firmware. Under “Setup > Basic Setup”, I set the “WAN Connection Type” to “disabled”. I configured a static IP on my primary VLAN, and added the IPv4 address of the EdgeRouter as the default gateway and DNS server. I disabled the DHCP server, and defined an NTP server.
我所做的第一件事是将DD-WRT配置为以常规WAP(而不是路由器)的形式参与,就像以前使用库存固件一样。 在“设置>基本设置”下,将“ WAN连接类型”设置为“禁用”。 我在主VLAN上配置了静态IP,并将EdgeRouter的IPv4地址添加为默认网关和DNS服务器。 我禁用了DHCP服务器,并定义了NTP服务器。
After making the changes, click “Save”, then “Apply Changes”. Reconnect to the R7000 using the static IP address to continue. I then went to “Administration > Management” and set the admin username and password. Finally, I went to “Wireless > Basic Settings” and “Wireless > Wireless Security” to reconfigure my previous 2.4 GHz and 5 GHz WLANs. Now that the preliminary DD-WRT configuration is out of the way, we can continue to add the new isolated WLAN.
进行更改后,单击“保存”,然后单击“应用更改”。 使用静态IP地址重新连接到R7000继续。 然后,我进入“管理>管理”并设置管理员用户名和密码。 最后,我转到“无线>基本设置”和“无线>无线安全”以重新配置以前的2.4 GHz和5 GHz WLAN。 现在,初步的DD-WRT配置已经完成,我们可以继续添加新的隔离WLAN。
Go to “Setup > VLANs”. Underneath the port connected to the EdgeSwitch (R7000 port 4 in my case), click the “Tagged” check box, then check a box for a VLAN, 3–15. Don’t think of these as VLAN numbers, but as VLAN “slots”, meaning DD- WRT on the R7000 supports up to 16 VLAN definitions. I chose 6 just for consistency. This will cause the link to be tagged with VLAN 6 automatically, but this setting can be overridden later if you are using a different VLAN number. Do not change the bridge assignment. Save the settings, then apply.
转到“设置> VLAN”。 在连接到EdgeSwitch的端口(在我的情况下为R7000端口4)的下面,单击“已标记”复选框,然后选中一个VLAN框(3-15)。 不要将它们视为VLAN号,而应视为VLAN“插槽”,这意味着R7000上的DD-WRT最多支持16个VLAN定义。 我选择6只是为了保持一致性。 这将使链接自动标记有VLAN 6,但是如果您使用其他VLAN号,以后可以覆盖此设置。 请勿更改网桥分配。 保存设置,然后应用。

Next we’ll set up the new SSID. Go to “Wireless > Basic Settings”, and click the “Add” button under the “Virtual Interface” category. Remember that SSIDs are defined per-radio. In my case, I created the new SSID only on the 5 GHz radio. Name your SSID, leave the “Network Configuration” setting to “Bridged”, then save and apply.
接下来,我们将设置新的SSID。 转到“无线>基本设置”,然后单击“虚拟接口”类别下的“添加”按钮。 请记住,SSID是按无线电定义的。 就我而言,我仅在5 GHz无线电上创建了新的SSID。 命名您的SSID,将“网络配置”设置保留为“桥接”,然后保存并应用。

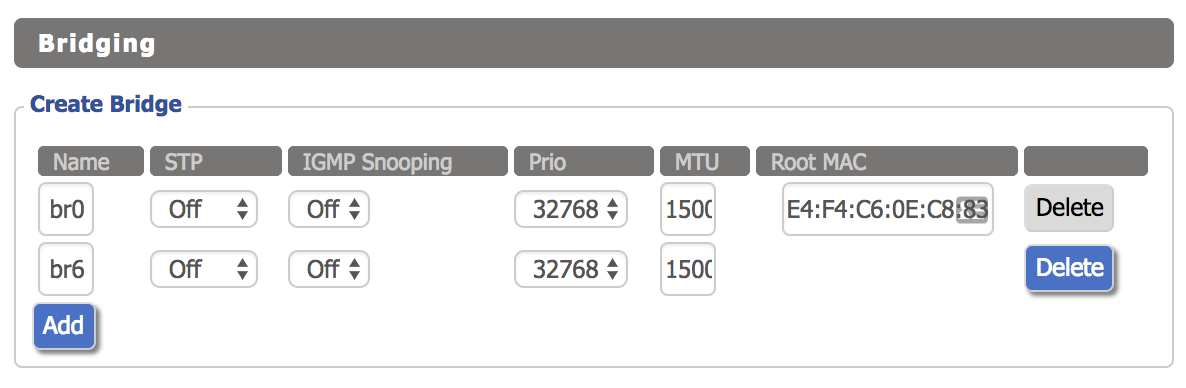
The next step is to create a bridge interface. Click “Setup > Networking”, then click the “Add” button under “Create Bridge”. The name can be anything you like, I used “br6” for consistency. There is no need to enable STP since the R7000 is acting as a WAP. Click save and apply.
下一步是创建桥接接口。 单击“设置>网络”,然后单击“创建网桥”下的“添加”按钮。 名称可以是任何您喜欢的名称,为了保持一致,我使用了“ br6”。 由于R7000充当WAP,因此无需启用STP。 单击保存并应用。
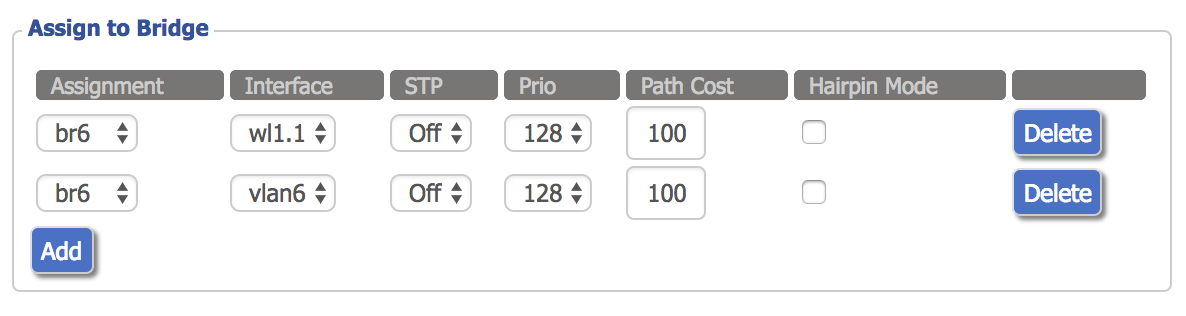
Now, click the “Add” button twice under the “Assign to Bridge” section. Under the “Assignment” column, select the new bridge for both rows. Under the “Interface” column, select the WLAN interface corresponding to the new SSID you added (wl1.1 in this case) for one row, and the VLAN slot for the other row (vlan6 in this case).
现在,在“分配给网桥”部分下单击两次“添加”按钮。 在“分配”列下,为两行选择新的网桥。 在“接口”列下,为一行选择与您添加的新SSID(在此情况下为wl1.1)对应的WLAN接口,为另一行选择VLAN插槽(在此情况下为vlan6)。
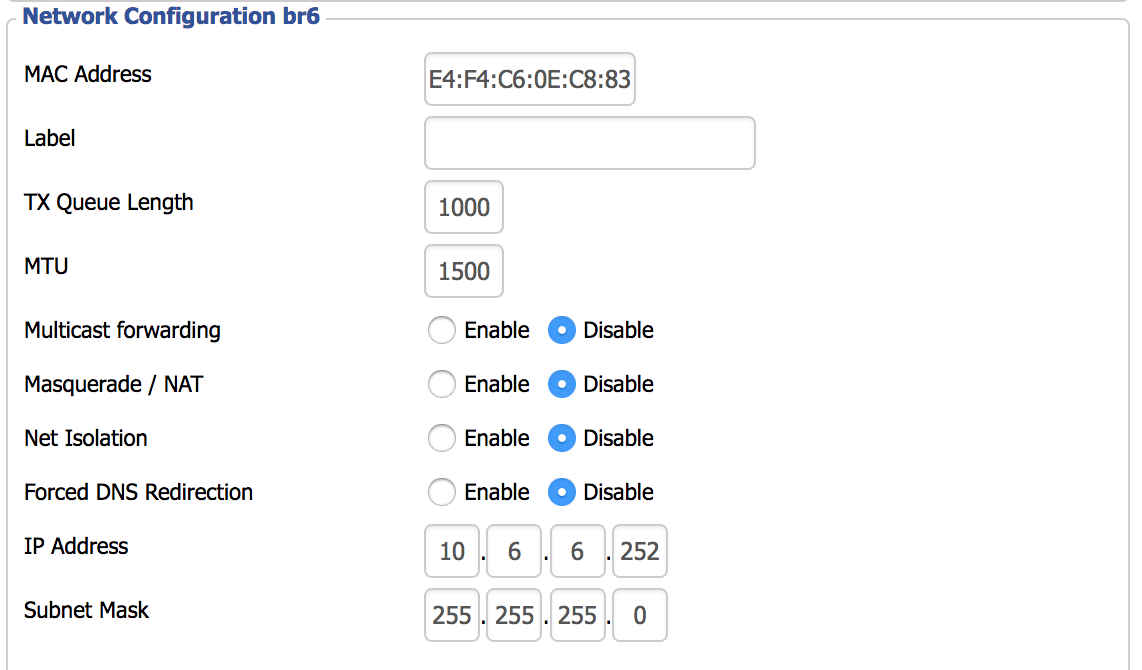
We can also configure the IPv4 Layer 3 interface under the “Network Configuration br6” section. Disable “Masquerade / NAT” and assign an appropriate IPv4 address. Click save and apply.
我们还可以在“网络配置br6”部分下配置IPv4第3层接口。 禁用“伪装/ NAT”并分配适当的IPv4地址。 单击保存并应用。
Now we’ll enable protected access: go to “Wireless > Wireless Security”, and configure the appropriate settings for the new SSID. Most people will use “WPA2 Personal” unless you have a AAA setup with RADIUS (DD-WRT has a built-in FreeRadius server if you are so inclined).
现在,我们将启用受保护的访问:转到“无线>无线安全”,然后为新的SSID配置适当的设置。 除非您使用RADIUS进行AAA设置(否则,DD-WRT会内置FreeRadius服务器),否则大多数人都会使用“ WPA2 Personal”。

Click “Save”, but do not click “Apply” yet. I ran into a problem that took awhile to chase down. I don’t know if the issue is with DD-WRT in general, or just the R7000. I had to go to the “Services” tab and disable “DNSMasq”. Until I disabled this setting, I could not connect to the new SSID after configuring authentication.
单击“保存”,但不要单击“应用”。 我遇到了一个需要一段时间才能解决的问题。 我不知道这是一般的DD-WRT还是R7000。 我必须转到“服务”选项卡并禁用“ DNSMasq”。 在禁用此设置之前,配置身份验证后无法连接到新的SSID。

Click save and apply. Go to the “Administration” tab, scroll down to the bottom, and reboot the R7000. When it comes back up, you should now have authenticated access to the SSID providing segregated access to the IPv6 Internet, with your IPv6 address configured via SLAAC:
单击保存并应用。 转到“管理”选项卡,向下滚动到底部,然后重新启动R7000。 备份后,您现在应该已经对SSID进行了身份验证访问,从而可以通过SLAAC配置IPv6地址,从而实现对IPv6 Internet的单独访问:

The downside to this is that since my public IPv4 address is obtained via DHCP, I will have to reconfigure the EdgeRouter if my IPv4 address ever changes. Luckily this is extremely rare, and is something that could be scripted.
不利的一面是,由于我的公共IPv4地址是通过DHCP获得的,因此,如果我的IPv4地址发生更改,我将不得不重新配置EdgeRouter。 幸运的是,这非常罕见,并且可以编写脚本。
There is one more very important factor to keep in mind: unlike with IPv4, you are no longer behind a NAT, so you cannot use “security through obscurity” as a defense mechanism anymore. Every device on this VLAN is now directly connected to the public IPv6 Internet with its own individual public IPv6 address, so make sure you run a personal firewall on all of your IPv6 devices attached to this network! The firewall settings on the EdgeRouter will protect against unsolicited attacks, but once you make a connection with a malicious IPv6 host, your device may be up for grabs until the session times out.
需要牢记的一个非常重要的因素:与IPv4不同,您不再位于NAT的后面,因此您不能再将“通过隐蔽性进行的安全性”用作防御机制。 现在,该VLAN上的每个设备都使用自己的单独的公共IPv6地址直接连接到公共IPv6互联网,因此请确保在连接到该网络的所有IPv6设备上运行个人防火墙! EdgeRouter上的防火墙设置可以防止未经请求的攻击,但是一旦您与恶意IPv6主机建立连接,您的设备就可以抢到会话超时为止。
The concepts in this guide can also be used to create a guest WLAN. With everything now configured, I can say that DD-WRT is very finicky. Many settings require a full router reboot before they actually take effect. While you’re getting some enterprise-level features for a much cheaper price, the software stability leaves a little to be desired. Conversely, my experience has been that Ubiquiti WAPs are really excellent. My next home network upgrade will definitely be to replace the R7000 with a real WAP. But, sometimes it’s fun to see what you can do with what you already have, and sometimes you have no choice, such is the life of a typical enterprise network engineer.
本指南中的概念也可以用于创建访客WLAN。 现在,一切都配置好了,我可以说DD-WRT非常挑剔。 许多设置都需要重新启动路由器才能真正生效。 当您以便宜得多的价格获得一些企业级功能时,软件的稳定性就有些不足了。 相反,我的经验是Ubiquiti WAP非常出色。 我的下一个家庭网络升级肯定是用真正的WAP代替R7000。 但是,有时候有趣的是,看看可以用已有的东西做什么,有时却别无选择,这就是典型的企业网络工程师的生活。
** Yes, you can convert from decimal to hexadecimal in your head. When dealing with IPv4 addresses, the conversion is somewhat easier because you are only dealing with a range of values from 0 to 255. Since each IPv4 octet represents two hexadecimal digits, the range in hex is 00 to FF. The left hexadecimal digit counts the number of “16s”. 32 in decimal is 20 in hex. 33 in decimal is 21 in hex, and so on. So for any given number, the left hex digit is how many times the decimal number can be divided by 16, and the right hex digit is the remainder. 222 has thirteen 16s in it, with 14 left over, making decimal 222 be DE in hex (D=13, E=14).
**是的,您可以在头脑中将十进制转换为十六进制。 在处理IPv4地址时,转换要容易一些,因为您只处理从0到255的值范围。由于每个IPv4八位字节代表两个十六进制数字,因此十六进制的范围是00到FF。 左边的十六进制数字表示“ 16s”的数量。 十进制的32是十六进制的20。 十进制的33十六进制为21,依此类推。 因此,对于任何给定的数字,左十六进制数字是十进制数可以除以16的倍数,而右十六进制数字是余数。 222中有13个16s,还剩14个,使十进制222为十六进制的DE(D = 13,E = 14)。
翻译自: https://medium.com/swlh/ipv6-6rd-with-ubiquiti-and-dd-wrt-edb1682135ab
ipv6 6rd


 761
761

 被折叠的 条评论
为什么被折叠?
被折叠的 条评论
为什么被折叠?
 到【灌水乐园】发言


