


A comprehensive guide to analyzing CSV data using Python Pandas and Pandas Profiling
使用Python Pandas和Pandas分析来分析CSV数据的综合指南
Python Pandas is one of the most heavily used tools utilized by data scientists today. Pandas can help you explore, clean, manipulate and process data from a large number of sources such as CSV, JSON and database connections. Today we are going to look at:
Python Pandas是当今数据科学家最常使用的工具之一。 熊猫可以帮助您探索,清理,处理和处理来自CSV,JSON和数据库连接等大量来源的数据。 今天我们来看看:
- Setting up Pandas and reading in a CSV; 设置熊猫并以CSV格式阅读;
- Gathering general descriptive analytics from the DataFrame; 从DataFrame收集一般描述性分析;
- Installing and using Pandas Profiling. 安装和使用Pandas分析。
入门 (Getting Started)
In order to get started with Pandas, we first need to install all the required packages. Pandas can be installed from PyPI through a terminal using the command pip install pandas.
为了开始使用Pandas,我们首先需要安装所有必需的软件包。 可以使用命令pip install pandas通过终端从PyPI安装Pandas。
Once Pandas has been installed its best to set up a virtual environment, this will allow you to manage all the project dependencies without impacting your default python installation installed on your machine. For this tutorial, we are using PyCharm from JetBrains, which has the ability to create and manage virtual environments for you when creating a new project.
最好地安装了Pandas来设置虚拟环境后,这将使您能够管理所有项目依赖项,而不会影响安装在计算机上的默认python安装。 对于本教程,我们使用来自JetBrains的PyCharm ,它在创建新项目时能够为您创建和管理虚拟环境。
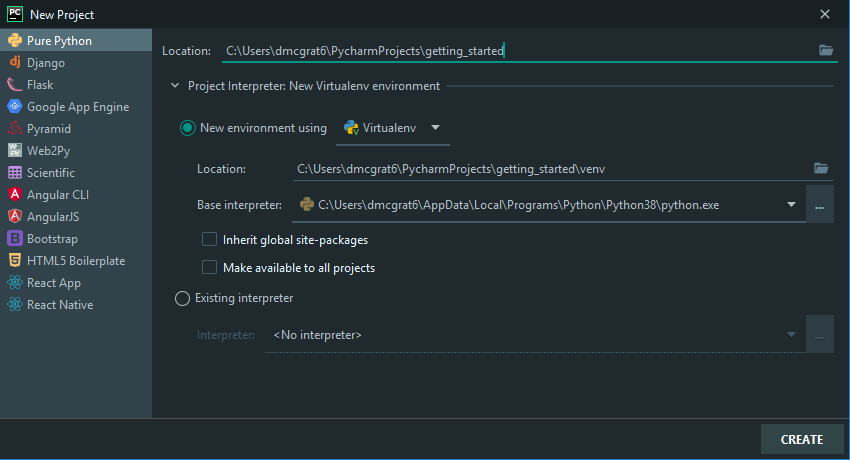
Start by opening PyCharm and selecting File > New Project from the navigation bar. Here you will be able to name the project and create a new virtual environment using Python Virtualenv. The process of creating the virtual environment may take a couple of minutes while the default libraries and dependencies are being installed.
首先打开PyCharm,然后从导航栏中选择“ File > New Project ”。 在这里,您将能够使用Python Virtualenv命名项目并创建一个新的虚拟环境。 在安装默认库和依赖项时,创建虚拟环境的过程可能需要花费几分钟。
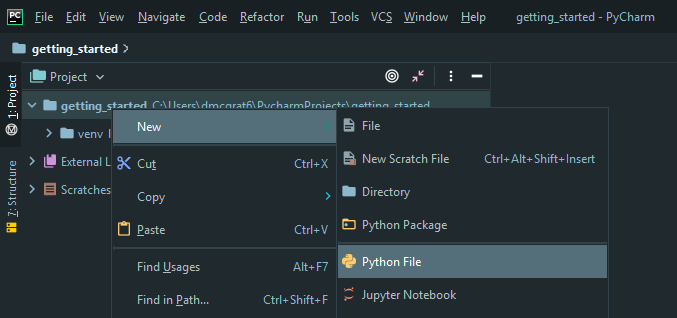
After the virtual environment has been created right-click on the project root within the Project pane and select New > Python File and name the new file.
创建虚拟环境后,在“项目”窗格中的项目根目录上单击鼠标右键 ,然后选择“ New > Python File并命名新文件。
Within the new file, we begin by importing the libraries that we need to get started, the first being Pandas. Add import pandas as pd on the first line. At this point, if there is a red line under pandas it indicates that the Pandas library does not exist within the virtual environment for this project. To correct this right-click on pandas and select Show Context Menu then install package pandas. import pandas allows the current file to use the functions from the Pandas library as pd creates an alias which allows you to reference Pandas as pd within the context of the current file.
在新文件中,我们首先导入需要入门的库,第一个是Pandas。 在第一行中将import pandas as pd添加import pandas as pd 。 此时,如果pandas下有红线,则表明该项目的虚拟环境中不存在Pandas库。 要更正此问题,请右键单击 pandas并选择Show Context Menu然后install package pandas 。 import pandas允许当前文件使用Pandas库中的函数, as pd创建了一个别名,该别名使您可以在当前文件的上下文中将Pandas引用为pd 。
读取CSV文件 (Reading a CSV File)
For the purpose of this example, the test data can be downloaded from here and saved into your project root directory. We have also created a base python file which can be accessed below, this sets a basic script structure that will be used throughout this article.
就本示例而言,可以从此处下载测试数据并将其保存到项目根目录中。 我们还创建了一个基本的python文件,可以在下面访问该文件,该文件设置了将在本文中使用的基本脚本结构。
import pandas as pd


def load_csv_file():
    df = pd.read_csv('getting_started_test_data.csv')

    print(df.info())
    print(df.describe(include='all'))
    print(df.head(5))


if __name__ == '__main__':
    # Override default pandas configuration
    pd.options.display.width = 0
    pd.options.display.max_rows = 100
    pd.options.display.max_info_columns = 100


    load_csv_file()
Beginning at lines 14–16, we override a number of default pandas configurations that normally would clip the data printed on lines 7–9 when dealing with larger files. On line 5 we read the csv file using pandas built-in function read_csv, as of version 1.1.2 Pandas has 19 different built-in functions that can read in file types including HTML, JSON, Excel and SQL. For this example getting_started_test_data.csv can be overridden to any other file name or a path to a particular file on your machine.
从第14–16行开始,我们将覆盖许多默认的熊猫配置,这些配置通常在处理较大文件时会裁剪第7–9行上打印的数据。 在第5行中,从版本1.1.2 read_csv ,我们使用pandas内置函数read_csv读取csv文件read_csv具有19种不同的内置函数,可以读取文件类型,包括HTML,JSON,Excel和SQL。 对于此示例, getting_started_test_data.csv可以覆盖为任何其他文件名或计算机上特定文件的路径。
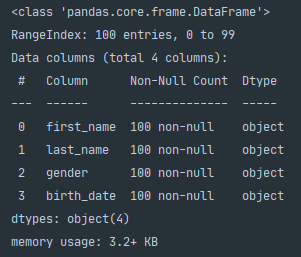
On line 7, we call .info() this returns general DataFrame information such as the column names, the number of non-null elements within the columns and any data type information similar to the below. The .info() function is handy when analysing data as it provides a clear picture of any columns that contain missing data which may need to be mapped.
在第7行,我们调用.info()它返回常规的DataFrame信息,例如列名称,列中非null元素的数量以及类似于以下内容的任何数据类型信息。 .info()函数在分析数据时非常方便,因为它提供了包含可能需要映射的缺失数据的任何列的清晰图片。
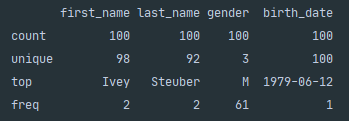
Next on line 8, we call .describe(include='all) which builds on the data returned from .info() however, provides a more in-depth analysis. This will return the number of non-null elements with the column, the number of unique elements and statistics regarding the top appearing element and the frequency that it appears.
接下来的第8行,我们调用.describe(include='all) ,它基于从.info()返回的数据,但是提供了更深入的分析。 这将返回带有列的非空元素的数量,唯一元素的数量以及有关出现在最前面的元素及其出现频率的统计信息。
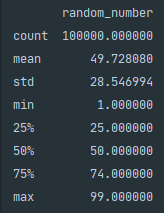
The .describe() function is incredibly powerful when dealing with numerical data. It provides additional statistics including mean, standard deviation, min, max and quartile breakdown. This is handy during initial data exploration as you can quickly get an idea of the spread of the data and any potential incorrect values with min and max.
处理数字数据时, .describe()函数的功能异常强大。 它提供了其他统计信息,包括均值,标准差,最小值,最大值和四分位数细分。 这在初始数据探索期间非常方便,因为您可以快速了解数据的分布以及最小和最大的任何潜在不正确值。
熊猫分析 (Pandas Profiling)
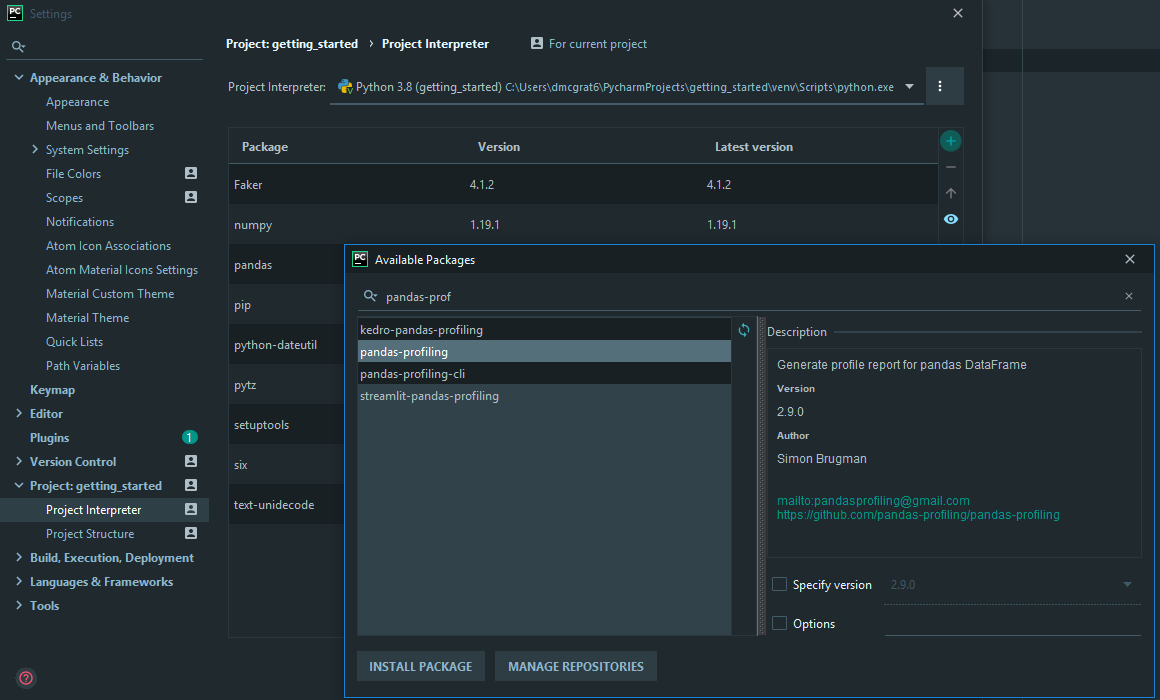
The next step in our data exploration is to use an open-source tool called Pandas Profiling. Pandas profiling generates an interactive HTML report which provides descriptive statistics, histograms, correlations, quartile statistics and missing value analysis for a Python Pandas DataFrame. To install Pandas Profiling navigate to File > Settings > Project > Project Interpeter from here select the + button in the top right and search for pandas-profiling then press Install Package.
我们数据探索的下一步是使用一个名为Pandas Profiling的开源工具。 熊猫配置文件生成一个交互式HTML报告,该报告为Python Pandas DataFrame提供描述性统计信息,直方图,相关性,四分位数统计信息和缺失值分析。 要安装Pandas Profiling, File > Settings > Project > Project Interpeter从此处导航至“ File > Settings > Project > Project Interpeter ,选择File > Settings > Project > Project Interpeter的+按钮,搜索pandas-profiling然后按“ Install Package 。
Once Pandas Profiling has been installed we can import the library by adding import pandas_profiling to the top of the file similar to the below.
一旦安装了Pandas Profiling,我们可以通过在文件顶部添加import pandas_profiling来导入库,如下所示。
import numpy as np
import pandas as pd
import pandas_profiling
from faker import Faker


def build_fake_data(size=1):
    fake = Faker()
    output = [{'name': fake.name(),
               'address': fake.address(),
               'email': fake.email(),
               'city': fake.city(),
               'state': fake.state(),
               'date_time': fake.date_time(),
               'random_number': np.random.randint(1000, 2000)} for _ in range(size)]
    return output


if __name__ == '__main__':
    # Override default pandas configuration
    pd.options.display.width = 0
    pd.options.display.max_rows = 10000
    pd.options.display.max_info_columns = 10000


    df = pd.DataFrame(build_fake_data(10))


    prof = pandas_profiling.ProfileReport(df=df)
    prof.to_file('pandas_profile_test.html')
In this example, we are generating fake data using a package called Faker within the function build_fake_data(). Using the fake data we create a DataFrame from scratch using Pandas built-in DataFrame() function on line 25. To begin profiling first we need to create a Profile Report object using the function pandas_profiling.ProfileReport() which accepts a Pandas DataFrame as an argument. Then we use .to_file() to pipe out the Profile Report to a HTML file. To view the interactive report using PyCharm right-click the file pandas_profiling_test.html and select Open in Browser > Default. Below are examples of the data that the Pandas Profiling Report can display:
在此示例中,我们使用build_fake_data()函数中的一个名为Faker的包来生成伪造数据。 使用伪造的数据,我们在第25行使用Pandas内置的DataFrame()函数从头开始创建一个DataFrame。首先要开始分析,我们需要使用pandas_profiling.ProfileReport()函数创建一个Profile Report对象,该函数接受Pandas DataFrame作为论据。 然后,我们使用.to_file()将配置文件报告导出到HTML文件。 要使用PyCharm查看交互式报告,请右键单击文件pandas_profiling_test.html然后选择Open in Browser > Default 。 以下是熊猫分析报告可以显示的数据示例:
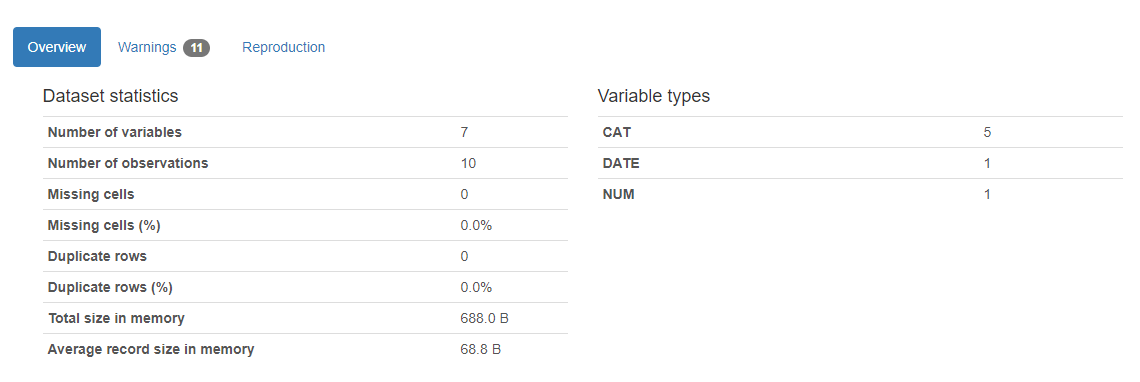

The Pandas Profiling Report streamlines your initial exploratory data analysis as shown above it can generate an incredibly in-depth analysis of key elements from the data set. For numerical data, the report generates histograms which you can use to identify potential outliers and visually view the distribution of the data.
熊猫分析报告简化了您的初步探索性数据分析,如上面所示,它可以从数据集中生成令人难以置信的深入分析。 对于数字数据,报告会生成直方图,您可以使用该直方图来识别潜在的异常值并直观地查看数据的分布。
Combining both Pandas and Pandas Profiling will allow you as a data analyst to quickly gather detailed descriptive statistics when exploring new datasets. In our next article, we are going to show you how you can use Pandas to handle missing values and manipulate data to clean a dataset ready for analysis.
结合使用Pandas和Pandas Profiling,可以使您作为数据分析师在探索新数据集时快速收集详细的描述性统计信息。 在下一篇文章中,我们将向您展示如何使用Pandas处理缺失值并处理数据以清理数据集以备分析。
Thank you for taking the time to read this article, we hope you have found it valuable.
感谢您抽出宝贵的时间阅读本文,希望您发现它有价值。
翻译自: https://medium.com/@deanmcgrath/getting-started-python-pandas-84068523a819


 97
97

 被折叠的 条评论
为什么被折叠?
被折叠的 条评论
为什么被折叠?
 到【灌水乐园】发言


