


万彩动画大师难吗
在Python / Jupyter笔记本中制作和查看Matplotlib动画的简单,无意义,直接,完全可访问,易于阅读的指南 (An Easy, No-Nonsense, Straightforward, Completely Accessible, Actually Readable Guide to Making & Viewing Matplotlib Animations in Python/Jupyter Notebooks)
Part 1: Introduction and Using Celluloid
第1部分:赛璐璐的介绍和使用
Python is great for a lot of reasons. One of the main ones is that so much is documented online. What’s less great, though, is that Python documentation is usually written by the creator at the level of understanding the creator is currently at; almost by definition a reader of the documentation is going to be at a lower level than this. It can thus be difficult to find out how to do a given task with python when you’re just starting out, as every new explanation requires you to add 20 new things to the list of things you need explained before you can go forward. Relying on stackexchange threads only compounds this, as they will center specifically on the particular question being asked and so it’s difficult to know how generalizable any particular piece of advice is. There’s another issue with some documentation/instruction being out-of-date, particularly for well-supported but still very much “capable of improvement” packages like Matplotlib. A final problem with guides is spending too long on the preface material, so let’s move on.
Python之所以出色,有很多原因。 主要问题之一是在线记录了太多内容。 不过,最糟糕的是Python文档通常是由创建者在了解创建者当前所处的水平上编写的; 几乎按照定义,文档阅读者的水平将低于此水平。 因此,刚开始时很难找到如何使用python完成给定任务的方法,因为每一项新的解释都要求您在要解释的事物列表中添加20项新事物,然后才能继续。 依靠stackexchange线程只会使问题更加复杂,因为它们将特别关注所要解决的特定问题,因此很难知道任何特定建议的通用性。 还有一个问题是某些文档/说明已经过时,特别是对于受良好支持但仍然非常有“改进能力”的软件包,例如Matplotlib。 指南的最后一个问题是花太多时间在序言材料上,所以让我们继续前进。
When I was starting out coding in Python, by way of Anaconda-Jupyter Notebooks, I was surprised at how bad the instructions I could find were for how to make animated plots. So, some time later and with a good bit better of a grasp on things, I’ll here lay out some simple to follow methods to create animations out of matplotlib graphs (or, at the end, other images) at three levels of complexity. After we make our first animation, I’ll also show how to easily view the animations we’re making in the same notebook we’re using to make them. So that’s the structure:
当我开始通过Anaconda-Jupyter笔记本进行Python编码时,我惊讶于我能找到的关于如何制作动画剧情的说明多么糟糕 。 因此,一段时间后,我对事物有了更好的了解,在这里我将介绍一些简单易用的方法,以三种复杂度从matplotlib图形(或最后是其他图像)中创建动画。 制作完第一个动画之后,我还将展示如何在用于制作动画的同一笔记本中轻松查看正在制作的动画。 这就是结构:
Dead Simple Animations: Looping with Celluloid
死了的简单动画:赛璐Cell循环播放
>Interlude: Seeing those animations
>插曲:看那些动画
- A Little More Involved, But A Workhorse: Matplotlib’s FuncAnimation 多一点参与,但很努力:Matplotlib的FuncAnimation
- I’ll Put In The Effort, I Just Need This To Actually Work: Animations out of Pre-made Frames 我会努力的,我只需要它才能真正起作用:预制框架中的动画
To keep navigability, I plan on breaking this up over three articles. Like a Stalinist-era airbrushing, this might change later-on and I’ll re-edit this planned structure to accommodate that.
为了保持可导航性,我计划将其分解为三篇文章。 就像斯大林时代的喷枪一样,这种情况可能会在以后发生变化,我将重新编辑此计划的结构以适应这种情况。
Going into this, I am assuming you’re familiar with making simple static plots in matplotlib. I’ve used a couple fancier functions in some of the graphics because, well, don’t try to tell me they don’t look great, but in every case they’ll be defined in a way clearly distinct from the animation “bits” and it’s my intent to make it clear how to modify the code to put in arbitrary functions. I’ll be using the standard import aliases here, i.e. I’m not a monster so I’m importing matplotlib.pyplot as plt.
走进这个, 我假设你熟悉matplotlib制作简单的静态图。 我在某些图形中使用了一些更高级的函数,因为,好吧,不要试图告诉我它们看起来并不好看,但是在每种情况下,它们的定义方式都明显不同于动画“位”。 ”,目的是明确说明如何修改代码以放入任意函数。 我将在此处使用标准的导入别名,即,我不是怪物,所以我将matplotlib.pyplot导入为plt。
赛璐ul的死简单动画 (Dead Simple Animations with Celluloid)
Celluloid is a stupidly simple animation package to use, essentially just wrapping up a couple of matplotlib animation commands that we’ll see below. The essence of using Celluloid is simple. You just:
赛璐oid是一个非常简单的动画包,使用起来很简单,基本上只是包装了一些matplotlib动画命令,我们将在下面看到。 使用赛璐oid的本质很简单。 你刚才:
- Create a blank plot object as you normally would (plt.figure(), for instance) 像往常一样创建一个空白绘图对象(例如plt.figure())
- Create a “camera” that gets attached to your plot. 创建一个与您的情节关联的“相机”。
- Step through each frame you want to draw. 逐步浏览要绘制的每个帧。
- “Take a snapshot” at each frame. 每帧“拍摄快照”。
- Roll the resulting snapshots up into an animation. 将生成的快照向上滚动到动画中。
Consider, for instance, an animation of the parametric curve given by
例如,考虑由下式给出的参数曲线的动画
x=t cos(kt), y=t sin(kt) for 0≤t≤100
对于0≤t≤100,x = t cos(kt),y = t sin(kt)
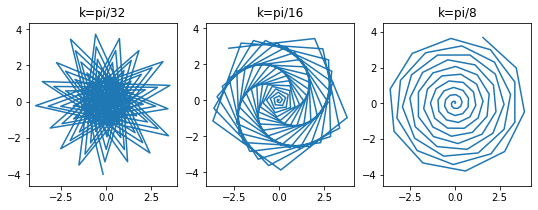
As we drag k from 0 to π. A few frames to show what is intended are given to the left. We’ll do essentially what we would want to do if we wanted to iterate through drawing every frame, and simply use a Celluloid’s .snap() feature after each iteration to “take a picture”. Celluloid will then clear out the figure and repeat for the next iteration, until we’re complete.
当我们将k从0拖动到π时。 左侧显示了一些框,以表明预期的用途。 如果要遍历绘制每一帧进行迭代,我们基本上会做我们想做的事情,并且在每次迭代后仅使用赛璐oid的.snap()功能“拍照”即可。 然后,赛璐oid将清除图形并重复进行下一次迭代,直到完成。
We’ll start by doing some standard imports:
我们将从进行一些标准导入开始:
matplotlib.pylab may be a little less familiar; it’s entirely optional but we’ll be using it here to make colors for our graph (which will look neat). Importing Video IPython.display will give us a nice way to view our animation.
matplotlib.pylab可能不那么熟悉; 它是完全可选的,但我们将在此处使用它为图表着色(看起来很整齐)。 导入Video IPython.display将为我们提供一种观看动画的好方法。
The actual code we’ll use then looks like this:
然后,我们将使用的实际代码如下所示:
And we’ll get the quite nice looking image to the right.
我们将在右侧获得外观漂亮的图像。
The saving and displaying of the animation merits some discussion. What exactly will be workable on a given system will depend on what you have installed and what your desires are, generally speaking mp4s will often be superior to gifs if hosting will not be a problem. It’s wise to just try out saving as an mp4 and to see if that works for you, if not then you can delve into matplotlib’s image writers, which would merit an entire blog post of its own. Understand that for matplotlib animations in general, the point at which you “animate” your creation does not “draw” an animation, it’s the point at which you save or otherwise export it that does that. We can thus control the speed at which our video plays by adjusting the fps passed to the save command. If you know the number of frames you have and your desired duration then your fps will just be the ratio of those two. Here I have 500 frames, and numerous studies have shown that the optimal time for an education gif is exactly 45 seconds, so the fps is just 500/45.
动画的保存和显示值得讨论。 在给定的系统上确切可行的方法取决于您已安装的内容以及您的需求,通常来说,如果托管不会成为问题,mp4通常会比gif更好。 明智的做法是尝试将其另存为mp4并查看是否对您有用,如果不行,则可以深入研究matplotlib的图像编写器,这将值得您撰写一篇完整的博客文章。 可以理解,对于一般的matplotlib动画来说,“动画化”创建的点不会 “绘制”动画,而是保存或导出动画的点。 因此,我们可以通过调整传递给save命令的fps来控制视频的播放速度。 如果知道帧数和所需的持续时间,则fps就是这两者的比率。 在这里,我有500帧,并且大量研究表明,教育gif的最佳时间恰好是45秒 ,因此fps仅为500/45。
有关向Medium.com添加动画的说明: (A note on adding animations to Medium.com:)
Use gfycat. It’s fast, it lets you upload a ton of different filetypes quickly and painlessly, and it will give play controls (track, fast-forward, pause, etc) on Medium’s auto-embedded images, which many of the other big services won’t. When you’re composing your blog with gfycat’s images you’ll think the controls aren’t working, but they will be outside of “edit” mode.
使用gfycat。 它的速度很快,可让您快速而轻松地上传大量不同的文件类型,并且可以在Medium的自动嵌入图片上提供播放控件(曲目,快进,暂停等),而其他许多大型服务都不会。 当您用gfycat的图片来撰写博客时,您会认为控件无法正常工作,但它们将不在“编辑”模式下。
For display, here we used Jupyter’s built-in “Video” method. This will take a saved video file and will display it directly in the notebook. We have two other, very similar, options to animate matplotlib animations directly: convert them to html5 videos or jshtml videos and display that inline. This is done entirely separate from the “.save()”, applied to the animation object itself. For the above code, for instance, rather than (or perhaps in addition to) the call to video, we could use: from IPython.display import HTML and then either HTML(animation.to_html5_video()) or HTML(animation.to_jshtml())
为了显示,这里我们使用了Jupyter的内置“视频”方法。 这将获取一个保存的视频文件,并将其直接显示在笔记本中。 我们还有两个非常相似的选项可以直接对matplotlib 动画进行动画处理 :将它们转换为html5视频或jshtml视频并内联显示。 这完全与应用于动画对象本身的“ .save()”完全不同。 例如,对于上述代码,我们可以使用: from IPython.display import HTML ,而不是(或者除了对视频的调用之外),然后使用HTML(animation.to_html5_video())或HTML(animation.to_jshtml())
If you have the ability to host videos of either of the above formats you can also use those converted files directly, of course. The jshtml display is particularly nice to use within a notebook though, as it will create interactive controls for you to use.
当然,如果您能够托管上述两种格式的视频,则也可以直接使用这些转换后的文件。 jshtml显示特别适合在笔记本中使用,因为它将创建交互式控件供您使用。
Celluloid can be used to draw subplots with essentially the same syntax as was used above, with the only modifications to the code being the ones that you’d make to draw a still-frame shot of multiple subplots.
赛璐oid可用于绘制与上面所使用的语法基本相同的子图,对代码的唯一修改是绘制多个子图的静止帧快照时所做的修改。
Notice that nothing has really changed here. Celluloid does have some limitations though, which all stem from it being a very nice way to handle matplotlib’s otherwise brutal animation modules. Celluloid’s basic assumption is that it can draw a single “normal” frame, with all the “background” stuff, and just move the “graph” part each time. As a result, we’ll run into trouble if we, for instance, change the size our plot in different frames or if we try to change elements that Celluloid assumes will be static, like labels or background colors. Why this happens and how to work-around it is touched on in very slight terms in Celluloid’s documentation; in doing more complicated graphing routines in later sections we’ll see what’s going on in the underlying code that calls this.
请注意,这里并没有真正改变。 赛璐oid确实有一些局限性,这都源于它是处理matplotlib否则残酷的动画模块的一种非常好的方法。 赛璐oid的基本假设是,它可以绘制带有所有“背景”内容的单个“正常”框架,并且每次都只需移动“图形”部分即可。 结果,例如,如果我们在不同的帧中更改绘图的大小,或者尝试更改Celluloid假定为静态的元素(例如标签或背景色),就会遇到麻烦。 为什么出现这种情况,如何变通它谈到了赛璐珞的文档中非常微小的条款; 在后面的部分中,通过执行更复杂的绘图例程,我们将看到调用此代码的基础代码中发生的事情。
Notice as well that, for any significant challenge, Celluloid can get incredibly slow. This isn’t actually unique to Celluloid — in fact, Celluloid’s tricks to mitigate this are what cause the problems described above, and we’ll see some other ways to speed things up in later sections.
还要注意,对于任何重大挑战,赛璐oid都会变得异常缓慢。 这实际上并不是赛璐oid独有的-实际上,赛璐oid缓解这种情况的技巧就是导致上述问题的原因,我们将在后面的部分中看到一些其他加快方法的方法。
Further slowdown will be caused by the jupyter notebook itself though, especially as graphics objects accumulate. It’s wise to call plt.close(‘all’) routinely to make sure no unused plot objects are still hanging around, and expect to occasionally have to restart the kernel when making a lot of graphics objects.
但是,进一步的速度下降将由jupyter笔记本电脑本身引起,尤其是随着图形对象的堆积。 明智的做法是定期调用plt.close('all') ,以确保没有未使用的绘图对象仍然挂在身边,并期望在制作大量图形对象时偶尔需要重新启动内核。
翻译自: https://medium.com/swlh/making-animations-doesnt-have-to-be-that-hard-675eeb723cf4
万彩动画大师难吗


 3746
3746

 被折叠的 条评论
为什么被折叠?
被折叠的 条评论
为什么被折叠?
 到【灌水乐园】发言


