


There are still a lot of Developers and IT Professionals that have no experience with Docker. My personal experience is they think Docker is complex and challenging to manage.
仍然有许多没有Docker经验的开发人员和IT专业人员。 我的个人经验是,他们认为Docker非常复杂且难以管理。
In this tutorial, I’m going to demonstrate how to get Docker up and running quickly and how to simplify Docker management with the Web-Based graphical management tool, Portainer.
在本教程中,我将演示如何快速启动和运行Docker,以及如何使用基于Web的图形管理工具Portainer简化Docker管理。
Docker与虚拟机 (Docker vs Virtual Machines)
Before we start, a quick overview of the difference between Docker and Virtual Machines might be helpful. If your already familiar with Docker just skip this section.
在开始之前,快速了解Docker和虚拟机之间的区别可能会有所帮助。 如果您已经熟悉Docker,请跳过此部分。
A Virtual Machine (VM) is an encapsulated operating system, running on top of another operating system. The VM uses the memory, processor and disk resources of the underlying hardware. The critical point here is that the Operating System running in the VM requires a substantial amount of the host machines resources to run. On a typical 16GB, i5 machine, you would struggle to run five virtual machines simultaneously. Even if they were not running any applications, you would quickly see a significant degradation in the performance of the underlying operating system and the VM’s start to freeze.
虚拟机 (VM)是一个封装的操作系统,在另一个操作系统之上运行。 VM使用基础硬件的内存,处理器和磁盘资源。 这里的关键点是,在VM中运行的操作系统需要大量的主机资源才能运行。 在典型的16GB i5计算机上,您将很难同时运行五个虚拟机。 即使他们没有运行任何应用程序,您也会很快看到基础操作系统的性能显着下降,并且VM开始冻结。
Docker containers, on the other hand, make use of the hardware resource through the underlying Operating System almost as though they were an installed application (That is a very simplistic description). The images used to build a Docker container are very small in comparison to a VM, often only a 40 or 50 MB. Since there is not a full operating system to maintain inside a Docker container, memory and processor resource usage is typically very low. I often have 20+ containers running on my 16GB Mac Book Pro. That would be impossible using VM’s.
另一方面, Docker容器通过基础操作系统使用硬件资源,就像它们是已安装的应用程序一样(这是非常简单的描述)。 与VM相比,用于构建Docker容器的映像很小,通常只有40或50 MB。 由于在Docker容器中没有完整的操作系统需要维护,因此内存和处理器资源使用率通常非常低。 我的16GB Mac Book Pro通常会运行20多个容器。 使用虚拟机是不可能的。
烤盘 (Portainer)
By default, we manage Docker through the command line. Portainer provides an excellent and highly informative user interface for managing all aspects of Docker. It charts, and dashboards provide realtime charts of container resource usage. Starting and managing containers and stacks can be done with a few mouse clicks.
默认情况下,我们通过命令行管理Docker。 Portainer为管理Docker的各个方面提供了一个出色且高度有用的用户界面。 它的图表和仪表板提供了容器资源使用情况的实时图表。 只需单击几下鼠标,即可启动和管理容器和堆栈。
安装Docker (Installing Docker)
在Windows上安装 (Installing on Windows)
Ideally, you need to be running Windows 10 Pro to take advantage of the Windows Linux sub System. If you’re using a works computer where a lot of options are disabled, you might struggle, but see how far you get, then ask your IT administrators for help if required.
理想情况下,您需要运行Windows 10 Pro才能利用Windows Linux子系统。 如果您使用的是禁用了许多选项的工程计算机,则可能会遇到困难,但要了解您能走多远,请在需要时向IT管理员寻求帮助。
Download docker from the following URL. Choose the stable version.
从以下URL下载docker。 选择稳定的版本。
Run the installer. Make sure to select WSL (Windows Sub Systems for Linux)
运行安装程序。 确保选择WSL(Linux的Windows子系统)

When the installation is complete, restart Windows.
安装完成后,请重新启动Windows。
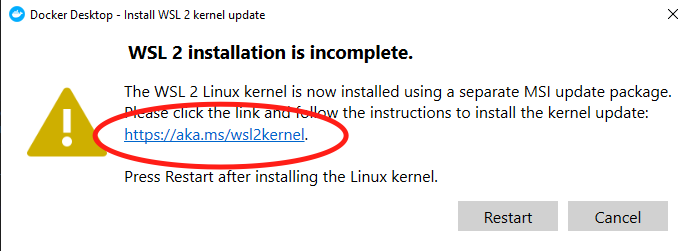
Once the system has restarted, you might see a prompt to install an updated WSL 2 Linux Kernal. Just click the link and follow the instructions.
系统重新启动后,可能会提示您安装更新的WSL 2 Linux Kernal。 只需单击链接,然后按照说明进行操作即可。
If you get an error about WSL not being enabled. Try the following command.
如果收到有关未启用WSL的错误。 请尝试以下命令。
Open PowerShell as an Administrator and run
以管理员身份打开PowerShell并运行
dism.exe /online /enable-feature /featurename:Microsoft-Windows-Subsystem-Linux /all /norestart在Linux上安装 (Installing on Linux)
Linux is the preferred environment for Docker as it offers the best performance in a native environment.
Linux是Docker的首选环境,因为它在本机环境中可提供最佳性能。
Due to the many distributions of Linux and various platforms that you may be running it on, you will have to follow the instructions on the docker web site for installation. https://docs.docker.com/engine/install/ There are links on this web page that take you to specific instructions for your distribution.
由于您可能会在Linux和各种平台上运行多种发行版,因此必须遵循docker网站上的说明进行安装。 https://docs.docker.com/engine/install/此网页上有一些链接,可带您获得有关分发的特定说明。
在macOS上安装 (Installing on macOS)
You can download and install Docker desktop for Mac by visiting the following web site. https://hub.docker.com/editions/community/docker-ce-desktop-mac/
您可以通过访问以下网站下载并安装Mac版Docker桌面。 https://hub.docker.com/editions/community/docker-ce-desktop-mac/
Make sure to get the Stable version.
确保获得稳定版本。

After downloading open the .dmg installer file, drag the Docker application in the Applications folder, as shown above.
下载完成后,打开.dmg安装程序文件,将Docker应用程序拖到Applications文件夹中,如上所示。
安装Portainer (Installing Portainer)
Whichever operating system you’re running, the commands from this point will be the same. Where I mention opening a terminal, I am referring to the Command Prompt on windows.
无论您运行的是哪种操作系统,此刻的命令都是相同的。 在提到打开终端的地方,我指的是Windows上的命令提示符。
Open a terminal and run the following command to create a
打开一个终端并运行以下命令来创建一个
docker volume create portainer_dataThe above command creates a data volume on your disk that Portainer will use to save configuration data. Without it, data would be stored in the container and lost each time the container restarts.
上面的命令在磁盘上创建一个数据量,Portainer将使用该数据量保存配置数据。 没有它,数据将存储在容器中,并且每次容器重新启动时都会丢失。
Next, run the following the command to download and run the Portainer image and start up the Portainer Container.
接下来,运行以下命令以下载并运行Portainer映像并启动Portainer容器。
docker run -d -p 8000:8000 -p 9000:9000 --name=portainer --restart=always -v /var/run/docker.sock:/var/run/docker.sock -v portainer_data:/data portainer/portainer连接到Portainer (Connecting to Portainer)
Installing Portainer was easy and connecting to it, is just as easy. Open a web browser and visit http://loaclhost:9000
安装Portainer很容易,连接它也很容易。 打开网络浏览器并访问http://loaclhost:9000
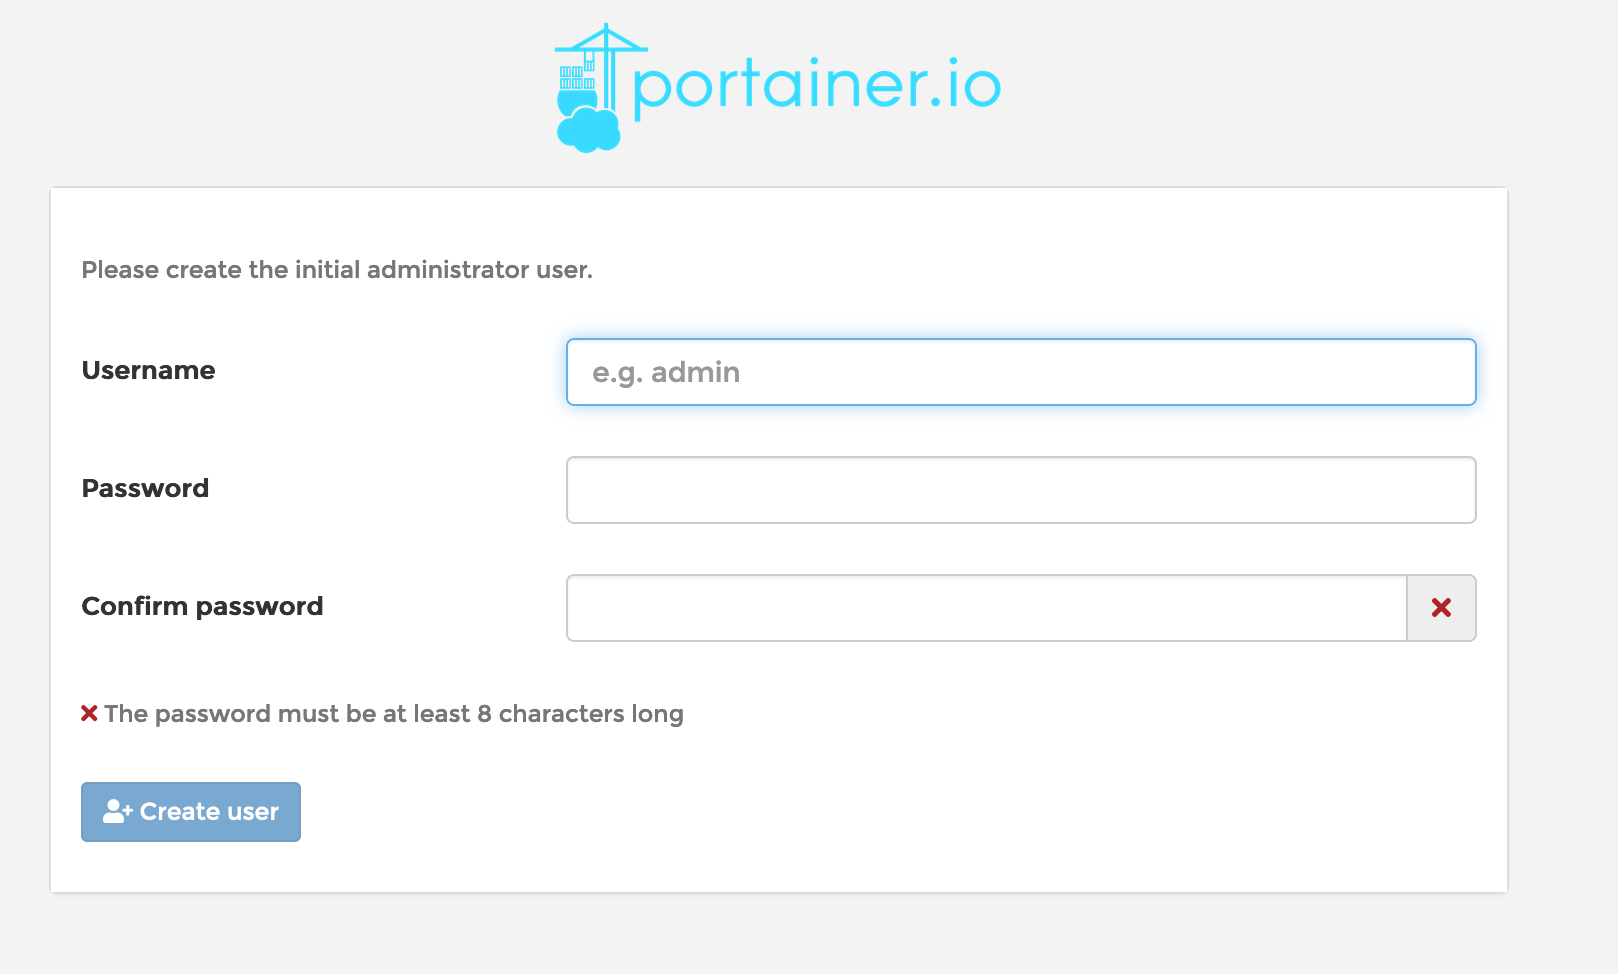
The default user name is admin as this is the first time you have logged in, you will be asked to create a new password and confirm it.
默认用户名是admin因为这是您第一次登录,系统将要求您创建一个新密码并进行确认。
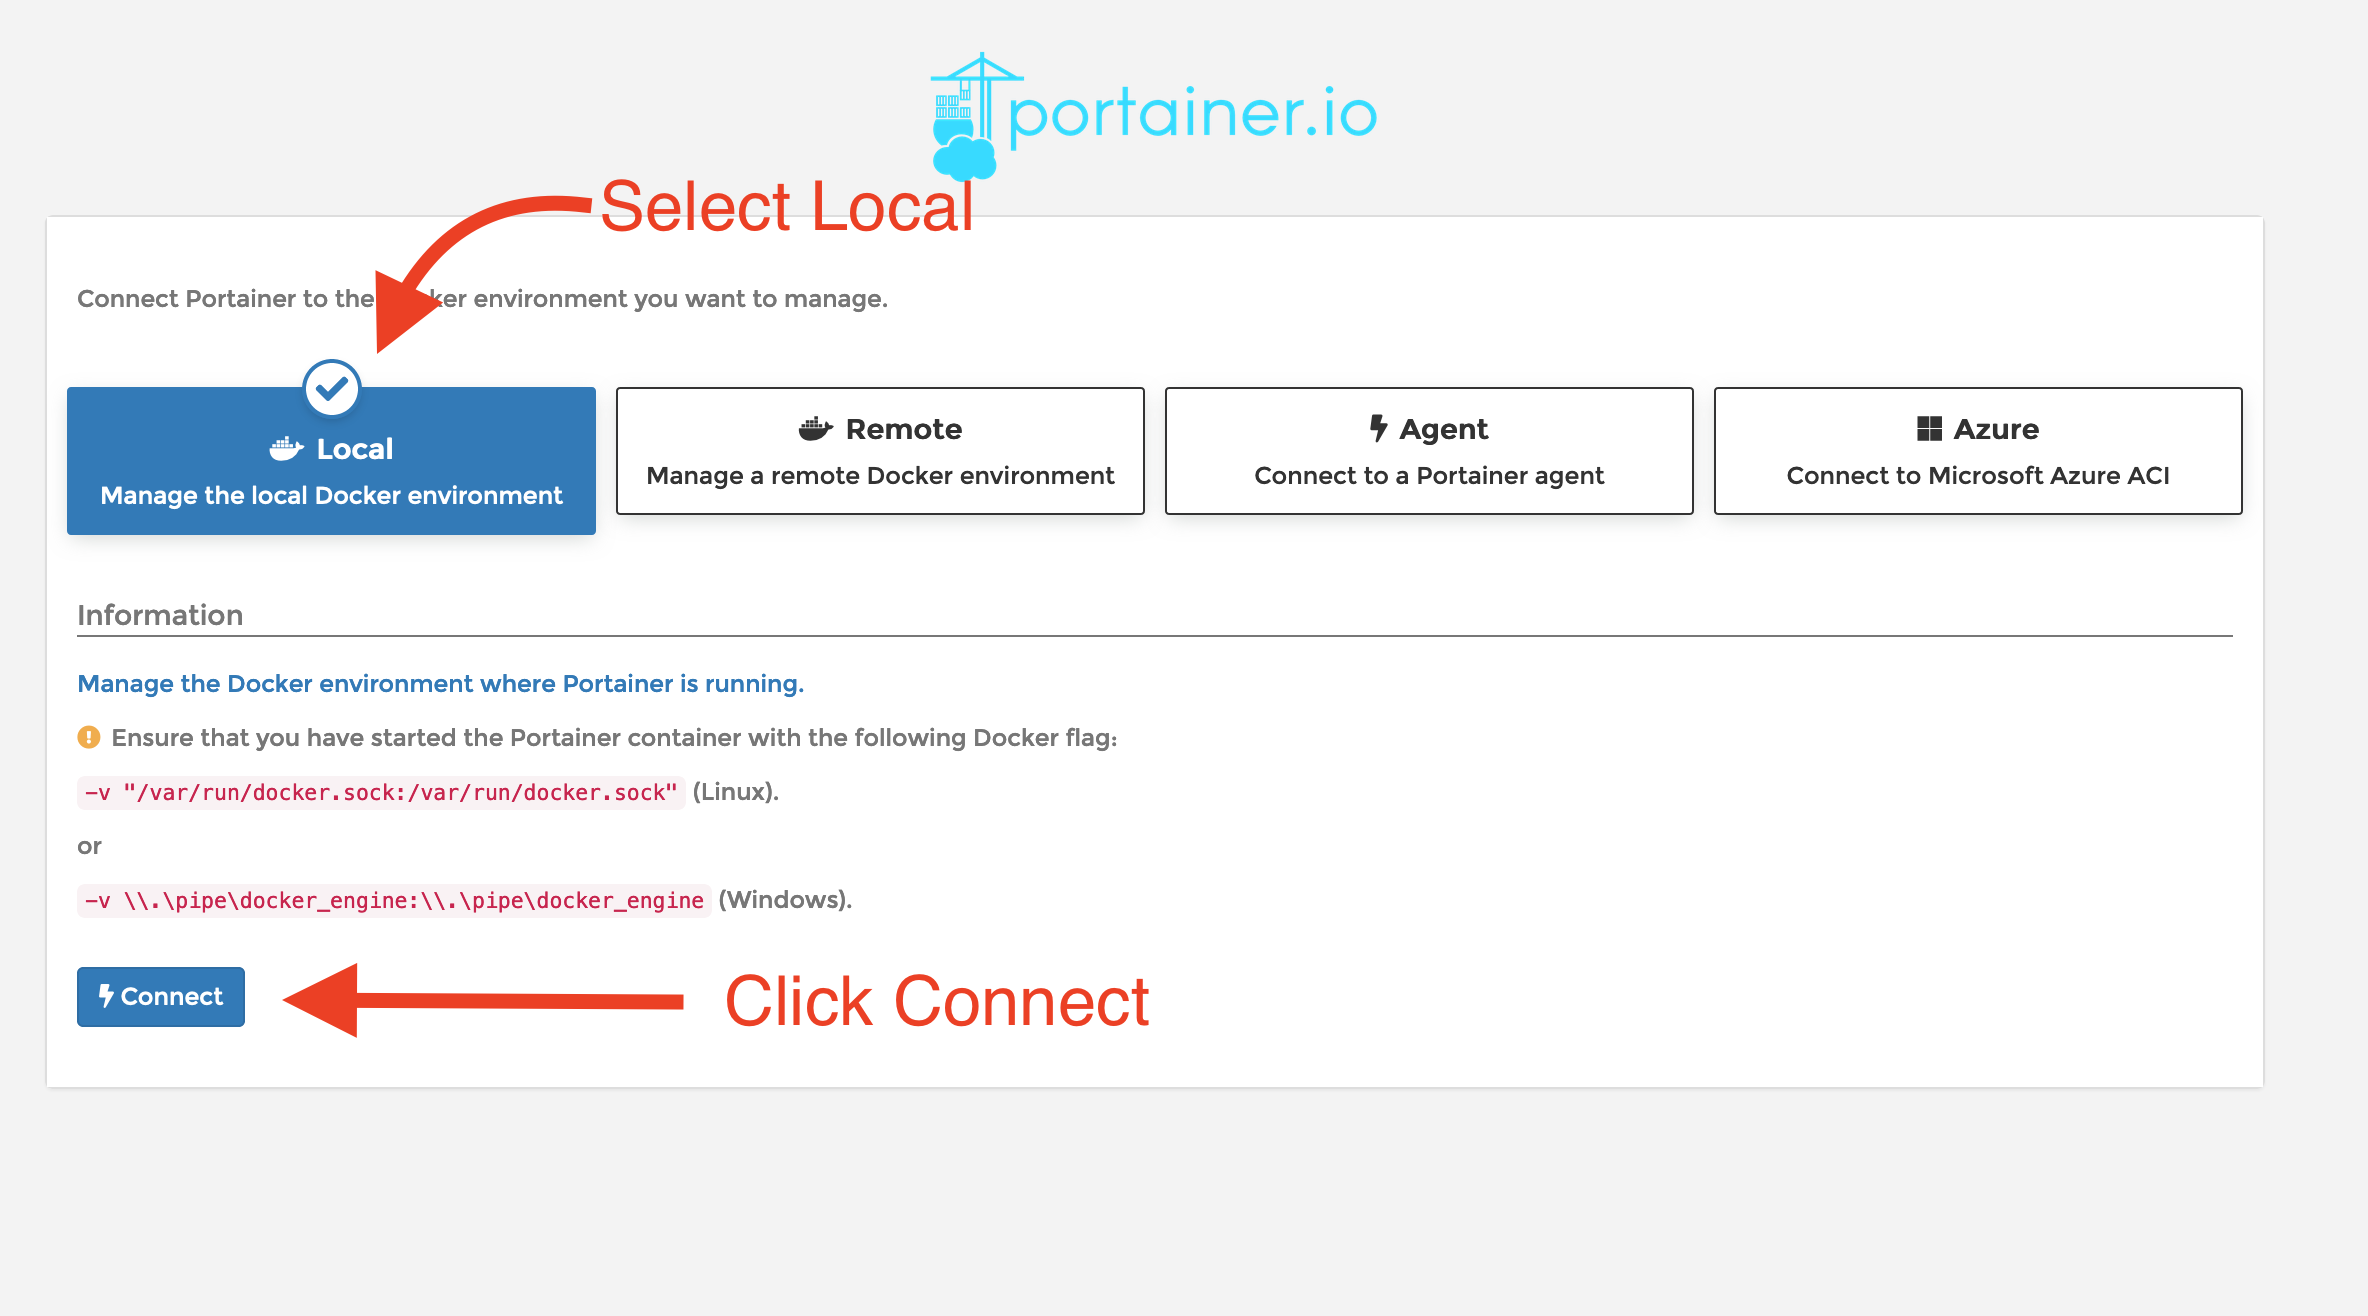
On the next screen, select Local and click Connect
在下一个屏幕上,选择Local ,然后单击Connect
Portainer主屏幕 (The Portainer home screen)
The Docker instances that Portainer knows about are displayed in the central portion of the screen. There will only be one at this time, “local”. On the left is a menu that offers many of the options you would have in the Docker command line plus many more.
Portainer知道的Docker实例显示在屏幕的中央部分。 此时将只有一个“本地”。 左侧是一个菜单,提供您在Docker命令行中可能拥有的许多选项以及更多其他功能。
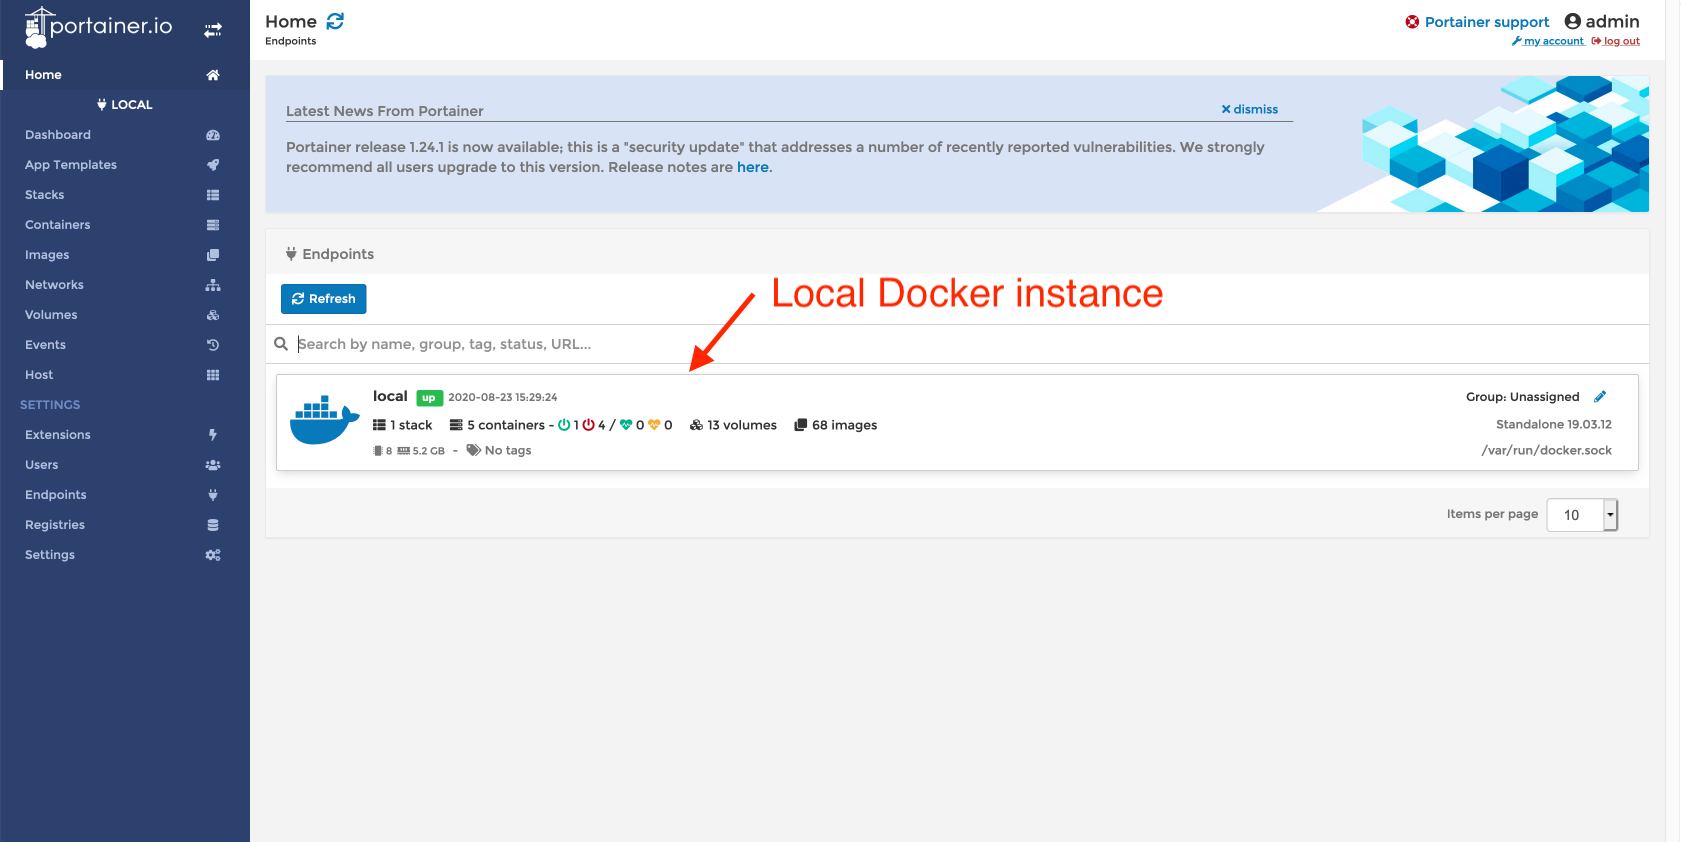
Click the Local Docker instance, to see the Dashboard showing a high-level overview of what is currently running in Docker.
单击本地Docker实例,以查看仪表板,其中显示了Docker当前正在运行的内容的高级概述。

Unless you have already been using Docker, you won’t have much running yet.
除非您已经使用过Docker,否则您将不会有太多运行。
添加新图像并启动容器 (Adding a new image and starting a container)
Let’s get a MariaDB Docker container up and running to see the workflow and how easy it is.
让我们启动并运行一个MariaDB Docker容器,以查看工作流程及其简单程度。
The first thing to do is create a Volume that will hold the database data — Click Volumes in the left menu panel.
首先要做的是创建一个将保存数据库数据的卷-单击左侧菜单面板中的卷。
创建一个卷 (Create a volume)
Click Add volume
点击Add volume

Name the volume MariaDB and click Create the volume
将卷命名为MariaDB,然后单击Create the volume
创建一个MariaDB容器 (Create a MariaDB Container)
Click Containers in the left menu panel
单击左侧菜单面板中的Containers
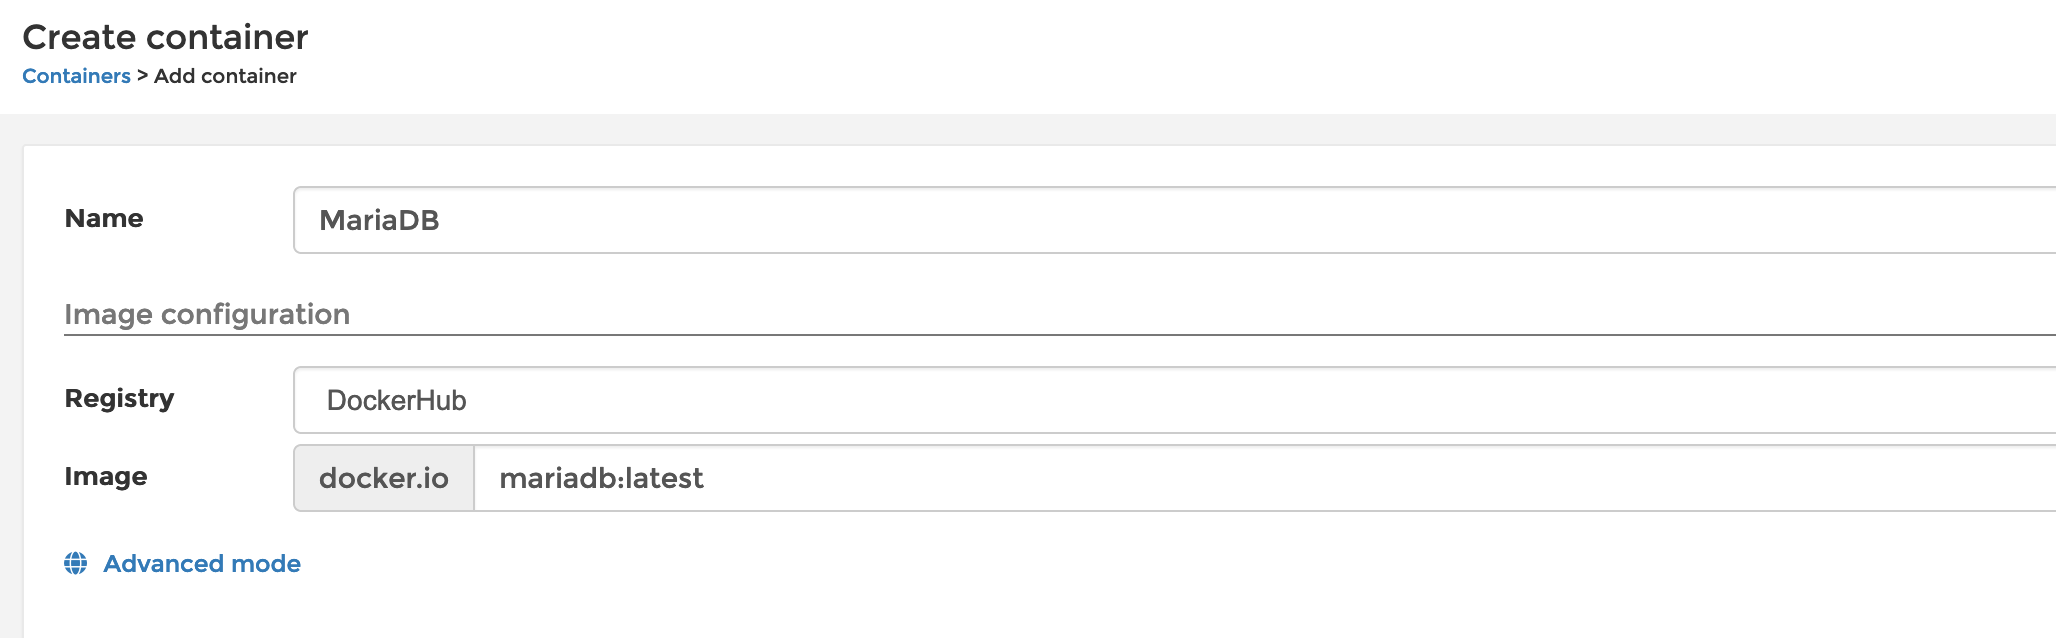
Click the Add container button
点击Add container按钮
Name the container MariaDB
将容器命名为MariaDB
In the image text box type mariadb:latest
在图像文本框中,键入mariadb:latest
Click publish a new network port
单击发布新的网络端口

Enter 3306 for the host and container
输入3306作为host和container

At the bottom of the page in Advanced container settings, click Volumes, then click map additional volumes
在页面底部的“ Advanced container settings ,单击“ Volumes ,然后单击“ map additional volumes

Add the following to container and volume
将以下内容添加到container和volume
container:
/var/lib/mysql容器:
/var/lib/mysqlvolume: Select the MariaDB volume you created earlier from the dropdown, which will be named
MariaDB — localvolume:从下拉列表中选择您先前创建的MariaDB卷,该卷将命名为
MariaDB — local

Finally, select the Env tab and click add enviroment variable
最后,选择“ Env选项卡,然后单击“ add enviroment variable

We need to tell MariaDB what the root user password should be set too. We do this by providing an environment variable. Fill the name and value text boxes as below
我们需要告诉MariaDB也应该设置root用户密码。 我们通过提供一个环境变量来做到这一点。 如下填写name和value文本框
name:
MYSQL_ROOT_PASSWORD名称:
MYSQL_ROOT_PASSWORDvalue:
passwordPlease use a more suitable password!值:
password请使用更合适的密码!

To finish the configuration of the MariaDB container, click theDeploy the container button.
要完成MariaDB容器的配置,请单击“ Deploy the container按钮。
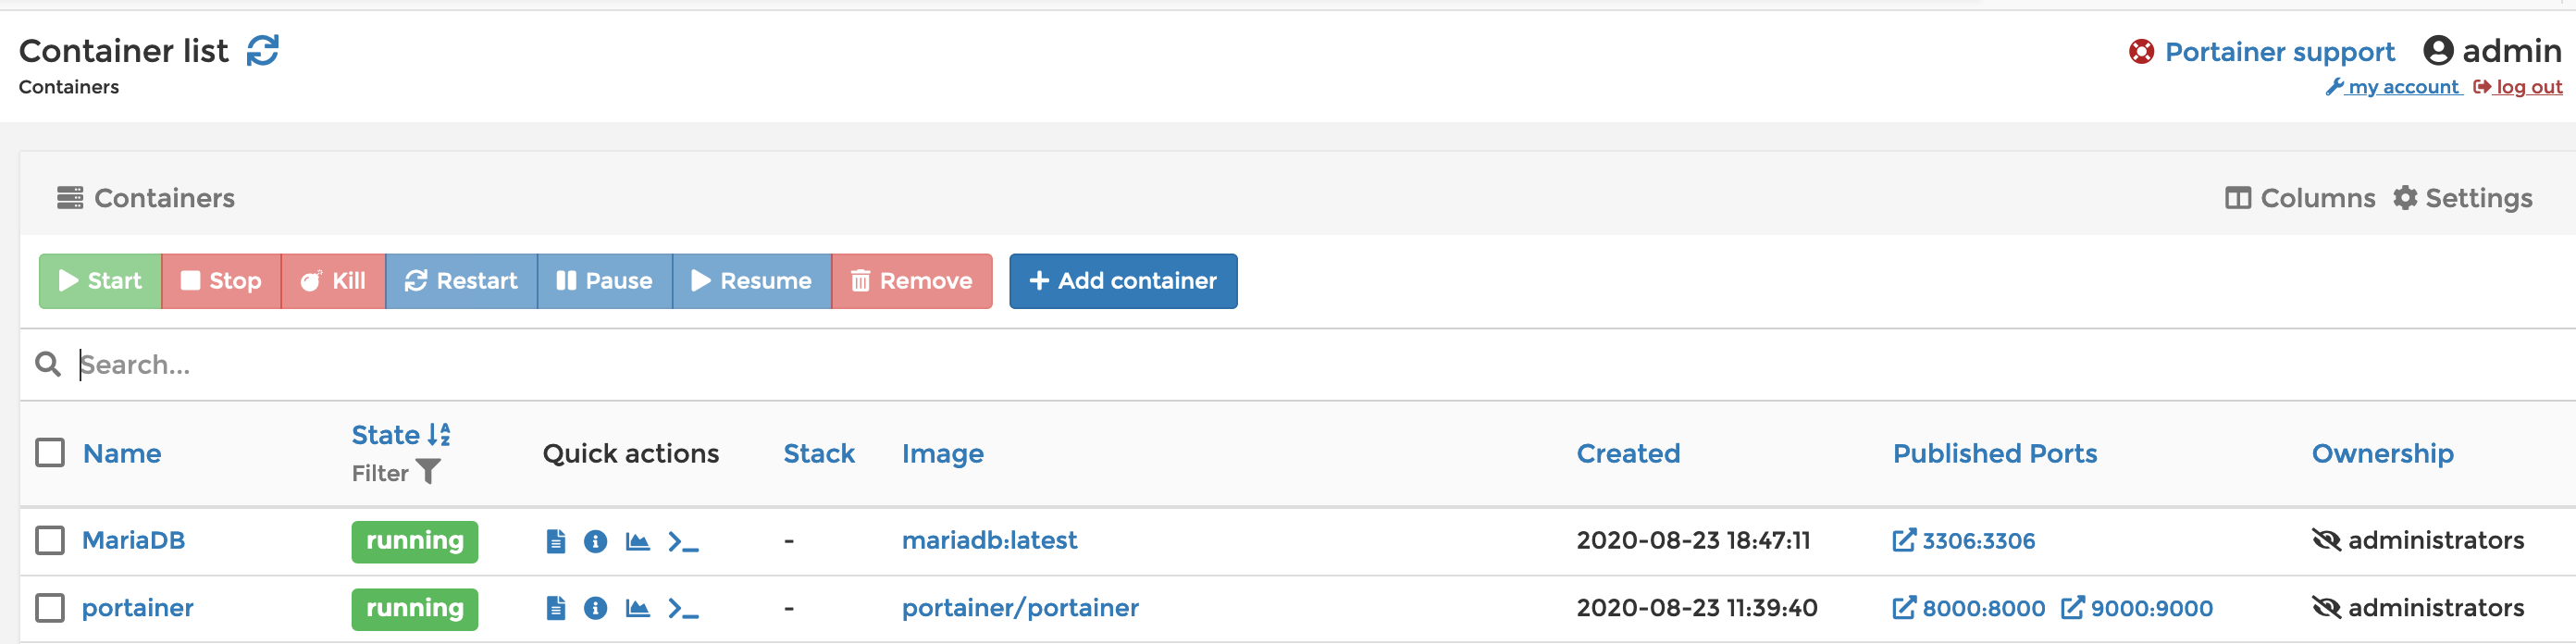
After a short while, you will be taken back to the container list and you should see your MariaDB container in the running state
片刻之后,您将返回到container list并且您应该看到MariaDB容器处于运行状态
创建一个管理员容器 (Create an Adminer container)
We could connect to the MariaDB container through the console and issue MySQL commands on the command line. A better way is to use a Graphical interface. I prefer adminer which we will add as a container now.
我们可以通过控制台连接到MariaDB容器,并在命令行上发出MySQL命令。 更好的方法是使用图形界面。 我更喜欢adminer ,我们现在将其添加为容器。
Making sure you still on the container list screen, click theAdd container button.
确保仍在container list屏幕上,单击Add container按钮。
Name the container Adminer and enter adminer:latest as the image.
将容器命名为Adminer并输入adminer:latest作为映像。

In Network ports configuration section, click publish a new network port
在“ Network ports configuration部分中,单击“ publish a new network port
Enter 8080 for the host and 8080 for the container
进入8080主机和8080的容器

We don’t need to make any other changes. Click Deploy the container
我们不需要进行任何其他更改。 单击Deploy the container
检查一切正常 (Checking everything works)
Open your browser and navigate to http://localhost:8080
打开浏览器并导航到http://localhost:8080
You should see the Adminer login screen
您应该看到“管理员”登录屏幕
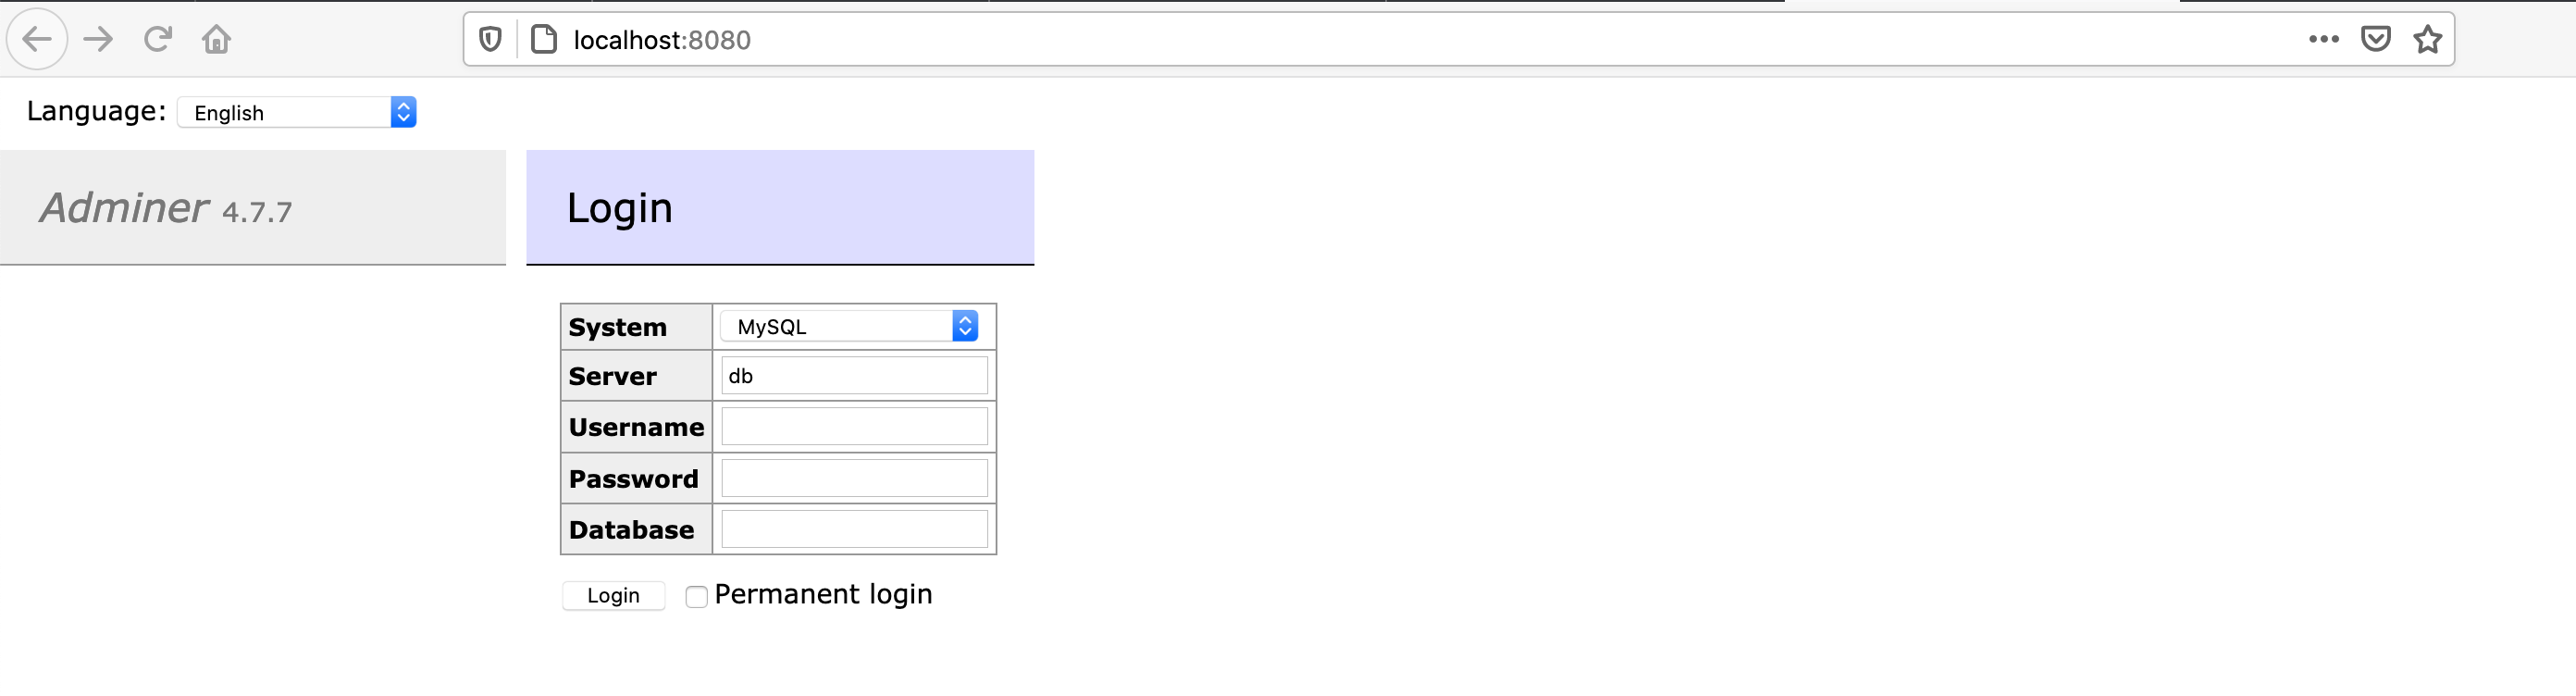
Before we try to connect, be aware that you can’t use localhost for the Server setting. Why? Because Adminer is running in its own container, localhost refers to its container. Instead, you will need to provide the IP address of your computer. In my case that is 192.168.30.100.
在尝试连接之前,请注意您不能将localhost用于Server设置。 为什么? 由于Adminer在其自己的容器中运行,因此localhost引用其容器。 相反,您将需要提供计算机的IP地址。 在我的情况下是192.168.30.100。
The username will be root, and the password is whatever you set the value of MYSQL_ROOT_PASSWORD too.
用户名将是root,密码也是您设置MYSQL_ROOT_PASSWORD的值。

Now click Login
现在单击Login
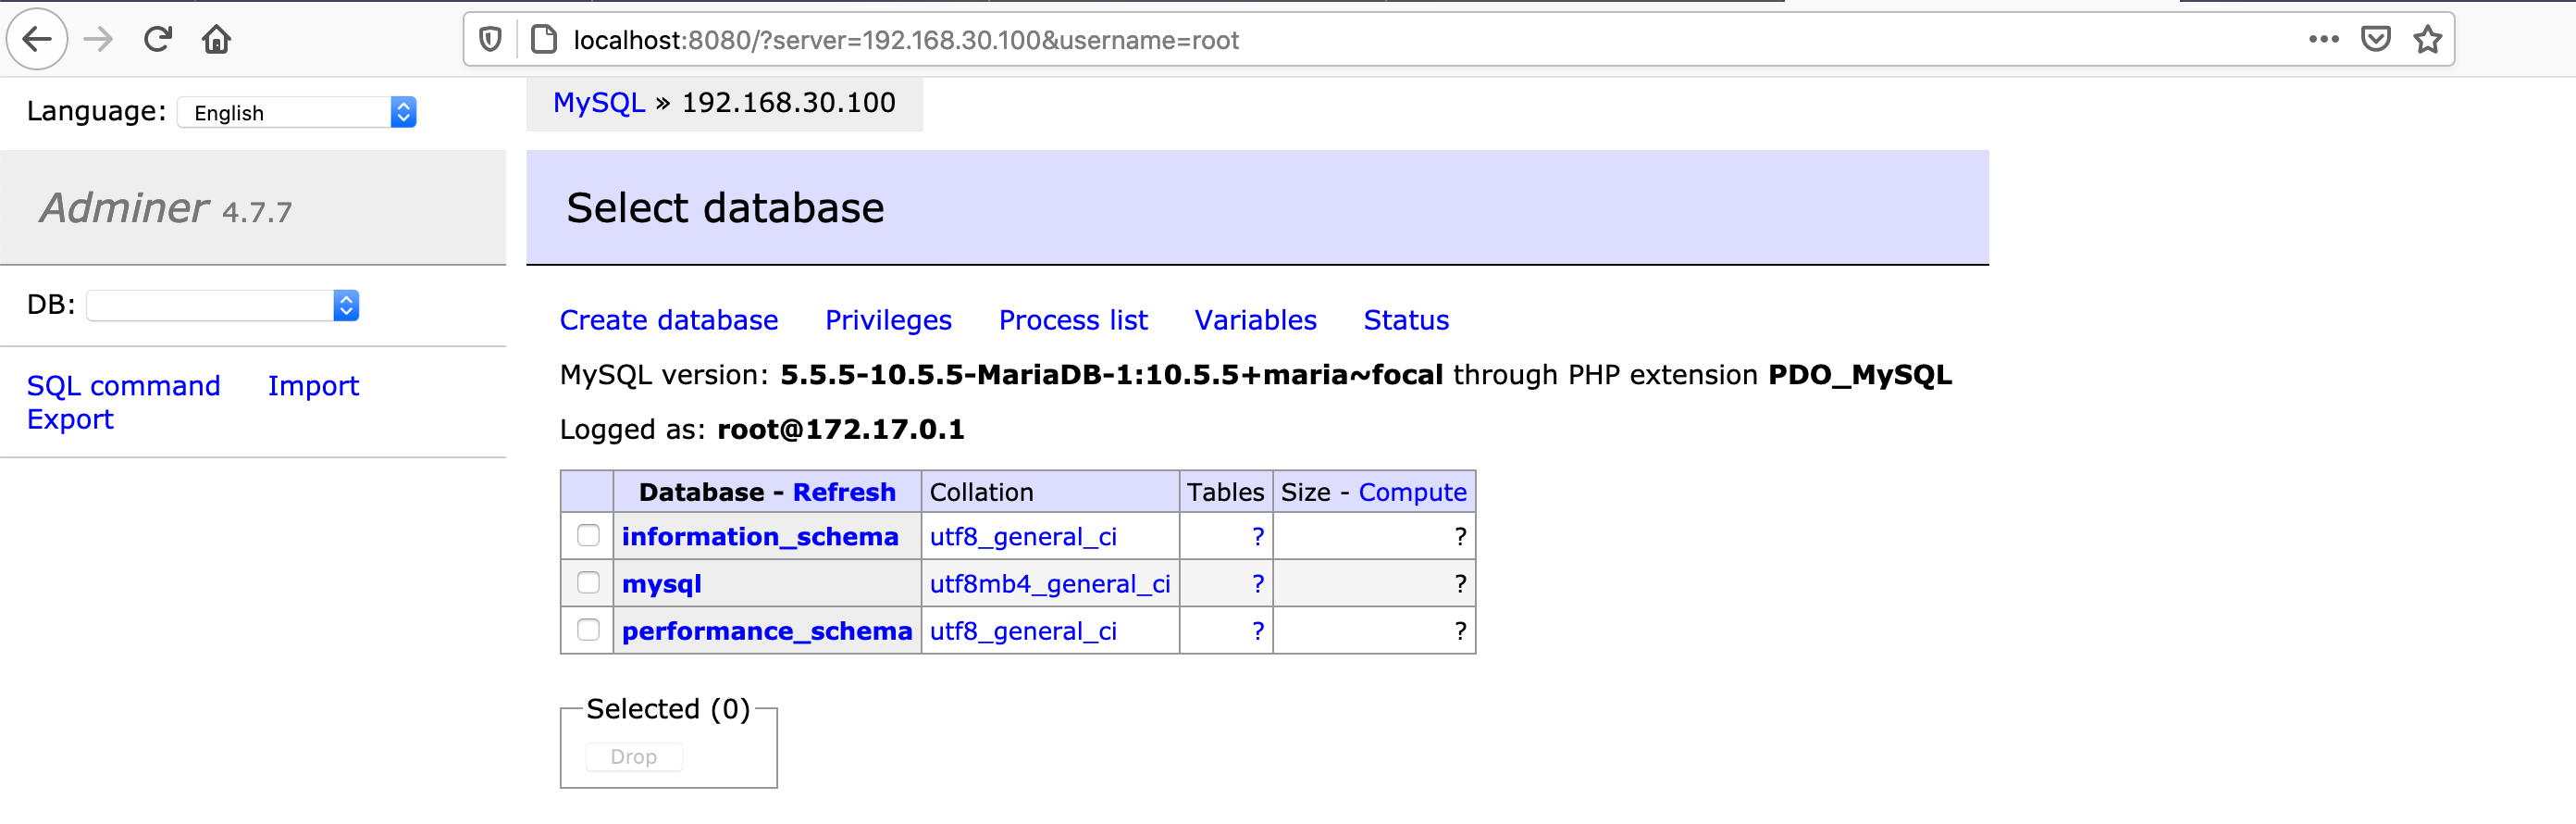
Congratulations, your life will never be the same! :-) Being able to bring up containers in Docker quickly and without affecting the underlying operating system, opens so many opportunities.
恭喜,您的生活将不再一样! :-)能够在Docker中快速启动容器并且不影响底层操作系统的情况下,打开了很多机会。
There are a lot of prebuilt container templates included in Portainer. If you click App Templates in the left-hand toolbar, you will find some interesting apps.
Portainer中包含许多预构建的容器模板。 如果单击左侧工具栏中的“ App Templates ”,则会发现一些有趣的应用。
Eventually, you will be looking for a container not included in the App Templates. The first place you should look is https://hub.docker.com/.
最终,您将寻找未包含在应用程序模板中的容器。 您应该看的第一个地方是https://hub.docker.com/ 。
资源监控 (Resource monitoring)
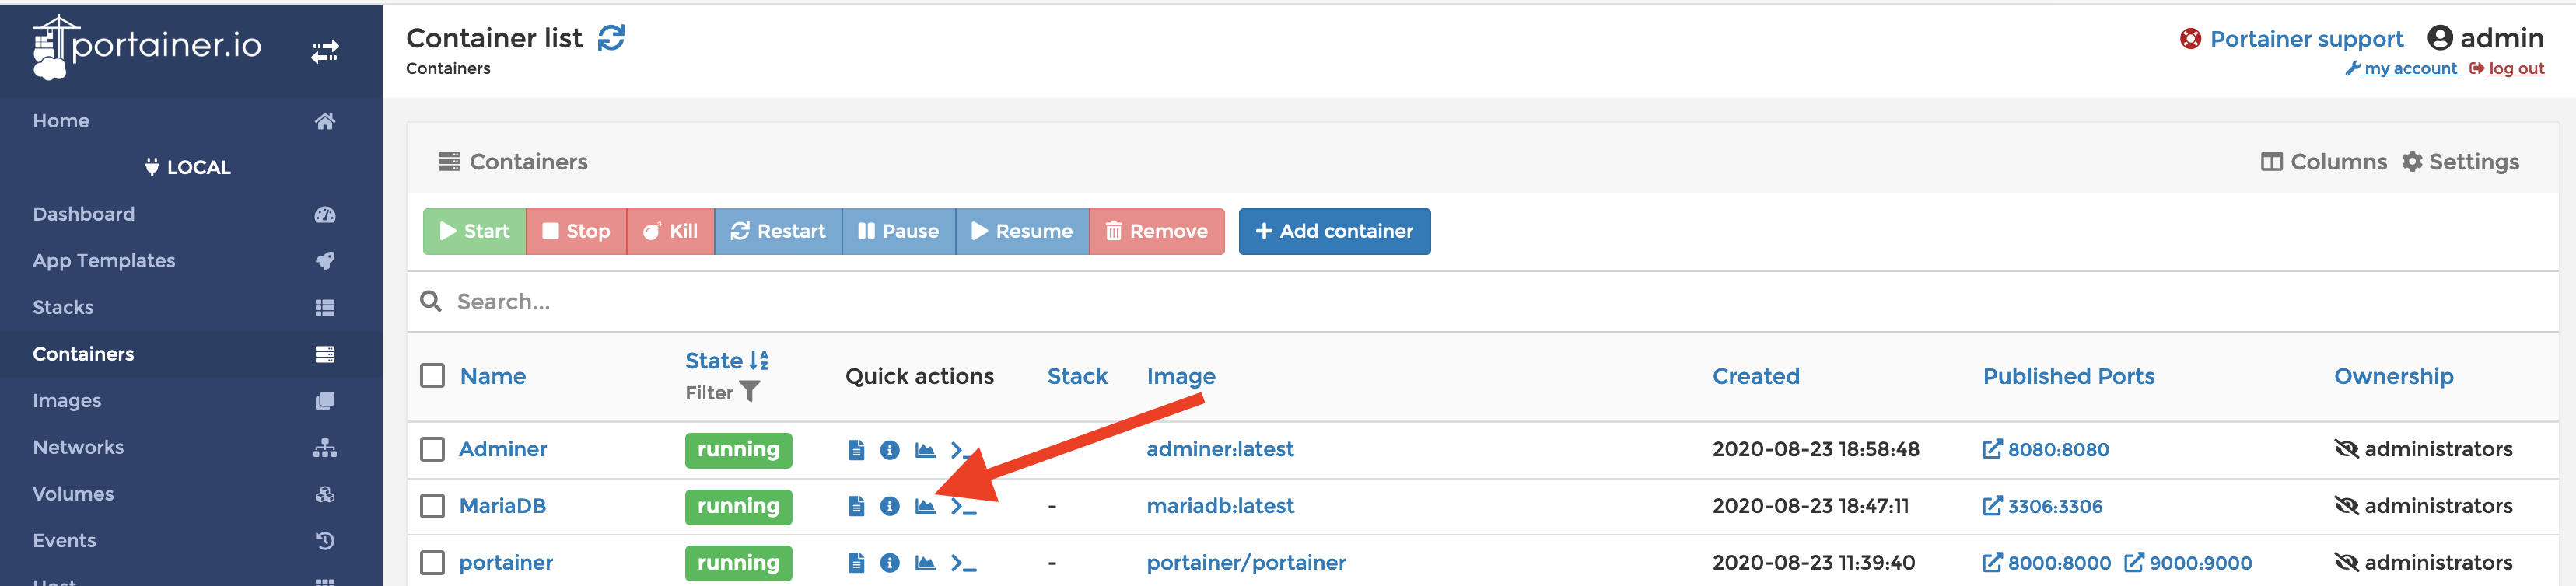
Let's check the resource being used by MariaDB. Click Containers in the left-hand menu. Click the small chart icon next to MariaDB in the Quick Actions column.
让我们检查一下MariaDB正在使用的资源。 单击左侧菜单中的Containers 。 单击“ Quick Actions列中MariaDB旁边的小图表图标。
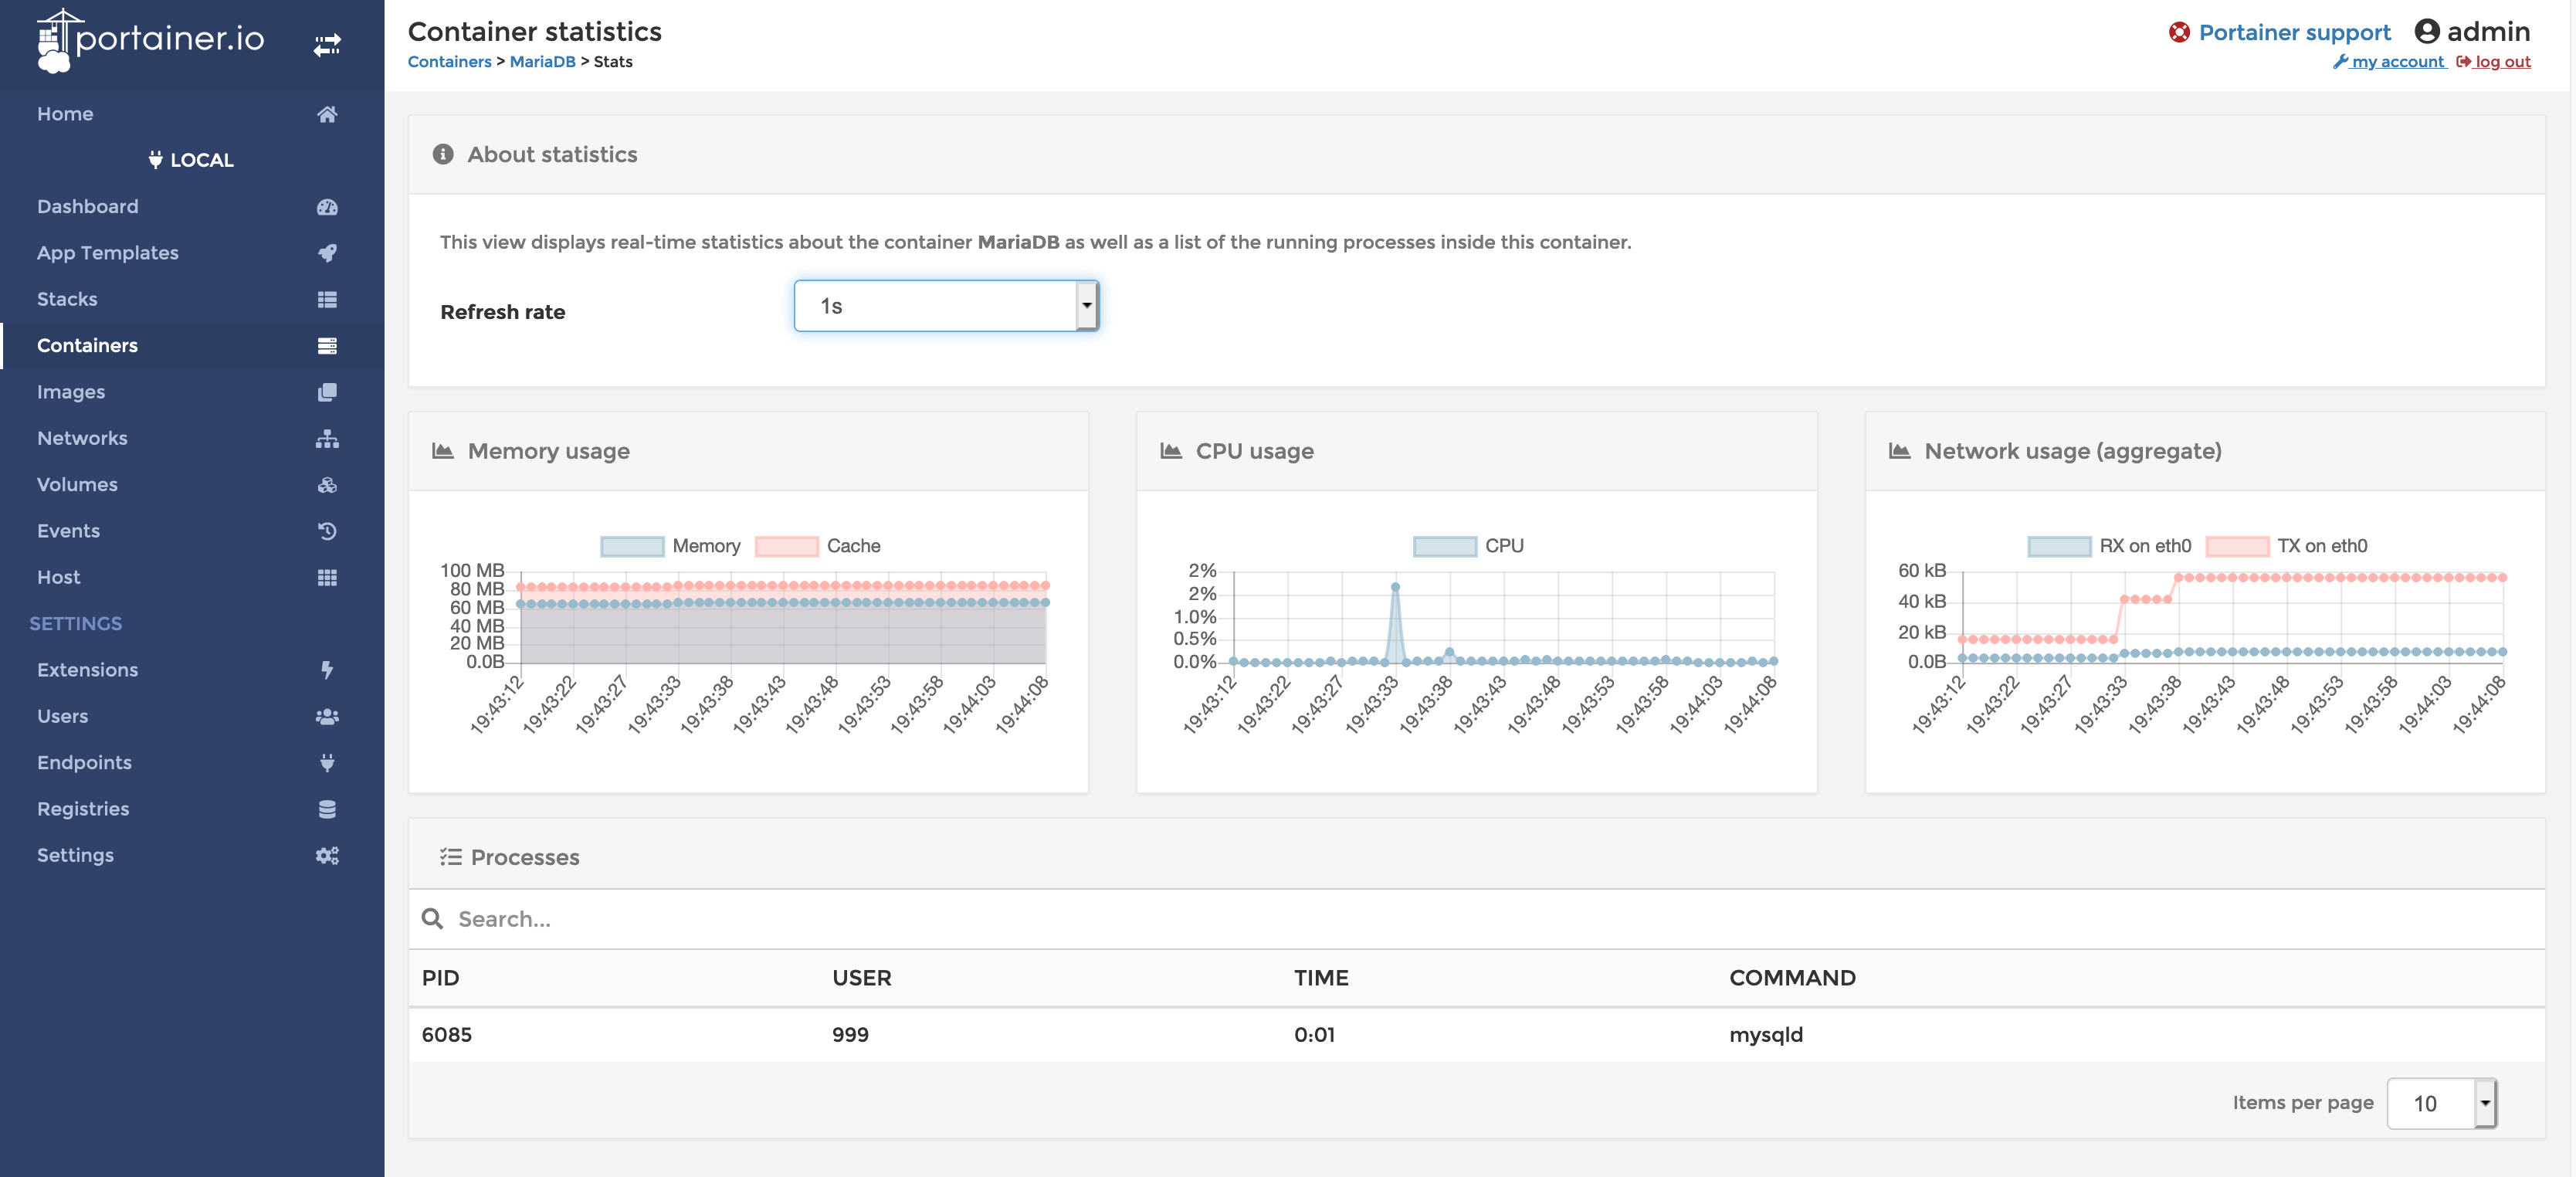
You will see three real-time charts that cover Memory usage, CPU usage, and Network usage
您将看到三个实时图表,分别涵盖Memory usage , CPU usage和Network usage
检查日志 (Inspecting Logs)
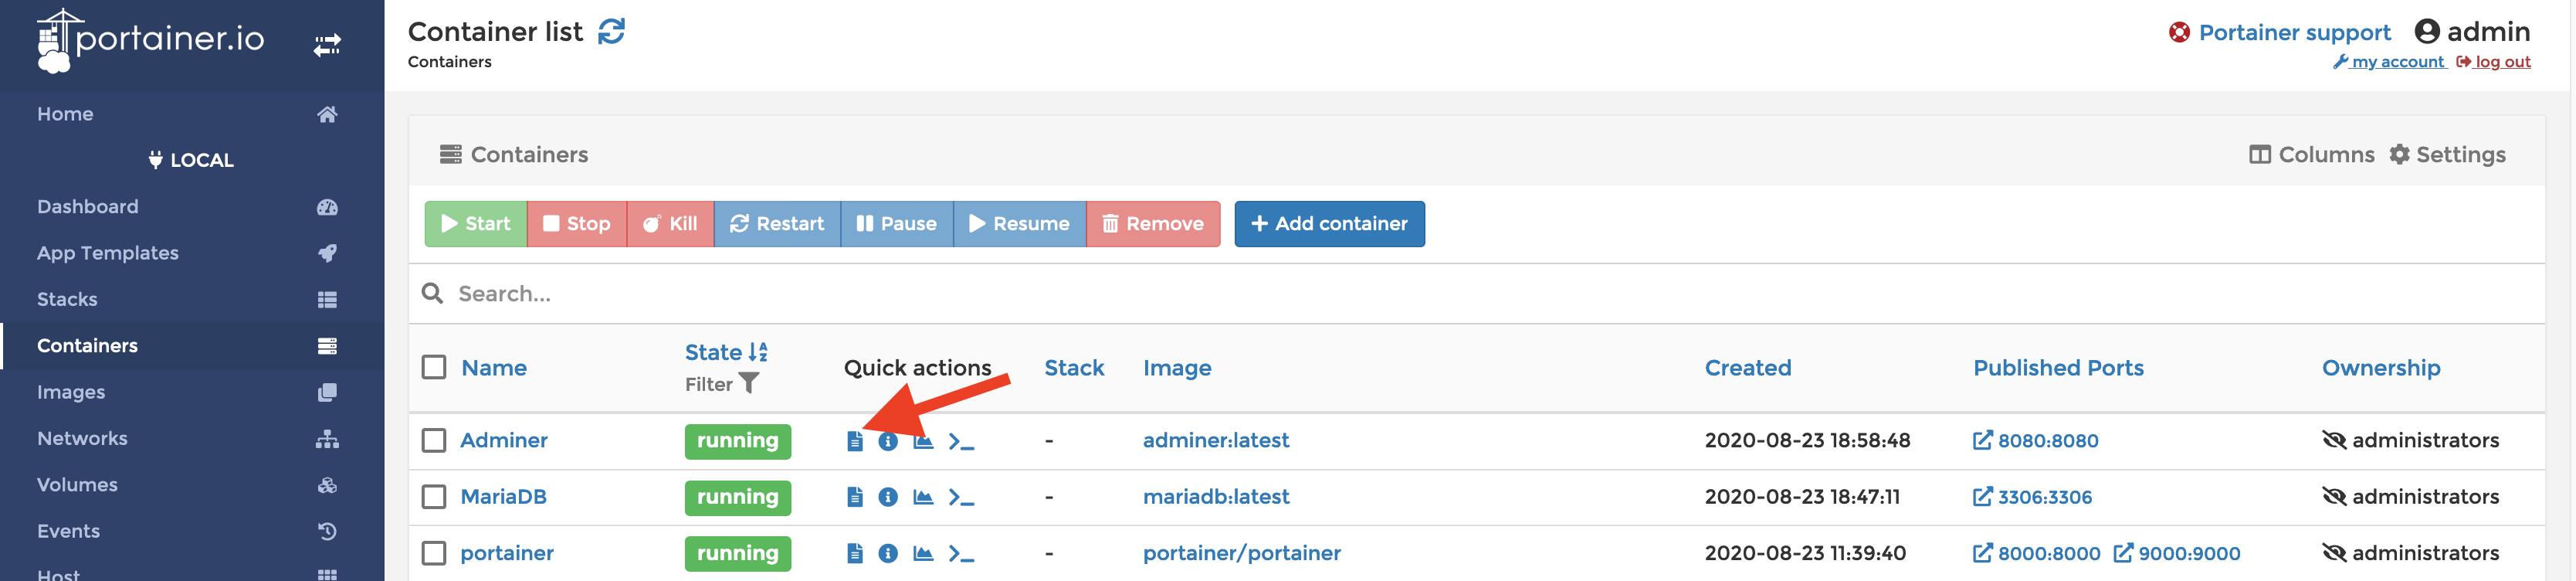
Go back to the Containers screen. Click the Document icon next to the Adminer container in the Quck actions column.
返回到“ Containers屏幕。 在“ Quck actions列中,单击“管理员”容器旁边的“ Document icon 。
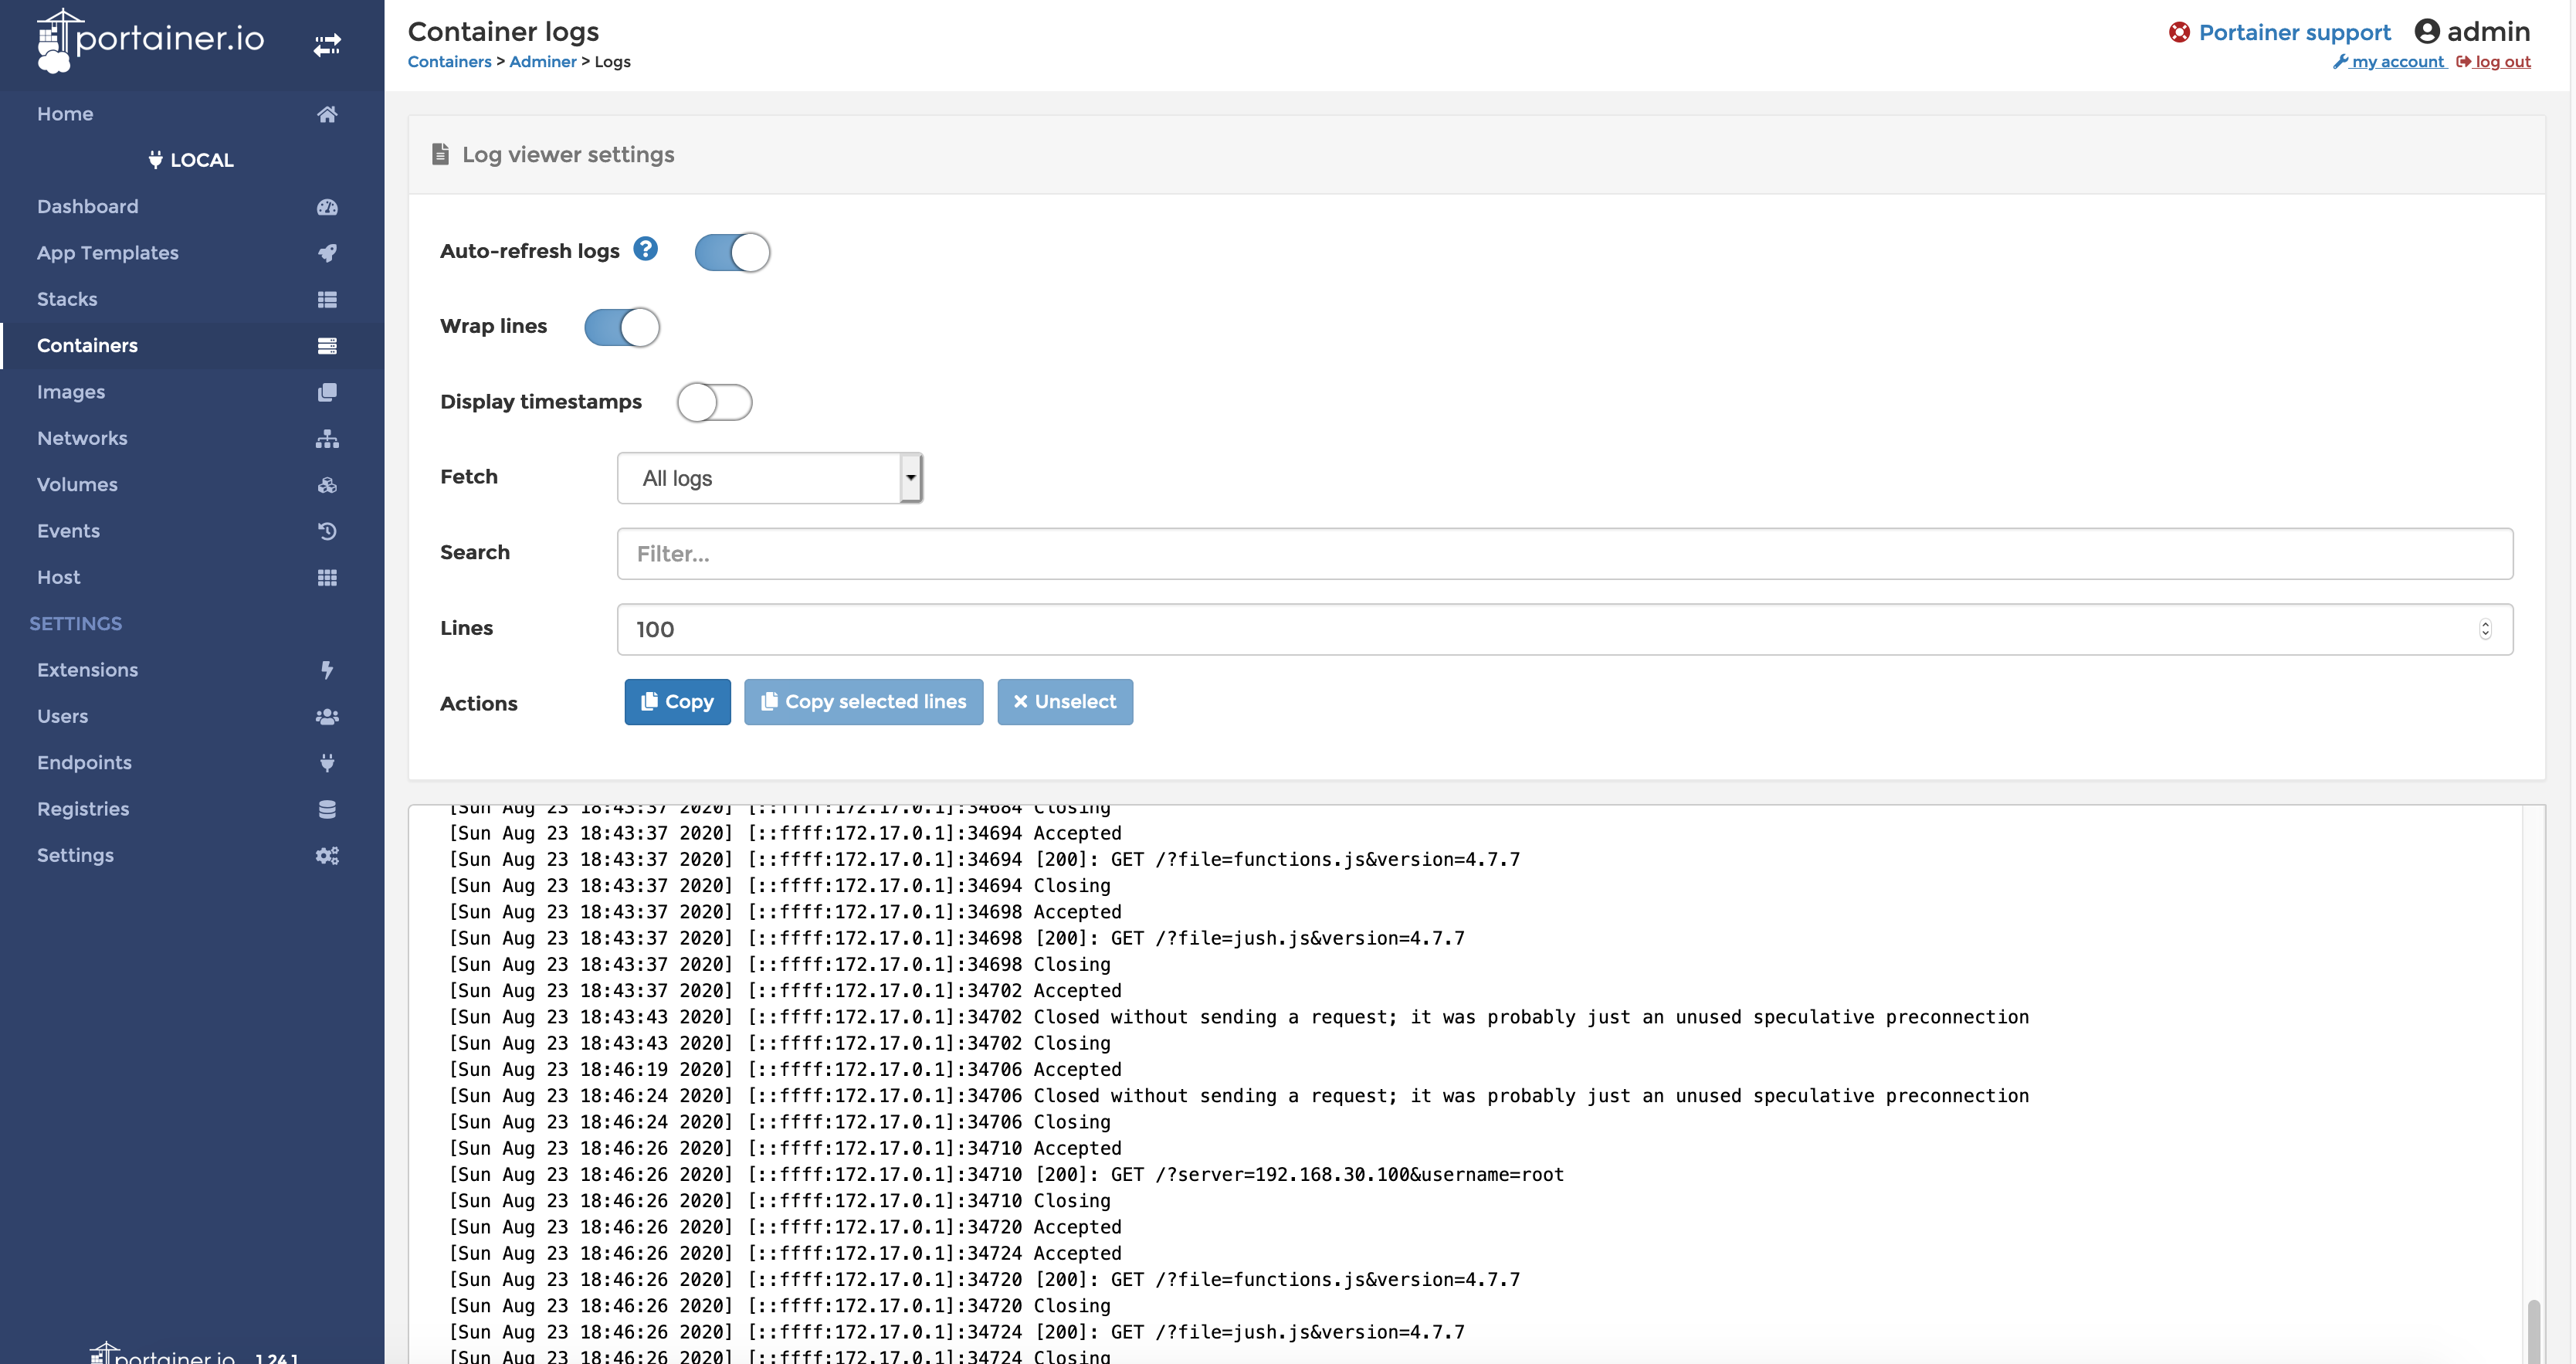
The logs you will see are the PHP web server logs for Adminer. Open the Adminer web page http://localhost:8080 and refresh the screen. You will see the logs update a second later with the latest entries.
您将看到的日志是AdminerPHP Web服务器日志。 打开管理员网页http:// localhost:8080并刷新屏幕。 您将看到日志稍后再使用最新条目进行更新。
与Docker一起前进 (Moving forward with Docker)
There is a lot more than Portainer can do. In future tutorials, I will look at other Docker and Portainer features. To use some of the more advanced features of Docker, even with the help of Portainer, you are going to need a bit more knowledge about how Docker works and the tool docker-compose. I suggest you start by visiting https://docs.docker.com/get-started/.
Portainer可以做的还很多。 在以后的教程中,我将介绍其他Docker和Portainer功能。 要使用Docker的一些更高级的功能,即使在Portainer的帮助下,您将需要更多有关Docker如何工作以及docker-compose工具的知识。 我建议您首先访问https://docs.docker.com/get-started/ 。
摘要 (Summary)
To make sure you don’t miss any of my tutorials, you can follow me by clicking Simon Carr.
为确保您不会错过我的任何教程,您可以通过单击Simon Carr跟随我。
I hope you found this tutorial informative, and you learned what you expected. Let me know in the comments if you enjoyed it, or give me some suggestions about how the tutorial or writing style could be improved.
希望本教程对您有帮助,并了解了您的期望。 如果您喜欢它,请在评论中让我知道,或者给我一些有关如何改进教程或写作风格的建议。
翻译自: https://levelup.gitconnected.com/portainer-the-easy-way-to-manage-docker-a982a17146c1


 2656
2656

 被折叠的 条评论
为什么被折叠?
被折叠的 条评论
为什么被折叠?
 到【灌水乐园】发言


