


 本文介绍了如何结合Gatsby静态站点生成器和Prismic内容管理系统,创建一个支持前后端过滤功能的建筑展示网站。通过实例详细阐述了实现这一功能的步骤和技术要点。
gatsby
Often times you’ll have a fairly complicated assortment of resources to filter through on the front end. I’m going to walk you through our approach to filtering through a resource room with Prismic and Gatsby. If you’re new to Prismic or Gatsby be sure to check out their excellent docs to get started.
通常,您会在前端有相当复杂的各种资源进行过滤。 我将向您介绍使用Prismic和Gatsby筛选资源室的方法。 如果您不熟悉Prismic或Gatsby ,请务必查看其出色的文档以开始使用。
范本 (Templates)
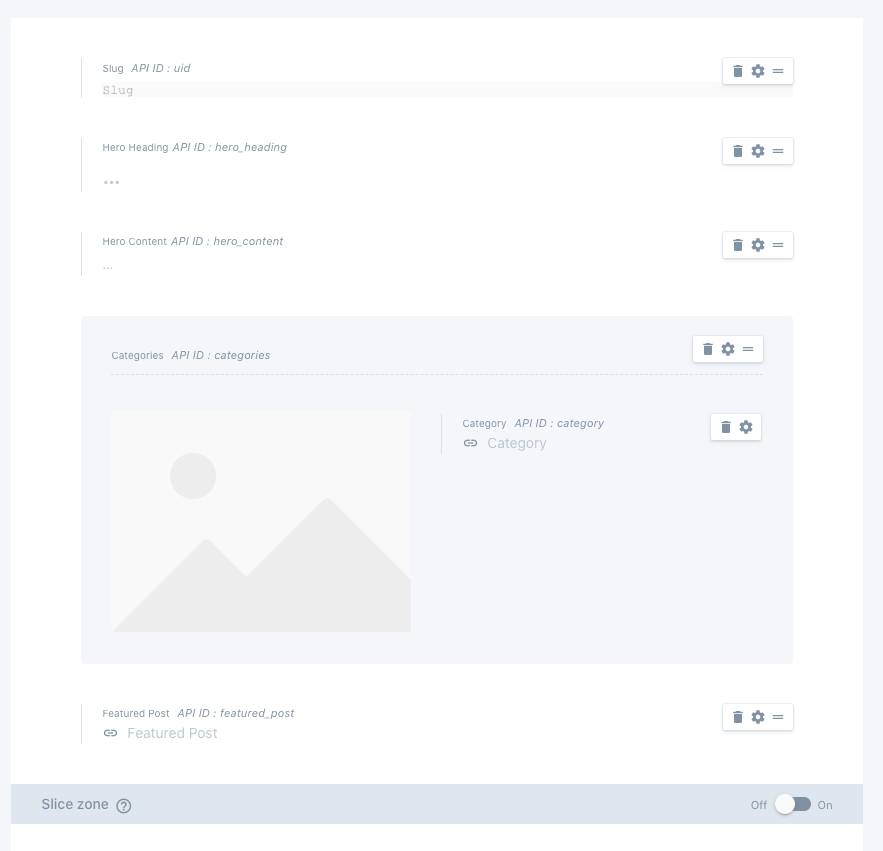
Templates to the rescue! If we structure our CMS in a thoughtful way then we can abstract away a lot of the complexity of filtering on the front-end. In Prismic you’ll need to create a repeatable content type of category and assign a category for each blog. Or in traditional back end speak there needs to be a one-to-many relationship between blogs and categories. This way we’re able to assign the data with its own designated end point for each category. Let’s explore how.
模板来解救! 如果我们以周到的方式构建CMS,则可以抽象出许多前端过滤的复杂性。 在Prismic中,您将需要创建类别的可重复内容类型,并为每个博客分配一个类别。 或用传统的后端说话,博客和类别之间需要一对多的关系。 这样,我们就可以为每个类别的数据分配自己的指定终点。 让我们探讨一下。
Here’s an example of how a blog content type could look. The essential take away here is including a unique uid, which we will use for our routing and dynamic page generation.
这是一个博客内容类型外观的示例。 这里的基本要点是包括一个唯一的uid,我们将使用该uid进行路由和动态页面生成。
In our application we’re going to generate templates with the help of gatsby-source-prismic-graphql
在我们的应用程序中,我们将借助gatsby-source-prismic-graphql生成模板
I would recommend this plugin over gatsby-source-prismic because it comes with content previewing right out of the box, which is a pretty essential feature if your client is not tech savvy and are going to be updating the application independently.
我建议使用此插件而不是gatsby-source-prismic因为它附带了gatsby-source-prismic即用的内容预览功能,如果您的客户不精通技术并且打算独立更新应用程序,则这是一项非常重要的功能。
gatsby-config.js
gatsby-config.js
resolve: 'gatsby-source-prismic-graphql',options: { repositoryName: '<your-repo-name>', path: '/preview', previews: true, pages: [ { type: 'Post', match: '/post/:uid', path: '/post-preview', component: require.resolve('./src/templates/post.js'),},The pages attribute is what finds all our uid’s and dynamically creates our routes. Here’s what the post.js template could look like:
pages属性是查找所有uid并动态创建路由的属性。 这是post.js模板的样子:
import React from 'react';import { graphql } from 'gatsby';import SEO from 'components/SEO';import Layout from 'components/Layout';const PostPage = (props) => { const post = props.data.prismic.postByUID; if(!post) { return null; }return ( <Layout> ... <render your post data> </Layout> );}export default PostPage;export const query = graphql`query getPost($uid: String!) { prismic { post(uid: $uid, lang: "en-us") { _meta {...GraphQL (GraphQL)
Our qraphql query is set up to take a uid as a parameter and fetch the corresponding data depending on what uid is passed in.
我们的qraphql查询设置为将uid作为参数,并根据传入的uid获取相应的数据。
Now that we have all our posts rendered as their own page we can move on to the categories and define a template for those.
现在,我们将所有帖子呈现为自己的页面,我们可以继续转到类别并为其定义模板。
gatsby-config-js
gatsby-config-js
{type: 'Category',match: '/post/:uid',path: '/category-preview',component: require.resolve('./src/templates/category.js'),},Again the important take away is the uid that we’re passing into our graphql query.
再次重要的是要传递给graphql查询的uid。
const postQuery = graphql`query getCategoryPosts($first: Int = 12, $after: String, $id: String!) { prismic { allPosts(first: $first, after: $after, sortBy: publish_date_DESC, where: {category: $id}) { edges {node {The where keyword in graphql defines the condition for the data we are querying so the above code will define an endpoint for each category and fetch all blog posts that are under that category.
graphql中的where关键字定义了我们要查询的数据的条件,因此上述代码将为每个类别定义一个终结点,并获取该类别下的所有博客文章。
前端过滤 (Front End Filtering)
If you have a second factor to sort by then we’ll need to take this one step further and drill into each section on the front end.
如果您要排序的第二个因素,那么我们需要进一步迈出这一步,并深入研究前端的每个部分。
Let’s create a select element and use the handle change to trigger a filterByType() method. There will of course have to be a type associated with each of our blog posts so make sure you have that set up in your CMS.
让我们创建一个select元素,并使用句柄更改来触发filterByType()方法。 当然,我们的每个博客帖子都必须具有一种类型,因此请确保在CMS中进行了设置。
Here we’re taking the target from the select and beginning the filtering process:
在这里,我们从选择中获取目标并开始过滤过程:
async filterFunction(type) { if (type === 'all') { await this.setState({ filteredBlogs: this.state.blogs, type: null, });} else { await this.setState({filteredBlogs: this.state.blogs.filter(blog => blog.node.blog_type._meta.uid === type && blog.__typename === 'ResourceConnectionEdge),type,});}await this.setCurrentBlogs();}...Since the data is going to be a changing variable we need to first set the state with the blogs by category.
由于数据将是一个变化的变量,因此我们需要首先按类别设置博客的状态。
The setCurrentBlogs() method is going to asynchronously splice, depending on how many blogs we want to see per page, and set the state with the newBlogs.
setCurrentBlogs()方法将异步进行拼接,具体取决于我们希望每页看到多少博客,并使用newBlogs设置状态。
async setCurrentBlog() {
...await this.setState({currentBlogs: this.state.filteredBlogs.slice(this.state.firstBlog, this.state.lastBlog),loaded: true,})}
That’s pretty much it! Now you have the filtered blogs in state that are going to change dynamically in your render method in a clean and concise way. You can check out the finished product here.
差不多了! 现在,您处于过滤状态的博客将以简洁的方式在您的render方法中动态变化。 您可以在此处检查成品。
Filtering a complicated resource room for a client can take a bit of planning at times, but with the right setup on the backend, graphql, React and a bit of es6 thrown in you can get it together is a pretty readable and maintainable way.
为客户端过滤一个复杂的资源室有时可能需要一些计划,但是通过在后端进行正确的设置,graphql,React和一些es6,您可以将其组合在一起,这是一种易于阅读和可维护的方法。
The author of this tutorial is Kahil Nayton, a full stack developer at Ronik, a creative digital agency based out of Brooklyn NYC.
本教程的作者是 Kahil Nayton ,在一个完整的堆栈开发商 Ronik ,纽约市布鲁克林区的基础了创造性的数字机构。
翻译自: https://medium.com/swlh/building-with-gatsby-and-prismic-filtering-front-to-back-33bd510dda2a
gatsby


 253
253

 被折叠的 条评论
为什么被折叠?
被折叠的 条评论
为什么被折叠?
 到【灌水乐园】发言


