


 本文介绍了如何利用Terraform实现云环境的自动化配置,通过引用原文链接提供了详细教程。
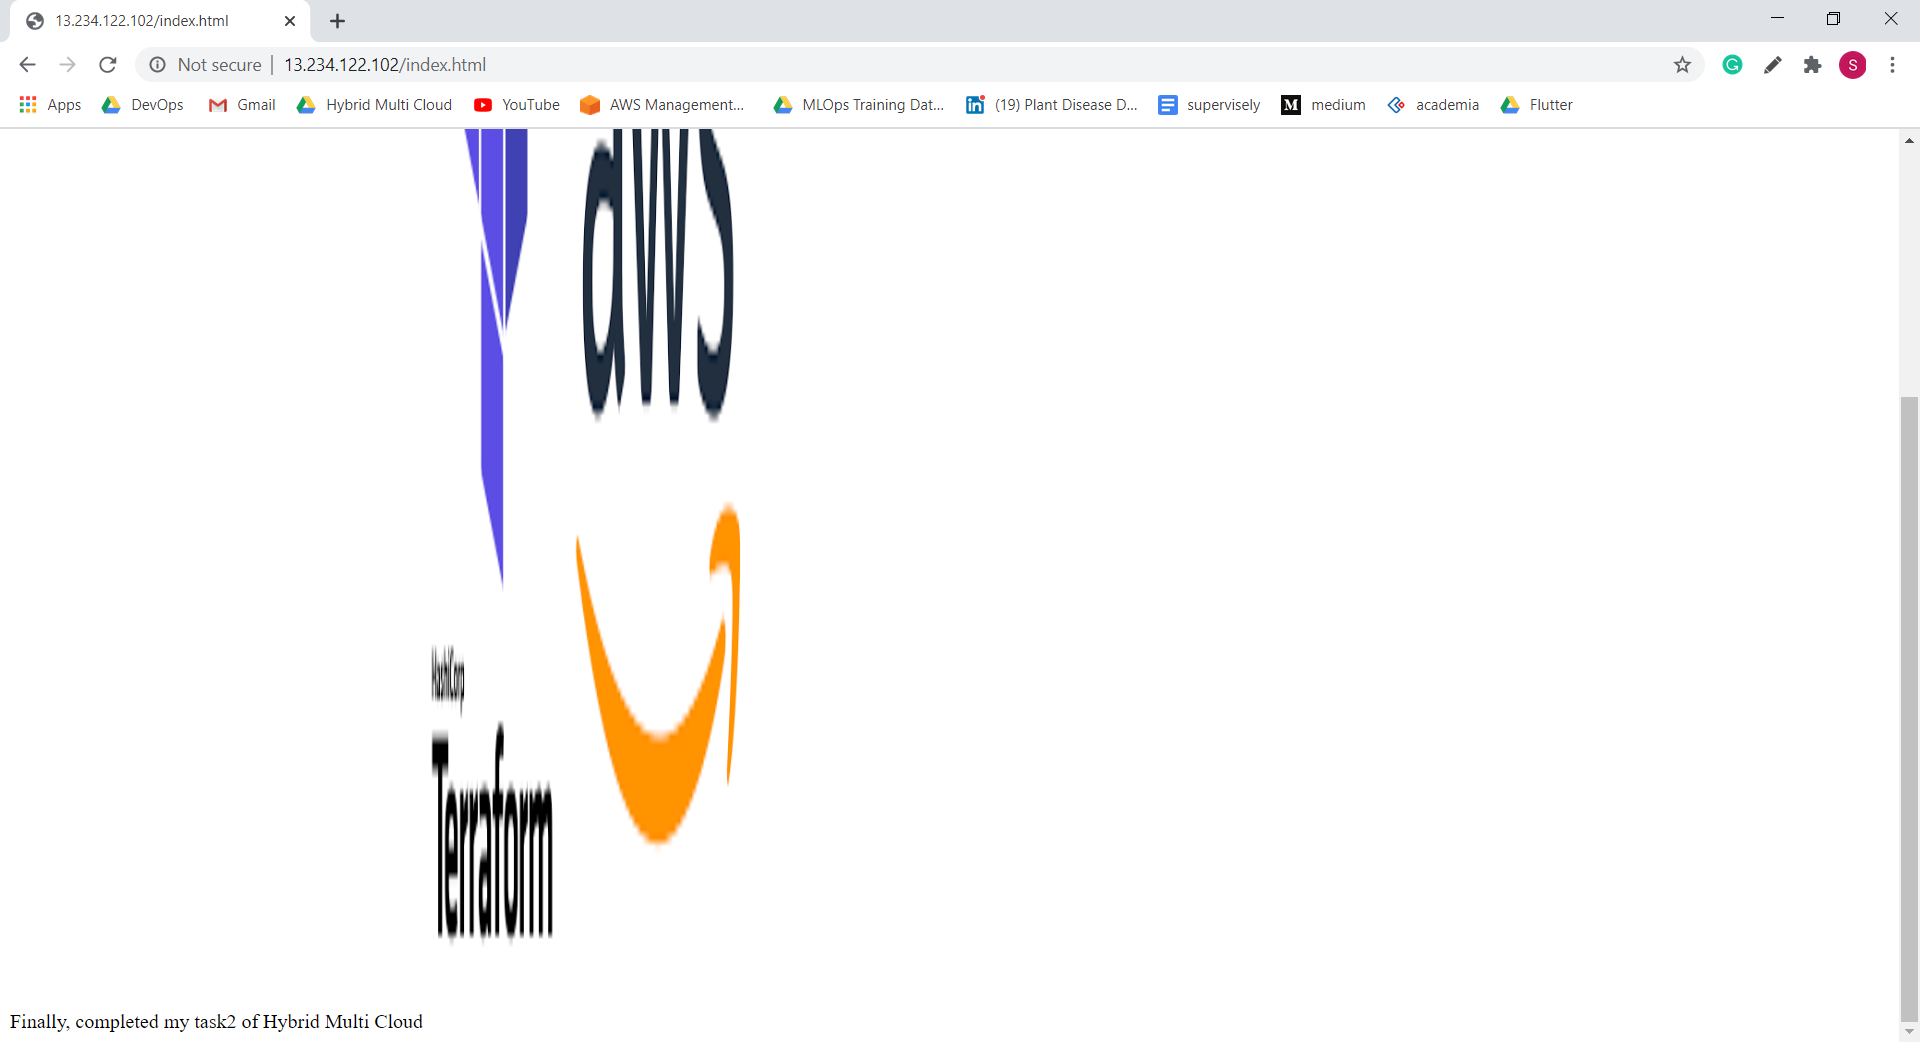
terraform自动化
This article will help us to understand how to spin up instances in AWS using the Infrastructure as a Code tool Terraform. Firstly we’ve to know what is Terraform?
本文将帮助我们了解如何使用基础结构作为代码工具Terraform在AWS中启动实例。 首先,我们必须知道什么是Terraform?
Terraform is an open-source infrastructure-as-a-code software tool created by HashiCorp. It enables users to define and provision a data-center infrastructure using a high-level configuration language known as Hashicorp Configuration Language (HCL), or optionally JSON. Terraform supports a number of cloud infrastructure providers such as Amazon Web Services, IBM Cloud (formerly BlueMix), Google Cloud Platform, Digital Ocean, Linode, Microsoft Azure, Oracle Cloud Infrastructure, OVH, Scaleway, VMware vSphere or Open Telekom cloud as well as Open-Nebula and Open-Stack.
Terraform是由HashiCorp创建的开源基础结构即代码软件工具。 它使用户能够使用称为Hashicorp配置语言(HCL)或JSON(可选)的高级配置语言来定义和配置数据中心基础结构。 Terraform支持许多云基础架构提供商,例如Amazon Web Services,IBM Cloud(以前为BlueMix),Google Cloud Platform,Digital Ocean,Linode,Microsoft Azure,Oracle Cloud Infrastructure,OVH,Scaleway,VMware vSphere或Open Telekom云以及Open-Nebula和Open-Stack。
HashiCorp also supports a Terraform Module Registry launched in 2017 during HashiConf 2017 conferences. In 2019 Terraform introduced the paid version called Terraform Enterprise for larger organizations. Terraform has four major commands: Terraform init, Terraform Plan, Terraform Apply, Terraform Destroy.
HashiCorp还支持在2017年HashiConf会议期间启动的Terraform Module Registry。 在2019年,Terraform为大型组织推出了付费版本,称为Terraform Enterprise。 Terraform具有四个主要命令:Terraform初始化,Terraform计划,Terraform应用,Terraform销毁。
Terraform has a great set of features that make it worth adding to your tool belt, including:
Terraform具有一系列强大的功能,使其值得添加到您的工具带中,其中包括:
- Friendly custom syntax, but also has support for JSON. 友好的自定义语法,但也支持JSON。
- Visibility into changes before they actually happen. 在更改实际发生之前就可以看到它们。
Built-in graphing feature to visualize the infrastructure.
内置的图形功能使基础结构可视化。
- Understands resource relationships. One example is failures are isolated to dependent resources while non-dependent resources still get created, updated, or destroyed. 了解资源关系。 一个例子是,故障被隔离到相关资源上,而非相关资源仍被创建,更新或销毁。
An open-source project with a community of thousands of contributors who add features and updates.
一个开源项目 ,由成千上万的添加功能和更新的贡献者组成的社区。
- The ability to break down the configuration into smaller chunks for better organization, re-use, and maintainability. The last part of this article goes into this feature in detail. 能够将配置分解为较小的块,以实现更好的组织,重用和可维护性。 本文的最后一部分详细介绍了此功能。
问题陈述 (Problem Statement)
- Create a Security group that allows the port 80. 创建一个允许端口80的安全组。
- Launch EC2 instance. 启动EC2实例。
- In this EC2 instance use the existing key or provided key and security group which we have created in step 1. 在此EC2实例中,使用我们在步骤1中创建的现有密钥或提供的密钥和安全组。
- Launch one Volume using the EFS service and attach it in your VPC, then mount that volume into /var/www/html 使用EFS服务启动一个卷并将其附加到您的VPC中,然后将该卷安装到/ var / www / html
- Developers have uploaded the code into GitHub repository. 开发人员已将代码上传到GitHub存储库中。
- Copy the github repo code into /var/www/html 将github repo代码复制到/ var / www / html
- Create an S3 bucket, and copy/deploy the image into the S3 bucket and change the permission to public readable. 创建一个S3存储桶,然后将映像复制/部署到S3存储桶中,并将权限更改为公共可读。
- Create a Cloudfront using an S3 bucket(which contains images) and use the Cloudfront URL to update in code in /var/www/html. 使用S3存储桶(包含图像)创建Cloudfront,并使用Cloudfront URL在/ var / www / html中的代码中进行更新。
L
大号
So this is an updated task with respect to my task 1 of AWS. Here I have created the same setup as that of the previous ones but with a small difference here I have integrated using EFS instead of EBS.
因此,这是关于我的AWS任务1的更新任务。 在这里,我创建了与以前的设置相同的设置,但在这里有一点点不同,我使用EFS而不是EBS进行了集成。
什么是EFS? (What is EFS?)
Amazon Elastic File System provides a simple, scalable, fully managed elastic NFS file system for use with AWS Cloud services and on-premises resources. It is built to scale on-demand to petabytes without disrupting applications, growing and shrinking automatically as you add and remove files, eliminating the need to provision and manage capacity to accommodate growth. Amazon EFS has a simple web services interface that allows you to create and configure file systems quickly and easily. The service manages all the file storage infrastructure for you, meaning that you can avoid the complexity of deploying, patching, and maintaining complex file system configurations.
Amazon Elastic File System提供了一个简单,可扩展,完全托管的弹性NFS文件系统,可与AWS Cloud服务和本地资源一起使用。 它的构建可按需扩展到PB,而不会中断应用程序,在您添加和删除文件时会自动增长和收缩,从而无需配置和管理容量以适应增长。 Amazon EFS具有简单的Web服务界面,可让您快速轻松地创建和配置文件系统。 该服务为您管理所有文件存储基础结构,这意味着您可以避免部署,打补丁和维护复杂的文件系统配置的复杂性。
The major difference between the both is EBS can only be accessed by only a single instance at a time. Where’s using the EFS you can access multiple Amazon instances at the same time
两者之间的主要区别是EBS一次只能由一个实例访问。 在哪里使用EFS,您可以同时访问多个Amazon实例
Before moving on to the task we need to know some basics about terraform
在继续执行此任务之前,我们需要了解有关Terraform的一些基础知识。
terraform init - To install the required plugins
terraform apply - To make the resources run
terraform plan - is used to create an execution plan
terraform validate - To check the code
terraform destroy - To destroy all the resources in single click
Creating the separate folder for web page code and in that create terraform file with extension .tf and after initializing with terraform init the terraform file so that it can download the required plugins for that particular folder.
为网页代码创建单独的文件夹,并在其中创建扩展名为.tf的 terraform文件,并在使用terraform初始化后初始化terraform文件,以便它可以下载该特定文件夹所需的插件。
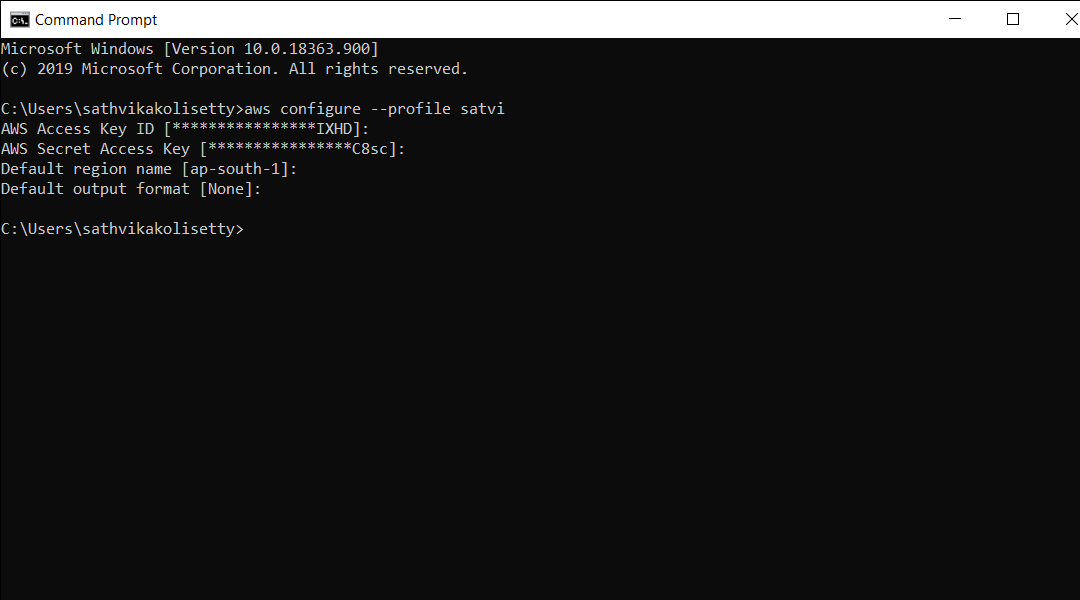
Before that Login to your AWS profile using your CLI and fill down the necessary credentials.
在此之前,请使用CLI登录到您的AWS配置文件并填写必要的凭证。
第1步 (Step1)
All the necessary plugins will be downloaded which belongs to the terraform provider and the profile of AWS.
将下载所有必需的插件,这些插件属于terraform提供商和AWS的个人资料。
provider "aws" {
  profile = "satvi"
  region  = "ap-south-1"
}
Since we are using it for the first time so we need to initialize the code using the following command
由于我们是第一次使用它,因此我们需要使用以下命令初始化代码
terraform init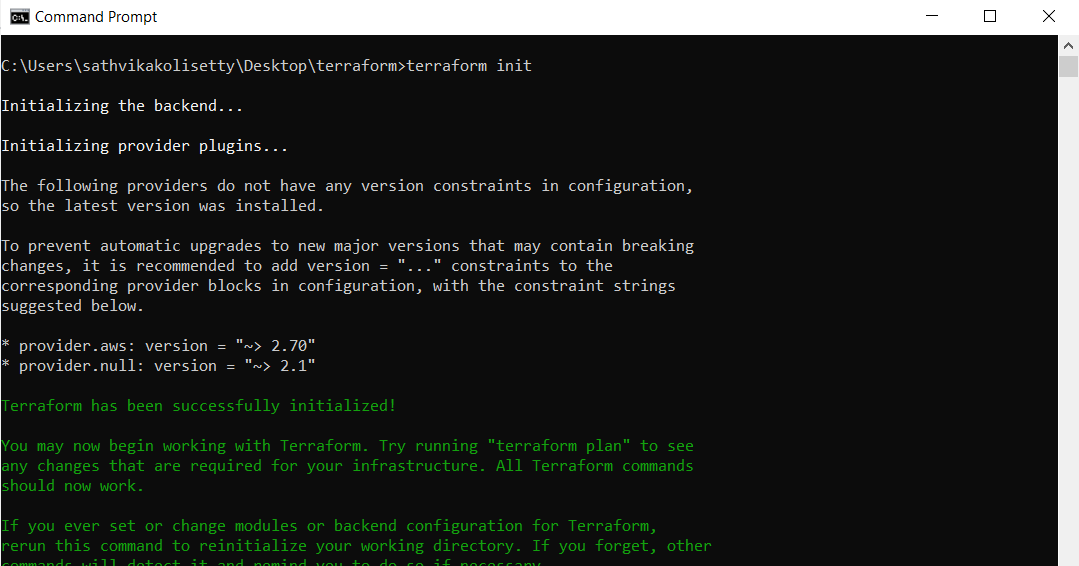
第2步 (Step2)
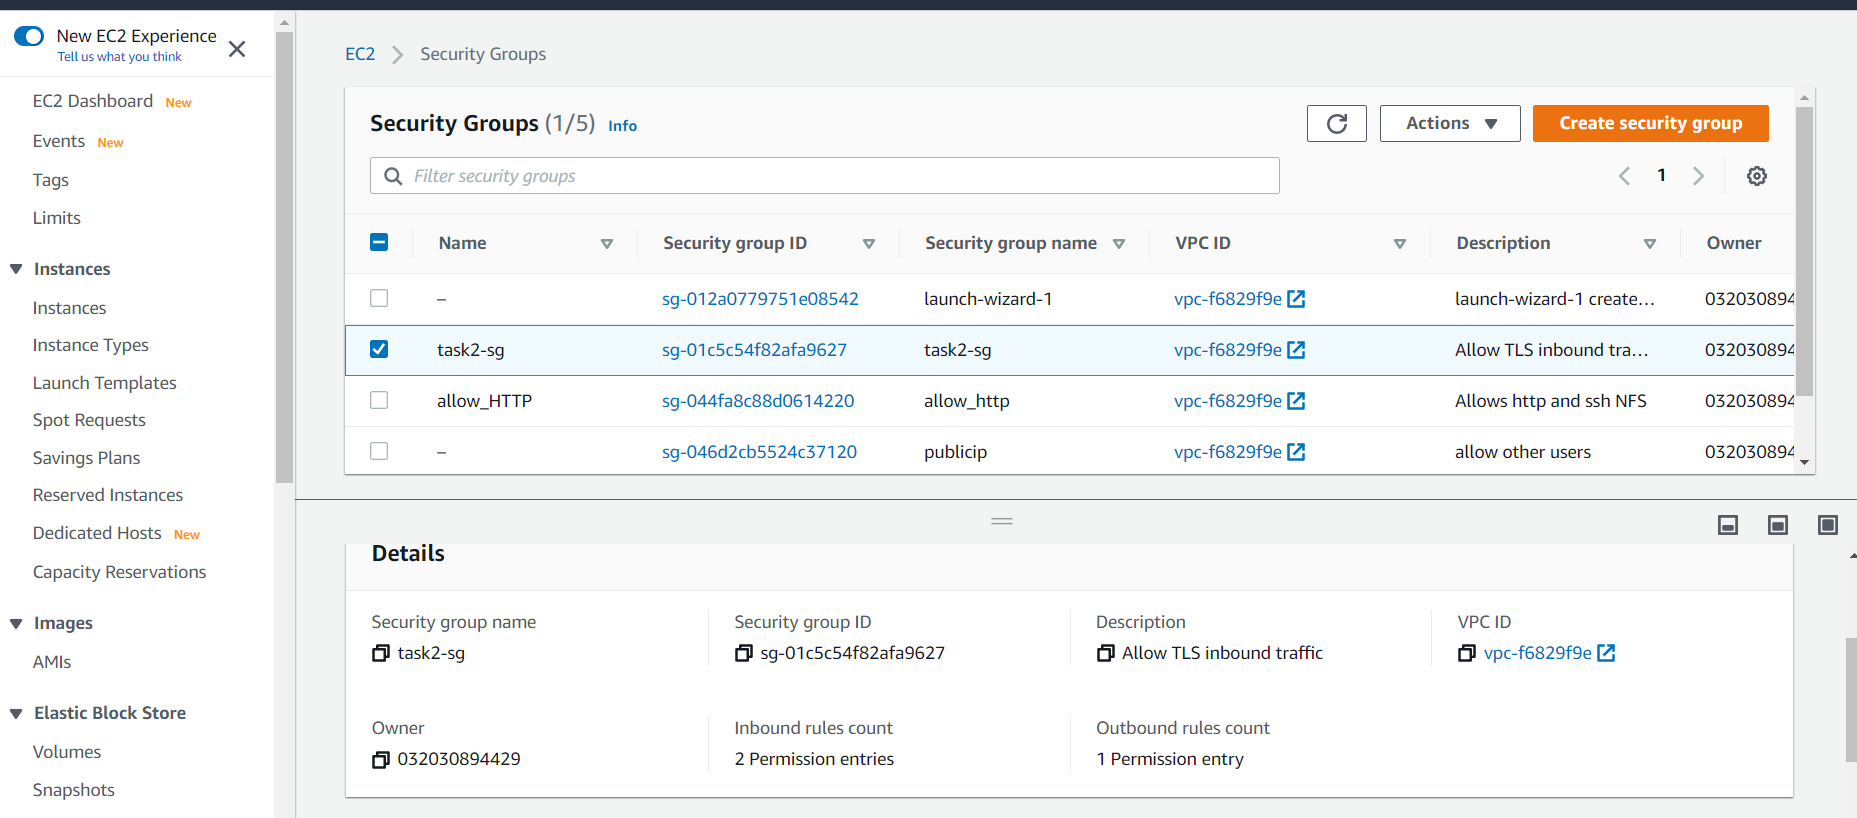
Creating the Security group for instance so our clients can access from other devices as the AWS has some default security setting for not allowing to connect from outside the host so there is a firewall which protects from outside for connecting we need to configure the TCP settings here I’m giving access to the SSH, HTTPS, NFS services with their respective port numbers as 22, 80, 2049.
例如,创建安全组,以便我们的客户端可以从其他设备访问,因为AWS具有一些默认安全设置,不允许从主机外部进行连接,因此有一个防火墙可以防止外部连接,我们需要在此处配置TCP设置我可以使用各自的端口号分别为22、80、2049来访问SSH,HTTPS,NFS服务。
# -- Creating Security Groupsresource "aws_security_group" "sg" {
 name        = "task2-sg"
   description = "Allow TLS inbound traffic"
   vpc_id      = "vpc-f6829f9e"ingress {
      description = "SSH"
      from_port   = 22
      to_port     = 22
      protocol    = "tcp"
      cidr_blocks = [ "0.0.0.0/0" ]
   }ingress {
      description = "HTTP"
      from_port   = 80
      to_port     = 80
      protocol    = "tcp"
      cidr_blocks = [ "0.0.0.0/0" ]
   }egress {
      from_port   = 0
      to_port     = 0
      protocol    = "-1"
      cidr_blocks = ["0.0.0.0/0"]
   }tags = {
      Name = "task2-sg"
   }
}
第三步 (Step3)
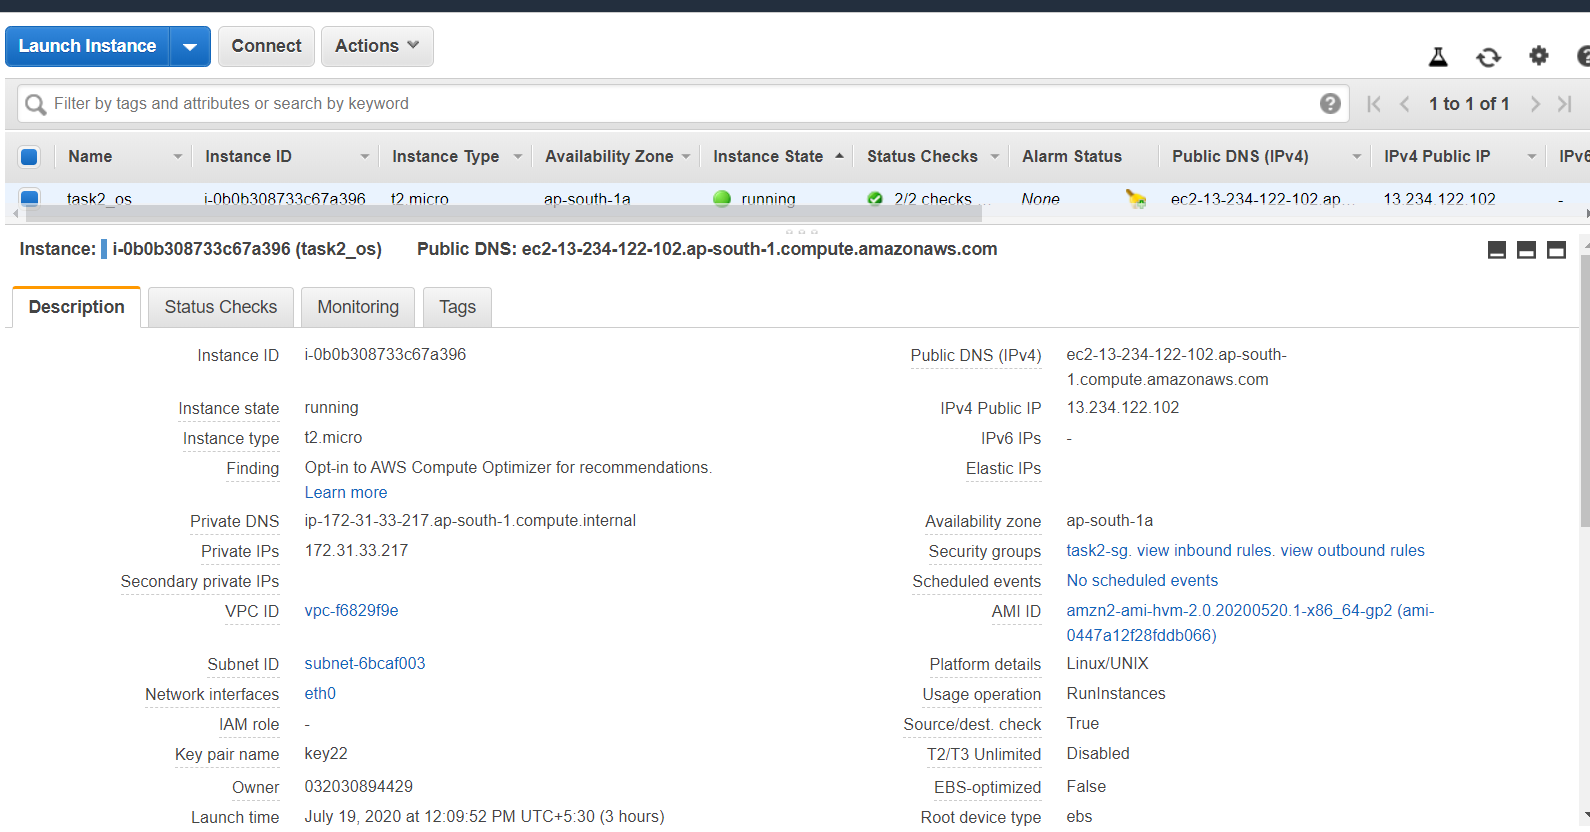
Launching an instance with created key pair and security group and to connect into the instance we need to specify the path of the key and public_ip of instance. And will be launching my provisioner “remote-exec” that will start working once my instances are launched and will download and install all the required packages
使用创建的密钥对和安全组启动实例,并连接到该实例,我们需要指定密钥的路径和实例的public_ip。 并将启动我的预配器“ remote-exec”,一旦启动我的实例,它将开始工作,并将下载并安装所有必需的软件包
# -- Creating Ec2 instanceresource "aws_instance" "web_server" {
   ami = "ami-0447a12f28fddb066"
   instance_type = "t2.micro"
   root_block_device {
  volume_type = "gp2"
  delete_on_termination = true
 }
   key_name = "key22"
   security_groups = [ "${aws_security_group.sg.name}" ]connection {
      type     = "ssh"
      user     = "ec2-user"
      private_key = file("C:/Users/sathvikakolisetty/Downloads/key22.pem")
      host     = aws_instance.web_server.public_ip
   }provisioner "remote-exec" {
      inline = [
         "sudo yum install httpd git -y",
         "sudo systemctl restart httpd",
         "sudo systemctl enable httpd",
      ]
   }tags = {
      Name = "task2_os"
   }}
第4步 (Step4)
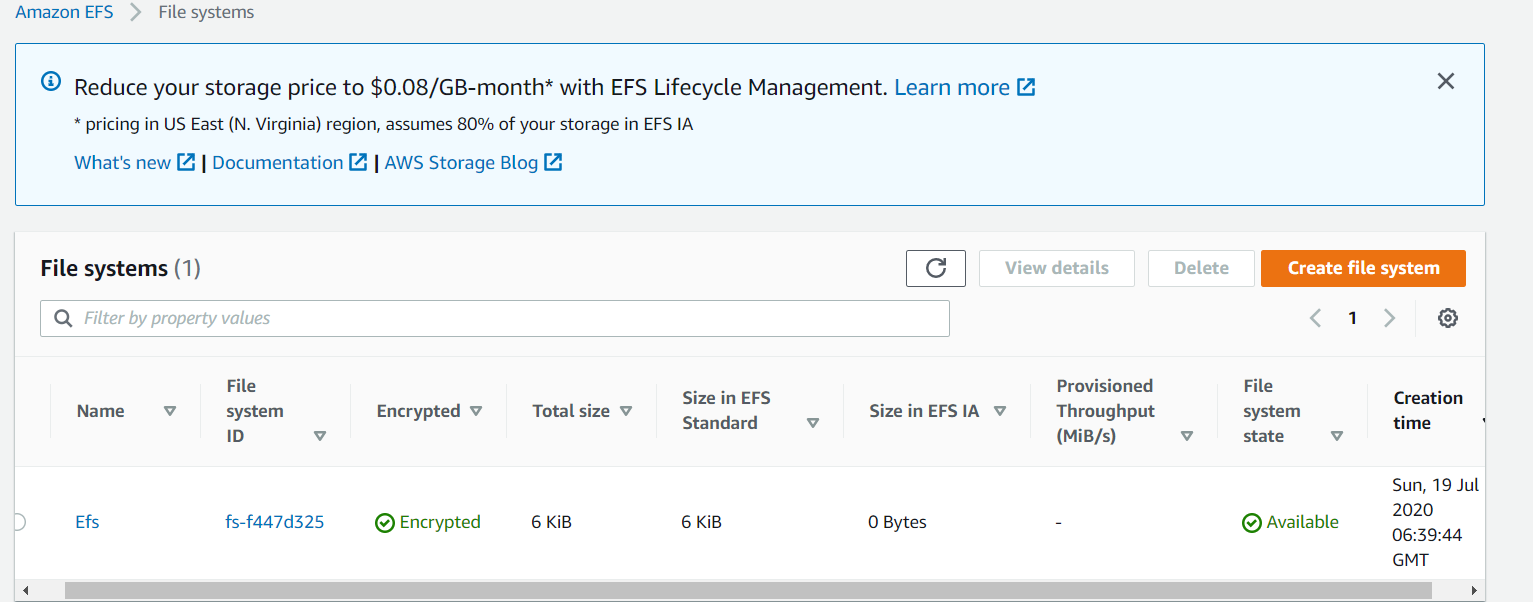
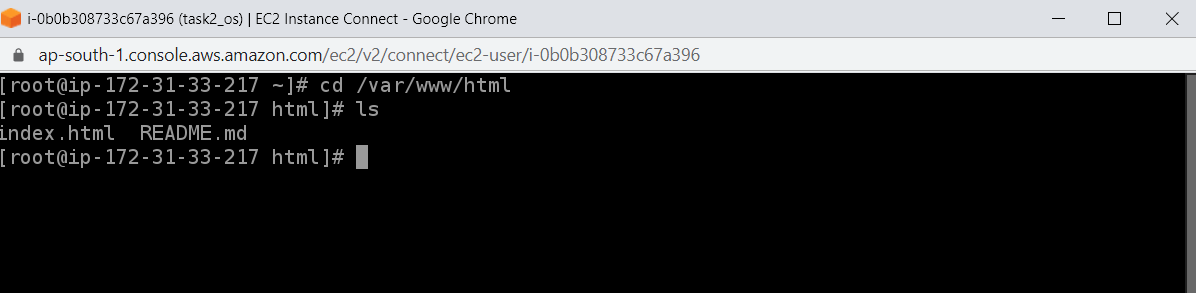
Now we will be creating our EFS and for that, we require VPC which will contact VP at the backend but since we haven’t mentioned it so we will go for the default one. And once it gets created then we will create a mount we will clone all the required data from the Github and then we will mount our EFS to /var/www/Html directory.
现在,我们将创建EFS,为此,我们需要VPC,该VPC将在后端与VP联系,但是由于我们没有提到它,因此我们将使用默认值。 创建之后,我们将创建一个挂载,我们将从Github克隆所有必需的数据,然后将EFS挂载到/ var / www / Html目录。
# -- Creating EFS volumeresource "aws_efs_file_system" "efs" {
    creation_token = "efs"
    performance_mode = "generalPurpose"
    throughput_mode = "bursting"
    encrypted = "true"
  tags = {
      Name = "Efs"
    }
}# -- Mounting the EFS volumeresource "aws_efs_mount_target" "efs-mount" {
 depends_on = [
  aws_instance.web_server,
  aws_security_group.sg,
  aws_efs_file_system.efs,
   ]

    file_system_id  = aws_efs_file_system.efs.id
   subnet_id       = aws_instance.web_server.subnet_id
    security_groups = ["${aws_security_group.sg.id}"]


   connection {
      type     = "ssh"
      user     = "ec2-user"
     private_key = file("C:/Users/sathvikakolisetty/Downloads/key22.pem")
      host     = aws_instance.web_server.public_ip
   }provisioner "remote-exec" {
      inline = [
         "sudo mount ${aws_efs_file_system.efs.id}:/ /var/www/html",
          "sudo echo '${aws_efs_file_system.efs.id}:/ /var/www/html efs defaults,_netdev 0 0' >> /etc/fstab",
         "sudo rm -rf /var/www/html/*",
         "sudo git clone https://github.com/satvikakolisetty/cloudtask2.git /var/www/html/"
      ]
   }
}
步骤5 (Step5)
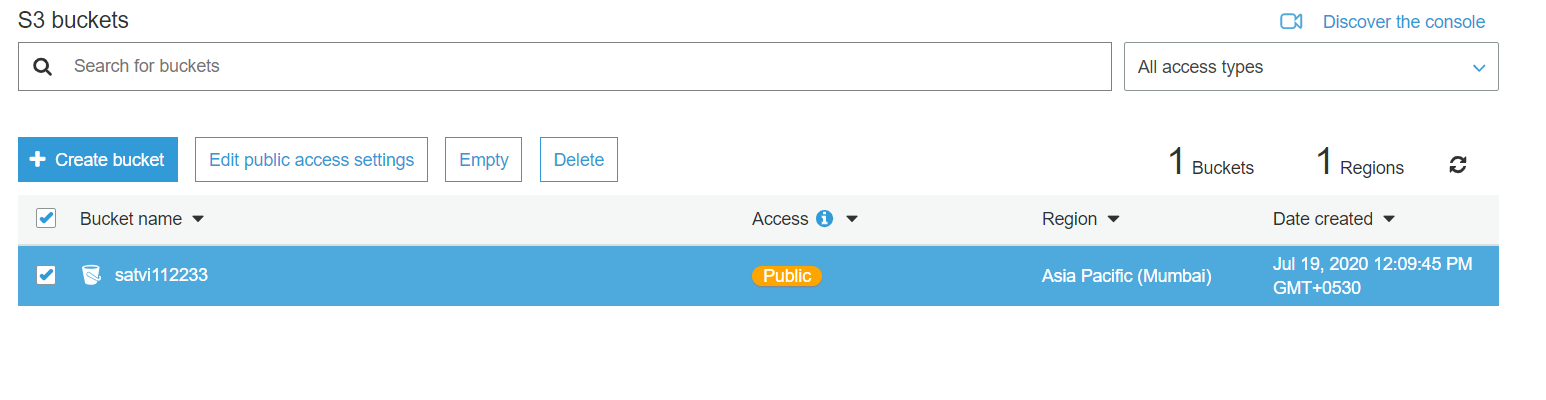
Now I will create an S3 bucket and upload my image to it in the same availability zone.
现在,我将创建一个S3存储桶,并将我的映像上传到同一可用区中。
# -- Creating S3 Bucketresource "aws_s3_bucket" "mybucket" {
  bucket = "satvi112233"
  acl    = "public-read"
  region = "ap-south-1"tags = {
    Name = "satvi112233"
  }
}# -- Uploading files in S3 bucketresource "aws_s3_bucket_object" "file_upload" {
 depends_on = [
      aws_s3_bucket.mybucket,azxccvgh  i
   ]
   bucket = "satvi112233"
   key    = "hybrid.png"
   source = "C:/Users/sathvikakolisetty/Desktop/terraform/hybrid.png"
 acl ="public-read"
}
步骤6 (Step6)
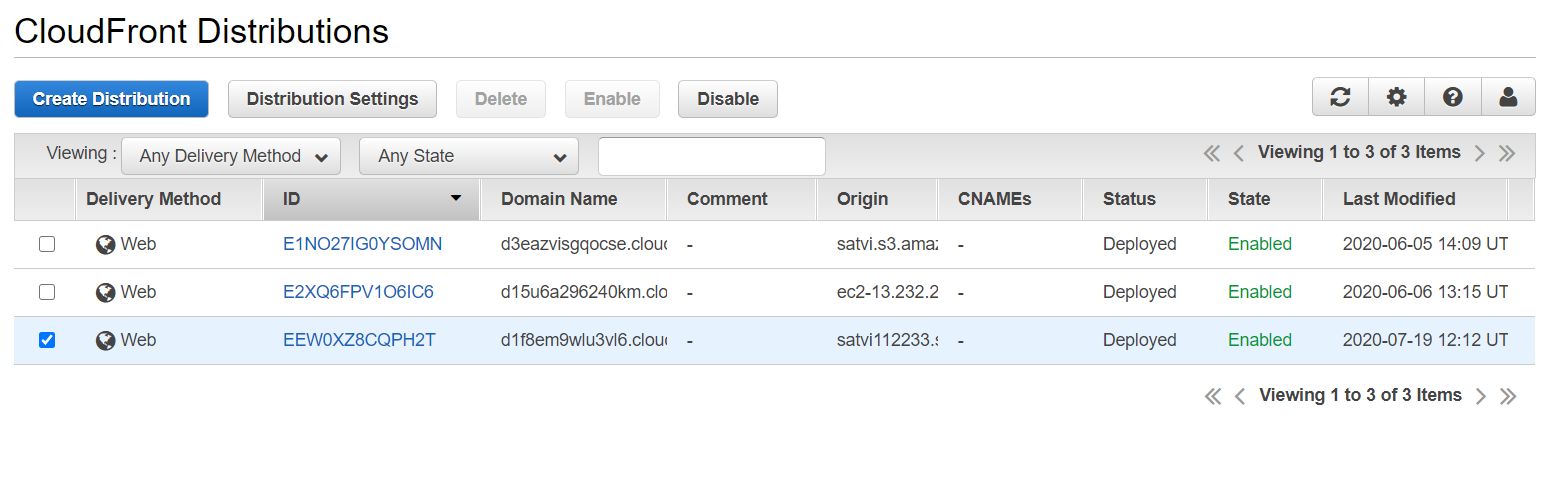
In the last step, we will create the cloud-front that will collect all my data from the S3 bucket and reach my client through the nearest edge locations whenever any client will hit to my site.
在最后一步,我们将创建云前端,以便在任何客户端访问我的站点时,从S3存储桶中收集我的所有数据,并通过最近的边缘位置到达我的客户端。
resource "aws_cloudfront_distribution" "s3_distribution" {
 depends_on = [
  aws_efs_mount_target.efs-mount,
      aws_s3_bucket_object.file_upload,
   ]origin {
  domain_name = "${aws_s3_bucket.mybucket.bucket}.s3.amazonaws.com"
  origin_id = "ak"
        }enabled = true
 is_ipv6_enabled = true
 default_root_object = "index.html"restrictions {
  geo_restriction {
   restriction_type = "none"
    }
      }default_cache_behavior {
  allowed_methods = ["HEAD", "GET"]
  cached_methods = ["HEAD", "GET"]
  forwarded_values {
   query_string = false
   cookies {
    forward = "none"
   }
  }
  default_ttl = 3600
  max_ttl = 86400
  min_ttl = 0
  target_origin_id = "ak"
  viewer_protocol_policy = "allow-all"
  }price_class = "PriceClass_All"viewer_certificate {
      cloudfront_default_certificate = true
   }
}
# -- Updating cloudfront_url to main lacationresource "null_resource" "nullremote3"  {
 depends_on = [
      aws_cloudfront_distribution.s3_distribution,
   ]
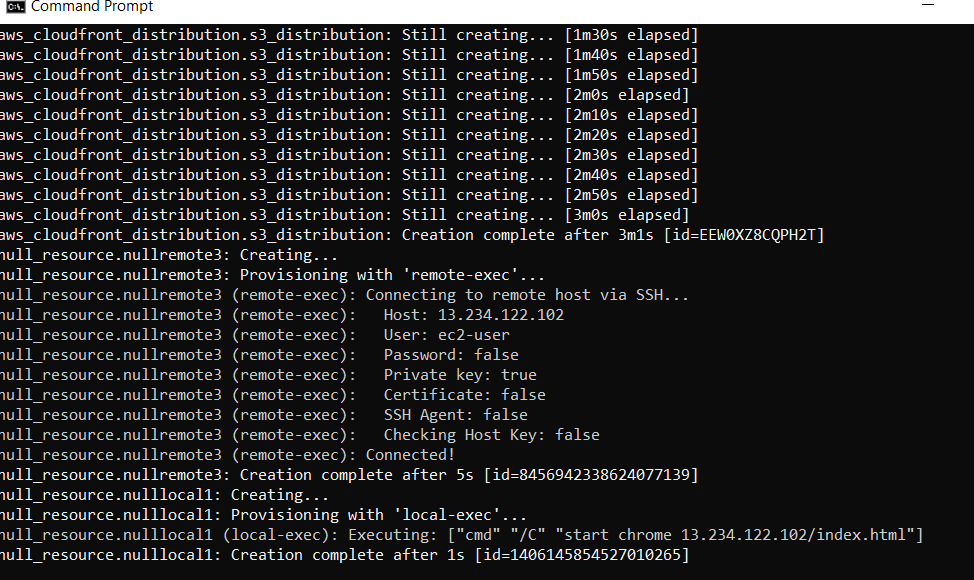
步骤7 (Step7)
Connecting to the instance and deploying image of s3 bucket to the var/www/html and then it automatically opens on the google chrome browser
连接到实例并将s3存储桶的映像部署到var / www / html,然后在Google Chrome浏览器中自动打开
connection {
      type     = "ssh"
      user     = "ec2-user"
     private_key = file("C:/Users/sathvikakolisetty/Downloads/key22.pem")
      host     = aws_instance.web_server.public_ip
   }

 provisioner "remote-exec" {
      inline = [
      "sudo su <<END",
      "echo \"<img src='http://${aws_cloudfront_distribution.s3_distribution.domain_name}/${aws_s3_bucket_object.file_upload.key}' height='1000' width='250'>\" >> /var/www/html/index.html",
      "END",
    ]}
}# -- Starting chrome for outputresource "null_resource" "nulllocal1"  {
 depends_on = [
      null_resource.nullremote3,
   ]provisioner "local-exec" {
     command = "start chrome ${aws_instance.web_server.public_ip}/index.html"
   }
}
Now we are done with all our steps required and to create our setup just create the complete code and run the following commands and then now our entire setup will be ready
现在我们完成了所有必需的步骤,并创建我们的设置,只需创建完整的代码并运行以下命令,然后便可以完成整个设置
$ terraform plan #check your code
$ terraform apply -auto-approve  #run the cluster created
$ terraform destroy -auto-apply  #destroy the cluster created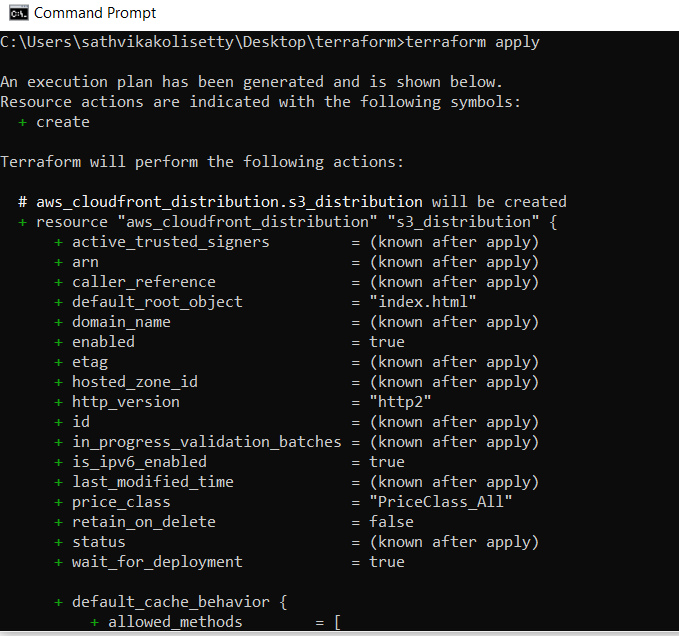
翻译自: https://medium.com/@satvikakolisetty/cloud-automation-using-terraform-fa3fc049ecfa
terraform自动化


 1487
1487

 被折叠的 条评论
为什么被折叠?
被折叠的 条评论
为什么被折叠?
 到【灌水乐园】发言


