


微服务构建
This series of ‘How-to’ blog posts is my effort to learn and share the knowledge and working code of building various components of a microservices ecosystem.
这一系列的“操作方法”博客文章是我学习和分享构建微服务生态系统各个组件的知识和工作代码的努力 。
This is a complete end-to-end explanation and ‘open-source’ code for microservices using NGINX + Consul + Spring boot. So, I think, this would be useful to fellow software engineers.
这是使用NGINX + Consul + Spring boot的微服务的完整的端到端说明和“开源”代码。 因此,我认为这对其他软件工程师很有用。
Let me know in the comments or message me if you want me to cover any more aspects of microservices.
如果您希望我介绍微服务的其他方面,请在评论中告诉我或给我发消息 。
In part I of this series, we built spring boot microservices that have service discovery and external configuration. In part II, we containerized these microservices.
在本系列的第一部分中 ,我们构建了具有服务发现和外部配置的spring boot微服务。 在第二部分中,我们将这些微服务进行了容器化。
In this part, I will describe how to add an NGINX API Gateway in front of microservices.
在这一部分中,我将描述如何在微服务之前添加NGINX API网关。
Part I : — https://medium.com/swlh/lets-build-microservices-part-1-a6d1b37154a9
第一部分 :— https://medium.com/swlh/lets-build-microservices-part-1-a6d1b37154a9
Part II : — https://medium.com/@amol.limaye/lets-build-microservices-part-ii-9620c930587
第二部分 :— https://medium.com/@amol.limaye/lets-build-microservices-part-ii-9620c930587
Source code:
源代码:
https://github.com/amollimaye/microservices-ecommerce-2
https://github.com/amollimaye/microservices-ecommerce-2
博客结构 (Blog Structure)
Part 1
第1部分
- Build spring boot microservices 构建Spring Boot微服务
Use Consul for external configuration and service discovery
使用Consul进行外部配置和服务发现
Part 2
第2部分
- Explaining what we will build — What we built in part I 解释我们将要建立的东西-我们在第一部分中建立的东西
- Why Containerize ? 为什么要进行容器化?
- About Docker 关于Docker
- Step 1: Containerize microservices 步骤1:容器化微服务
Part 3
第三部分
- Explaining what we will build — What we build in this part 解释我们将要建立的东西—我们在这一部分将要建立的东西
- Need for API gateway 需要API网关
- About NGINX 关于NGINX
- About Consul-Template and Docker-Compose 关于Consul-Template和Docker-Compose
- Step 2: Updates to service properties 步骤2:更新服务属性
- Step 3: Build NGINX + Consul Template container 第三步:构建NGINX + Consul模板容器
- Step 4: docker-compose 第4步:泊坞窗组成
- See the application in action 查看实际应用程序
解释我们将要建立的 (Explaining what we will build)
What we build in this part
我们在这部分中建立的
In part II, I explained docker and how to dockerize the three spring boot microservices.
在第二部分中,我解释了docker以及如何对三个spring boot微服务进行dockerize。
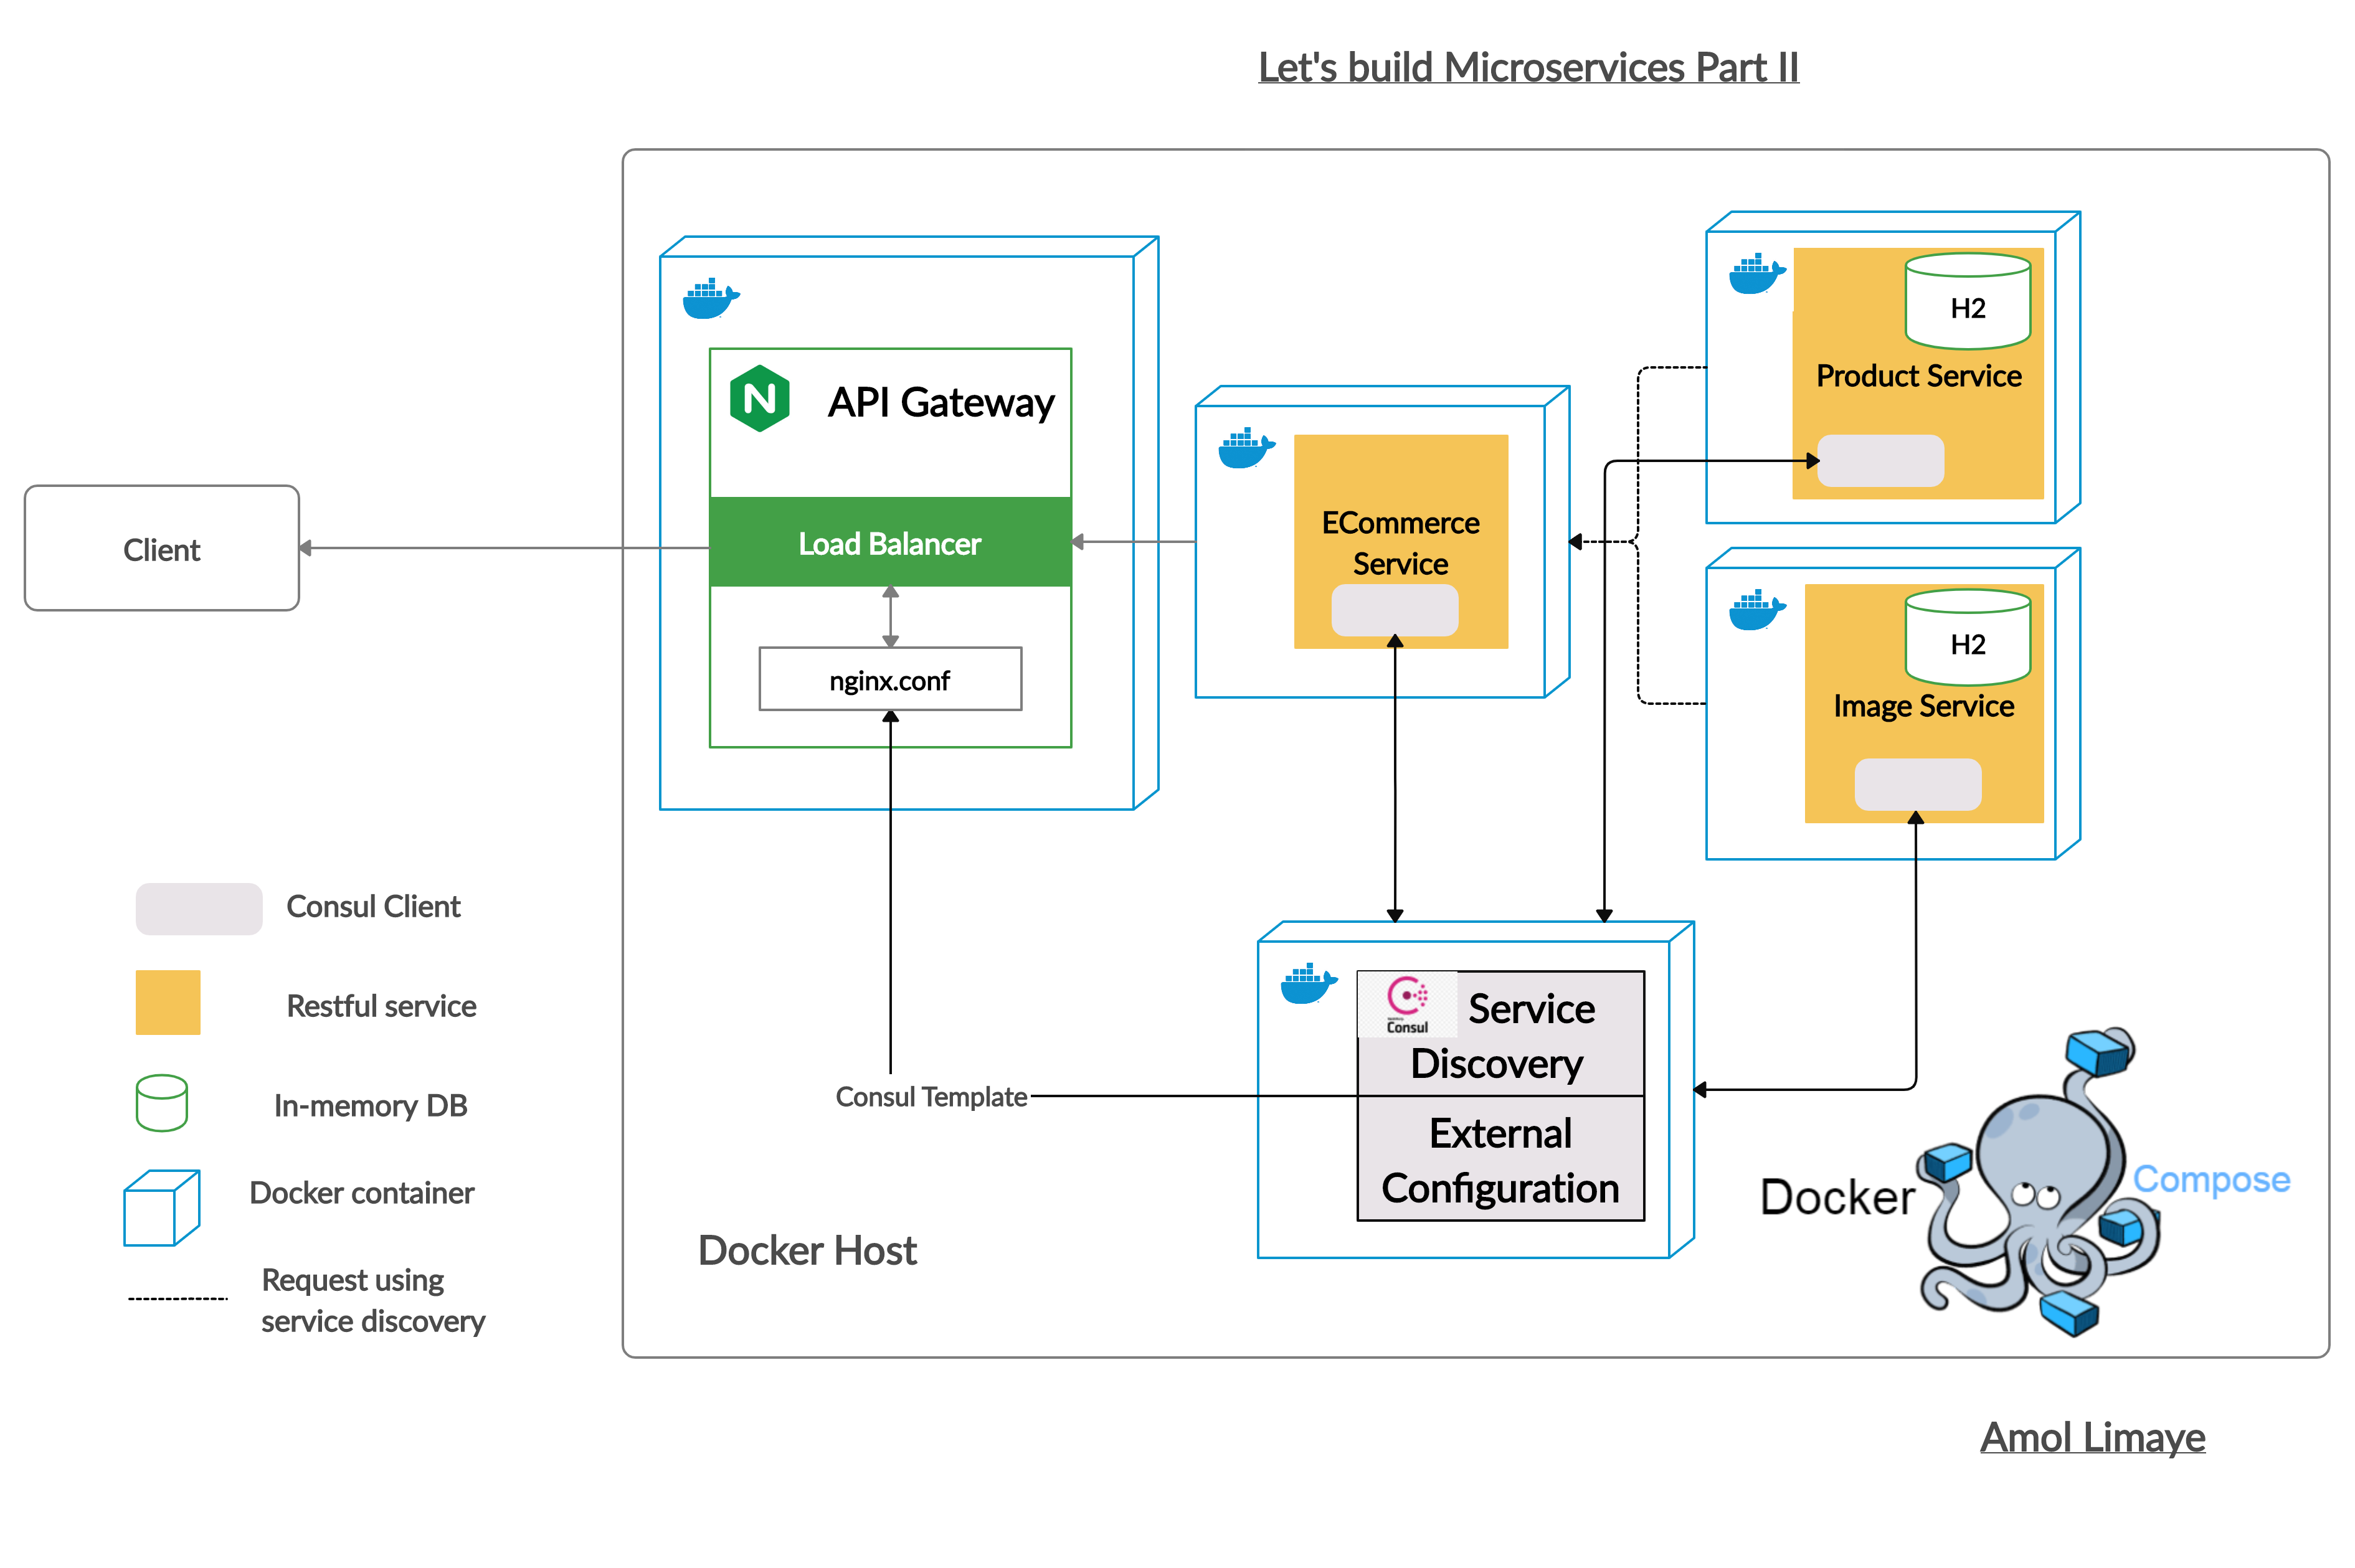
In this part, we add an API gateway using NGINX. It will act as a single entry point for our services. In this simplistic demo application, we expose one endpoint of one service(eCommerce) to the client. Other services are not needed and hence won’t be accessible to client. This is API Gateway pattern.
在这一部分中,我们使用NGINX添加一个API网关。 它将作为我们服务的单一入口。 在这个简单的演示应用程序中,我们向客户公开了一项服务(电子商务)的一个端点。 不需要其他服务,因此客户端将无法访问。 这是API网关模式 。
We will configure NGINX to do load balancing as well. I explain and show how the client requests are load balanced across multiple instances of eCommerce service, whose count, hosts and ports could change dynamically. Consul-template will dynamically update the nginx configuration using consul service registry, thus enabling NGINX to do load balancing.
我们还将配置NGINX来执行负载平衡 。 我将说明并展示如何在多个电子商务服务实例之间平衡客户端请求,这些实例的数量,主机和端口可以动态更改。 领事模板将使用领事服务注册表动态更新nginx配置,从而使NGINX能够进行负载平衡。
We containerize each of these components using docker. The images are orchestrated(managed) using docker compose.
我们使用docker容器化每个组件。 使用docker compose对图像进行编排(管理)。
Below, I explain code for each component in detail and then finally show steps to run these components together.
下面,我将详细解释每个组件的代码,然后最后展示将这些组件一起运行的步骤。
对API网关的需求 (The need for API Gateway)
We have three dockerized microservices and a consul server, all running on same machine. When we start them, the services register their IP and hosts to consul service registry. These services will work together to vend out the information we need.
我们有三个dockerized微服务和一个consul服务器,它们都在同一台机器上运行。 启动它们时,服务会注册其IP和主机以咨询服务注册表。 这些服务将共同提供我们所需的信息。
Next, I can deploy this setup on a hosted production server so that the world can access my eCommerce application.
接下来,我可以将此设置部署在托管的生产服务器上,以便全世界都可以访问我的电子商务应用程序。
But how do I make sure only eCommerce service is accessible to outside world ? Since, other 2 services i.e. product and image are used only internally and not for direct use by client.
但是,如何确保外部世界只能访问电子商务服务? 因为,其他2个服务(即产品和图像)仅在内部使用,不能由客户直接使用。
What if I want multiple instances of eCommerce service to cater to increasing load ? How do I load-balance client requests coming to eCommerce service and distribute them evenly across instances?
如果我希望多个电子商务服务实例可以满足不断增加的负载怎么办? 如何对进入电子商务服务的客户端请求进行负载平衡并在实例之间平均分配?
API Gateway will solve these problems. An API gateway will serve as a single entry point to our system and expose only the required endpoints. It will also load balance the client requests and distribute them across multiple instances of a service. API gateway will leverage the discovery service to know the dynamically changing hosts and ports of the service instances.
API网关将解决这些问题。 API网关将用作我们系统的单个入口点,并且仅公开所需的端点。 它还将负载均衡客户端请求,并将其分配到服务的多个实例中。 API网关将利用发现服务来了解服务实例的动态更改主机和端口。
We will use NGINX as API gateway. Below is a nice video explaining API gateway.
我们将使用NGINX作为API网关。 以下是一个解释API网关的漂亮视频。
关于NGINX (About NGINX)
NGINX is a web server. But it does a lot more than just serving content.
NGINX是一个Web服务器。 但这不仅仅提供内容。
NGINX is a multifunction tool. With NGINX, you can use the same tool as your load balancer, reverse proxy, content cache, and web server, minimizing the amount of tooling and configuration your organization needs to maintain.
NGINX是一个多功能工具。 借助NGINX,您可以使用与负载均衡器,反向代理,内容缓存和Web服务器相同的工具,从而最大限度地减少组织需要维护的工具和配置。
In this use case, we will use it as an API gateway and load balancer.
在此用例中,我们将其用作API网关和负载平衡器。
So, client requests will go through NGINX api gateway and will be routed to respective services.These services will be discovered by consul.
因此,客户端请求将通过NGINX api网关,并将被路由到相应的服务,这些服务将由领事发现。
In addition, we will use consul-template and docker-compose.
此外,我们将使用consul-template和docker-compose。
关于Consul-Template和Docker-Compose (About Consul-Template and Docker-Compose)
consul-template : Consul template runs as a daemon service. It listens to consul service registry for changes. It accordingly updates the nginx configuration file and reloads the nginx configuration. Thus, nginx knows the locations of the ‘running’ service instances. NGINX routes requests according to this configuration. This is especially important in a dynamic infrastructure where the number of instances of a service, their hosts and ports may keep changing.
consul-template: Consul模板作为守护程序运行。 它侦听领事服务注册表中的更改。 因此,它将更新nginx配置文件并重新加载nginx配置。 因此,nginx知道“正在运行”的服务实例的位置。 NGINX根据此配置路由请求。 这在动态基础架构中尤其重要,在该基础架构中,服务,其主机和端口的实例数可能会不断变化。
docker-compose : This tool enables us to define and manage a multi-container docker application using a single YAML file. Using this, we won’t need to start, stop or manage each image individually. We could start all docker instances, scale them up/down, with a single command. This would make application deployment very easy.
docker-compose:这 该工具使我们能够使用单个YAML文件定义和管理多容器Docker应用程序。 使用此工具,我们无需分别启动,停止或管理每个图像。 我们可以使用单个命令启动所有docker实例,放大/缩小它们。 这将使应用程序部署非常容易。
To sum up, below are the components we will have. Each will be in a single docker container.
总结一下,下面是我们将要拥有的组件。 每个都将在单个docker容器中。
- Nginx + consul template (in a single docker container) Nginx +领事模板(在单个Docker容器中)
- Consul 领事
- ECommerce service 电子商务服务
- Image service 影像服务
- Product service 产品服务
Deployment of these images is managed by docker-compose.
这些映像的部署由docker-compose管理。
Now, that we have got the big picture, lets build these components
现在,我们已经有了一个整体,让我们构建这些组件
步骤2:更新服务属性 (Step 2: Updates to service properties)
We will need to change bootstrap.properties of all three services. Earlier, we referred to consul using localhost or local machine IP address. Hardcoding is not good. And, once we dockerize consul, this is not going to work. So, will call it using http://consul:8500 . This request will be routed to the container named ‘consul’ , which contains the consul service.
我们将需要更改所有三个服务的bootstrap.properties。 之前,我们使用本地主机或本地计算机IP地址来指称consul。 硬编码不好。 而且,一旦我们对领事进行docker化,这将无法工作。 因此,将使用http:// consul:8500进行调用。 该请求将被路由到名为consul的容器,该容器包含consul服务。
We also add instanceId property so that multiple instances of a service will have unique instance id when registering themselves with consul.
我们还添加instanceId属性,以便在向领事注册自己时,服务的多个实例将具有唯一的实例ID。
spring.cloud.consul.discovery.instanceId=
${spring.application.name}:${random.value}#Consul configuration#
spring.cloud.consul.host=consul
spring.cloud.consul.port=8500
Rebuild docker images for all three services after these changes.
这些更改后,为所有三个服务重建docker映像。
步骤3:构建NGINX +领事模板容器 (Step 3: Build NGINX + consul template container)
I have re-used and modified the code from an nginx demo app to build this container (code link at the end of blog).
我已经重复使用并修改了nginx演示应用程序中的代码来构建此容器(博客结尾处的代码链接)。
We create a DockerFile for this container. We also create a template file for NGINX configuration (nginx.conf). This file uses consul templating language. This template will be populated with real-time consul service registry data and then set as NGINX configuration by consul template. Detailed explanation follows:
我们为此容器创建一个DockerFile。 我们还为NGINX配置(nginx.conf)创建了一个模板文件。 该文件使用领事模板语言。 此模板将使用实时领事服务注册表数据填充,然后由领事模板设置为NGINX配置。 详细说明如下:
nginx.conf
nginx.conf
This file uses consul templating language. It queries consul’s service registry for all the registered services, their host names and ports. This data will then be used to build NGINX configuration file.
该文件使用领事模板语言。 它向领事的服务注册表查询所有已注册的服务,其主机名和端口。 然后,这些数据将用于构建NGINX配置文件。
Configuration like below will be generated using this template. (This is resulting NGINX configuration from services running on my machine)
使用此模板将生成如下配置。 (这是我机器上运行的服务对NGINX的配置)
This is the nginx configuration when I have 1 instance of productApp and imageApp each and 3 instances of eCommerceApp.
当我分别有1个productApp和imageApp实例和3个eCommerceApp实例时,这就是nginx配置。
p.s. I have given application name as productApp for product service and same way to other services.
ps我为产品服务和其他服务使用了相同的应用程序名称,即productApp。
spring.application.name=productApp以上NGINX配置说明 (Above NGINX Configuration explained)
Let me explain each part of above mentioned nginx configuration. I explain the configuration using IP 192.168.99.100, which is my docker host IP. I can access the running dockerized applications using this IP.
让我解释一下上面提到的nginx配置的每个部分。 我使用IP 192.168.99.100解释了配置,这是我的Docker主机IP。 我可以使用此IP访问正在运行的dockerized应用程序。
From NGINX docs:: Nginx consists of modules which are controlled by directives specified in the configuration file. Directives are divided into simple directives and block directives. A simple directive consists of the name and parameters separated by spaces and ends with a semicolon (
;). A block directive has the same structure as a simple directive, but instead of the semicolon it ends with a set of additional instructions surrounded by braces ({and}).来自NGINX docs :: Nginx由受配置文件中指定的指令控制的模块组成。 伪指令分为简单伪指令和块伪指令。 一个简单的指令由名称和参数组成,这些名称和参数之间用空格分隔,并以分号(
;)结尾。 块指令的结构与简单指令的结构相同,但是它以分号(而不是分号)结尾,并带有一组用括号({和})括起来的附加指令。
- server — This defines a virtual server. It ‘listen’s on port 8080. So, NGINX can be accessed on port 8080 of docker host IP, 192.168.99.100 . NGINX will then proxy these requests to respective services as defined in location block. 服务器-这定义了一个虚拟服务器。 它在端口8080上监听。因此,可以在Docker主机IP 192.168.99.100的端口8080上访问NGINX。 然后,NGINX将这些请求代理到位置块中定义的相应服务。
server {
    listen 8080 default_server;     location ...<more configuration here>
}- location — Here, we define allowed URLs and what to do when NGINX receives that request. Below is location for ecommerce service. location —在这里,我们定义允许的URL以及NGINX收到该请求时的处理方式。 以下是电子商务服务的位置。
location /ecommerceApp {
   proxy_pass http://ecommerceApp;
   rewrite ^/ecommerceApp/(.*)$ /$1 break;
}
As per above configuration, ‘192.168.99.100:8080/ecommerceApp’ can be used to call eCommerce service. The 192.168.99.100:8080/ecommerceApp request will be proxied to service defined as ‘ecommerceApp’ using the ‘proxy_pass’ directive.
按照上述配置,可以使用“ 192.168.99.100:8080/ecommerceApp”来调用电子商务服务。 192.168.99.100:8080/ecommerceApp请求将使用'proxy_pass'指令代理到定义为'ecommerceApp'的服务。
- upstream — In this block, a group of servers is defined. We see 3 ‘server’ entries for ‘ecommerceApp’ application. This is because I have 3 running docker instances of ecommerce service. (This server entry is a simple directive, different from ‘server’ block directive explained above.) NGINX will distribute(load-balance) requests coming to ‘ecommerceApp’ in a round robin manner among these 3 instances. 上游—在此块中,定义了一组服务器。 我们为“ ecommerceApp”应用程序看到3个“服务器”条目。 这是因为我有3个正在运行的电子商务服务的docker实例。 (此服务器条目是一个简单的指令,不同于上面说明的“服务器”块指令。)NGINX将在这三个实例之间以轮循方式分配(负载均衡)到达“ ecommerceApp”的请求。
upstream ecommerceApp {
    zone upstream-ecommerceApp 64k;
    least_conn;
    server 7ec3c83093be:9080 max_fails=3 fail_timeout=60 weight=1;
    server 174af4c72f4f:9080 max_fails=3 fail_timeout=60 weight=1;
    server c3411a956f8b:9080 max_fails=3 fail_timeout=60 weight=1;
}
NGINX DockerFile
NGINX Docker文件
This is the DockerFile for NGINX + consul template with explanations. I have shortened the code and added description. You can view the entire DockerFile in the linked source code.
这是带有说明的DockerFile for NGINX +领事模板。 我缩短了代码并添加了描述。 您可以在链接的源代码中查看整个DockerFile。
第4步:泊坞窗组成 (Step 4: docker-compose)
Docker compose tool helps us to define containers of multi-container applications and start/stop/scale-up or down with a single command.
Docker compose工具可帮助我们定义多容器应用程序的容器,并使用单个命令启动/停止/放大或缩小。
We define all the needed docker images in this yaml file. When instantiated, docker-compose creates a bridge network. Instances of these images can communicate over this network to each other.
我们在此yaml文件中定义所有需要的docker映像。 实例化后,docker-compose将创建一个桥接网络。 这些映像的实例可以通过此网络相互通信。
When I give command docker-compose up -d , docker-compose will start instances of each of the defined docker image.
当我给命令docker-compose up -d ,docker-compose将启动每个定义的docker映像的实例。
Docker compose adds all these instances in a single network. Any instance inside the docker machine can reach to another using its container name e.g. consul container can be reached by its name : ‘consul’ .
Docker compose将所有这些实例添加到单个网络中。 docker计算机内部的任何实例都可以使用其容器名称访问另一个实例,例如consul容器可以通过其名称访问:'consul'。
Since we don’t need any custom behavior for consul, we use prebuilt consul dockerhub image.
由于领事不需要任何自定义行为,因此我们使用预构建的领事dockerhub映像。
For NGINX and consul, we expose ports 8080 and 8500 respectively to the host machine. So, I will be able to access NGINX using <Docker-Machine-IP>:8080 and consul using<Docker-Machine-IP>:8500 port from my machine when I start these instances on my machine.
对于NGINX和领事,我们分别向主机公开端口8080和8500。 因此,当我在机器上启动这些实例时,我将能够使用<Docker-Machine-IP>:8080访问NGINX,并使用<Docker-Machine-IP>:8500端口从Consul进行咨询。
运行代码 (Run the code)
1.构建Docker映像 (1. Build docker images)
We need to build 4 docker images. I have explained how to build docker images for three spring boot services. Fourth is NGINX. Go into ‘nginx’ folder to build the docker image.
我们需要构建4个docker映像。 我已经解释了如何为三个spring boot服务构建docker镜像。 第四是NGINX。 进入'nginx'文件夹以构建docker镜像。
docker build -t nginx .
docker build -t nginx .
You can see the nginx image in the list of locally available images using
您可以使用以下方法在本地可用图像列表中查看nginx图像:
docker images
docker images
2.运行docker-compose (2. Run docker-compose)
Set the HOST_IP env variable needed for this app.
设置此应用程序所需的HOST_IP env变量。
export HOST_IP=192.168.99.100
export HOST_IP=192.168.99.100
Run docker-compose
运行docker-compose
$ docker-compose up -d
Creating network "microservices_default" with the default driver
Creating consul                    ... done
Creating microservices_ecommerce_1 ... done
Creating microservices_images_1    ... done
Creating microservices_product_1   ... done
Creating nginx                     ... done
The network name will be created using the root folder name, which is ‘microservices’ in this case. We can see that all the instances are up. The three microservices will also start up once their docker container is created.
网络名称将使用根文件夹名称创建,在本例中为“微服务”。 我们可以看到所有实例都启动了。 一旦创建了它们的docker容器,这三个微服务也将启动。
3.查看正在启动的应用程序 (3. See the applications starting up)
The stderr and stdout logs of the processes(i.e. services) running in containers are collected by docker engine and sent to the logging driver. Here, we can see the logs of applications starting up using command
Docker引擎收集在容器中运行的进程(即服务)的stderr和stdout日志,并将其发送到日志记录驱动程序。 在这里,我们可以看到使用命令启动的应用程序日志
docker logs <container-id>Container Id of all running containers can be seen using docker ps command. I can see the logs of product service as below using product service container ID.
使用docker ps命令可以查看所有正在运行的容器的容器ID。 我可以使用产品服务容器ID来查看产品服务的日志,如下所示。
$ docker logs d1ce47bd63a2
2020-05-17 05:40:34.322  INFO [productApp,,,] 1 --- [           main] trationDelegate$BeanPostProcessorChecker : Bean 'org.springframework.cloud.autoconfigure.ConfigurationPropertiesRebinderAutoConfiguration' of type [org.springframework.cloud.autoconfigure.ConfigurationPropertiesRebinderAutoConfiguration$$EnhancerBySpringCGLIB$$be908dae] is not eligible for getting processed by all BeanPostProcessors (for example: not eligible for auto-proxying).   ____          _            __ _ _
 /\\ / ___'_ __ _ _(_)_ __  __ _ \ \ \ \
( ( )\___ | '_ | '_| | '_ \/ _` | \ \ \ \
 \\/  ___)| |_)| | | | | || (_| |  ) ) ) )
  '  |____| .__|_| |_|_| |_\__, | / / / /
 =========|_|==============|___/=/_/_/_/
 :: Spring Boot ::        (v2.1.8.RELEASE)2020-05-17 05:40:39.116  INFO [productApp,,,] 1 --- [           main] c.a.m.product.ProductApplication         : No active profile set, falling back to default profiles: default
2020-05-17 05:41:02.711  INFO [productApp,,,] 1 --- [           main] .s.d.r.c.RepositoryConfigurationDelegate : Bootstrapping Spring Data repositories in DEFAULT mode.
2020-05-17 05:41:04.358  INFO [productApp,,,] 1 --- [           main] .s.d.r.c.RepositoryConfigurationDelegate : Finished Spring Data repository scanning in 1442ms. Found 1 repository interfaces.
Once the services startup, consul service registry will be updated with their entries. Consul-template will update this info and reload NGINX configuration. We can verify this by checking the NGINX configuration.
服务启动后,领事服务注册表将使用其条目进行更新。 领事模板将更新此信息并重新加载NGINX配置。 我们可以通过检查NGINX配置来验证这一点。
检查NGINX (Check NGINX)
First, see the NGINX status using command service nginx status
首先,使用命令service nginx status查看NGINX service nginx status
This command needs to be executed inside the container having NGINX . We can do this by using docker exec <container-name> <command>
该命令需要在具有NGINX的容器内执行。 我们可以使用docker exec <container-name> <command>
$ docker exec nginx service nginx status
nginx is running.
We can also check the NGINX configuration status.
我们还可以检查NGINX的配置状态。
$ docker exec nginx nginx -t
nginx: the configuration file /etc/nginx/nginx.conf syntax is ok
nginx: configuration file /etc/nginx/nginx.conf test is successful
See NGINX configuration (-t just validates the configuration. -T validates and prints the configuration).
请参阅NGINX配置(-t仅验证配置。-T验证并打印配置)。
$ docker exec nginx nginx -T
nginx: the configuration file /etc/nginx/nginx.conf syntax is ok
nginx: configuration file /etc/nginx/nginx.conf test is successful
# configuration file /etc/nginx/nginx.conf:user  nginx;
worker_processes  1;
<more content FROM nginx.conf hidden>
# configuration file /etc/nginx/conf.d/app.conf:upstream consul {
    zone upstream-consul 64k;
    least_conn;
    server 192.168.99.100:8300 max_fails=3 fail_timeout=60 weight=1;}
upstream ecommerceApp {
<more content from app.conf hidden>    location /ecommerceApp {
        proxy_pass http://ecommerceApp;
        rewrite ^/ecommerceApp/(.*)$ /$1 break;
    }    location /imageApp {
        proxy_pass http://imageApp;
        rewrite ^/imageApp/(.*)$ /$1 break;
    }    location /productApp {
        proxy_pass http://productApp;
        rewrite ^/productApp/(.*)$ /$1 break;
    }
4.查看正在运行的应用程序! (4. See the application in action !)
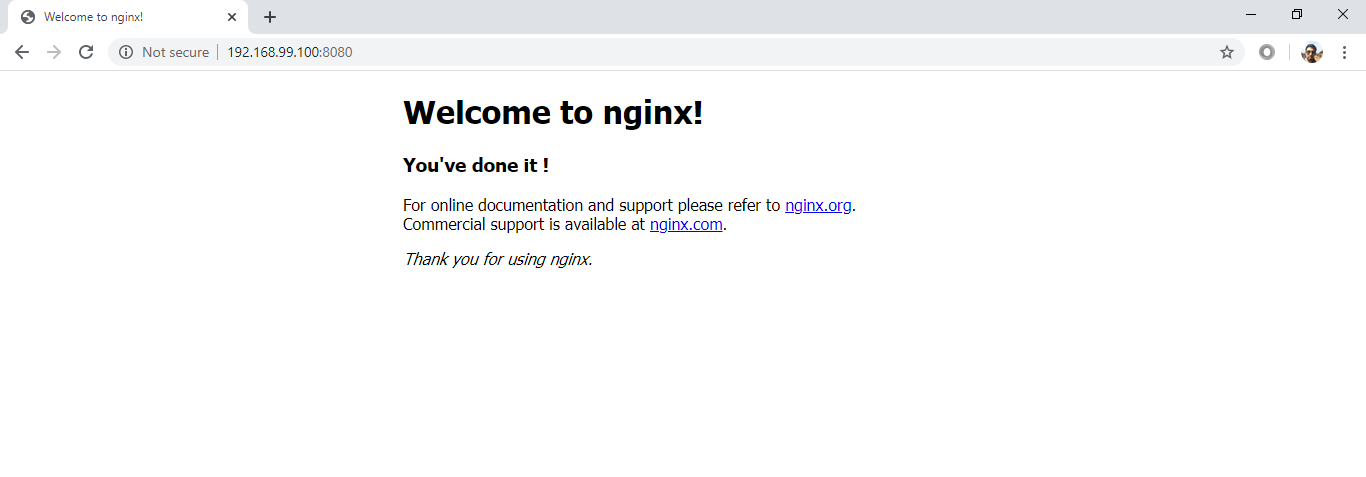
NGINX
NGINX
We have exposed port 8080 for NGINX . We can see the static welcome page by hitting http://192.168.99.100:8080/
我们为NGINX公开了端口8080。 我们可以通过点击http://192.168.99.100:8080/来看到静态欢迎页面
Services
服务
Now, let‘s see NGINX working as an API gateway. We can see in NGINX configuration that below URLs are enabled.
现在,让我们看看NGINX作为API网关。 我们可以在NGINX配置中看到以下URL已启用。
/ecommerceApp , /imageApp , /productApp
/ eCommerceApp,/ imageApp,/ productApp
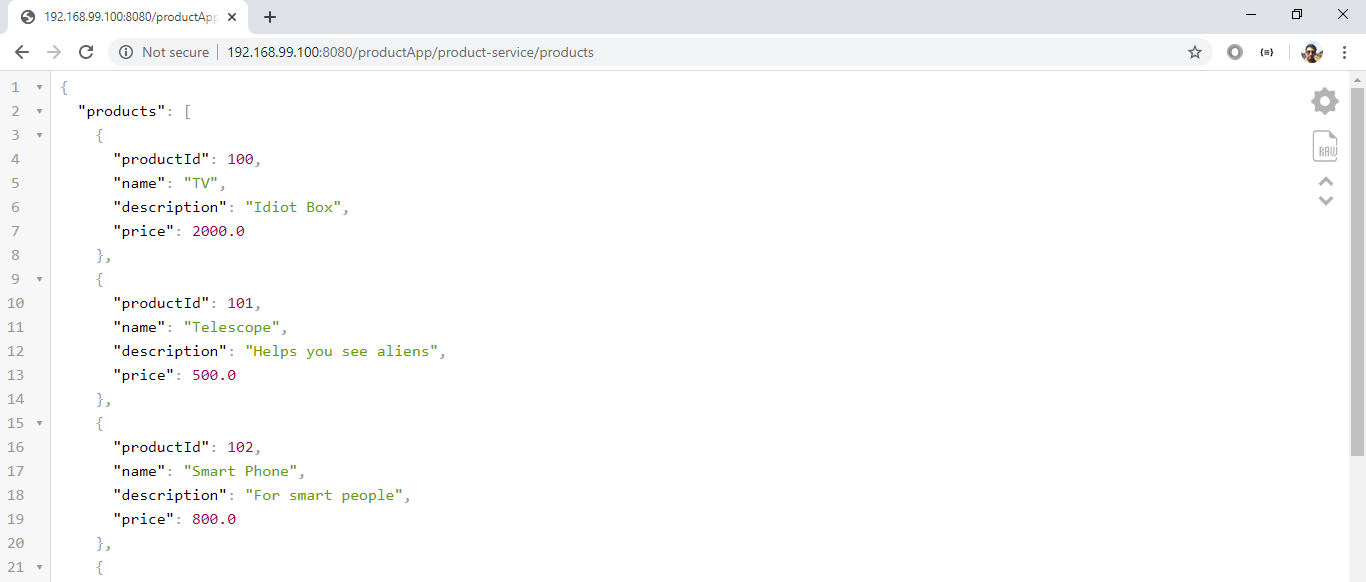
So, we can access respective services through NGINX api gateway.
因此,我们可以通过NGINX api网关访问相应的服务。
http://192.168.99.100:8080/ecommerceApp/ecommerce-service/ecommerceProductshttp://192.168.99.100:8080/imageApp/image-service/imageshttp://192.168.99.100:8080/productApp/product-service/products
http://192.168.99.100:8080/ecommerceApp/电子商务服务/电子商务产品http://192.168.99.100:8080/imageApp/图像服务/图像http://192.168.99.100:8080/productApp/product-service/products
You will see the respective JSON responses.
您将看到相应的JSON响应。
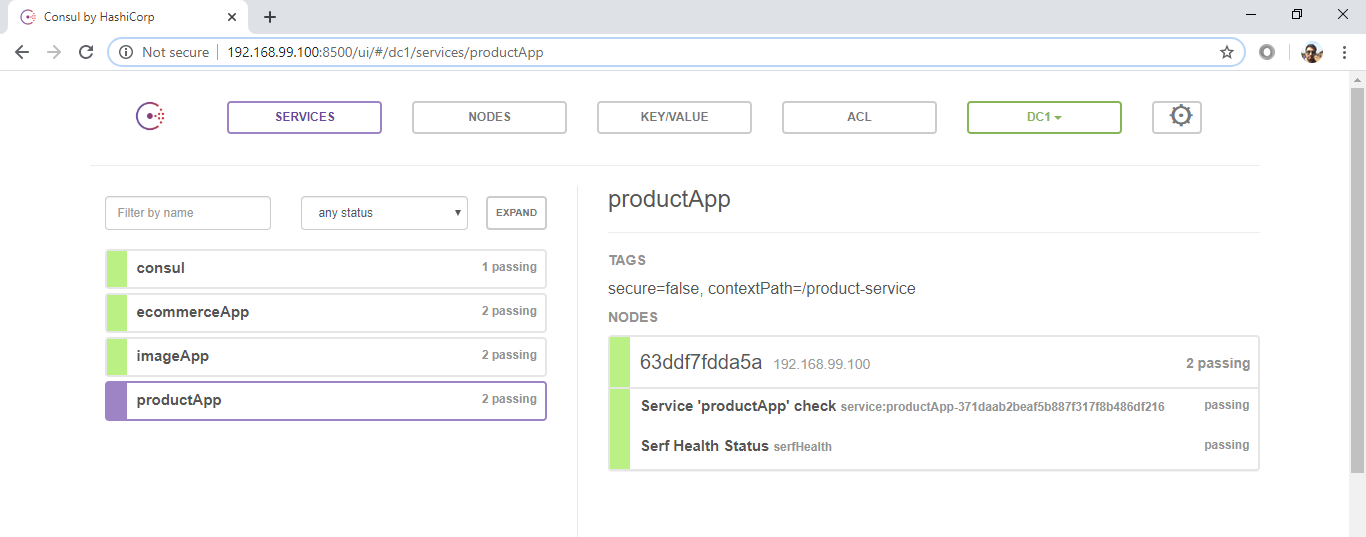
Consul
领事
We have also opened up consul on port 8500 via docker-compose.yml file.
我们还通过docker-compose.yml文件在端口8500上打开了领事。
We can see the consul UI using http://192.168.99.100:8500/
我们可以使用http://192.168.99.100:8500/查看领事UI
5.将访问权限限制为仅电子商务应用程序 (5. Limit the access to only ecommerce app)
Now, we want only ecommerce service to be accessible from outside NGINX. For this, we filter out that service in our nginx/nginx.conf file that is used by consul-template.
现在,我们只希望从NGINX外部可以访问电子商务服务。 为此,我们在consul-template使用的nginx / nginx.conf文件中过滤了该服务。
{{range services}} {{$name := .Name}}
    {{ if  eq .Name "ecommerceApp" }}
      location /{{$name}} {
           proxy_pass http://{{$name}};
           rewrite ^/{{$name}}/(.*)$ /$1 break;
      }
 {{end}}
{{end}}
We rebuild nginx image and restart that container. Now, only the url of ecommerce service will be seen in NGINX configuration ‘location’.
我们重建nginx映像并重新启动该容器。 现在,在NGINX配置“位置”中只能看到电子商务服务的url。
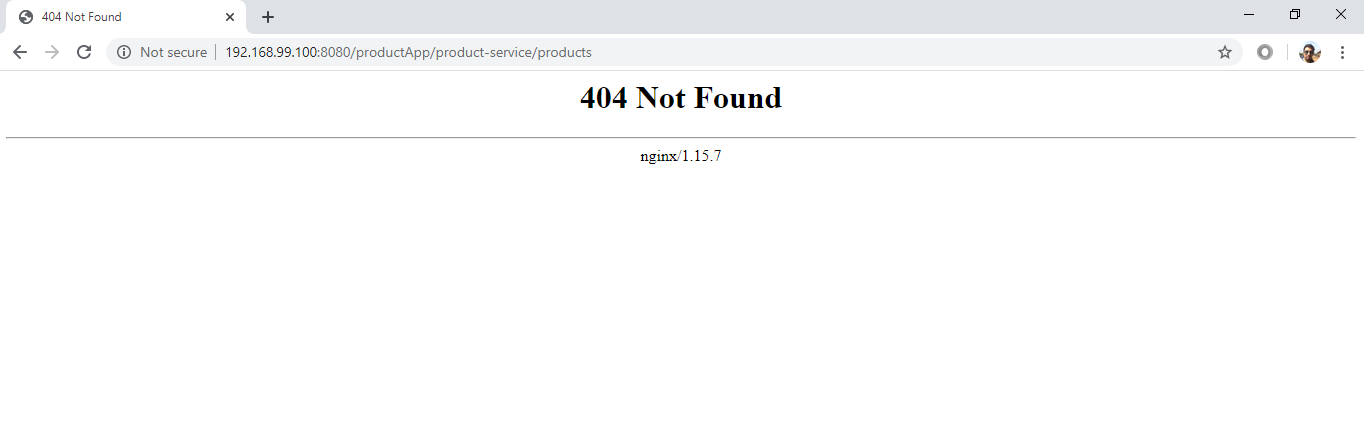
If you open http://192.168.99.100:8080/productApp/product-service/products , you will get a 404 response from NGINX.
如果您打开http://192.168.99.100:8080/productApp/product-service/products,您将收到NGINX的404响应。
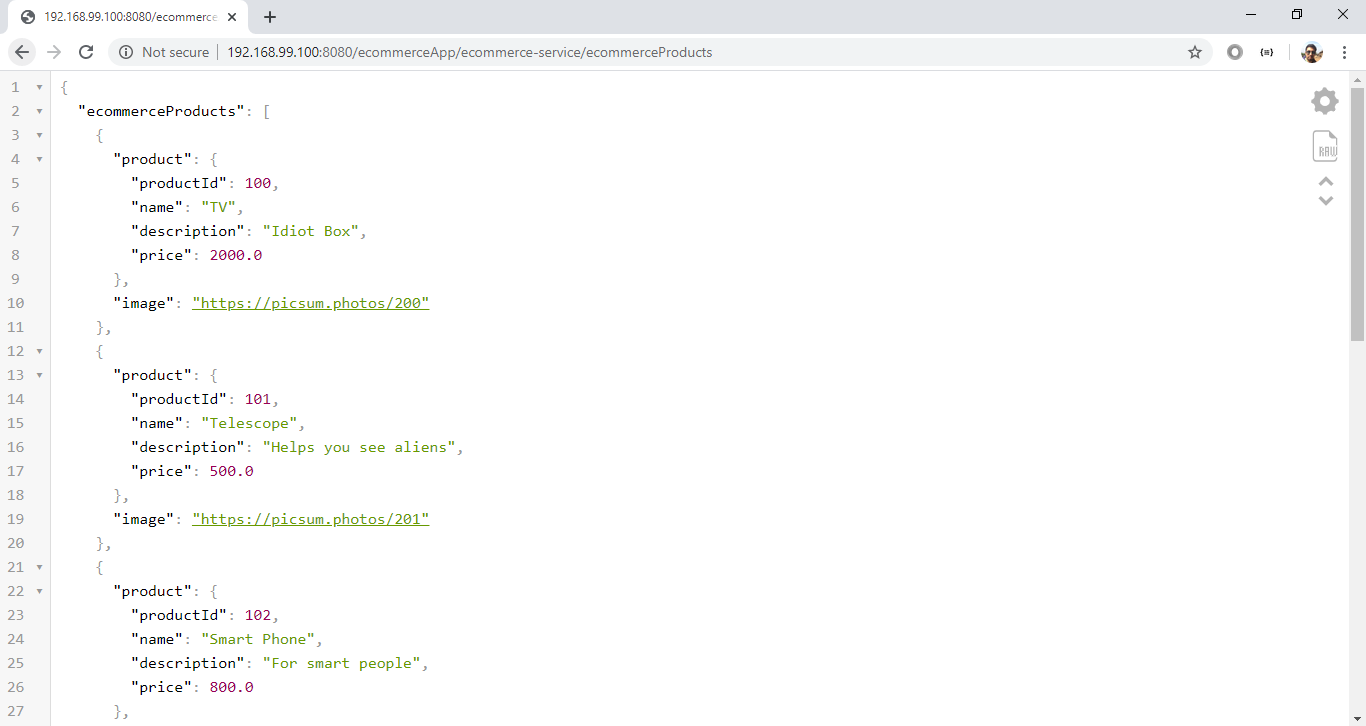
Whereas you will still be able to access ecommerce service, which is able to aggregate data from product and image services and respond back correctly.
而您仍然可以访问电子商务服务,该服务可以聚合来自产品和图像服务的数据并正确地进行回复。
http://192.168.99.100:8080/ecommerceApp/ecommerce-service/ecommerceProducts
http://192.168.99.100:8080/ecommerceApp/ecommerce-service/ecommerceProducts
This means the product and image services are accessible by other services inside the docker network, but not to the world outside this docker network.
这意味着产品和映像服务可由docker网络内部的其他服务访问,但不能访问此docker网络外部的世界。
6.扩大规模 (6. Scale-up)
Next, let us scale up the ecommerceService
接下来,让我们扩大ecommerceService
$ docker-compose up -d --scale ecommerce=3
consul is up-to-date
microservices_product_1 is up-to-date
microservices_images_1 is up-to-date
Starting microservices_ecommerce_1 ...
Starting microservices_ecommerce_1 ... done
Creating microservices_ecommerce_2 ... done
Creating microservices_ecommerce_3 ... done
Once the instances of ecommerce spring boot app start up, we can view the updated NGINX configuration. Notice the upstream block for ecommerce, you will see 3 servers now, corresponding to 3 running ecommerce service instances.
一旦电子商务spring boot应用程序实例启动,我们就可以查看更新的NGINX配置。 注意电子商务的上游块,您现在将看到3个服务器 ,对应于3个正在运行的电子商务服务实例。
upstream ecommerceApp {
    zone upstream-ecommerceApp 64k;
    least_conn;
    server 98f5b7ff1c5e:9080 max_fails=3 fail_timeout=60 weight=1;
    server 5b3fe4996ca8:9080 max_fails=3 fail_timeout=60 weight=1;
    server a1a6eb343191:9080 max_fails=3 fail_timeout=60 weight=1;
}
NGINX will load balance the requests, from external clients to ecommerce service, within these three instances.
NGINX将在这三个实例中平衡从外部客户端到电子商务服务的请求。
😎 This concludes part III .
III第三部分到此结束。
接下来的是 (Coming up next)
In next part , we will add following functionalities:
在下一部分中,我们将添加以下功能:
- Tracing 追踪
- Monitoring 监控方式
- Log aggregation 日志汇总
- Circuit breaker 断路器
- Security 安全
I have taken a lot of efforts to explain each component and the code in detail. Let me know your feedback on this.
我已经做了很多努力来详细解释每个组件和代码。 让我知道您对此的反馈。
Note: The contents of this blog are my personal views and do not reflect that of my employer in any way.
注意:此博客的内容是我的个人观点,并不以任何方式反映我雇主的观点。
资源资源 (Resources)
翻译自: https://medium.com/swlh/lets-build-microservices-part-iii-20e9e5c780a0
微服务构建


 1万+
1万+


 被折叠的 条评论
为什么被折叠?
被折叠的 条评论
为什么被折叠?
 到【灌水乐园】发言


