


 本文翻译自Medium,通过SwiftUI,您可以在30分钟内学会如何制作一个应用程序,SwiftUI是苹果推出的强大界面构建工具。
swiftui
This post was first delivered as a live coding presentation at a Telstra Purple Back2Base event, and then at a Junior Developer Code and Tell in October 2019.
该帖子首先在 Telstra Purple Back2Base活动中 以现场编码演示的形式 发布,然后在 2019年10月 的 Junior Developer Code and Tell 中发布。
At Apple’s annual developer conference WWDC in June 2019, Apple announced SwiftUI, a new declarative syntax for quickly creating user interfaces for both iOS, iPad OS and macOS apps. I wanted to get a taste of SwiftUI, in addition to coming up with a solution to a common problem for Melburnians.
在2019年6月的苹果年度开发者大会WWDC上,苹果宣布了SwiftUI,这是一种新的声明性语法,用于快速为iOS,iPad OS和macOS应用程序创建用户界面。 除了提出解决Melburnians常见问题的解决方案外,我还想尝试一下SwiftUI。
To get to work, I need to change trains at Flinders Street Station to get to Southern Cross, a station my train line doesn’t go to. Each morning I arrive at Flinders Street and across the 13 platforms, it's often inconsistent and unpredictable as to where the next Southern Cross train will depart from. So, being a developer, I decided this problem needed an app to solve it.
要开始工作 ,我需要在Flinders Street车站换火车才能到达Southern Cross,这是我的火车无法到达的车站。 每天早晨,我到达弗林德斯街(Flinders Street)并穿越13个站台,下一班南十字星列车的出发地通常都前后不一致且无法预测。 因此,作为一名开发人员,我认为这个问题需要一个应用来解决。
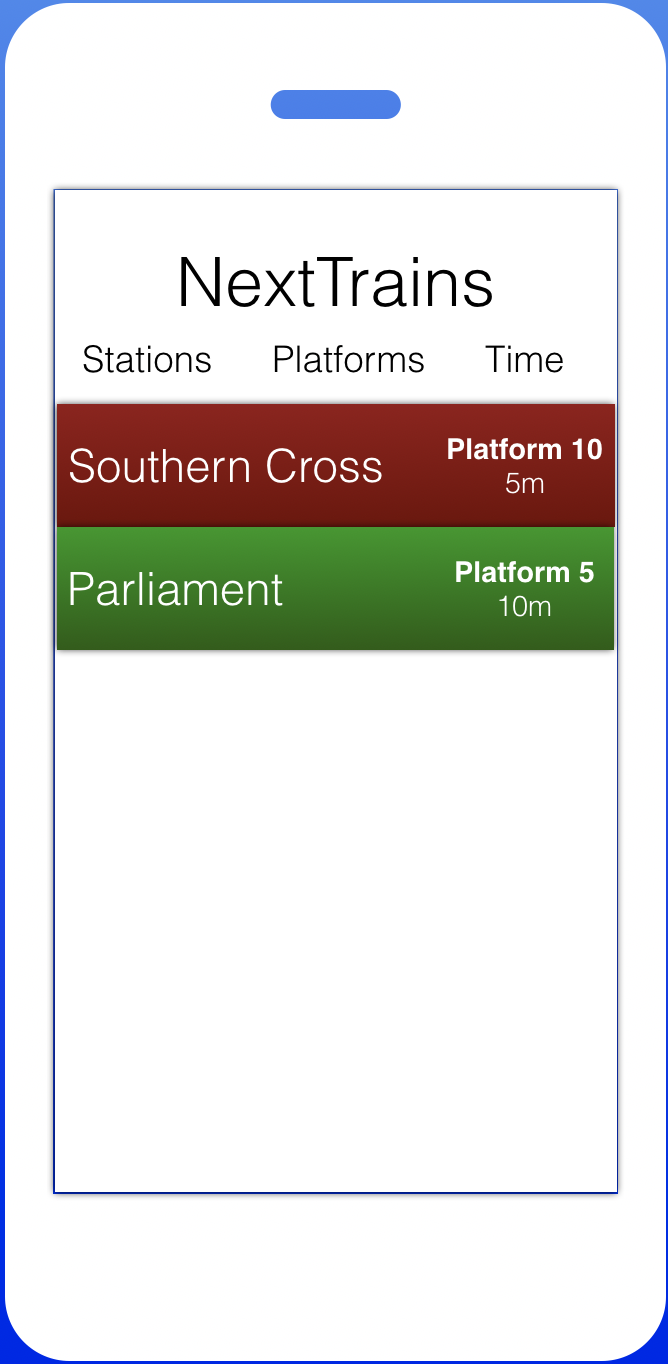
I’ve put all the code for the app on GitHub. Each of the branches corresponds to a section in this article. Here is a mockup of what I want to create:
我已将应用程序的所有代码都放在GitHub上 。 每个分支对应于本文的一个部分。 这是我要创建的模型:
这篇文章将涵盖什么内容? (What will this post cover?)
Don’t worry just yet if you don’t understand any of the concepts in this list. I picked a range of SwiftUI features and worked them into the app, to hopefully give you a good understanding of how to build your own, functional app.
如果您不了解此列表中的任何概念,请不要担心。 我选择了一系列SwiftUI功能并将其应用到应用程序中,希望可以使您更好地了解如何构建自己的功能性应用程序。
- “Hello World” in SwiftUI SwiftUI中的“ Hello World”
- Styling with SwiftUI SwiftUI样式
- Working with stacks 使用堆栈
- Creating subviews 创建子视图
- Using ObservableObject and @Published 使用ObservableObject和@Published
- Using @EnvironmentObject and how the app is structured 使用@EnvironmentObject以及应用程序的结构
- View lifecycle events 查看生命周期事件
- Adding input @Binding 添加输入@Binding
- Using @State with user interaction 在用户交互中使用@State
您需要什么? (What will you need?)
- A Mac, running Xcode 11+ (Xcode 12+ for some features) Mac,运行Xcode 11+(某些功能使用Xcode 12+)
(optional) an iOS or iPad OS device to test your app, running iOS 13+ (iOS 14+ for some features)
(可选)运行iOS 13+(某些功能为iOS 14+ )的iOS或iPad OS设备来测试您的应用程序
1. SwiftUI中的“ Hello World” (1. “Hello World” in SwiftUI)
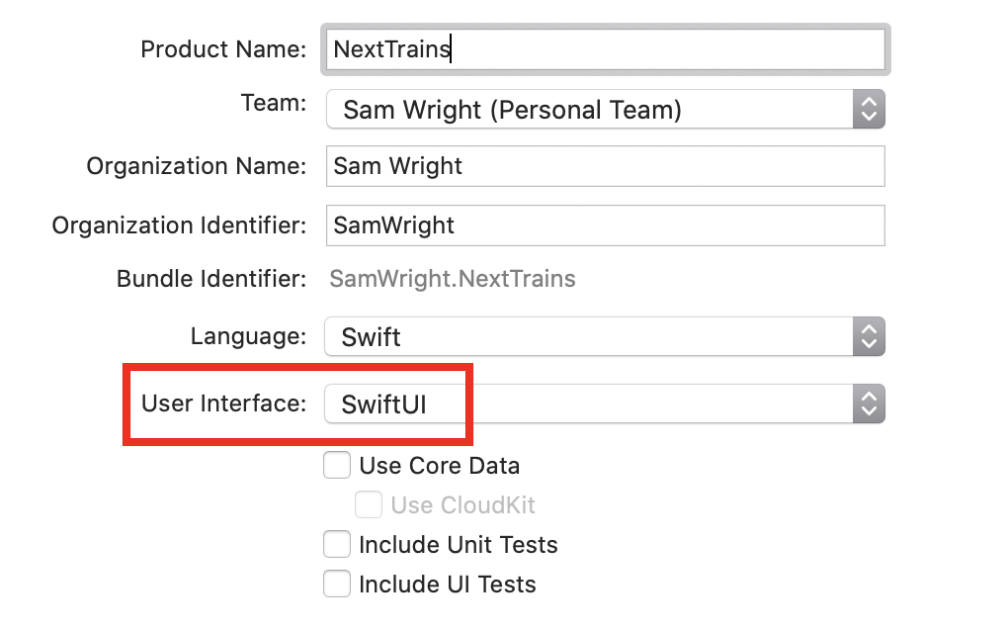
Start by opening Xcode and creating a new Xcode project. In my case, I chose a the Single View App template, and then selected ‘SwiftUI’ as the User Interface.
首先打开Xcode并创建一个新的Xcode项目。 就我而言,我选择了Single View App模板,然后选择“ SwiftUI”作为用户界面。
Later in this tutorial, I take advantage of Google Firebase’s Firestore for data storage. I recommend doing this while your project is still brand new. This guide from Google outlines exactly how to install the framework using CocoaPods. Setting this up is beyond the scope of this tutorial, but if I find a lot of people need assistance with this step I’d be happy to write a follow-up tutorial. Let me know in the comments!
在本教程的后面,我将利用Google Firebase的Firestore进行数据存储。 我建议在您的项目仍是全新项目时执行此操作。 Google的本指南准确概述了如何使用CocoaPods安装框架。 进行设置超出了本教程的范围,但是如果我发现很多人需要此步骤的帮助,我很乐意编写后续教程。 在评论中让我知道!
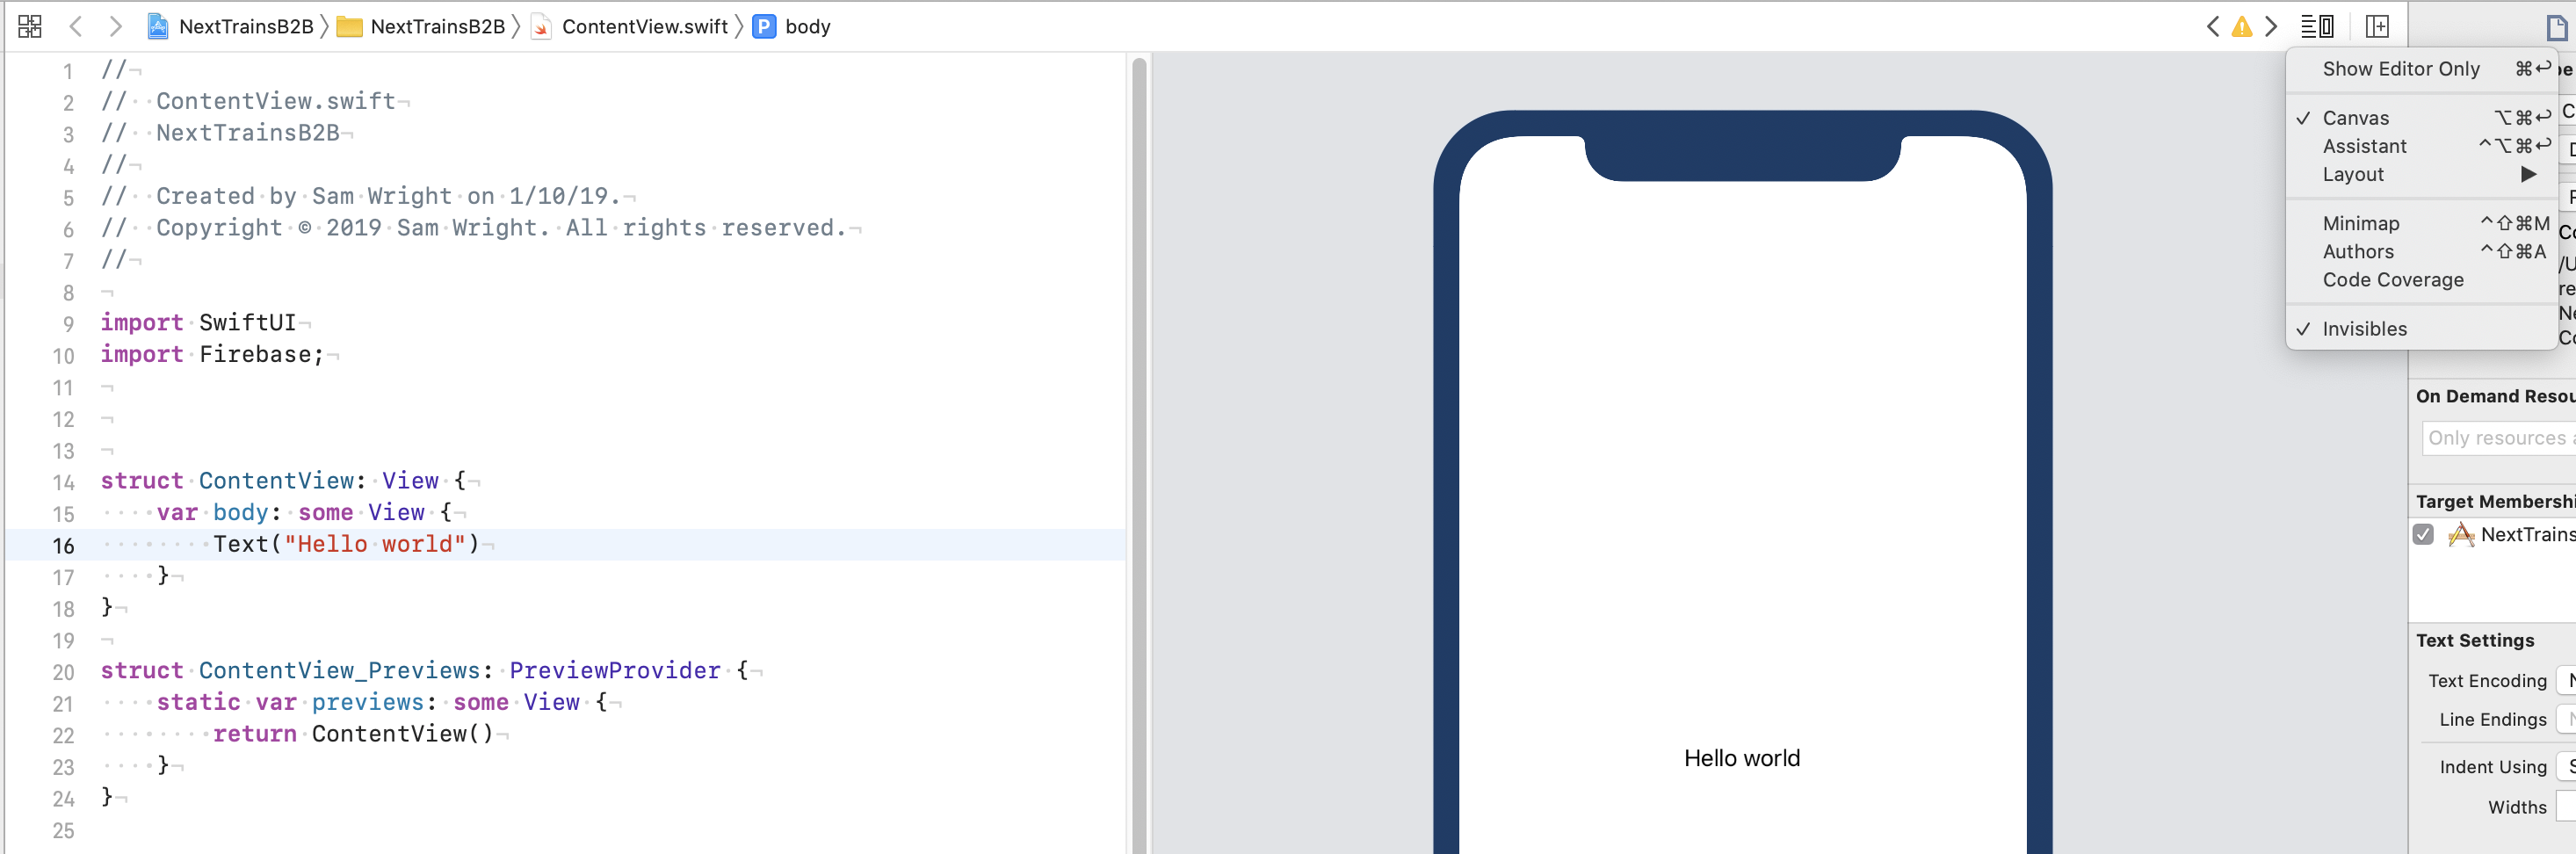
Now that your project has been created, open ContentView.swift if you’re not already in this file. Each View is a struct with a body variable. The value of this body variable is what is rendered for this view.
现在已经创建了项目,如果您尚未在此文件中,请打开ContentView.swift 。 每个视图都是带有body变量的struct 。 此body变量的值是为此视图呈现的内容。
In our case, the value of body is already set to Text("Hello World") . If you run the application (the play button in the top left corner of Xcode), we will see our app with the Hello World text.
在我们的例子中, body的值已经设置为Text("Hello World") 。 如果您运行该应用程序(Xcode左上角的播放按钮),我们将看到带有Hello World文本的应用程序。
The final thing we can set up is the Preview view. This is a feature new to SwiftUI that allows you to see your view in almost real-time, rendered exactly as it would on a real device. Under the hood, this uses Project Catalyst to bring iOS apps to the Mac, but what it means for you is when you are creating a view, you can see how it will really look like, as opposed to a simulation or a graphical mock-up.
我们可以设置的最后一件事是“预览”视图。 这是SwiftUI的新增功能,可让您几乎实时地查看视图,并完全像在真实设备上一样呈现。 在后台,它使用Project Catalyst将iOS应用引入Mac,但对您而言意味着的是创建视图时,您可以看到它的真实外观,而不是模拟或图形模拟,向上。
To take advantage of this feature, in the top right hand corner of your code editor, click the icon with the horizontal lines on the left and the vertical rectangle on the right, and then select ‘Canvas’. Alternatively, you can use the keyboard shortcut option + cmd + enter .
要利用此功能,请在代码编辑器的右上角,单击带有左侧水平线和右侧垂直矩形的图标,然后选择“画布”。 或者,您可以使用键盘快捷键option + cmd + enter 。
You may need to hit ‘Resume’ if there is a message saying ‘Automatic preview updating paused’.
如果显示“自动预览更新已暂停”消息,则可能需要单击“恢复”。
You should now be able to see a live view of your View, and you should see the text update live when you update the code.
现在,您应该可以看到View的实时视图,并且在更新代码时应该可以实时看到文本更新。
2.样式 (2. Styling)
Now that we’ve got some text on the screen, the next logical step for an app in Apple’s ecosystem is applying some design! The way to do this in SwiftUI is to chain methods (named ‘modifiers’) together. Each modifier returns a new view, which a subsequent modifier can then act upon.
现在我们已经在屏幕上显示了一些文本,Apple生态系统中应用程序的下一个逻辑步骤就是应用一些设计! 在SwiftUI中执行此操作的方法是将方法(称为“修饰符”)链接在一起。 每个修改器返回一个新视图,随后的修改器可以对其进行操作。
The first thing I’m going to do is update Hello World to NextTrains , which will be the name of our app. As this is the header, I want to set the font size to be much larger. To do this, we simply chain .font(.largeTitle) to our Text("NextTrains") view.
我要做的第一件事是将Hello World更新为NextTrains ,这将是我们应用程序的名称。 因为这是标题,所以我想将字体设置为更大。 为此,我们只需将.font(.largeTitle)到我们的Text("NextTrains")视图。
Let’s unpack this. When we call .font() on our text view, it returns a new copy of our text view with the new font applied. Then, in the parameters of .font() we are passing in .largeTitle . If you haven’t used Swift before, it gives us this shorthand syntax to call enum values given the parameter of the method matches that type. In this case .font() accepts different font types, so instead of calling Font.largeTitle we can simply input .largeTitle as we know any value is going to be a type of Font.
让我们打开包装。 当我们在文本视图上调用.font()时,它将返回具有新字体的文本视图的新副本。 然后,在.font()的参数中,我们传入.largeTitle 。 如果您以前从未使用过Swift,它会为我们提供这种简化的语法,以在方法参数与该类型匹配的情况下调用枚举值。 在这种情况下, .font()接受不同的字体类型,因此无需调用Font.largeTitle我们只需输入.largeTitle因为我们知道任何值都将是Font的类型。
The next thing I want to do is put this header on a background. We can’t apply a background directly to the text view, so what we need to do is put it in a group. Let’s create a Group { } and then put our text view inside of the curly braces.
我想做的下一件事是将此标头放在背景上。 我们无法将背景直接应用于文本视图,因此我们需要将其放在一个组中。 让我们创建一个Group { } ,然后将我们的文本视图放在花括号内。
Now, we can apply a .background(Color.black) to the group, in the same way that we applied a font to the text view. Once you do this, you’ll find that we can’t see the text because both the text and the background color is black, so lets add .foregroundColor(.white) to the text view. Finally, the text feels a bit cramped in the black background, so lets add some .padding() .
现在,我们可以将.background(Color.black)应用于该组,就像我们将字体应用于文本视图一样。 完成此操作后,您会发现我们看不到该文本,因为文本和背景颜色均为黑色,因此让.foregroundColor(.white)添加到文本视图中。 最后,文本在黑色背景下感觉有些局促,因此让我们添加一些.padding() 。

This is now how our heading in ContentView.swift looks:
现在,这就是我们在ContentView.swift中的标题的样子:
3.使用堆栈 (3. Working with stacks)
The bread and butter of SwiftUI layouts is with stacks, specifically VStack or vertical stack, and HStack or horizontal stack. As the names suggest, a vertical stack aligns objects within it vertically, or on top of one another. On the other hand, a horizontal stack aligns items within it horizontally, or next to each other. The syntax is identical to how we used Group { } in the previous section, except this time we use VStack { } and HStack { } with our views in between the curly braces. By using a combination of vertical and horizontal stacks, we can create almost any layout we can think of.
SwiftUI布局的主要内容是堆栈,特别是VStack或垂直堆栈,以及HStack或水平堆栈。 顾名思义,垂直堆栈将其中的对象垂直对齐或彼此对齐。 另一方面,水平堆栈将其中的项目水平对齐或彼此对齐。 语法与上一节中使用Group { }方式相同,除了这次我们使用VStack { }和HStack { }并将其视图放在花括号之间。 通过使用垂直和水平堆栈的组合,我们可以创建几乎可以想到的任何布局。
I’m going to go ahead and create the layout for the header that we saw in the original mockup. That is, we have the large heading ‘NextTrains’ at the top, and then we have three buttons underneath all on the same line allowing us to sort by either “Stations”, “Platforms” or “Time”.
我将继续为我们在原始模型中看到的标题创建布局。 也就是说,我们在顶部具有大标题“ NextTrains”,然后在同一行的所有下方都有三个按钮,使我们可以按“站”,“平台”或“时间”进行排序。
To add the buttons, I’m going to use the library to find the button view. This is the + button in the top right hand corner of Xcode.
要添加按钮,我将使用库来查找按钮视图。 这是Xcode右上角的+按钮。

We want to open this, find the button and drag three buttons in. We can then change the text of the three buttons to be the three sorting methods: Stations , Platforms and Time .
我们要打开它,找到按钮并拖入三个按钮。然后,我们可以将三个按钮的文本更改为三种排序方法: Stations , Platforms和Time 。
Let’s also group these three buttons into a HStack , as we know we want them to be placed side by side.
让我们还将这三个按钮分组到一个HStack ,因为我们知道我们希望它们并排放置。

Finally, let’s put both this HStack as well as our original heading text into a VStack , so we end up with the heading on top of the three buttons.
最后,让我们将此HStack以及原始标题文本都放入VStack ,因此最终将标题放在三个按钮的顶部。
Now we have a VStack wrapped around both our heading text “NextTrains”, as well as a HStack which itself is wrapped around our three buttons. The HStack ensures our three buttons are placed in the one horizontal row next to each other, while the VStack puts the text on top of the HStack containing the buttons.
现在,我们有一个VStack包裹在标题文本“ NextTrains”周围,还有一个HStack包裹在我们的三个按钮周围。 HStack确保我们的三个按钮彼此HStack放置在一个水平行中,而VStack将文本放在包含按钮的HStack顶部。
I’ve also removed the background and foreground colors, as we want to harness SwiftUI’s ability to adapt to both light and dark modes in iOS. I’ve also removed the padding.
我还删除了背景色和前景色,因为我们想利用SwiftUI的功能来适应iOS中的明暗模式。 我还删除了填充。
4.创建子视图 (4. Creating subviews)
ContentView.swift is now getting quite lengthy, and ContentView isn’t really a very descriptive name for what is essentially a header. Also, if for some reason we wanted two headers, we’d have to copy and paste the code. What we can do is now break our ContentView down into some smaller views, which we can then use within ContentView .
ContentView.swift现在变得相当冗长,而ContentView实际上不是一个本质上是标题的描述性名称。 另外,如果由于某种原因我们想要两个标头,则必须复制并粘贴代码。 现在,我们可以做的是将ContentView分解为一些较小的视图,然后可以在ContentView使用它们。
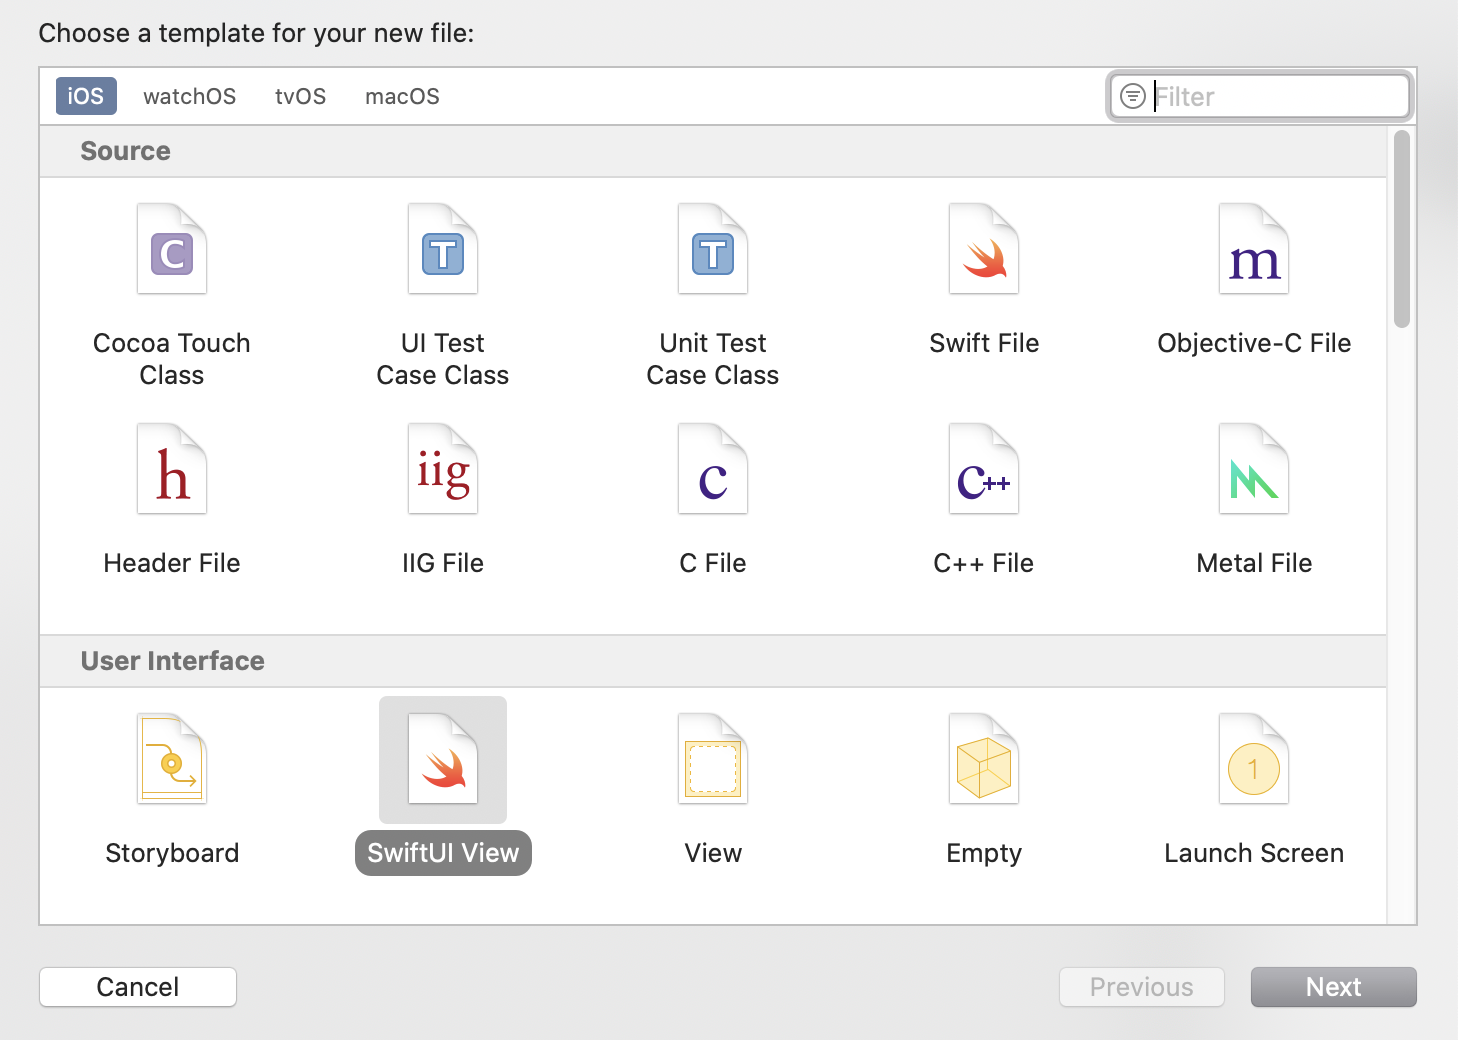
To create a new SwiftUI view, make sure your project navigator is open on the left hand side of Xcode, right click into the folder you want to create the file (probably the same folder that ContentView.swift is in), and click ‘New File…’.
要创建新的SwiftUI视图,请确保您的项目导航器在Xcode的左侧打开,右键单击要创建文件的文件夹(可能与ContentView.swift所在的文件夹相同),然后单击“新建文件…'。

Now, we want to create a new SwiftUI View
现在,我们要创建一个新的SwiftUI视图
Call this new file HeaderView . From here, you will see Xcode has created and opened a new file that looks almost identical to ContentView when it was first created.
将此新文件HeaderView 。 从这里,您将看到Xcode已经创建并打开了一个新文件,该文件看起来与首次创建时的ContentView几乎相同。
We now want to transfer all the code from ContentView through to HeaderView . Copy and paste all the code that is in the body variable in ContentView, and paste it in the body variable of HeaderView . Then, go back to ContentView and replace everything in the body variable with the name of our new view. In this case, replace it with HeaderView().
现在,我们希望将所有代码从ContentView传输到HeaderView 。 复制并粘贴ContentView的body变量中的所有代码,并将其粘贴到HeaderView的body变量中。 然后,返回ContentView并将body变量中的所有内容替换为新视图的名称。 在这种情况下,请将其替换为HeaderView() 。
Your HeaderView.swift in its entirety should now look something like this:
现在,您的HeaderView.swift整体应如下所示:
And, your ContentView.swift in its entirety should now look something like this:
而且,您的ContentView.swift现在应该看起来像这样:
We have now successfully refactored our application to split our big monolithic view into two smaller views. But let’s take this a step further.
现在,我们已经成功地重构了我们的应用程序,从而将整体视图分为两个较小的视图。 但是,让我们更进一步。
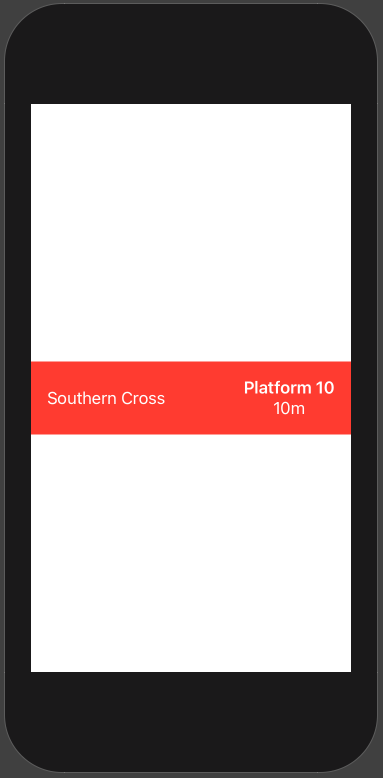
As per our designs, we want to show a list of depatures. So let’s go ahead and create a DepartureView . Create this file, the same way as I explained earlier, and style it however you like. As per the design at the start of the story, I want to have the destination station on the left, and then the platform and minutes til departure on the right.
根据我们的设计,我们想显示一个变形列表。 因此,让我们继续创建DepartureView 。 按照我之前解释的方法创建此文件,然后根据需要设置其样式。 根据故事开始时的设计,我想在左侧保留目标站,然后在右侧保留平台和分钟,直到出发。
Here’s what my preview looks like for DepartureView:
这是DepartureView的预览图:
Looks pretty cool I think.
我觉得看起来很酷。
Let’s go ahead and add it two DepartureView to our main ContentView.swift file so we can get a feel for how our app will look.
让我们继续,将其两个DepartureView添加到我们的主ContentView.swift文件中,以便我们可以了解应用程序的外观。
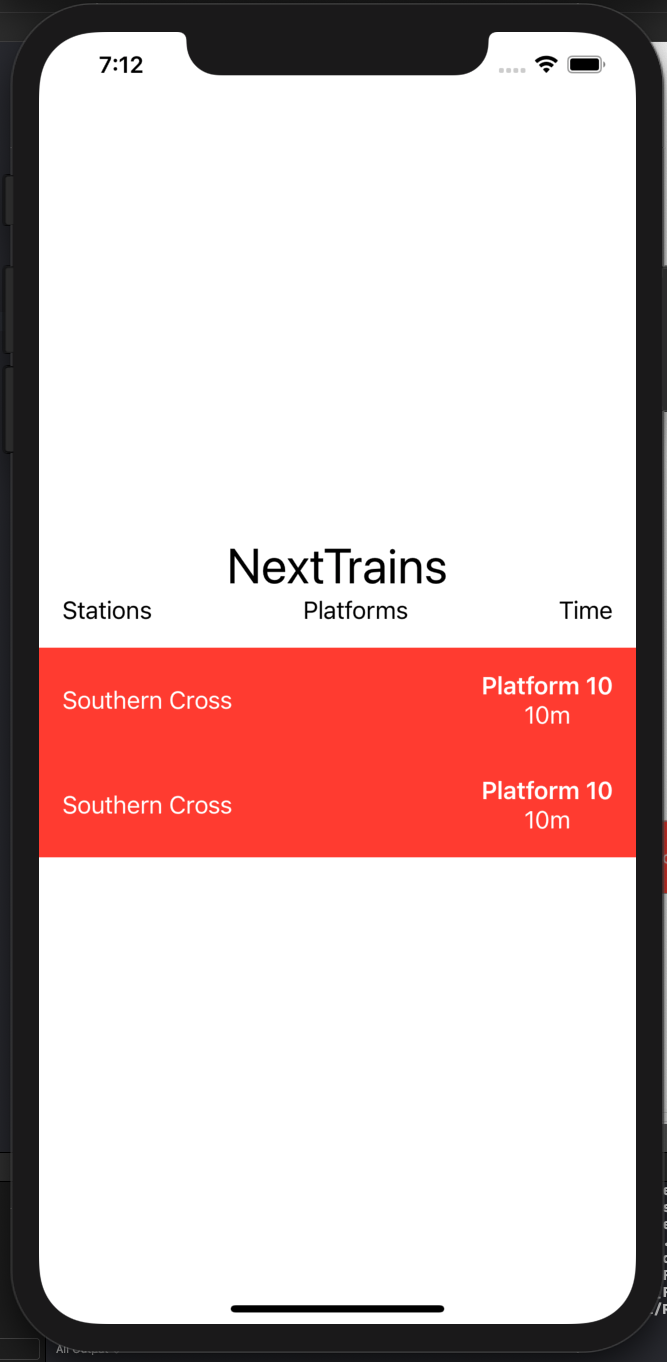
Our app is coming along nicely.
我们的应用程序进展顺利。
5.使用ObservableObject和@Published (5. Using ObservableObject and @Published)
So visually our app looks pretty cool. We have the header, some buttons, which don’t really do anything, and presumably a list of departures.
因此,从视觉上看,我们的应用看起来很酷。 我们有标题,一些按钮,这些按钮实际上并没有执行任何操作,大概还有一个离开列表。
Let’s connect this to some data.
让我们将其连接到一些数据。
I’m going to go ahead and bring some additional code in. It’s not within the scope of this story to talk about data fetching, network requests and databases, and as I want to cover SwiftUI here I’m going to skip over parts.
我将继续介绍其他一些代码。谈论数据获取,网络请求和数据库不在本文的讨论范围之内,在这里我想介绍SwiftUI时,我将跳过部分内容。
I’m going to be bringing in two files, one is the model describing our data structure. The second file is a service used for retrieving this data from our data store.
我将引入两个文件,一个是描述我们的数据结构的模型。 第二个文件是用于从我们的数据存储中检索此数据的服务。
The first file I’m going to be bringing in is Departure.swift . This is our model describing a Departure.
我要输入的第一个文件是Departure.swift 。 这是我们描述出发的模型。
Here is the initial code for Departure.swift :
这是Departure.swift的初始代码:
Each departure has a number of properties associated with it. A dateTime, describing when the train is leaving; platform; minutesTilDeparture, which is how many minutes from now until the departure; stationName; and finally a gradient, which we will use to set a unique background for each destination station.
每个离开都有许多与之关联的属性。 dateTime,描述火车何时出发; 平台; minutesTilDeparture,即从现在到出发的分钟数; 站名; 最后是一个渐变,我们将使用它为每个目标电台设置独特的背景。
DeparturesService.swift is a bit more complex, so I’m just going to show the first 10 or so lines, and omit the implementation of populateDepartures() for brevity.
DeparturesService.swift有点复杂,所以我只显示前十行,为简洁起见,省略了populateDepartures()实现。
Basically, this file is where we store our list of departures, and will be where we fetch our data.
基本上,此文件是我们存储出发清单的位置,也是我们获取数据的位置。
We want our views to know about when DeparturesService receives new data, so the views can reload in order to show updated data to the user. When we first instantiate DeparturesService , the list of departures is empty, so how do we tell the view it is time to reload when the departures list has some data?
我们希望我们的视图知道DeparturesService何时接收新数据,以便可以重新加载视图以向用户显示更新的数据。 当我们第一次实例化DeparturesService , DeparturesService列表为空,那么当离开列表中有一些数据时,如何告诉视图是时候重新加载了呢?
The first thing we need to do is conform our DeparturesService to the protocol ObservableObject . This then enables us to use the property wrapper @Published on our departures variable, which automatically adds some magic to let any view that uses DeparturesService know that any time departures updates, we want to re-render the view, which will force it to use our new data.
我们需要做的第一件事是使DeparturesService符合协议ObservableObject 。 然后,这使我们能够在出发变量上使用属性包装器@Published ,该变量自动添加一些魔力,以使使用DeparturesService任何视图都知道在任何时候departures更新,我们要重新渲染视图,这将迫使它使用我们的新数据。
But, how do we use our new DeparturesService in our view?
但是,我们认为如何使用新的DeparturesService ?
6.使用@EnvironmentObject以及我们的应用程序的结构 (6. Using @EnvironmentObject and how our app is structured)
I want to pause for a second to talk about how our app is structured. When we created our project, Xcode created three files for us:
我想停下来谈一谈我们应用的结构。 当我们创建项目时,Xcode为我们创建了三个文件:
ContentView.swiftwhich we’ve already looked at我们已经看过的
ContentView.swiftAppDelegate.swiftwhich contain methods that run when you open and close your app (and resume it from background etc.)AppDelegate.swift,其中包含在打开和关闭应用程序时运行的方法(并从后台等恢复运行)。SceneDelegate.swiftwhich contains methods that run when you open and close your scene. Some apps on iPad can have multiple scenes, hence the separation betweenAppDelegateandSceneDelegateSceneDelegate.swift,其中包含在打开和关闭场景时运行的方法。 iPad上的某些应用程序可以具有多个场景,因此AppDelegate和SceneDelegate之间是分开的
In iOS 14, you can now use SwiftUI to handle your whole app lifecycle, so you may not have a
SceneDelegate.swift. In this case, you can follow these steps in the struct that conforms to theAppprotocol, usually called<yourAppName>App.swift.在iOS 14中,您现在可以使用SwiftUI处理整个应用程序生命周期,因此您可能没有
SceneDelegate.swift。 在这种情况下,您可以在符合App协议(通常称为<yourAppName>App.swift的结构中执行以下步骤。
The main file I wanted to focus on was SceneDelegate.swift . This is where we instantiate our ContentView , and is where we should instantiate any objects we want to use across the lifetime of our app. In our case, DeparturesService is the perfect candidate for this latter situation.
我要关注的主要文件是SceneDelegate.swift 。 这是我们实例化ContentView ,也是我们应该实例化应用程序生命周期中要使用的所有对象的地方。 在我们的案例中, DeparturesService是后一种情况的理想选择。
What we want to do is instantiate DeparturesService , and then pass it to our ContentView so it is available across the whole app. We’re going to be taking advantage of another SwiftUI feature called @EnvironmentObject , which allows us to use our object in any child view across the app.
我们要做的是实例化DeparturesService ,然后将其传递到我们的ContentView以便在整个应用程序中都可用。 我们将利用另一个名为@EnvironmentObject SwiftUI功能,该功能允许我们在应用程序的任何子视图中使用我们的对象。
In SceneDelegate.swift , let’s instantiate DeparturesService , and then let’s attach it to ContentView as an environmentObject . Because ContentView is the root/parent view to all other views, our DeparturesService will be available across the whole app. Bear in mind, only classes that conform to ObservableObject can be an environmentObject .
在SceneDelegate.swift ,我们实例化DeparturesService ,然后将其作为environmentObject附加到ContentView 。 因为ContentView是所有其他视图的根/父视图,所以我们的DeparturesService将在整个应用程序中可用。 请记住,只有符合ObservableObject类才可以是environmentObject 。
Here is the willConnectTo method within SceneDelegate . You’ll see I’ve modified lines 9 and 10 to attach our new environment object.
这里是willConnectTo内的方法SceneDelegate 。 您会看到我修改了第9行和第10行以附加新的环境对象。
But, how do we actually use the environment object? Let’s head into our ContentView again and take a look.
但是,我们实际上如何使用环境对象? 让我们再次进入ContentView并进行查看。
So, I’ve made two changes to this file.
因此,我对该文件进行了两项更改。
On line 2, I’ve added a property called departuresService of type DeparturesService , and given it the property wrapper @EnvironmentObject . Notice I’m not instantiating DeparturesService , as we just did that the one time in SceneDelegate . Instead, the @EnvironmentObject property wrapper will check in the environment for any objects with the type of the variable (in this case, DeparturesService ) and allow us to use it.
在第2行 ,我添加了一个所谓的财产departuresService型DeparturesService ,并赋予它的包装财产@EnvironmentObject 。 注意,我没有实例化DeparturesService ,因为我们只是在SceneDelegate中进行了一次实例化。 相反, @EnvironmentObject属性包装器将在环境中检查具有变量类型(在本例中为DeparturesService )的任何对象,并允许我们使用它。
There are two important things to note:1. Because EnvironmentObject looks within the environment to find any objects of the type you’ve specified, you can only ever create one EnvironmentObject per type. You can’t add multiple EnvironmentObject of the same type.
有两个重要的注意事项:1。 由于EnvironmentObject在环境中查找以查找您指定类型的任何对象,因此每种类型只能创建一个EnvironmentObject 。 您不能添加相同类型的多个EnvironmentObject 。
2. EnvironmentObject works at run-time, meaning if you haven’t previously defined it, and then you go to access it within a view and it doesn’t exist, your app will crash. Xcode won’t give you any errors when you’re writing the code if it doesn’t exist yet, so make sure you know the object is there in all circumstances before you go to use it.
2. EnvironmentObject在运行时起作用,这意味着如果您之前未定义它,然后在视图中访问它并且它不存在,则您的应用程序将崩溃。 如果尚不存在,则Xcode在编写代码时不会给您任何错误,因此在使用它之前,请确保在所有情况下都知道该对象存在。
The other change I made to the file is on lines 7–9. Because we now have DeparturesService available to us, we can go ahead and create a ForEach loop on the list of departures, to create a DepartureView for each of the departures. This will create as many DepartureViews as there are departures in the list. Bear in mind, this is just our view with dummy data — we’re not showing any real data yet.
我对该文件所做的另一处更改是在第7–9行上 。 因为我们现在可以使用DeparturesService了,所以我们可以继续在出发清单上创建一个ForEach循环,为每个DepartureView创建一个DepartureView 。 这将创建与列表中的出发点一样多的DepartureView 。 请记住,这只是我们对虚拟数据的看法-我们尚未显示任何真实数据。
There is one other way we can use
DeparturesServiceif we didn’t want it to be accessible by default to all our views, and instead we wanted to explicitly pass it from view to view. That is through the use ofStateObject, which is new in iOS 14. Essentially instead of what was on line 2, we would replace@EnvironmentObjectwith@StateObject, and we would actually instantiateDeparturesService()right there at the end of the line. If you’d like to learn more about StateObject, take a look at Apple’s documentation如果我们不希望默认情况下所有视图都可以访问
DeparturesService则可以使用另一种方法,而我们希望在视图之间显式传递它。 这是通过使用iOS 14中新增的StateObject,本质上是用@StateObject替换@EnvironmentObject而不是第2行的@StateObject,并实际上在该行的末尾实例化DeparturesService()。 如果您想了解有关StateObject的更多信息,请查看Apple的文档。
7.查看生命周期事件 (7. View lifecycle events)
Next up, we want to actually call our function which will fetch the data and populate our departures list. Fortunately, SwiftUI provides a number of lifecycle events that allow us to respond to different events.
接下来,我们要实际调用函数,该函数将获取数据并填充出发列表。 幸运的是,SwiftUI提供了许多生命周期事件,使我们能够响应不同的事件。
The one we are going to be using is onAppear . This allows us to call some code whenever the view comes onto the user’s screen, which is the perfect time to load our data. Let’s go ahead and add that to our view.
我们将要使用的是onAppear 。 这样,只要视图出现在用户屏幕上,我们就可以调用一些代码,这是加载数据的最佳时机。 让我们继续将其添加到我们的视图中。
You’ll notice on line 9 I’ve added the onAppear event, which calls our fetch function from our departuresService .
你会发现在第9行我已经添加了onAppear事件,该事件我们从我们的抓取功能departuresService 。
The eagle-eyed among you will also notice I added a ScrollView around our ForEach that we defined in the last step. This will allow our departures list to scroll when there are too many elements to fit on the screen at once.
你们当中鹰眼的人还会注意到,我在最后一步中定义的ForEach周围添加了一个ScrollView 。 当元素过多而无法同时显示在屏幕上时,这将允许我们的出发列表滚动。
I’d recommend taking a look at some of the other events (list at the bottom of that page). There is
onDisappear,onChange,onTapGestureand many, many more.我建议您看一下其他一些事件 (该页面底部的列表)。 有
onDisappear,onChange,onTapGesture等等。
8.添加视图属性和预览 (8. Add view properties & a glimpse at previews)
Sam, we’ve got all these departure views, but no data! Where’s the data!
山姆,我们有所有这些离开的视图,但没有数据! 数据在哪里!
I hear you. Let’s go ahead and get those departures showing up.
我听到你了 让我们继续前进,显示那些离别。
Open up DepartureView.swift and add a departure property to the top of the view (see line 4). If you only specify the type and don't initialise the property, SwiftUI will automatically create an initialiser for the view with that property. Pretty neat.
打开DepartureView.swift并在视图顶部添加一个走出属性(请参见第4行 )。 如果仅指定类型而不初始化属性,SwiftUI将使用该属性为视图自动创建一个初始化程序。 漂亮整齐。
Initialise? Huh? Initialise or init is when you create the view (or any kind of “thing” in a coding language). Often it needs some data in order to be created.
我空手道? ?? 初始化或初始化是在创建视图(或使用编码语言的任何类型的“事物”)时进行的。 通常,它需要一些数据才能创建。
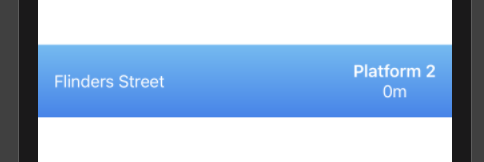
As you’ll see on line 8, line 11, line 12 and line 14, I’ve replaced existing dummy text with actual values from a Departure . Interestingly, on line 14, I’m actually passing in an entire LinearGradient to the background property.
正如您将在第8行,第11行,第12行和第14行中看到的那样,我已将现有的虚拟文本替换为Departure实际值。 有趣的是,在第14行上 ,我实际上是将整个LinearGradient传递给background属性。
预览提供者 (Preview Provider)
On lines 18–22 we have the definition of our PreviewProvider . I realise I haven’t fully explained this code. The PreviewProvider is entirely for us the developers to use to see how our view looks on the right hand side. Remember the preview window we opened earlier? It looks to the preview code to determine what to display.
在第18-22行,我们定义了PreviewProvider 。 我意识到我还没有完全解释这段代码。 PreviewProvider完全供开发人员使用,以在右侧查看我们的视图。 还记得我们之前打开的预览窗口吗? 它查看预览代码以确定要显示的内容。
The reason we have the PreviewProvider and the preview window doesn’t just try to render our view, is our view can often require additional properties given by parent elements that it doesn’t have when we render it standalone. For example, in our DepartureView , it now has the property departure which requires a Departure to be passed in in order to render the component. Think about it — if we didn’t pass this in, what would the component render in the spaces where we want to show the station name, platform and minutes til departure. It wouldn’t — it would just crash as they are empty.
我们拥有PreviewProvider和预览窗口不仅尝试呈现视图的原因是,我们的视图通常需要由父元素提供的其他属性,而当我们独立呈现时,该属性没有它。 例如,在我们的DepartureView ,它现在具有属性departure ,该属性需要传递Departure才能呈现组件。 考虑一下-如果我们不传递此信息,该组件将在我们想要显示站名,站台和离站时间的空间中呈现什么。 不会-它会因为它们为空而崩溃。
So the way Swift gets around this is allowing us to decide how our view is instantiated. This means we can pass in mock data to the preview, to see how our view is rendered, without that ever affecting our actual app.
因此,Swift解决此问题的方式使我们能够决定如何实例化视图。 这意味着我们可以将模拟数据传递给预览,以查看视图的呈现方式,而不会影响实际的应用程序。
This is what I’m doing on line 20, where you can see the implicit departure property has been added to the initialisation of DepartureView() . We need to pass in a Departure to this preview view, so I’ve gone ahead and created some mock data and am passing it in.
这就是我在第20行上所做的事情,您可以在其中看到隐式departure属性已添加到DepartureView()的初始化中。 我们需要将Departure传递到此预览视图,因此我继续进行操作并创建了一些模拟数据,并将其传递进来。
You can customise the view output by the PreviewProvider infinitely. For example, you might want to embed it in a NavigationView to see how it looks, or you might want to render multiple views with different data, to see how your views respond to different data sets (for example, really long text or date edge cases). You can even create multiple PreviewProviders , so you could test your view in both dark mode and light mode, and on different sized devices, all at exactly the same time!
您可以无限地定制PreviewProvider的视图输出。 例如,您可能希望将其嵌入到NavigationView以查看其外观,或者可能希望使用不同的数据呈现多个视图,以查看您的视图如何响应不同的数据集(例如,很长的文本或日期边缘)情况)。 您甚至可以创建多个PreviewProviders ,因此您可以同时在暗模式和亮模式以及不同大小的设备上测试视图!
Anyway, back to our view properties. You’ve already had a glimpse of how to pass variables into views with the PreviewProvider , but let’s make it super clear by passing in the departure from our ContentView .
无论如何,回到我们的视图属性。 您已经了解了如何使用PreviewProvider将变量传递到视图中,但是让我们通过传递与ContentView的不同来使其变得非常清晰。
If you head back into ContentView.swift , you’ll probably notice an error where we’re calling our DepartureView() . That’s because it’s expecting a Departure to be passed into it’s departure property, and at the moment we’re not passing anything in.
如果返回ContentView.swift ,则在调用DepartureView()可能会注意到一个错误。 这是因为它期望将Departure传递到其departure属性中,而目前我们还没有传递任何东西。
As I said before, any property you define without initialising in a view with automatically get added to the init method of the view. In other words, because we haven’t given departure a value in DepartureView (we’ve only said it should be of type Departure ), we must give DepartureView a departure value when creating it — and that’s what this error is saying.
就像我之前说过的那样,您定义而无需在视图中初始化的任何属性都会自动添加到视图的init方法中。 换句话说,因为我们没有在DepartureView给departure值赋值(我们只说它应该是Departure类型),所以在创建它时必须给DepartureView一个departure值-这就是这个错误的意思。
Let’s go ahead and add it in.
让我们继续添加它。
As you can see on line 9 I’ve gone ahead and added the departure from the ForEach to the departure property of DepartureView . That’s it!
正如你可以在网上看到9我已经先行一步,并加入departure从ForEach到departure的财产DepartureView 。 而已!
9.使用状态 (9. Using State)
The final piece of the SwiftUI puzzle is State. State is used for saving small parts of User Interface state — for anything more complex like data relating to the business logic of your app, seek to use ObservableObjects. You’ll have a much easier time scaling ObservableObjects to handle different types of data, and different permutations of the same data. State is for very simple pieces of data, think a string, an integer or a boolean. Nothing more.
SwiftUI难题的最后一部分是状态。 状态用于保存用户界面状态的一小部分-对于更复杂的事情(例如与应用程序的业务逻辑有关的数据),请尝试使用ObservableObjects。 您可以更轻松地缩放ObservableObjects的时间,以处理不同类型的数据以及相同数据的不同排列。 状态用于非常简单的数据,例如字符串,整数或布尔值。 而已。
What we want to use state for is enabling the three buttons we added in our header view, that allow us to sort the departures by either stations, platforms or time.
我们要使用状态的方法是启用在标题视图中添加的三个按钮,这些按钮使我们可以按车站,站台或时间对出发时间进行排序。
The first thing we need to go ahead and do is create our source of truth. Source of truth is a key concept in SwiftUI, and if you watch Apple’s Worldwide Developer Conference videos, you’ll hear them reiterate this concept over and over. They are essentially saying you need to decide upon a single place to store a piece of data, and have everywhere else read off the same piece of data — hence single source of truth.
我们要做的第一件事就是创造我们的真理来源。 事实来源是SwiftUI中的关键概念,如果您观看Apple的全球开发者大会视频,您会听到他们一遍又一遍地重申这一概念。 他们实际上是在说,您需要确定一个位置来存储一条数据,并让其他地方读取同一条数据,因此是唯一的真理来源。
You should never have to try to keep two values in sync, or manually update one value when another one changes. The whole idea of SwiftUI is it is a declarative language, meaning given that the state is X, the view will always look like Y. If you give it the state X which is supposed to call function A to update state B, you’re writing code imperatively, which is not the SwiftUI way of doing things.
您永远不必尝试使两个值保持同步,或者在另一个值更改时手动更新一个值。 SwiftUI的整体思想是一种声明性语言,也就是说,假设状态为X,则视图始终看起来像Y。如果将状态X赋予状态X(该状态应调用函数A来更新状态B),强制性地编写代码,这不是SwiftUI的处理方式。
The declarative way of doing this sorting is saving state indicating which of the three ways we are currently sorting by is, and then the list of departures uses that state to determine how to sort itself. When you click on one of the three buttons, all it does it set the value of this state.
进行此声明的声明方式是保存状态,该状态指示我们当前正在使用的三种排序方法中的哪一种,然后出发清单使用该状态来确定如何对其进行排序。 当您单击三个按钮之一时,它会设置此状态的值。
This is as opposed to the imperative way of doing it, would directly call a sort method on the list of departures as soon as you click a button. There is no way of knowing what sort method we are currently using. This might be fine for a small example like this, but begins to fall down when you’re managing a complex series of events involving user interaction, network activity, push notifications and device events like screen rotation and exiting your app.
这与命令式方法相反,单击按钮后,将直接在出发清单上调用sort方法。 无法知道我们当前正在使用哪种排序方法。 对于像这样的小示例来说,这可能很好,但是当您管理一系列复杂的事件时,包括用户交互,网络活动,推送通知和设备事件(例如屏幕旋转和退出应用程序),这就会开始崩溃。
So let’s go ahead and decide where to put our source of truth. We have three options:
因此,让我们继续前进,并决定将真理的来源放在哪里。 我们有三种选择:
In our
HeaderView. Maybe this makes sense because this is where the buttons are? Not really. If our source of truth is here, how do the list of departures have any idea how to sort themselves?HeaderViewhas no idea about the list of departures. All it has is the title and the three buttons.在我们的
HeaderView。 也许有道理,因为这是按钮所在的位置? 并不是的。 如果我们的真相在这里,那么出发清单怎么知道如何对自己进行排序?HeaderView不知道出发清单。 它只有标题和三个按钮。In our
DepartureView. Maybe this makes sense because this is the data we want to sort? Once again, not really. This is one single departure. We’re not going to be able to understand how all of the departures are listed and in what order from the perspective of one single departure.在我们的
DepartureView。 也许有道理,因为这是我们要排序的数据? 再一次,不是真的。 这是一个单一的离开。 从一个单一的出发点的角度来看,我们将无法理解所有出发点的列出方式和顺序。In our
ContentView. You might have guessed this was the right option. This view contains the departures list, so it will be easy to control how they are sorted. TheContentViewis also the parent ofHeaderView, so we are able to give theHeaderViewa way to change our state, even thoughHeaderViewhas no idea what the state is for, or even what the departures list is. In fact, we don’t even need the departures list to be inContentView. It could be in a different subview. We just selectContentViewas the source of truth because it is the common ancestor of the two components that need to access it,HeaderView, and a theoretical extra subview containing our departures view.在我们的
ContentView。 您可能已经猜到这是正确的选择。 该视图包含出发清单,因此可以轻松控制其排序方式。ContentView还是HeaderView的父HeaderView,因此即使HeaderView不知道状态是什么,甚至出发列表是什么,我们也可以为HeaderView提供一种更改状态的方法。 实际上,我们甚至不需要将出发清单放在ContentView。 它可能在另一个子视图中。 我们只选择ContentView作为事实的来源,因为它是需要访问它的两个组件的共同祖先HeaderView和一个包含我们的离开视图的理论上额外的子视图。
When thinking about where to store your state, always pick the view which contains all other views that require that piece of state. Basically the common ancestor or parent.
在考虑将状态存储在何处时,请始终选择包含所有其他需要该状态的视图的视图。 基本上是共同的祖先或父母。
To actually create the state, we create a property in ContentView like we normally would. I want to use a string to keep track of how we are sorting the list, and I’m going to give it a default value of “stations” as this is how I want to sort this list by default.
为了实际创建状态,我们像往常一样在ContentView创建一个属性。 我想使用一个字符串来跟踪我们如何对列表进行排序,并且我将给它一个默认值“ stations”,因为这是我默认情况下要对该列表进行排序的方式。
Because we are using this value as state, let’s go ahead and mark it with the property wrapper @State . This enables a number of handy features which we will use to allow other (child) views to update this value, and have it be instantly updated in any view which uses this piece of state.
因为我们使用此值作为状态,所以我们继续使用属性包装器@State对其进行标记。 这启用了许多方便的功能,我们将使用这些功能允许其他(子级)视图更新此值,并在使用此状态的任何视图中立即对其进行更新。
I’ve gone ahead and created the state variable on line 3. I’ve also gone ahead and passed it to our HeaderView on line 7. You may be wondering what the $ prefix on our sortedBy variable is on line 7. This is the binding version of sortedBy , and the @State property wrapper gives us this version for free.
我继续并在第3行上创建了state变量。 我也继续将其传递给第7行的HeaderView 。 您可能想知道我们的sortedBy变量上的$前缀在第7行是什么。这是sortedBy的绑定版本,而@State属性包装器免费提供了此版本。
What do I mean by binding? Bear with me for a second, because I’m going to use the word binding a whole bunch of times. Binding is a version of the variable which allows for two-way data binding. This means, if I pass this binding variable to HeaderView and it changes sortedBy to “platforms”, both HeaderView and ContentView will update as they are both bound to sortedBy . In other words, any changes to the binding version of sortedBy will cause any view that uses sortedBy to update.
绑定是什么意思? 请耐心等待一秒钟,因为我将使用捆绑一词来表示很多次。 绑定是变量的一种版本,它允许双向数据绑定。 这意味着,如果我将此绑定变量传递给HeaderView ,并且将sortedBy更改为“ platforms”,则HeaderView和ContentView都将更新,因为它们都绑定到sortedBy 。 换句话说,对sortedBy绑定版本的任何更改都将导致使用sortedBy任何视图更新。
If I didn’t pass in the binding version (denoted by the $ prefix) and updated the variable from HeaderView, this wouldn’t cause an update to ContentView , and our departures wouldn’t sort.
如果我没有传入绑定版本(由$前缀表示)并更新了HeaderView的变量, HeaderView不会导致ContentView的更新,并且我们的出发日期也不会排序。
If you only need to pass data one way, as opposed to two-way data binding with the binding type, you don’t need to use the binding version and you can pass the value down as a regular var. You don’t even need to use
@State如果只需要以一种方式传递数据,而不是使用绑定类型进行双向数据绑定,则不需要使用绑定版本,您可以将值作为常规var向下传递。 您甚至不需要使用
@State
Let’s update HeaderView to interact with our new $sortedBy binding variable, as I think that’ll explain the concept better than I can describe.
让我们更新HeaderView使其与新的$sortedBy绑定变量进行交互,因为我认为这将比我能更好地说明该概念。
The first difference is on line 4, where I’ve added the sortedBy property with the @Binding wrapper. The @Binding wrapper is the other half of the $sortedBy prefix, and is required to take advantage of two way data binding. It lets the parent view (in this case ContentView ) know that this view may try to update the value of the state.
第一个区别是在第4行 ,在该行中 ,我在@Binding包装器中添加了sortedBy属性。 @Binding包装器是$sortedBy前缀的另一半,需要使用双向数据绑定。 它使父视图(在本例中为ContentView )知道该视图可能尝试更新状态的值。
Notice I haven’t instantiated sortedBy . Because it is a bound variable, it assumes it is coming from the view that is creating it. It is not the source of truth, but instead can read and update the source of truth.
注意我还没有实例化sortedBy 。 因为它是一个绑定变量,所以它假定它来自创建它的视图。 它不是真理的源头,而是可以阅读和更新真理的源头。
The second difference is on lines 10, 14 and 18 where we are actually setting the value when the user clicks on the buttons. When we click these buttons, the state sortedBy in ContentView is set. This state has been passed down, from ContentView to here in HeaderView , and now we are updating it, and passing it back up from here in HeaderView up to ContentView .
第二个区别是在第10、14和18行 ,我们实际上是在用户单击按钮时设置值。 当我们单击这些按钮时,将在ContentView中设置为sortedBy状态。 此状态已从ContentView传递到HeaderView此处,现在我们对其进行更新,并将其从HeaderView此处传递回ContentView 。
So now we just need to head back up to ContentView and actually apply the sorting based on the state. For brevity, I’m just going to include the Group that was within ContentView
因此,现在我们只需要回到ContentView并根据状态实际应用排序。 为简便起见,我将包括位于ContentView的Group
Here I am using sortedBy in the if/elseif/else statement to determine which sorting method I apply to the departures list. Notice I don’t need to use the $sortedBy bound version of the variable in the view that creates the variable with @State — only in child views I’ve passed it through to.
在这里,我在if / elseif / else语句中使用sortedBy来确定我对出发清单应用的排序方法。 注意,我不需要在使用@State创建变量的视图中使用变量的$sortedBy绑定版本-仅在将其传递给的子视图中。
And that’s it! We’ve created a full SwiftUI application in a super short period of time. I tried to balance the number of features I showed with not trying to get too technical or in-depth. While this is a very simple app (in fact, Apple rejected it from their app store for not having a broad enough purpose), it shows how quickly you can create an app yourself. I’m sure if you have more than 30 minutes you can create an app that far exceeds Apple’s definition for a useful app.
就是这样! 我们已经在很短的时间内创建了完整的SwiftUI应用程序。 我试图平衡所展示的功能与不尝试过于技术或深入的功能。 尽管这是一个非常简单的应用程序(事实上,苹果公司因其用途不够广泛而拒绝了它的应用商店),但它显示了您自己创建应用程序的速度。 我确定如果您有超过30分钟的时间,则可以创建一个远远超出Apple定义的有用应用的应用。

SwiftUI makes it super easy for anyone to get started creating apps, regardless of whether you’ve been coding for years, or this is the first time picking up a programming language. I hope this story has given you some ideas, and I’d love to see what you end up creating!
SwiftUI使任何人都可以非常轻松地开始创建应用程序,无论您是否已经编码多年,或者这是第一次使用编程语言。 我希望这个故事能给您一些想法,我很想看看您最终创造了什么!
Some great resources for SwiftUI:
SwiftUI的一些重要资源:
翻译自: https://medium.com/swlh/making-an-app-in-30-minutes-with-swiftui-602f15c299d4
swiftui


 被折叠的 条评论
为什么被折叠?
被折叠的 条评论
为什么被折叠?
 到【灌水乐园】发言


