


gke google
Update: 2020年7月25日 Resources with blog source code link
更新 :2020年7月25日资源与博客源代码链接
When deploying a web application, it is preferable to use a name like hello.mycompany.com rather than 34.98.86.241. This requires configuring DNS records when you deploy your web application, which be done with the Kubernetes add-on ExternalDNS.
部署Web应用程序时,最好使用诸如hello.mycompany.com类的名称,而不要使用34.98.86.241 。 这需要在部署Web应用程序时配置DNS记录,这需要使用Kubernetes完成 附加的ExternalDNS 。
This article covers how install configure ExternalDNS to integrate Cloud DNS with Google Kubernetes Engine (GKE), so that you can automatically configure DNS records when deploying web applications. We’ll demonstrate use this facility using these Endpoints:
本文介绍如何安装配置外部DNS 整合Cloud DNS 使用Google Kubernetes Engine ( GKE ),以便在部署Web应用程序时可以自动配置DNS记录。 我们将通过以下端点演示如何使用此功能:
- Service Resource 服务资源
- Ingress Resource 入口资源
以前的文章 (Previous Articles)
服务或入口端点 (Service or Ingress EndPoints)
In a previous article, we covered how to configure endpoints in GKE using either a service resource or an Ingress resource.
在上一篇文章中,我们介绍了如何在GKE中配置端点 使用服务资源或Ingress资源。
使用Cloud SDK进行配置 (Provisioning using Cloud SDK)
使用Terraform进行配置 (Provisioning using Terraform)
先决条件 (Prerequisites)
You will need to setup Google Cloud account and ownership of a registered domain name.
您将需要设置Google Cloud帐户和注册域名的所有权。
工具要求 (Tool Requirements)
Google Cloud SDK that is authorized to your google account.
已授权您的Google帐户使用的Google Cloud SDK 。
Kubectl (pronounced koob-cuttle) is the Kubernetes client command line tool to interaction with the cluster and installing Kubernetes manifests.
Kubectl (发音为koob-cuttle )是Kubernetes客户端命令行工具,用于与集群交互并安装Kubernetes清单。
Helm 3 to install packages called charts on the cluster. Helm charts are essentially packaged Kubernetes manifests templates.
Helm 3在群集上安装称为图表的软件包。 Helm图表本质上是打包的Kubernetes清单模板。
Google Cloud Project和注册域名 (Google Cloud Project and Registered Domain)
You will also need the following requirements.
您还将需要满足以下要求。
registered domain or subdomain in Cloud DNS.
Cloud DNS中的注册域或子域。
For this tutorial we’ll use the following fictional names:
在本教程中,我们将使用以下虚构名称:
Domain:
test.acme.com.域:
test.acme.com.Zone:
acme-test区域:
acme-test
Replace the fictional names in the exercise with values that you have setup in your infrastructure.
用在基础架构中设置的值替换练习中的虚构名称。
测试云DNS (Testing Cloud DNS)
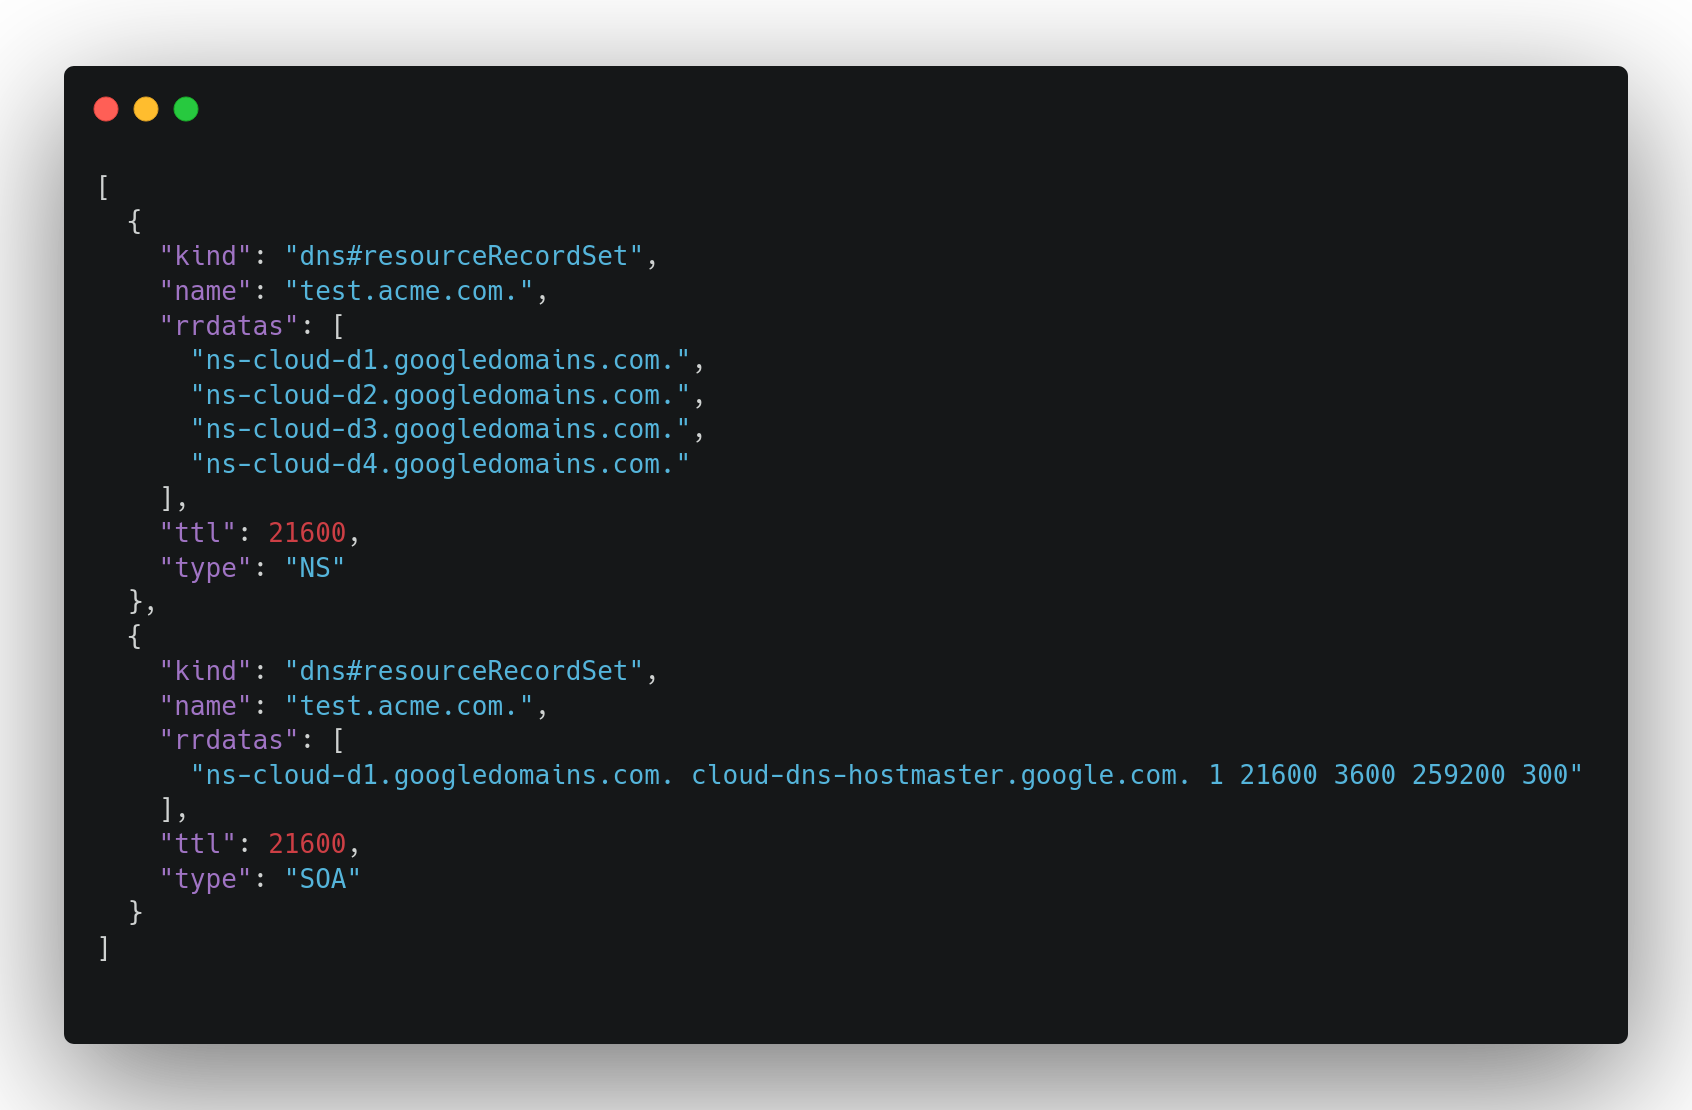
You can use gcloud dns record-sets list to verify you have a name server setup correctly.
您可以使用gcloud dns record-sets list来验证您是否正确设置了名称服务器。
gcloud dns record-sets list \
 --project acme-quality-team \
 --zone acme-test \
 --filter "type=NS OR type=SOA" \
 --format json
After creating an initial setup and registering a NS, you may see something like this from the above command.
创建初始设置并注册NS后,您可能会从上述命令中看到类似的内容。
创建GKE集群 (Creating the GKE Cluster)
In previous articles (see above), I covered how to provision GKE with either Google Cloud SDK or Terraform. You can follow through either of those articles to meet the requirements.
在之前的文章(请参见上文)中,我介绍了如何通过Google Cloud SDK或Terraform来配置GKE。 您可以按照其中任何一篇文章进行操作以满足要求。
使用您自己的脚本配置GKE (Provision GKE with Your Own Scripts)
You can craft your own configuration scripts with tools like Terraform, Ansible, Pulumi to provision the GKE cluster. Be sure to include the following scope for the worker nodes:
您可以使用Terraform , Ansible , Pulumi之类的工具来制作自己的配置脚本,以配置GKE集群。 确保为工作程序节点包括以下范围:
"https://www.googleapis.com/auth/ndev.clouddns.readwrite"示例Cloud SDK配置脚本 (Example Cloud SDK Provision Script)
I provided a small script here that you can use to stand up a cluster needed for this exercise:
我在这里提供了一个小脚本,您可以使用它来建立此练习所需的集群:
You can download and run this like this:
您可以像这样下载并运行:
# download script
GIST_URL=https://gist.githubusercontent.com/darkn3rd/f913dc0876e9352999154b135e447ac4/raw/curl --silent $GIST_URL > create_gke_cluster.sh# run script:  create_gke_cluster.sh PROJECT CLUSTER_NAME
bash create_gke_cluster.sh acme-quality-team test-cluster
安装ExternalDNS (Installing ExternalDNS)
For installation of external-dns, we’ll use the bitnami/external-dns chart. We can add Bitnami’s Helm charts with this command:
要安装external-dns ,我们将使用bitnami/external-dns图表。 我们可以使用以下命令添加Bitnami的Helm图表:
helm repo add bitnami https://charts.bitnami.com/bitnamiAfterward, we need to create chart values that will override the default values. We can use these set of helm chart values.
之后,我们需要创建将覆盖默认值的图表值。 我们可以使用这些舵图 值集 。
Some things to note about these values.
关于这些值的一些注意事项。
policyis set tosync, which allows ExternalDNS to delete records. For test environments this is fine, but for environments where you do not want ExternalDNS to delete records, change this toupsert-only.policy设置为sync,这允许ExternalDNS 删除记录。 对于测试环境,这很好,但是对于不需要外部DNS的环境, 要删除记录,请将其更改为upsert-only。domainFiltersrestricts domains that ExternalDNS can update.domainFilters限制ExternalDNS可以更新的域。IMPORTANT: These settings only work if both the GKE cluster and the Cloud DNS are in the same project.
重要说明 :仅当GKE群集和Cloud DNS都在同一项目中时,这些设置才有效。
Once you have a local copy of gcp-external-dns.values.yaml configured with the settings you want, you can install this into your GKE cluster with this command:
一旦使用所需设置配置了gcp-external-dns.values.yaml的本地副本,就可以使用以下命令将其安装到GKE群集中:
helm install "acme-externaldns" \
  --values gcp-external-dns.values.yaml \
  bitnami/external-dns
配置端点 (Configuring an EndPoint)
You can expose your application to an Endpoint that is accessible outside of your Kubernetes cluster using a Service resource or an Ingress resource.
您可以将应用程序公开给端点 可以使用服务资源或Ingress资源在Kubernetes集群外部访问该文件。
使用服务资源进行部署 (Deploy using an Service Resource)
A service resource will define logical set of pods and policy to access them. We’ll deploy a sample application, hello-kubernetes, using a service resource with a service type of LoadBalancer.
服务资源将定义Pod的逻辑集和访问它们的策略。 我们将使用服务类型为LoadBalancer的服务资源来部署示例应用程序hello-kubernetes 。
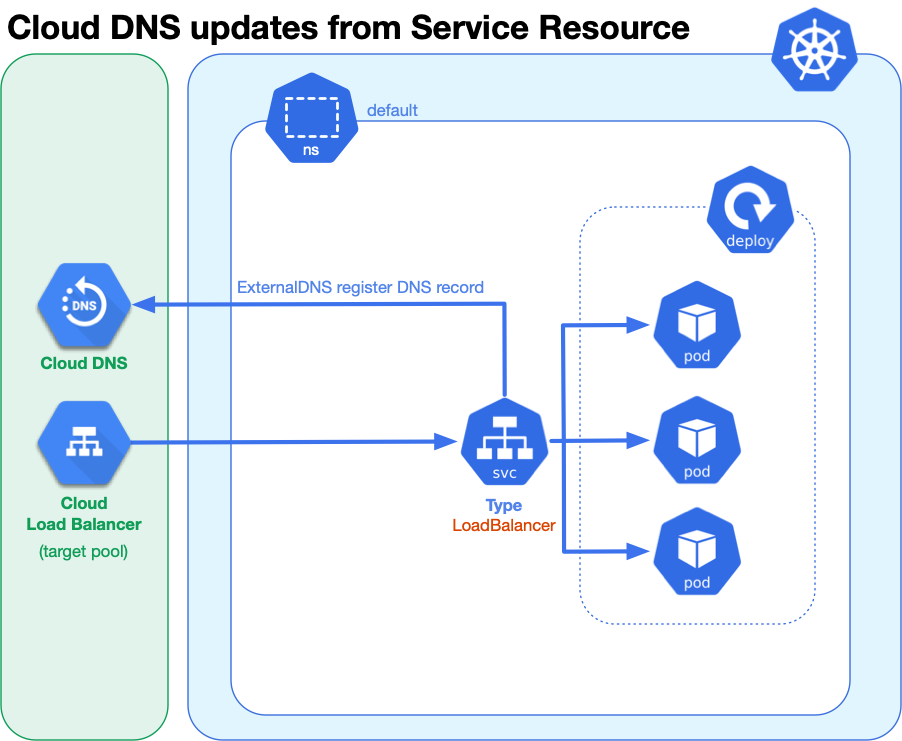
When defining our service resource, we use an annotation to configure the desired DNS record:
在定义我们的服务资源时,我们使用注释来配置所需的DNS记录:
external-dns.alpha.kubernetes.io/hostname: hello-svc.test.acme.comBelow is a manifest you can use to deploy this service. Save this as hello_k8s_lb.yaml.
以下是可用于部署此服务的清单。 将其另存为hello_k8s_lb.yaml 。
This manifest containers two resources:
此清单包含两个资源:
- deployment controller to deploy three pods to the Kubernetes cluster 部署控制器将三个Pod部署到Kubernetes集群
a service resource to provide access to those pods using a LoadBalancer type to get a public IP address, and through the
external-dnsannotation (line 27), register a DNS address record, e.g.hello-svc.test.acme.com, to point to the public IP address.服务资源以使用LoadBalancer提供对这些Pod的访问 键入以获取公共IP地址,并通过
external-dns注释(第27行)注册DNS地址记录,例如hello-svc.test.acme.com,以指向公共IP地址。
When ready to deploy run:
准备部署运行时:
kubectl apply --filename hello_k8s_lb.yaml验证服务端点 (Verify Service EndPoint)
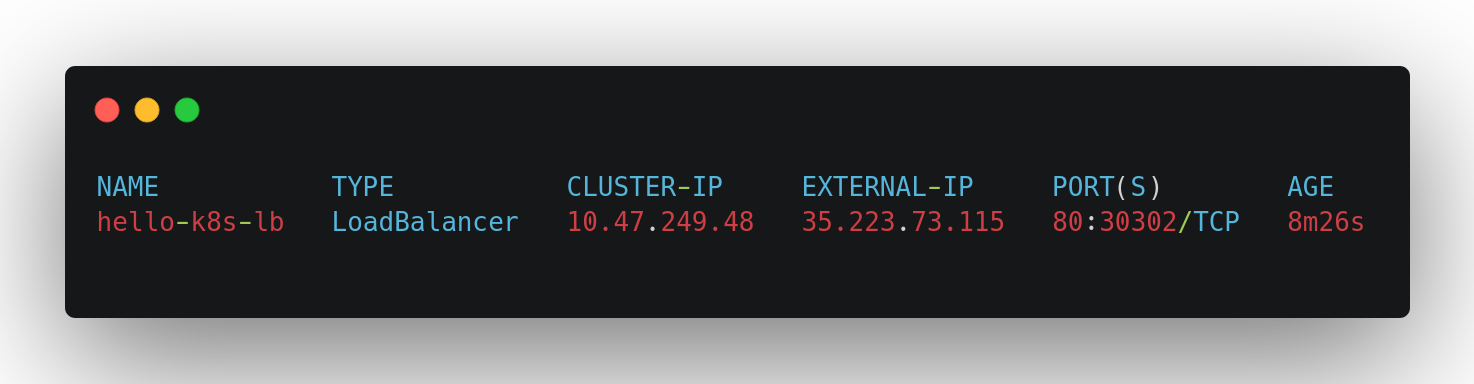
We can see the results in few moments by typing:
通过输入以下内容,我们很快就会看到结果:
kubectl get service --field-selector metadata.name=hello-k8s-lbThe results may look something similar to this:
结果可能类似于以下内容:
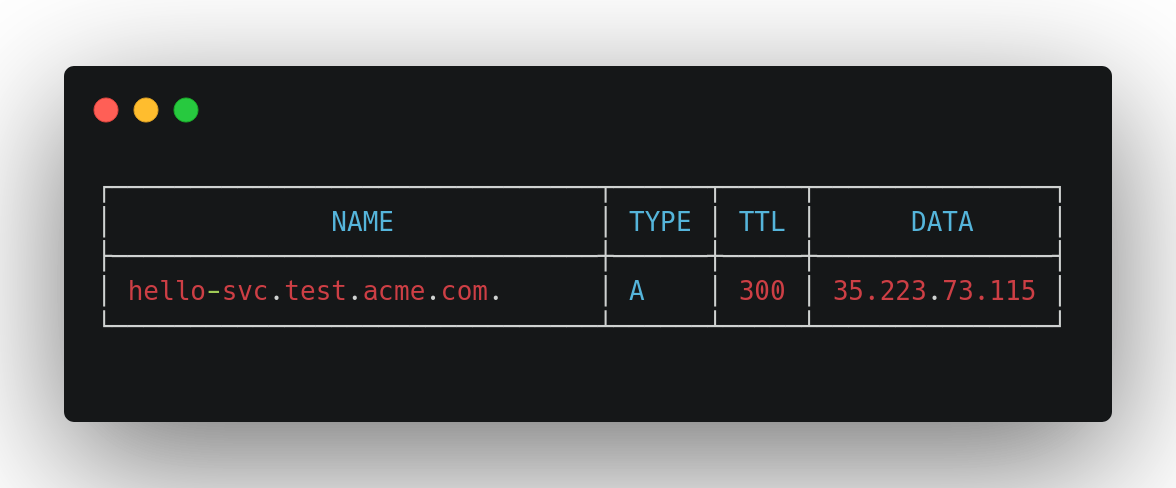
We can query CloudDNS with the glcoud dns record-sets list command to see if the DNS record was added:
我们可以使用glcoud dns record-sets list命令查询CloudDNS,以查看是否添加了DNS记录:
gcloud dns record-sets list \
  --project acme-quality-team \
  --zone acme-test \
  --filter "name~hello-svc AND type=A" \
  --format "table[box](name,type,ttl,rrdatas[0]:label=DATA)"
We should see a record added that looks something like this:
我们应该看到添加了一条类似于以下内容的记录:
测试服务端点的DNS地址 (Test the DNS Address for Service EndPoint)
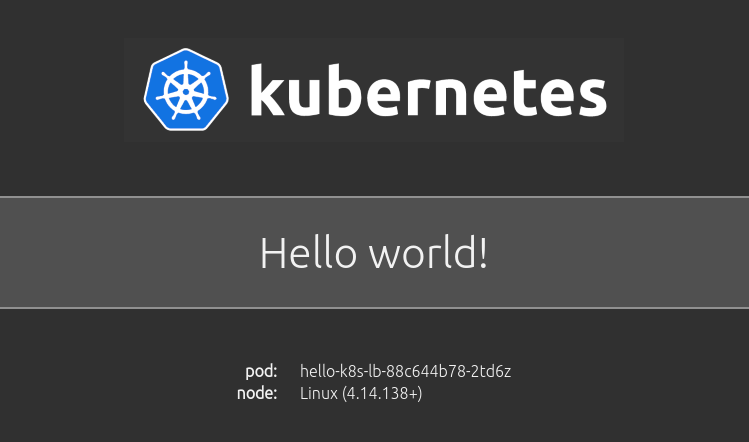
You can point your web browser to http://hello-svc.test.acme.com and seem something like:
您可以将网络浏览器指向http://hello-svc.test.acme.com ,看起来像这样:
We can also use curl and filter out the pod name several times to see if we can hit all 3 pods:
我们还可以使用curl并多次过滤出豆荚名称,以查看是否可以打满所有3个豆荚:
MAX_TIMES=8for ((i=1; i<=$MAX_TIMES; i++)); do
  curl --silent
    awk --field-separator='>|<' '/hello-k8s-lb/{ print $3 }' done
The results will definitely vary. Chances are that we will touch all three pods:
结果肯定会有所不同。 我们很可能会碰到所有三个豆荚:
hello-k8s-lb-88c644b78-ckcd7
hello-k8s-lb-88c644b78-2td6z
hello-k8s-lb-88c644b78-2td6z
hello-k8s-lb-88c644b78-ckcd7
hello-k8s-lb-88c644b78-ckcd7
hello-k8s-lb-88c644b78-x5vxd
hello-k8s-lb-88c644b78-ckcd7
hello-k8s-lb-88c644b78-2td6z
使用Ingress进行部署 (Deploy using an Ingress)
An Ingress resource exposes HTTP(S) routes from outside the cluster to services within the cluster, where L7 traffic is sent to the service resource by rules defined in the ingress resource configuration.
入口资源公开了从群集外部到群集内服务的HTTP(S)路由,其中L7流量通过入口资源配置中定义的规则发送到服务资源。
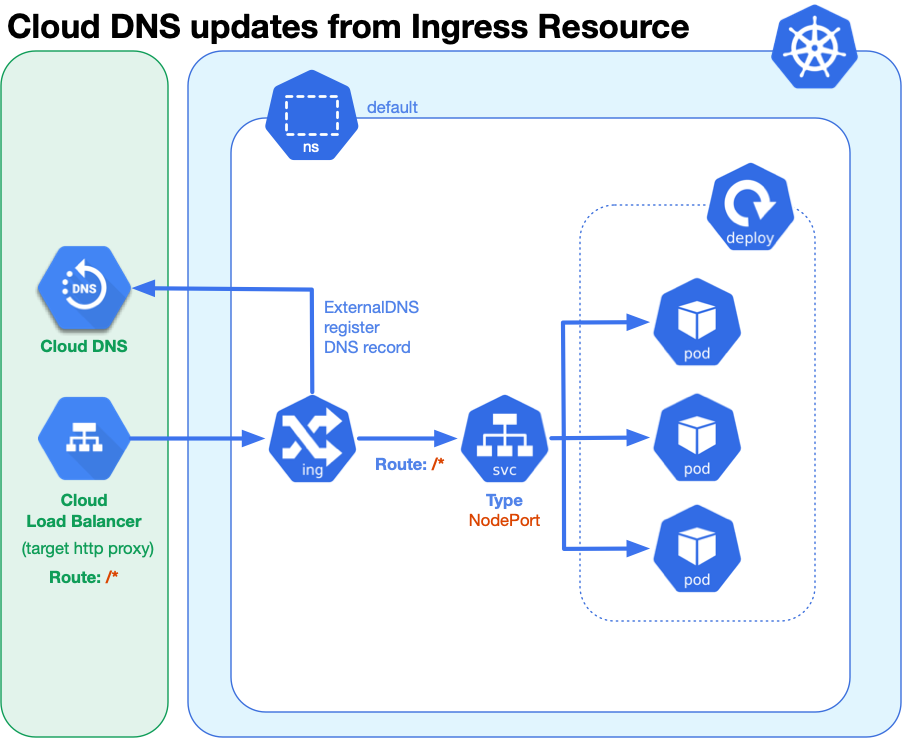
For this exercise, we’ll use the default ingress controller that comes with GKE called gce.
在本练习中,我们将使用GKE附带的默认入口控制器gce 。
We can define the desired DNS record by configuring a virtual hostname using the host key:
我们可以通过使用host密钥配置虚拟主机名来定义所需的DNS记录:
spec:
  rules:
    - host:
Below is the full manifest that includes deployment, service, and ingress. Copy this and save it as hello_k8s_gce.yaml.
以下是包含部署,服务和入口的完整清单。 复制此文件并将其另存为hello_k8s_gce.yaml 。
NOTE: For the service resource, normally when using an ingress resource, you use a service type of ClusterIP, but this will not work with the default ingress on GKE, where only NodePort and LoadBalancer are supported. As we only wish to expose the hello-kubernetes application through the ingress, we chose NodePort.
注意 :对于服务资源 ,通常在使用入口资源时,使用的是ClusterIP服务类型,但这不适用于GKE上的默认入口,其中仅支持NodePort和LoadBalancer 。 因为我们只希望通过入口公开hello-kubernetes应用程序,所以我们选择NodePort 。
For the ingress resource, the key host is used use to route on virtualhost and with ExternalDNS install will also configure DNS records on Cloud DNS. For this definition, we set an ingress class of gce to document we are using default ingress in GKE. This is not necessary, but generally a good practice to follow, and avoids side effects in case another ingress was configured as the new default.
对于入口资源 ,密钥host用于在虚拟主机上和与外部 DNS进行路由 安装还将在Cloud DNS上配置DNS记录。 对于此定义,我们将gce的入口类设置为文档,以证明我们在GKE中使用默认入口。 这不是必需的,但通常是一个好的做法,并且在将另一个入口配置为新的默认值的情况下避免了副作用。
To deploy all of this, run the following command:
要部署所有这些,请运行以下命令:
kubectl apply --filename 测试入口端点 (Testing the Ingress EndPoint)
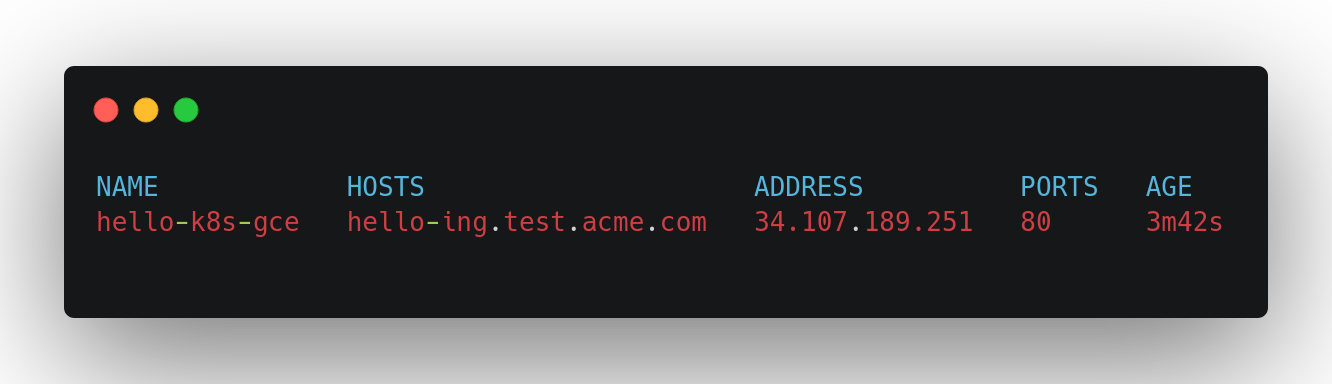
After a few moments, you can the ingress created with:
片刻之后,您可以使用以下方法创建入口:
kubectl get ingress --field-selector metadata.name=hello-k8s-gceThis should show something like:
这应该显示如下内容:
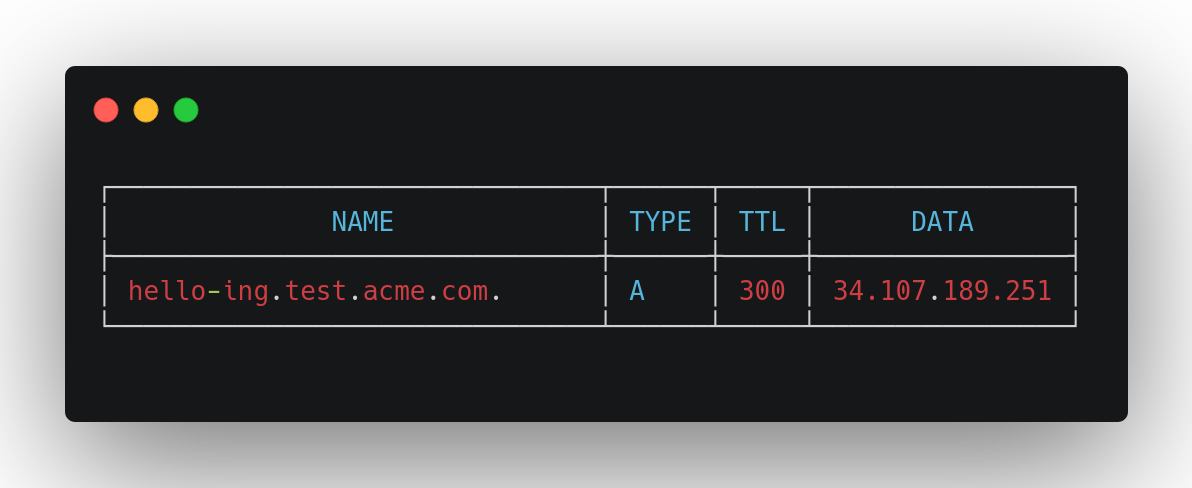
We can check to see our DNS record is registered in Cloud DNS with:
我们可以检查一下我们的DNS记录是否已在Cloud DNS中通过以下方式注册:
gcloud dns record-sets list \
  --project acme-quality-team \
  --zone acme-test \
  --filter "name~hello-ing AND type=A" \
  --format "table[box](name,type,ttl,rrdatas[0]:label=DATA)"
This will show us something like the following:
这将向我们显示如下内容:
测试服务端点的DNS地址 (Test the DNS Address for Service EndPoint)
You can point your web browser to http://hello-ing.test.acme.com and seem something like:
您可以将网络浏览器指向http://hello-ing.test.acme.com ,看起来像这样:
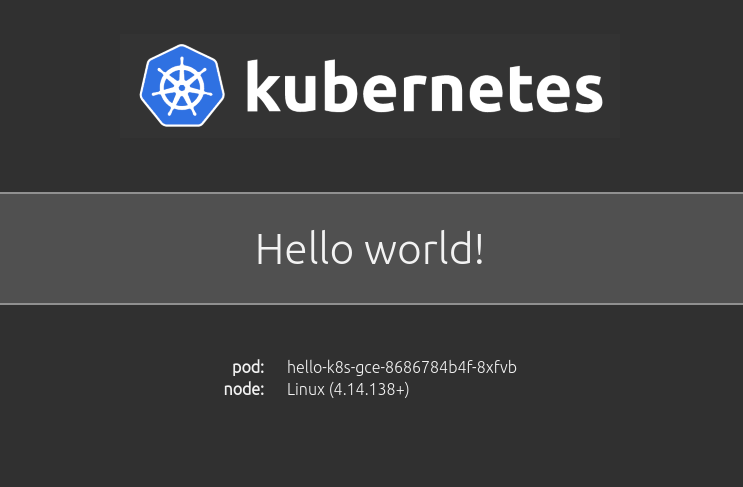
Using the same URL, we can use curl to hit the DNS name a few times and filter for the pod name. We should be able to land on all three pods after a few tries:
使用相同的URL,我们可以使用curl多次单击DNS名称并过滤pod的名称。 经过几次尝试,我们应该能够在所有三个豆荚上着陆:
MAX_TIMES=8for ((i=1; i<=$MAX_TIMES; i++)); do
  curl --silent
    awk --field-separator='>|<' '/hello-k8s-gce/{ print $3 }' done
This should result in something like this, showing three different types of pods:
这应导致如下所示,显示三种不同类型的豆荚:
hello-k8s-gce-8686784b4f-d85qf
hello-k8s-gce-8686784b4f-8xfvb
hello-k8s-gce-8686784b4f-8xfvb
hello-k8s-gce-8686784b4f-8xfvb
hello-k8s-gce-8686784b4f-fmgqp
hello-k8s-gce-8686784b4f-d85qf
hello-k8s-gce-8686784b4f-d85qfhello-k8s-gce-8686784b4f-8xfvb
资源资源 (Resources)
Here are some other articles and resources that you may find useful in the area of GKE + ExternalDNS + Cloud DNS.
以下是在GKE + ExternalDNS + Cloud DNS领域中可能有用的其他文章和资源。
博客源代码 (Blog Source Code)
翻译自: https://medium.com/swlh/extending-gke-with-externaldns-d02c09157793
gke google


 1886
1886

 被折叠的 条评论
为什么被折叠?
被折叠的 条评论
为什么被折叠?
 到【灌水乐园】发言


