


In the previous articles, we studied the basic rules of SQL database design, created a database schema diagram for a recruitment service, and filled the newly-created database with test data on employees.
在先前的文章中,我们研究了SQL数据库设计的基本规则,为招聘服务创建了数据库模式图,并使用有关员工的测试数据填充了新创建的数据库 。
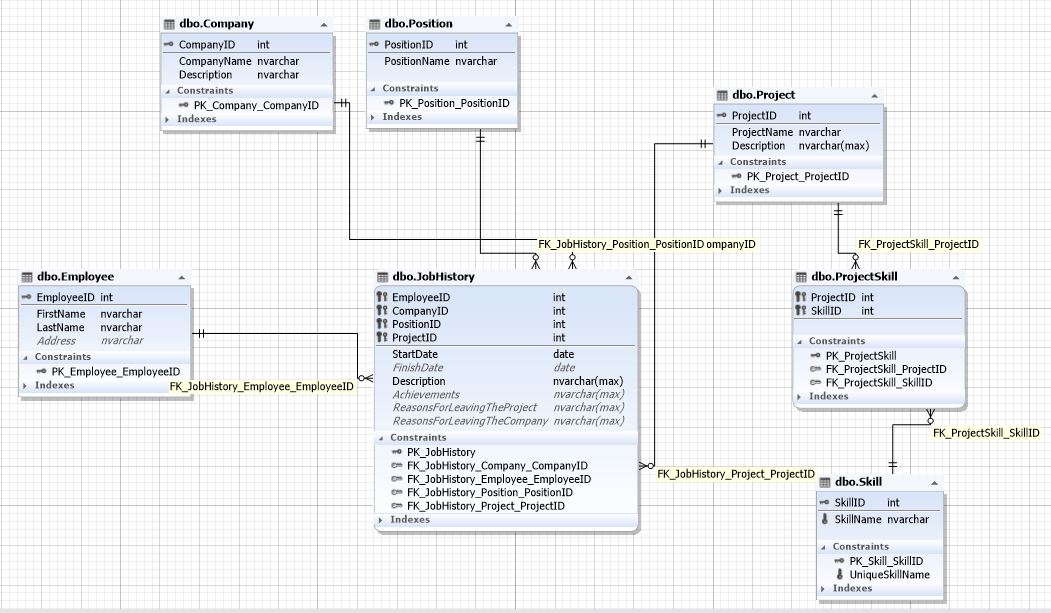
The database contains the following entities:
该数据库包含以下实体:
- Employee 雇员
- Company 公司
- Position 位置
- Project 项目
- Skill 技能
This time, let’s consider the ways to transfer data from one SQL Server database to another one through export and import. This can come in handy when the management system of the client database is an older version than the data source. Meaning, when it is impossible to use a backup copy or when only a part of data has to be transferred, as all data weighs too much.
这次,让我们考虑通过导出和导入将数据从一个SQL Server数据库传输到另一个数据库的方法。 当客户端数据库的管理系统是比数据源旧的版本时,这可能会派上用场。 就是说,当不可能使用备份副本时,或者当只需要传输一部分数据时,由于所有数据都太重了。
将数据从SQL Server导出到JSON表 (Export data from SQL Server to JSON tables)
Firstly, the functionality for data export is available in dbForge Studio for SQL Server as well as dbForge Data Pump. When it comes to filling SQL databases with external source data and migrating data between systems, Data Pump is the add-in that is always of great help.
首先, 用于SQL Server的dbForge Studio和dbForge数据泵中都提供了数据导出功能。 在使用外部源数据填充SQL数据库以及在系统之间迁移数据时, Data Pump是始终可以提供极大帮助的外接程序。
Let us first consider its use in SSMS.
让我们首先考虑一下它在SSMS中的使用。
To begin with, let us perform data export.
首先,让我们执行数据导出。
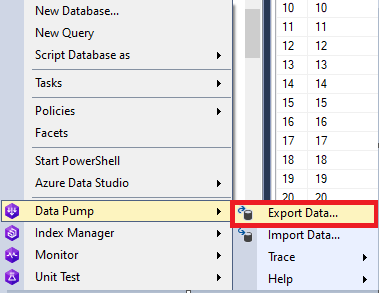
To do this, in SSMS, right-click on the database you need, and in the drop-down menu, select the Data Pump\ Export Data… command:
为此,在SSMS中 ,右键单击所需的数据库,然后在下拉菜单中选择“数据泵\导出数据…”命令:
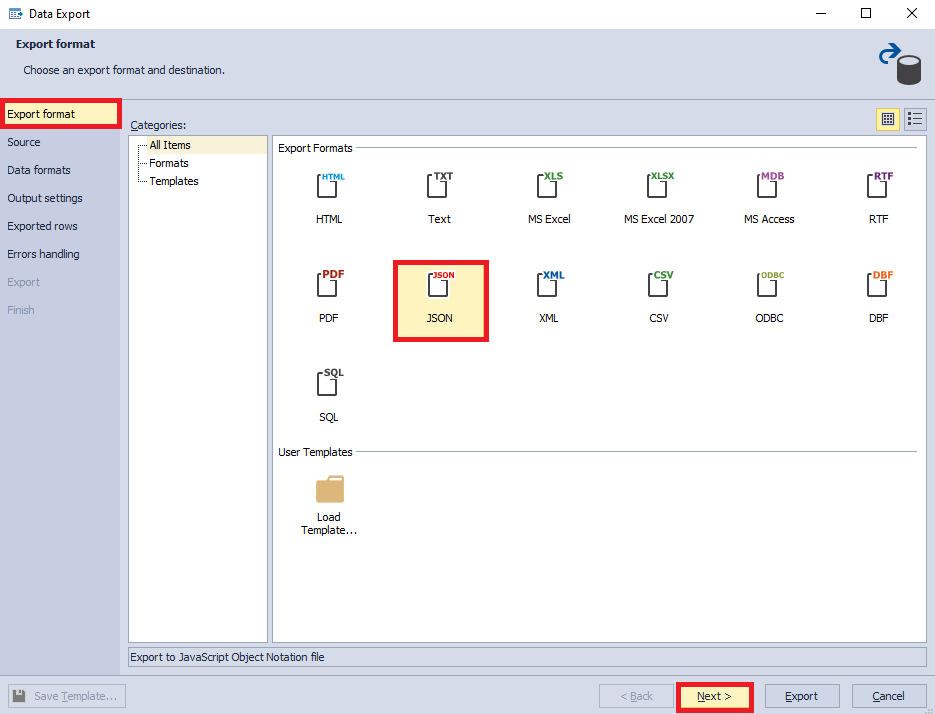
The export settings window will then appear. On the “Export format” tab, you can select different formats. We select JSON format in our case, to transfer data and import it into another database. Let’s then press the “Next” button:
然后将出现导出设置窗口。 在“导出格式”选项卡上,可以选择其他格式。 在这种情况下,我们选择JSON格式来传输数据并将其导入另一个数据库。 然后,我们按“下一步”按钮:
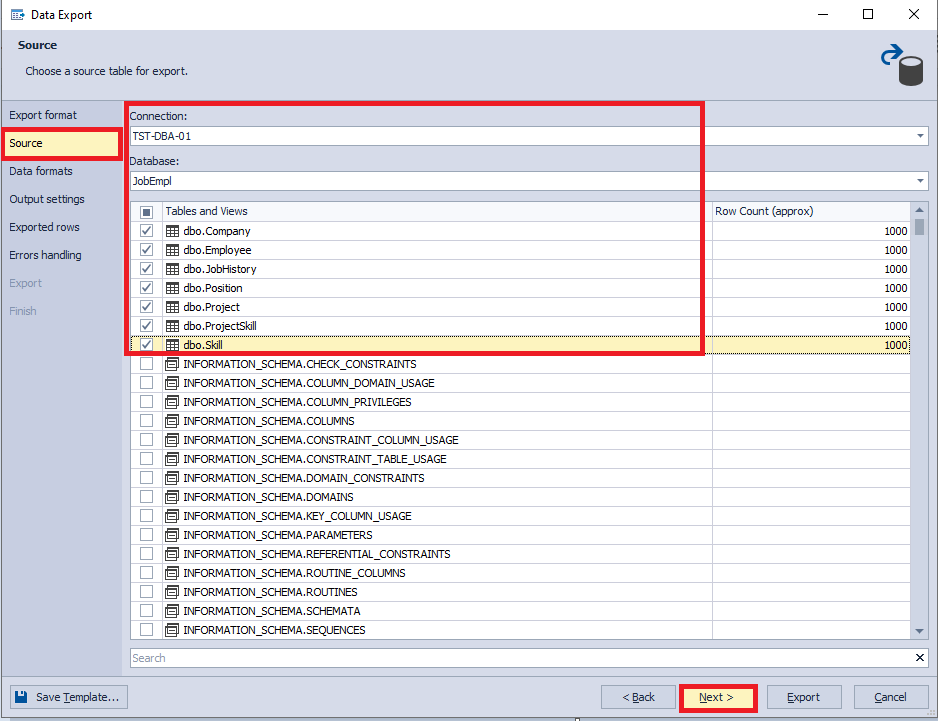
Next, on the “Source” tab, you need to select the necessary tables for export. In this case, we select all user tables and press the “Next” button:
接下来,在“源”选项卡上,您需要选择必要的表以进行导出。 在这种情况下,我们选择所有用户表,然后按“下一步”按钮:
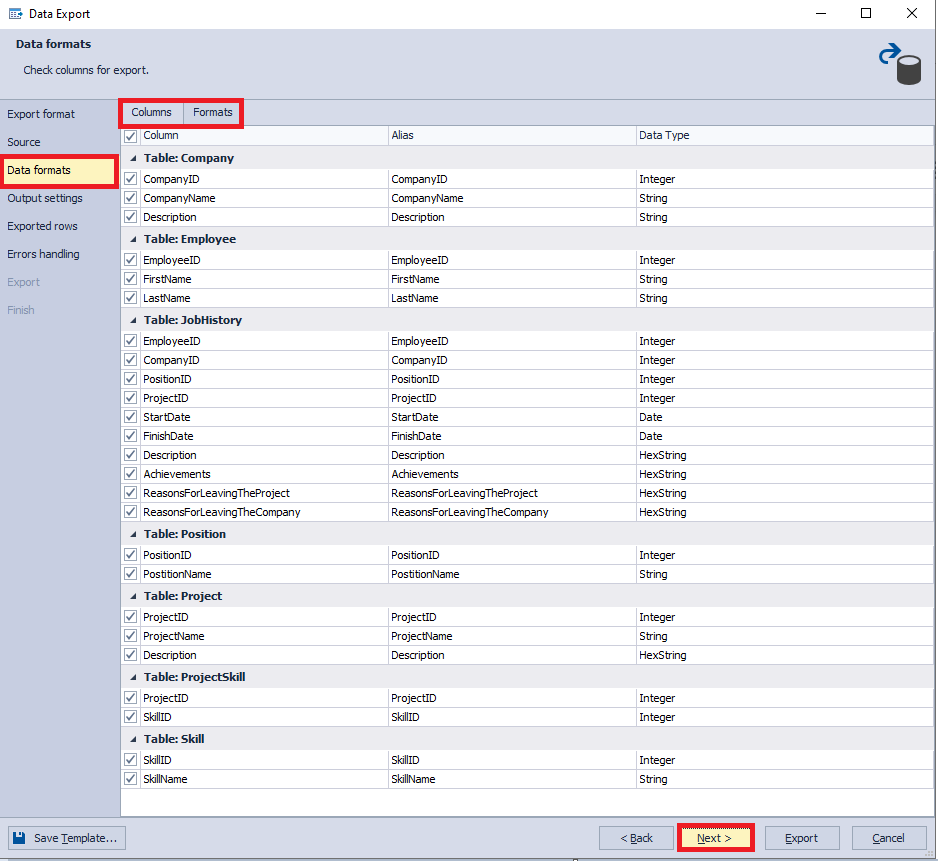
Following that, on the “Data formats” tab, you need to select the required columns on the “Columns” tab and setup data formats on the “Formats” tab. In the present case, we choose all columns and leave settings of the “Formats” at their defaults. Then, press the “Next” button:
然后,在“数据格式”选项卡上,您需要在“列”选项卡上选择所需的列,并在“格式”选项卡上设置数据格式。 在当前情况下,我们选择所有列,并将“格式”的设置保留为默认值。 然后,按“下一步”按钮:
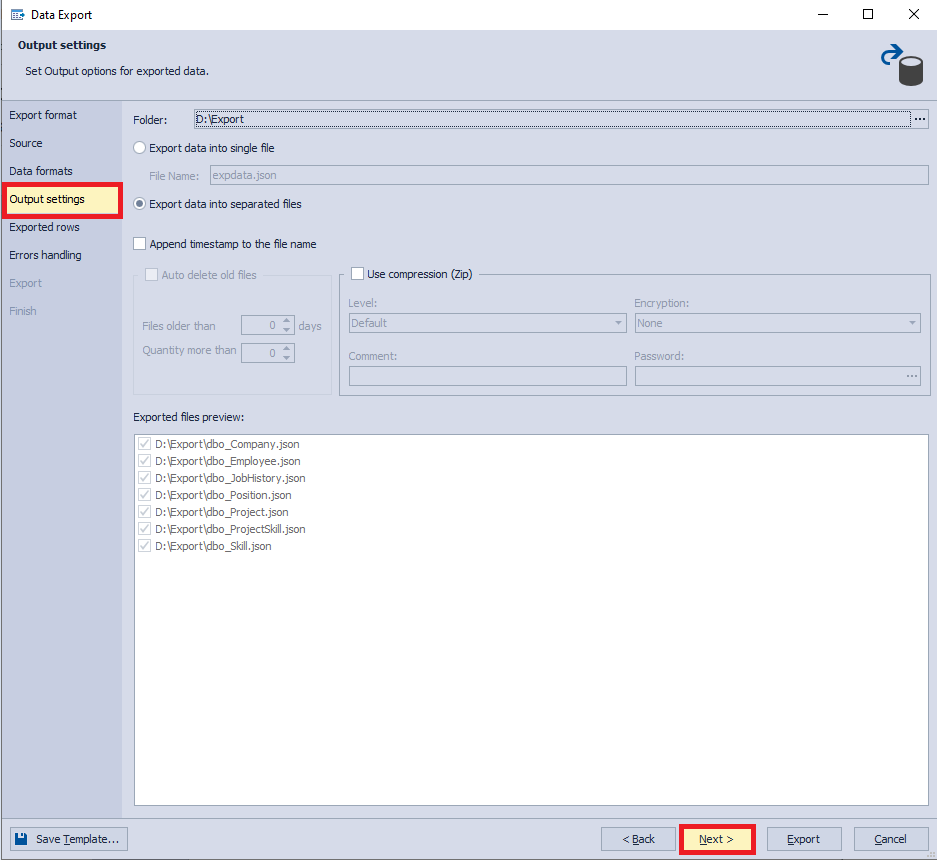
On the “Output settings” tab, we need to configure the output parameters of the exported data. Here, we leave the default settings and click on the “Next” button:
在“输出设置”选项卡上,我们需要配置导出数据的输出参数。 在这里,我们保留默认设置,然后单击“下一步”按钮:
On the “Exported rows” tab, you can configure the number of exported rows, depending on whether you need to export all rows or only a certain part of them. In this case, we leave the settings as default, that is, we will export rows. Now press the “Next” button:
在“导出的行”选项卡上,可以配置导出的行数,具体取决于您需要导出所有行还是仅导出其中的一部分。 在这种情况下,我们将设置保留为默认设置,即,我们将导出行。 现在按“下一步”按钮:

Next, on the “Errors handling” tab, you can specify the settings for the output of runtime errors during export. Leave the settings as default. Note that for later use, you can save all the specified settings as a template by clicking the “Save Template…” button in the left bottom corner. Now, you should press the “Export” button to start data export:
接下来,在“错误处理”选项卡上,可以指定导出期间输出运行时错误的设置。 将设置保留为默认设置。 请注意,您可以通过单击左下角的“保存模板...”按钮将所有指定的设置另存为模板。 现在,您应该按“导出”按钮开始数据导出:
While export is running, you can view the process of data extraction on the “Export” tab.
导出运行时,您可以在“导出”选项卡上查看数据提取的过程。
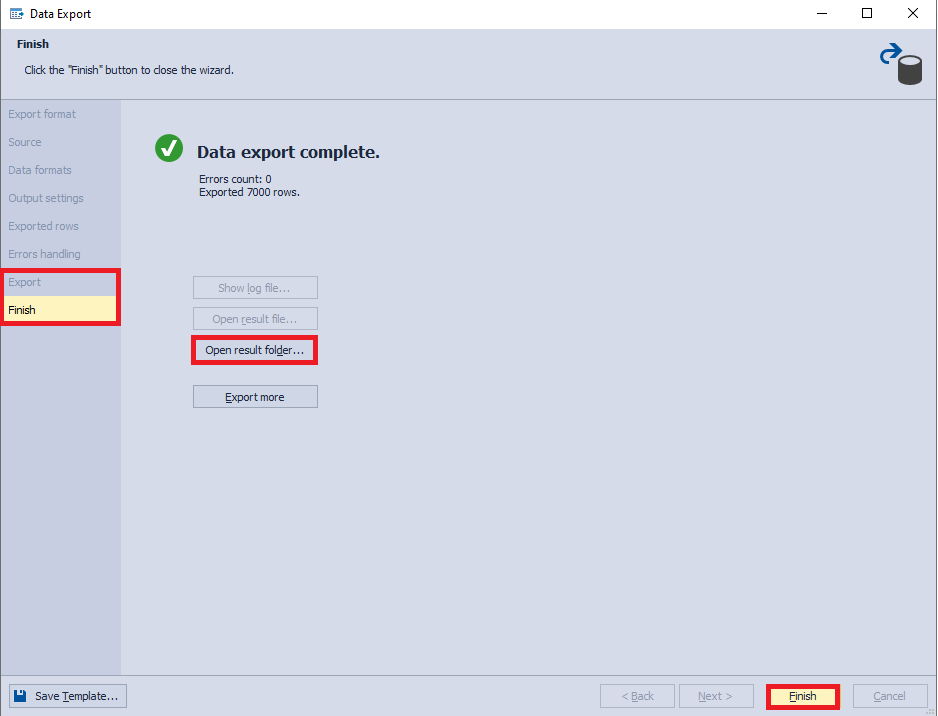
Upon the completion, you will see the “Finish” tab, where you can either close the window by pressing the “Finish” button or immediately go to the folder that contains generated files by pressing the “Open result folder…” button:
完成后,您将看到“完成”选项卡,您可以在其中通过按“完成”按钮关闭窗口,或通过按“打开结果文件夹…”按钮立即转到包含生成的文件的文件夹:
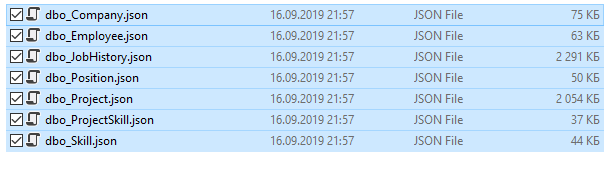
Finally, you can see the folder with generated SQL database data in JSON files:
最后,您可以在JSON文件中看到包含生成SQL数据库数据的文件夹:
Let’s open the contents of the dbo_Employee file:
让我们打开dbo_Employee文件的内容:

To sum up, we exported the data of the new database to files with JSON format.
综上所述,我们将新数据库的数据导出到JSON格式的文件中。
Note that export can be useful when exchanging data between two types of database management systems.
请注意,在两种类型的数据库管理系统之间交换数据时,导出很有用。
It is also quite handy to export data in Excel, to provide some data for analysts to research.
在Excel中导出数据也很方便,以提供一些数据供分析人员进行研究。
将JSON数据导入到SQL Server数据库 (Import JSON data to a SQL Server database)
Now, let us copy the resulting data to the necessary server and restore the JobEmpl2 database there.
现在,让我们将结果数据复制到必要的服务器,然后在其中还原JobEmpl2数据库。
To do this, we need to create a new database, JobEmpl2, with the same schema as the JobEmpl using the following script:
为此,我们需要使用以下脚本创建一个具有与JobEmpl相同架构的新数据库JobEmpl2:
This script can be obtained in a number of ways. For instance, using the Compare Bundle for SQL Server tool.
该脚本可以通过多种方式获得。 例如,使用“ SQL Server比较捆绑包”工具。
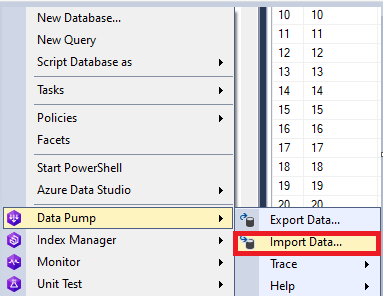
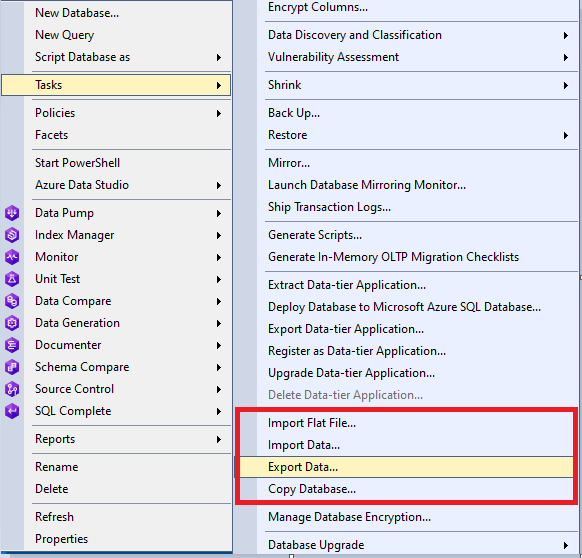
Right-click on it and in the drop-down menu, select the Data Pump\ “Import Data…” command:
右键单击它,然后在下拉菜单中,选择“数据泵” \“导入数据…”命令:
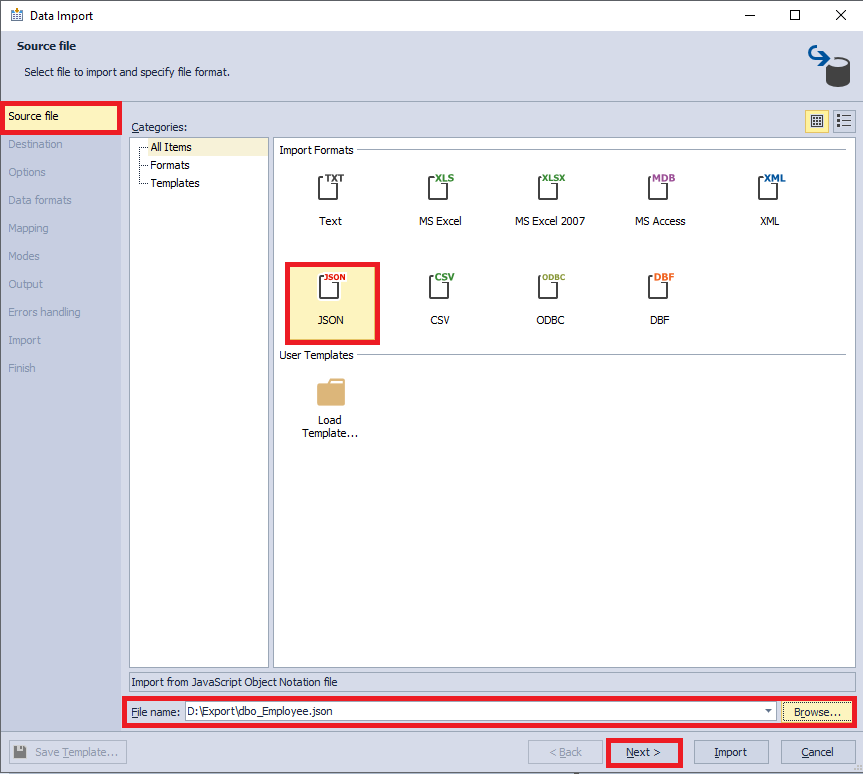
Similarly to export, on the “Source file” tab, select the JSON format and the file itself. Then press the “Next” button:
与导出类似,在“源文件”选项卡上,选择JSON格式和文件本身。 然后按“下一步”按钮:
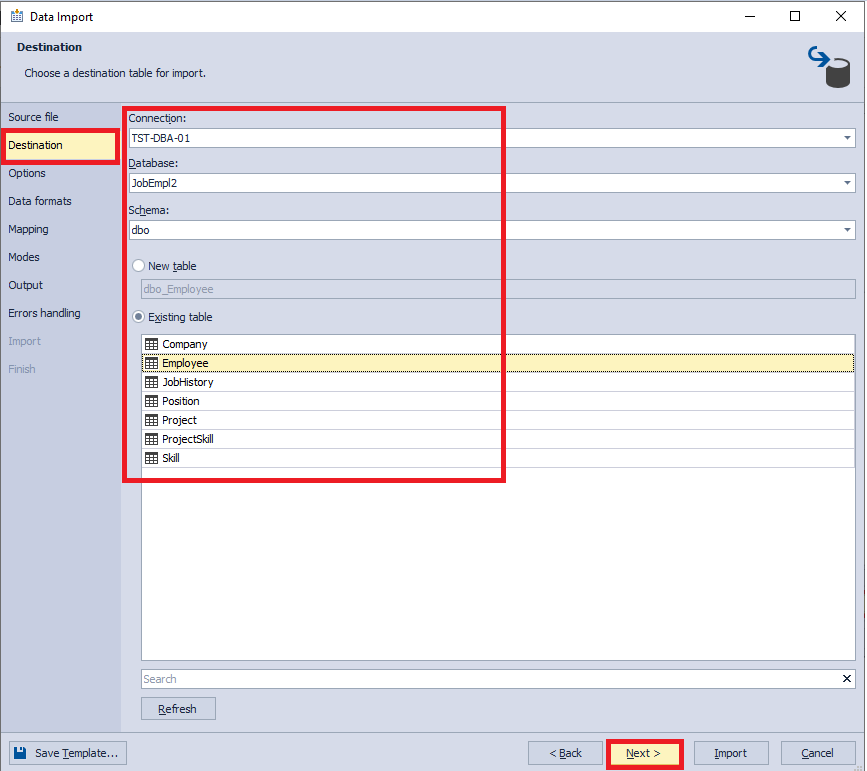
On the “Destination” tab, pick the existing Employee table in the dbo schema of JobEmpl2 database and then press “Next”:
在“目标”选项卡上,在JobEmpl2数据库的dbo模式中选择现有的Employee表,然后按“下一步”:
Next, on the “Options” tab, you can set encoding and see what the inserted data will look like. Leave the settings at their defaults and press the “Next” key:
接下来,在“选项”选项卡上,您可以设置编码并查看所插入数据的外观。 将设置保留为默认设置,然后按“下一步”键:

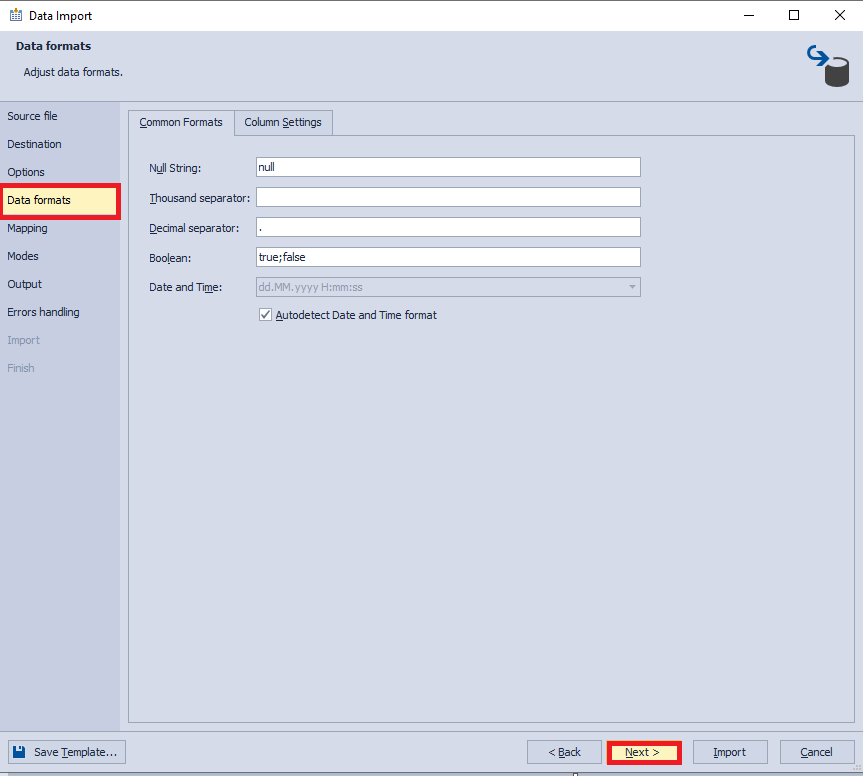
On the “Data formats” tab, you can configure the format of inserted data. Here, we leave the default values and press the “Next” button:
在“数据格式”选项卡上,您可以配置插入数据的格式。 在这里,我们保留默认值,然后按“下一步”按钮:
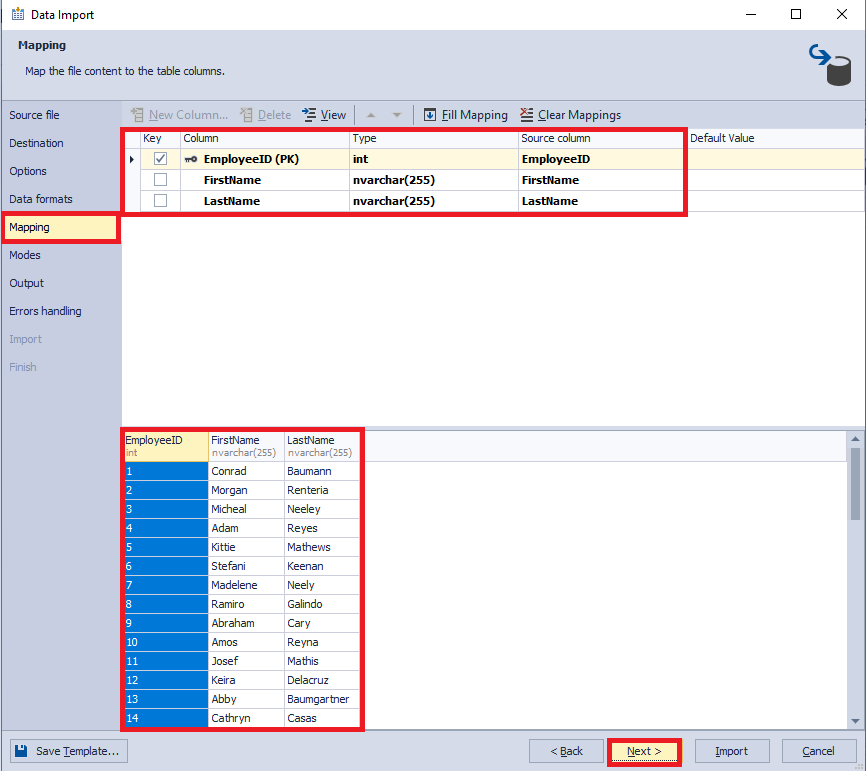
On the “Mapping” tab, you can configure the mapping of the source and target fields. Let’s leave everything as it is and press the “Next” button:
在“映射”选项卡上,您可以配置源字段和目标字段的映射。 让我们保持一切不变,然后按“下一步”按钮:
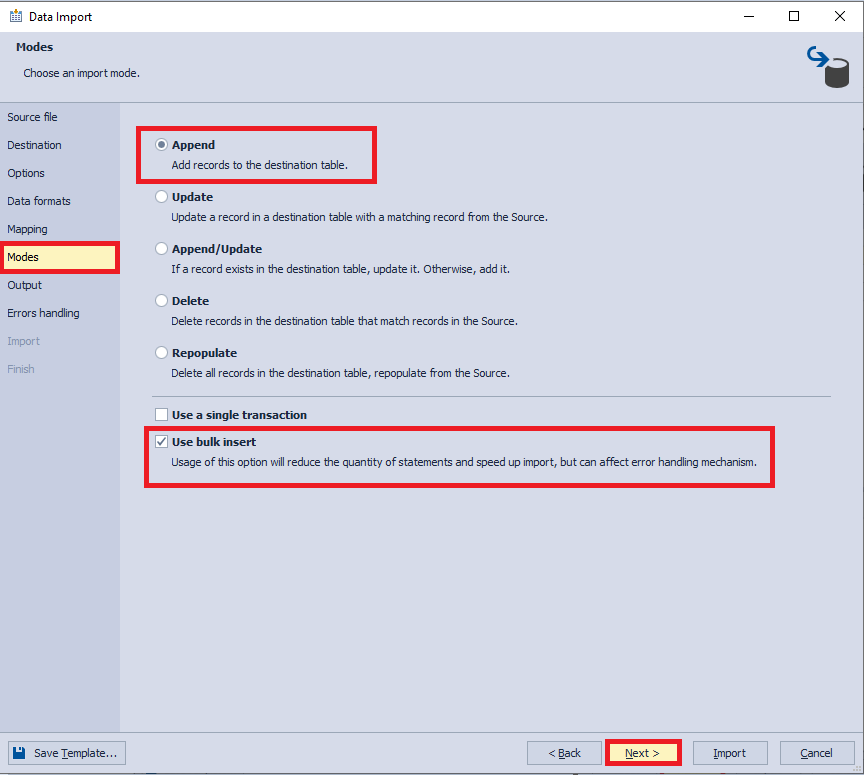
Following that, on the “Modes” tab, you can set the data import mode. In our case, we leave adding data without deleting the existing data by means of the bulk insert. Then, press “Next”:
然后,在“模式”选项卡上,可以设置数据导入模式。 在我们的情况下,我们无需添加数据,而无需通过批量插入删除现有数据。 然后,按“下一步”:
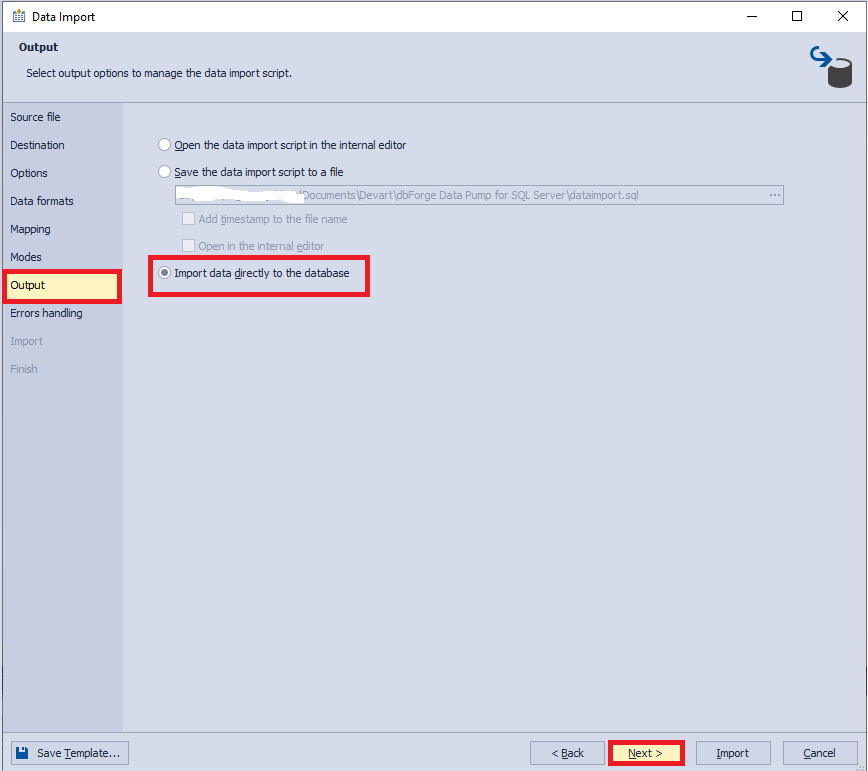
On the “Output” tab, you can configure the target place for the data to be imported. In this case, select import data directly to the database and click “Next”:
在“输出”选项卡上,您可以配置要导入数据的目标位置。 在这种情况下,选择直接将数据导入数据库,然后单击“下一步”:
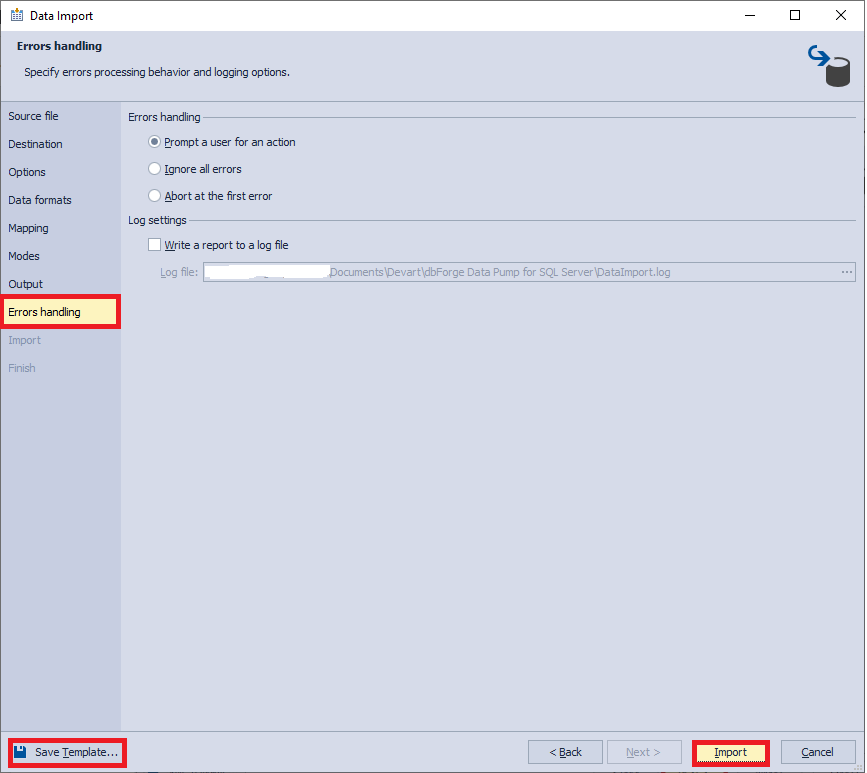
Thereafter, on the “Errors handling” tab, you can configure the output of runtime errors during the import process. You can also save the previous settings as a template by clicking on the “Save Template…” button situated in the left bottom corner. We leave the default settings and press the “Import” button to start import:
之后,在“错误处理”选项卡上,可以配置导入过程中运行时错误的输出。 您也可以通过单击左下角的“保存模板...”按钮将以前的设置另存为模板。 我们保留默认设置,然后按“导入”按钮开始导入:
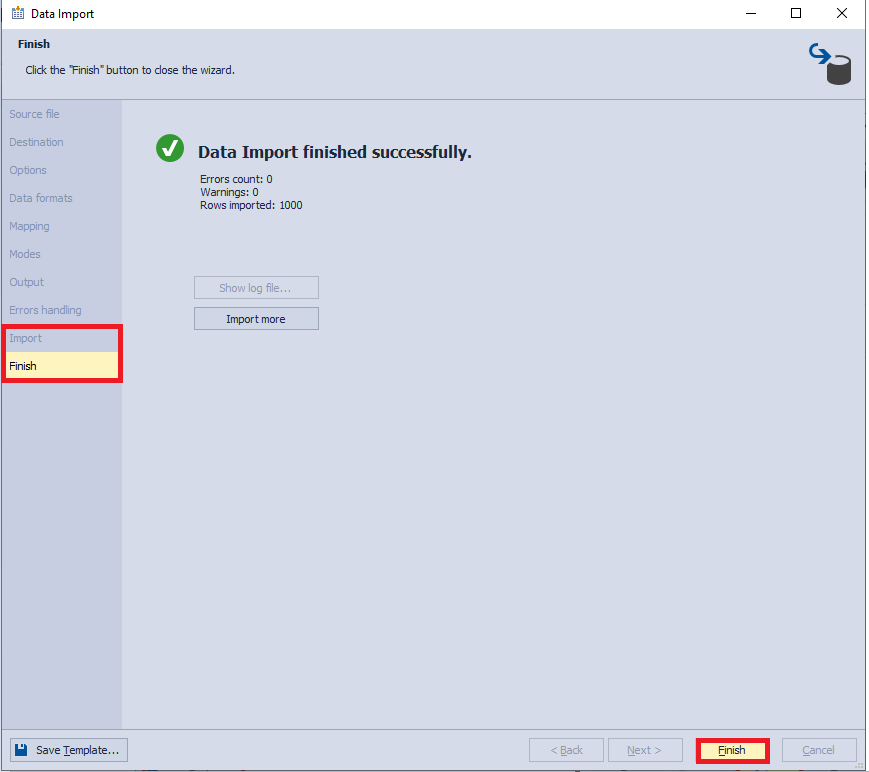
During the import process, on the “Import” tab, you can track the execution progress. As soon as the import is complete, the result is displayed on the “Finish” tab. Press the “Finish” button to close the window:
在导入过程中,可以在“导入”选项卡上跟踪执行进度。 导入完成后,结果将显示在“完成”选项卡上。 按“完成”按钮关闭窗口:
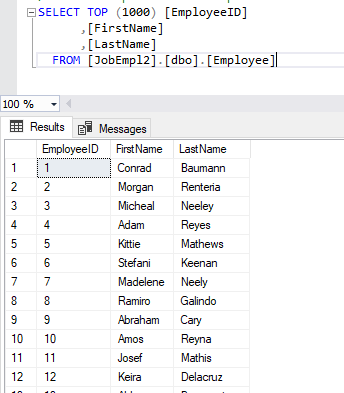
When you query the destination database, you can make sure that the data was successfully imported to the Employee table:
查询目标数据库时,可以确保数据已成功导入到Employee表中:
By the same token, you can import the remaining files to the corresponding tables.
同样,您可以将其余文件导入到相应的表中。
You can perform data export and import with the help of standard functionality of SSMS by right-clicking on the necessary database and selecting the corresponding command in the drop-down menu:
您可以在SSMS的标准功能的帮助下执行数据导出和导入,方法是右键单击所需的数据库,然后在下拉菜单中选择相应的命令:
结论 (Conclusion)
To put it briefly, data export and import allow not only to move data between databases and to provide data in a convenient form for subsequent processing but also to import the part of the necessary data into the required database.
简而言之,数据导出和导入不仅允许在数据库之间移动数据,并以方便的形式提供数据以进行后续处理,而且还可以将一部分必要的数据导入到所需的数据库中。
In the next part, we will examine how to conduct the object and data search in the created database.
在下一部分中,我们将研究如何在创建的数据库中进行对象和数据搜索。
Originally published at https://blog.devart.com on July 23, 2020.
最初于 2020年7月23日 发布于 https://blog.devart.com 。
翻译自: https://towardsdatascience.com/exporting-and-importing-json-data-fc1753808349


 1800
1800

 被折叠的 条评论
为什么被折叠?
被折叠的 条评论
为什么被折叠?
 到【灌水乐园】发言


