


这篇文章讲述了如何对线性变换的物体,如物体的旋转和大小变换,使用基于像素的碰撞检测。
Note 注意
这个教程的代码是建立在之前教程的基础上的,请确保学习过前面的教程之后再开始本教程的学习。
绪论
在前面的教程当中,你已经为你的躲避落体游戏添加了可以使游戏中的碰撞更精确的基于像素级别的碰撞检测。而在教程2中所讲述的像素碰撞检测只是对于没有产生变换的图像精灵而言。而对于其他游戏而言,或许需要物体进行旋转,大小变换或者其他的线性变换,所以你就需要一个更加聪明的检测方法。
第一步:建立旋转的落体
首先,你的游戏需要一个可以旋转的落体。在 Content文件夹下面的 SpinnerBlock.bmp文件就是我们所需要的旋转下落的物体。
将 Spinner Block文件添加到你的工程当中
1. 首先确定你打开了 Solution Exploer并且可以看到你的工程项目。
2. 右击 Content文件夹,单击 Add,通过对话框选择 SpinnerBlock.bmp纹理文件。
3. 单击 OK.
在 LoadGraphicsContent方法中修改代码加载新的美术资源
在 game类中找到 LoadGraphicsContent方法,修改 blockTexture,
1
blockTexture
=
content.Load
<
Texture2D
>
(
"
Content/SpinnerBlock
"
);
如果你编译运行工程,你会发现一个新的十字形的物体下落。如果你觉得物体下落太快没有办法躲避的话可以将
BlockFallSpeed的值由2修改为1。
为每一个下落物体建立旋转元素
在之前的教程当中,我们使用一个 Vector2型变量存储下落物体的位置,但是现在他们需要旋转。所以你需要为下落的物体建立一个类。
1.右击 Solution Explorer的工程图标,单击 Add,单击 New Item。
2. 在显示出的对话窗口中选择 Class,输入名 称’Block.cs”
3.单击 OK。
建立了 Block类,需要添加物体的位置和旋转两个元素。位置采用 Vector2类型,而旋转需要一个 float型来表示物体顺时针旋转的速度。 Block.cs类应如下建立:
1
using
System;
2 using Microsoft.Xna.Framework;
3 namespace TransformedCollision
4 {
5 /// <summary>
6 /// A falling and spinning object to be avoided.
7 /// </summary>
8 class Block
9 {
10 public Vector2 Position;
11 public float Rotation;
12 }
13 }
而现有的代码必须因为
Block类的存在而进行改变,我们需要将所有的
blockPositions替换为
Blocks。
2 using Microsoft.Xna.Framework;
3 namespace TransformedCollision
4 {
5 /// <summary>
6 /// A falling and spinning object to be avoided.
7 /// </summary>
8 class Block
9 {
10 public Vector2 Position;
11 public float Rotation;
12 }
13 }
1
List
<
Block
>
blocks
=
new
List
<
Block
>
();
2 const float BlockRotateSpeed = 0.005f ;
现在,你的代码是无法编译通过的,因为blockPositions已经不存在了,而所有的blockPositions的需要由Blocks代替,例如需要将blockPositions[i]替换为blocks[i].Position, 将foreach (Vector2 blockPosition in blockPositions)替换为foreach (Block block in blocks).建立block的代码同样需要一些修改. 需要将Vector2 blockPosition = new Vector2(x, y), 修改为Block newBlock = new Block()同时添加newBlock.Position = new Vector2(x, y). 在进行下面的学习之前请确保完成所有的替换。否则程序是无法编译的。
2 const float BlockRotateSpeed = 0.005f ;
更新并绘制旋转精灵
尽管我们建立了block的类,但是没有进行初始化,下落物体以一个随机的速度进行匀速的旋转,在Update方法中修改下面代码:
1
//
Spawn new falling blocks
2 if (random.NextDouble() < BlockSpawnProbability)
3 {
4 Block newBlock = new Block();
5 // at a random position just above the screen
6 float x = ( float )random.NextDouble() *
7 (Window.ClientBounds.Width - blockTexture.Width);
8 newBlock.Position = new Vector2(x, - blockTexture.Height);
9 // with a random rotation
10 newBlock.Rotation = ( float )random.NextDouble() * MathHelper.TwoPi;
11 blocks.Add(newBlock);
12 }
在
Update方法中再进行修改。
2 if (random.NextDouble() < BlockSpawnProbability)
3 {
4 Block newBlock = new Block();
5 // at a random position just above the screen
6 float x = ( float )random.NextDouble() *
7 (Window.ClientBounds.Width - blockTexture.Width);
8 newBlock.Position = new Vector2(x, - blockTexture.Height);
9 // with a random rotation
10 newBlock.Rotation = ( float )random.NextDouble() * MathHelper.TwoPi;
11 blocks.Add(newBlock);
12 }
1
//
Animate this block falling
2 blocks[i].Position += new Vector2( 0.0f , BlockFallSpeed);
3 blocks[i].Rotation += BlockRotateSpeed;
现在,下落的物体可以进行旋转了,但还需要在
Draw方法中添加以下代码。
2 blocks[i].Position += new Vector2( 0.0f , BlockFallSpeed);
3 blocks[i].Rotation += BlockRotateSpeed;
1
//
Draw blocks
2 foreach (Block block in blocks)
3 {
4 spriteBatch.Draw(blockTexture, block.Position, null , Color.White,
5 block.Rotation, Vector2.Zero, 1.0f , SpriteEffects.None, 0.0f );
6 }
如果现在进行编译运行,你会发现两个错误,第一个就是你所想像的那样,碰撞检测并没有起作用。第二个就是下落的物体只依照图片精灵的左上角为中心进行旋转。我们通过下面代码来修改这两个错误。
2 foreach (Block block in blocks)
3 {
4 spriteBatch.Draw(blockTexture, block.Position, null , Color.White,
5 block.Rotation, Vector2.Zero, 1.0f , SpriteEffects.None, 0.0f );
6 }
Vector2 blockOrigin;
在 LoadGraphicsContent方法中加载 block的纹理后,初始 blockOrigin为图像精灵的中间。
1
//
Calculate the block origin
2 blockOrigin =
3 new Vector2(blockTexture.Width / 2 , blockTexture.Height / 2 );
修改
Draw
方法
2 blockOrigin =
3 new Vector2(blockTexture.Width / 2 , blockTexture.Height / 2 );
1
//
Draw blocks
2 foreach (Block block in blocks)
3 {
4 spriteBatch.Draw(blockTexture, block.Position, null , Color.White,
5 block.Rotation, blockOrigin, 1.0f , SpriteEffects.None, 0.0f );
6 }
编译运行之后你会发现物体按照他们下落的路径进行旋转,但与此同时你会发现另一个错误,下落的物体在中心经过窗口下边的时候就消失了。现在我们在
Update
方法中修改代码如下:
2 foreach (Block block in blocks)
3 {
4 spriteBatch.Draw(blockTexture, block.Position, null , Color.White,
5 block.Rotation, blockOrigin, 1.0f , SpriteEffects.None, 0.0f );
6 }
1
//
Remove this block if it has fallen off the screen
2 if (block.Position.Y > Window.ClientBounds.Height + blockOrigin.Length())
2 if (block.Position.Y > Window.ClientBounds.Height + blockOrigin.Length())
最后,物体的下落和旋转完成了。
第二步:转换物体的2D像素碰撞检测
在我们前面教程中讲到过对可能存在碰撞的两个图像精灵都要进行像素级别的碰撞检测。那么我们看一下下面的这种情况。
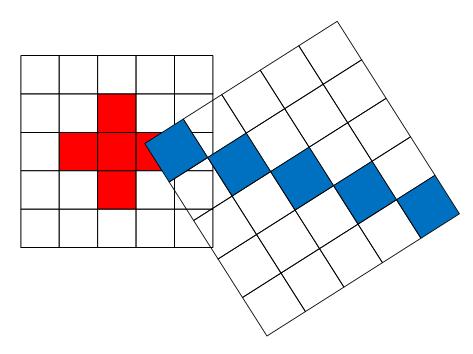
红色的十字图片,我们成为精灵 A ,蓝色斜杠的图片,我们称之为精灵 B 。我们可以看到这两个精灵都有部分的旋转,而且精灵 B 在大小上
第二步:转换物体的2D像素碰撞检测
在我们前面教程中讲到过对可能存在碰撞的两个图像精灵都要进行像素级别的碰撞检测。那么我们看一下下面的这种情况。
红色的十字图片,我们成为精灵 A ,蓝色斜杠的图片,我们称之为精灵 B 。我们可以看到这两个精灵都有部分的旋转,而且精灵 B 在大小上
也有变化。而我们要判断这两个图片精灵是否产生碰撞,我们就要用精灵
A
的每一个像素与精灵
B
的进行比较。所以我们需要一个方法得到精灵
A
重合在精灵
B
上的像素位置。
注意 为了理解这个技术,对于矩阵的运算的理解是有帮助的,但不是必要的。现在你只需要知道一个矩阵可以用来实现精灵的大小,位置以及旋转等变换。多个变换矩阵有序的连乘可以表示多个变换。同样一个矩阵可以将一个向量通过一个坐标系转换为另外一个坐标系。而这个矩阵的逆矩阵可以完成反向的变换。我们使用
XNA框架中的
Vector2.Transform方法来实现对一个向量的变换。
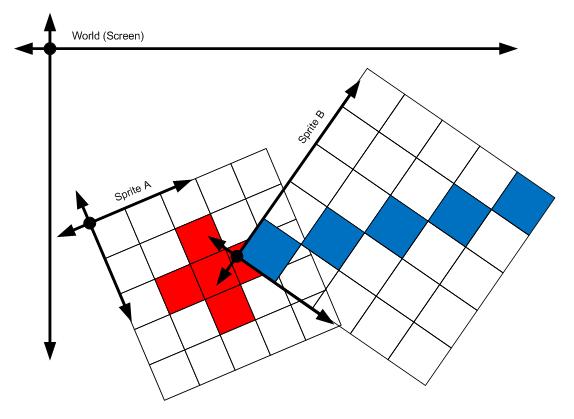
如果我们将精灵A看作是没有经过变换的话,那么问题就会简单很多。我们现在使用精灵A的坐标系,如下图。现在这两个精灵之间的关系就比较好进行计算了。
下面这个图也许会帮助你理解是怎样实现坐标系的变换的

每一个图像精灵的坐标系都与世界坐标相关,那么我们可以通过世界坐标来判断判断精灵A的像素在精灵B的像素的位置。首先计算出精灵A的变换矩阵,其次计算出精灵B的逆矩阵。
1
Matrix transformAToB
=
transformA
*
Matrix.Invert(transformB);
对精灵A的每一个像素点转换到精灵B所对应的区域内,如果出现小数的话近似为整数。如果这个整数在B的区域内,则将此像素点与原来精灵A的像素进行碰撞检测。
所有的代码如下,将他们添加到你的 Game类中。
1
///
<summary>
2 /// Determines if there is overlap of the non-transparent pixels between two
3 /// sprites.
4 /// </summary>
5 /// <param name="transformA"> World transform of the first sprite. </param>
6 /// <param name="widthA"> Width of the first sprite's texture. </param>
7 /// <param name="heightA"> Height of the first sprite's texture. <;/param>
8 /// <param name="dataA"> Pixel color data of the first sprite. </param>
9 /// <param name="transformB"> World transform of the second sprite. </param>
10 /// <param name="widthB"> Width of the second sprite's texture. </param>
11 /// <param name="heightB"> Height of the second sprite's texture. </param>
12 /// <param name="dataB"> Pixel color data of the second sprite. </param>
13 /// <returns> True if non-transparent pixels overlap; false otherwise </returns>
14 static bool IntersectPixels(
15 Matrix transformA, int widthA, int heightA, Color[] dataA,
16 Matrix transformB, int widthB, int heightB, Color[] dataB)
17 {
18 // Calculate a matrix which transforms from A's local space into
19 // world space and then into B's local space
20 Matrix transformAToB = transformA * Matrix.Invert(transformB);
21 // For each row of pixels in A
22 for ( int yA = 0 ; yA < heightA; yA ++ )
23 {
24 // For each pixel in this row
25 for ( int xA = 0 ; xA < widthA; xA ++ )
26 {
27 // Calculate this pixel's location in B
28 Vector2 positionInB =
29 Vector2.Transform( new Vector2(xA, yA), transformAToB);
30 // Round to the nearest pixel
31 int xB = ( int )Math.Round(positionInB.X);
32 int yB = ( int )Math.Round(positionInB.Y);
33 // If the pixel lies within the bounds of B
34 if ( 0 <= xB && xB < widthB &&
35 0 <= yB && yB < heightB)
36 {
37 // Get the colors of the overlapping pixels
38 Color colorA = dataA[xA + yA * widthA];
39 Color colorB = dataB[xB + yB * widthB];
40 // If both pixels are not completely transparent,
41 if (colorA.A != 0 && colorB.A != 0 )
42 {
43 // then an intersection has been found
44 return true ;
45 }
46 }
47 }
48 }
49 // No intersection found
50 return false ;
51 }
测试程序
2 /// Determines if there is overlap of the non-transparent pixels between two
3 /// sprites.
4 /// </summary>
5 /// <param name="transformA"> World transform of the first sprite. </param>
6 /// <param name="widthA"> Width of the first sprite's texture. </param>
7 /// <param name="heightA"> Height of the first sprite's texture. <;/param>
8 /// <param name="dataA"> Pixel color data of the first sprite. </param>
9 /// <param name="transformB"> World transform of the second sprite. </param>
10 /// <param name="widthB"> Width of the second sprite's texture. </param>
11 /// <param name="heightB"> Height of the second sprite's texture. </param>
12 /// <param name="dataB"> Pixel color data of the second sprite. </param>
13 /// <returns> True if non-transparent pixels overlap; false otherwise </returns>
14 static bool IntersectPixels(
15 Matrix transformA, int widthA, int heightA, Color[] dataA,
16 Matrix transformB, int widthB, int heightB, Color[] dataB)
17 {
18 // Calculate a matrix which transforms from A's local space into
19 // world space and then into B's local space
20 Matrix transformAToB = transformA * Matrix.Invert(transformB);
21 // For each row of pixels in A
22 for ( int yA = 0 ; yA < heightA; yA ++ )
23 {
24 // For each pixel in this row
25 for ( int xA = 0 ; xA < widthA; xA ++ )
26 {
27 // Calculate this pixel's location in B
28 Vector2 positionInB =
29 Vector2.Transform( new Vector2(xA, yA), transformAToB);
30 // Round to the nearest pixel
31 int xB = ( int )Math.Round(positionInB.X);
32 int yB = ( int )Math.Round(positionInB.Y);
33 // If the pixel lies within the bounds of B
34 if ( 0 <= xB && xB < widthB &&
35 0 <= yB && yB < heightB)
36 {
37 // Get the colors of the overlapping pixels
38 Color colorA = dataA[xA + yA * widthA];
39 Color colorB = dataB[xB + yB * widthB];
40 // If both pixels are not completely transparent,
41 if (colorA.A != 0 && colorB.A != 0 )
42 {
43 // then an intersection has been found
44 return true ;
45 }
46 }
47 }
48 }
49 // No intersection found
50 return false ;
51 }
第一次看到这个算法也许有些令人恐惧,在 TransformedCollisionTest的文件夹下有一个程序使你更好的理解上述的一些概念。这个程序呈现出两个图像精灵F和R,与此同时有两个相似的灰色精灵在与之对应的地方。其中原点是图像精灵的原始位置,你可以看到灰色的R会随着黑色R的变换而变换,但是F的旋转是灰色R旋转的反方向。灰色的F是不会移动的。
程序的控制
动作 键盘鼠标 手柄
选择 F 按下鼠标左键 按下左按键
选择 R 按下鼠标右键 按下右按键
选择移动 移动鼠标 左控制键
旋转物体 LEFT 和RIGHT 键或者鼠标滚轮 左右控制键
缩放物体 UP 和 DOWN 键或者CTRL加鼠标滚轮 上下控制键
选择原始F ALT 和鼠标左键 左上方按键
选择原始 R ALT和鼠标右键 右上方按键
第三步:应用新的碰撞算法
在新的算法当中,我们需要为游戏角色和下落物体都建立一个转换矩阵。我们可以使用XNA框架自带的Matrix结构来建立矩阵,并且通过多个矩阵的乘法完成转换。我们可以将下面的代码添加到Update方法当中来完成对游戏角色的转换。
1
//
Move the player left and right with arrow keys or D-pad
2 if (keyboard.IsKeyDown(Keys.Left) ||
3 gamePad.DPad.Left == ButtonState.Pressed)
4 {
5 personPosition.X -= PersonMoveSpeed;
6 }
7 if (keyboard.IsKeyDown(Keys.Right) ||
8 gamePad.DPad.Right == ButtonState.Pressed)
9 {
10 personPosition.X += PersonMoveSpeed;
11 }
12 // Prevent the person from moving off of the screen
13 personPosition.X = MathHelper.Clamp(personPosition.X,
14 safeBounds.Left, safeBounds.Right - personTexture.Width);
15 // Update the person's transform
16 Matrix personTransform =
17 Matrix.CreateTranslation( new Vector3(personPosition, 0.0f ));
在
Update循环当中,变换矩阵表示了下落物体的旋转,位置等转换。
2 if (keyboard.IsKeyDown(Keys.Left) ||
3 gamePad.DPad.Left == ButtonState.Pressed)
4 {
5 personPosition.X -= PersonMoveSpeed;
6 }
7 if (keyboard.IsKeyDown(Keys.Right) ||
8 gamePad.DPad.Right == ButtonState.Pressed)
9 {
10 personPosition.X += PersonMoveSpeed;
11 }
12 // Prevent the person from moving off of the screen
13 personPosition.X = MathHelper.Clamp(personPosition.X,
14 safeBounds.Left, safeBounds.Right - personTexture.Width);
15 // Update the person's transform
16 Matrix personTransform =
17 Matrix.CreateTranslation( new Vector3(personPosition, 0.0f ));
1
//
Build the block's transform
2 Matrix blockTransform =
3 Matrix.CreateTranslation( new Vector3( - blockOrigin, 0.0f )) *
4 Matrix.CreateRotationZ(blocks[i].Rotation) *
5 Matrix.CreateTranslation( new Vector3(blocks[i].Position, 0.0f ));
6 // Check collision with person
7 if (IntersectPixels(personTransform, pe rsonTexture.Width,
8 personTexture.Height, personTextureData,
9 blockTransform, blockTex ture.Width,
10 blockTexture.Height, blockTextureData))
11 {
12 personHit = true ;
13 }
编译并运行游戏。一切都正常了!
2 Matrix blockTransform =
3 Matrix.CreateTranslation( new Vector3( - blockOrigin, 0.0f )) *
4 Matrix.CreateRotationZ(blocks[i].Rotation) *
5 Matrix.CreateTranslation( new Vector3(blocks[i].Position, 0.0f ));
6 // Check collision with person
7 if (IntersectPixels(personTransform, pe rsonTexture.Width,
8 personTexture.Height, personTextureData,
9 blockTransform, blockTex ture.Width,
10 blockTexture.Height, blockTextureData))
11 {
12 personHit = true ;
13 }
扩展:优化
优化这个算法有以下两种方式,第一种是在调用像素检测之前使用包围盒检测来判断两个物体是否相交。如果包围盒都不想交的话我们就不用使用像素检测了。第二个优化方法比较复杂,我们在后面进行讨论。
变换物体的矩形包围盒
一般的图像精灵的包围盒比较好计算,而变换后的物体的包围盒计算就比较复杂了。当一个图像精灵变换之后,他的包围盒也随之变换。但是这个新的包围盒并不是在正坐标系下的。所以我们需要选择变换后的精灵的角作为包围盒的边界。如下图所示。

我们将下面的代码添加到你的Game类当中。
1
///
<summary>
2 /// Calculates an axis aligned rectangle which fully contains an arbitrarily
3 /// transformed axis aligned rectangle.
4 /// </summary>
5 /// <param name="rectangle"> Original bounding rectangle. </param>
6 /// <param name="transform"> World transform of the rectangle. </param>
7 /// <returns> A new rectangle which contains the trasnformed rectangle. </returns>
8 public static Rectangle CalculateBoundingRectangle(Rectangle rectangle, Matrix transform)
9 {
10 // Get all four corners in local space
11 Vector2 leftTop = new Vector2(rectangle.Left, rectangle.Top);
12 Vector2 rightTop = new Vector2(rectangle.Right, rectangle.Top);
13 Vector2 leftBottom = new Vector2(rectangle.Left, rectangle.Bottom);
14 Vector2 rightBottom = new Vector2(rectangle.Right, rectangle.Bottom);
15 // Transform all four corners into work space
16 Vector2.Transform( ref leftTop, ref transform, out leftTop);
17 Vector2.Transform( ref rightTop, ref transform, out rightTop);
18 Vector2.Transform( ref leftBottom, ref transform, out leftBottom);
19 Vector2.Transform( ref rightBottom, ref transform, out rightBottom);
20 // Find the minimum and maximum extents of the rectangle in world space
21 Vector2 min = Vector2.Min(Vector2.Min(leftTop, rightTop),
22 Vector2.Min(leftBottom, rightBottom));
23 Vector2 max = Vector2.Max(Vector2.Max(leftTop, rightTop),
24 Vector2.Max(leftBottom, rightBottom));
25 // Return as a rectangle
26 return new Rectangle(( int )min.X, ( int )min.Y,
27 ( int )(max.X - min.X), ( int )(max.Y - min.Y));
28 }
在
Update
方法当中,为相交的矩形进行像素级别的检测
2 /// Calculates an axis aligned rectangle which fully contains an arbitrarily
3 /// transformed axis aligned rectangle.
4 /// </summary>
5 /// <param name="rectangle"> Original bounding rectangle. </param>
6 /// <param name="transform"> World transform of the rectangle. </param>
7 /// <returns> A new rectangle which contains the trasnformed rectangle. </returns>
8 public static Rectangle CalculateBoundingRectangle(Rectangle rectangle, Matrix transform)
9 {
10 // Get all four corners in local space
11 Vector2 leftTop = new Vector2(rectangle.Left, rectangle.Top);
12 Vector2 rightTop = new Vector2(rectangle.Right, rectangle.Top);
13 Vector2 leftBottom = new Vector2(rectangle.Left, rectangle.Bottom);
14 Vector2 rightBottom = new Vector2(rectangle.Right, rectangle.Bottom);
15 // Transform all four corners into work space
16 Vector2.Transform( ref leftTop, ref transform, out leftTop);
17 Vector2.Transform( ref rightTop, ref transform, out rightTop);
18 Vector2.Transform( ref leftBottom, ref transform, out leftBottom);
19 Vector2.Transform( ref rightBottom, ref transform, out rightBottom);
20 // Find the minimum and maximum extents of the rectangle in world space
21 Vector2 min = Vector2.Min(Vector2.Min(leftTop, rightTop),
22 Vector2.Min(leftBottom, rightBottom));
23 Vector2 max = Vector2.Max(Vector2.Max(leftTop, rightTop),
24 Vector2.Max(leftBottom, rightBottom));
25 // Return as a rectangle
26 return new Rectangle(( int )min.X, ( int )min.Y,
27 ( int )(max.X - min.X), ( int )(max.Y - min.Y));
28 }
1
//
Calculate the bounding rectangle of this block in world space
2 Rectangle blockRectangle = CalculateBoundingRectangle(
3 new Rectangle( 0 , 0 , blockTexture.Width, blockTexture.Height),
4 blockTransform);
5
6 // The per-pixel check is expensive, so check the bounding rectangles
7 // first to prevent testing pixels when collisions are impossible.
8 if (personRectangle.Intersects(blockRectangle))
9 {
10 // Check collision with person
11 if (IntersectPixels(personTransform, personTexture.Width,
12 personTexture.Height, personTextureData,
13 blockTransform, blockTexture.Width,
14 blockTexture.Height, blockTextureData))
15 {
16 personHit = true ;
17 }
18 }
减少像素的转换
2 Rectangle blockRectangle = CalculateBoundingRectangle(
3 new Rectangle( 0 , 0 , blockTexture.Width, blockTexture.Height),
4 blockTransform);
5
6 // The per-pixel check is expensive, so check the bounding rectangles
7 // first to prevent testing pixels when collisions are impossible.
8 if (personRectangle.Intersects(blockRectangle))
9 {
10 // Check collision with person
11 if (IntersectPixels(personTransform, personTexture.Width,
12 personTexture.Height, personTextureData,
13 blockTransform, blockTexture.Width,
14 blockTexture.Height, blockTextureData))
15 {
16 personHit = true ;
17 }
18 }
到目前为止,我们的IntersectPixels方法会将精灵A的每一个像素转换到精灵B的坐标当中,在像素的转换当中,我们如果知道第一个像素转换后的位置,那么我们就可以根据原先像素之间的位置关系来确定转换后的像素位置,而不需要再将这些像素进行矩阵乘法了。这样,速度就会提高很多。
我们来看下面这两幅图,可以看到在精灵A的坐标系当中,像素是按照X轴横向计算的,而在精灵B的坐标系当中,相似的像素按照另外一个方向排列。我们可以通过精灵A的坐标系和精灵B的坐标系的关系,不需要变换就可以求得在精灵B的坐标系中X轴方向每个像素的移动距离。同样,我们也可以求出Y轴方向的像素移动距离,我们主要通过Vector2.TransformNormal方法实现。
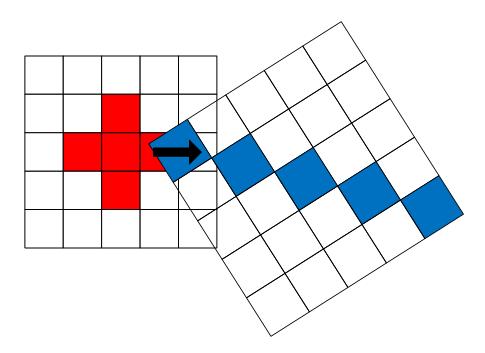
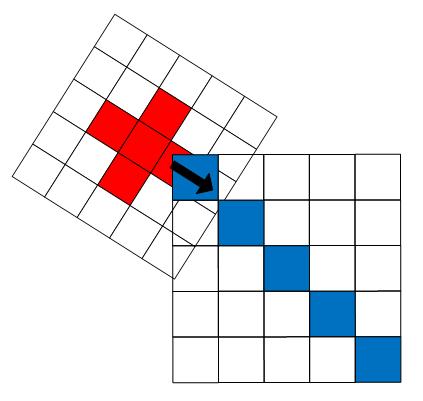
在精灵A的每个像素在精灵B当中的相对应的像素可以通过一个步向量(Step Vector)来计算。也就是说确定精灵A的第一个对应像素之后,后面的像素只通过步向量的计算既可以得到。比起通过矩阵计算要减少很多资源消耗。
下面是在IntersectPixels方法中添加的优化代码
1
///
<summary>
2 /// Determines if there is overlap of the non-transparent pixels between two
3 /// sprites.
4 /// </summary>
5 /// <param name="transformA"> World transform of the first sprite. </param>
6 /// <param name="widthA"> Width of the first sprite's texture. </param>
7 /// <param name="heightA"> Height of the first sprite's texture. </param>
8 /// <param name="dataA"> Pixel color data of the first sprite. </param>
9 /// <param name="transformB"> World transform of the second sprite. </param>
10 /// <param name="widthB"> Width of the second sprite's texture. </param>
11 /// <param name="heightB"> Height of the second sprite's texture. </param>
12 /// <param name="dataB"> Pixel color data of the second sprite. </param>
13 /// <returns> True if non-transparent pixels overlap; false otherwise </returns>
14 public static bool IntersectPixels(
15 Matrix transformA, int widthA, int heightA, Color[] dataA,
16 Matrix transformB, int widthB, int heightB, Color[] dataB)
17 {
18 // Calculate a matrix which transforms from A's local space into
19 // world space and then into B's local space
20 Matrix transformAToB = transformA * Matrix.Invert(transformB);
21
22 // When a point moves in A's local space, it moves in B's local space with a
23 // fixed direction and distance proportional to the movement in A.
24 // This algorithm steps through A one pixel at a time along A's X and Y axes
25 // Calculate the analogous steps in B:
26 Vector2 stepX = Vector2.TransformNormal(Vector2.UnitX, transformAToB);
27 Vector2 stepY = Vector2.TransformNormal(Vector2.UnitY, transformAToB);
28
29 // Calculate the top left corner of A in B's local space
30 // This variable will be reused to keep track of the start of each row
31 Vector2 yPosInB = Vector2.Transform(Vector2.Zero, transformAToB);
32
33 // For each row of pixels in A
34 for ( int yA = 0 ; yA < heightA; yA ++ )
35 {
36 // Start at the beginning of the row
37 Vector2 posInB = yPosInB;
38
39 // For each pixel in this row
40 for ( int xA = 0 ; xA < widthA; xA ++ )
41 {
42 // Round to the nearest pixel
43 int xB = ( int )Math.Round(posInB.X);
44 int yB = ( int )Math.Round(posInB.Y);
45
46 // If the pixel lies within the bounds of B
47 if ( 0 <= xB && xB < widthB &&
48 0 <= yB && yB < heightB)
49 {
50 // Get the colors of the overlapping pixels
51 Color colorA = dataA[xA + yA * widthA];
52 Color colorB = dataB[xB + yB * widthB];
53
54 // If both pixels are not completely transparent,
55 if (colorA.A != 0 && colorB.A != 0 )
56 {
57 // then an intersection has been found
58 return true ;
59 }
60 }
61
62 // Move to the next pixel in the row
63 posInB += stepX;
64 }
65
66 // Move to the next row
67 yPosInB += stepY;
68 }
69
70 // No intersection found
71 return false ;
72 }


 3732
3732

 被折叠的 条评论
为什么被折叠?
被折叠的 条评论
为什么被折叠?
 到【灌水乐园】发言


