


1: K Fold Cross Validation
In the previous mission, we learned about cross validation, a technique for testing a machine learning model's accuracy on new data that the model wasn't trained on. Specifically, we focused on the holdout validation technique, which involved:
- splitting the full dataset into 2 partitions:
- a training set and
- a test set
- training the model on the training set,
- using the trained model to predict labels on the test set,
- computing an error metric (e.g. simple accuracy) to understand the model's accuracy.
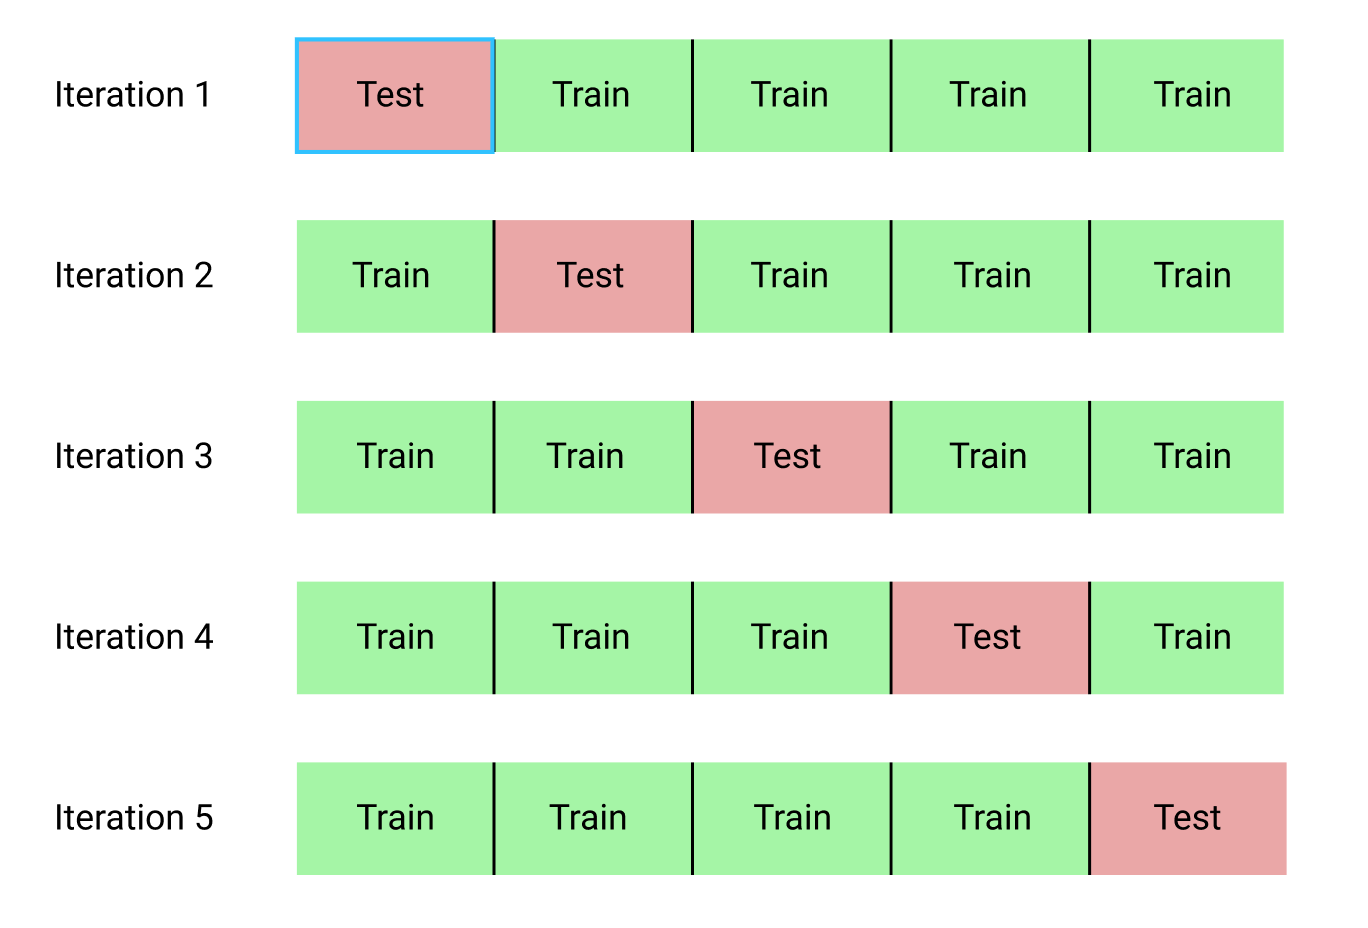
Holdout validation is actually a specific example of a larger class of validation techniques called k-fold cross-validation. K-fold cross-validation works by:
- splitting the full dataset into
kequal length partitions,- selecting
k-1partitions as the training set and - selecting the remaining partition as the test set
- selecting
- training the model on the training set,
- using the trained model to predict labels on the test set,
- computing an error metric (e.g. simple accuracy) and setting aside the value for later,
- repeating all of the above steps
k-1times, until each partition has been used as the test set for an iteration, - calculating the mean of the
kerror values.
Using 5 or 10 folds is common for k-fold cross-validation. Here's a diagram describing each iteration of 5-fold cross validation:
Since you're training k models, the more number of folds you use the longer it takes. When working with large datasets, often only a few number of folds are used because of the time and cost it takes, with the tradeoff that having more training examples helps improve the accuracy even with less folds.
2: Partititioning The Data
To explore k-fold cross-validation, we'll continue to work with the dataset on graduate admissions. Recall that this dataset contains data on 644 applications with the following columns:
gre- applicant's store on the Graduate Record Exam, a generalized test for prospective graduate students.- Score ranges from 200 to 800.
gpa- college grade point average.- Continuous between 0.0 and 4.0.
admit- binary value- Binary value, 0 or 1, where 1 means the applicant was admitted to the program and 0 means the applicant was rejected.
To save you time, we've already imported the Pandas library, read in admissions.csv into a Dataframe, renamed the admit column toactual_label, and randomized the ordering of the rows.
Now, partition the dataset into 5 folds.
Instructions
Partition the dataset into 5 folds and store each row's fold in a new integer column named fold:
- Fold
1: rows from index0to128, including both of those rows. - Fold
2: rows from index129to257, including both of those rows. - Fold
3: rows from index258to386, including both of those rows. - Fold
4: rows from index387to514, including both of those rows. - Fold
5: rows from index515to644, including both of those rows.
Display the first 5 rows and the last 5 rows of the Dataframe to confirm.
import pandas as pd
admissions = pd.read_csv("admissions.csv")
admissions["actual_label"] = admissions["admit"]
admissions = admissions.drop("admit", axis=1)
shuffled_index = np.random.permutation(admissions.index)
shuffled_admissions = admissions.loc[shuffled_index]
admissions = shuffled_admissions.reset_index()
admissions.ix[0:128,"fold"]=1
admissions.ix[129:257,"fold"]=2
admissions.ix[258:386,"fold"]=3
admissions.ix[387:514,"fold"]=4
admissions.ix[515:644,"fold"]=5
admissions["fold"]=admissions["fold"].astype("int")
print(admissions.head())
print(admissions.tail())
3: First Iteration
In the first iteration, let's assign fold 1 as the test set and folds 2 to 5 as the training set. Then, train the model and use it to predict labels for the test set.
Instructions
- Train a logistic regression model using the
gpacolumn as the sole feature from folds2to5as the training set.c - Use the model to make predictions on the test set and assign the predicted labels to
labels. - Calculate the accuracy by comparing the predicted labels with the actual labels from the
actual_labelcolumn on the test set. - Assign the accuracy value to
iteration_one_accuracy.
from sklearn.linear_model import LogisticRegression
model=LogisticRegression()
train_iteration_one=admissions[admissions["fold"]!=1]
test_iteration_one=admissions[admissions["fold"]==1]
model.fit(train_iteration_one[["gpa"]],train_iteration_one[["actual_label"]])
labels=model.predict(test_iteration_one[["gpa"]])
test_iteration_one["prediction_label"]=labels
matches=test_iteration_one["prediction_label"]==test_iteration_one["actual_label"]
correct_predictions=test_iteration_one[matches]
iteration_one_accuracy=len(correct_predictions)/len(test_iteration_one)
print(iteration_one_accuracy)
4: Function For Training Models
From the first iteration, we achieved an accuracy score of 60.5% accuracy. Let's now run through the rest of the iterations to see how the accuracy changes after each iteration and to compute the mean accuracy.
To make the iteration process easier, wrap the code you in the previous screen in a function.
Instructions
- Write a function named
train_and_testthat takes in a Dataframe and a list of fold id values (1to5in our case) and returns a list of accuracy values, e.g.:
[0.5, 0.5, 0.5, 0.5, 0.5]
- Use the
train_and_testfunction to return the list of accuracy values for theadmissionsDataframe and assign toaccuracies. e.g.:
accuracies = train_and_test(admissions, [1,2,3,4,5])
- Compute the average accuracy and assign to
average_accuracy. average_accuracyshould be a float value whileaccuraciesshould be a list of float values (one float value per iteration).- Use the variable inspector or the
printfunction to display the values foraccuraciesandaverage_accuracy.
# Use np.mean to calculate the mean.
import numpy as np
fold_ids = [1,2,3,4,5]
def train_and_test(df, folds):
fold_accuracies = []
for fold in folds:
model = LogisticRegression()
train = admissions[admissions["fold"] != fold]
test = admissions[admissions["fold"] == fold]
model.fit(train[["gpa"]], train["actual_label"])
model.fit(train[["gpa"] = model.predict(test[["gpa"]])
matches = test["predicted_label"] == test["actual_label"]
correct_predictions = test[matches]
fold_accuracies.append(len(correct_predictions) / len(test))
return(fold_accuracies)
accuracies = train_and_test(admissions, fold_ids)
print(accuracies)
average_accuracy = np.mean(accuracies)
print(average_accuracy)
5: Sklearn
The average accuracy value was 64.8%, compared to an accuracy value of 63.6% using holdout validation from the last mission. In many cases, the resulting accuracy values don't differ much between a simpler, less time-intensive method like holdout validation and a more robust but more time-intensive method like k-fold cross-validation. As you use these and other cross validation techniques more often, you should get a better sense of these tradeoffs and when to use which validation technique.
In addition, the computed accuracy values for each fold stayed within 61% and 63%, which is a healthy sign. Wild variations in the accuracy values between folds is usually indicative of using too many folds (k value). By implementing your own k-fold cross-validation function, you hopefully acquired a good understanding of the inner workings of the technique.
When working in a production environment however, you should use scikit-learn. Scikit-learn has a few different tools that make performing cross validation easy. Similar to having to instantiate a LinearRegression or LogisticRegression object before you can train one of those models, you need to instantiate a KFold class before you can perform k-fold cross-validation:
kf = KFold(n, n_folds, shuffle=False, random_state=None)
where:
nis the number of observations in the dataset,n_foldsis the number of folds you want to use,shuffleis used to toggle shuffling(切换洗牌) of the ordering of the observations in the dataset,random_stateis used to specify a seed value(种子值) ifshuffleis set toTrue.
You'll notice here that only the first parameter depends on the dataset at all. This is because the KFold class returns an iterator object but won't actually handle the training and testing of models. If we're primarily only interested in accuracy and error metrics for each fold, we can use the KFold class in conjunction with the cross_val_score function, which will handle training and testing of the models in each fold.
Here are the relevant parameters for the cross_val_score function:
cross_val_score(estimator, X, Y, scoring=None, cv=None)
where:
estimatoris a sklearn model that implements thefitmethod (e.g. instance of LinearRegression or LogisticRegression),Xis the list or 2D array containing the features you want to train on,yis a list containing the values you want to predict (target column),scoringis a string describing the scoring criteria (list of accepted values here).cvdescribes the number of folds. Here are some examples of accepted values:- an instance of the
KFoldclass, - an integer representing the number of folds.
- an instance of the
Depending on the scoring criteria you specify, either a single value is returned (e.g. average_precision) or an array of values (e.g.accuracy), one value for each fold.
Here's the general workflow for performing k-fold cross-validation using the classes we just described:
- instantiate the model class you want to fit (e.g. LogisticRegression),
- instantiate the
KFoldclass and using the parameters to specify the k-fold cross-validation attributes you want, - use the
cross_val_scorefunction to return the scoring metric you're interested in.
Instructions
-
Create a new instance of the
KFoldclass with the following properties:nset to length ofadmissions,- 5 folds,
- shuffle set to
True, - random seed set to
8(so we can answer check using the same seed), - assigned to the variable
kf.
-
Create a new instance of the
LogisticRegressionclass and assign tolr. -
Use the
cross_val_scorefunction to perform k-fold cross-validation:- using the LogisticRegression instance
lr, - using the
gpacolumn for training, - using the
actual_labelcolumn as the target column, - returning an array of accuracy values (one value for each fold).
- using the LogisticRegression instance
-
Assign the resulting array of accuracy values to
accuracies, compute the average accuracy, and assign the average toaverage_accuracy. -
Use the variable inspector or the
printfunction to display the values foraccuraciesandaverage_accuracy.
from sklearn.cross_validation import KFold
from sklearn.cross_validation import cross_val_score
admissions = pd.read_csv("admissions.csv")
admissions["actual_label"] = admissions["admit"]
admissions = admissions.drop("admit", axis=1)
kf = KFold(len(admissions),5,shuffle=True, random_state=8)
lr=LogisticRegression()
accuracies=cross_val_score(lr, admissions[["gpa"]], admissions["actual_label"], scoring="accuracy", cv=kf)
average_accuracy=sum(accuracies)/len(accuracies)
print(accuracies)
print(average_accuracy)
6: Interpretation
Using 5-fold cross-validation, we achieved an average accuracy score of 64.4%, which closely matches the 63.6% accuracy score we achieved using holdout validation. When working with simple univariate models, often holdout validation is more than enough and the similar accuracy scores confirm this. When you're using multiple features to train a model (multivariate models), performing k-fold cross-validation can give you a better sense of the accuracy you should expect when you use the model on data it wasn't trained on.
7: Next Steps
In this mission, we explored a more robust cross validation technique called k-fold cross-validation. Cross-validation helps us understand a model's generalizability and reduce overfitting. In the next mission, we'll explore some more specific overfitting techniques.


 4万+
4万+

 被折叠的 条评论
为什么被折叠?
被折叠的 条评论
为什么被折叠?
 到【灌水乐园】发言


