Install
Welcome to Caffe2! Get started with deep learning today by following the step by step guide on how to download and install Caffe2.
Select your preferred platform and install type.

This build is confirmed for:
Required Dependencies
1
2
3
4
5
6
7
8
9
10
11 | sudo apt-get update
sudo apt-get install -y --no-install-recommends \
build-essential \
cmake \
git \
libgoogle-glog-dev \
libprotobuf-dev \ protobuf-compiler \ python-dev \ python-pip sudo pip install numpy protobuf |
Optional GPU Support
If you plan to use GPU instead of CPU only, then you should install NVIDIA CUDA 8 and cuDNN v5.1 or v6.0, a GPU-accelerated library of primitives for deep neural networks. NVIDIA’s detailed instructions or if you’re feeling lucky try the quick install set of commands below.
Update your graphics card drivers first! Otherwise you may suffer from a wide range of difficult to diagnose errors.
For Ubuntu 14.04
1
2
3
4
5 | sudo apt-get update && sudo apt-get install wget -y --no-install-recommends
wget "http://developer.download.nvidia.com/compute/cuda/repos/ubuntu1404/x86_64/cuda-repo-ubuntu1404_8.0.61-1_amd64.deb"
sudo dpkg -i cuda-repo-ubuntu1404_8.0.61-1_amd64.deb
sudo apt-get update
sudo apt-get install cuda
|
For Ubuntu 16.04
1
2
3
4
5 | sudo apt-get update && sudo apt-get install wget -y --no-install-recommends
wget "http://developer.download.nvidia.com/compute/cuda/repos/ubuntu1604/x86_64/cuda-repo-ubuntu1604_8.0.61-1_amd64.deb"
sudo dpkg -i cuda-repo-ubuntu1604_8.0.61-1_amd64.deb
sudo apt-get update
sudo apt-get install cuda
|
Install cuDNN (all Ubuntu versions)
Version 5.1
1
2
3
4 | CUDNN_URL="http://developer.download.nvidia.com/compute/redist/cudnn/v5.1/cudnn-8.0-linux-x64-v5.1.tgz"
wget ${CUDNN_URL}
sudo tar -xzf cudnn-8.0-linux-x64-v5.1.tgz -C /usr/local
rm cudnn-8.0-linux-x64-v5.1.tgz && sudo ldconfig
|
Version 6.0 Visit NVIDIA’s cuDNN download to register and download the archive. Follow the same instructions above switching out for the updated library.
Optional Dependencies
Note libgflags2 is for Ubuntu 14.04. libgflags-dev is for Ubuntu 16.04.
1
2 | # for Ubuntu 14.04
sudo apt-get install -y --no-install-recommends libgflags2
|
1
2 | # for Ubuntu 16.04
sudo apt-get install -y --no-install-recommends libgflags-dev
|
1
2
3
4
5
6
7
8
9
10
11
12
13
14
15
16
17
18
19
20
21
22
23
24
25
26
27 | # for both Ubuntu 14.04 and 16.04
sudo apt-get install -y --no-install-recommends \
libgtest-dev \
libiomp-dev \
libleveldb-dev \
liblmdb-dev \ libopencv-dev \ libopenmpi-dev \ libsnappy-dev \ openmpi-bin \ openmpi-doc \ python-pydot sudo pip install \ flask \ future \ graphviz \ hypothesis \ jupyter \ matplotlib \ pydot python-nvd3 \ pyyaml \ requests \ scikit-image \ scipy \ setuptools \ six \ tornado |
Clone & Build
1
2
3 | git clone --recursive https://github.com/caffe2/caffe2.git && cd caffe2
make && cd build && sudo make install
python -c 'from caffe2.python import core' 2>/dev/null && echo "Success" || echo "Failure" |
Run this command below to test if your GPU build was a success. You will get a test output either way, but it will warn you at the top of the output if CPU was used instead along with other errors like missing libraries.
1 | python -m caffe2.python.operator_test.relu_op_test
|
Environment Variables
These environment variables may assist you depending on your current configuration. When using the install instructions above on the AWS Deep Learning AMI you don’t need to set these variables. However, our Docker scripts built on Ubuntu-14.04 or NVIDIA’s CUDA images seem to benefit from having these set. If you ran into problems with the build tests above then these are good things to check. Echo them first and see what you have and possibly append or replace with these directories. Also visit the Troubleshooting section.
1
2
3
4
5 | echo $PYTHONPATH
# export PYTHONPATH=/usr/local:$PYTHONPATH
# export PYTHONPATH=$PYTHONPATH:/home/ubuntu/caffe2/build
echo $LD_LIBRARY_PATH # export LD_LIBRARY_PATH=/usr/local/lib:$LD_LIBRARY_PATH |
Setting Up Tutorials & Jupyter Server
If you’re running this all on a cloud computer, you probably won’t have a UI or way to view the IPython notebooks by default. Typically, you would launch them locally with ipython notebook and you would see a localhost:8888 webpage pop up with the directory of notebooks running. The following example will show you how to launch the Jupyter server and connect to remotely via an SSH tunnel.
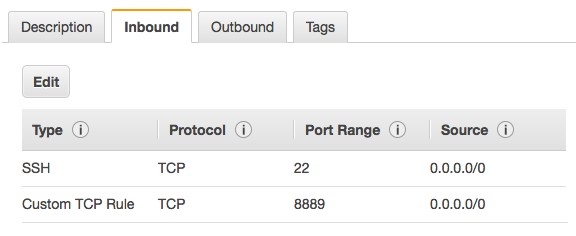
First configure your cloud server to accept port 8889, or whatever you want, but change the port in the following commands. On AWS you accomplish this by adding a rule to your server’s security group allowing a TCP inbound on port 8889. Otherwise you would adjust iptables for this.
Next you launch the Juypter server.
1 | jupyter notebook --no-browser --port=8889
|
Then create the SSH tunnel. This will pass the cloud server’s Jupyter instance to your localhost 8888 port for you to use locally. The example below is templated after how you would connect AWS, where your-public-cert.pem is your own public certificate and ubuntu@super-rad-GPU-instance.compute-1.amazonaws.com is your login to your cloud server. You can easily grab this on AWS by going to Instances > Connect and copy the part after ssh and swap that out in the command below.
1 | ssh -N -f -L localhost:8888:localhost:8889 -i "your-public-cert.pem" ubuntu@super-rad-GPU-instance.compute-1.amazonaws.com
|
Troubleshooting
| PYTHON ERRORS | |
|---|
| Python version | Python is core to run Caffe2. We currently require Python2.7. Ubuntu 14.04 and greater have Python built in by default, and that can be used to run Caffe2. To check your version: python --version |
| Solution | If you want the developer version of python, you could install the dev package for Python: sudo apt-get install python-dev |
| Python environment | You may have another version of Python installed or need to support Python version 3 for other projects. |
| Solution | Try virtualenv or Anaconda. The Anaconda platform provides a single script to install many of the necessary packages for Caffe2, including Python. Using Anaconda is outside the scope of these instructions, but if you are interested, it may work well for you. |
| pip version | If you plan to use Python with Caffe2 then you need pip. |
| Solution | sudo apt-get install python-pip and also try using pip2 instead of pip. |
| BUILDING FROM SOURCE | |
|---|
| OS version | Caffe2 requires Ubuntu 14.04 or greater. |
| git | While you can download the Caffe2 source code and submodules directly from GitHub as a zip, using git makes it much easier. |
| Solution | sudo apt-get install git |
| protobuf | You may experience an error related to protobuf during the make step. |
| Solution | Make sure you’ve installed protobuf in both of these two ways: sudo apt-get install libprotobuf-dev protobuf-compiler && sudo pip install protobuf |
| libgflags2 error | This optional dependency is for Ubuntu 14.04. |
| Solution | Use apt-get install libgflags-dev for Ubuntu 16.04. |
| GPU SUPPORT | |
|---|
| GPU errors | Unsupported GPU or wrong version |
| Solution | You need to know the specific deb for your version of Linux. sudo dpkg -i cuda-repo-<distro>_<version>_<architecture>.debRefer to NVIDIA’s installation guide. |
| Build issues | Be warned that installing CUDA and cuDNN will increase the size of your build by about 4GB, so plan to have at least 12GB for your Ubuntu disk size. |
| CAFFE2 PYTHON | |
|---|
| Module not found | Verify that Caffe2 was installed correctly |
| Solution | Run the following: python -c 'from caffe2.python import core' 2>/dev/null && echo "Success" || echo "Failure"An output of Success means you are ready to with Caffe2 - congratulations! An output of Failure usually means you have not installed one of the dependencies correctly. |
| Dependencies missing | It’s possible you’re trying to run something that was using an optional dependency. |
| Solution | sudo pip install setuptools flask jupyter matplotlib scipy pydot tornado python-nvd3 scikit-image pyyaml |
| matplotlib error | Sometimes you need setuptools first: sudo pip install -U pip setuptools && sudo pip install matplotlib |
| model downloader error | If you need to run it as sudo (because it’s trying to install the model in /usr/local/caffe2…), then PYTHONPATH might not be visible in that context. |
| Solution | sudo visudo then add this line: Defaults env_keep += "PYTHONPATH" |
| “AttributeError: ‘module’ object has no attribute ‘MakeArgument’” | Occurs when calling core.CreateOperator |
| Solution | Check your install directory (/usr/local/), and remove the folder /caffe2/python/utils |
| OTHER ERRORS | |
|---|
| libdc1394 error | for some reason once opencv is installed you may get errors with libdc1394 |
| Solution | ln /dev/null /dev/raw1394 but that’s not persistent so try sh -c 'ln -s /dev/null /dev/raw1394' or when instantiating the container use: --device /dev/null:/dev/raw1394 |
| caffe2_pybind11_state_gpu | WARNING:root:Debug message: No module named caffe2_pybind11_state_gpu |
| Solution | ignore if you’re using CPU-only |
| Python kernel crashing | This happens when you try to call Jupyter server directly (like in a Docker container). |
| Solution | Use sh -c "jupyter notebook ..." to get around this problem. |
| Exception: “dot” not found in path | This happens in some of the tutorials when graphing. |
| Solution | Make sure you have graphviz and pydot. sudo apt-get install python-pydot and sudo pip install graphvizor brew install these to fix the problem. |
Dependencies
Try to keep the system and python dependencies at the same version. We’ve encountered issues when the python version is more updated than the system version or vice versa.
Strictly speaking, the core dependencies above are all you need to run the core Caffe2 successfully. However, for real-world deep learning (e.g., image processing, mathematical operations, etc), there are other dependencies that you will want to install in order to experience the full features of Caffe2.
| OPTIONAL SYSTEM DEPENDENCIES | |
|---|
| cuDNN | if using GPU, this is needed for Caffe2’s cuDNN operators |
| Eigen 3 | |
| LevelDB | |
| Nvidia CUDA | v6.5 or greater |
| OpenCV | for image-related operations; requires leveldb <= v1.19 |
| OpenMPI | for MPI-related Caffe2 operators |
| RocksdB | for Caffe2’s RocksDB IO backend |
| ZeroMQ | needed for Caffe2’s ZmqDB IO backend (serving data through a socket) |


 508
508


 被折叠的 条评论
为什么被折叠?
被折叠的 条评论
为什么被折叠?
 到【灌水乐园】发言


