


一、SearchView的基本使用
SearchView是android系统中内置的一个搜索框组件,可以很方便在添加在用户界面之上,但是也带来了一些问题,那就是searchview的UI是固定的,定制起来会很麻烦,如果对SearchView的要求比较高,完全可以采用button和EditText自己实现。
1.代码实战
<LinearLayout xmlns:android="http://schemas.android.com/apk/res/android"
    xmlns:tools="http://schemas.android.com/tools"
    android:layout_width="match_parent"
    android:layout_height="match_parent"
    android:orientation="vertical"
    tools:context=".Main" >

    <SearchView
        android:id="@+id/sv"
        android:layout_width="wrap_content"
        android:layout_height="wrap_content"
        android:imeOptions="actionGo" />

</LinearLayout>
在显示suggestion的时候会用到下面的布局文件:mytextview.xml
<?xml version="1.0" encoding="utf-8"?>
<LinearLayout xmlns:android="http://schemas.android.com/apk/res/android"
    android:layout_width="match_parent"
    android:layout_height="50sp"
    android:orientation="vertical" >

    <TextView
        android:id="@+id/textview"
        android:layout_width="match_parent"
        android:layout_height="wrap_content"
        android:gravity="center_vertical"
        android:paddingLeft="5sp"
        android:textSize="18sp" />

</LinearLayout>
activity代码
public class Main extends Activity {

	SearchView sv = null;
	ListView lv = null;

	@Override
	protected void onCreate(Bundle savedInstanceState) {
		super.onCreate(savedInstanceState);
		setContentView(R.layout.main);

		sv = (SearchView) this.findViewById(R.id.sv);

		sv.setIconifiedByDefault(false);

		sv.setSubmitButtonEnabled(true);

		sv.setQueryHint("查询");

         //通过反射,修改默认的样式,可以从android的search_view.xml中找到需要的组件

		try {
			Field field = sv.getClass().getDeclaredField("mSubmitButton");

			field.setAccessible(true);

			ImageView iv = (ImageView) field.get(sv);

			iv.setImageDrawable(this.getResources().getDrawable(
					R.drawable.pointer));


		} catch (Exception e) {

			e.printStackTrace();
		}

		Cursor cursor = this.getTestCursor();

		@SuppressWarnings("deprecation")
		SimpleCursorAdapter adapter = new SimpleCursorAdapter(this,
				R.layout.mytextview, cursor, new String[] { "tb_name" },
				new int[] { R.id.textview });

		sv.setSuggestionsAdapter(adapter);

		sv.setOnQueryTextListener(new OnQueryTextListener() {

			@Override
			public boolean onQueryTextChange(String str) {

				return false;
			}

			@Override
			public boolean onQueryTextSubmit(String str) {

				Toast.makeText(Main.this, str, Toast.LENGTH_SHORT).show();

				return false;
			}

		});

	}

//添加suggestion需要的数据
	public Cursor getTestCursor() {

		SQLiteDatabase db = SQLiteDatabase.openOrCreateDatabase(
				this.getFilesDir() + "/my.db3", null);

		Cursor cursor = null;
		try {

			String insertSql = "insert into tb_test values (null,?,?)";

			db.execSQL(insertSql, new Object[] { "aa", 1 });

			db.execSQL(insertSql, new Object[] { "ab", 2 });

			db.execSQL(insertSql, new Object[] { "ac", 3 });

			db.execSQL(insertSql, new Object[] { "ad", 4 });

			db.execSQL(insertSql, new Object[] { "ae", 5 });

			String querySql = "select * from tb_test";

			cursor = db.rawQuery(querySql, null);

		} catch (Exception e) {

			String sql = "create table tb_test (_id integer primary key autoincrement,tb_name varchar(20),tb_age integer)";

			db.execSQL(sql);

			String insertSql = "insert into tb_test values (null,?,?)";

			db.execSQL(insertSql, new Object[] { "aa", 1 });

			db.execSQL(insertSql, new Object[] { "ab", 2 });

			db.execSQL(insertSql, new Object[] { "ac", 3 });

			db.execSQL(insertSql, new Object[] { "ad", 4 });

			db.execSQL(insertSql, new Object[] { "ae", 5 });

			String querySql = "select * from tb_test";

			cursor = db.rawQuery(querySql, null);
		}

		return cursor;
	}

}
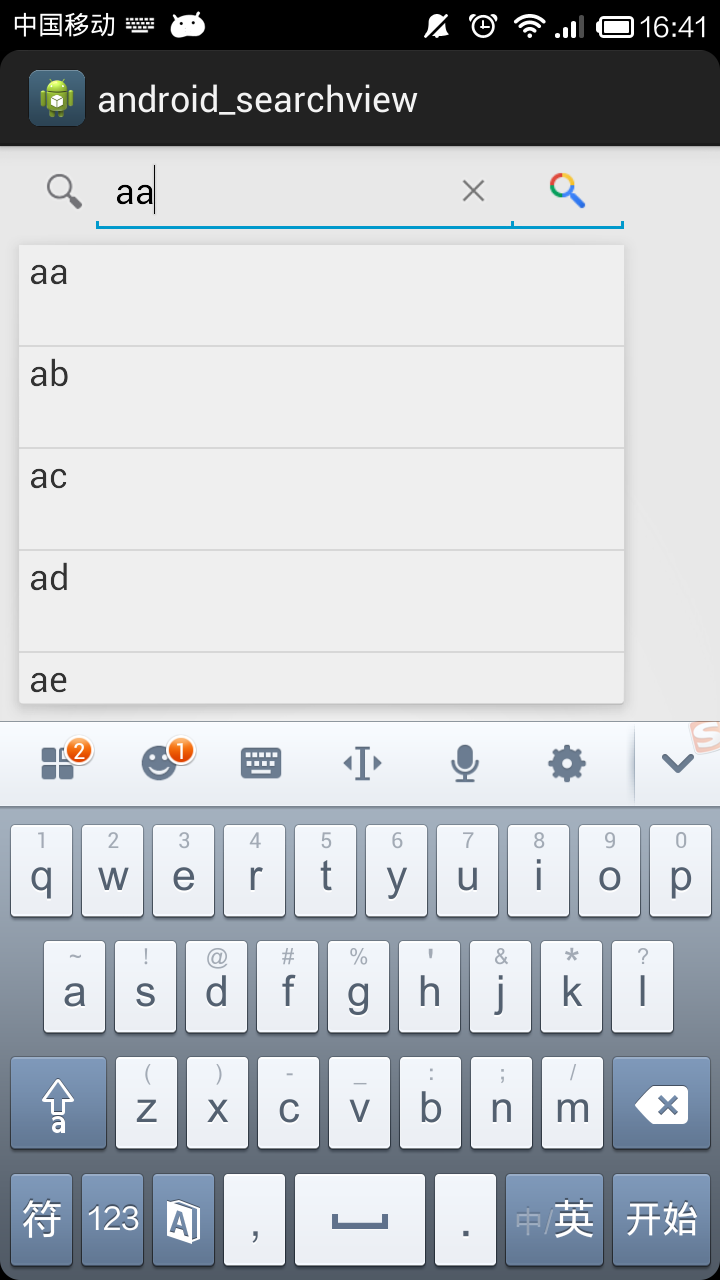
2.效果预览
二、布局动画
1.LayoutTransition
在3.0及以后只需要在XML中设置animateLayoutChanges="true"或者在Java代码中添加一个LayoutTransition对象即可实现任何ViewGroup布局改变时的动画。
目前系统中支持以下5种状态变化,应用程序可以为下面任意一种状态设置自定义动画:
1、APPEARING:容器中出现一个视图。
2、DISAPPEARING:容器中消失一个视图。
3、CHANGING:布局改变导致某个视图随之改变,例如调整大小,但不包括添加或者移除视图。
4、CHANGE_APPEARING:其他视图的出现导致某个视图改变。
5、CHANGE_DISAPPEARING:其他视图的消失导致某个视图改变。
2.方式一:在layout.xml添加动画
注意在容器中设置了属性android:animateLayoutChanges="true",这个时候容器布局改变就已经有动画效果了,只不过是系统默认的,比如添加一个按钮会出现渐入动画,移除一个按钮会出现渐出动画,而周围的视图则会平滑地填充移除时的空隙。
<?xml version="1.0" encoding="utf-8"?>
<LinearLayout xmlns:android="http://schemas.android.com/apk/res/android"
    android:layout_width="match_parent"
    android:layout_height="match_parent"
    android:orientation="vertical" >

    <Button
        android:id="@+id/main_btn"
        android:layout_width="match_parent"
        android:layout_height="wrap_content"
        android:text="添加控件"/>

    <LinearLayout
        android:layout_width="match_parent"
        android:layout_height="match_parent"
        android:animateLayoutChanges="true"
        android:id="@+id/main_container"
        android:orientation="vertical"/>

</LinearLayout>
3.方式二:构造LayoutTransition动画
但是如果我们想自定义这些效果怎么办呢?使用LayoutTransition
package com.example.animtest;

import android.animation.Animator;
import android.animation.AnimatorListenerAdapter;
import android.animation.Keyframe;
import android.animation.LayoutTransition;
import android.animation.ObjectAnimator;
import android.animation.PropertyValuesHolder;
import android.app.Activity;
import android.os.Bundle;
import android.view.View;
import android.view.View.OnClickListener;
import android.widget.Button;
import android.widget.LinearLayout;

public class AnimateLayoutTransition extends Activity {

    private LinearLayout ll;
    private LayoutTransition mTransition = new LayoutTransition();

    @Override
    protected void onCreate(Bundle savedInstanceState) {
        super.onCreate(savedInstanceState);
        setContentView(R.layout.animate_layout_transition);

        ll = (LinearLayout) findViewById(R.id.ll);
        setupCustomAnimations();
        ll.setLayoutTransition(mTransition);
    }

    public void add(View view) {
        final Button button = new Button(this);
        ll.addView(button);
        button.setOnClickListener(new OnClickListener() {

            @Override
            public void onClick(View arg0) {
                ll.removeView(button);
            }
        });
    }

    // 生成自定义动画
    private void setupCustomAnimations() {
        // 动画 - 开始添加view动画
        // Changing while Adding
        PropertyValuesHolder pvhLeft = PropertyValuesHolder.ofInt("left", 0, 1);
        PropertyValuesHolder pvhTop = PropertyValuesHolder.ofInt("top", 0, 1);
        PropertyValuesHolder pvhRight = PropertyValuesHolder.ofInt("right", 0,
                1);
        PropertyValuesHolder pvhBottom = PropertyValuesHolder.ofInt("bottom",
                0, 1);
        PropertyValuesHolder pvhScaleX = PropertyValuesHolder.ofFloat("scaleX",
                1f, 0f, 1f);
        PropertyValuesHolder pvhScaleY = PropertyValuesHolder.ofFloat("scaleY",
                1f, 0f, 1f);

        final ObjectAnimator changeIn = ObjectAnimator.ofPropertyValuesHolder(
                this, pvhLeft, pvhTop, pvhRight, pvhBottom, pvhScaleX,
                pvhScaleY).setDuration(
                mTransition.getDuration(LayoutTransition.CHANGE_APPEARING));
        mTransition.setAnimator(LayoutTransition.CHANGE_APPEARING, changeIn);
        changeIn.addListener(new AnimatorListenerAdapter() {
            public void onAnimationEnd(Animator anim) {
                View view = (View) ((ObjectAnimator) anim).getTarget();
                // View也支持此种动画执行方式了
                view.setScaleX(1f);
                view.setScaleY(1f);
            }
        });

        // 动画 - 开始移除动画
        // Changing while Removing
        Keyframe kf0 = Keyframe.ofFloat(0f, 0f);
        Keyframe kf1 = Keyframe.ofFloat(.9999f, 360f);
        Keyframe kf2 = Keyframe.ofFloat(1f, 0f);
        PropertyValuesHolder pvhRotation = PropertyValuesHolder.ofKeyframe(
                "rotation", kf0, kf1, kf2);
        final ObjectAnimator changeOut = ObjectAnimator
                .ofPropertyValuesHolder(this, pvhLeft, pvhTop, pvhRight,
                        pvhBottom, pvhRotation)
                .setDuration(
                        mTransition
                                .getDuration(LayoutTransition.CHANGE_DISAPPEARING));
        mTransition
                .setAnimator(LayoutTransition.CHANGE_DISAPPEARING, changeOut);
        changeOut.addListener(new AnimatorListenerAdapter() {
            public void onAnimationEnd(Animator anim) {
                View view = (View) ((ObjectAnimator) anim).getTarget();
                view.setRotation(0f);
            }
        });

        // 动画 - 添加View动画
        // Adding
        ObjectAnimator animIn = ObjectAnimator.ofFloat(null, "rotationY", 90f,
                0f).setDuration(
                mTransition.getDuration(LayoutTransition.APPEARING));
        mTransition.setAnimator(LayoutTransition.APPEARING, animIn);
        animIn.addListener(new AnimatorListenerAdapter() {
            public void onAnimationEnd(Animator anim) {
                View view = (View) ((ObjectAnimator) anim).getTarget();
                view.setRotationY(0f);
            }
        });

        // 动画 - 移除时View动画
        // Removing
        ObjectAnimator animOut = ObjectAnimator.ofFloat(null, "rotationX", 0f,
                90f).setDuration(
                mTransition.getDuration(LayoutTransition.DISAPPEARING));
        mTransition.setAnimator(LayoutTransition.DISAPPEARING, animOut);
        animOut.addListener(new AnimatorListenerAdapter() {
            public void onAnimationEnd(Animator anim) {
                View view = (View) ((ObjectAnimator) anim).getTarget();
                view.setRotationX(0f);
            }
        });

    }
}


 1537
1537


 被折叠的 条评论
为什么被折叠?
被折叠的 条评论
为什么被折叠?
 到【灌水乐园】发言


