


原理主要是通过鼠标点击UI的位置,将当前图片的alpha(透明通道)改为0,然后通过Shader叠加渲染
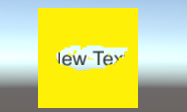
大致效果就是这样:
属性编辑窗口需要填写图片的大小和橡皮檫的大小
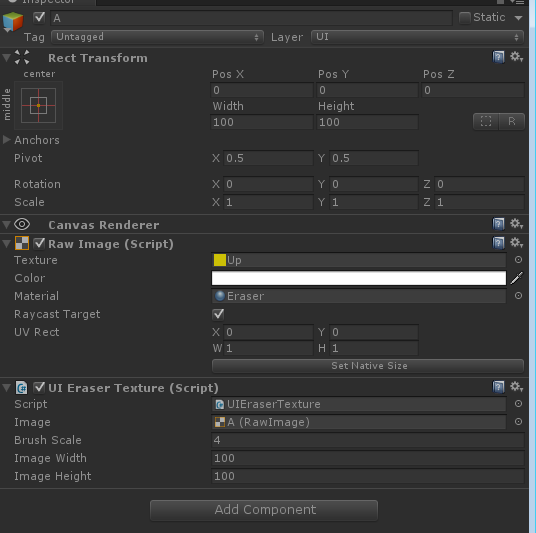
界面布局如下:
以下为C#脚本,主要负责计算当前需要镂空的像素位置,并将当前像素点上的颜色值Color.a=0
using UnityEngine;
using UnityEngine.UI;
using UnityEngine.EventSystems;
using System.Collections;

public class UIEraserTexture : MonoBehaviour ,IPointerDownHandler,IPointerUpHandler{

    public  RawImage image;
    public  int brushScale = 4;
    public int imageWidth;
    public int imageHeight;
    Texture2D texRender;
    RectTransform mRectTransform;
    Canvas canvas;

    void Awake(){
        mRectTransform = GetComponent<RectTransform> ();
        canvas = GameObject.Find("Canvas").GetComponent<Canvas>();
    }

    void Start ()
    {
        //texRender = new Texture2D(image.mainTexture.width, image.mainTexture.height,TextureFormat.ARGB32,true);
        texRender = new Texture2D(imageWidth, imageWidth,TextureFormat.ARGB32,true);
        Reset ();

    }

    bool isMove = false;

    public void OnPointerDown(PointerEventData data)
    {
        start = ConvertSceneToUI (data.position);
        isMove = true;
    }

    public void OnPointerUp(PointerEventData data)
    {
        isMove = false;
        OnMouseMove (data.position);
        start = Vector2.zero;
    }

    void Update(){
        if (isMove) {
            OnMouseMove (Input.mousePosition);
        }
    }

    Vector2 start = Vector2.zero;
    Vector2 end = Vector2.zero;

    Vector2 ConvertSceneToUI(Vector3 posi){
        Vector2 postion;
        if(RectTransformUtility.ScreenPointToLocalPointInRectangle(mRectTransform , posi, canvas.worldCamera, out postion)){
            return postion;
        }
        return Vector2.zero;
    }

    void OnMouseMove(Vector2 position)
    {
        end = ConvertSceneToUI (position);
        Draw (new Rect (end.x+texRender.width/2, end.y+texRender.height/2, brushScale, brushScale));

        if (start.Equals (Vector2.zero)) {
            return;
        }

        Rect disract = new Rect ((start+end).x/2+texRender.width/2, (start+end).y/2+texRender.height/2, Mathf.Abs (end.x-start.x), Mathf.Abs (end.y-start.y));

        for (int x = (int)disract.xMin; x < (int)disract.xMax; x++) {
            for (int y = (int)disract.yMin; y < (int)disract.yMax; y++) {
                Draw (new Rect (x, y, brushScale, brushScale));
            }
        }

        start = end;
    }

    void Reset(){

        for (int i = 0; i < texRender.width; i++) {

            for (int j = 0; j < texRender.height; j++) {

                Color color = texRender.GetPixel (i,j);
                color.a = 1;
                texRender.SetPixel (i,j,color);
            }
        }

        texRender.Apply ();
        image.material.SetTexture ("_RendTex",texRender);

    }

    void Draw(Rect rect){
        for (int x = (int)rect.xMin; x < (int)rect.xMax; x++) {
            for (int y = (int)rect.yMin; y < (int)rect.yMax; y++) {
                if (x < 0 || x > texRender.width || y < 0 || y > texRender.height) {
                    return;
                }
                Color color = texRender.GetPixel (x,y);
                color.a = 0;
                texRender.SetPixel (x,y,color);
            }
        }

        texRender.Apply();
        image.material.SetTexture ("_RendTex",texRender);
    }

}
接下来就是shader了
Shader "Unlit/Transparent Colored Eraser"
{
    Properties
    {
        _MainTex ("Base (RGB), Alpha (A)", 2D) = "white" {}
        _RendTex ("Base (RGB), Alpha (A)", 2D) = "white" {}
    }

    SubShader
    {
        LOD 200

        Tags
        {
            "Queue" = "Transparent"
            "IgnoreProjector" = "True"
            "RenderType" = "Transparent"
        }

        Pass
        {
            Cull Off
            Lighting Off
            ZWrite Off
            Fog { Mode Off }
            Offset -1, -1
            ColorMask RGB
            AlphaTest Greater .01
            Blend SrcAlpha OneMinusSrcAlpha
            ColorMaterial AmbientAndDiffuse

            CGPROGRAM
            #pragma vertex vert
            #pragma fragment frag
            #include "UnityCG.cginc"

            sampler2D _MainTex;
            float4 _MainTex_ST;
            sampler2D _RendTex;

            struct appdata_t
            {
                float4 vertex : POSITION;
                half4 color : COLOR;
                float2 texcoord : TEXCOORD0;
            };

            struct v2f
            {
                float4 vertex : POSITION;
                half4 color : COLOR;
                float2 texcoord : TEXCOORD0;
            };

            v2f vert (appdata_t v)
            {
                v2f o;
                o.vertex = mul(UNITY_MATRIX_MVP, v.vertex);
                o.color = v.color;
                o.texcoord = v.texcoord;
                return o;
            }

            half4 frag (v2f IN) : COLOR
            {
                // Sample the texture
                half4 col = tex2D(_MainTex, IN.texcoord) * IN.color;
                half4 rnd = tex2D(_RendTex, IN.texcoord) * IN.color;
                col.a =  rnd.a;
                return col;
                }
            ENDCG
        }
    }
}


 3060
3060


 被折叠的 条评论
为什么被折叠?
被折叠的 条评论
为什么被折叠?
 到【灌水乐园】发言


