


本人在开发Android Nfc POS之初,探索调试了一番驱动,目前在Nexus 5X 7.1.1上已经调成,之前的步骤可以参考我发的文章,Android驱动开发经验分享如下。
1. Linux 内核驱动实例
以下均在Android Linux内核目录下操作, 在drivers目录下创建驱动目录hello
这个目下要创建3个文件,hello.c, Makefile and Kconfig
1.1 hello.ccd driversmkdir hello
vim hello.c
code as follows:
/linux kernel driver: hello.c => /dev/hello /
/create the device file: /sys/class/hello/hello/
please find the code in the below. here skip the code to make the page clean and clear.
1.2 Makefile
Create the Makefile and add:obj-y += hello.o
1.3 Kconfig
Create Kconfig and add:
config HELLO
    tristate "Eric: First Android Driver"
default n
help
  This is the first Android driver.
this file is used when we make menuconfig.
1.4 Modify drivers/Makefile
Add following in the endobj-y += hello.o
1.5 Add the driver into system configuration
Before we build the kernal, we need to config the system.
1.5.1 Modify arch/arm64/Kconfig
Add following in the endsource "drivers/hello/Kconfig"
It seems that this config not work, may be skipped.
1.5.2 Modify drivers/Kconfig
Following the menu:menu "Device Drivers"
Please addsource "drivers/hello/Kconfig"
1.5.3 Modify drivers/Kconfig
make menuconfig
To enble the menu 'Eric: First Android Driver' in the "Device Drivers" item.
And save , then to build the linux kernel code.
2. 测试驱动
以下是需要操作的目录在AOSP目录下
2.1 create the application on externel
在external下创建hello目录
目录下将有两个文件:hello.c and Android.mk
cd external
mkdir hello
vim hello.c
/ AOSP app : ./external/hello.c =>/system/bin/hello/
Android.mk as follows:
 LOCAL_PATH := $(call my-dir)
include $(CLEAR_VARS)
LOCAL_MODULE_TAGS := optional
LOCAL_MODULE := hello
LOCAL_SRC_FILES := $(call all-subdir-c-files)
include $(BUILD_EXECUTABLE)
2.2 build the application
To build the hello applicationmmm external/hello/
Add it into the system.imgmake snod
2.3 Modify the authority of the applicationvim system/core/rootdir/ueventd.rc
Add ‘/dev/hello 0666 root root’ in the end of the file.
Build the AOSP before flash.
2.4 Test/Debug the driver hello
Before flash, we can build the AOSP again, of cource, don't forget replace the linux kernel file 'Image.gz-dtb'.
After flash into the phone, reboot the phone, and then do follows:
C:\Users\ylgi>adb devices
List of devices attached
01059f9781509a67        device

C:\Users\ylgi>adb -s 01059f9781509a67 shell
bullhead:/ $ ls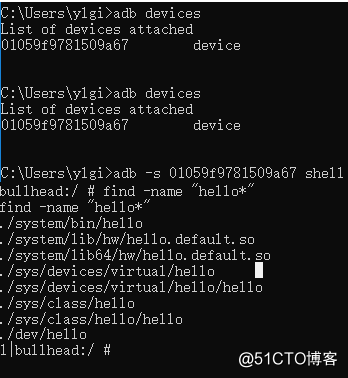
cd /system/bin
./hello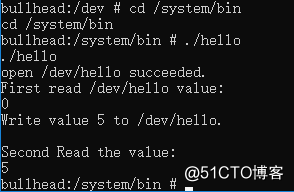
运行效果如上图,表示Linux驱动已经成功加载并运行。
3. 驱动的HAL层实例
以下是需要操作的目录在AOSP目录下
3.1 create hello.c file
cd hardware/libhardware/modules
mkdir hello
vim hello.c
/ to implement the HAL/
3.2 create hello.h file
vim hardware/libhardware/include/hardware/hello.h
/add the implement /
#ifndef ANDROID_HELLO_INTERFACE_H
#define ANDROID_HELLO_INTERFACE_H
#include <hardware/hardware.h>
__BEGIN_DECLS
#define HELLO_HARDWARE_MODULE_ID "hello"//ID
struct hello_module_t {
struct hw_module_t common;};//hw_module_t的继承者
struct hello_device_t {
struct hw_device_t common;

int fd;

int (*set_val)(struct hello_device_t* dev, int val);

int (*get_val)(struct hello_device_t* dev, int* val);
};//hw_device_t的继承者
__END_DECLS
#endif
..............................
3.3 create Android.mk filevim Android.mk
LOCAL_PATH := $(call my-dir)
include $(CLEAR_VARS)
LOCAL_MODULE := hello.default
LOCAL_MODULE_RELATIVE_PATH := hw
LOCAL_SRC_FILES := hello.c
LOCAL_SHARED_LIBRARIES := liblog
LOCAL_MODULE_TAGS := optional
include $(BUILD_SHARED_LIBRARY)
3.4 build the hello modulemmm hardware/libhardware/modules/hello
then check the so file in the path:ll out/target/product/bullhead/system/lib/hw/hello.default.so
4. HAL Layer之上Java的Jni硬件接口封装。
4.1 create com_android_server_HelloService.cpp
cd frameworks/base/services/core/jni
vim com_android_server_HelloService.cpp
其中:
- HELLO_HARDWARE_MODULE_ID为hardware/libhardware/include/hardware/hello.h中定义的hello模块名字,
- jniRegisterNativeMethods注册HelloService包路径为com.android.server.HelloService
4.2 Modify onload.cppcd frameworks/base/services/core/jni/vim onload.cpp
namespace android {
........
int register_android_server_HelloService(JNIEnv *env);//added by eric.y
};
extern "C" jint JNI_OnLoad(JavaVM vm, void / reserved /)
{
..............
register_android_server_HelloService(env);//add by eric
return JNI_VERSION_1_4;
}
4.3 Modify Android.mk
cd frameworks/base/services/core/jni/vim Android.mk
LOCAL_SRC_FILES += \
     ....................
    $(LOCAL_REL_DIR)/com_android_server_HelloService.cpp \
    $(LOCAL_REL_DIR)/onload.cpp
4.4 build the jni modulemmm frameworks/base/services/core/jnimmm frameworks/base/services/core/jnimake snod
out/target/product/bullhead/system/lib/libandroid_servers.so
5. JNI上层Service实例的实现,Framework接口
5.1 建立aidl通信接口;
AOSP目录下操作cd frameworks/base/core/java/android/os/vim IHelloService.aidl
package android.os;

interface IHelloService {
    void setVal(int val);
    int getVal();
}
5.2 在system_server中注册hello_service到servicemanager cd frameworks/base/services/java/com/android/server/vim SystemServer.java
        try {

        Slog.i(TAG, "Service: hello");

        ServiceManager.addService("hello", new HelloService());//

        } catch (Throwable e) {

        Slog.e(TAG, "Failure starting Service: hello", e);

        }
5.3 实现hello_service
create the service file
cd frameworks/base/services/core/java/com/android/server/vim HelloService.java
/------Eric: hello service-----/
package com.android.server;
import android.content.Context;
import android.os.IHelloService;
public class HelloService extends IHelloService.Stub {
    private static final String TAG = "HelloService";
    HelloService() {
        init_native();
    }

    public void setVal(int val) {
        setVal_native(val);
    }

public int getVal() {
        return getVal_native();
    }
//native implement from HAL layer
private static native boolean init_native();
private static native void setVal_native(int val);
private static native int getVal_native();

};
5.4 modify the Android.mk
cd frameworks/base/vim Android.mk
add follow into LOCAL_SRC_FILES +=core/java/android/os/IHelloService.aidl \
5.5 Build the service
mmm frameworks/base
5.6 Add into the SELinux
android5.0以后的系统引入了SELinux,要想让JNI可以成功的访问/dev/hello硬件就必须修改SELinux的策略,否则Android系统再启动是就是出现
add_service ('hello',4e) uid=1000 - PERMISSION DENIED 的错误信息。
AOSP中,SELinux相关的策略配置文件保存在 /external/sepolicy/中,为了完成我们这次实验,需要修改5个 .te 文件.
modify: system/sepolicy/service.te
Add following:type hello_service, system_api_service, system_server_service, service_manager_type;
modify: external\sepolicy\service_contexts
Add following:hello u:object_r:hello_service:s0
为了确保修改后的 .te 文件被成功的编译进system.img 建议执行一次 make update-api ,然后重新执行 make 进行编译make -j4
5.6 Double check the service
To double check if the serivce works:service list | grep hello

6. Application on the UI
6.1 create the NfcPosTest applicatoin with button and edit box
copy android project NfcPosTest into the packages/experimental/
代码中需要调用到:
import android.os.IHelloService;
//请求hello_service
private IHelloService helloService = null;
helloService = IHelloService.Stub.asInterface(
ServiceManager.getService("hello"));
//调用HAL接口
int val = helloService.getVal();
String text = String.valueOf(val);
valueText.setText(text);
6.2 Add the Android.mk
vim packages/experimental/NfcPosTest/Android.mk
LOCAL_PATH:= $(call my-dir)
include $(CLEAR_VARS)
LOCAL_MODULE_TAGS := optional
LOCAL_SRC_FILES := $(call all-subdir-java-files)
LOCAL_PACKAGE_NAME := NfcPosTest
include $(BUILD_PACKAGE)
6.3 build the application
build the demo:mmm packages/experimental/NfcPosTest
succeeded check the apk file in the path:ll out/target/product/bullhead/system/app/NfcPosDemo.apk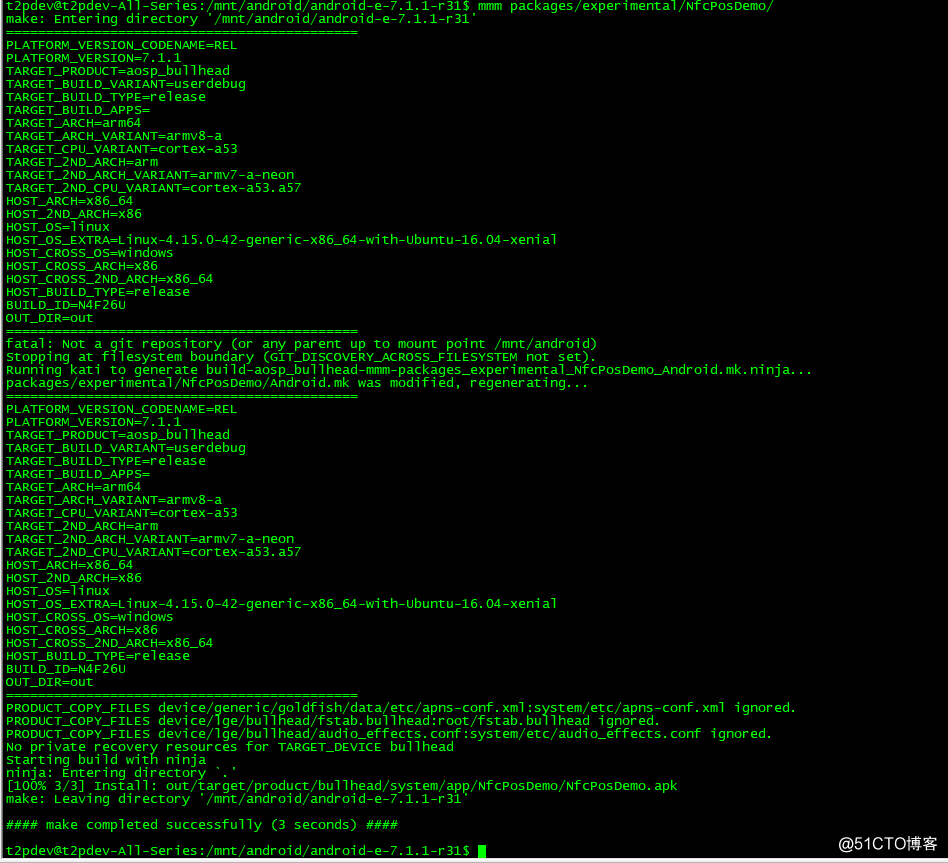
6.4 update system.img
make snod
7. Check NfcPosTest application in Android phone after flash succeeded.
转载于:https://blog.51cto.com/12090569/2329081


 8155
8155


 被折叠的 条评论
为什么被折叠?
被折叠的 条评论
为什么被折叠?
 到【灌水乐园】发言


