简单的介绍 Mean Shift 的数学原理和代码实现,基于均值漂移法 Mean Shift 的图像分割

Mean Shift 算法简介

从分割到聚类

对于图像分割算法,一个视角就是将图像中的某些点集分为一类(前景),另外一些点集分为另一类(后景),从而达到分割的目的。而 Mean Shift 就是这样一类基于聚类的分割方法。

如果只是需要前景和背景的分割,那么就可以看成一个簇为2的一个聚类任务

这篇文章就简单介绍一下 Mean Shift 的数学原理和代码实现。
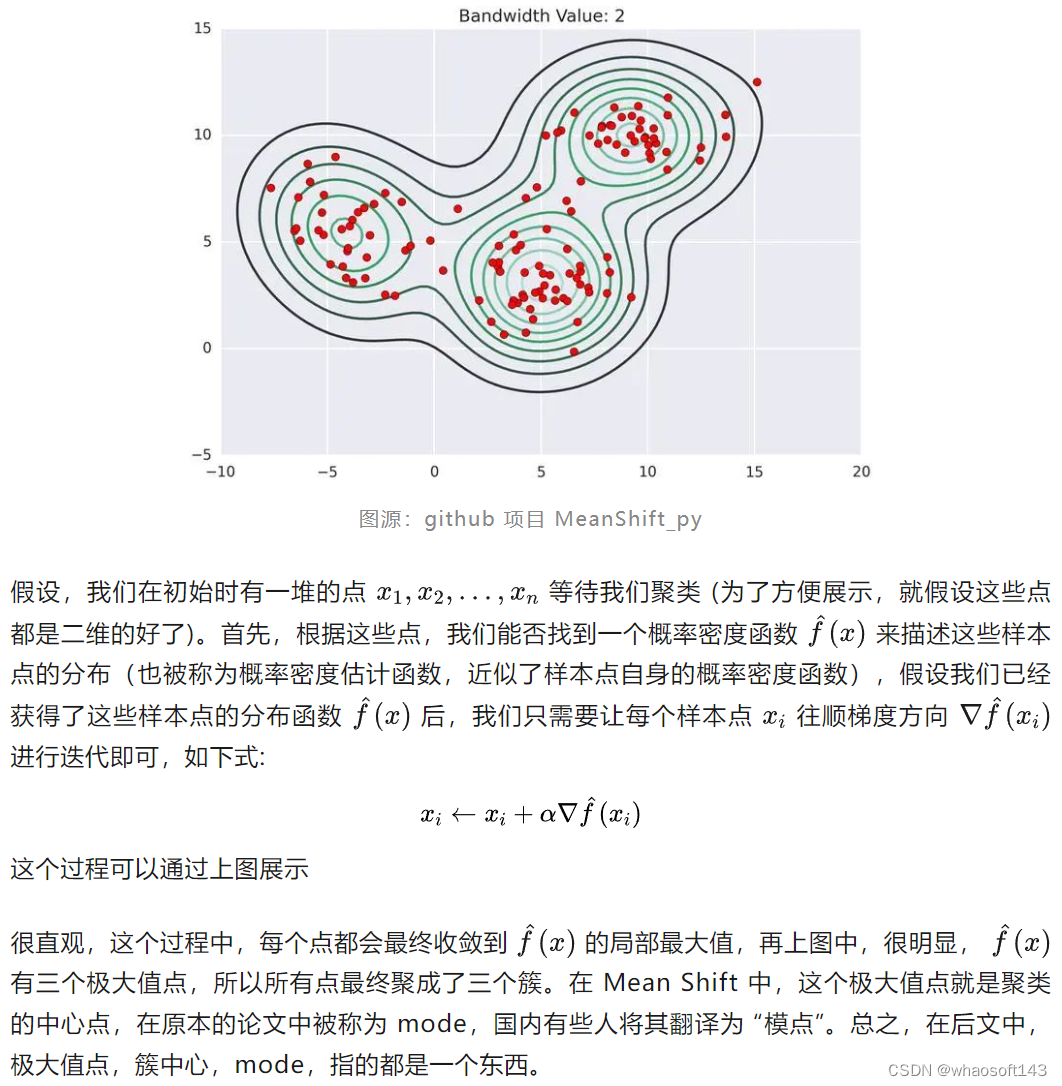
用概率密度估计函数的极大值点来聚类!

不同于KMeans 这样的原型聚类,Mean Shift 有一套自己的聚类方法,原理其实也很简单。相信部分读者在看到这个子标题时就已经茅塞顿开。但是,为了照顾其他读者,我仍然打算完整描述 Mean Shift 的聚类流程。此处,我借用 MeanShift_py(https//github.com/mattnedrich/MeanShift_py) 这个项目中的图:

Mean Shift_图像分割

Mean Shift_图像分割_02

核密度估计 KDE

Mean Shift_图像分割_03

好啦好啦,我们接下来就可以非常简单愉快地实现基于 Mean Shift 的图像分割了。

从聚类到分割

下面是 Mean Shift 图像分割算法的流程

Mean Shift_聚类_04

这样,我们就得到了分割之后的图,当然,如果希望制定分割的类数,可以尝试调整 bandwidth 或者在聚类完成后改变数量较小的点的label (大概率会得到很多的簇)


代码实现

我们先预装一下要用到的库:

pip install numpy scikit-learn opencv-python
  • 1.

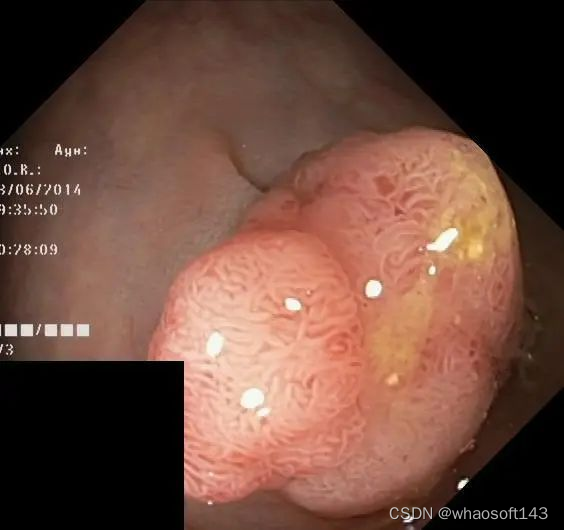
简单介绍一下本次需要分割的对象,为 kvasir-seg 中的图像,需要分割的为下图中的息肉
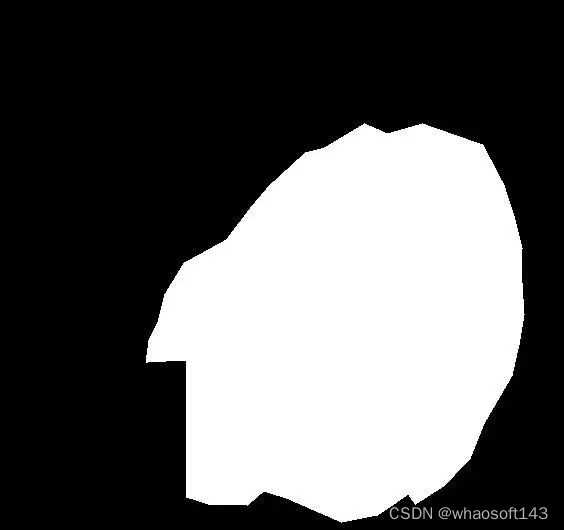
Mean Shift_图像分割_05

它的 ground truth 为:

Mean Shift_代码实现_06

下面尝试使用 Mean Shift 和 KMeans 来解决。

Mean Shift

先引入需要的库。

from collection import Counter
import numpy as np
from PIL import Image
import cv2
from sklearn.cluster import MeanShift, KMeans
  • 1.
  • 2.
  • 3.
  • 4.
  • 5.

Mean Shift 对于噪音非常敏感,我们先进行去噪,并降采样:

image = cv2.imread('./test.png')
image = cv2.GaussianBlur(image, ksize=(15, 15), sigmaX=10)
origin_h = image.shape[0]
# resize 函数详见结尾附录
image = resize(image, height=100)
  • 1.
  • 2.
  • 3.
  • 4.
  • 5.

然后制作每个像素点对应的五维特征:

h, w = image.shape[:2]
features = []
for i in range(h):
    for j in range(w):
        pixel = image[i, j]
        if len(pixel.shape) == 0:
            pixel = [pixel.tolist()]
        else:
            pixel = pixel.tolist()
        pixel.append(i * 1.)
        pixel.append(j * 1.)
        features.append(pixel)

features = np.array(features)

normalized_features = features / features.max(axis=0)
  • 1.
  • 2.
  • 3.
  • 4.
  • 5.
  • 6.
  • 7.
  • 8.
  • 9.
  • 10.
  • 11.
  • 12.
  • 13.
  • 14.
  • 15.
  • 16.

然后进行 Mean Shift 聚类,并保存簇的个数:

mean_shift_model = MeanShift(bandwidth=50)
clusters = mean_shift_model.fit(normalized_features)
cluster_num = Counter(clusters.labels_)
cluster_num
  • 1.
  • 2.
  • 3.
  • 4.

如果簇太多,就调大 bandwidth 的值

run in 44.6 s:

可以看到,有 8 个簇,一般簇在20个以内算是比较正常的,太多说明效果不佳。

我们来看一下这8个簇合在一起的可视化效果:

seg = clusters.labels_.reshape(h, w)
seg = (seg / seg.max() * 255).astype('uint8')
seg = resize(seg, height=origin_h)
image = Image.fromarray(seg)
image.save('mean_shift.png')
image
  • 1.
  • 2.
  • 3.
  • 4.
  • 5.
  • 6.

渲染效果如下:

Mean Shift_聚类_07

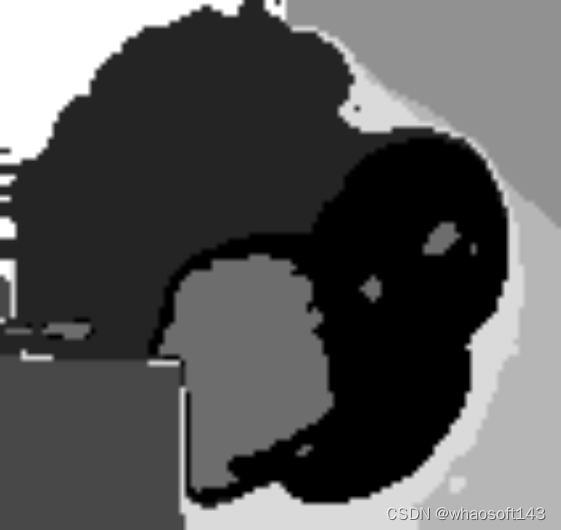
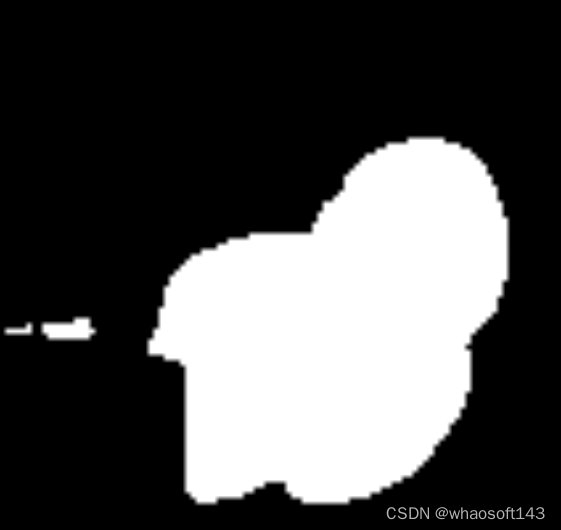
可以看到,目标区域被两个mask给覆盖了,我们只需要将这两个 mask 合并一下就是最终的结果了:

masks = []
for cluster_id in range(cluster_num):
    seg = np.where(clusters.labels_.reshape(h, w) == cluster_id, 255, 0)
    masks.append(seg.astype('uint8'))

# 通过可视化每一个 masks 中的元素找到需要的元素索引 0 和 3
select_mask_ids = [0, 3]
final_mask = np.zeros((h, w)).astype(np.bool_)
for mask_id in select_mask_ids:
    mask = masks[mask_id].astype(np.bool_)
    final_mask |= mask
final_mask = final_mask.astype('uint8') * 255
final_mask = resize(final_mask, height=origin_h)
final_mask_image = Image.fromarray(final_mask)
final_mask_image.save('mean_shift.mask.png')
final_mask_image
  • 1.
  • 2.
  • 3.
  • 4.
  • 5.
  • 6.
  • 7.
  • 8.
  • 9.
  • 10.
  • 11.
  • 12.
  • 13.
  • 14.
  • 15.
  • 16.

最终效果:

Mean Shift_人工智能_08

KMeans

接下来我们再试试 KMeans,步骤和上面几乎完全一样,只需要注意使用 KMeans 不需要下采样,并且,高斯平滑的参数设的小一些,我设置的如下:

image = cv2.GaussianBlur(image, ksize=(5, 5), sigmaX=2)
  • 1.

调用 KMeans 的函数如下:

kmean_model = KMeans(n_clusters=5, n_init='auto')
clusters = kmean_model.fit(normalized_features)
cluster_num = len(Counter(clusters.labels_))
cluster_num
  • 1.
  • 2.
  • 3.
  • 4.

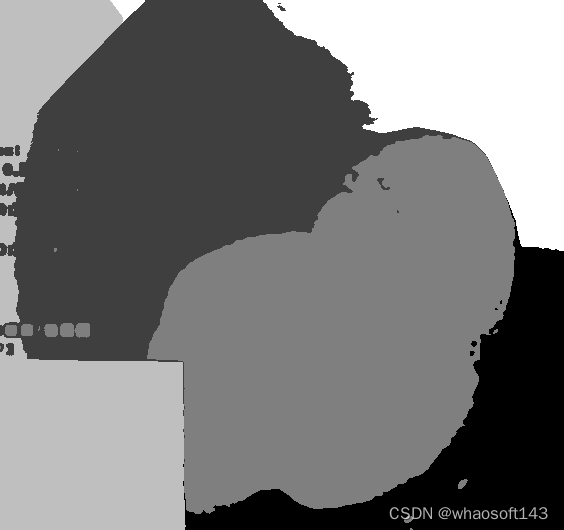
其余都一样,值得一提的是,KMeans 在我的 256 核服务器上瞬间就跑完了,打上 Mean Shift 却需要 44 秒。下来看看 KMeans 的所有 mask 堆叠的效果:

Mean Shift_聚类_09

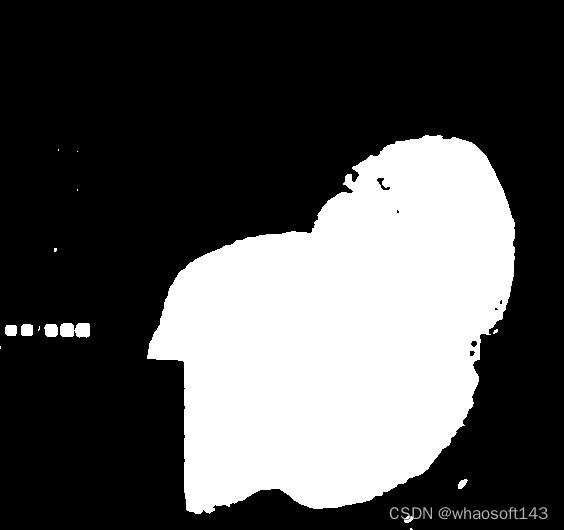
可以看到,效果非常不错,我们只需要选一个部分就可以,最终效果如下:

Mean Shift_人工智能_10

指标计算

我们最后可以算一下分割指标。

分割指标的代码可以 copy 我的博客:(https//kirigaya.cn/blog/article%3Fseq%3D141)

指标

KMeans

Mean Shift

Dice

0.900

0.898

IoU

0.818

0.815

Sensitivity

0.829

0.832

PPV

0.984

0.975

HD95

6.650

114.0

可以看到,两者性能难分伯仲(但是Mean Shift 的 HD95 却很大)。但是从笔者使用体验下来,无论是调参难度还是运行速度,都是 KMeans 更胜一筹。因为 KMeans 只需要控制生成的簇的个数。且原型聚类本身就很适合图像这种样本点比较多的情况下的快速聚类。


附录

resize函数:

def resize(img : np.ndarray, height=None, width=None) -> np.ndarray:
    if height is None and width is None:
        raise ValueError("not None at the same time")
    if height is not None and width is not None:
        raise ValueError("not not None at the same time")
    h, w = img.shape[0], img.shape[1]
    if height:
        width = int(w / h * height)
    else:
        height = int(h / w * width)
    target_img = cv2.resize(img, dsize=(width, height))
    return target_img
  • 1.
  • 2.
  • 3.
  • 4.
  • 5.
  • 6.
  • 7.
  • 8.
  • 9.
  • 10.
  • 11.
  • 12.