


知识内容:
1.random模块
2.re模块
3.time模块和datetime模块
4.os模块和sys模块
5.json模块和pickle模块
6.xml模块和shelve模块
7.hashlib模块
8.shutil模块
9.configparser模块与logging模块
注:本节内容均是介绍python中的内置模块,python的第三方模块不在此介绍,将在具体应用场景中介绍第三方模块
一、random模块
1.random模块的作用: 生成随机数
2.random模块中的内容
1 >>> importrandom2 >>>dir(random)3 ['BPF', 'LOG4', 'NV_MAGICCONST', 'RECIP_BPF', 'Random', 'SG_MAGICCONST', 'SystemRandom', 'TWOPI', '_BuiltinMethodType', '_MethodType', '_Sequence', '_Set', '__all__', '__builtins__', '__cached__', '__doc__', '__file__', '__loader__', '__name__', '__package__', '__spec__', '_acos', '_bisect', '_ceil', '_cos', '_e', '_exp', '_inst', '_itertools', '_log', '_pi', '_random', '_sha512', '_sin', '_sqrt', '_test', '_test_generator', '_urandom', '_warn', 'betavariate', 'choice', 'choices', 'expovariate', 'gammavariate', 'gauss', 'getrandbits', 'getstate', 'lognormvariate', 'normalvariate', 'paretovariate', 'randint', 'random', 'randrange', 'sample', 'seed', 'setstate', 'shuffle', 'triangular', 'uniform', 'vonmisesvariate', 'weibullvariate']
3.random模块的主要方法
choice(): 用于从序列中任意选择一个元素的函数
getrandbits(): 生成指定二进制位数的随机整数
randrange(): 生成指定范围内(包含左边界不包含右边界)随机数(整数)的函数
randint(): 生成指定范围内(左右边界都包含)随机数(整数)的函数
shuffle(): 将列表原地打乱
sample(): 从序列中随机指定数量不重复的元素
seed(): 生成一个种子,如果使用了seed,那么每次程序重新启动后面random函数生成的随机数都是一样的,也就算可以再现程序
random(): 返回随机生成的一个实数,它在[0,1)范围内
uniform(): 生成指定范围内(左边界右边界均不包含)随机数(浮点数)的函数
1 >>> importrandom2 >>> random.seed(3)3 >>>random.random()4 0.23796462709189137
5 >>>random.random()6 0.5442292252959519
1 importrandom2 #(0,1)----float 大于0且小于1之间的小数
3 print(random.random())4
5 #[1,3] 大于等于1且小于等于3之间的整数
6 print(random.randint(1, 3))7
8 #[1,3) 大于等于1且小于3之间的整数
9 print(random.randrange(1, 3))10
11 #1或者23或者[4,5]
12 print(random.choice([1, '23', [4, 5]]))13
14 #列表元素任意2个组合
15 print(random.sample([1, '23', [4, 5]], 2))16
17 #大于1小于3的小数,如1.927109612082716
18 print(random.uniform(1, 3))
4.random模块应用
(1)验证码
1 #生成一个随机验证码: 前两位是英文字母,后三位是数字
2 importrandom3 checkcode = ''
4
5 for i in range(5):6 current = random.randint(0, 5)7 #字母
8 if i == 0 or i == 1:9 tmp = chr(random.randint(65, 90))10 #数字
11 else:12 tmp = random.randint(0, 9)13 checkcode +=str(tmp)14 print(checkcode)
(2)随机密码生成器
1 importstring2 importrandom3
4 #x中包含了所以的数字、大小写字母和符号
5 x = string.digits + string.ascii_letters +string.punctuation6
7 #random中的choice() -> 是从序列中任意选择一个元素
8 pwd = ''.join([random.choice(x) for i in range(8)])9 print(pwd)
二、re模块
1.re模块的作用: 提供了正则表达式操作所需要的功能
2.正则表达式语法
1 '.'默认匹配除\n之外的任意一个字符,若指定flag DOTALL,则匹配任意字符,包括换行2 '^' 匹配字符开头,若指定flags MULTILINE,这种也可以匹配上(r"^a","\nabc\neee",flags=re.MULTILINE)3 '$' 匹配字符结尾,或e.search("foo$","bfoo\nsdfsf",flags=re.MULTILINE).group()也可以4 '*' 匹配*号前的字符0次或多次,re.findall("ab*","cabb3abcbbac") 结果为['abb', 'ab', 'a']5 '+' 匹配前一个字符1次或多次,re.findall("ab+","ab+cd+abb+bba") 结果['ab', 'abb']6 '?'匹配前一个字符1次或0次7 '{m}'匹配前一个字符m次8 '{n,m}' 匹配前一个字符n到m次,re.findall("ab{1,3}","abb abc abbcbbb") 结果'abb', 'ab', 'abb']9 '|' 匹配|左或|右的字符,re.search("abc|ABC","ABCBabcCD").group() 结果'ABC'
10 '(...)' 分组匹配,re.search("(abc){2}a(123|456)c", "abcabca456c").group() 结果 abcabca456c11
12
13 '\A' 只从字符开头匹配,re.search("\Aabc","alexabc") 是匹配不到的14 '\Z'匹配字符结尾,同$15 '\d' 匹配数字0-9
16 '\D'匹配非数字17 '\w' 匹配[A-Za-z0-9]18 '\W' 匹配非[A-Za-z0-9]19 's' 匹配空白字符、\t、\n、\r , re.search("\s+","ab\tc1\n3").group() 结果 '\t'
20
语法示例:
(1)最简单的正则表达式是普通字符串,可以匹配自身
(2)'[pjc]ython'可以匹配'python'\'jython'\'cython'
(3)'[a-zA-Z0-9]'可以匹配一个任意大小写字母或数字
(4)'[^abc]'可以匹配任意除'a','b','c'之外的字符
(5)'python|perl'或'p(ython|erl)'都可以匹配python或perl
(6)'^http'只能匹配以'http'开头的字符串
(7)'pattern'*: 允许模式重复0次或多次
(8)'pattern'+: 允许模式重复1次或多次
(9)'(pattern){m, n}'允许模式重复m到n次
(10)'(a|b)*c'匹配多个(包含0个)a或b,后面紧跟一个字母c
语法应用:
(1)'^\d{1, 3}\.\d{1, 3}\.\d{1, 3}\.\d{1, 3}$': 检查给定字符串是否为合法IP
(2)'^1(3|5|7|8|9)\\d{9}$': 检查给定字符串是否为移动手机号码
(3)'^\w+@(\w+\.)+\w+$': 检查给定字符串是否为合法电子邮件地址
(4)'^\d{18}|\d{15}$': 检查字符串是否为合法省份证格式
(5)'\d{4}-\d{1,2}-d{1,2}': 匹配指定给定格式的日期,例如2018-4-19
(6)'^(?=.*[a-z])(?=.*[A-Z])(?=.*\d)(?=.*[,._].{8,})$': 检查给定字符串是否是强密码: 必须同时包含大写小写字母、数字、特殊符号且长度必须至少8位
3.re模块主要方法
1 re.match 从头开始匹配2 re.search 匹配包含3 re.findall 把所有匹配到的字符放到以列表中的元素返回4 re.split 以匹配到的字符当做列表分隔符5 re.sub 匹配字符并替换6 re.escape() 将字符串中所有的特殊正则表达式字符转义7 re.compile 将正则表达式模式编译成一个正则表达式对象,与match()和search()匹配使用
re模块修饰符(flags):
1 re模块修饰符 ->控制匹配的模式2 re.I ->使匹配对大小写不敏感3 re.L -> 做本地化识别(locale-aware)匹配4 re.M -> 多行匹配,影响^和$5 re.S ->使匹配包括换行在内的所有字符6 re.U ->根据Unicode字符集解析字符。这个标志影响\w\W\b\B7 re.X ->该标志通过给予更灵活的格式,以便将正则表达式写得更容易理解8
9 re.S -> 换行匹配,经常在爬虫实战中使用,且注意在换行匹配之后用strip清除掉\n
以下函数中参数的统一说明:
pattern->匹配的正则表达式 string->待匹配的字符串 flags->上面的re模块修饰符
(1)re.match()
re.match 尝试从字符串的起始位置匹配一个模式,如果不是起始位置匹配成功的话,match()就返回none
语法: re.match(pattern,string,flags=0)
1 importre2 #re.match(pattern, string, flags=0)
3 #字符串的开头是否能匹配正则表达式。返回_sre.SRE_Match对象,如果不能匹配返回None。
4 res = re.match('03', '0302')5 print(res.group())
1 importre2 >>> print(re.match('done|quit', 'done')) #匹配成功
3 <_sre.sre_match object span="(0," match="done">
4 >>> print(re.match('done|quit', 'done!')) #匹配成功
5 <_sre.sre_match object span="(0," match="done">
6 >>> print(re.match('done|quit', 'doe!')) #匹配不成功
7 None
(2)re.search()
re.search()扫描整个字符串并返回第一个成功的匹配。匹配成功re.search方法返回一个匹配的对象,否则返回None
函数语法:re.search(pattern,string,flags=0)
1 importre2 >>> print(re.search('done|quit', 'd!one!donew')) #匹配成功
3 <_sre.sre_match object span="(6," match="done">
1 importre2 #re.search(pattern, string, flags=0)
3 #在字符串中查找,是否能匹配正则表达式。返回_sre.SRE_Match对象,如果不能匹配返回None。
4 res = re.search('030', '90302030')5 print(res.group())
re.match与re.search的区别:
re.match只匹配字符串的开始,如果字符串开始不符合正则表达式,则匹配失败,函数返回None;而re.search匹配整个字符串,直到找到一个匹配。
(3)re.findall()
re.findall()在字符串中找到正则表达式所匹配的所有子串,并返回一个列表,如果没有找到匹配的,则返回空列表。
语法: re.findall(pattern, string, flags=0)
1 importre2
3 #最常用的re匹配字符串->(.*?) 可以匹配不包括换行的任何信息,示例如下:
4 a = 'xxIxxjshdxxLovexxsffaxxpythonxx'
5 info = re.findall('xx(.*?)xx', a)6 print(info) #findall方法返回的为列表结构
1 >>> importre2 >>> text = 'alpha.beta...gamma delta'
3 >>> pattern = '[a-zA-Z]+'
4 >>> re.findall(pattern, text) #查找所有单词
5 ['alpha', 'beta', 'gamma', 'delta']
注意: match 和 search 是匹配一次 findall 匹配所有,match和search返回的是一个匹配对象,要通过group方法才能获取值,而findall返回列表
(4)re.split()
re.split()通过正则表达式将字符串分离,如果用括号将正则表达式括起来,那么匹配的字符串也会被列入到list中返回。
语法: re.split(pattern, string, maxsplit=0)
maxsplit: 分离的次数
1 >>>importre2 >>> re.split('\W+', 'runoob, runoob, runoob.')3 ['runoob', 'runoob', 'runoob', '']4 >>> re.split('(\W+)', 'runoob, runoob, runoob.')5 ['', ' ', 'runoob', ',', 'runoob', ',', 'runoob', '.', '']6 >>> re.split('\W+', 'runoob, runoob, runoob.', 1)7 ['', 'runoob, runoob, runoob.']8
9 >>> re.split('a*', 'hello world') #对于一个找不到匹配的字符串而言,split 不会对其作出分割
10 ['hello world']
1 >>> importre2 >>> text = 'alpha.beta...gamma delta'
3 >>> re.split('[\.]+', text)4 ['alpha', 'beta', 'gamma delta']5 >>> re.split('[\. ]+', text)6 ['alpha', 'beta', 'gamma', 'delta']7 >>> re.split('[\. ]+', text, maxsplit=2) #分割两次
8 ['alpha', 'beta', 'gamma delta']
(5)re.sub()
re.sub()用于替换字符串中的匹配项
语法:re.sub(pattern,repl,string,count=0)
repl : 替换的字符串,也可为一个函数
count : 模式匹配后替换的最大次数,默认 0 表示替换所有的匹配
1 importre2 #sub(): 类似于replace(),用于替换字符串中的匹配符,在爬虫实战中使用极少,示例如下:
3 phone = '123-4567-1234'
4 new_phone = re.sub('\D', '', phone) #sub方法用于替换字符串
5 print(new_phone)
1 >>> importre2 >>> pat = '{name}'
3 >>> text = 'dear {name}...'
4 >>> re.sub(pat, 'my baby', text) #字符串替换
5 'dear my baby...'
(6)re.escape()
re.escape(string)将字符串中所有特殊正则表达式字符转义
1 >>> re.escape('http://www.python.org') #字符串转义
2 'http\\:\\/\\/www\\.python\\.org'
(7)re.compile()
re.compile()能实现对正则表达式的重用,用于编译正则表达式,生成一个正则表达式对象,供 match() 和 search() 这两个函数使用
语法:re.compile(pattern[,flags])
具体使用见下一节的正则表达式对象中
4.使用正则表达式对象
(1)使用流程:
使用re模块中的compile方法将正则表达式编译生成正则表达式对象
根据正则表达式对象提供的方法进行字符串处理
使用编译后的正则表达式对象可以提高字符串处理速度
(2)compile方法:
re.compile(pattern, flags=0)用于编译正则表达式,生成一个正则表达式对象
(3)正则表达式对象的方法:
match(string[, pos,[, endpos]])方法在字符串开头或指定位置进行搜索,模式必须出现在字符串开头或指定位置
search(string[, pos,[, endpos]])方法在整个字符串或指定范围内搜索
findall(string[, pos,[, endpos]])方法在字符串中查找所以符正则表达式的字符串并以列表的方式返回
注: pos->指定起始位置 endpos->指定结束位置 一般我们都是全文查找,所以这两个参数基本上用不到!
(4)正则表达式对象应用
1 >>> importre2 >>> example = 'shandong institute of business and technology'
3 >>> pattern = re.compile(r'\bb\w+\b') #以b开头的单词
4 >>>pattern.findall(example)5 ['business']6 >>> pattern = re.compile(r'\w+g\b') #以g结尾的单词
7 >>>pattern.findall(example)8 ['shandong']9 >>> pattern = re.compile(r'\b[a-zA-Z]{3}\b') #查找3个字母长的单词
10 >>>pattern.findall(example)11 ['and']12 >>> pattern.match(example) #从字符串开头开始匹配,不成功没有任何返回值
13 >>> pattern.search(example) #在整个字符串中搜索,成功
14 <_sre.sre_match object span="(31," match="and">
15 >>> pattern = re.compile(r'\b\w*a\w*\b') #查找所有含有字母a的单词
16 >>>pattern.findall(example)17 ['shandong', 'and']18 >>> text = 'He was carefully diguised but captured quickly by police'
19 >>> re.findall(r'\w+ly', text) #查找所有副词
20 ['carefully', 'quickly']
5.re模块应用
(1)使用"\"开头的元字符进行字符串的特定搜索
1 >>> importre2 >>> example = "shandong institute of business and technology is a very beautiful school."
3 >>> re.findall('\\ba.+?\\b', example) #a开头的完整单词
4 ['and', 'a']5 >>> re.findall('\\b\w.+?\\b', example) #所有单词
6 ['shandong', 'institute', 'of', 'business', 'and', 'technology', 'is', 'a', 'very', 'beautiful', 'school']7 >>> re.findall(r'\b\w.+?\b', example) #所有单词(使用原始字符串减少输入的符号数量)
8 ['shandong', 'institute', 'of', 'business', 'and', 'technology', 'is', 'a', 'very', 'beautiful', 'school']9 >>> re.split('\s', example) #使用任何空白字符串分割字符串
10 ['shandong', 'institute', 'of', 'business', 'and', 'technology', 'is', 'a', 'very', 'beautiful', 'school.']11 >>> re.findall('\d\.\d\.\d+', 'python 3.6.5') #查找并返回形式为x.x.x的数字
12 ['3.6.5']13 >>> re.findall('\d\.\d\.\d+', 'python 2.7.11 python 3.5.1 python 3.6.5') #查找并返回形式为x.x.x的数字
14 ['2.7.11', '3.5.1', '3.6.5']
(2)使用正则表达式实现字符串替换
1 >>> importre2 >>> example = '''Beautiful is better than ugly.3 ... Explicit is better than implicit.4 ... Simple is better than complex.5 ... Complex is better than complicated.6 ... Flat is better than nested.7 ... Sparse is better than dense.8 ... Readability counts.'''
9 >>> pattern = re.compile(r'\bb\w*\b', re.I)10 >>> pattern.sub('*', example) #将以字母b和B开头的单词替换成*
11 '* is * than ugly.\nExplicit is * than implicit.\nSimple is * than complex.\nComplex is * than complicated.\nFlat is * than nested.\nSparse is * than dense.\nReadability counts.'
12 >>> pattern.sub('*', example, 1) #只替换一次
13 '* is better than ugly.\nExplicit is better than implicit.\nSimple is better than complex.\nComplex is better than complicated.\nFlat is better than nested.\nSparse is better than dense.\nReadability counts.'
(3)使用正则表达式实现字符串分割
1 >>> importre2 >>> example = r"one, two, there.four/five\six? seven[eight]nine|ten"
3 >>> pattern = re.compile(r'[,./\\?[\]\|]') #指定多个可能的分割符
4 >>>pattern.split(example)5 ['one', 'two', 'there', 'four', 'five', 'six', 'seven', 'eight', 'nine', 'ten']6 >>> example = r"one1two2three3four4five5six6seven7eight8nine9ten"
7 >>> pattern = re.compile(r'\d+') #使用数字作为分割符
8 >>>pattern.split(example)9 ['one', 'two', 'three', 'four', 'five', 'six', 'seven', 'eight', 'nine', 'ten']10 >>> example = r"one two three four,,five.six.seven,eight,nine99ten"
11 >>> pattern = re.compile(r'[\s,.\d]+') #允许分隔符重复
12 >>>pattern.split(example)13 ['one', 'two', 'three', 'four', 'five', 'six', 'seven', 'eight', 'nine', 'ten']
三、time模块和datetime模块
1.时间的表示方式
时间相关的操作,时间有三种表示方式:
时间戳 1970年1月1日之后的秒,即:time.time()
格式化的字符串 2014-11-11 11:11, 即:time.strftime('%Y-%m-%d')
结构化时间 元组包含了:年、日、星期等... time.struct_time 即:time.localtime()
2.time模块使用示例:
1 importtime2 print(time.asctime()) #返回时间格式"Fri Aug 19 11:14:16 2016",
3 print(time.localtime()) #返回本地时间 的struct time对象格式
4 print(time.gmtime(time.time()-800000)) #返回utc时间的struc时间对象格式
5
6 print(time.asctime(time.localtime())) #返回时间格式"Fri Aug 19 11:14:16 2016",
7 print(time.ctime()) #返回Fri Aug 19 12:38:29 2016 格式, 同上
8
9
10
11 #日期字符串 转成 时间戳
12 string_2_struct = time.strptime("2016/05/22","%Y/%m/%d")13 #将 日期字符串 转成 struct时间对象格式
14 print(string_2_struct)15 #将struct时间对象转成时间戳16 struct_2_stamp = time.mktime(string_2_struct)
17 print(struct_2_stamp)18
19
20
21 #将时间戳转为字符串格式
22 print(time.gmtime(time.time()-86640)) #将utc时间戳转换成struct_time格式
23 print(time.strftime("%Y-%m-%d %H:%M:%S",time.gmtime()) ) #将utc struct_time格式转成指定的字符串格式
3.时间之间的转换
计算机认识的时间只能是'时间戳'格式,而程序员可处理的或者说人类能看懂的时间有: '格式化的时间字符串','结构化的时间' ,于是有了下图的转换关系
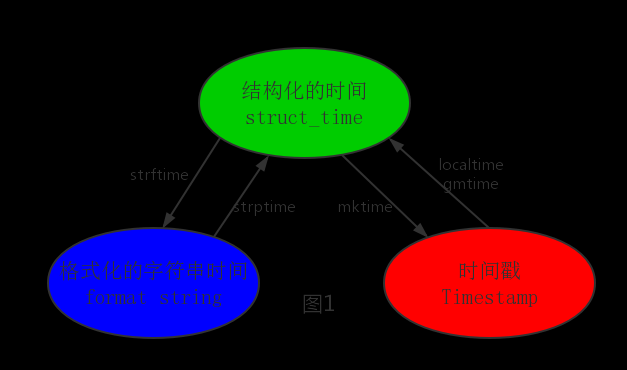


1 importtime2 #--------------------------按图1转换时间
3 #localtime([secs])
4 #将一个时间戳转换为当前时区的struct_time。secs参数未提供,则以当前时间为准。
5 time.localtime()6 time.localtime(1473525444.037215)7
8 #gmtime([secs]) 和localtime()方法类似,gmtime()方法是将一个时间戳转换为UTC时区(0时区)的struct_time。
9
10 #mktime(t) : 将一个struct_time转化为时间戳。
11 print(time.mktime(time.localtime()))#1473525749.0
12
13
14 #strftime(format[, t]) : 把一个代表时间的元组或者struct_time(如由time.localtime()和
15 #time.gmtime()返回)转化为格式化的时间字符串。如果t未指定,将传入time.localtime()。如果元组中任何一个
16 #元素越界,ValueError的错误将会被抛出。
17 print(time.strftime("%Y-%m-%d %X", time.localtime()))#2016-09-11 00:49:56
18
19 #time.strptime(string[, format])
20 #把一个格式化时间字符串转化为struct_time。实际上它和strftime()是逆操作。
21 print(time.strptime('2011-05-05 16:37:06', '%Y-%m-%d %X'))22 #time.struct_time(tm_year=2011, tm_mon=5, tm_mday=5, tm_hour=16, tm_min=37, tm_sec=6,
23 #tm_wday=3, tm_yday=125, tm_isdst=-1)
24 #在这个函数中,format默认为:"%a %b %d %H:%M:%S %Y"。
时间转换
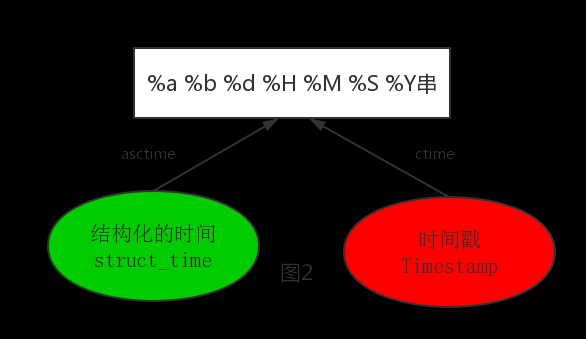
1 importtime2 #--------------------------按图2转换时间
3 #asctime([t]) : 把一个表示时间的元组或者struct_time表示为这种形式:'Sun Jun 20 23:21:05 1993'。
4 #如果没有参数,将会将time.localtime()作为参数传入。
5 print(time.asctime())#Sun Sep 11 00:43:43 2016
6
7 #ctime([secs]) : 把一个时间戳(按秒计算的浮点数)转化为time.asctime()的形式。如果参数未给或者为
8 #None的时候,将会默认time.time()为参数。它的作用相当于time.asctime(time.localtime(secs))。
9 print(time.ctime()) #Sun Sep 11 00:46:38 2016
10 print(time.ctime(time.time())) #Sun Sep 11 00:46:38 2016
时间转换2
4.其他用法
1 importtime2 #sleep(secs): 线程推迟指定的时间运行,单位为秒
3 time.sleep(1); #休眠1秒
5、datetime模块
1 importdatetime2
3 print(datetime.datetime.now()) #返回 2017-08-19 12:47:03.941925
4 print(datetime.date.fromtimestamp(time.time()) ) #时间戳直接转成日期格式 2017-08-19
5 print(datetime.datetime.now() )6 print(datetime.datetime.now() + datetime.timedelta(3)) #当前时间+3天
7 print(datetime.datetime.now() + datetime.timedelta(-3)) #当前时间-3天
8 print(datetime.datetime.now() + datetime.timedelta(hours=3)) #当前时间+3小时
9 print(datetime.datetime.now() + datetime.timedelta(minutes=30)) #当前时间+30分
10
11
12
13 c_time =datetime.datetime.now()14 print(c_time.replace(minute=3,hour=2)) #时间替换
四、os模块和sys模块
1.os模块
作用:提供一些对操作系统的接口
1 os.getcwd() 获取当前工作目录,即当前python脚本工作的目录路径2 os.chdir("dirname") 改变当前脚本工作目录;相当于shell下cd3 os.curdir 返回当前目录: ('.')4 os.pardir 获取当前目录的父目录字符串名:('..')5 os.makedirs('dirname1/dirname2') 可生成多层递归目录6 os.removedirs('dirname1') 若目录为空,则删除,并递归到上一级目录,如若也为空,则删除,依此类推7 os.mkdir('dirname') 生成单级目录;相当于shell中mkdir dirname8 os.rmdir('dirname') 删除单级空目录,若目录不为空则无法删除,报错;相当于shell中rmdir dirname9 os.listdir('dirname') 列出指定目录下的所有文件和子目录,包括隐藏文件,并以列表方式打印10 os.remove() 删除一个文件11 os.rename("oldname","newname") 重命名文件/目录12 os.stat('path/filename') 获取文件/目录信息13 os.sep 输出操作系统特定的路径分隔符,win下为"\\",Linux下为"/"
14 os.linesep 输出当前平台使用的行终止符,win下为"\t\n",Linux下为"\n"
15 os.pathsep 输出用于分割文件路径的字符串16 os.name 输出字符串指示当前使用平台。win->'nt'; Linux->'posix'
17 os.system("bash command") 运行shell命令,直接显示18 os.environ 获取系统环境变量19 os.path.abspath(path) 返回path规范化的绝对路径20 os.path.split(path) 将path分割成目录和文件名二元组返回21 os.path.dirname(path) 返回path的目录。其实就是os.path.split(path)的第一个元素22 os.path.basename(path) 返回path最后的文件名。如何path以/或\结尾,那么就会返回空值。即os.path.split(path)的第二个元素23 os.path.exists(path) 如果path存在,返回True;如果path不存在,返回False24 os.path.isabs(path) 如果path是绝对路径,返回True25 os.path.isfile(path) 如果path是一个存在的文件,返回True。否则返回False26 os.path.isdir(path) 如果path是一个存在的目录,则返回True。否则返回False27 os.path.join(path1[, path2[, ...]]) 将多个路径组合后返回,第一个绝对路径之前的参数将被忽略28 os.path.getatime(path) 返回path所指向的文件或者目录的最后存取时间29 os.path.getmtime(path) 返回path所指向的文件或者目录的最后修改时间
2.sys模块
作用:主要处理系统相关的功能
1 sys.argv 命令行参数List,第一个元素是程序本身路径2 sys.exit(n) 退出程序,正常退出时exit(0)3 sys.version 获取Python解释程序的版本信息4 sys.maxint 最大的Int值5 sys.path 返回模块的搜索路径,初始化时使用PYTHONPATH环境变量的值6 sys.platform 返回操作系统平台名称7 sys.stdout.write('please:')8 val = sys.stdin.readline()[:-1]
五、json模块和pickle模块
1 序列化(encoding):把python对象转换成Json字符串2 反序列化(decoding):把json格式字符串解码为python对象
用于序列化的两个模块
json,用于字符串 和 python数据类型间进行转换
pickle,用于python特有的类型 和 python的数据类型间进行转换
1.json
json.dumps方法对数据进行序列化操作
json.dump方法把字典、列表等数据类型序列化进入一个文件中,等待别的程序进行调用
json.loads进行反序列化
json.load方法对文件进行反序列化操作,读取文件中的内容
1 #json.dumps方法可以将字典等数据格式化成一个字符串,这样可以方便别的编程语言进行调用
2 #json.dump方法把字典等数据类型序列化进入一个文件中,等待别的程序进行调用
3 #json.loads进行反序列化
4 #json.load方法读取文件中的内容
5
6 importjson7 #s = {"k1": "v1", "k2": "v2"}
8 s = [1, 2, 3, 4, 5, 6]9 k = json.dumps(s) #序列化: 将字典、字符串等数类型转换成字符串
10 print(k)11 print(type(k))12 res = json.loads(k) #反序列化: 将字符串转换成其他类型
13 print(res)14 print(type(res))15
16 #打开一个文件向其中写入字典、列表等数据类型
17 with open("test.json", "w") as f:18 json.dump(s, f)19
20 #读取文件内容
21 with open("test.json", "r") as f:22 r =json.load(f)23 print(r)24 print(type(r))
2.pickle
pickle.dumps对数据进行序列化操作
pickle.loads对数据进行反序列化操作
pickle.dump把列表,元组或字典序列化进一个文件中以实现永久保存
pickle.load对文件进行反序列化,得到文件里保存的数据
1 #pickle.dumps对数据进行序列化操作
2 #pickle.loads进行反序列化操作
3 #pickle.dump把列表,元组或字典序列化进一个文件中以实现永久保存
4 #pickle.load对文件f1进行反序列化,得到文件f1里保存的数据
5
6 importpickle7
8 #序列化操作
9 l1 = [1, 2, 3, 4, 5]10 t1 = (1, 2, 3, 4, 5)11 dic1 = {"k1": "v1", "k2": "v2", "k3": "v3"}12 res_1 =pickle.dumps(l1)13 res_2 =pickle.dumps(t1)14 res_3 =pickle.dumps(dic1)15 print(res_1, res_2, res_3)16
17 #反序列化操作
18 print(pickle.loads(res_1), type(pickle.loads(res_1)))19 print(pickle.loads(res_2), type(pickle.loads(res_2)))20 print(pickle.loads(res_3), type(pickle.loads(res_3)))21
22 #把列表,元组或字典序列化进一个文件中以实现永久保存
23 dic1 = {"k1": "v1", "k2": "v2", "k3": "v3"}24 with open("f1", "wb") as f:25 pickle.dump(dic1, f)26
27 #对文件f1进行反序列化,得到文件f1里保存的数据
28 with open("f1", "rb") as f:29 res =pickle.load(f)30 print(res)
3.json和pickle比较
json:
优点:跨语言、体积小
缺点:只能支持int\str\list\tuple\dict
pickle:
优点:专为python设计,支持python所有数据类型
缺点:只能在python中使用,存储数据体积大
六、xml模块和shelve模块
xml模块作用:处理xml格式的数据
xml是实现不同语言或程序之间进行数据交换的协议,跟json差不多,但json使用起来更简单
xml的格式如下,就是通过<>节点来区别数据结构的:
1 <?xml version="1.0"?>
2
3
4 2
5 2008
6 141100
7
8
9
10
11 5
12 2011
13 59900
14
15
16
17 69
18 2011
19 13600
20
21
22
23
View Code
1.创建XML
1 import xml.etree.ElementTree asET2
3 # 根节点:4 new_xml = ET.Element("namelist")5
6 # 子节点:7 name = ET.SubElement(new_xml, "name", attrib={"enrolled": "yes"})8 age = ET.SubElement(name, "age", attrib={"checked": "no"})9 sex = ET.SubElement(name, "sex")10 age.text = '33'
11 name2 = ET.SubElement(new_xml, "name", attrib={"enrolled": "no"})12 age = ET.SubElement(name2, "age")13 age.text = '19'
14
15 et =ET.ElementTree(new_xml) # 生成文档对象16 et.write("test.xml", encoding="utf-8", xml_declaration=True)17
18 ET.dump(new_xml) # 打印生成的格式
2.修改xml
1 import xml.etree.ElementTree asET
2
3 tree = ET.parse("xmltest.xml")
4 root =tree.getroot()
5
6 # # 修改
7 # for node in root.iter('year'):
8 # new_year = int(node.text) + 1
9 # node.text =str(new_year)
10 # node.set("updated_wyb", "yes")
11 #
12 # tree.write("xmltest.xml")
13
14 # 删除node
15 for country in root.findall('country'):
16 rank = int(country.find('rank').text)
17 if rank > 50:
18 root.remove(country)
19
20 tree.write('output.xml')
3.读xml
1 import xml.etree.ElementTree asET
2
3 tree = ET.parse("xmltest.xml")
4 root =tree.getroot()
5 print(root.tag)
6
7 # 遍历xml文档
8 for child inroot:
9 print(child.tag, child.attrib)
10 for i inchild:
11 print(i.tag, i.text, i.attrib)
12
13 # 只遍历year 节点
14 for node in root.iter('year'):
15 print(node.tag, node.text)
shelve模块作用:shelve模块是一个简单的k,v将内存数据通过文件持久化的模块,可以持久化任何pickle可支持的python数据格式
4.shelve写数据
1 importshelve2
3 f = shelve.open('123.txt')4
5 name = ["wyb", "cyy", "gas"]6 info = {"age": 22, "sex": 'f'}7
8 f["name"] = name #持久化列表
9 f["info"] = info #持久化列表
10
11 f.close()
5.shelve读数据
1 importshelve2
3 f = shelve.open('123.txt')4
5 print(f.get("name"))6 print(f.get("info"))7
8 f.close()
七、hashlib模块
作用:用于加密相关的操作,主要提供 SHA1, SHA224, SHA256, SHA384, SHA512 ,MD5 算法
1 importhashlib2
3 ######### md5 ########
4 hash =hashlib.md5()5 #help(hash.update)
6 hash.update(bytes('wyb', encoding='utf-8'))7 print(hash.hexdigest()) # 二进制hash8 print(hash.digest()) # 十六进制hash9
10 ####### sha1 ########
11
12 hash =hashlib.sha1()13 hash.update(bytes('wyb', encoding='utf-8'))14 print(hash.hexdigest())15
16 ######### sha256 ########
17
18 hash =hashlib.sha256()19 hash.update(bytes('wyb', encoding='utf-8'))20 print(hash.hexdigest())21
22 ######### sha384 ########
23
24 hash =hashlib.sha384()25 hash.update(bytes('wyb', encoding='utf-8'))26 print(hash.hexdigest())27
28 ######### sha512 ########
29
30 hash =hashlib.sha512()31 hash.update(bytes('wyb', encoding='utf-8'))32 print(hash.hexdigest())
注:加密算法虽然非常厉害,但依然存在缺陷,因为通过撞库可以反解。所以有必要对加密算法添加自定义key再来做加密
1 importhashlib2
3 ######### md5 ########
4
5 hash = hashlib.md5(bytes('898oaFs09f', encoding="utf-8"))6 hash.update(bytes('admin', encoding="utf-8"))7 print(hash.hexdigest())
md5加盐加密
python还有一个hmac模块,它内部对我们创建 key 和 内容 再进行处理然后再加密
1 importhmac2
3 h = hmac.new(bytes('898oaFs09f', encoding="utf-8"))4 h.update(bytes('wyb', encoding="utf-8"))5 print(h.hexdigest())
八、shutil模块
作用:高级的文件、文件夹、压缩包 处理模块
1.详细用法:
1 shutil.copyfileobj(fsrc, fdst[, length]) 将文件内容拷贝到另一个文件中,可以部分内容(fsrc是源文件的句柄,fdst是目标文件的句柄)2
3 shutil.copyfile(src, dst) 拷贝文件(src是源文件,dst是目标文件,下同)4
5 shutil.copymode(src, dst) 仅拷贝权限。内容、组、用户均不变6
7 shutil.copystat(src, dst) 拷贝状态的信息,包括:mode bits, atime, mtime, flags8
9 shutil.copy(src, dst) 拷贝文件和权限10
11 shutil.copy2(src, dst) 拷贝文件和状态信息12
13 shutil.copytree(src, dst, symlinks=False, ignore=None) 递归的去拷贝文件14 例如:copytree(source, destination, ignore=ignore_patterns('*.pyc', 'tmp*'))15
16 shutil.rmtree(path[, ignore_errors[, onerror]]) 递归的去删除文件17
18 shutil.move(src, dst) 递归的去移动文件
2.压缩包处理:
shutil.make_archive(base_name, format,...)
创建压缩包并返回文件路径,例如:zip、tar
base_name: 压缩包的文件名,也可以是压缩包的路径。只是文件名时,则保存至当前目录,否则保存至指定路径,
如:www =>保存至当前路径
format:压缩包种类,“zip”, “tar”, “bztar”,“gztar”
root_dir:要压缩的文件夹路径(默认当前目录)
owner:用户,默认当前用户
group:组,默认当前组
logger:用于记录日志,通常是logging.Logger对象
1 shutil.make_archive("test", "zip", r"D:/wyb/python/oldboy/2.进阶(函数,内置方法,模块,文件操作、字符编码)/模块(库)/shutil")
shutil 对压缩包的处理是调用 ZipFile 和 TarFile 两个模块来进行的,详细:
ZipFile压缩解压
1 importzipfile2
3 #压缩
4 z = zipfile.ZipFile('test.zip', 'w')
5 z.write('1.txt')6 z.write('2.txt')7 z.close()8
9 #解压
10 z = zipfile.ZipFile('test.zip', 'r')11 z.extractall()12 z.close()
TarFile压缩解压
1 importtarfile2
3 #压缩
4 tar = tarfile.open('your.tar', 'w')5 tar.add('C:/Users/HUAWEI/Desktop/bbs2.zip', arcname='bbs2.zip')6 tar.add('C:/Users/HUAWEI/Desktop/cmdb.zip', arcname='cmdb.zip')7 tar.close()8
9 #解压
10 tar = tarfile.open('your.tar', 'r')11 tar.extractall() #可设置解压地址
12 tar.close()
九、configparser模块和logging模块
configparser作用:用于对特定的配置进行操作
logging作用:用于便捷记录日志且线程安全的模块
1.configparser模块
configparser模块用于处理特定格式的文件(一般是配置文件),本质是利用open来操作文件,假设有一个文件,内容如下
1 [section1]2 k1 =v13 k2:v24
5 [section2]6 k1 = v1
我们可以进行通过configerparser进行如下操作:
(1)获取所有节点
1 importconfigparser2
3 config =configparser.ConfigParser()4 config.read('content.txt', encoding='utf-8')5 ret =config.sections()6 print(ret) # 输出: ['section1', 'section2']
(2)获取指定节点下所有的键值对
1 config =configparser.ConfigParser()2 config.read('content.txt', encoding='utf-8')3 ret = config.items('section1')4 print(ret) # 输出: [('k1', 'v1'), ('k2', 'v2')]
(3)获取指定节点下所有的键
1 config =configparser.ConfigParser()2 config.read('content.txt', encoding='utf-8')3 ret = config.options('section1')4 print(ret) # 输出: ['k1', 'k2']
(4)获取指定节点下指定key的值
1 config =configparser.ConfigParser()2 config.read('content.txt', encoding='utf-8')3
4 v = config.get('section1', 'k1')5 print(v) # 输出: v16
7 #config.getint('section1', 'k1')
8 #config.getfloat('section1', 'k1')
9 #config.getboolean('section1', 'k1')
(5)检查、删除、添加节点
1 config =configparser.ConfigParser()2 config.read('content.txt', encoding='utf-8')3 #检查
4 has_sec = config.has_section('section1')5 print(has_sec) #输出: True
6 #添加节点
7 config.add_section("SEC_1")8 config.write(open('content.txt', 'w'))9 #删除节点
10 config.remove_section("SEC_1")11 config.write(open('content.txt', 'w'))
(6)检查、删除、设置指定组内的键值对
1 config =configparser.ConfigParser()2 config.read('content.txt', encoding='utf-8')3 #检查
4 has_opt = config.has_option('section1', 'k1')5 print(has_opt) #输出: True
6 #删除
7 config.remove_option('section1', 'k1')8 config.write(open('content.txt', 'w'))9 #设置
10 config.set('section1', 'k10', "123")11 config.write(open('content.txt', 'w'))
2.logging模块
logging是用于便捷记录日志且线程安全的模块
(1)日志标准输出
1 importlogging2
3 logging.warning("user [wyb] attempted wrong password more than 3 times")4 logging.critical("server is down")
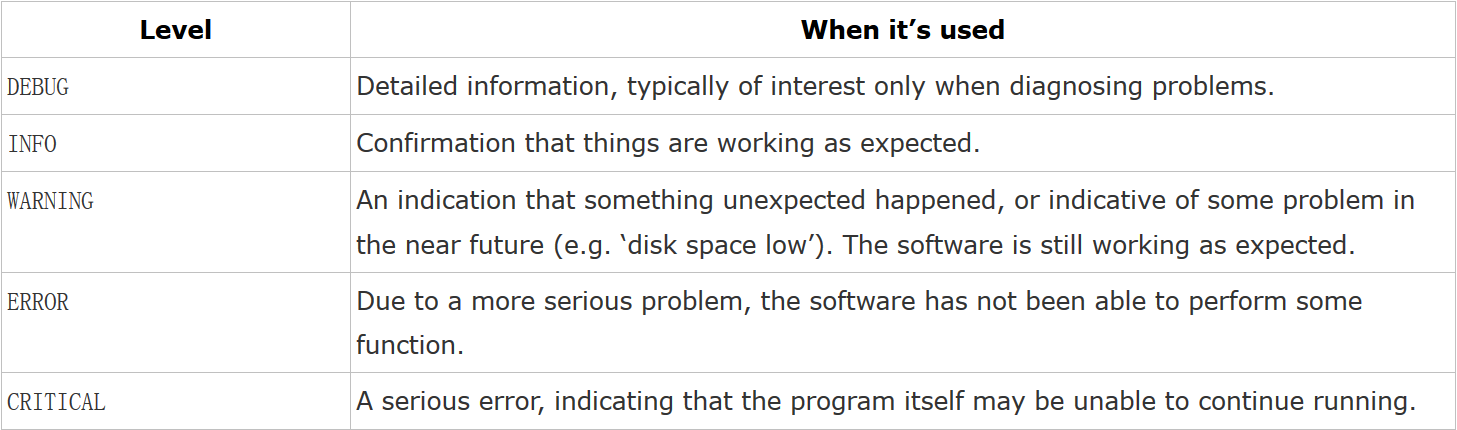
默认情况下logging模块将日志打印到标准输出中,且只显示了大于等于WARNING级别的日志,这说明默认的日志级别设置为WARNING
日志级别等级CRITICAL > ERROR > WARNING > INFO > DEBUG,默认的日志格式为日志级别:Logger名称:用户输出消息
5个日志级别的官方解释如下:
(2)日志文件输出
1 importlogging2
3 logging.basicConfig(filename='test.log', level=logging.INFO)4 logging.debug('This message should go to the log file')5 logging.info('So should this')6 logging.warning('And this, too')
level指定最低级别,低于level的级别将不会写入到文件中,在这里第一条debug是不会被记录的,想要记录的话就把level改成DEBUG即可
(3)basicConfig配置参数
1 logging.basicConfig()函数中可通过具体参数来更改logging模块默认行为,可用参数有:2
3 filename:用指定的文件名创建FiledHandler,这样日志会被存储在指定的文件中。4 filemode:文件打开方式,在指定了filename时使用这个参数,默认值为“a”还可指定为“w”。5 format:指定handler使用的日志显示格式。6 datefmt:指定日期时间格式。7 level:设置rootlogger的日志级别8 stream:用指定的stream创建StreamHandler。可以指定输出到sys.stderr,sys.stdout或者文件(f=open(‘test.log’,’w’)),默认为sys.stderr。若同时列出了filename和stream两个参数,则stream参数会被忽略。9
10 format参数中可能用到的格式化串:11 %(name)s Logger的名字12 %(levelno)s 数字形式的日志级别13 %(levelname)s 文本形式的日志级别14 %(pathname)s 调用日志输出函数的模块的完整路径名,可能没有15 %(filename)s 调用日志输出函数的模块的文件名16 %(module)s 调用日志输出函数的模块名17 %(funcName)s 调用日志输出函数的函数名18 %(lineno)d 调用日志输出函数的语句所在的代码行19 %(created)f 当前时间,用UNIX标准的表示时间的浮 点数表示20 %(relativeCreated)d 输出日志信息时的,自Logger创建以 来的毫秒数21 %(asctime)s 字符串形式的当前时间。默认格式是 “2003-07-08 16:49:45,896”。逗号后面的是毫秒22 %(thread)d 线程ID。可能没有23 %(threadName)s 线程名。可能没有24 %(process)d 进程ID。可能没有25 %(message)s用户输出的消息26
(4)输出时间
1 importlogging2 logging.basicConfig(format='%(asctime)s %(message)s', datefmt='%m/%d/%Y %I:%M:%S %p')3 logging.warning('is when this event was logged.')
输出结果:
04/28/2018 01:33:16 PM is when this event was logged.
(5)同时将日志输出到文件和屏幕上
Python 使用logging模块记录日志涉及四个主要类,使用官方文档中的概括最为合适:
logger提供了应用程序可以直接使用的接口
handler将(logger创建的)日志记录发送到合适的目的输出
filter提供了细度设备来决定输出哪条日志记录 -> 很少用到!
formatter决定日志记录的最终输出格式
logger
每个程序在输出信息之前都要获得一个Logger。Logger通常对应了程序的模块名
Logger.setLevel(lel):指定最低的日志级别,低于lel的级别将被忽略。debug是最低的内置级别,critical为最高
Logger.addFilter(filt)、Logger.removeFilter(filt):添加或删除指定的filter
Logger.addHandler(hdlr)、Logger.removeHandler(hdlr):增加或删除指定的handler
Logger.debug()、Logger.info()、Logger.warning()、Logger.error()、Logger.critical():可以设置的日志级别
handler
handler对象负责发送相关的信息到指定目的地。Python的日志系统有多种Handler可以使用。有些Handler可以把信息输出到控制台,有些Logger可以把信息输出到文件,还有些
Handler可以把信息发送到网络上。如果觉得不够用,还可以编写自己的Handler。可以通过addHandler()方法添加多个多handler
Handler.setLevel(lel):指定被处理的信息级别,低于lel级别的信息将被忽略
Handler.setFormatter():给这个handler选择一个格式
Handler.addFilter(filt)、Handler.removeFilter(filt):新增或删除一个filter对象
每个Logger可以附加多个Handler。接下来我们就来介绍一些常用的Handler:
1) logging.StreamHandler
使用这个Handler可以向类似与sys.stdout或者sys.stderr的任何文件对象(file object)输出信息。它的构造函数是:
StreamHandler([strm])
其中strm参数是一个文件对象。默认是sys.stderr
2) logging.FileHandler
和StreamHandler类似,用于向一个文件输出日志信息。不过FileHandler会帮你打开这个文件。它的构造函数是:
FileHandler(filename[,mode])
filename是文件名,必须指定一个文件名。
mode是文件的打开方式。参见Python内置函数open()的用法。默认是’a',即添加到文件末尾
3) logging.handlers.RotatingFileHandler
这个Handler类似于上面的FileHandler,但是它可以管理文件大小。当文件达到一定大小之后,它会自动将当前日志文件改名,然后创建
一个新的同名日志文件继续输出。比如日志文件是chat.log。当chat.log达到指定的大小之后,RotatingFileHandler自动把
文件改名为chat.log.1。不过,如果chat.log.1已经存在,会先把chat.log.1重命名为chat.log.2。。。最后重新创建
chat.log,继续输出日志信息。它的构造函数是:
RotatingFileHandler( filename[, mode[, maxBytes[, backupCount]]])
其中filename和mode两个参数和FileHandler一样。
maxBytes用于指定日志文件的最大文件大小。如果maxBytes为0,意味着日志文件可以无限大,这时上面描述的重命名过程就不会发生。
backupCount用于指定保留的备份文件的个数。比如,如果指定为2,当上面描述的重命名过程发生时,原有的chat.log.2并不会被更名,而是被删除。
4) logging.handlers.TimedRotatingFileHandler
这个Handler和RotatingFileHandler类似,不过,它没有通过判断文件大小来决定何时重新创建日志文件,而是间隔一定时间就
自动创建新的日志文件。重命名的过程与RotatingFileHandler类似,不过新的文件不是附加数字,而是当前时间。它的构造函数是:
TimedRotatingFileHandler( filename [,when [,interval [,backupCount]]])
其中filename参数和backupCount参数和RotatingFileHandler具有相同的意义。
interval是时间间隔。
when参数是一个字符串。表示时间间隔的单位,不区分大小写。它有以下取值:
S 秒
M 分
H 小时
D 天
W 每星期(interval==0时代表星期一)
midnight 每天凌晨
Formater
Formater对象用于配置日志信息的最终顺序、结构和内容。与logging.Handler基类不同的是,应用代码可以直接实例化Formatter类。另外,如果你的应用程序需要一些特殊的处理行为,也可以实现一个Formatter的子类来完成。
Formatter类的构造方法定义如下:
logging.Formatter.__init__(fmt=None, datefmt=None, style='%')
可见,该构造方法接收3个可选参数:
fmt:指定消息格式化字符串,如果不指定该参数则默认使用message的原始值
datefmt:指定日期格式字符串,如果不指定该参数则默认使用"%Y-%m-%d %H:%M:%S"
style:Python 3.2新增的参数,可取值为 '%', '{'和 '$',如果不指定该参数则默认使用'%'
上述使用见:
1 importlogging2
3 #create logger
4 logger = logging.getLogger('test') #获得logger对象
5 logger.setLevel(logging.DEBUG) #设置一个全局的日志级别
6
7 #create console handler and set level to debug
8 ch = logging.StreamHandler() #把日志打印到屏幕
9 ch.setLevel(logging.DEBUG) #设定屏幕的日志级别
10
11 #create file handler and set level to warning
12 fh = logging.FileHandler("access.log") #把日志打印到文件
13 fh.setLevel(logging.WARNING) #设定文件的日志级别
14
15 #create formatter 设置输出格式
16 formatter = logging.Formatter('%(asctime)s - %(name)s - %(levelname)s - %(message)s')17
18 #add formatter to ch and fh 给屏幕和文件设置输出格式
19 ch.setFormatter(formatter)20 fh.setFormatter(formatter)21
22 #add ch and fh to logger 把日志打印到指定的handler中
23 logger.addHandler(ch)24 logger.addHandler(fh)25
26 #'application' code
27 #设置信息
28 logger.debug('debug message')29 logger.info('info message')30 logger.warning('warn message')31 logger.error('error message')32 logger.critical('critical message')
注:在最后加上下面一段代码避免重复输出日志的问题
1 #添加下面一句,在记录日志之后移除句柄
2 logger.removeHandler(ch)3 logger.removeHandler(fh)


 436
436


 被折叠的 条评论
为什么被折叠?
被折叠的 条评论
为什么被折叠?
 到【灌水乐园】发言


