


安装就再不提了,默认已经安装好ubuntu+vscode
创建文件夹
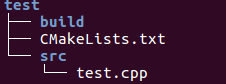
准备一段代码:
test.cpp:
#include <iostream>

using namespace std;

int main(){
    int a(0), b(1);
    cout<<a+b<<endl;
    return 0;
}
写CMakeLists.txt:
cmake_minimum_required(VERSION 2.8 FATAL_ERROR)

project(test)

set(CMAKE_BUILD_TYPE DEBUG)

add_executable (test src/test.cpp)
断点调试时,一定要:set(CMAKE_BUILD_TYPE DEBUG)这句,发布时改为set(CMAKE_BUILD_TYPE RELEASE)
修改launch.json:
{
    // Use IntelliSense to learn about possible attributes.
    // Hover to view descriptions of existing attributes.
    // For more information, visit: https://go.microsoft.com/fwlink/?linkid=830387
    "version": "0.2.0",
    "configurations": [
        {
            "name": "g++ - Build and debug active file",
            "type": "cppdbg",
            "request": "launch",
            "program": "${workspaceFolder}/build/test",
            "args": [],
            "stopAtEntry": false,
            "cwd": "${workspaceFolder}",
            "environment": [],
            "externalConsole": false,
            "MIMode": "gdb",
            "setupCommands": [
                {
                    "description": "Enable pretty-printing for gdb",
                    "text": "-enable-pretty-printing",
                    "ignoreFailures": true
                }
            ],
            "preLaunchTask": "build",
            "miDebuggerPath": "/usr/bin/gdb"
        }
    ]
}
在自动生成的launch.json下,修改内容为:
1、"program": "${workspaceFolder}/build/test",指明执行程序位置:build/test,
2、"preLaunchTask": "build",此处build只是一个label,可随便取,注意和后面的tasks.json中保持一致即可;
修改tasks.json:
{
    "tasks": [
        {
            "type": "shell",
            "label": "build",
            "command": "cd ${workspaceFolder}/build;cmake ..;make",
            "args": [

            ],
            "options": {
                "cwd": "${workspaceFolder}"
            },
            "problemMatcher": [
                "$gcc"
            ],
            "group": {
                "kind": "build",
                "isDefault": true
            },
            "detail": "Task generated by Debugger."
        }
    ],
    "version": "2.0.0"
}
这也是自动生成的,修改部分为:
1、"type": "shell",
2、"label": "build",此处build和前面launch.json中的label保持一致。
3、"command": "cd ${workspaceFolder}/build;cmake ..;make"这个就是在终端执行
cd build
cmake ..
make
的意思,注意这个${workspaceFolder}是"cwd": "${workspaceFolder}"中的这个东西,表示当前工作空间路径。
这下就完了,设置个断点一下试试吧:


 1458
1458


 被折叠的 条评论
为什么被折叠?
被折叠的 条评论
为什么被折叠?
 到【灌水乐园】发言


