


Containers For Collaboration(协作容器)
Using Docker to Share Your Software
Eric Kerfoot , School of Biomedical Engineering & Imaging Sciences, King’s College London
此博文是翻译如下英文网页
复杂软件在许多科学领域变得越来越重要,而科学的再现性部分是所使用软件的传播。对于更复杂的系统,构建正确环境以由其他科学家和合作者运行该软件带来了挑战。任何不得不连续数小时与包管理器一起玩以得到工作的人都知道这会是多么痛苦!
本笔记本是关于使用 Docker 在图像中托管深度学习模型的简短教程,其中包括应用推理所需的所有环境和库。目标是将模型包装到一个可移植且可重现的软件单元中,您的合作者可以轻松下载和调用,而无需担心安装 Docker 之外的平台配置。
尽管本笔记本中的示例是基于 Pytorch 的网络,用于在 4D MR 图像中分割心脏,但创建 Docker 图像及其用于执行推理的概念可以应用于许多其他应用程序。此处的许多单元包含可以运行以与 Docker 交互或执行构建过程的代码,因此请随意使用此笔记本进行试验。
我们将涵盖:
- What is Docker 什么是 Docke
- Running Docker 运行 Docker
- Building Images 构建镜像
- Model Inference 模型推理
- Sharing Your Image 分享你的镜像
什么是 Docker?
Docker 是一组工具和应用程序,用于将软件系统打包成可移植的可部署单元,称为镜像。容器代表正在运行的映像实例,它们依赖于映像中包含的库和环境,而不是主机系统上的库和环境。本质上,Docker 镜像是一个完整的 Linux 系统,减去了内核和其他低级组件,可以根据您手头的任务进行配置,并且在运行时仅依赖于主机内核和驱动程序。
由于是独立的图像,因此您可以轻松地将其分发给其他人的更便携的软件单元。研讨会和会议的挑战(例如 MICCAI 的挑战)有时要求参与者将他们的软件作为图像提交,以便组织者可以将其应用于隐藏的测试数据。具体而言,在科学领域内,另一个常见的应用领域是集群计算系统,其中用户的作业作为图像提交,其中包含作业所需的设置和环境。与提供一组库的系统相比,这具有优势,您可以根据这些库构建软件,但可能难以托管您引入的用于编译软件的新库。容器化允许您将软件封装在集群可以使用的包中,而兼容性问题要少得多。
封装整个环境的最常见替代机制是虚拟化。 在虚拟机中,“客户”操作系统呈现出看似是正在运行的计算机的实际硬件,但实际上是“主机”提供的软件环境。 然后,来宾必须提供运行实际机器所需的所有设施,包括定义引导机制、格式化必要的文件系统、提供内核以及与硬件接口所需的服务。 右图说明了这一点,将虚拟机与本地应用程序和 Docker 容器进行了比较。
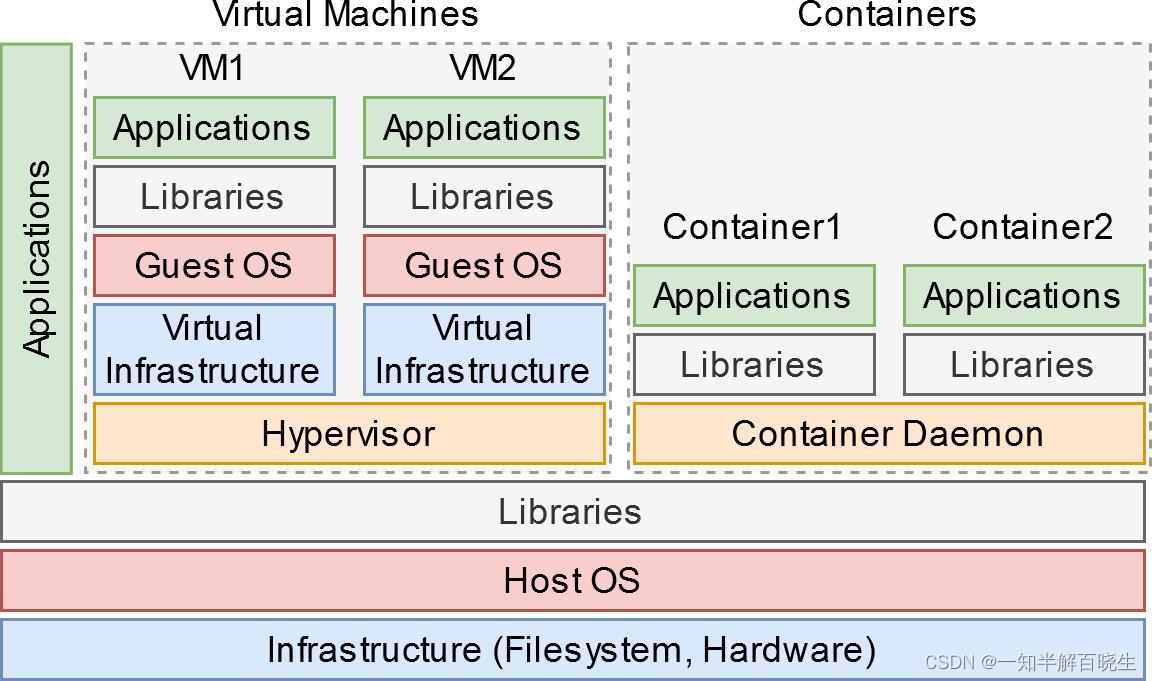
相比之下,Docker 和其他容器化方案通过使用主机内核及其提供的功能,提供了比 VM 更高级别的抽象。 这创建了一个更轻量级的环境和更小的分发文件,以及来宾与主机或其他来宾容器之间的更简单的接口。 通过包含几乎所有所需的软件基础设施,托管在 Docker 映像中的程序不会像普通本地程序那样与错误配置的系统发生冲突。 作为该软件的用户,您无需设置库、依赖项、配置或以其他方式安装除 Docker 之外的任何东西来使用该程序。
Installation安装
Docker can be installed by following these instructions:
Linux: Ubuntu is a popular distribution so follow the instructions here. Other distros are supported but might be harder to trouble shoot.
Windows: Instructions are here. This should be a simple application installation, just be sure to switch to Linux containers.
macOS: Instructions are here. This should also be straight-forward.
如下我们将以ubuntu为例
- Set up the repository 设置存储库
Update the apt package index and install packages to allow apt to use a repository over HTTPS:
 sudo apt-get update
 sudo apt-get install \
    ca-certificates \
    curl \
    gnupg \
    lsb-release
- Add Docker’s official GPG key:
 sudo mkdir -p /etc/apt/keyrings
 curl -fsSL https://download.docker.com/linux/ubuntu/gpg | sudo gpg --dearmor -o /etc/apt/keyrings/docker.gpg
- Use the following command to set up the repository:
 echo \
  "deb [arch=$(dpkg --print-architecture) signed-by=/etc/apt/keyrings/docker.gpg] https://download.docker.com/linux/ubuntu \
  $(lsb_release -cs) stable" | sudo tee /etc/apt/sources.list.d/docker.list > /dev/null
Install Docker Engine
- Update the apt package index, and install the latest version of Docker Engine, containerd, and Docker Compose, or go to the next step to install a specific version:
 sudo apt-get update
 sudo apt-get install docker-ce docker-ce-cli containerd.io docker-compose-plugin
Running Docker 运行Docker
Docker 容器可以使用 docker 命令后跟参数和图像标签名称来实例化。 Docker 使用称为注册表的服务来存储图像,默认的是 Docker Hub (https://hub.docker.com/),当我们请求下载图像时,pull 命令将查看它:
1.
docker pull hello-world
输出
Using default tag: latest
latest: Pulling from library/hello-world

bdcc26d7: Pull complete 529kB/2.529kBBDigest: sha256:49a1c8800c94df04e9658809b006fd8a686cab8028d33cfba2cc049724254202
Status: Downloaded newer image for hello-world:latest
docker.io/library/hello-world:latest
- 自己运行上面的单元格以查看命令的实际作用。 下载后,我们现在可以使用 run 运行容器:
docker run hello-world
输出
Hello from Docker!
This message shows that your installation appears to be working correctly.

To generate this message, Docker took the following steps:
 1. The Docker client contacted the Docker daemon.
 2. The Docker daemon pulled the "hello-world" image from the Docker Hub.
    (amd64)
 3. The Docker daemon created a new container from that image which runs the
    executable that produces the output you are currently reading.
 4. The Docker daemon streamed that output to the Docker client, which sent it
    to your terminal.

To try something more ambitious, you can run an Ubuntu container with:
 $ docker run -it ubuntu bash

Share images, automate workflows, and more with a free Docker ID:
 https://hub.docker.com/

For more examples and ideas, visit:
 https://docs.docker.com/get-started/
- 我们可以使用 Docker 命令查看我们拥有的镜像和容器:
docker image ls
输出
REPOSITORY          TAG                               IMAGE ID            CREATED             SIZE
python              3.7                               22c70bba8283        5 days ago          920MB
ubuntu              16.04                             c522ac0d6194        2 weeks ago         126MB
pytorch/pytorch     1.5.1-cuda10.1-cudnn7-runtime     d89e4943dd55        5 weeks ago         3.14GB
python              3.7-alpine                        6a5ca85ed89b        7 weeks ago         72.5MB
alpine              3.12                              a24bb4013296        8 weeks ago         5.57MB
hello-world         latest                            bf756fb1ae65        6 months ago        13.3kB
nvidia/cuda         10.1-cudnn7-runtime-ubuntu18.04   e135227729c4        7 months ago        1.65GB
docker container ls -a
输出
CONTAINER ID        IMAGE               COMMAND             CREATED             STATUS                     PORTS               NAMES
0a43be8cc32f        hello-world         "/hello"            4 seconds ago       Exited (0) 2 seconds ago                       adoring_sammet
再举一个例子,我们可以运行基础 Python 3.7 映像(Jupyter 单元不喜欢交互式终端,所以我将输出放在这里):
$ docker run -ti --rm python:3.7
Python 3.7.4 (default, Aug 14 2019, 12:09:51)
[GCC 8.3.0] on linux
Type "help", "copyright", "credits" or "license" for more information.
>>>
这将从 Docker Hub 下载镜像,然后使用指定的内部命令运行它,即 python 交互式 shell。 参数 -ti --rm 表示分配一个伪 TTY,使用交互模式,并在容器退出时移除容器。
对于这个图像,我们可以提供一个命令来代替 python 运行,在这种情况下 bash 来获取命令提示符:
$ docker run -ti --rm python:3.7 bash
root@eca6d4b7f4ef:/# head -1 /etc/os-release
PRETTY_NAME="Debian GNU/Linux 10 (buster)"
我们可以看到,我们使用的 Python 映像在内部本质上是一个 Debian 10 系统,并且使用 bash 命令我们可以与它进行交互,就像它是一个正在运行的 Linux 系统一样。
Building Images 构建镜像
到目前为止,我们看到的是使用 Docker 从图像中实例化容器并将它们视为正在运行的程序。 通过包含几乎整个 Linux 系统,它们不需要在客户端进行安装或配置,因此通过制作我们自己的图像,我们可以将自己的代码打包成一个单元,我们可以分发给合作者和公众。
Docker 镜像是使用 Dockerfile 构建的,Dockerfile 本质上是一个脚本文件,其中包含定义创建配方的特殊命令。 通常,图像基于初始现有图像,并为特定目的添加了调整。
让我们根据我们已经看到的图像创建一个基于 Python 的“Hello, world”图像。 运行接下来的四个单元以创建一个工作目录(通常是 Docker 在构建期间复制目录的好做法)、一个脚本文件、Dockerfile 与之一起运行,然后构建并运行它:
!mkdir hellopy
%%writefile hellopy/hello.py

print("Hello, world!")
Writing hellopy/hello.py
%%writefile hellopy/Dockerfile

FROM python:3.7
COPY hello.py /
CMD ["python","hello.py"]
Writing hellopy/Dockerfile
%%bash

cd hellopy
docker build . -t hellopy  # -t assigns the tag "hellopy" to the image
docker run --rm hellopy    # run the image tagged as "hellopy"
Sending build context to Docker daemon 3.072kB
Step 1/3 : FROM python:3.7
—> 22c70bba8283
Step 2/3 : COPY hello.py /
—> f83a218e13aa
Step 3/3 : CMD [“python”,“hello.py”]
—> Running in 183b7a43cd94
Removing intermediate container 183b7a43cd94
—> 4c79f534cadf
Successfully built 4c79f534cadf
Successfully tagged hellopy:latest
Hello, world!
我们在这里所做的重要方面是在 Dockerfile 中。 如前所述,这是将新镜像放在一起的方法,在这种情况下,我们将从 python:3.7 图像(FROM 行)开始,将当前目录中的文件 hello.py 复制到图像文件系统的根目录中 区别于宿主机的文件系统(COPY行),然后设置运行命令为python hello.py(CMD行)。 前一个单元格的输出在底部打印了消息。
我们可以改为使用交互式终端运行图像并声明程序 bash 应该运行:
$ docker run -ti --rm hellopy bash
root@d109519ef671:/#
现在 CMD 行上的命令被替换为我们在图像的标签(即名称)之后传递的任何参数。如果我们想在容器中运行程序或脚本并能够向它传递参数,我们需要使用 ENTRYPOINT 代替 CMD。这会强制运行该命令,并且 CMD 中或命令行中给出的任何内容都将成为参数,我们很快就会看到为什么这很重要。
Dockerfiles 可以包含许多其他命令来执行其他设置任务。此笔记本附带另一个 Docker_Cheatsheet.ipynb,其中包含有关常用命令的更多详细信息。然而,我们稍后将使用的重要的是 RUN,它在映像中运行一个命令,就好像它是一个正在运行的容器一样。命令完成后的映像状态是下一个 RUN 或其他命令将使用的状态,因此这用于运行设置操作以按照我们的喜好配置映像。我们最后得到的是我们用这些命令构建的,还有其他可以用来以其他方式修改环境的。
Model Inference模型的预测
此笔记本包含一个 Pytorch 1.5 神经网络,用于在 MR 图像中分割心脏,称为 net.zip。 这是一个在 ACDC 数据集上训练的 UNet,用于识别短轴方向的左心室池、左心室心肌和右心室。
还包括我们将用于将推理应用于名为 seg_sax_3label.py 的 Nifti 文件的脚本。 该脚本将读取在命令行上传递的 Nifti 文件(如果没有给出,则通过标准输入),使用网络应用推理,然后将结果保存到提供的输出文件名(如果没有给出,则保存到标准输出)。 您现在可以使用从 SCD 数据集生成的提供的 test.nii.gz 文件自己运行此脚本。
!python seg_sax_3label.py test.nii.gz -o out.nii
如果我们只是将这个脚本和网络提供给合作者,那么现在由他们来正确配置他们的环境以运行它,包括安装正确版本的 Python、Pytorch、Nibabel 和其他库。 如今,Python 的魔力已经不那么尝试了,但是更复杂的软件可能更难以正确设置。
我们现在要做的是创建一个包含此设置的 Docker 映像,并使用 Nvidia Container Toolkit 来提供 GPU 加速。 需要注意的是,这些映像要求您在 Linux 上运行,拥有具有足够内存和计算能力的 Nvidia GPU,拥有 Docker 版本 19.03 或更高版本,或者已安装 nvidia-docker2。 有关更多安装信息,请参阅链接。
我们的镜像必须包含网络和脚本文件,但还必须通过 Dockerfile 命令安装 Pytorch 和 Nibabel。 运行以下单元来创建我们的分割图像 seg_sax:
%%bash
mkdir -p seg_sax
cp net.zip seg_sax_3label.py seg_sax
%%writefile seg_sax/Dockerfile

FROM nvidia/cuda:10.1-cudnn7-runtime-ubuntu18.04

RUN apt-get update
RUN apt-get install python3-pip -y

RUN pip3 install torch==1.5.0+cu101 -f https://download.pytorch.org/whl/torch_stable.html
RUN pip3 install nibabel

COPY net.zip /
COPY seg_sax_3label.py /

ENTRYPOINT ["python3", "/seg_sax_3label.py"]
Overwriting seg_sax/Dockerfile
%%bash
cd seg_sax
docker build . -t seg_sax
(Overly long output omitted)
File Redirection 文件重定向
Now our image is built and stored locally. We’ve used the Nvidia CUDA image which is rather large but comes with all the libraries we need to use GPU acceleration. Now we can segment our Nifti file with IO redirection without having to install anything except Docker:
!docker run --gpus=all -i --rm seg_sax < test.nii.gz > out.nii
A few important things on what’s going on here:
-
We’re using IO redirection with the < and > operators to send the contents of test.nii.gz to stdin and stdout to out.nii. In our script if we don’t have arguments for the input and output files the stdin/stdout streams are used instead.
-
We’ve selected to give access to all GPU devices with --gpus=all, without this CUDA will not be available when performing network inference. If we wanted to allow access to a specific card, eg. card 1, we would use an argument like --gpus “device=1”.
-
-i is used to run in interactive mode, without it stdin/stdout for the running container won’t be connected to the terminal and so redirection wouldn’t work.
Let’s visualize some of our results. If you have Nibabel and Matplotlib installed you can run the following cell to see one segmented slice:
import nibabel as nib
import matplotlib.pyplot as plt

im = nib.load('test.nii.gz').get_fdata()
seg = nib.load('out.nii').get_fdata()

idx = 10  # slice position

plt.imshow(im[..., idx, 0] / im.max() + seg[..., idx, 0] / 6, cmap='gray')

Direct File Access
我们图像的上述用例使用文件重定向与容器通信。 如果我们想直接访问主机文件系统上的文件,我们必须在正在运行的容器中挂载一个虚拟目录。 出于安全和其他原因,Docker 容器的文件系统与主机文件系统脱节,而 Singularity 等其他容器技术则不这样做。
可以通过 docker run 命令挂载这个虚拟目录:
!docker run --gpus=all --rm -u $(id -u ${USER}):$(id -g ${USER}) -v "$(pwd):/data:rw" seg_sax /data/test.nii.gz /data/out.nii
There’s a lot going on here:
- -v “$(pwd):/data:rw” states that we want to mount the current directory (the path to which is returned by the program pwd) and map it to /data in the container with read/write access.
- -u $(id -u U S E R ) : {USER}): USER):(id -g ${USER}) states that we want to run the container as the current user, the program id returns user and group ID numbers to do this. If we don’t have this the container will run and produce files owned by root which isn’t convenient, this way the files will be owned by you instead.
- /data/test.nii.gz /data/out_local.nii are arguments to the script stating an input and an output file path, the script will read from paths when given instead of stdin/stdout. Note that these are paths to files within the running container, paths to files in your local file system will not be valid.
- We don’t need -i anymore.
Depending on what the task is it makes sense to use this method of accessing local files rather than the simpler file redirection, for our example segmentation image we can use either.
Sharing Your Image
通过构建和测试我们的图像,我们现在希望将其分发给合作者和其他科学家。 我们可以将图像导出到一个文件并共享它,但它的大小将是许多 GB:
!docker save seg_sax | gzip > seg_sax.tgz
!du -h seg_sax.tgz
2.5G seg_sax.tgz
这可以通过 docker load 加载到本地存储库中,但是在 2.5GB 时将其提供给您的用户并不方便。 相反,我们会将图像上传到 Docker Hub,这是为 Docker 提供的注册表服务,我们一直在使用它来拉取整个笔记本中的图像。
为此,首先在 https://hub.docker.com 使用 Docker Hub 创建一个帐户,然后使用 docker login 命令将您的本地系统与您的帐户相关联(将“dockerid”替换为您的 Docker Hub 帐户名称):
$ docker login
Login with your Docker ID to push and pull images from Docker Hub. If you don't have a Docker ID, head over to https://hub.docker.com to create one.
Username: dockerid
Password:
WARNING! Your password will be stored unencrypted in /home/localuser/.docker/config.json.
Configure a credential helper to remove this warning. See
https://docs.docker.com/engine/reference/commandline/login/#credentials-store
Now we want to tag our image based on our docker ID and assign a tag “latest”:
$ docker tag seg_sax dockerid/seg_sax:latest
Tags can be used to identify different types or versions of an image, latest is the commonly used one for referring to the most recent release. Finally we push to the registry:
$ docker push dockerid/seg_sax
The push refers to repository [docker.io/dockerid/seg_sax]
7ba0a45c6a59: ...
You should be able to see your image now at https://hub.docker.com/repository/docker/dockerid/seg_sax (replacing “dockerid” with your username of course). The free account with Docker Hub permits one repository to be private so if you want more you will have to sign up for a pro account, otherwise whatever else is uploaded is publicly available.
Now your collaborators can use your software just by specifying the full repository name of your image:
$ docker run --gpus=all -i --rm dockerid/seg_sax:latest < test.nii.gz > out.nii
As we’ve seen this will pull the image from Docker Hub and then run it. Your collaborators don’t need anything more now besides the image name.
that’s it
现在您的模型可以与其他合作者共享。我们在这个笔记本中使用了一个支持 CUDA 的 Pytorch 示例,但是当然任何其他程序都可以通过正确的设置托管在 Docker 映像中。使用 Nvidia 映像会导致映像大小损失,因此如果速度不是优先考虑的因素,您可以更改 Dockerfile 以使用更小的非 CUDA 兼容的基本映像,例如 Alpine。
Web 服务是 Docker 的一个非常常见的用例,它通过网络接口呈现应用程序,例如。数据库。使用像 Flask 这样的 Python 框架,您可以将简单的 Web 服务器放在一起,以通过内部网络提供功能,而不仅仅是在本地命令行上(或者更好的是使用像 BentoML 这样的工具)。
使用 X 窗口(Linux 中的所有功能)的图形应用程序也可以通过带有命令行选项的 Docker 提供,以转发正确的信息,以便程序可以找到您的显示。使用可用于 macOS 和 Windows 的 X 服务器,甚至可以将此类应用程序分发给任何用户,尽管他们需要进行更多设置。
使用 Docker 打包软件系统有很多可能性。可重复性依赖于用于进行研究的所有工具的可用性,因此使用这项技术,您现在可以创建模块化和便携式软件单元,其他用户可以轻松地自行使用。
然后去哪儿?查看包含的 Docker 备忘单以获取有关命令的链接和更多信息。
谢谢阅读!


 2170
2170


 被折叠的 条评论
为什么被折叠?
被折叠的 条评论
为什么被折叠?
 到【灌水乐园】发言


