


一.前期准备在Mysql数据库的spring下新建表student
-- ----------------------------
-- Table structure for student
-- ----------------------------
DROP TABLE IF EXISTS `student`;
CREATE TABLE `student` (
  `id` int(11) NOT NULL AUTO_INCREMENT,
  `name` varchar(255) DEFAULT NULL,
  `major` varchar(255) DEFAULT NULL,
  PRIMARY KEY (`id`)
) ENGINE=InnoDB AUTO_INCREMENT=5 DEFAULT CHARSET=utf8;

-- ----------------------------
-- Records of student
-- ----------------------------
INSERT INTO `student` VALUES ('1', 'a', 'math');
INSERT INTO `student` VALUES ('2', 'b', 'chinese');
INSERT INTO `student` VALUES ('3', 'c', 'English');
INSERT INTO `student` VALUES ('4', 'd', 'computer');
二.环境搭建
在Idea中新建maven project
①

②

下一步直到完成点击finish
1.首先在pom.xml中加入必要的依赖
pom.xml中的代码如下:
<?xml version="1.0" encoding="UTF-8"?>
<project xmlns="http://maven.apache.org/POM/4.0.0"
         xmlns:xsi="http://www.w3.org/2001/XMLSchema-instance"
         xsi:schemaLocation="http://maven.apache.org/POM/4.0.0 http://maven.apache.org/xsd/maven-4.0.0.xsd">
    <modelVersion>4.0.0</modelVersion>
    <groupId>com.lut</groupId>
    <artifactId>studentXmlIoc</artifactId>
    <version>1.0-SNAPSHOT</version>
    <packaging>jar</packaging>
    <dependencies>
        <dependency>
            <groupId>org.springframework</groupId>
            <artifactId>spring-context</artifactId>
            <version>5.2.7.RELEASE</version>
        </dependency>
        <dependency>
            <groupId>commons-dbutils</groupId>
            <artifactId>commons-dbutils</artifactId>
            <version>1.7</version>
        </dependency>
        <dependency>
            <groupId>mysql</groupId>
            <artifactId>mysql-connector-java</artifactId>
            <version>8.0.20</version>
        </dependency>
        <!-- https://mvnrepository.com/artifact/com.mchange/c3p0 -->
        <dependency>
            <groupId>com.mchange</groupId>
            <artifactId>c3p0</artifactId>
            <version>0.9.5.5</version>
        </dependency>
        <!-- https://mvnrepository.com/artifact/junit/junit -->
        <dependency>
            <groupId>junit</groupId>
            <artifactId>junit</artifactId>
            <version>4.11</version>
            <scope>test</scope>
        </dependency>
    </dependencies>
</project>
2.在java包下新建java实体类如下

Student.java中的代码如下:
package com.lut.domain;
/**
 * @author Roy
 * @date 2020/7/28 14:56
 */
public class Student {
    private  Integer id;
    private String name;
    private String major;
    @Override
    public String toString() {
        return "Student{" +
                "id=" + id +
                ", name='" + name + '\'' +
                ", major='" + major + '\'' +
                '}';
    }
    public Integer getId() {
        return id;
    }
    public void setId(Integer id) {
        this.id = id;
    }
    public String getName() {
        return name;
    }
    public void setName(String name) {
        this.name = name;
    }
    public String getMajor() {
        return major;
    }
    public void setMajor(String major) {
        this.major = major;
    }
}
3.在java包下新建持久层dao,分别创建IStudentDao.java和StudentDaoImpl

IStudentDao.java中代码如下:
package com.lut.dao;

import com.lut.domain.Student;
/**
 * @author Roy
 * @date 2020/7/28 15:03
 * 学生的持久层接口
 */
public interface IStudentDao {
    //查询所有学生
     void findAllStudent();
    //根据id查询一个学生
    Student findStudentById(Integer studentId);
    //保存学生
    void saveStudent(Student student);
    //更新学生信息
    void updateStudent(Student student);
    //根据id删除学生信息
    void deleteStudent(Integer studentId);
}

StudentDaoImpl.java中的代码如下:
package com.lut.dao.impl;

import com.lut.dao.IStudentDao;
import com.lut.domain.Student;
import org.apache.commons.dbutils.QueryRunner;
import org.apache.commons.dbutils.handlers.BeanHandler;
import org.apache.commons.dbutils.handlers.BeanListHandler;

import java.util.List;

/**
 * @author Roy
 * @date 2020/7/28 15:02
 */
public class StudentDaoImpl implements IStudentDao {
    private QueryRunner runner;
    public void setRunner(QueryRunner runner) {
        this.runner = runner;
    }
    public List<Student> findAllStudent() {
        try {
            return runner.query("select * from student",new BeanListHandler<Student>(Student.class));
        }catch (Exception e){
            throw new RuntimeException(e);
        }
    }
    public Student findStudentById(Integer studentId) {
       try {
           return runner.query("select * from account where id=?",new BeanHandler<Student>(Student.class),studentId);
       }catch (Exception e){
           throw  new RuntimeException(e);
       }
    }
   public void saveStudent(Student student) {
    try {
        runner.update("insert into student(name,major) values(?,?)",student.getName(),student.getMajor());
    }catch (Exception e){
        throw new RuntimeException(e);
    }
    }
    public void updateStudent(Student student) {
try {
    runner.update("update student set name=?,major=? where id=?",student.getName(),student.getMajor(),student.getId());
}catch (Exception e){
    throw new RuntimeException(e);
}
    }
    public void deleteStudent(Integer studentId) {
try {
    runner.update("delete from student where id=?",studentId);
}catch (Exception e){
    throw new  RuntimeException(e);
}
    }
}
4.在java包中新建service业务层接口,包含IStudentService.java和StudentServiceImpl.java。

IStudentService.java中的代码如下:
package com.lut.service;

import com.lut.domain.Student;

import java.util.List;
/**
 * @author Roy
 * @date 2020/7/28 15:21
 * 业务层接口
 */
public interface IStudentService {
    //查询所有学生
    List<Student> findAllStudent();
    //根据id查询一个学生
    Student findStudentById(Integer studentId);
    //保存学生
    void saveStudent(Student student);
    //更新学生信息
    void updateStudent(Student student);
    //根据id删除学生信息
    void deleteStudent(Integer studentId);
}

StudentServiceImpl.java中代码如下:
package com.lut.service.impl;

import com.lut.dao.IStudentDao;
import com.lut.domain.Student;

import java.util.List;

/**
 * @author Roy
 * @date 2020/7/28 15:22
 */
public class StudentServiceImpl implements IStudentService {
    public IStudentDao studentDao;

    public void setStudentDao(IStudentDao studentDao) {
        this.studentDao = studentDao;
    }

    public List<Student> findAllStudent() {
        return studentDao.findAllStudent();
    }

    public Student findStudentById(Integer studentId) {
        return studentDao.findStudentById(studentId);
    }

    public void saveStudent(Student student) {
studentDao.saveStudent(student);
    }

    public void updateStudent(Student student) {
studentDao.updateStudent(student);
    }

    public void deleteStudent(Integer studentId) {
studentDao.deleteStudent(studentId);
    }
}
5.在resource包下创建配置文件bean.xml

bean.xml中配置如下代码:
<?xml version="1.0" encoding="UTF-8"?>
<beans xmlns="http://www.springframework.org/schema/beans"
       xmlns:xsi="http://www.w3.org/2001/XMLSchema-instance"
       xsi:schemaLocation="http://www.springframework.org/schema/beans
       http://www.springframework.org/schema/beans/spring-beans.xsd">
    <!--配置数据源-->
    <bean id="dataSource" class="com.mchange.v2.c3p0.ComboPooledDataSource">
        <!--链接数据库的必备信息-->
        <property name="driverClass" value="com.mysql.cj.jdbc.Driver"></property>
        <property name="jdbcUrl" value="jdbc:mysql://localhost:3306/spring?serverTimezone=UTC"></property>
        <property name="user" value="root"></property>
        <property name="password" value="123456"></property>
    </bean>
    <!--配置QueryRunner-->
    <bean id="runner" class="org.apache.commons.dbutils.QueryRunner">
        <!--注入数据源-->
        <constructor-arg name="ds" ref="dataSource"></constructor-arg>
    </bean>
    <!--配置dao对象-->
    <bean id="studentDao" class="com.lut.dao.impl.StudentDaoImpl">
        <!--注入QueryRunner-->
        <property name="runner" ref="runner"></property>
    </bean>
    <!--配置Service对象-->
    <bean id="studentService" class="com.lut.service.impl.StudentServiceImpl">
        <!--注入Dao对象-->
        <property name="studentDao" ref="studentDao"></property>
    </bean>
</beans>
6.创建测试类

StudentServiceTest.java中的代码如下:
package com.lut.test;

import com.lut.domain.Student;
import com.lut.service.IStudentService;
import org.junit.Test;
import org.springframework.context.ApplicationContext;
import org.springframework.context.support.ClassPathXmlApplicationContext;

import java.util.List;

/**
 * @author Roy
 * @date 2020/7/28 15:33
 */
public class StudentServiceTest {
    @Test
    public void testFindAll(){
        //1.获取容器
        ApplicationContext applicationContext=new ClassPathXmlApplicationContext("bean.xml");
        //2.得到业务层对象
        IStudentService studentService=applicationContext.getBean("studentService",IStudentService.class);
        //3.执行方法
        List<Student>students=studentService.findAllStudent();
        for(Student student:students){
            System.out.println(student);
        }
    }
    @Test
    public void testFindById(){
        //1.获取容器
        ApplicationContext applicationContext=new ClassPathXmlApplicationContext("bean.xml");
        //2.得到业务层对象
        IStudentService studentService=applicationContext.getBean("studentService",IStudentService.class);
        //3.执行方法
        Student student=studentService.findStudentById(1);
        System.out.println(student);
    }
    @Test
    public void testSave(){
        //1.获取容器
        ApplicationContext applicationContext=new ClassPathXmlApplicationContext("bean.xml");
        //2.得到业务层对象
        IStudentService studentService=applicationContext.getBean("studentService",IStudentService.class);
        //3.执行方法
        Student student=new Student();
        student.setName("test");
        student.setMajor("Science");
        studentService.saveStudent(student);
    }
    @Test
    public void testUpdate(){
        //1.获取容器
        ApplicationContext applicationContext=new ClassPathXmlApplicationContext("bean.xml");
        //2.得到业务层对象
        IStudentService studentService=applicationContext.getBean("studentService",IStudentService.class);
        //3.执行方法
        Student student=new Student();
        student.setId(2);
        student.setName("update");
        student.setMajor("Ph");
        studentService.updateStudent(student);
    }
    @Test
    public void testDelete(){
        //1.获取容器
        ApplicationContext applicationContext=new ClassPathXmlApplicationContext("bean.xml");
        //2.得到业务层对象
        IStudentService studentService=applicationContext.getBean("studentService",IStudentService.class);
        //3.执行方法
       studentService.deleteStudent(3);
    }
}
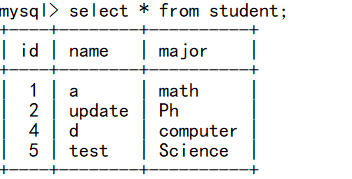
单表的操作查看表已经都成功完成了。


 174
174


 被折叠的 条评论
为什么被折叠?
被折叠的 条评论
为什么被折叠?
 到【灌水乐园】发言


